Sea Frost ETT's User manual
148 OLD CONCORD TURNPIKE BARRINGTON, NH 03825 USA TEL (603) 868-5720 FAX (603) 868-1040 1-800-435-6708
ELECTRONIC THERMOSTAT AND THERMOMETER
• The Sea Frost ETT’s (Electronic Thermostat/Thermometer) accurate
operating settings and the programmable differential increases
efficiency. In comparison, mechanical controls tend to over run the
desired temperature range and must be set colder, running the
compressor longer, to maintain the proper average temperature.
• The ETT is powered by low voltage and will operate any Sea Frost
electric system, AC or DC.
• The ETT always shows cabinet temperature, displayed in Centigrade
or Fahrenheit.
• Accurate numerical setting of operating temperatures and differential
makes set up and temperature adjustment easy.

2
• Thermometer mode when operating dual systems.
• Wire leads allow mounting any distance from cabinet.
• Black faceplate with red L.E.D. operation indicators.
• Non-volatile memory, control will not loose settings.
The ETT is pre-wired with plug in connectors for the two 10’ probes and 20’
harness included.
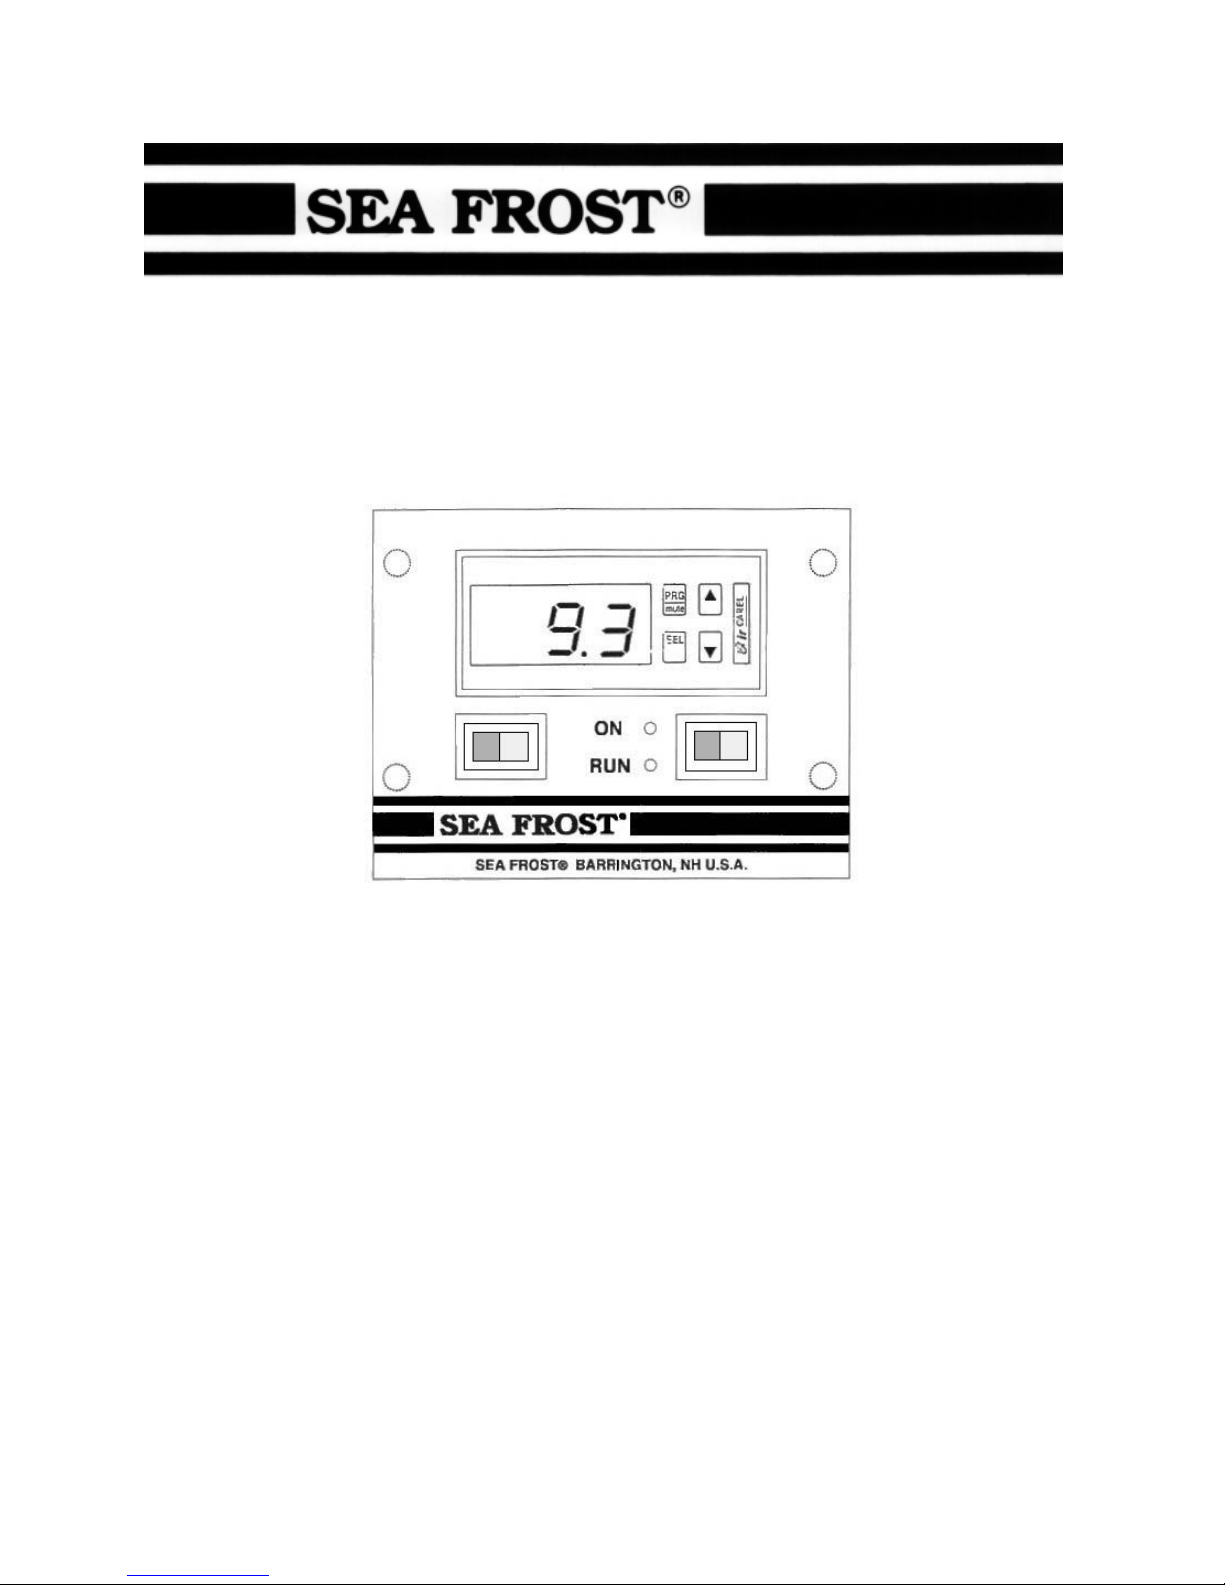
The left hand rocker switch turns on the display. The right hand switch
activates the control relay. Red L.E.D.s indicate ON and RUN modes.
Faceplate size: 4 5/8” x 3 ½” (120 mm x 90 mm). Requires 2 ½” (64 mm)
behind mounting panel. Weight 1 lb (.4 kilo).
Specify the voltage of the system to be controlled: 110 volts AC, 12 volts
DC or 24 volts DC.
CLEANING
Do not use acetone or any solvent on the control panel, clean with a damp
cloth and mild detergent.

3
INSTALLATION AND OPERATION MANUAL
OPERATION
The Sea Frost Electronic Thermostat and Thermometer (ETT) is an
electronic device using two probes installed in the refrigerated space. One
probe is sensing the cabinet temperature, which is displayed. The other
probe controls the compressor operation by measuring the temperature of
a cold plate.
To operate the control, switch both rocker switches to the left position (off).
Make sure power is available then push the left rocker switch to the right
(on). The display will light and the temperature will be displayed. To switch
on the compressor controlled by the ETT, switch the right switch to the on
position. Both red indicators will light indicating the compressor switch is
on and the compressor is running. When the compressor cools to the pre-
set cut out temperature the RUN indicator light will go off with the
compressor. The ON indicator light will remain lit indicating a standby or
ready to run mode.
To display temperature only turn off the right ON/RUN switch.
To turn off both the temperature readout and compressor the left switch
may be used however when turning it back on the compressor will start
immediately. All settings will always be saved.
CHECKING THE TEMPERATURE SETTING
Before adjusting the thermostat be sure the refrigeration system is working
properly.
The ETT can be adjusted and will maintain very stable temperatures. Care
must be taken to adjust the settings to maintain obtainable temperatures.
Do not set below -10 F. (–23 degrees C.) Excessive power drain and
compressor wear will occur with no benefit if the setting is below the
temperature the compressor system can easily obtain.

4
To check the cut out setting (cold stopping point) push and hold the SEL
button until ST-1 appears. Release the button and a number will flash.
This is the cut out temperature. Push SEL again and the readout will return
to box temperature. The cut out temperature is associated with the second
probe. This probe read out temperature is hidden. (Press and hold the
down arrow button to view this read out temperature.)
CHECKING THE PLATE PROBE TEMPERATURE
To monitor the cooling progress, push in and hold the down arrow button.
The plate probe temperature will be displayed while this button is held.
RECOMMENDED SETTINGS
The air temperature in a refrigerator is always 10 to 15 degrees F. (6 to 9
C.) warmer than the cooling device. This difference in temperature must be
remembered when setting the control cut out temperature (stopping point).
A refrigerator might have to be set to run up to 20 degrees colder than the
desired box temperature.
Make several small setting changes over a period of several days to
determine the proper setting.
CHANGING THE TEMPERATURE
To lower or raise the box temperature, hold the SEL button until the ST-1
appears. Release the button and the cut out temperature will flash. Use
the up and down arrows to change the temperature. Push SEL when
finished. The control setting has now been changed.
THE DIFFERENTIAL SETTING
The differential is the number of degrees the temperature must rise before
the compressor will come back on after cooling to the set point. The
factory setting is 6 degrees F. (4.5 C.)
To change the differential setting press and hold PRG until P 1 is
displayed, then press SEL. Use the up and down arrows to change the
setting. Press PRG when finished.

5
READOUT CHANGES ~ Fahrenheit to Centigrade
To change the readout to centigrade hold down PRG and SEL for 5
seconds until 0 is displayed. Using the up and down arrows select #77,
which is the password. Press SEL. Using the up and down arrows scroll to
C-18. Press SEL. Using the arrows keys set 0 for centigrade or 1 for
Fahrenheit. Press PRG to store the change and return to the temperature
display. WARNING: When changing temperature measurement units the
cutoff setting and the differential setting must be changed to represent the
proper units.
INSTALLING THE ETT
The ETT can be located anywhere as long as it is protected from water and
spray. The leads to the probes may be extended if the connections are
soldered and sealed with heat shrink.
The ETT requires a 3 5/8” x 2 ¾” (91 mm x 70 mm) panel cut out. The
minimum depth is 2 ½” (64 mm).
WIRE ROUTING
The gray 4-wire cable connects at the compressor.
The two black probe wires must enter the refrigerated space.
WIRING CONNECTIONS
The harness and the probes plug into the head unit and are polarized.
NOTE: One probe has red bands and should connect to the head unit plug
with the red band. The probe with the red bands must be routed to attach
to the cold plate. If you need to disconnect the plugs, do not pull on the
wires. See special instructions for series plates and twin valve systems.
6
PROBE ATTACHMENT
The probe with red bands must be in excellent thermal
contact with the cold plate. Use the stainless steel clip
provided, and attach it to the edge of the plate as
shown in the drawing to the right.
The probe without a red band should be installed at
the mid point of the cabinet to get an accurate reading
of the average temperature. Avoid installing this probe
near a front opening door or too close to a cold plate.
Mount the probe bulb with two nylon straps or self stick
pads and tie wraps provided. Do not drill and screw into a vacuum panel
box!
Secure the wires neatly using cable ties, self-stick pads, and proper yacht
construction wiring practices.

7
COMPRESSOR CONTROL WIRING HOOKUP
AC Units – BG 1000 and Shore Assist Systems
Connect the white and green wires from the ETT gray cable to the two red
wires coming from the (CC) condensing unit.
12/24-Volt BD and Tradewinds
Connect the white and green wires from the ETT gray cable to the end of
the yellow harness. There is no polarity.
12/24-Volt BDXP and Tradewinds XP
Connect the white and green wires from the ETT gray cable to terminals T
and C on the module. There is no polarity.
12/24-Volt DC 5000
Connect the white and green wires from the ETT gray cable to T1 and T1 in
the solenoid junction box.
DC 5000 Twin Valve Systems
When connecting to a dual solenoid a second ETT is required. One green
and white pair is connected to T1 and T1 and the second green and white
pair is connected to T2 and T2.
ETT POWER INPUT
12/24-Volt DC5000
Connect the black wire with a 3/8" ring terminal to the negative supply
grounding stud. Connect the red wire with a #8 ring terminal to the positive
supply at the power solenoid. The red wire must be fused. (2 amps)
On twin valve systems, two ETTs must be connected to the DC 5000
solenoid panel. Connect the red wires from the ETT to terminal L with a 2-
amp fuse. Connect the black wires to B-.

8
AC Units – BG 1000 and Shore Assist Systems
Wire the ETT to 12-volt DC power using a 2-amp fuse in order to maintain
the temperature readouts. An optional 110-volt unit is available if needed.
12/24-Volt BD and Tradewinds
See electrical connections in the unit manual.
Crimp the red and black wires from the power source to the 12-10 gauge
yellow piggyback terminals. Crimp a female 22-18 (red) terminal to the red
and black wires from the ETT gray cable. Be sure to fuse the red wire with
a 2-amp fuse. Slide onto the yellow 12-10 gauge piggyback terminals.
Attach these to the positive and negative terminals of the compressor
module. Observe polarity, red is positive and black is negative.
CLEANING
Do not use acetone or any solvent on the control panel, clean with a damp
cloth and mild detergent.

9
SEA FROST ELECTRONIC THERMOSTAT AND THERMOMETER
DRILL (4) HOLES 3/32" FOR #6 SCREWS.
(1) Control Panel Head
(2) Sensor Probes (1-with red band, 1-without red band)
(1) 4-wire gray harness
INSTALLATION KIT
(4) #6 x 1/2" flat head screws for mounting panel
(6) #6 x 1/2" pan head screws
(5) 3/16" nylon clamps
(8) Adhesive mounting tabs
(10) 4" tie wraps
(1) Stainless steel bulb clip
(2) Yellow 10-12 gauge piggyback push-on terminals
(2) Red 22-18 gauge piggyback push-on terminals
(2) Red 22-18 female terminals
(1) Fuse holder & fuse
Other manuals for ETT's
1
This manual suits for next models
1
Table of contents
Other Sea Frost Thermostat manuals


Popular Thermostat manuals by other brands

Hvac
Hvac R Series installation instructions

Robertshaw
Robertshaw RS332NE Installation and operation instructions for

Honeywell
Honeywell FocusPRO 5000 quick guide

Alpha IP
Alpha IP RTD 61001 Series manual

Danfoss
Danfoss ECtemp Next Plus HW installation guide

Honeywell
Honeywell CM507A Installation and user guide


