Seagate STCEA101-RK - FreeAgent Theater - Digital AV... User manual

FreeAgent®| Theater™ User Guide

FreeAgent® | Theater™ User Guide
© 2008 Seagate Technology LLC. All rights reserved. Seagate, Seagate Technology, the Wave
logo, and FreeAgent are trademarks or registered trademarks of Seagate Technology LLC, or one
of its affiliates. All other trademarks or registered trademarks are the property of their respective
owners. When referring to hard drive capacity, one gigabyte, or GB, equals one billion bytes and
one terabyte, or TB, equals one thousand billion bytes when referring to hard drive capacity. In
addition, some of the listed capacity is used for formatting and other functions, and thus will not be
available for data storage. Quantitative usage examples for various applications are for illustrative
purposes. Actual quantities will vary based on various factors including file size, file format, features,
and application software. Seagate reserves the right to change, without notice, product offerings or
specifications.
Seagate Technology LLC
920 Disc Drive
Scotts Valley CA 95066 U.S.A.

FreeAgent® | Theater™ User Guide 3
Contents
Contents
1. Overview . . . . . . . . . . . . . . . . . . . . . . . . . . . . . . . . . . . . . . . . . . . . . . . 5
Using FreeAgent | Theater . . . . . . . . . . . . . . . . . . . . . . . . . . . . . . . . . . . . . . 5
FreeAgent | Theater Components . . . . . . . . . . . . . . . . . . . . . . . . . . . . . . 6
Navigating the FreeAgent | Theater Menus . . . . . . . . . . . . . . . . . . . . . . . . . 10
Selecting a Storage Drive . . . . . . . . . . . . . . . . . . . . . . . . . . . . . . . . . . . . . . 10
Organizing Media Files and Folders . . . . . . . . . . . . . . . . . . . . . . . . . . . . . . 10
Preparing Background Music Files for Slideshows . . . . . . . . . . . . . . . . 11
2. Setting Up FreeAgent | Theater . . . . . . . . . . . . . . . . . . . . . . . . . . . . 12
Selecting a Screen Language . . . . . . . . . . . . . . . . . . . . . . . . . . . . . . . . . . . 12
Configuring Your Media Player . . . . . . . . . . . . . . . . . . . . . . . . . . . . . . . . . . 12
Audio Setup . . . . . . . . . . . . . . . . . . . . . . . . . . . . . . . . . . . . . . . . . . . . . . 13
Video Setup . . . . . . . . . . . . . . . . . . . . . . . . . . . . . . . . . . . . . . . . . . . . . . 13
Resetting Your Media Player . . . . . . . . . . . . . . . . . . . . . . . . . . . . . . . . . 17
System Setup . . . . . . . . . . . . . . . . . . . . . . . . . . . . . . . . . . . . . . . . . . . . 17
Photo Slideshow Setup . . . . . . . . . . . . . . . . . . . . . . . . . . . . . . . . . . . . . 18
Movie Setup . . . . . . . . . . . . . . . . . . . . . . . . . . . . . . . . . . . . . . . . . . . . . . 20
3. Playing Music . . . . . . . . . . . . . . . . . . . . . . . . . . . . . . . . . . . . . . . . . . 22
Supported Audio File Types . . . . . . . . . . . . . . . . . . . . . . . . . . . . . . . . . . . . 23
Playback Options . . . . . . . . . . . . . . . . . . . . . . . . . . . . . . . . . . . . . . . . . . . . 23
4. Playing Videos . . . . . . . . . . . . . . . . . . . . . . . . . . . . . . . . . . . . . . . . . . 24
Supported Video File Types . . . . . . . . . . . . . . . . . . . . . . . . . . . . . . . . . . . . 25
Video Display . . . . . . . . . . . . . . . . . . . . . . . . . . . . . . . . . . . . . . . . . . . . . . . 25
Subtitle Formats . . . . . . . . . . . . . . . . . . . . . . . . . . . . . . . . . . . . . . . . . . 25
Video Playback Features . . . . . . . . . . . . . . . . . . . . . . . . . . . . . . . . . . . . 26
5. Viewing Photos . . . . . . . . . . . . . . . . . . . . . . . . . . . . . . . . . . . . . . . . . 27
Viewing Individual Photos . . . . . . . . . . . . . . . . . . . . . . . . . . . . . . . . . . . . . . 27
Browsing Photo Thumbnails . . . . . . . . . . . . . . . . . . . . . . . . . . . . . . . . . . . . 28
Rotating Photos . . . . . . . . . . . . . . . . . . . . . . . . . . . . . . . . . . . . . . . . . . . . . . 29
Playing Photos and Videos from Compatible Digital Cameras . . . . . . . . . . 30
Playing a Slideshow . . . . . . . . . . . . . . . . . . . . . . . . . . . . . . . . . . . . . . . . . . 31

FreeAgent® | Theater™ User Guide 4
Contents
Slideshow Features . . . . . . . . . . . . . . . . . . . . . . . . . . . . . . . . . . . . . . . . 32
6. Using the FreeAgent | Theater Desktop Application . . . . . . . . . . . 33
Installing the FreeAgent | Theater Software . . . . . . . . . . . . . . . . . . . . . . . . 33
Using the FreeAgent | Theater Application . . . . . . . . . . . . . . . . . . . . . . . . . 34
Accessing the FreeAgent Drive Features . . . . . . . . . . . . . . . . . . . . . . . 34
Using the System Tray Status Icon . . . . . . . . . . . . . . . . . . . . . . . . . . . . 35
Restoring the System Tray Status Icon . . . . . . . . . . . . . . . . . . . . . . . . . 36
7. Using Media Sync . . . . . . . . . . . . . . . . . . . . . . . . . . . . . . . . . . . . . . . 38
Using Simple Sync . . . . . . . . . . . . . . . . . . . . . . . . . . . . . . . . . . . . . . . . . . . 39
Using Custom Sync . . . . . . . . . . . . . . . . . . . . . . . . . . . . . . . . . . . . . . . . . . . 39
Managing Media Sync Settings . . . . . . . . . . . . . . . . . . . . . . . . . . . . . . . . . . 40
Editing Media Sync Settings . . . . . . . . . . . . . . . . . . . . . . . . . . . . . . . . . 40
Checking Sync Status . . . . . . . . . . . . . . . . . . . . . . . . . . . . . . . . . . . . . . 40
Deleting Media Sync Settings . . . . . . . . . . . . . . . . . . . . . . . . . . . . . . . . 41
Using Automatic Sync . . . . . . . . . . . . . . . . . . . . . . . . . . . . . . . . . . . . . . . . . 41
Turning Off Automatic Sync . . . . . . . . . . . . . . . . . . . . . . . . . . . . . . . . . . 41
8. About DivX® Certification . . . . . . . . . . . . . . . . . . . . . . . . . . . . . . . . 42
About DivX . . . . . . . . . . . . . . . . . . . . . . . . . . . . . . . . . . . . . . . . . . . . . . . . . 42
Index . . . . . . . . . . . . . . . . . . . . . . . . . . . . . . . . . . . . . . . . . . . . . . . . . . . . 43

FreeAgent® | Theater™ User Guide 5
1. Overview Using FreeAgent | Theater
1. Overview
The FreeAgent | Theater media player lets you use your TV to play digital
media files copied from your compute. You use the FreeAgent | Go drive to
collect videos, photos, and music from your computer and the FreeAgent |
Theater media player to play them on your TV.
In addition to using the FreeAgent | Go drive with your media player, you can
use the USB port on the front of the media player to connect any NTFS- or
FAT32-formatted USB external storage device to the media player. You can
also play images and videos directly from compatible digital cameras via a
USB cable.
Using FreeAgent | Theater
You can use the FreeAgent | Theater media player without installing the
FreeAgent | Theater application software by dragging media files from your
computer to your FreeAgent drive and using the media player to play them on
your TV. However, the FreeAgent | Theater application allows you to access
your external drive features and to synchronize media folders on your drive
with those on your PC.
To use the FreeAgent | Theater with a FreeAgent | Go drive,
1. If you want to use the FreeAgent | Theater application to manage and sync
your media files, install the software on your computer from the FreeAgent
| Theater Installation CD included with the FreeAgent | Theater.
2. Connect the PC dock to your computer and insert your FreeAgent | Go
drive.
Figure 1: FreeAgent | Theater with FreeAgent | Go Drive
USB Port
FreeAgent | Go Drive
FreeAgent | Theater Media Player

FreeAgent® | Theater™ User Guide 6
1. Overview Using FreeAgent | Theater
3. If you’ve installed the software, use the FreeAgent | Theater desktop
application to select the media files you want to play on your TV and follow
the on-screen instructions to copy those files onto your FreeAgent drive.
— OR —
If you’ve chosen not to install the FreeAgent | Theater software, drag media
files from your PC to your FreeAgent drive.
4. Remove the FreeAgent drive from the PC dock and insert it in the media
player connected to your TV.
Note: If you haven’t connected the media player to your TV yet, follow the steps in
the Setup Guide included in your shipping carton to connect the components.
5. Use the remote control to navigate through the media player menus to
access and play your videos, photos, and music on your TV.
Note: The FreeAgent | Theater media player works with any NTFS- or FAT32-
formatted USB external storage device or compatible digital camera
connected to the USB port on the front of the media player.
FreeAgent | Theater Components
FreeAgent | Theater consists of these components:
•A media player that connects to your TV and works with both standard
definition and high definition TVs
•A PC dock that connects to your computer
•A FreeAgent | Go external drive that connects directly to both the media
player and the PC dock for easy transport of media files between
computer and TV
•A remote control to navigate the FreeAgent | Theater TV interface
•A CD containing the FreeAgent | Theater application software and this
FreeAgent | Theater User Guide

FreeAgent® | Theater™ User Guide 7
1. Overview Using FreeAgent | Theater
FreeAgent | Theater Media Player
Figure 2: FreeAgent | Theater Media Player: Front View
SELECT MENU /
>
>
>
>
Navigate
Play/Pause StopPower
Eject button
IR lens
FreeAgent™ | Go drive in play position
USB port
Figure 3: FreeAgent | Theater Media Player: Rear View
Composite video
S-Video connector
Component video
AC3 coax audio
connector
DC connector
Reset button
Analog audio
PrPbY

FreeAgent® | Theater™ User Guide 8
1. Overview Using FreeAgent | Theater
FreeAgent | Go Drive and PC Dock
Remote Control
All media player features can be controlled using the remote control buttons.
Certain functions can also be completed using the controls on the front of the
media player.
Figure 4: PC Dock with FreeAgent | Go Drive Inserted
Figure 5: Remote Control
ANGLE
SUBTITLE
On/Off
A-B
AUDIO
TITLE
MOVIE
INFORMATION
OPTIONS
MENU RETURN
SELECT
PLAY/PAUSE
FORWARD
STOP
ZOOM
REPEAT
Navigation Buttons
REVERSE
PREVIOUS
NEXT
VOLUME+/VOLUME-
MUTE

FreeAgent® | Theater™ User Guide 9
1. Overview Using FreeAgent | Theater
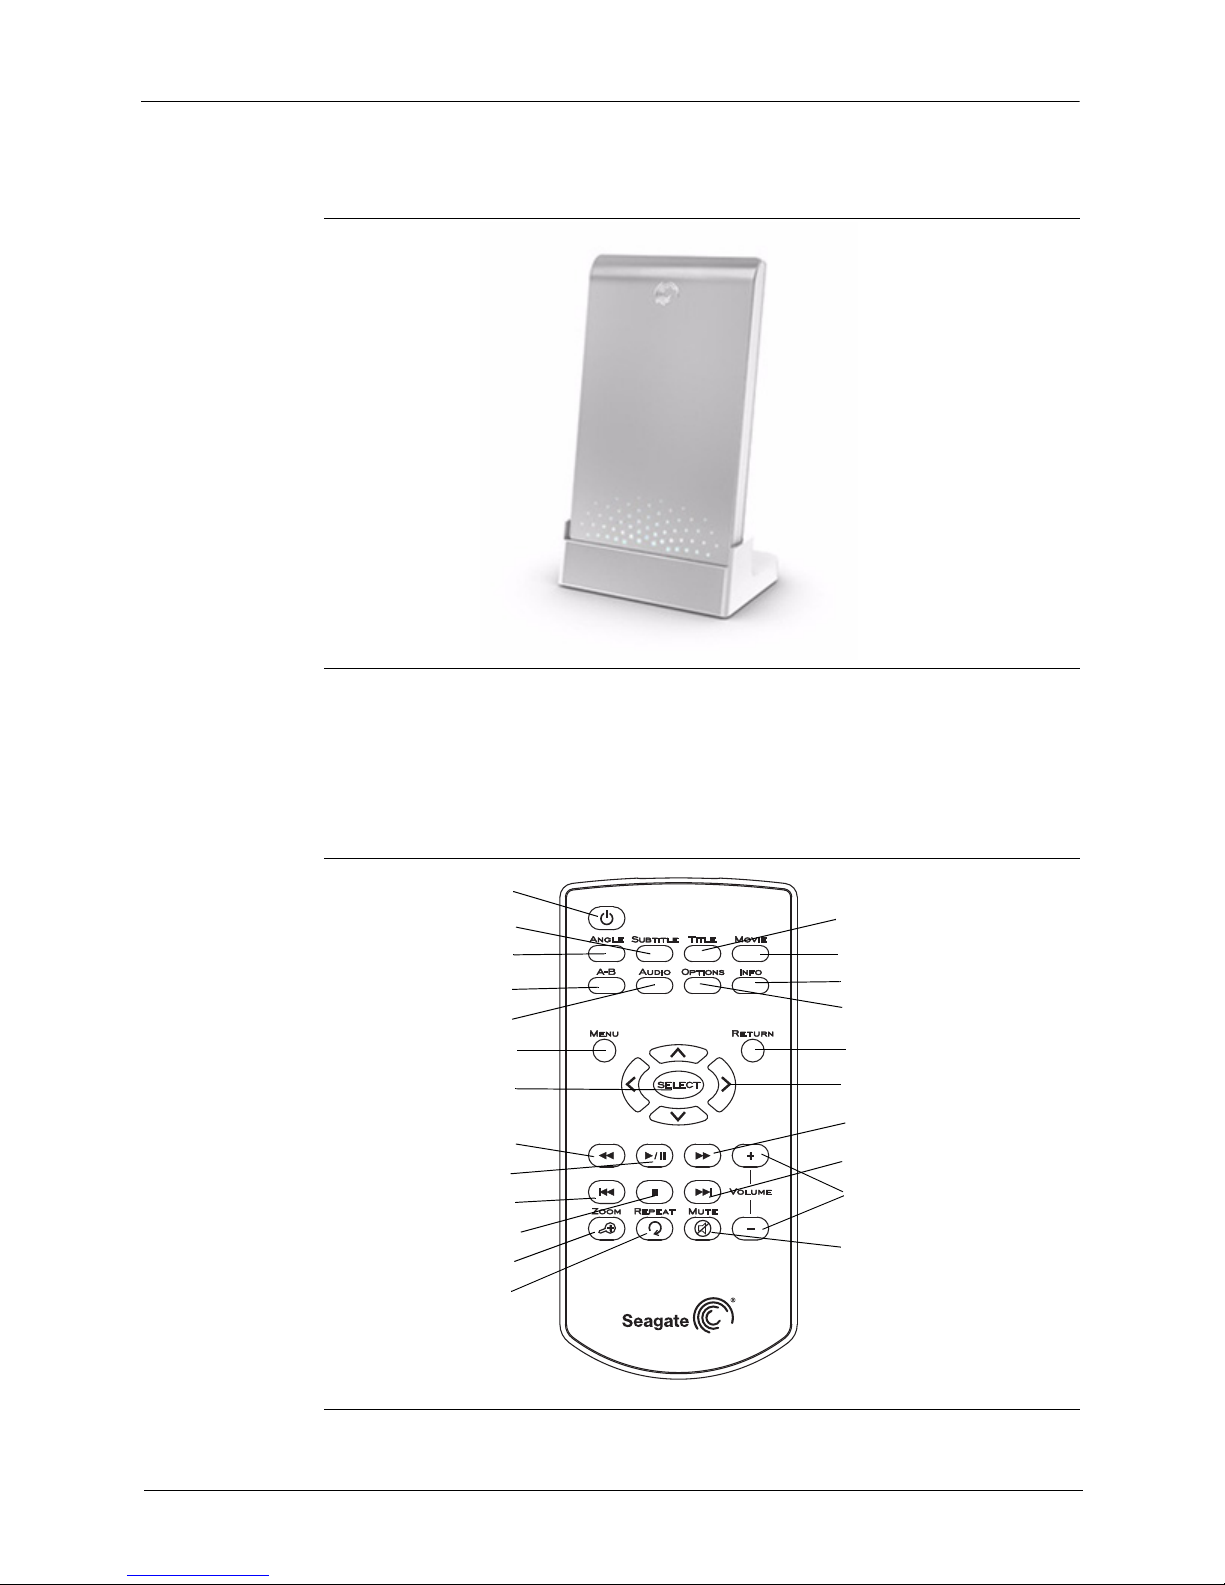
Table 1: Remote Control Buttons
On/Off: Turn FreeAgent | Theater on and off. Navigation Buttons: Press the arrow buttons to
navigate the menus.
ANGLE: Switch a movie angle or rotate a photo. << (REVERSE): Press to fast reverse the current
playback.
Press repeatedly to select faster reverse speeds.
SUBTITLE: Activate available subtitles when playing
DivX®files.
Supported subtitle formats: SRT, SMI, SUB, SSA
> /|| (PLAY/PAUSE): Play or pause movies, music,
and photos.
TITLE: Open the movie title menu. >> (FORWARD): Press to fast forward the current
playback.
Press repeatedly to select faster forward speeds.
MOVIE: Open the movie main menu. VOLUME+/VOLUME-: Increase or decrease volume.
A-B: Select a start (A) and end (B) point in a video and
replay that portion.
|<< (PREVIOUS): Return to the previous file when
playing music or viewing photos or to the previous
chapter in a video.
Page up in a file list.
AUDIO: Select a language for an audio track in a file. (STOP): Stop playback.
OPTIONS: Search Title/Chapter/Time.
Change from list to thumbnail view when viewing photos.
>>| (NEXT): Go to the next file when playing music
or viewing photos or to the next chapter in a video.
Page down in a file list.
INFORMATION: Display media information such as file
properties or elapsed time.
ZOOM: Zoom in or out when playing photos or
movies. Press repeatedly to select higher zoom
levels.
Photo zoom levels: 2x ,4x, 8x, 16x
Movie zoom levels: 2x, 4x, 8x
MENU: Open the main menu for FreeAgent | Theater. REPEAT: Repeat a music selection or slideshow.
RETURN: Return to the previous screen when navigating
menus.
Change from thumbnail to list view when viewing photos.
MUTE: Press to mute audio output; press again to
resume audio.
SELECT: Confirm a menu selection or play the selected
music, video, or photo file.

FreeAgent® | Theater™ User Guide 10
1. Overview Navigating the FreeAgent | Theater Menus
Navigating the FreeAgent | Theater Menus
Use the buttons and arrow keys on the remote control to navigate among the
FreeAgent | Theater media player menus. Each media type has its own set of
submenus that allow you to set up and control the playback of selected files.
See the video, music, and photo sections of this user guide for detailed
information about using those menus.
Selecting a Storage Drive
You can use the media player to play videos, music, and photos you’ve stored
on either a FreeAgent | Go drive or another USB external storage device.
Step 1. On the main menu, select the device (FreeAgent Go or External Storage)
containing the media you want to play on your TV.
If you select External Storage, make sure the external drive is connected to
the USB port on the front of the media player.
Step 2. Navigate through the specific video, photo, and music menus to access fea-
tures available for each media type.
Organizing Media Files and Folders
The FreeAgent | Theater stores all the media files and folders you’ve copied
from your computer and displays your files in a structure similar to that seen
Figure 6: Main Menu
ALL VIDEOS PHOTOS MUSIC
FreeAgent Go
External Storage
Setup

FreeAgent® | Theater™ User Guide 11
1. Overview Organizing Media Files and Folders
on your computer. So before you copy media from your computer, it’s a good
idea to take the time to organize your files in folders and sub-folders whose
names tell you clearly what’s inside.
For example, you can create sub-folders in your My Pictures folder for each
month or for important events, or create sub-folders in your My Music folder
for various genres. Any system will work as long as you give your folders
names that make sense to you and allow you to find the media files you’re
looking for quickly and easily.
Preparing Background Music Files for Slideshows
If you want to be able to play background music with a slideshow of your
pictures on your TV, you must put the desired music files in the same folder as
the photos to be played in the slideshow before you copy your media files
from your PC. The Setup menu on the media player will allow you to turn the
Background Music option on or off, but you must prepare the slideshow folder
on your computer.
For more suggestions on how to organize and label your media files, go to the
Knowledge Base at www.seagate.com.

FreeAgent® | Theater™ User Guide 12
2. Setting Up FreeAgent | Theater Selecting a Screen Language
2. Setting Up FreeAgent | Theater
Although the FreeAgent | Theater media player is ready for use as soon as
you plug it in, you can adjust the audio, video, system, photo, and movie
settings for optimal use with your TV.
See the FreeAgent | Theater Setup Guide included in your product carton for
instructions on how to connect the components.
Selecting a Screen Language
The first time you connect your media player to your TV, a language selection
screen asks you to select your on-screen language from a list of available
languages. You won’t see this screen again unless you reset your media
player to the factory default settings.
Configuring Your Media Player
Use the Setup menu to configure the audio, video, system, photo, and movie
settings for your media player.
To open the Setup menu,
Step 1. Select Setup on the main menu.
The Setup menu opens.
Figure 7: Main Menu
ALL VIDEOS PHOTOS MUSIC
FreeAgent Go
External Storage
Setup

FreeAgent® | Theater™ User Guide 13
2. Setting Up FreeAgent | Theater Configuring Your Media Player
Step 2. In the menu bar at the top of the screen, select the feature whose settings you
want to adjust.
Step 3. To exit the Setup menu, press Return.
Audio Setup
To set up the way the audio portion of media files is played,
•Click Audio in the menu bar.
Audio Digital Output
SPDIF LPCM: Convert the multi-channel audio output into stereo.
SPDIF RAW: Play the digital audio without decoding.
Video Setup
To set up the way images are displayed on your TV,
Figure 8: Audio Setup Menu
AUDIO VIDEO SYSTEM PHOTOS MOVIE
Digital Output SPDIF LPCM
SPDIF RAW

FreeAgent® | Theater™ User Guide 14
2. Setting Up FreeAgent | Theater Configuring Your Media Player
•Click Video in the menu bar.
Aspect Ratio
Standard definition TVs display in a 4:3 aspect ratio; high definition TVs
display in a 16:9 aspect ratio.
PAN SCAN 4:3: The standard definition broadcast television format.
Letter Box 4:3: Transfers a wide screen film to a 4:3 video display while
maintaining the film’s original aspect ratio.
16:9: The same viewing area as a movie theater screen.
Brightness
Adjust the picture brightness to the desired level.
Contrast
Adjust the picture contrast to the desired level.
TV System
NTSC: American television standard
PAL: European television standard
Video Resolution
The media player transmits an analog video signal in both standard definition
(SD) and high definition (HD) resolutions for American NTSC- and European
PAL- compatible televisions.
You have four video resolution options, which are explained below:
Figure 9: Video Setup Menu
VIDEO SYSTEM PHOTOS MOVIE AUDIO
Aspect Ratio 16 : 9
Brightness 25
Contrast 25
TV System NTSC
Video Resolution 1080i

FreeAgent® | Theater™ User Guide 15
2. Setting Up FreeAgent | Theater Configuring Your Media Player
SD Interlace (composite and S-Video hookup)
SD Progressive (component hookup)
720p (HD)
1080i (HD)
Your choice depends upon several factors:
•What country you live in
•Whether you have a standard definition (SD) or high definition (HD) TV
•Whether you want to use a basic composite connection, a higher quality S-
Video connection, or the highest quality component connection.
Note: Composite cables are included with your media player; S-Video and
component cables are not.
Frequently Asked Questions About Video Resolution
What are 720p and 1080i? 720 and 1080 refer to the number of horizontal
lines used to fill the screen. The more lines, the better the picture.The “p”
refers to progressive scanning, while the “i” refers to interlaced scanning.
What do Progressive and Interlaced mean? These are the two basic video
display methods and they define how the lines that make up the picture on
your TV screen are drawn. Progressive scanning produces a smoother,
sharper image and should be selected if your TV supports it.
What’s the difference between composite, S-Video, and component video
connections? The media player supports three types of video connection:
•Composite video carries both color and brightness over a single cable
and produces a fair picture quality.
•S-Video splits the video information into two signals, one for color and the
other for brightness, and produces a good picture quality.

FreeAgent® | Theater™ User Guide 16
2. Setting Up FreeAgent | Theater Configuring Your Media Player
•Component video splits video information into three separate signals, two
for color and one for brightness, and produces the best picture quality.
Video Resolution Options:
•SD Interlace (Composite and S-Video)
–American NTSC: 480i (for the USA, Canada, Mexico, Japan,
Taiwan, South America, South Korea, the Philippines, and Puerto
Rico)
–European PAL: 576i (for the U.K, Australia, Malaysia, Germany,
China, Africa, South America, Indonesia, Yugoslavia, France,
Eastern Europe, Russia, and Greece)
•SD Progressive (Component)
–American NTSC: 480p (for the USA, Canada, Mexico, Japan,
Taiwan, South America, South Korea, the Philippines, and Puerto
Rico)
–European PAL: 576p (for the U.K, Australia, Malaysia, Germany,
China, Africa, South America, Indonesia, Yugoslavia, France,
Eastern Europe, Russia, and Greece)
Note: HDTV maintains the same standards and regions as NTSC and PAL, but the
signal is displayed digitally and the resolution increases to 720p and 1080i.
•720p (HD): Better quality picture than SD interlace or SD progressive if
your TV supports this format. Check your TV manual for supported
formats.
•1080i (HD): Better quality picture than 720p, SD interlace, or SD
progressive if your TV supports this format. Check your TV manual for
supported formats.
Problems with Video Resolution
Figure 10: Composite, S-Video, and Component Hookups
Composite Video Component Video
S-Video

FreeAgent® | Theater™ User Guide 17
2. Setting Up FreeAgent | Theater Configuring Your Media Player
The higher the resolution your TV can support, the better your picture will be. If
you select a high resolution but are unable to see a picture, select a lower
resolution until a picture appears on your TV.
If you’re having trouble getting any picture at all on your TV, you might have a
problem with your cable connections or a video resolution that’s set too high. If
you’re sure your cables are connected properly and you still can’t get a
picture, press the reset button on the rear of the media player to reset the
device for your region. The reset causes the unit to display the lowest video
resolution, which most televisions are capable of displaying.
Also press the Input button on your TV to switch to the input to which the
media player is connected.
Resetting Your Media Player
On the rear of the media player is a reset button.
•Press once to reset the device to the PAL European TV standard.
•Press a second time to reset the device to the NTSC American TV
standard.
•Hold for 10 seconds to restore factory default settings.
System Setup
To configure your system language preferences,
Figure 11: Reset Button
Reset

FreeAgent® | Theater™ User Guide 18
2. Setting Up FreeAgent | Theater Configuring Your Media Player
•Click System in the menu bar.
Version
System software version
Screen Language
Select the language to be used to display the Setup menu, information, and
video subtitles.
Factory Default
Reset all Setup menu functions to the factory default and display the initial
language selection screen.
Photo Slideshow Setup
To set up a slideshow,
Figure 12: System Setup Menu
SYSTEM PHOTOS MOVIE AUDIO VIDEO
Version 1.0
Screen Language English
Factory Default

FreeAgent® | Theater™ User Guide 19
2. Setting Up FreeAgent | Theater Configuring Your Media Player
•Click Photos in the menu bar.
Create a slideshow by selecting the amount of time each image is displayed
and the transition effect as you move from one image to the next and turn on
the Background Music option.
Timing
Set the amount of time each image in a slideshow remains on the screen:
•2 seconds (default setting)
•5 seconds
•10 seconds
•30 seconds
•1 minute
•2 minutes
•Off
Transition Effect
Choose the way one image is replaced by another during the slideshow:
•Cross Fade (default setting)
•Left to Right
•Top to Bottom
Figure 13: Slideshow Setup Menu
PHOTOS VIDEO SYSTEM MOVIE AUDIO
Slideshow Timing
Transition Eect
Background Music
2 Seconds
Cross Fade
On

FreeAgent® | Theater™ User Guide 20
2. Setting Up FreeAgent | Theater Configuring Your Media Player
•Waterfall
•Snake
•Dissolve
•Strip Left Down
•All Effect Shuffle
•Off
Note: If you select Off, your photos simply replace one another after the allotted
amount of time with no transition effect.
Background Music
If you want to play background music with your slideshow, you must put the
desired music files in the same folder as the photos to be played in the
slideshow before you copy your media files from your PC.
•If the Background Music setting is Off, no background music plays
automatically when you play a slideshow. However, you can play
background music by first starting your music and then starting the
slideshow. (Default Setting)
•If the Background Music setting is On and the folder containing the
slideshow images also includes audio files or a playlist, that music is
automatically played as background music when you play a slideshow.
Movie Setup
To configure your movie preferences,
Other manuals for STCEA101-RK - FreeAgent Theater - Digital AV...
1
This manual suits for next models
1
Table of contents
Other Seagate Media Player manuals

Seagate
Seagate STCEA101-RK - FreeAgent Theater - Digital AV... User manual

Seagate
Seagate GoFlex Cinema User manual

Seagate
Seagate GoFlex Cinema User manual

Seagate
Seagate FreeAgent GoFlex TV User instructions

Seagate
Seagate STAJ100 User manual

Seagate
Seagate FreeAgent ater User manual

Seagate
Seagate ST905004CEA2E1-RK - FreeAgent Theater+ - Digital Multimedia... User manual

Seagate
Seagate ST905004CEA2E1-RK - FreeAgent Theater+ - Digital Multimedia... User manual

Seagate
Seagate STCEB101-RK User manual

Seagate
Seagate GoFlex Cinema User manual