manuals.online logo
Brands
  1. Home
  2. •
  3. Brands
  4. •
  5. Seagate
  6. •
  7. Storage
  8. •
  9. Seagate STEA2000400 Installation guide

Seagate STEA2000400 Installation guide

Other Seagate Storage manuals

Seagate GoFlex Turbo User manual

Seagate

Seagate GoFlex Turbo User manual

Seagate ST305004EXA101-RK User manual

Seagate

Seagate ST305004EXA101-RK User manual

Seagate ST973401LC - Savvio 73.4 GB Hard Drive User manual

Seagate

Seagate ST973401LC - Savvio 73.4 GB Hard Drive User manual

Seagate ST3000VM002 User manual

Seagate

Seagate ST3000VM002 User manual

Seagate SkyHawk AI User manual

Seagate

Seagate SkyHawk AI User manual

Seagate EXOS Standard 5 E Series User manual

Seagate

Seagate EXOS Standard 5 E Series User manual

Seagate ST9500420AS - Momentus 7200.4 500 GB Hard... User manual

Seagate

Seagate ST9500420AS - Momentus 7200.4 500 GB Hard... User manual

Seagate Barracuda Series User manual

Seagate

Seagate Barracuda Series User manual

Seagate Cheetah 18LP User manual

Seagate

Seagate Cheetah 18LP User manual

Seagate Savvio 15K.1 FC ST973451FC User manual

Seagate

Seagate Savvio 15K.1 FC ST973451FC User manual

Seagate ST251 User manual

Seagate

Seagate ST251 User manual

Seagate STM303004N1AAA-RK - Maxtor Basics 300 GB Hard... User manual

Seagate

Seagate STM303004N1AAA-RK - Maxtor Basics 300 GB Hard... User manual

Seagate ST-506 User manual

Seagate

Seagate ST-506 User manual

Seagate Elite 9 User manual

Seagate

Seagate Elite 9 User manual

Seagate Savvio 10K User manual

Seagate

Seagate Savvio 10K User manual

Seagate ST9300 Series User manual

Seagate

Seagate ST9300 Series User manual

Seagate OneTouch III User manual

Seagate

Seagate OneTouch III User manual

Seagate Video 2.5 HDD User manual

Seagate

Seagate Video 2.5 HDD User manual

Seagate ST6000VN0011 User manual

Seagate

Seagate ST6000VN0011 User manual

Seagate FreeAgent Desktop 1TB User manual

Seagate

Seagate FreeAgent Desktop 1TB User manual

Seagate Cheetah 15K.7 SAS Series User manual

Seagate

Seagate Cheetah 15K.7 SAS Series User manual

Seagate FreeAgent Pro User manual

Seagate

Seagate FreeAgent Pro User manual

Seagate ST910021AS User manual

Seagate

Seagate ST910021AS User manual

Seagate GoFlex Satellite User manual

Seagate

Seagate GoFlex Satellite User manual

Popular Storage manuals by other brands

IBM 40/80 GB HH DLTVS user guide

IBM

IBM 40/80 GB HH DLTVS user guide

Synology DiskStation DS716+II Quick installation guide

Synology

Synology DiskStation DS716+II Quick installation guide

Vantec NexStar-HX4 user manual

Vantec

Vantec NexStar-HX4 user manual

LaCie Christofle Galet datasheet

LaCie

LaCie Christofle Galet datasheet

LaCie Rugged Thunderbolt user manual

LaCie

LaCie Rugged Thunderbolt user manual

OCZ IBIS datasheet

OCZ

OCZ IBIS datasheet

Transcend JetFlash 110 Brochure & specs

Transcend

Transcend JetFlash 110 Brochure & specs

QNAP TS 32PXU Series user guide

QNAP

QNAP TS 32PXU Series user guide

LaCie RUGGED RAID user manual

LaCie

LaCie RUGGED RAID user manual

Freecom CLS DOCK Quick install guide

Freecom

Freecom CLS DOCK Quick install guide

PNY Attache P-FD64MBATT3 install guide

PNY

PNY Attache P-FD64MBATT3 install guide

OWC Mercury Elite Pro Dual mini Assembly manual

OWC

OWC Mercury Elite Pro Dual mini Assembly manual

OLT 6x6 Maximizer Assembly manual

OLT

OLT 6x6 Maximizer Assembly manual

Transcend JetFlash 160 Specifications

Transcend

Transcend JetFlash 160 Specifications

Thunderbolt 600 user manual

Thunderbolt

Thunderbolt 600 user manual

Intel RAID High Availability user guide

Intel

Intel RAID High Availability user guide

LaCie 12big Thunderbolt 3 Quick install guide

LaCie

LaCie 12big Thunderbolt 3 Quick install guide

Spectra Logic T-Series Spectra T50e quick start guide

Spectra Logic

Spectra Logic T-Series Spectra T50e quick start guide

manuals.online logo
manuals.online logoBrands
  • About & Mission
  • Contact us
  • Privacy Policy
  • Terms and Conditions

Copyright 2025 Manuals.Online. All Rights Reserved.

My second external drive isn't detected in
Windows
Sometimes only one of two external (ie, GoFlex, Backup Plus) drives mounts with a drive letter
when connected to Windows. This article explains.
Sometimes only one of two external (ie, GoFlex, Backup Plus) drives mounts with a drive letter
when connected to Windows.
This is caused if two drives have the same drive signature, which can occur when drives are
setup in a mass production environment or when they are cloned.
The issue can be quickly fixed by forcing the drive on-line. To force a drive online in Windows:
1. Press Windows key ( ) + R.
2. In the run box type diskmgmt.msc
3. On the right, scroll down so you can see your external drives.
4. You will notice that the 1st external drive is Online.
5. You will notice that the other external drive is Offline.
6. Right-click on Offline (in the grey area of the box) and choose Online from the menu.
The drive should show in Computer (Window Explorer) in a few seconds.
Why won't my 3TB or 4TB external drive
work with Microsoft Image Backup in
Windows 7?
Microsoft Image Backup in Windows 7 will not support any Seagate Backup Plus, 3TB or
4TB GoFlex drives and the older model Expansion Portable And Desktop drives (along
with most other external drives above 2.1TB). This article explains.Windows Image Backup
in Windows 7 will not support any Seagate Backup Plus drives, GoFlex drives that exceed 2.1TB
(3TB and 4TB models), or older model Expansion Portable and Desktop
drives (along with most other external drives that exceed 2.1TB in size).
Microsoft only supports drives that are set up to use 512 byte blocks as destinations for image
backups. The drives listed above are compatible with all other Windows functionalities.
To allow 3TB and 4TB drives to work in older operating systems such as Windows XP, these
drives are configured using 4K byte blocks. Microsoft has added support for 4K drives in
Windows 8. See here for more information.
For Backup Plus and GoFlex drives, the bundled software will allow you to back up your data.
As an alternative to Windows image backups for Backup Plus drives, GoFlex drives, and older
model Expansion drives, consider using DiscWizard.
Computer won't boot with USB drive
connected
Issues booting while a USB drive is connected is usually the result of a USB Device option being
enabled in the System BIOS' Boot Order or Boot Sequence.
Some of these steps require accessing the system’s BIOS. Please refer to the system or
motherboard manufacturer’s documentation for access and configuring options.
Here are some steps to try and resolve the issue:
Check to see if the active flag is set to active on the partition. If it is then remove the
active flag using these instructions.
Check the format of the drive. Some Seagate drives ship as exFAT for Window and Mac
compatibility. For some systems this may present issues. If using on Windows only, then
format the drive to NTFS. See how to format your drive here. If using exFAT is required,
try one of the other options listed.
Disable Boot from USB devices in the BIOS
Note: Verbiage will vary from system to system
Disable USB Legacy Support in the BIOS
Note: If you are using a USB mouse or Keyboard disabling legacy support may result
in those devices not functioning in Real mode (MS-DOS) or Safe Mode.
Here are two Microsoft links that cover Disabling USB Legacy support
oComputer Hangs During Shutdown with USB Legacy Support Enabled in the
BIOS
oUSB Keyboard or Mouse May Not Work After You Restart Your Computer in
MS-DOS Mode
Some System BIOS' may not include the ability to disable USB devices from the Boot
Order/Boot Sequence. If this is the case, it is recommended that you disconnect the USB
External Drive from your system until the system’s operating system has fully booted; at which
time you can connect the USB Drive to your system.
Disclaimer: REFERENCE TO THIRD PARTIES AND THIRD PARTY WEB SITES. Seagate
references third parties and third party products as an informational service only, it is not an
endorsement or recommendation - implied or otherwise - of any of the listed companies. Seagate
makes no warranty - implied or otherwise - regarding the performance or reliability of these
companies or products. Each company listed is independent from Seagate and is not under the
control of Seagate; therefore, Seagate accepts no responsibility for and disclaims any liability
from the actions or products of the listed companies. You should make your own independent
evaluation before conducting business with any company. To obtain product specifications and
warranty information, please contact the respective vendor directly. There are links in this
document that will permit you to connect to third-party web sites over which Seagate has no
control. These links are provided for your convenience only and your use of them is at your own
risk. Seagate makes no representations whatsoever about the content of any of these websites.
Seagate does not endorse or accept any responsibility for the content, or use of any such
websites.
Newer model Expansion portable and Expansion desktop drives are
compatible with Windows image backup.
For more information about the limitations of Windows Backup and Restore, please
contact Microsoft.
Drive reports 'write protected' or 'read only'
when trying to save to or delete from it
Discusses what to do if an external reports "Write Protected" when trying to save files onto it or
delete files from it.
A drive can sometimes report "Write Protected" when trying to save files onto it or delete files
from it.
This typically means that you have connected an external drive that is formatted with an NTFS
partition to a Mac computer. MacOS cannot write to NTFS partitions and so will often indicate
the drive is write-protected.
Seagate GoFlex and GoFlex for Mac drives include an NTFS driver that can make the drives
intercompatible between Mac and Windows, so that may be a good solution.
See Document ID: 214531 for more information.
For all other drives, please see Document ID: 207851 for instructions on reformatting the drive
in MacOS.
Reformatting the drive will ERASE ALL DATA on the drive. Please note that
Windows partitions (ie, NTFS partitions) and MacOS partitions are not easily compatible at this
time without special software, so using an external drive to transfer data between a Windows
computer and a MacOS computer can be difficult and sometimes dangerous to your data.
Windows 7 or Vista requests drivers for an
external drive

Troubleshooting when external drives encounter driver and ʺUnknown Deviceʺ problems in
Windows 7/Vista Device Manager.
Windows 7 or Vista sometimes encounters problems locating the drivers necessary for the proper
function of external hard drives.
When that happens, it may alert you that drivers were not loaded correctly. These drivers are part
of its own Windows registry.
First, update Windows Vista to Service Pack 1.
If this does not resolve the problem and the drivers do not now load automatically, you may
simply point Windows 7 or Vista to its own drivers manually.
From Vista:
1. Right-click on Computer.
2. Choose Manage.
3. Choose Device Manager.
Here is the relevant graphic for Vista's Device Manager:
(Click to expand image.)
Here is the procedure to load the drivers manually:
Troubleshooting GPT Protective Partition
Issues
Sometimes, after connecting an internal or external hard drive to your system, Windows Disk
Management says that it is prepared with a GPT Protective Partition. This will mean that you
cannot repartition or reformat the drive. This article will discuss how to overcome this issue.
What is a GPT disk?
The GUID Partition Table (GPT) was introduced as part of the Extensible Firmware Interface
(EFI) initiative. GPT provides a more flexible mechanism for partitioning disks than the older
Master Boot Record (MBR) partitioning scheme that has been common to PCs.
A partition is a contiguous space of storage on a physical or logical disk that functions as though
it were a physically separate disk. Partitions are seen by the system firmware and the installed
operating systems. Access to a partition is controlled by the system firmware before the system
boots the operating system, and then by the operating system after it starts.
The GUID Partition Table (GPT) Scheme was implemented under Microsoft Windows XP x64
edition, Windows Server 2003 (64-bit), Windows Server 2003 SP1 (all versions), Windows
Vista, Windows 7+
In a nutshell, GPT Partition was developed to get around known, MBR partition size issues; the
maximum size for a MBR partiton is 2 Terabytes (TB). GPT partitions enable this limit to be
exceeded.
Note: For more comprehensive information on GPT Protective Partitions, refer to the following
Microsoft link:
https://docs.microsoft.com/en-us/windows-hardware/manufacture/desktop/windows-and-gpt-faq
GUID Partition Table (GPT) partitions are also found in Mac OS X versions 10.4.6 and newer.
All Intel-based Macs require a GPT partition on a boot volume, whether it be internal or external.
When connecting an internal and/or and external hard drive to a Windows XP (or newer), 32-bit
operating system, you may find your drive is inaccessible and that Disk Management reports that
the drive has a GPT Protective Partition on it. The drive cannot be repartitioned and formatted in
this state. This is because the internal or external hard disk was previously prepared on either a
Windows or Macintosh computer with a GPT partition.
Normal Disk Management facilities will not overcome this issue. To prepare this drive, you will
need to use the Windows diskpart command-line utility. The following procedure provides the
steps for cleaning a GPT Protective Partition from a hard disk drive connected to an existing
Windows XP (or newer), 32-bit Operating System.
This is a data destructive process. This procedure not only removes the drive's partition,
but also removes the Drive Signature. It is highly recommended that you backup any/all critical
data on the drive before proceeding.
You must open Disk Management and document the Disk Number of the drive
containing the GPT Protective partition, as you will need this information later in the procedure.
1. Determine the disknumber assigned to the GPT-protected drive.
1. Right-click on (My) Computer.
2. Choose Manage.
3. Select Disk Management (listed under Storage).
4. Look for the drive that is identified as GPT and note the Disk number (such as
Disk 1).
2. Open a Command Window. From the command prompt, type diskpart and press Enter.
The diskpart prompt will open.
3. From the diskpart prompt, type list disk and press Enter. A list of disks will appear in a
text format. You will return to the diskpart prompt.
4. From the diskpart prompt, type select disk disknumber (for instance, if the disk
containing the GPT Protective Partition is Disk 2, you would type select disk 2)and press
Enter. A message appears saying that the disk is selected. You will return to the diskpart
prompt.
5. From the diskpart prompt, type clean and press Enter. At this point the drive's partition
and signature a removed. You will return to the diskpart prompt.
6. From the diskpart prompt, type exit and press Enter. Type exit once more to close the
Command Window. At this point, the internal and/or external drive can be re-initialised,
partitioned and formatted.
7. Launch Disk Management, and to initialise the disk:
oUse the Initialise and Convert Disk Wizard...
-OR-
oClose the Wizard, right-click on the disk in question and select Initialize Disk
from the drop-down menu.
8. Once the drive is initialised, continue using Disk Management to partition and format the
drive.
REFERENCE TO THIRD PARTIES AND THIRD PARTY WEB SITES. Seagate
references third parties and third party products as an informational service only, it is not an
endorsement or recommendation - implied or otherwise - of any of the listed companies. Seagate
makes no warranty - implied or otherwise - regarding the performance or reliability of these
companies or products. Each company listed is independent from Seagate and is not under the
control of Seagate; therefore, Seagate accepts no responsibility for and disclaims any liability
from the actions or products of the listed companies. You should make your own independent
evaluation before conducting business with any company. To obtain product specifications and
warranty information, please contact the respective vendor directly. There are links in this
document that will permit you to connect to third-party web sites over which Seagate has no
control. These links are provided for your convenience only and your use of them is at your own
risk. Seagate makes no representations whatsoever about the content of any of these web sites.
Seagate does not endorse or accept any responsibility for the content, or use, of any such web
sites.
1. Click the + box next to Other Devices.
2. Double-click the drive (usually listed as USB Mass Storage, but may be listed under
another name).
3. A new window will open showing properties; click the Reinstall Driver button.
4. This will open the Update Driver software wizard, click "Locate and install driver
software (recommended)".
5. Then click "Browse my computer for driver software".
6. Click Browse.
7. Open the Windows folder on the C: drive (Computer > C: > Windows) and click OK.
8. Make sure the "Include subfolders" box is checked.
9. Click Next. This should load the drivers.
Additional Troubleshooting Step for External Drives requesting drivers or if receiving an
Error Code 28 on an External Drive / Mass Storage Device in Device Manager.
Vista and Windows 7: If the drive works fine on another computer, there are a few steps to
try while the drive is connected to the original computer:
1. Click the Start / Windows button at the bottom left corner of the screen.
Right-click on Computer and choose Manage.
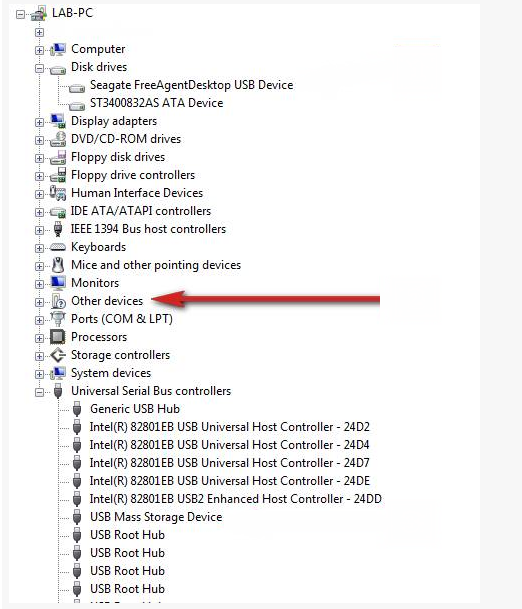
2. Double-click on the Device Manager.
3. The device will usually appear under "Other Devices" or "Unknown Devices"; right-click
on it and choose Uninstall.
4. Once it has disappeared from the Device Manager, disconnect the external hard drive.
5. Disconnect the device from the computer (unplug the USB cable).
6. Click Start / Windows button in the bottom left corner of the screen
7. For Vista - In the Search field, type c:\windows\inf and press Enter.
For Windows 7 - In the Search field, type C:\windows\system32\driverstor and press
Enter.
8. Delete the file INFCACHE.1.
9. If you get an error when trying to delete this file, try the following steps:
1. Right-click on INFCACHE.1.
2. Select Properties.
3. Click the Security tab.
4. Click the Edit button.
5. Select (Users xxxx-PC\Users) or something like (Users 7xxxx \Users)
6. Under the "Permissions for users" check, mark everything to "Allow All".
7. Click Apply then OK.
If you receive a Windows Security box click Yes, then OK, then OK again.
8. Right-click on INFCACHE.1 file and choose Delete.
9. Reboot and reconnect the drive. The file should be rebuilt, correcting the
problem.
10. If that fails, you will need to try to reload the USB drivers for the operating
system by inserting your Vista install CD, rebooting, and attempting a
Repair/Restore.
This can be dangerous to your data and you should disconnect your
external drive before attempting this.
REFERENCE TO THIRD PARTIES AND THIRD PARTY WEB SITES. Seagate
references third parties and third party products as an informational service only, it is not an
endorsement or recommendation - implied or otherwise - of any of the listed companies. Seagate
makes no warranty - implied or otherwise - regarding the performance or reliability of these
companies or products. Each company listed is independent from Seagate and is not under the
control of Seagate; therefore, Seagate accepts no responsibility for and disclaims any liability
from the actions or products of the listed companies. You should make your own independent
evaluation before conducting business with any company. To obtain product specifications and
warranty information, please contact the respective vendor directly. There are links in this
document that will permit you to connect to third-party web sites over which Seagate has no
control. These links are provided for your convenience only and your use of them is at your own
risk. Seagate makes no representations whatsoever about the content of any of these web sites.
Seagate does not endorse or accept any responsibility for the content, or use, of any such web
sites.
My USB device is detected with a ! or ? in
Device Manager
If a USB external drive displays in "Other Devices" in the Windows Device Manager, it is
possible that additional drivers are required for it, that Windows lost track of the drivers, or the
drive is malfunctioning. This article gives troubleshooting steps.
If the device is in "Other Devices" (look for "USB Mass Storage Device") then it is possible that
additional drivers are required for it, that Windows lost track of the drivers, or the drive is
malfunctioning.
To see Device Manager, right-click on (My) Computer/ This PC > Manage > choose Device
Manager from the left column.
1. ensure you have Service Pack 4 (Window 2000) or at least Service Pack 1 (Windows
XP).
2. try another USB cable and another USB port.
3. try another computer. If it works on another computer, the drive is fine but the Windows
drivers on your computer need to be reloaded.
4. If the drive is not detected there in the same way, go back to the USB Mass Storage
Device and double-click on it. Look under the General tab.
If Code 28 appears:
1. First see the Microsoft support article related to this issue.
2. In general, Code 28 can often be overcome by following these steps:
1. right-click on the drive (probably USB Mass Storage Device) and choose
Uninstall
2. turn off the drive