4. CONTENTS
5. OPERATION
5.1. GENERAL NOTES
WARNING!Ensureyouhavereadandunderstoodthesafetyinstructions.
5.1.1. Checkthetyreforphysicalsignsofdamage.
NOTE:Iftheholeortearisgreaterthan6mmitisprobablytoobigtox.Considerseekingassistance.
8DO NOTpulloutanyobjectsstuckinthetyre,thismightmaketherepairhardertoachieve.
NOTE:Ifpossible,workonthetyrewiththehole/tearneartothelowermostpointofthetyre.Thesealantwillworkbetterthatway.
NOTE: Wheninating/repairingatotallyattyrestillttedonavehicle,thereshouldnotbeanyweightonit.Thevehiclemust,
therefore,bejackeduptotaketheweightoffthetyre.Reviewjacksafetyinstructionsandvehiclemanufacturer’sguidelinesfor
jacking.
5.1.2. Positioncompressoronarm,atsurfaceandlocatedsothattheairhosereachesthetyrevalve.
IMPORTANT:Inationwillonlybeeffectiveiftheconnectorsarefullytted.
WARNING!Thecompressormustbeswitchedofffortwentyminutesaftereachtwentyminuteperiodofcontinuousoperationto
preventexcessiveheatbuild-up.
5.2. PUNCTURE REPAIR
NOTE:ReviewSection5.1beforebeginningthisprocess.
5.2.1. Unpacktheunitandcheckthatallitemsarepresentandingoodworkingcondition.
5.2.2. CheckthatthecompressorOn/OffswitchisintheOFFpositionandplugthe12Vplugintothevehicle’saccessorysocket.
5.2.3. Gentlyshakethesealantbottletomixitthoroughly.
IMPORTANT:Repairwillonlybeeffectiveiftheconnectorsarecorrectlytted.
5.2.4. Connectairhose(g.1.6)tosealantairinletconnector(g.1.1)
5.2.5. Invertsealantbottleandlocateintofaceofcompressor(g.1.2).Rotateclockwisetolockinplace.
5.2.6. Connectsealantoutlet(g.1.7)totyrevalve.
5.2.7. Turnthecompressorontobegintheprocess.Oncethetyrereachestherequiredpressureturnthecompressoroff.
NOTE:Ifthetyrehasnotinatedafterapproximately10minutescheckallconnectionsforleakage/blockage.Ifnoneisevident
considerseekingassistance.
NOTE: Ifthetyreisaccidentallyover-inated,usethereliefvalveonairhose(g.1.6)toallowairoutofthetyre.
WARNING!Afterrepairingthetyre,theairhoseanditsconnectorsmaybehot.Leavetocoolfor2to3minutesbeforeremoving.
5.2.8. Removeallttingsandthepowersupply.Stowtheitemsincarrycaseandplaceusedsealantbottleinaleak-proofbagifavailable.
5.2.9. Driveforabout2miles(~3km)sothatsealantcansealthedamagedarea.Stopandchecktyrepressure,topuptyrepressureif
required.
8DO NOTdrivefasterthan50mph(80kph)ontherepairedtyre.
8DO NOTdrivefurtherthan125miles(200km)ontherepairedtyre.
8DO NOTcontinuedrivingifanyvibrations,unsteadysteeringornoisesoccur.Considerseekingassistance.
5.3. TYRE / INFLATABLES INFLATION
NOTE:ReviewSection4.1beforebeginningthisprocess.
5.3.1. CheckthatthecompressorOn/OffswitchisintheOFFpositionandplugthe12Vplugintothevehicle’saccessorysocket.
5.3.2. Removethevalvedustcapandscrewtheconnectorontothevalvestem.
IMPORTANT:Inationwillonlybeeffectiveiftheconnectorisfullyttedontothevalve.
5.3.3. PressthecompressorOn/OffswitchtotheONpositionandthecompressorwillbegintooperate.
5.3.4. InatethetyretothedesiredpressureandturnoffthecompressorbypressingtheswitchtotheOFFposition.
NOTE: Thegaugemaybesubjecttouctuationwhilstpumping.
5.3.5. Removetheairhosefromthetyrevalvebyunscrewingconnectorfromthetyrevalve,takingcaretominimiseairlossinthe
process.Replacethedustcap.
5.3.6. Disconnectthe12Vplugfromthevehicle’saccessorysocket.
NOTE:Thepressuregaugeisnotacalibratedinstrument.Itisrecommendedtouseacalibratedtyrepressuregaugeforan
accuratenalreading.
NOTE:Thecompressormayalsobeusedonitemssuchasinatabledinghies,sportsballs,airbedsetc.usingoneofthetwo
adaptorssupplied.
NOTE: Ifthetyre/inatableisaccidentallyover-inated,usethereliefvalveonairhose(g.1.6)toallowairout.
CAUTION: Someitemsmaynotindicatethepressurerequiredorthesafemaximumpressure.Beverycarefulnottoover-inate.
6. MAINTENANCE
6.1. Beforeeachusecheckallhosesandttingsaresoundandserviceable.
6.2. Wipedownunitwithdampclothanddrythoroughlyifsoiled.DO NOTgettheunitwet.
6.3. Replaceallhosesbackintorelativecompartmentsincompressorbodyandplace
MAC10SIssue131/10/19
Original Language Version
©JackSealeyLimited
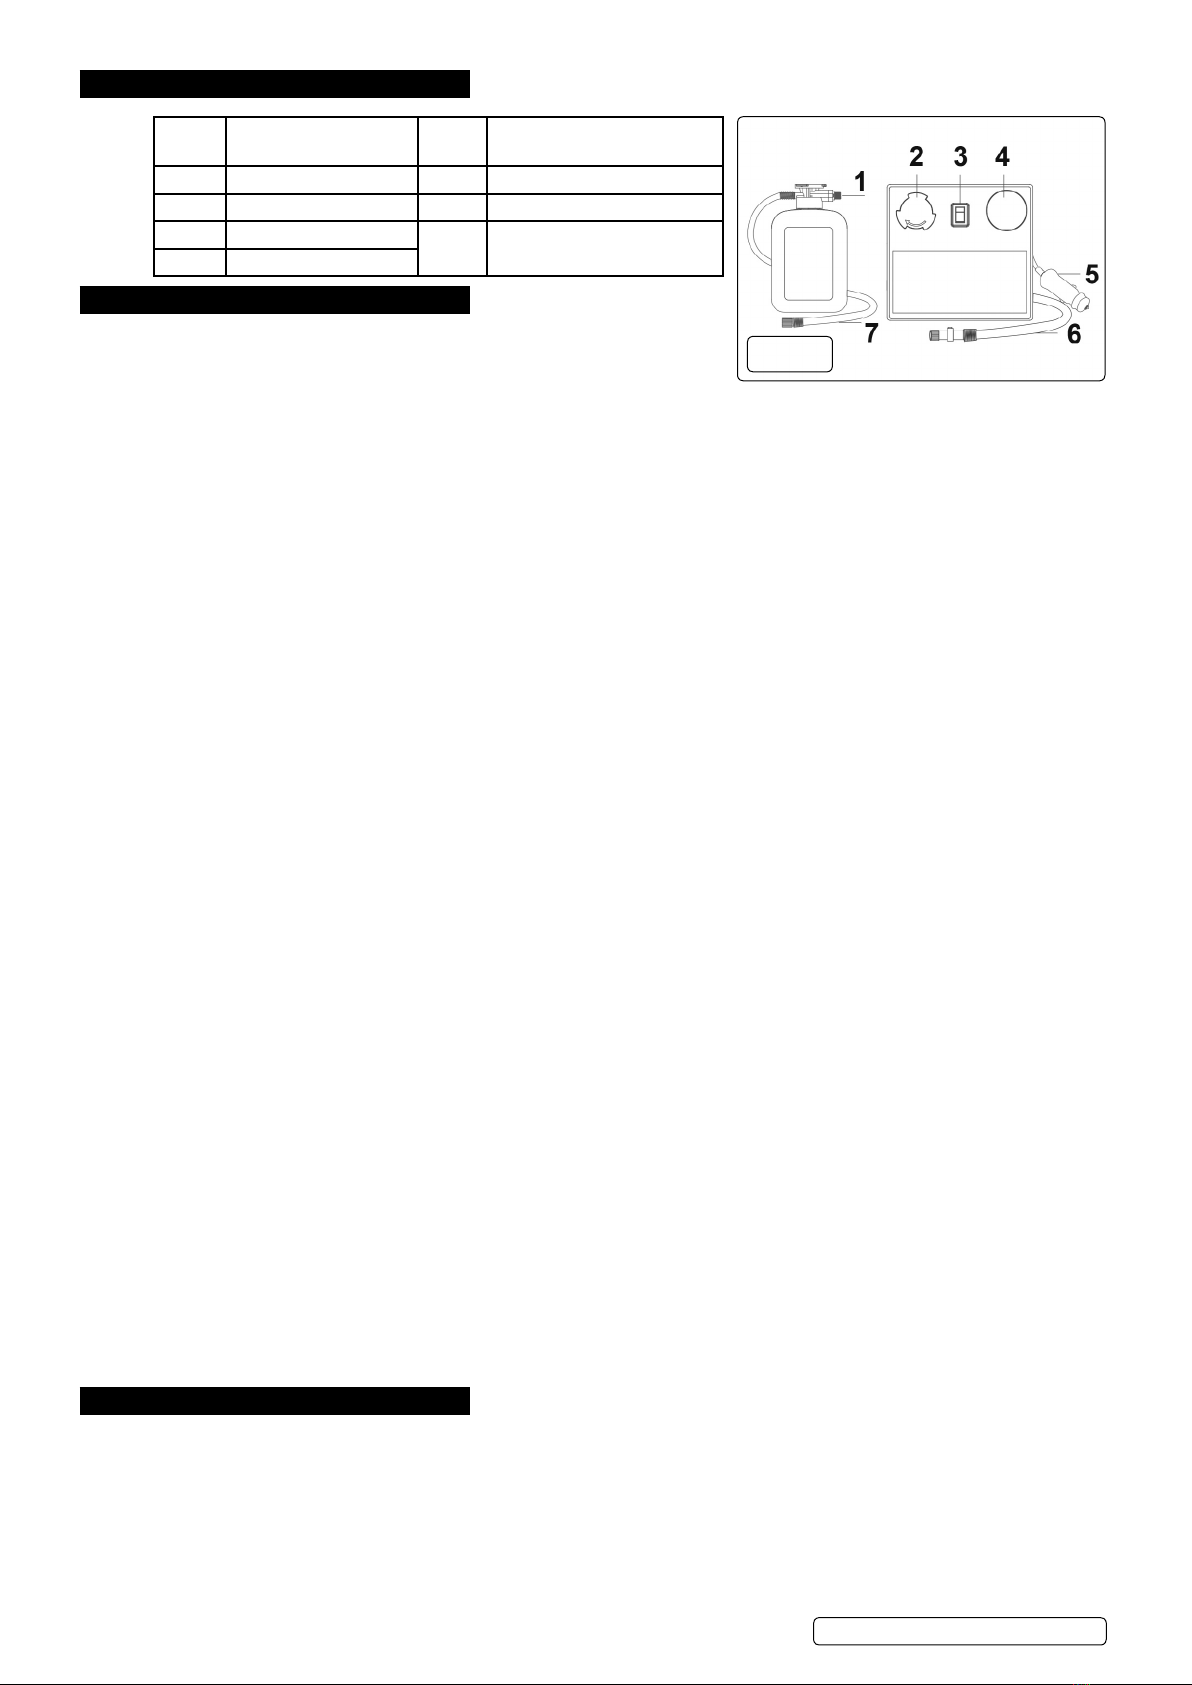
Item
no.
Description Item
no.
Description
1 Connector-airinlet 5 Powercable
2Sealantlocation 6 Airhose+deationvalve
3 On/Offswitch
7
Tyrevalve
Connector
4 Pressuregauge
g.1