Sealey MS900PS User manual
INSTRUCTIONS FOR
SANDER/POLISHER Ø170MM VARIABLE SPEED
1300W/230V
MODEL NO: MS900PS
Thank you for purchasing a Sealey product. Manufactured to a high standard, this product will, if used according to these instructions,
and properly maintained, give you years of trouble free performance.
IMPORTANT: PLEASE READ THESE INSTRUCTIONS CAREFULLY. NOTE THE SAFE OPERATIONAL REQUIREMENTS, WARNINGS & CAUTIONS. USE
THE PRODUCT CORRECTLY AND WITH CARE FOR THE PURPOSE FOR WHICH IT IS INTENDED. FAILURE TO DO SO MAY CAUSE DAMAGE AND/OR
PERSONAL INJURY AND WILL INVALIDATE THE WARRANTY. KEEP THESE INSTRUCTIONS SAFE FOR FUTURE USE.
1. SAFETY
1.1. ELECTRICAL SAFETY
WARNING! It is the user’s responsibility to check the following:
Check all electrical equipment and appliances to ensure that they are safe before using. Inspect power supply leads, plugs and all
electrical connections for wear and damage. Sealey recommend that an RCD (Residual Current Device) is used with all electrical
products. You may obtain an RCD by contacting your local Sealey stockist.
If the sander/polisher is used in the course of business duties, it must be maintained in a safe condition and routinely PAT (Portable
Appliance Test) tested.
Electrical safety information, it is important that the following information is read and understood.
1.1.1. Ensure that the insulation on all cables and on the appliance is safe before connecting it to the power supply.
1.1.2. Regularly inspect power supply cables and plugs for wear or damage and check all connections to ensure that they are secure.
1.1.3. Important: Ensure that the voltage rating on the appliance suits the power supply to be used and that the plug is tted with the correct
fuse - see fuse rating in these instructions.
8DO NOT pull or carry the appliance by the power cable.
8DO NOT pull the plug from the socket by the cable. Remove the plug from the socket by maintaining a rm grip on the plug.
8DO NOT use worn or damaged cables, plugs or connectors. Ensure that any faulty item is repaired or replaced immediately by a
qualied electrician.
1.1.4. This product is tted with a BS1363/A 13 Amp 3 pin plug.
If the cable or plug is damaged during use, switch the electricity supply and remove from use.
Replace a damaged plug with a BS1363/A 13 Amp 3 pin plug. If in doubt contact a qualied electrician.
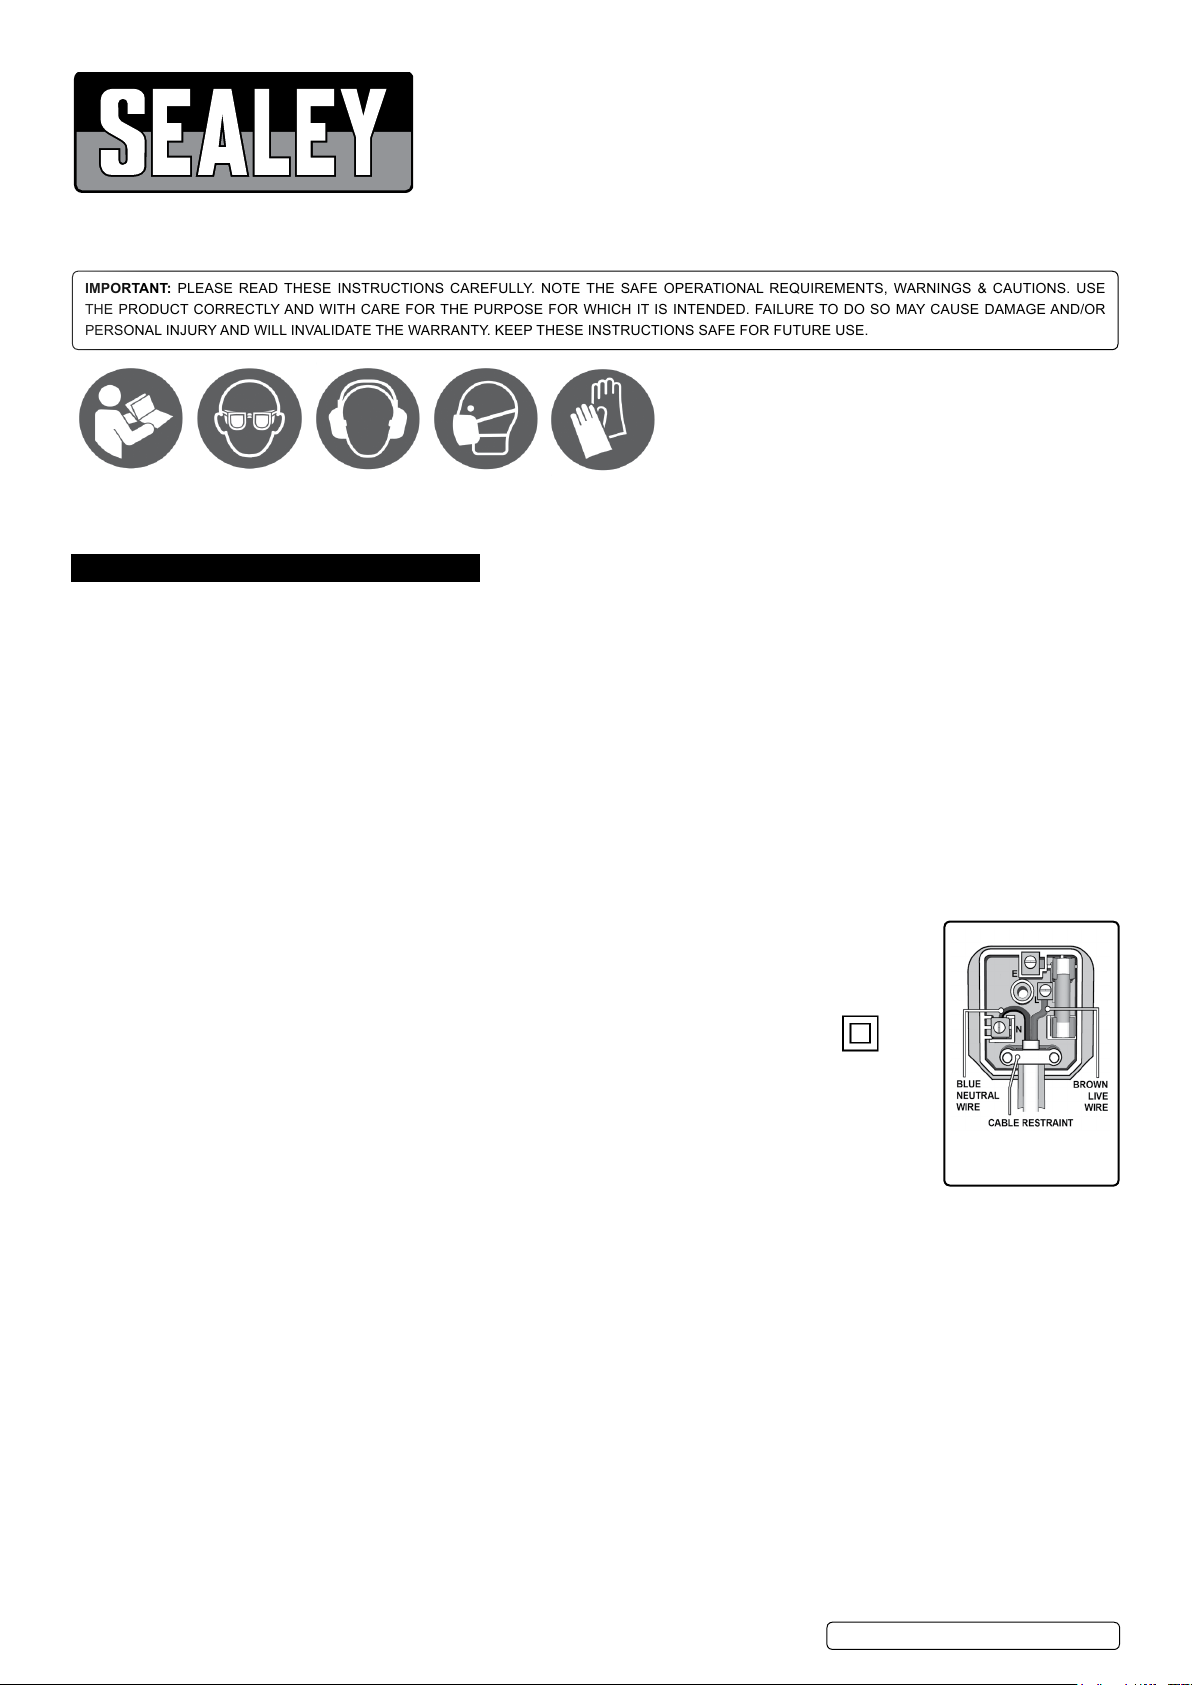
Class II products are wired with live (brown) and neutral (blue) only are marked with the Class II symbol;
A) Connect the BROWN live wire to the live terminal ‘L’.
B) Connect the BLUE neutral wire to the neutral terminal ‘N’.
C) After wiring, check that there are no bare wires and ensure that all wires have been correctly connected.
Ensure that the cable outer sheath extends inside the cable restraint and that the restraint is tight.
DO NOT connect either wire to the earth terminal.
Sealey recommend that repairs are carried out by a qualied electrician.
NOTE: The MS900PS has an electronic speed control, which requires a ‘clean’ and stable power supply. Normal 230V
mains supply is suitable. However, the output from many petrol driven generators may not be suitable for this
tool. ‘Inverter’ type power supplies provide a much more stable output, and should present no problem. S
1.1.5. Cable extension reels. When a cable extension reel is used it should be fully unwound before connection. A cable reel with an RCD
fitted is recommended since any product which is plugged into the cable reel will be protected. The section of the cores of the cable
is important. We suggest 1.5mm2section as a minimum but to be absolutely sure that the capacity of the cable reel is suitable for this
product and for others that may be used in the other output sockets, we recommend the use of 2.5mm2 section cable.
1.2. GENERAL SAFETY
WARNING! Ensure Health & Safety, local authority, and general workshop practice regulations are adhered to when using this
equipment.
9 Familiarise yourself with the application and limitations of the product, as well as the specic potential hazards peculiar to the polisher.
WARNING! Disconnect from the mains power and ensure the disc is at a complete standstill before changing accessories, servicing
or performing any maintenance.
9Maintain the polisher/sander in good condition (use an authorised service agent).
9Replace or repair damaged parts. Use genuine parts only. Non-authorised parts may be dangerous and will invalidate the warranty.
WARNING! Keep all guards and holding screws in place, tight and in good working order. Check regularly for damaged parts. A guard
or any other part that is damaged must be repaired/replaced before the tool is next used.
9Locate polisher/sander in a suitable working area, keep area clean and tidy and free from unrelated materials. Ensure there is
adequate lighting.
9Keep the polisher/sander clean for best and safest performance.
9 Before each use check abrasive attachments for condition. If worn or damaged replace immediately.
9 Ensure there are no ammable or combustible materials near the work area.
Refer to
instruction
manual
Wear eye
protection
Wear ear
protection
Wear a mask Wear
protective
gloves
MS900PS | Issue 4 (SP) 10/10/17
Original Language Version
© Jack Sealey Limited
Recommended fuse rating
13 Amp
WARNING! Wear approved eye safety protection, ear defenders and, if dust is generated, respiratory protection.
9 Maintain correct balance and footing. Ensure the oor is not slippery and wear non-slip shoes.
9 Remove ill tting clothing. Remove ties, watches, rings, and other loose jewellery, and contain and/ or tie back long hair.
9Keep children and unauthorised persons away from the working area.
9Secure non-stable work piece with a clamp, vice or other adequate holding device.
9 Remove adjusting keys and wrenches from the machine and its vicinity before turning it on.
8DO NOT use equipment for any purpose other than that for which it is designed.
8DO NOT operate the polisher/sander if any parts are damaged or missing as this may cause failure or possible personal injury.
WARNING! DO NOT sand any materials containing asbestos.
8DO NOT switch the polisher/sander on whilst the head is in contact with the work piece and avoid unintentional starting.
8DO NOT get the polisher/sander wet or use in damp or wet locations or areas where there is condensation.
8DO NOT allow untrained persons to operate the polisher/sander.
8DO NOT operate the polisher/sander when you are tired, under the inuence of alcohol, drugs or intoxicating medication.
8DO NOT use the polisher/sander where there are ammable liquids, solids or gases such as paint solvents, etc.
8DO NOT leave the polisher/sander operating unattended.
8DO NOT carry the polisher/sander with your nger on the power switch.
8DO NOT pull the cord to remove the plug from the power supply.
9 Use a qualied person to lubricate and maintain the polisher/sander.
9 When not in use unplug from the mains power supply and store in a safe, dry, childproof area.
LEAD PAINT WARNING! Paint once contained lead as a traditional ingredient. Contact with the dust from the removal of such paint is
toxic and must therefore be avoided. The following action must be taken before using machine as a sander:
1. User must determine potential hazard relating to age of paint to be removed. (Modern paints do not have lead content).
2. DANGER! Keep all persons and pets away from the working area. The following are particularly vulnerable to the effects of lead
paint dust: Expectant women, babies and children.
3. We recommend personal protection by using the following safety items:
A) Paint Spray Respirator (Sealey ref. SSP1699) B) PE Coated Hooded Coverall (Sealey ref. SSP266). C) Latex Gloves
(Sealey ref. SSP24).
4. Take adequate measures to contain paint dust, akes and scrapings. Wear safety equipment, as in (3) above and thoroughly
clean all areas when task is complete.
5. Ensure the paint waste is disposed of in sealed bags or containers according to local regulations.
2. INTRODUCTION
Variable speed control for sanding and polishing. Speed varies from 1000 to 3000rpm. Alloy bevel gear head with composite motor housing.
Supplied with Ø170mm backing pad and side handle.
3. SPECIFICATIONS
Model no: ............................................................... MS900PS
Pad size: ................................................................. Ø170mm
Thread size: ........................................................ M14 x 2mm
No load speed:..............................................1000 - 3000rpm
Power:.........................................................................1300W
Supply:...........................................................................230V
Weight:.......................................................................... 3.8kg
Noise power: ..............................................................102Lwa
Noise pressure:............................................................ 91Lpa
Vibration:................................................................ 7.678m/s²
Uncertainty:..................................................................... 1.5k
4. CONTENTS
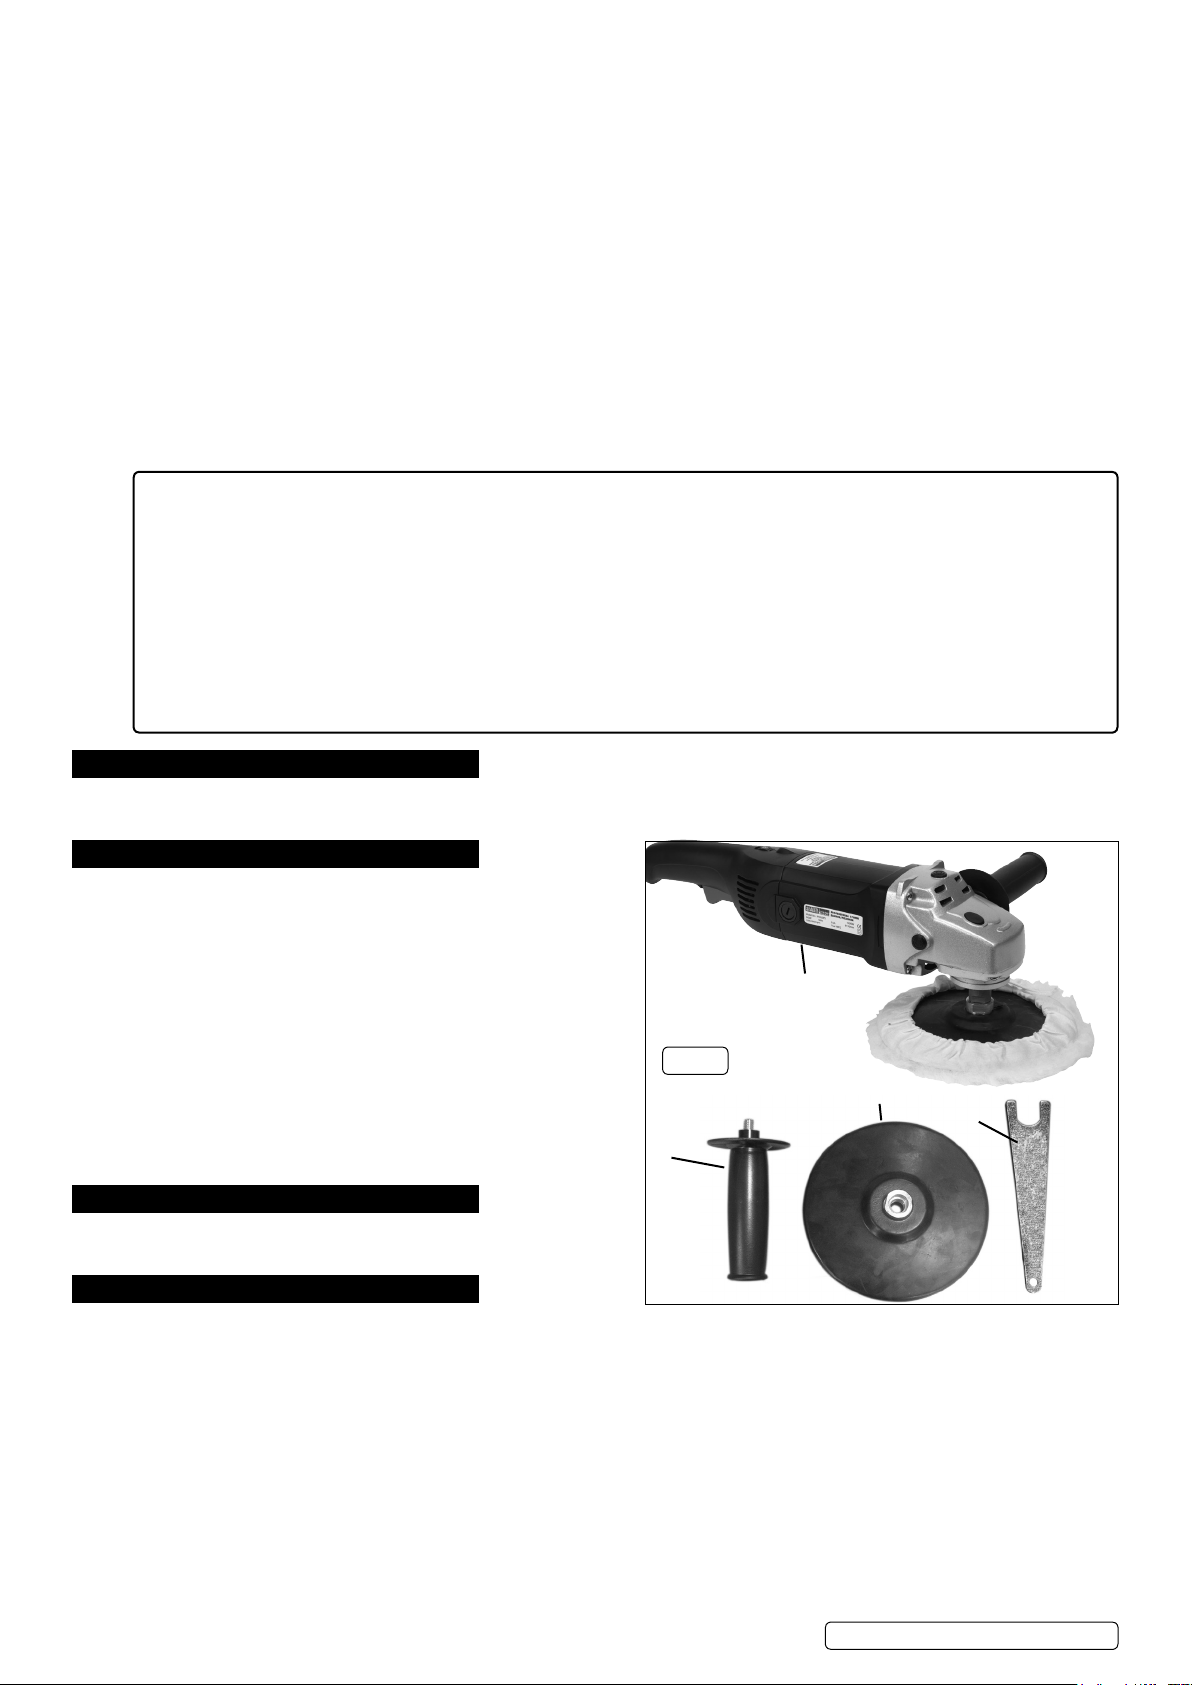
Refer to g.1
1: Polisher Unit, 2: Side Handle, 3: Pad, 4: Spanner.
5. ASSEMBLY
WARNING! Ensure unit is not plugged into mains before
attempting any assembly.
5.1. Attach the side handle (fig.1.2). Note: there is a mounting hole on either side and the top to suit the application and/or operator.
5.2. To attach the rubber pad:
Thread the rubber pad (fig.1.3) on shaft and tighten using spanner (fig.1.4) by holding shaft steady with locking button (fig.2).
5.3. To fit a sanding disc:
Select the grade of self adhesive sanding disc required, peel off the backing and centrally locate the disc onto the rubber pad.
5.4. To fit a polishing bonnet:
Fit the polishing bonnet over the secured rubber pad, using the pull cord, tighten the bonnet and tie a bow to secure, tuck the loose
ends of the bow neatly under the bonnet.
Fig.1
1
2
4
3
Original Language Version
© Jack Sealey Limited MS900PS | Issue 4 (SP) 10/10/17

6. OPERATION
WARNING! Ensure you read, understand and apply the safety instructions in Section 1.
6.1. Ensure the power control switch is NOT locked on before plugging into the mains.
6.2. Hold the polisher rmly with one hand on the handle grip and the other on the side handle. To select the required speed rotate the
speed selector switch (g.3.2) to the required speed 1 to 6.
Speed Settings: Range from 1000rpm - 3000rpm
6.3. To start the polisher press and hold down the safety lock button (g.3.1) and squeeze the trigger. When releasing the trigger, the
safety lock button will engage, preventing the polisher from being inadvertently started.
WARNING! The high speed settings are intended for sanding. If used for polishing an excessive amount of surface material may
be removed or if polishing at too high a speed the tool will burn through paintwork. For this reason it will not be necessary to use the
tool at a speed setting above 3 (2000rpm no load).
Note: As the rubber support disc is exible, when sanding it should not be used head on, but at an angle of approximately 10 to 20
degrees.
6.4. Contact your Sealey stockist for details of compound heads and lambs wool bonnets.
7. MAINTENANCE
WARNING! Before attempting any maintenance ensure the unit is unplugged from the mains power supply.
7.1. Keep the machine clean and dry. DO NOT use abrasives to clean the unit. Ensure all external head screws are tight.
7.2. Clean regularly by blowing a jet of compressed air through side vents to ensure motor ventilation is kept clear.
WARNING! Wear approved safety eye protection and, if necessary, respiratory protection.
Note. The following maintenance must only be carried out by a technically qualied person or an authorised Sealey service agent.
7.3. Check carbon brushes by removing each side screw (g.4). Check to see if the brushes are worn or cracked. If so, the brushes must
be replaced to avoid sparking and damage to the armature. Always change brushes as a pair. Use only genuine spare parts as these
are specically designed for the machine. Failure to do so may be dangerous and will invalidate your warranty.
7.4. After each 500 hours of use replace the gear head grease to prevent gear wear and possible drive failure.
Original Language Version
© Jack Sealey Limited
Sealey Group, Kempson Way, Suffolk Business Park, Bury St Edmunds, Suffolk. IP32 7AR
01284 757500 01284 703534 sales@sealey.co.uk www.sealey.co.uk
ENVIRONMENT PROTECTION
Recycle unwanted materials instead of disposing of them as waste. All tools, accessories and packaging should be sorted, taken to
a recycling centre and disposed of in a manner which is compatible with the environment. When the product becomes completely
unserviceable and requires disposal, drain any fluids (if applicable) into approved containers and dispose of the product and fluids
according to local regulations.
WEEE REGULATIONS
Dispose of this product at the end of its working life in compliance with the EU Directive on Waste Electrical and Electronic Equipment
(WEEE). When the product is no longer required, it must be disposed of in an environmentally protective way. Contact your local solid
waste authority for recycling information.
Note: It is our policy to continually improve products and as such we reserve the right to alter data, specifications and component parts without prior
notice.
Important: No Liability is accepted for incorrect use of this product.
Warranty: Guarantee is 12 months from purchase date, proof of which is required for any claim.
Fig.2 Fig.3
LOCKING
BUTTON
1
2
Fig.4
MS900PS | Issue 4 (SP) 10/10/17

WARNING! – Risk of Hand Arm Vibration Injury.
This tool may cause Hand Arm Vibration Syndrome if its use is not managed adequately.
This tool is subject to the vibration testing section of the Machinery Directive 2006/42/EC.
This tool is to be operated in accordance with these instructions.
Measured vibration emission value (a): .........7.678 m/s²
Uncertainty value (k):...........................1.5 m/s²
Please note that the application of the tool to a sole specialist task may produce a different average vibration emission. We recommend that a
specific evaluation of the vibration emission is conducted prior to commencing with a specialist task.
A health and safety assessment by the user (or employer) will need to be carried out to determine the suitable duration of use for each tool.
NB: Stated Vibration Emission values are type-test values and are intended to be typical.
Whilst in use, the actual value will vary considerably from and depend on many factors.
Such factors include; the operator, the task and the inserted tool or consumable.
NB: ensure that the length of leader hoses is sufficient to allow unrestricted use, as this also helps to reduce vibration.
The state of maintenance of the tool itself is also an important factor, a poorly maintained tool will also increase the risk of Hand Arm Vibration
Syndrome.
Health surveillance.
We recommend a programme of health surveillance to detect early symptoms of vibration injury so that management procedures can be
modified accordingly.
Personal protective equipment.
We are not aware of any personal protective equipment (PPE) that provides protection against vibration injury that may result from the
uncontrolled use of this tool. We recommend a sufficient supply of clothing (including gloves) to enable the operator to remain warm and dry
and maintain good blood circulation in fingers etc. Please note that the most effective protection is prevention, please refer to the Correct Use
and Maintenance section in these instructions. Guidance relating to the management of hand arm vibration can be found on the HSC website
www.hse.gov.uk - Hand-Arm Vibration at Work.
Table of contents
Other Sealey Sander manuals

Sealey
Sealey DAS151 User manual

Sealey
Sealey SM750 User manual

Sealey
Sealey SA356 User manual

Sealey
Sealey CP20VRPX User manual

Sealey
Sealey SA1003 User manual

Sealey
Sealey SA722.V3 User manual

Sealey
Sealey CP108VSPBO User manual

Sealey
Sealey SA18/S.V2 User manual

Sealey
Sealey RP1500 User manual

Sealey
Sealey CP108VCPBO User manual

Sealey
Sealey SM100.V2 User manual

Sealey
Sealey ER1700P User manual

Sealey
Sealey SA802.V2 User manual

Sealey
Sealey SA1003 User manual

Sealey
Sealey SM100 User manual

Sealey
Sealey ER230P User manual

Sealey
Sealey ER1700P.V2 User manual

Sealey
Sealey SV20 Series User manual

Sealey
Sealey CP108VCP User manual

Sealey
Sealey CP108VCPBO User manual


