manuals.online logo
Brands
  1. Home
  2. •
  3. Brands
  4. •
  5. Sealey
  6. •
  7. Sander
  8. •
  9. Sealey SM100.V2 User manual

Sealey SM100.V2 User manual

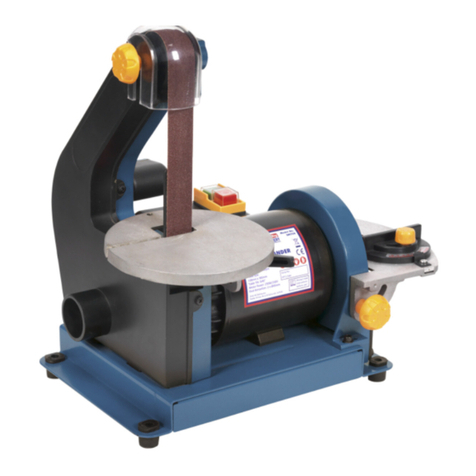
100MM POWER BELT SANDER/LINISHER
MODEL NO: SM100.V2
Thank you for purchasing a Sealey product. Manufactured to a high standard, this product will, if used according to these instructions,
and properly maintained, give you years of trouble free performance.
IMPORTANT: PLEASE READ THESE INSTRUCTIONS CAREFULLY. NOTE THE SAFE OPERATIONAL REQUIREMENTS, WARNINGS & CAUTIONS. USE
THE PRODUCT CORRECTLY AND WITH CARE FOR THE PURPOSE FOR WHICH IT IS INTENDED. FAILURE TO DO SO MAY CAUSE DAMAGE AND/OR
PERSONAL INJURY AND WILL INVALIDATE THE WARRANTY.
1. SAFETY
1.1. ELECTRICAL SAFETY
WARNING! It is the user’s responsibility to check the following:
Check all electrical equipment and appliances to ensure that they are safe before using. Inspect power supply leads, plugs and
all electrical connections for wear and damage. Sealey recommend that an RCD (Residual Current Device) is used with all electrical
products. You may obtain an RCD by contacting your local Sealey stockist.
If the product is used in the course of business duties, it must be maintained in a safe condition and routinely PAT (Portable
Appliance Test) tested.
Electrical safety information, it is important that the following information is read and understood.
Ensure that the insulation on all cables and on the appliance is safe before connecting it to the power supply.
Regularly inspect power supply cables and plugs for wear or damage and check all connections to ensure that they are secure.
IMPORTANT: Ensure that the voltage rating on the appliance suits the power supply to be used and that the plug is tted with the
correct fuse - see fuse rating in these instructions.
8DO NOT pull or carry the appliance by the power cable.
8DO NOT pull the plug from the socket by the cable.
8DO NOT use worn or damaged cables, plugs or connectors. Ensure that any faulty item is repaired
or is replaced immediately by a qualied electrician.
This product is tted with a BS1363/A 13 Amp 3 pin plug.
If the cable or plug is damaged during use, switch o󰀨 the electricity supply and remove from use.
Ensure that repairs are carried out by a qualied electrician.
Replace a damaged plug with a BS1363/A 13 Amp 3 pin plug. If in doubt contact a qualied electrician.
a) Connect the GREEN/YELLOW earth wire to the earth terminal ‘E’.
b) Connect the BROWN live wire to the live terminal ‘L’.
c) Connect the BLUE neutral wire to the neutral terminal ‘N’.
Ensure that the cable outer sheath extends inside the cable restraint and that the restraint is tight.
Sealey recommend that repairs are carried out by a qualied electrician.
1.2. GENERAL SAFETY
9Wear approved safety goggles, ear defenders, mask and safety shoes.
9Remove ill tting clothing. Remove ties, watches, rings, and other loose jewellery, and contain long hair.
9Use sander in a suitable work area, keep area clean, tidy and free from unrelated materials, and ensure adequate lighting.
9Keep children and visitors away from the work area.
9Maintain correct balance and footing. DO NOT over-reach and ensure the oor is not slippery. Wear non-slip shoes.
8DO NOT operate the sander when you are tired or under the inuence of alcohol, drugs or intoxicating medication.
9Disconnect the sander from the mains power before changing accessories, making adjustments, servicing or performing any
maintenance.
9 Read the manual before using the machine. Learn the machine’s limitations and specic hazards to minimise the possibility of
accidents and injury.
9 Use common sense and exercise caution when using the machine.
8DO NOT use the machine outdoors or expose to damp or rain.
8DO NOT modify the machine or use it in any other way except the tasks it was designed for. Never use the machine exceeding the
limits shown in the specication.
9 Use machine in good light and clean conditions with the correct space around it as dened in the Installation section.
9 Before starting the machine make sure that all safety guards are in their active positions and check their function.
8DO NOT use the machine when any safety device is suspended or removed. If any defect is noticed stop using the machine.
9Maintain the machine in top condition according to the Maintenance Section.
9 Before using the machine check for damaged parts. Check for damage to, alignment and operation of parts. Any damaged guard or
any other part should be properly repaired or replaced.
9 Avoid unintentional starting, ensure the switch is in the o󰀨 position before plugging in the mains plug. In the event of power failure,
switch the machine o󰀨.
9 Remove adjusting keys/spanners before using the machine. Tools or scrap pieces can be ejected at high speed.
9Only use recommended accessories.
9Secure the workpiece using clamps etc when practicable.
Refer to
instruction
manual
Wear eye
protection
No reaching in Wear a mask Wear ear
protection
Wear safety
footwear
Recommended fuse rating
13 Amp
Original Language Version
© Jack Sealey Limited SM100.V2 Issue:2 22/07/2020
9Feed the workpiece against the direction of rotation of the belt. Feeding from the other direction will cause the workpiece to be thrown
out at high speed.
8DO NOT force the workpiece on the machine.
8DO NOT over reach, loss of balance could result in falling onto the moving machine.
8DO NOT stand on the machine.
8DO NOT leave the machine until it has come to a complete stop or leave the machine running unattended.
9Make the machine secure against accidental start up by untrained persons, children etc. by using locks.
9Always use in well ventilated areas and provide for proper dust removal using a dust collection system.
1.3. OPERATIONAL SAFETY
8DO NOT use machine until it is assembled and installed according to instructions.
9 Obtain training from a qualied person before using.
9 Use with correctly installed/operating guards in place.
9Check belt for wear and tension and correct installation. If the belt is damaged or if it can not be tensioned properly, replace it.
9Ensure belt is tracking properly.
9 Keep arms, hands and ngers away from abrasive surfaces.
9Avoid awkward stance, operation and hand positions which could cause contact with the sanding surface.
8DO NOT wear gloves or hold the workpiece with a rag.
8DO NOT start the machine with the workpiece against the sanding surface.
8DO NOT start the machine until all objects (tools, scrap pieces etc.) have been removed from the machine.
9Maintain the minimum distance between the sanding surface and the workpiece rests and backstop.
8DO NOT sand workpieces shorter than 18cm (7”) and thinner than 0.8mm (1/32”).
9Properly support long or wide workpieces.
9 Disconnect machine from mains supply and clean table/work area before leaving the machine. Lock the switch in the o󰀨 position to
prevent unauthorised use.
9Functional tests must be carried out before using the machine, including condition of belt, running speed and stop buttons.
2. INTRODUCTION
Suitable for metal and fabrication workshops. Robust construction designed for everyday use. Supplied with high quality abrasive belt. Graphite
plate on the platen to reduce belt friction. Powerful 1500W 230V motor with IP54 protection. No-volt release switch tted to aid safe operation.
Bench or oor mounting (stand supplied).
3. SPECIFICATION
MODEL NO.......................................................... SM100.V2
Belt size ..........................................................100 x 1220mm
Belt speed.................................................................... 19m/s
Flat grinding surface .........................................100 x 280mm
Motor power.................................................... 1500W - 230V
No load speed..........................................................2840rpm
CONSUMABLES:
BELTS:
SB0012 ...........................................SM100 x 1220mm 80Grit
SB0013 .........................................SM100 x 1200mm 100Grit
4. FEATURES
1 Sanding belt cover
2 Pedestal bolts
3 Tool rest
4 Dust deector
5 Sanding belt
6 Dust receiver/extraction port
7 Electric motor ventilation
8 Pedestal
8 A Base
9 Belt tracking adjustment knob
10 Emergency switch
11 Guard
12 Cover xing bolt
13 Dust extraction port
14 Cover handles g.1
Original Language Version
© Jack Sealey Limited SM100.V2 Issue:2 22/07/2020
5. ASSEMBLY
Refer to parts diagram
5.1. Bolt pedestal to base.
5.2. With assistance from at least 2 other persons lift the machine onto the pedestal (if it is being used) and bolt into position, g 1.2.
5.3. Attach dust receiver, g.1.6. with single screw.
5.4. Attach tool rest, g.1.3, refer to section 7.3 for adjustment.
5.5. Attach guard, g.1.11. Ensure guard bolts and cover xing bolt, g.1.12 are tight before use.
6. INSTALLATION
6.1. Site machine in an area with good ventilation and adequate lighting.
6.2. The machine should be xed to a oor, or a bench, strong enough to take the weight of the machine, with 4 M10 bolts.
6.3. Minimum installation distance is 2m in front, 1.5m behind and 1m at each side of the machine.
6.4. The machine must be connected to a dust extraction system (not supplied).
7. OPERATION
WARNING! Functional tests must be carried out before using the machine, including condition of belt, running speed and stop buttons.
7.1. ADJUST BELT TRACKING refer to g.2
7.1.1. Loosen hex screw and twist knob clockwise or anticlockwise to adjust the sanding belt’s tracking. Re-tighten the hex screw.
7.2. FLAT TABLE LINISHING (TOP TABLE) Refer to g.3
7.2.1. Hold the workpiece parallel to the belt, place against the guard and grip securely.
7.3. CURVED SANDING WHEEL Refer to g.4
7.3.1. Adjust tool rest by loosening the 2 adjustment screws, so that the gap between the belt and the tool rest is no more than 2mm.
Re-tighten screws. Grip workpiece securely. Ensure workpiece is kept square to the belt.
7.4. NO VOLT RELEASE SWITCH refer to g’s 5 & 6
7.4.1. Lift the clip on top of the switch housing, to let down the door
to access the On/O󰀨 switch if the stop button has been used
to turn the machine o󰀨.
g.2
g.3
g.4
g.5 g.6
Original Language Version
© Jack Sealey Limited SM100.V2 Issue:2 22/07/2020
Sealey Group, Kempson Way, Suffolk Business Park, Bury St Edmunds, Suffolk. IP32 7AR
01284 757500 01284 703534 sales@sealey.co.uk www.sealey.co.uk
ENVIRONMENT PROTECTION
Recycle unwanted materials instead of disposing of them as waste. All tools, accessories and packaging should be sorted, taken to
a recycling centre and disposed of in a manner which is compatible with the environment. When the product becomes completely
unserviceable and requires disposal, drain any fluids (if applicable) into approved containers and dispose of the product and fluids
according to local regulations.
Note: It is our policy to continually improve products and as such we reserve the right to alter data, specifications and component parts without prior
notice. Please note that other versions of this product are available. If you require documentation for alternative versions, please email or call
our technical team on technical@sealey.co.uk or 01284 757505.
Important: No Liability is accepted for incorrect use of this product.
Warranty: Guarantee is 12 months from purchase date, proof of which is required for any claim.
WEEE REGULATIONS
Dispose of this product at the end of its working life in compliance with the EU Directive on Waste Electrical and Electronic Equipment
(WEEE). When the product is no longer required, it must be disposed of in an environmentally protective way. Contact your local solid
waste authority for recycling information.
8. MAINTENANCE
WARNING! Ensure machine is switched o󰀨 and disconnected from the mains supply, before carrying out any maintenance.
8.1. CHANGING THE BELT Refer to g.7
8.1.1. Remove dust receiver, g.1.6.
8.1.2. Loosen cover xing bolt, g.1.12, and hinge open cover.
8.1.3. Pull lever fully forward to loosen belt tension, g.2.
8.1.4. Slide o󰀨 used belt and slide on new belt, observing the direction of travel.
8.1.5. Align the belt so that it is perpendicular with the drive wheel and the driven wheel, see g.8.
8.1.6. Push the lever back to re-tighten the belt.
8.1.7. Close the cover and secure the cover xing bolt, g.1.12.
8.1.8. Ret the dust receiver, g.1.6.
8.2. Check tightness of all xings before use, including work rests.
8.3. CLEANING
8.3.1. Keep machine and work area clean at all times, especially the motor air inlets.
9. TROUBLESHOOTING
PROBLEM CAUSE SOLUTION
Motor will not run 1. Defective On/O󰀨 switch
2. Motor unserviceable
1. Replace switch
2. Replace motor - professional repair only
Machine slows down when sanding 1. Drive belt too tight
2. Applying too much pressure to workpiece, onto belt
1. Decrease belt tension
2. Ease up on pressure
Sanding belt runs o󰀨 the pulleys 1. Belt not tracking properly 1. Adjust belt tracking. See section 7.1.
g.7 g.8
Original Language Version
© Jack Sealey Limited SM100.V2 Issue:2 22/07/2020

This manual suits for next models

1

Other Sealey Sander manuals

Sealey DAS152PS User manual

Sealey

Sealey DAS152PS User manual

Sealey SA7/S User manual

Sealey

Sealey SA7/S User manual

Sealey SA802.V2 User manual

Sealey

Sealey SA802.V2 User manual

Sealey GSA04 User manual

Sealey

Sealey GSA04 User manual

Sealey MA20.V2 User manual

Sealey

Sealey MA20.V2 User manual

Sealey MS900PS User manual

Sealey

Sealey MS900PS User manual

Sealey Power Tools SA19/S.V2 User manual

Sealey

Sealey Power Tools SA19/S.V2 User manual

Sealey SM31.V3 User manual

Sealey

Sealey SM31.V3 User manual

Sealey Quality MACHINERY SM15.V2 User manual

Sealey

Sealey Quality MACHINERY SM15.V2 User manual

Sealey SA17/S.V2 User manual

Sealey

Sealey SA17/S.V2 User manual

Sealey SA1003 User manual

Sealey

Sealey SA1003 User manual

Sealey SA354 Firmware update

Sealey

Sealey SA354 Firmware update

Sealey SA720.V2 User manual

Sealey

Sealey SA720.V2 User manual

Sealey CP108VDSBO User manual

Sealey

Sealey CP108VDSBO User manual

Sealey MS800PS User manual

Sealey

Sealey MS800PS User manual

Sealey MA110AS User manual

Sealey

Sealey MA110AS User manual

Sealey SM14.V4 User manual

Sealey

Sealey SM14.V4 User manual

Sealey CP20VRP User manual

Sealey

Sealey CP20VRP User manual

Sealey SA22.V4 User manual

Sealey

Sealey SA22.V4 User manual

Sealey SM14.V5 User manual

Sealey

Sealey SM14.V5 User manual

Sealey SA802 User manual

Sealey

Sealey SA802 User manual

Sealey SM1214 User manual

Sealey

Sealey SM1214 User manual

Sealey DAS150T User manual

Sealey

Sealey DAS150T User manual

Sealey SA35 User manual

Sealey

Sealey SA35 User manual

Popular Sander manuals by other brands

Meec tools 210-258 operating instructions

Meec tools

Meec tools 210-258 operating instructions

Makita DSL801 instruction manual

Makita

Makita DSL801 instruction manual

Perfomance Tool W50089 owner's manual

Perfomance Tool

Perfomance Tool W50089 owner's manual

Virutex LRT84H operating instructions

Virutex

Virutex LRT84H operating instructions

Baileigh OS-2424 Operator's manual

Baileigh

Baileigh OS-2424 Operator's manual

Zgonc Yellow PROFILINE YPL710 manual

Zgonc

Zgonc Yellow PROFILINE YPL710 manual

Festool ETS 150/3 EQ Original operating manual/spare parts list

Festool

Festool ETS 150/3 EQ Original operating manual/spare parts list

Grizzly G1183 parts list

Grizzly

Grizzly G1183 parts list

Makita BO6050 instruction manual

Makita

Makita BO6050 instruction manual

jcb 21-RO125 Original instructions

jcb

jcb 21-RO125 Original instructions

Craftsman 315.115970 Operator's manual

Craftsman

Craftsman 315.115970 Operator's manual

Porter-Cable 503 instruction manual

Porter-Cable

Porter-Cable 503 instruction manual

GÜDE GUS 1100 Translation of the original instructions

GÜDE

GÜDE GUS 1100 Translation of the original instructions

Makita 9031 instruction manual

Makita

Makita 9031 instruction manual

Graphite 59G324 Translation of the original instructions

Graphite

Graphite 59G324 Translation of the original instructions

Metabo BAE 75 Original instructions

Metabo

Metabo BAE 75 Original instructions

Ryobi ROS300 Original instructions

Ryobi

Ryobi ROS300 Original instructions

Ferm BSM1021 Original instructions

Ferm

Ferm BSM1021 Original instructions

manuals.online logo
manuals.online logoBrands
  • About & Mission
  • Contact us
  • Privacy Policy
  • Terms and Conditions

Copyright 2025 Manuals.Online. All Rights Reserved.