manuals.online logo
Brands
  1. Home
  2. •
  3. Brands
  4. •
  5. Sealey
  6. •
  7. Spotlight
  8. •
  9. Sealey AK437.V2 User manual

Sealey AK437.V2 User manual

INSTRUCTIONS FOR:
RECHARGEABLE SPOTLIGHT
5,000,000 CANDLE POWER
Model: AK437.V2
Thank you for purchasing a Sealey Product. Manufactured to a high standard this product
will, if used according to these instructions and properly maintained, give you years of
trouble free performance.
IMPORTANT: PLEASE READ THESE INSTRUCTIONS CAREFULLY. NOTE
THE SAFE OPERATIONAL REQUIREMENTS, WARNINGS AND CAUTIONS.
USE THIS PRODUCT CORRECTLY AND WITH CARE FOR THE PURPOSE
FOR WHICH IT IS INTENDED. FAILURE TO DO SO MAY CAUSE DAMAGE
AND/OR PERSONAL INJURY AND WILL INVALIDATE THE WARRANTY.
PLEASE KEEP INSTRUCTIONS SAFE FOR FUTURE USE.
1. SAFETY INSTRUCTIONS
1.1. GENERAL
!Ensure the spotlight is correctly charged before initial use.
!When fully charged, spotlight must not be used for more than 20 minutes
continuously. To do so may damage the lamp.
"WARNING! The lens becomes very hot during operation.
#DO NOT cover or block the lens during use.
#DO NOT turn the spotlight on when it is being re-charged.
#DO NOT shine directly into your, other person’s or animal’s eyes.
#DO NOT stand the spotlight near any surface or item that may be adversely
effected by the heat emitted by the lens.
#DO NOT allow children to use the spotlight.
#DO NOT handle or move the spotlight whilst it is being charged.
#DO NOT use the spotlight if you suspect that the battery or the spotlight
casing is damaged.
#DO NOT handle lamp bulb with your fingers. Use a soft lint-free cloth.
!Ensure that correctly rated battery and bulb are used for replacements.
!When not in use store the spotlight in a safe, dry, childproof location.
AK437.V2 - 1 - 300707
1.2. BATTERY SAFETY
DANGER! BE AWARE, LEAD-ACID BATTERIES MAY BE DANGEROUS IF
NOT HANDLED WITH CARE AND ACCORDING TO THESE INSTRUCTIONS.,
!Before exposing the batteries for replacement, remove personal metallic
items such as rings, bracelets, necklaces and watches. A lead-acid
battery can produce a short-circuit current high enough to weld a ring
to metal, which would cause severe burns.
#DO NOT smoke or allow a spark or flame in the vicinity of batteries.
!Ensure the charger is switched off and disconnected from the
spotlight before attempting to open the lamp unit.
!If the batteries’ terminals are corroded or dirty, clean them before
replacing batteries.
#DO NOT dis-assemble the batteries for any reason.
"WARNING! DO NOT allow metal tools to touch both battery terminals
simultaneously. Arcing or short circuit will result.
#DO NOT allow battery wires to touch each other or to make contact
with any other metallic part.
#DO NOT leave batteries in a discharged state, recharge batteries
immediately. If the spotlight is not in use, recharge the batteries every
three months.
#Dispose of the old batteries in accordance with local authority battery
regulations. DO NOT dispose of with regular refuse.
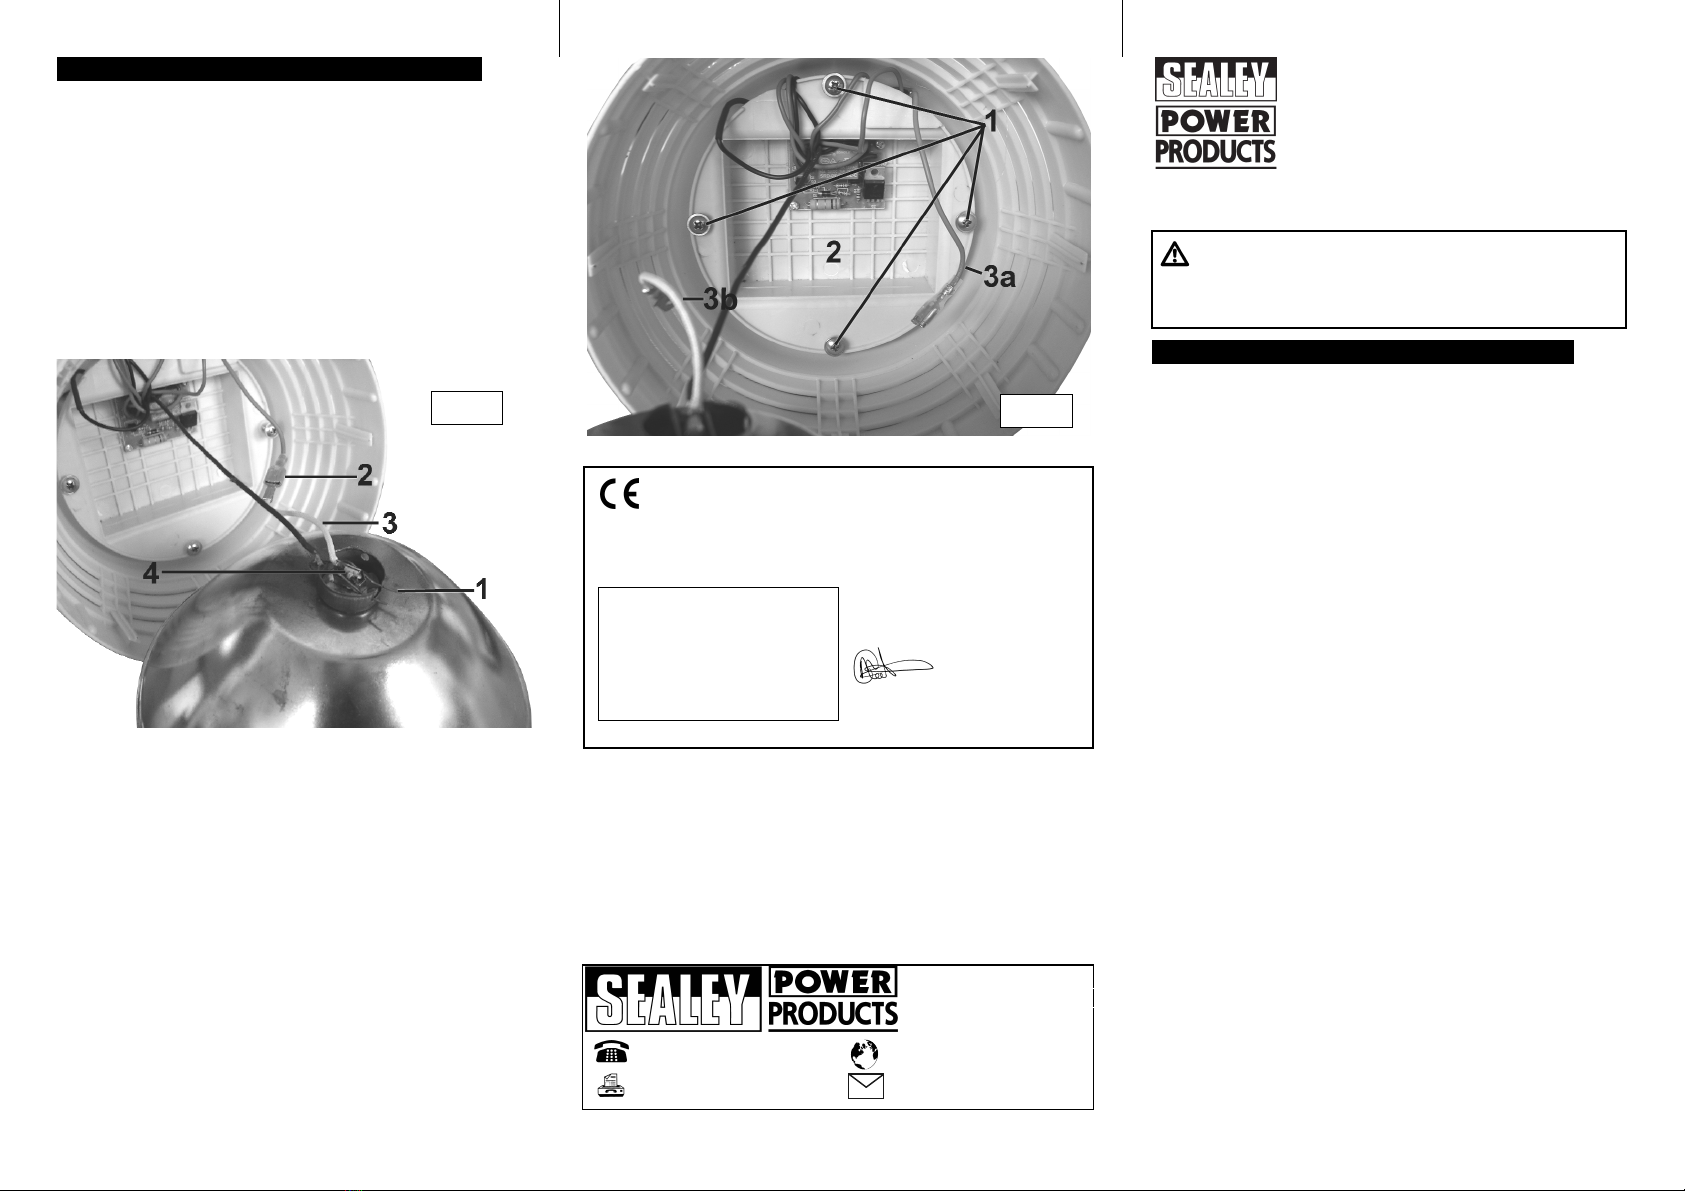
4.1. CHANGING THE SPOTLIGHT BULB
"WARNING! Ensure the spotlight is turned off and the lens has cooled
prior to changing the bulb.
1. Undo the spotlight hood (fig.1.A) by turning it anti-clockwise.
2. Carefully lift the reflector assembly revealing the spring clip (fig.5.1)
and the cable connector (fig.5.2).
3. Disconnect cable (fig.5.3).
4. Remove the spring clip (fig.5.1).
5. Pull bulb (fig.5.4) outward from the reflector.
6. Hold the new bulb with a lint free cloth, (do not handle the bulb),
install by reversing the above procedure.
"WARNING! Beware of causing a short circuit.
4. MAINTENANCE
4.2. CHANGING THE BATTERIES
""WARNING! Ensure you read, understand and apply safety
instructions relating to the battery before changing.
1. Undo the spotlight hood (fig.1.A) by turning it anti-clockwise.
2. Carefully lift the hood and reflector assembly revealing the four
battery cover retaining screws (fig.6.1)
3. Disconnect wire (fig.6.3a) from bulb cable (fig.6.3b) .
"WARNING! Beware of causing a short circuit.
4 Undo the four retaining screws.
5. Carefully raise the battery cover (fig.6.2).
6. Carefully remove battery terminal wires, noting cable connections,
then remove both batteries.
7. Replace with genuine Sealey batteries and install by reversing the
above procedure.
Notes: a) Take care not to pinch or misconnect any wires.
b) When replacing battery cover make sure that charging jack PCB
is slotted into supports before replacing screws.
8. Dispose of old batteries in accordance with local authority lead-
acid battery regulations. DO NOT dispose of with regular refuse.
1
NOTE: It is our policy to continually improve products and as such we reserve
the right to alter data, specifications and component parts without prior notice.
IMPORTANT: No liability is accepted for incorrect use of this equipment.
WARRANTY: Guarantee is 12 months from purchase date, proof of which
will be required for any claim.
INFORMATION: For a copy of our latest catalogue and promotions call us
on 01284 757525 and leave your full name and address, including postcode.
For Jack Sealey Ltd. Sole importer into the UK of Sealey Power Products.
Rechargeable Spotlight
Model AK437.V2
73/23/EEC Low Voltage Directive
89/336/EEC EMC Directive
2002/95/EC RoHS Directive
2002/96/EC WEEE Directive
30th July 2007
Declaration of Conformity
Signed by Mark Sweetman
We, the sole importer into the UK, declare that the products listed here are in
conformity with the following standards and directives. The construction files
for these products are held by the Manufacturer and may be inspected, by a
national authority, upon request to Jack Sealey Ltd.
01284 757500
01284 703534 sales@sealey.co.uk
Sole UK Distributor
Sealey Group,
Bury St. Edmunds, Suffolk.
www.sealey.co.uk
Web
email
fig.6
fig.5
3.1. OPERATION
""WARNING! Ensure you read and understand safety instructions
before use.
Reminder: This spotlight is designed for intermittent use only.
Continuous use may damage the unit.
1. Charge the batteries before use.
IMPORTANT: Turn off spotlight while charging. Failure to do so
will damage the charger plug/vehicle plug.
2. Turn spotlight ‘On’ and ‘Off’ by the rocker switch (fig.3.A) on the main
body.
3. The spotlight has a fixed carrying handle and two adjustable
standing supports (fig.1.C).
3.2. BATTERY CHARGING
""WARNING! Ensure you read, understand and apply safety
instructions relating to the batteries and charger before use.
3.2.1. Charger plug
1. Plug the charger adaptor (fig.2) into the jack inlet (fig.3.B) on the
opposite side to the switch on the spotlight body and stand the
spotlight in a safe location ready to charge.
2. Ensure the spotlight is turned ‘Off’ and then plug charger into the
mains supply.
3. Allow approximately 20 hours (approx.) for the initial charge and 16
hours (approx.) for susequent charges. When full charge has been
reached, switch off the mains supply and unplug the charger. Unplug
the charger adapter (fig.2) from the spotlight. The spotlight may now
be used.
4. Store the charger in a safe, dry location.
Notes: a) Fully charged batteries will last for approximately 60 minutes.
b) DO NOT fully discharge the batteries before recharging.
3.2.2. Vehicle plug
1. Ensure spotlight is turned ‘Off’ and then plug the 12 volt vehicle
plug adaptor (fig.4) into the jack inlet on the spotlight body. Stand
the spotlight in a safe location ready to charge.
2. Insert plug into vehicle cigarette lighter socket (12V). Allow
approximately 20 hours (approx.) for the initial charge and 16 hours
(approx.) for subsequent charges.
3. When fully charged, unplug the adaptor from the vehicle socket and
from the spotlight before turning the spotlight on.
4. Store the adaptor in a safe, dry location.
NOTE: Charging the spotlight from a 12 volt vehicle socket will drain
the vehicle battery, unless the engine is running.
2. INTRODUCTION & SPECIFICATION
2.1. INTRODUCTION
Weatherproof composite spotlight with carry handle. Integral stand
keeps lens and battery case off the floor and permits light to be
directed where it is needed. Ø170mm Lens with halogen bulb
produces 5-million candle power of intense white light and is suitable
for a variety of industrial, domestic and leisure applications. Supplied
with two sealed heavy-duty batteries, in-vehicle charger and 230 -
12Volt battery charger pack.
Weight . . . . . . . . . . . . . .3.5kg Charge Time (approx.) . .16hrs
Lens Diameter . . . . . . .170mm Usage Time (approx.) . . .60min
Bulb Type . . . . . .H3 6V 150W Cell Type . . . . . . . . .2x(6V4Ah)
1.3. ELECTRICAL SAFETY.
USE ONLY THE SUPPLIED CHARGER PLUG FOR CONNECTING
SPOTLIGHT TO THE POWER SUPPLY.
ONLY USE THE SUPPLIED ADAPTOR FOR CONNECTING TO A
VEHICLE 12V SOCKET.
"" WARNING! It is the user’s responsibility to read, understand and comply
with the following electrical instructions:
You must ensure the risk of electric shock is minimised by the installation of
appropriate safety devices. An RCCB (Residual Current Circuit Breaker)
should be incorporated in the main distribution board. We also recommend
that an RCD (Residual Current Device) is used with all electrical products,
particularly portable equipment which is plugged into an electrical supply not
protected by an RCCB.
You must also read and understand the following instructions concerning
electrical safety.
1.3.1. The Electricity At Work Act 1989 requires all portable electrical
appliances, if used on business premises, to be tested by a qualified
electrician, using a Portable Appliance Tester (PAT), at least once a year.
1.3.2. The Health & Safety at Work Act 1974 makes owners of
electrical appliances responsible for the safe condition of the appliance
and the safety of the appliance operator. If in any doubt about electrical
safety, contact a qualified electrician.
1.3.3. You must ensure that you:
!Inspect the charger plug, cable and connector for wear and damage to
ensure items are safe before connecting to the mains power supply.
If worn or damaged DO NOT use.
!Check cables are always protected against short circuit and overload.
!Important: Check that the voltage marked on the charger plug is the
same as the power supply to be used.
!Uncoil the cable between charger and the spotlight.
#DO NOT pull the charger plug from the mains socket by the lead.
#DO NOT use any other type of charger with this product.
#DO NOT place the connector into any area of the spotlight except
the correct jack inlet socket.
#DO NOT try to take the charger plug apart.
#DO NOT use the charger plug to charge or power any other electrical item.
#DO NOT get the charger wet, or use in wet, damp conditions (for
indoor use only).
"WARNING! NEVER substitute a standard 13 amp 3 pin plug, or any
other type of plug, for the charger plug.
fig.4
A
B
WEEE REGULATIONS
Dispose of this product
at the end of its working
life in compliance with
the EU Directive on
Waste Electrical and
Electronic Equipment.
AK437.V2 - 1 - 300707
3. OPERATION
fig.1
C
fig.2
fig.3

Other Sealey Spotlight manuals

Sealey AK436.V3 User manual

Sealey

Sealey AK436.V3 User manual

Sealey ML2 User manual

Sealey

Sealey ML2 User manual

Sealey LED438 User manual

Sealey

Sealey LED438 User manual

Sealey Power Products LED437 User manual

Sealey

Sealey Power Products LED437 User manual

Sealey LED140 User manual

Sealey

Sealey LED140 User manual

Sealey AK438.V2 User manual

Sealey

Sealey AK438.V2 User manual

Sealey LED433 User manual

Sealey

Sealey LED433 User manual

Sealey LED438 User manual

Sealey

Sealey LED438 User manual

Sealey AK438.V2 User manual

Sealey

Sealey AK438.V2 User manual

Sealey Power Products LED436.V2 User manual

Sealey

Sealey Power Products LED436.V2 User manual

Sealey AK437.V2 User manual

Sealey

Sealey AK437.V2 User manual

Sealey AK437.V3 User manual

Sealey

Sealey AK437.V3 User manual

Sealey LED436 User manual

Sealey

Sealey LED436 User manual

Sealey LED140 User manual

Sealey

Sealey LED140 User manual

Sealey wl12w User manual

Sealey

Sealey wl12w User manual

Sealey AK435.V3 User manual

Sealey

Sealey AK435.V3 User manual

Sealey AK436.V2 User manual

Sealey

Sealey AK436.V2 User manual

Sealey LED439 User manual

Sealey

Sealey LED439 User manual

Popular Spotlight manuals by other brands

Renkforce 1521798 operating instructions

Renkforce

Renkforce 1521798 operating instructions

VIPOW URZ0037 owner's manual

VIPOW

VIPOW URZ0037 owner's manual

Prolycht ORION 300 user manual

Prolycht

Prolycht ORION 300 user manual

Paradise Datacom GL28560 quick start guide

Paradise Datacom

Paradise Datacom GL28560 quick start guide

Stanley SL5HS instruction manual

Stanley

Stanley SL5HS instruction manual

TECH LIGHT ST-3327 user manual

TECH LIGHT

TECH LIGHT ST-3327 user manual

ARRI ARRISUN 5 operating instructions

ARRI

ARRI ARRISUN 5 operating instructions

Unex 180-332-70 operating manual

Unex

Unex 180-332-70 operating manual

Stagg SLI FLATSET1 user manual

Stagg

Stagg SLI FLATSET1 user manual

Vector SL3AKV instruction manual

Vector

Vector SL3AKV instruction manual

M&M EFESO instruction sheet

M&M

M&M EFESO instruction sheet

DTS XR2000 SPOT CMY user manual

DTS

DTS XR2000 SPOT CMY user manual

thomann VARYTEC Hero Wash 300 FC user manual

thomann

thomann VARYTEC Hero Wash 300 FC user manual

American DJ FS-1000/HTI User instructions

American DJ

American DJ FS-1000/HTI User instructions

CY Lighting AILISI-1060 user manual

CY Lighting

CY Lighting AILISI-1060 user manual

Brinkmann Qbeam Owner's manual & operating instructions

Brinkmann

Brinkmann Qbeam Owner's manual & operating instructions

IKEA OMLOPP Assembly instructions

IKEA

IKEA OMLOPP Assembly instructions

BETOPPER Spot Light user manual

BETOPPER

BETOPPER Spot Light user manual

manuals.online logo
manuals.online logoBrands
  • About & Mission
  • Contact us
  • Privacy Policy
  • Terms and Conditions

Copyright 2025 Manuals.Online. All Rights Reserved.