Sealite POSEIDON-1750 Supplement

Version 1.5
POSEIDON-1750
Ocean Buoy
Installation & Service Manual


Latest products and information available at www.sealite.com
3
POSEIDON-1750 Ocean Buoy
Table of Contents
Introduction..........................................................................................Page 4
Sealite Buoy Division..........................................................................Page 4
Why Choose Polyethylene Buoys? ...................................................Page 4
Mooring Requirements & Regulations ..............................................Page 4
POSEIDON-1750 Ocean Buoy ............................................................Page 5
ProductFeatures&TechnicalSpecications ..............................Page 5
Product Components...................................................................Page 7
Assembly Instructions .................................................................Page 8
Mooring Assembly Instructions..................................................Page 10
Mooring Diagram.......................................................................Page 11
Marine Buoy Maintenance ................................................................Page 12
Sealite Buoy Warranty ......................................................................Page 13
Version No. Description Date Approved
1.0 Manual Launch July 2009 K. Paton
1.1 Individual Manual Nov 2009 A. Dixon
1.2 Logo and Warranty Update July 2010 K. Paton
1.3 Update: Spec Table May 2012 J. Dore
1.4 Breather Unit September 2013 P. Rainey
1.5 Delete back page,spec and warranty statement December 2018

Latest products and information available at www.sealite.com
4
POSEIDON-1750 Ocean Buoy
Introduction
Congratulations! By choosing to purchase a Sealite Buoy, you have become the
owner of one of the most advanced rotationally-moulded polyethylene marine buoys
in the world.
Sealite Pty Ltd has been manufacturing buoys for over 25 years, and particular care has been taken to
ensure your buoy gives years of service.
As a commitment to producing the highest quality products for our customers, Sealite has been
independentlycertiedascomplyingwiththerequirementsofISO9001:2008qualitymanagement
system.
By taking a few moments to browse through this booklet, you will become familiar with the versatility of
your buoy, and be able to maximise its operating function.
Sealite Buoy Division
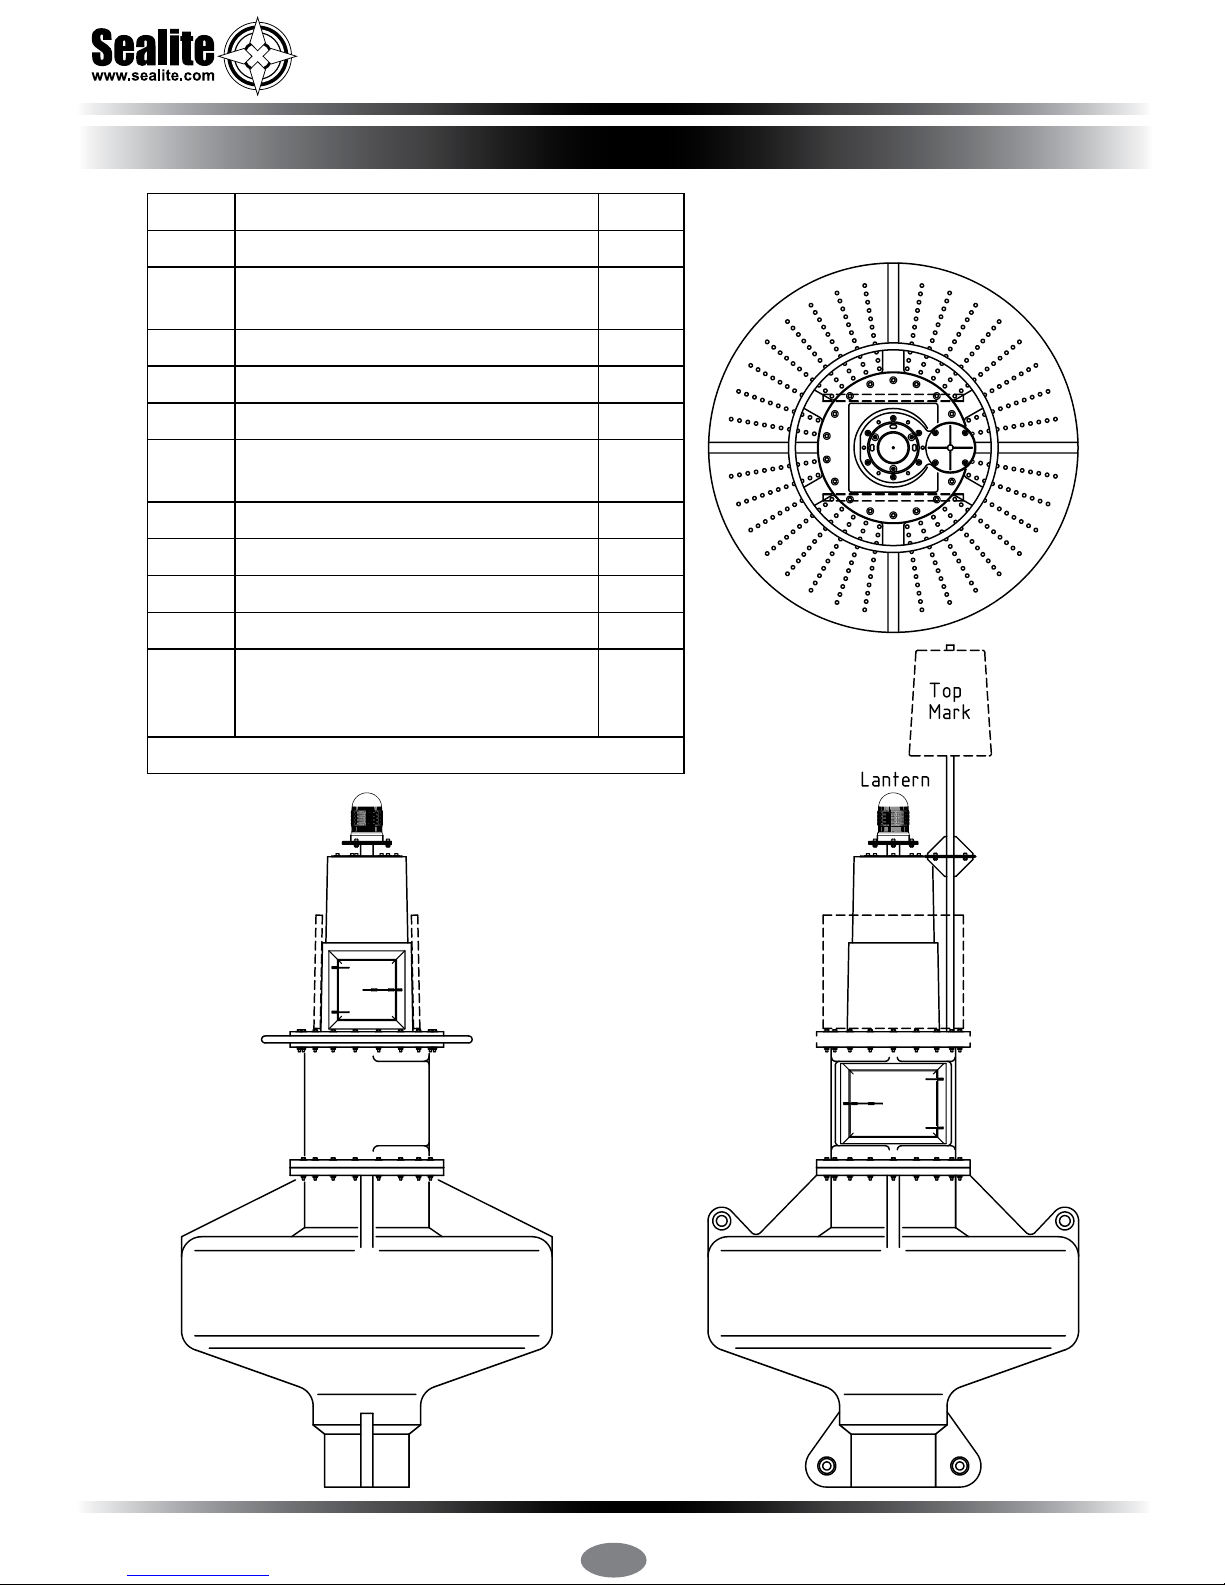
Sealite marine buoys are manufactured on-site from rotationally-moulded UV-stabilised polyethylene,
and are designed to offer a low-maintenance, high visibility solution to marine navigation.
The Sealite buoy division provides turn-key production of navigation buoys. From tooling development,
rawmaterialsselection,andproduction,tonaltestingandinspection,Sealiteguaranteessuperior
quality and fast turn-around times.
Sealite’sbuoyproductsareavailableinawiderangeofcongurationsandsizes,andcanbe
economically shipped worldwide.
Why Choose Polyethylene Buoys?
• No painting
• Inhibits growth
• Increased interval between servicing
• Routine maintenance on location
• Easily repaired in the unlikely event of damage
• Lightweight for ease of deployment and maintenance
• Environmentally friendly – no use of toxic antifouling paint
4. Mooring Requirements & Regulations
Pleasecontactyourlocalauthorityforanyspecicrequirementsregardingthedeploymentofbuoys.
IALA also has guidelines and recommendations that should be followed.
All information given in this manual is advisory only. Please consult with your local authority before
deploying your buoy products.
Local conditions that need to be considered include:-
• Water depth
• Maximum currents
• Maximum wind speeds
• Sinkersizeandweight

Latest products and information available at www.sealite.com
5
POSEIDON-1750 Ocean Buoy
Product Features & Technical Specications
316-grade stainless
steel grab rail
Rotationally-moulded to
16mm wall thickness
Foam lled with
closed-cell polyurethane
Optional top marks
and lights available
Non-slip deck
Made from strong,
durable, UV-stabilized,
virgin polyethylene
Stainless steel mooring
bush
POSEIDON-1750 Ocean Buoy
The Sealite POSEIDON-1750 Buoy is rotationally-moulded from UV-stabilised virgin
polyethylene and has been specically designed to withstand the harsh marine environment
and operate reliably with minimal maintenance. Constructed from 3 parts; a oatation section,
mid-section, and top section, individual colouring of each component enables the POSEIDON
to be congured to suite a range of IALA recommendations and guidelines.

Latest products and information available at www.sealite.com
6
POSEIDON-1750 Ocean Buoy

Latest products and information available at www.sealite.com
7
POSEIDON-1750 Ocean Buoy
POSEIDON-1750 Product Components
No Description Qty
1POSEIDONFloatSection 1
2POSEIDONMidSection(Cotton
Reel)
1
3POSEIDONTowerSection 1
4G316 S/S Bolt. M10x90mm Long 34
5G316 S/S Flat Washer 68
6G316 S/S Spring or Locking
Washer
34
7G316 S/S Plain Nut 34
8Handrail 1
9Day Mark Mounting Plate 1
10 POSEIDONLugBushes 4
11 Galvanised Grade M Shackle
Ø32mmwith35mmODpininside
widtgh 60mm x 114mm
2
G316 S/S = Grade 316 Stainless Steel

Latest products and information available at www.sealite.com
8
POSEIDON-1750 Ocean Buoy
Assembly Instructions
Check Components
• Unload all components from crate or container.
• Check all components are complete and correct.
• PositionthePOSEIDONFloatSection(1)onatlevelground.
Prepare Tower Section
• Optional: Position the Lantern on the Tower section. For details on Lantern see Lantern
Installation Manual.
Note:CheckforcorrectLanternoperationbeforettingtothetowersection.
• Optional: Position the Day Mark to the Mounting Plate and secure using 4 x M10 Socket Head
Cap Screws, washers and Nuts.
Connect Tower & Mid Sections
• PositionthePOSEIDONTower(3)ontopoftheHandRail(8)andMidSection(2).
o Secure the Tower to the Mid Section.
- IfTowerSectionisttedwithSolarPanels,itwillrequire14xM10StainlessSteel
Bolts, Nuts and Washers.
- IfTowerSectionisnotttedwithSolarPanelsthen18xM10StainlessSteel
Bolts, Nuts and Washers are required.
o Placeaatwasherontothebolt
o Insert bolt into hole through Tower and Float Section
o Secure a second Flat Washer, a Spring Washer and a Nut on to the Bolt
o Tighten the Nut
Connect Tower/Mid Section to Float Section
• PositionthePOSEIDONTowerandMidSectionAssemblytotheFloatSection(1)
o Secure the Tower and Mid Section assembly to the Float Section using 16 x M10
Stainless Steel Bolts, Nuts and Washers are required.
o Placeaatwasherontothebolt
o Insert bolt into hole through Tower and Float Section
o Secure a second Flat Washer, a Spring Washer and a Nut on to the Bolt
o Tighten the Nut
• Fit 2 x Ø25mm Shackles to the Lifting Eyes on the Float Section.
• Lift Buoy up to access the Lug Bushes at the base of the Buoy.
• ThebuoyisnowreadyfortheMooringAssemblytobetted.

Latest products and information available at www.sealite.com
9
POSEIDON-1750 Ocean Buoy
Sealite Breather Unit
How it Works
Inside the breather unit, is an air channel which forms in the shape of an S-Bend which runs from the
M16 threaded hole to a small hole located on the other side.
Thischannel,llswithwaterandspillsoutthroughthesmallhole,allowingthewatertoeffectively
drain from the buoy and at the same time, preventing water from entering into the buoy through the
small hole.
Installation Instructions for Breather Units (For Products which Contain Sealite’s Power Packs)
1. Unscrew the white plug located at the side/base of the buoy
2. Apply a small amount of marine grade silicon adhesive to the thread of the breather valve
3. Carefully screw in the breather unit ensuring that the arrow’s direction is pointing down.

Latest products and information available at www.sealite.com
10
POSEIDON-1750 Ocean Buoy
Mooring Assembly Instructions
Check Components
• Unpack all Mooring and check all components are complete and correct.
UsePOSEIDON-1750MooringDiagramonfollowingpagefordetails.
Prepare & Attach Chain
• Cut 2 x lengths of chain approximately 600 – 750mm long. Each length must have an odd number
of links to allow for proper connection between the buoy and the Bridal Plate.
Note:Pleaseusetheguidesbelowtodeterminethecorrectchainsizeandlength.
• Secure the chain to the upper two holes in the Bridal Plate using 2 x Ø25mm Shackles with
Ø29mm Pin. Note: All Shackles must be positively locked. For example use 3mm Stainless Steel
wire to lock the pin eye, or use a use a shackle pin with nut and split pin.
• Fitandsecure1xØ25mmShackleswithØ29mmPinand1xØ25mm(orlarger)SwivelEyeand
Eye to the lower hole in the Bridal Plate.
• FitandsecuretheBridalPlateandChainassemblytothePOSEIDON.Connectthechainlengths
using 2 x Ø25mm Shackles with Ø29mm Pins.
• Secure the required length of chain to the Swivel Eye using 1 x Ø25mm Shackles with Ø29mm Pin
Attach Mooring Block
• Fit and secure the Chain to the Mooring Block.
• The Buoy is now ready for deployment.
Water Depth Recommended Chain Size
(from swivel to mooring block)
Metres Feet
6 to 14 20 to 46 28mm
14 to 22 46 to 72 24mm
22 to 32 72 to 105 22mm
32 to 50 105 to 164 20mm
50 to 75 164 to 246 16mm
Chain Size Guide
Recommended
Length of Chain
Maximum
Water Depth
Best Practice
(Upto6ktscurrent) 3 x Water Depth 30m
For Reduced Water Circle
(Current2ktsto4kts) 2.5 x Water Depth 36m
For Minimum Water Circle
(useonlywherecurrent<2kts) 2 x Water Depth 45m
Chain Length Guide

Latest products and information available at www.sealite.com
11
POSEIDON-1750 Ocean Buoy
POSEIDON-1750 Mooring Diagram

Latest products and information available at www.sealite.com
12
POSEIDON-1750 Ocean Buoy
Marine Buoy Maintenance
Sealite Marine Buoys are designed to require very little maintenance. We recommend the buoy be
inspected annually. Inspection may need to increase depending on the local conditions and the
position of the buoy.
IALA Recommendation AISM E-107 suggests moorings are inspected annually.
Marine Buoy – Annual Maintenance
• Visually inspect buoy for damage
• Inspect the top mark for any damage. Repair any broken or damaged section.
• Clean buoy of animal debris
Mooring – Annual Maintenance
• Check and clear the tail and ride chains from shells and algae.
• Check for wear on any shackle axis and check the tapered pins. Any worn shackles must be
replaced.
• Check the free movement of each swivel around its head. If any swivel head sticks it must be
replaced.
• Check every link of the thrash length of the chain. Check the diameter of the nips and sides and
also inspect the welds on every link.
• If depth allows, a worn riding chain may be reversed.
• Change a chain when any link shows excessive wear.
• Chain must be replaced if any link wears to less than 3/5 of the original diameter.
Mooring – Biannual Maintenance
• Inspect the ground chain and sinker.
Lanterns – Maintenance
• PleaserefertotheInstallationManualforthespecicMarineLanternttedtotheBuoy.

Latest products and information available at www.sealite.com
13
POSEIDON-1750 Ocean Buoy
Refer to Sealite website:www.sealite.com
Sealite Buoy Warranty
Notes
Table of contents
Other Sealite Marine Safety Device manuals
Popular Marine Safety Device manuals by other brands

Fell
Fell WiMEA owner's manual

ACR Electronics
ACR Electronics NAUTICAST Y1-03-0212-1 Installationshandbuch

Daniamant
Daniamant DAN M4-A Installation and maintenance instructions

Mustang Survival
Mustang Survival MD3071 Manufacturer's manual

West Marine
West Marine Lifesling2 instruction manual

LSC
LSC PRO LITE owner's manual