Seamaid LEDINPOOL 502822 Instruction Manual

1
23
FR
EN
ES
IT
DE
1
Bornes à visser
Screw terminal
Terminales que
deben atornillarse
Terminali da
avvitare
Schraubkontakte
2
Connecteurs
Connectors
Conectores
Connettori
Anschlussklemme
3
Câble
d’alimentation
Power supply
cable
Cable de
alimentación
Cavo
d'alimentazione
Kabelschuh

IMPORTANT : This instruction manual includes essential information on the safety measures to be
implemented for installation and start-up. It is important to read these instructions before beginning
installation and start-up. Keep this manual for future reference.
Failure to comply with the instructions given by the manufacturer in this manual regarding
installation, operational start up and maintenance of the product exonerates the manufacturer or the
distributor from any liability for damages affecting persons, the concerned product or the other
installations, and shall void the guarantee.
ENGLISH
1. VERIFY THE CONTENT OF THE PACKING
PAR56 LED lamp ~12V
Screws
Radio remote controller 4 buttons with battery
Manual of installation and maintenance
2. GENERAL CHARACTERISTICS
This lamp has been designed to be used immerged in fresh water. It is a Class III electric apparatus
with very low safety voltage ~12V. The light source of this lamp is not replaceable; when the light
source reaches its end of life, the whole lamp shall be replaced. This lamp complies with IP68 degree
of protection and must be installed in a PAR56 niche at a maximal immersion depth of 1 meter.
This lamp complies with international standards for lights, especially the EN 60598-2-18 standards,
lights for swimming pools and similar applications. This lamp must be connected to a power supply
cable with a minimum section of 2x1mm².
3. INSTALLATION
For a correct installation, the power socket which feeds the installation lamp will have to possess a
device of protection by residual current with a maximal intensity of 30mA.
This projector will be only connected to a ~12V security transformer with double winding. Another type
of transformer is prohibited.
The power of this transformer will be always higher than the power of all projectors connected.
The manufacturer is not responsible in any circumstances for assembly, installation or start-up of any
electric components which have been inserted or handled at locations other than its own premises.
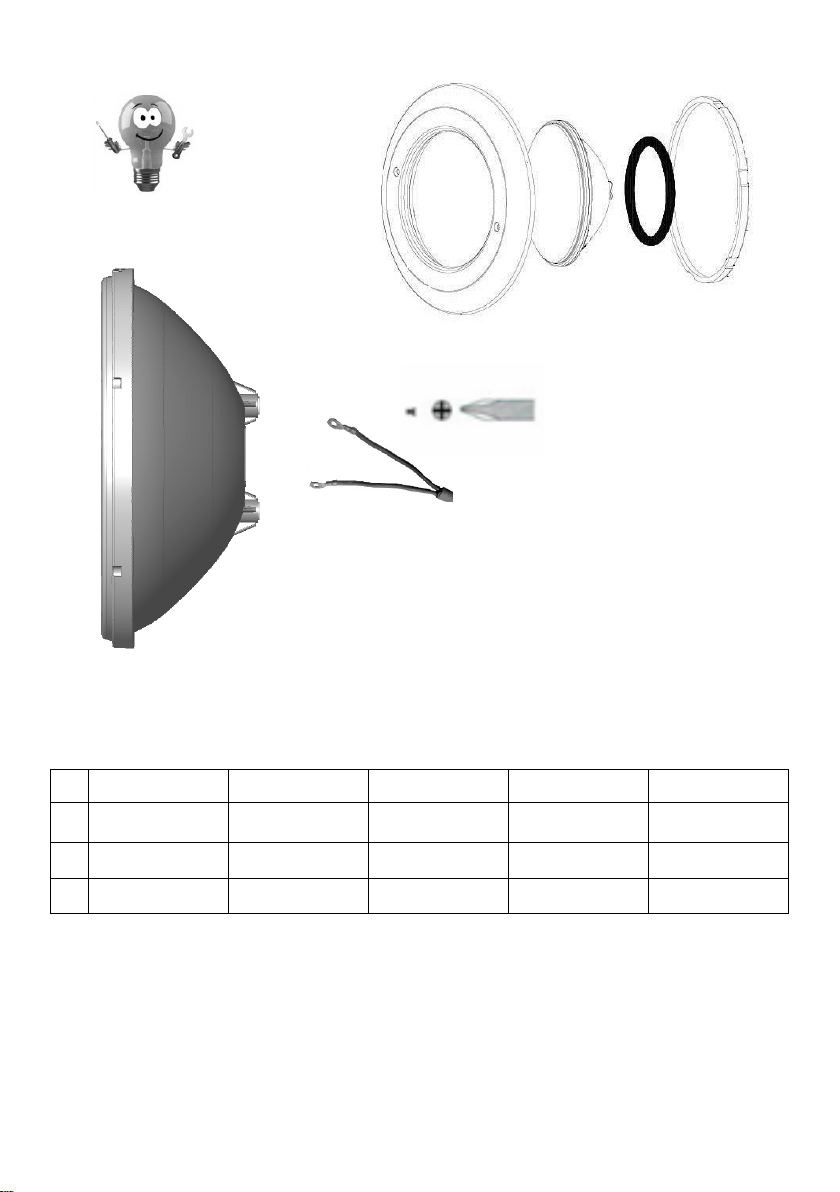
4. ASSEMBLY and REPLACEMENT
Precaution, change the existing O-ring gasket when replacing a bulb on an old light system. Do not
install a replacement bulb if original housing has been distorted due to overheating.
Before any operation, turn OFF the power supply to bulb
Remove existing bulb from housing to dry place and unscrew its back support
Unscrew the gland to make the cable free (3)
Unscrew the 2 connectors (2) from the back of the bulb (1)
Check and change if necessary the O-ring gasket and the back support of the bulb
Connect the new LED lamp, screw on the back support, the gland and replace the
projector in its niche. During this operation, it is recommended to grease the back
cup of the lamp
Control the sealing of the support and turn ON the power supply
Proceed to the remote controller pairing
5. MAINTENANCE
This lamp does not require any type of maintenance work. When the red LED of the remote controller
does not light anymore, replace the CR2032 3V 120mAh battery.
In case of improperly working, please contact our customer service or the customer service of our
dealer.

> Before any operation ensures that the main power supply is turned OFF
> All electrical connections must be made out of water
> Do not handle with wet feet
> Comply with the current standards regarding accident prevention
> In this regard, the IEC 364-7-702 standards must be observed : WIRING IN
BUILDINGS, SPECIAL WIRING, SWIMMING POOLS.
> The persons in charge of the assembly of this product must have the qualification
required for this kind of work
> Stop by the remote corresponds to a standby mode. If stopping over 24 hours, it is
recommended to use the switch located upstream of the transformer
6. OPERATION
The system offers 16 programs including 11 static colours and 5 automatic modes.
The control is made manually by the remote controller provided and also short cuts of the current.
Each fast cut of the current (less than 2 seconds) makes change the programs. After leaving the
lamps OFF for over 10 seconds, switch ON restarts from the last program used.
The use of the remote controller requires a positioning facia to the lamp at a maximum distance of 10
meters, unfolded antenna. Metallic part closed to the lamp can cut the radio reception and the distance
of use under 1 to 2 meters.
At first use, the remote controller needs to be paired with the receiver installed in the projector.
>>> Pairing process :
Install the battery in the remote controller and switch on the projector
Press the buttons O& Stogether during 5 seconds
Each lamp connected flash several times to valid the pairing and keep a static colour
Press several times the button Cor Puntil obtaining the colour or the desired program.
7. SAFETY WARNINGS
8. GUARANTEE
This PAR56 LED lamp is guaranteed 24 months against any material and/or manufacture defect
(electronic components) from the date of delivery. (Keep the purchase invoice/receipt)
The lamp is not guaranteed against problems coming from external shock, electric short-circuit or
excessive screwing. The product is not guaranteed against electrical excessive voltage coming from
the external power supply. (In this case, refer to the house insurance coverage)
This guarantee is conditioned with the strict respect of these instructions of assembly and
maintenance. Under this guarantee, the only obligation falling on the manufacturer or distributor will be
the free replacement or repair of the product or the element found defective by their after sale
services. All the other expenses will be the responsibility of the purchaser. For any replacement or
repair, the product must be subjected to an inspection to the after-sales service of the manufacturer or
distributor.
The guarantee does not play in the event of apparent vice.
The defects and deteriorations caused by the fair wear and tear, the defects resulting from a wrong
assembly and/or employment, and the modifications of the product carried out without the written and
preliminary assent of the manufacturer are all also excluded.
9. ENVIRONMENTAL INFORMATION
In accordance with the European Directive 2002/96/CE, concerning the electric and
electronic component scrap (EEED), the consumer must turn over the used product to
the collect points envisaged to this end.


FR / CARACTERISTIQUES TECHNIQUES
EN / TECHNICAL DATA
ES / CARACTERISTICAS TECNICAS
IT / DATI TECNICI
DE / TECHNISCHE ANGABEN
502822
502839
FR
UK
ES
IT
ALL
PORT
LED
90
90
90
90
90
90
RVB
RGB
RVA
RVB
RGB
RVA
CRI
-
-
-
-
-
-
15 000h
15 000h
15 000h
15 000h
15 000h
15 000h
11 couleurs
5 séquences
11 colours
5 sequences
11 colores
5 sequencias
11 colori
5 sequenze
11 Farben
5 Sequenzen
11 cores
5 sequências
On/Off +
télécommande
radio
On/Off + remote
controller
On/Off + mando
a distancia
On/Off +
telecomando
radio
On/Off +
Funkfernbedienung
On/Off +
telecomando
rádio
~12V/50~60HZ
~12V/50~60HZ
~12V/50~60HZ
~12V/50~60HZ
~12V/50~60HZ
~12V/50~60HZ
180°
510 lumens ±
10% full RGB
510 lumens ±
10% full RGB
510 lumens ±
10% full RGB
510 lumens ±
10% full RGB
510 lumens ± 10%
full RGB
510 lumens ±
10% full RGB
P max
16,0W ± 10%
16,0W ± 10%
16,0W ± 10%
16,0W ± 10%
16,0W ± 10%
16,0W ± 10%
IEE
-
-
-
-
-
-
PF
0,75
0,75
0,75
0,75
0,75
0,75
> 100 000
> 100 000
> 100 000
> 100 000
> 100 000
> 100 000
Fabriqué en Chine et importé par / Made in China and imported by / Fabricado en China y importado
por / Fabbricato in Cina e importato per / Hergestellt in China und eingeführt von:
This manual suits for next models
1
Table of contents
Popular Work Light manuals by other brands

Makita
Makita ML003G instruction manual

Kurt Versen
Kurt Versen XTM LED MODULES installation instructions

Good Earth Lighting
Good Earth Lighting RE1174-WHG-08LF4 quick start guide

Hilti
Hilti SL 6-22 Original operating instructions

artograph
artograph LightPad 920 LX 25920 user guide

KRESS
KRESS KUF05.9 Safety and operating manual

JMP
JMP Cordless inductive hand lamp operating instructions

Matelec
Matelec FLU-06020-S instruction manual

Home Accents Holiday
Home Accents Holiday 1003 155 267 Assembly instructions

GreenWorks
GreenWorks WL24B00 Operator's manual

BGS technic
BGS technic 85349 quick start guide

Stanley
Stanley FATMAX FMCL001B Original instructions