ENFORCER Desktop RF Wireless Transmitter Manual ENFORCER Desktop RF Wireless Transmitter Manual
Introduction
TheENFORCERDesktopandFootswitchRFWirelessTransmitterscan beused fora varietyof applicationsfor
RFremotecontrolled activationoflocks,cameras,or otherdevicesfromtheconvenienceofadeskorother
location(whenusedtogetherwithanySECO-LARMRFwirelessreceiver). Allmodelscomeinanattractive
heavy-dutyaluminumenclosure. There aretwo-orfour-buttonversions withlarge19/32"(15mm)diameter
pushbuttons. Afootswitchversionisalsoavailablewith2heavy-dutymetalswitches.
TheENFORCERDesktopRFWirelessTransmittersarecompatiblewithallSECO-LARMreceivers.
Features
•Operatesupto 500feet(160m).
•Over68billion (6.8 x 10¹⁰)possiblecodes.
•LEDindicatorsfortransmission,lowbattery,andbatterycharging.
•Includesrechargeable9-voltbatteryand500mApoweradapter(ST-1212-U0.5A).
•Attractiveheavy-dutyaluminumenclosure.
•Largebuttonsforeasyuse.
•Canbeused on a desktopormountedon a wall.
•Portable
--
easilymovedfromonelocationtoanother.
•315MHzoperation.Alsoavailablein433.92MHz.
•Size:61/4"x43/4"x 21/4"(159 x121x58 mm)
Included
TheENFORCERSK-919TP4D-P/SK-919TP2D-P/SK-919TP2D-Fincludethefollowing:
•1xSK-919TP4D-P/SK-919TP2D-P/SK-919TP2D-FRFTransmitter
•1xDetachableAntenna(X-AN3143Q)
•1x12VDC,500mAPowerChargerAdapter(ST-1212-U0.5A)
•1x9VDCRechargeableNickelMetalHydrideBattery.
Operating Instructions
IMPORTANT:
The transmitter must be charged overnight before its initial use.
Note Before Initial Operation
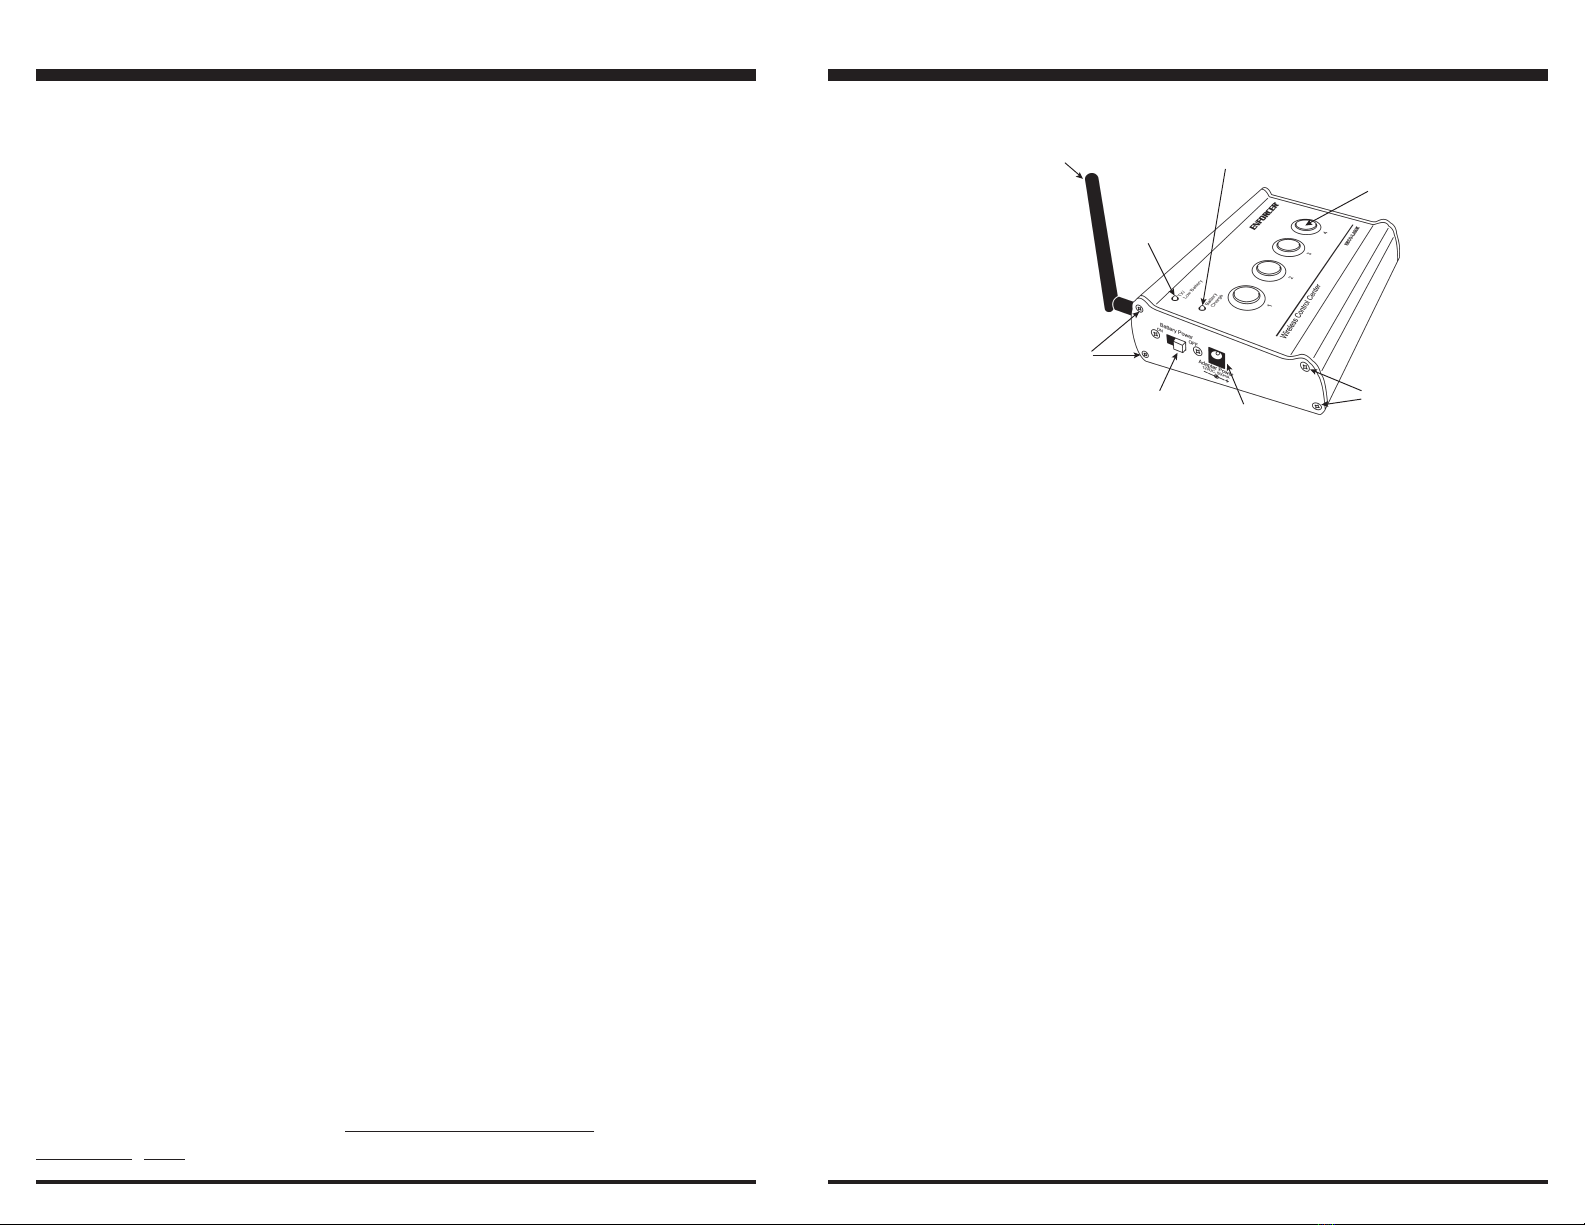
Installthe detachable antennatothe backofthe desktop transmitterasshown inFig.1byscrewingclockwise
untilthe antennafitssnuglywith thealuminumenclosure. Becarefulnotto over-tightentoavoid damage.
USINGTHETRANSMITTER WITHOUTTHE ANTENNAWILLDAMAGE THETRANSMITTER.
Desktop Transmitter Mounting Notes
Thisunitmaybemountedona wall. Install 2 screws into the wall at the location where the unit will be
mounted.Slide themountingholes inthebase ofthedesktop transmitteroverthescrewheads.
Transmitter operation
1. Slidethe"BatteryPower"switchtothe ONposition.
2. Learnthetransmitterintothechannel(s)ofitscorrespondingreceiver(s).Formoredetailsonthisprocedure,
seethereceiver'smanual.
3. Testtomakesurethetransmitterandreceiverarebothworkingproperly.
4. Operatethetransmitterbypressinganypushbuttonsasrequired.
IMPORTANT:Please note that the desktop transmitter will not operate when the battery power is low,
evenifthepowerchargeradapterispluggedin.Intheeventthatyouforgottochargeyourtransmitter,you may
usea standard 9-voltbatterytooperate theunitafterunplugging the poweradapter.
WARNING:Never plug the AC power adapter in when using a standard 9-volt battery.
Understanding the LED Indicators
“TX/ Low Battery”BlueLED indicator
--
Transmissionandlowbattery indicator:
• Transmitting
--
Theblue LED flashes rapidly to indicateavalidtransmissionisbeing sent while any of
thedesktoptransmitterbuttonsarebeingpressed.
•
Lowbattery--TheblueLEDflashesslowlyafterthetransmitterbuttonisreleased,ifthebatterypowerislow.
“BatteryCharge”RedLEDindicator--Batterychargingstatusindicator(whenthepoweradapterispluggedin):
• Batterycharging
--
TheredLEDflashes toindicatethat the rechargeablebatteryis being charged.
•
Batteryfullycharged
--
TheredLEDremainssteadyONwhentherechargeablebatteryisfullycharged.
NOTE:The LEDsarelocatedat the upperleft-handside of thetransmitter,seeFig.1.
Charging the Battery
Whenthe "TX /LowBattery"blue LED startstoflashslowly, it indicatesthatthebattery power islow.When
chargingisnecessary,turnthe“Battery Power” switch toOFFandplugthe power adapter intothe"Adapter
Power”Jack of thetransmitterlocated at theleftside oftheunit(see Fig.1).Next,plugthe poweradapterinto
anelectricalwall outlet and the "BatteryCharge"redLED will flash to indicatethattherechargeablebattery is
beingcharged.
Whentherechargeablebatteryis fully charged, the red LED will be steady ON.Thepoweradapter can now
beremoved.Afterthepower adapter is removed, theredLEDwill be OFF.
NOTE:TheblueLEDwillcontinuetoflash(evenwhentherechargeablebatteryisalready fully charged) until
thedesktop transmitterisresetbyturning the“BatteryPower”switchfrom OFFtoON.
Important Notes:
1. FORMAXIMUMBATTERYLIFE
--
Turnthe“BatteryPower” switch ONandunplug theadapterduring
normaluse.Turnthe“BatteryPower”switch OFF and plug intheadaptertorecharge the battery.
2. Donotremove the poweradapteruntilthe rechargeable batteryisfully charged. (Itisbestto charge the
batteryovernight.)
3. Toprolong the lifeoftherechargeable battery,turnthe"Battery Power" switch toOFFwhenthe unit is not
beingusedfor an extended period of time.
4. Anew,completelychargedbattery should lastapproximately12hours or moredependingon usage.
Fig.1–Transmitter
SK-919TP4D-Pshown
“BatteryPower”
Switch “Adapter
Power”Jack
Antenna “Tx/Low
Battery”LED
Indicator
(blue)
“BatteryCharge”
LEDIndicator(red)
Panelscrewstobe
removedwhenreplacing
therechargeablebattery
Panelscrewstobe
removedwhenreplacing
therechargeablebattery
Transmitter
pushbutton


