Securakey RADIO KEY 600 Setup guide

RADIO KERADIO KE
RADIO KERADIO KE
RADIO KEYY
YY
Y
®®
®®
®
600600
600600
600
QUICK-START USER GUIDEQUICK-START USER GUIDE
QUICK-START USER GUIDEQUICK-START USER GUIDE
QUICK-START USER GUIDE
This guide contains keypad sequences for programming your Radio Key®600,
usingthebuilt-inprogrammingkeypad.
Radio Key®Transponders (Key Tags) are pre-encoded and engraved at the
factorywithuniqueTransponderIDnumbers.FacilityCodes(SiteCodes)are
notrequired.YoumayassigneitheraTransponderoraPINcodetoeachUser
Number (1-600) for programming purposes. Be sure to record the User
Number,theTransponderIDNumberorPINcodeandtheuser’snameonthe
UserLogForm. Ablankformhasbeenincludedforthispurpose. Donotwrite
on this form; use it as a photocopy master.
Aredlightand three beeps at theendofakeypad sequence means that
you have made an error. Refer to the appropriate section, and carefully
re-enterthecommandinthepropersequence.
If you select a User Number for which a Transponder ID Number or PIN is
already stored in memory, a red light and three beeps will occur. Select
anotherUserNumberorvoidtheUserNumber,whichremovesthepreviously
storedTransponderIDorPINNumberfrommemory.
NOTE: User Number and ID Number Values in the following
examples are for demonstration purposes only; enter
the appropriate values for your system.
First, enter Program Mode:First, enter Program Mode:
First, enter Program Mode:First, enter Program Mode:
First, enter Program Mode:
Enteryour5-digitpassword,thenpressENTER.(Allnewunitsarepre-programmed
with the password 12345.) The LED will flash amber to show that the unit is in
ProgramMode.Theunitwill“timeout”andreturntoActive(Normal) Modein15
seconds if no key is pressed.
1 + 2 + 3 + 4 + 5 +
Add a Transponder (Key Tag) to the System:Add a Transponder (Key Tag) to the System:
Add a Transponder (Key Tag) to the System:Add a Transponder (Key Tag) to the System:
Add a Transponder (Key Tag) to the System:
EnterPassword. PressENTER. PressADD. EnteraUserNumber(1-600)andpress
ENTER.TheexampleisforUser#12.HoldtheTransponderneartheRK600Unit.Agreen
lightandbeepmeanstheTransponderwasaccepted. Aredlightandthreebeepsmeans
aTransponderorPINhasalreadybeenstoredfortheselectedUserNumber.Deletethe
previouslystoredTransponderorPINorselectanewUserNumber.
+ 1 + 2 + (Hold Key Tag near unit)
(User Number 12)
(Password) (ENTER)
(ADD) (ENTER)
(User Number 12)
(VOID) (ENTER)
(VOID) (ENTER)
(Starting User No. 1) (Ending User Number
10)
(VOID) (ENTER)
(Starting User No.
1) (Ending User Number
10)
(ADD) (ENTER)
(ID Number 995)
(User Number 12)
(ADD) (ENTER)
Add a Transponder by Entering Transponder ID:Add a Transponder by Entering Transponder ID:
Add a Transponder by Entering Transponder ID:Add a Transponder by Entering Transponder ID:
Add a Transponder by Entering Transponder ID:
(RKCM-01 cards or RKKT-01 Tags Only)
Enter Password. Press ENTER. Press ADD, enter the User Number, press*,
entertheIDnumberengravedontheTransponder,thenpressENTER.
+ 1 + 2 + + 9 + 9 + 5 +
Ineithercase,besuretorecordtheUserNumberandNameandTransponderID
Numberin theUser LogForm.
Add a Series of Transponders to the System:Add a Series of Transponders to the System:
Add a Series of Transponders to the System:Add a Series of Transponders to the System:
Add a Series of Transponders to the System:
EnterPassword. PressENTER. PressADD. EntertheStartingUserNumber
intherange. Press*,entertheEndingUserNumber,press*,thenpressENTER.
Present the Transponders to the reader in the desired order (making a careful
recordofwhichTranspondersareassignedtowhichUserNumbers.) Ifoneormore
TranspondersarealreadyenteredintotheUserNumberrangeyouhaveselected,
a red light and three beeps will occur, in which case, you must delete the entire
rangebeforeproceeding.
+ 1 + + 1 + 0 + +
Delete a Transponder from the System:Delete a Transponder from the System:
Delete a Transponder from the System:Delete a Transponder from the System:
Delete a Transponder from the System:
Enter Password. Press ENTER. Press VOID. Enter the User Number. Press
ENTER. Agreenlightandbeepmeans thattheTransponderwasdeleted.
+ 1 + 2 +
Delete a Range of Transponders from System:Delete a Range of Transponders from System:
Delete a Range of Transponders from System:Delete a Range of Transponders from System:
Delete a Range of Transponders from System:
EnterPassword. PressENTER. PressVOID. EntertheStartingUserNumber
intherange,press*,entertheEndingUserNumber,thenpressENTER. Agreen
lightandbeepmeanstherangeofTransponderswasdeleted.
+ 1 + + 1 + 0 +
Delete a Transponder by Presenting to Reader:Delete a Transponder by Presenting to Reader:
Delete a Transponder by Presenting to Reader:Delete a Transponder by Presenting to Reader:
Delete a Transponder by Presenting to Reader:
Enter Password. Press ENTER. Press VOID, then press ENTER. Hold the
TransponderneartheRK600Unit.AgreenlightandbeepmeanstheTransponder
wasdeleted.
+ (Hold Key Tag near Unit)

(Mode No. 2)
(MODE) (ENTER)
(5 Seconds)
(SET
TIMER) (ENTER)
(Re-type New Password - 54321) (ENTER)
(New Password - 54321)
(PIN Number 3253)
(User Number 14)
(ADD) (ENTER)
(ADD)
(ID Number 995)
(VOID) (ENTER)
Delete a Transponder by Entering Transponder ID:Delete a Transponder by Entering Transponder ID:
Delete a Transponder by Entering Transponder ID:Delete a Transponder by Entering Transponder ID:
Delete a Transponder by Entering Transponder ID:
(RKCM-01 cards or RKKT-01 Tags Only)
Enter Password. Press ENTER. Press VOID, Press *, enter the ID number
engravedontheTransponder,thenpressENTER.Agreenlightandbeepmeans
theTransponderwasdeleted.
+ + 9 + 9 + 5 +
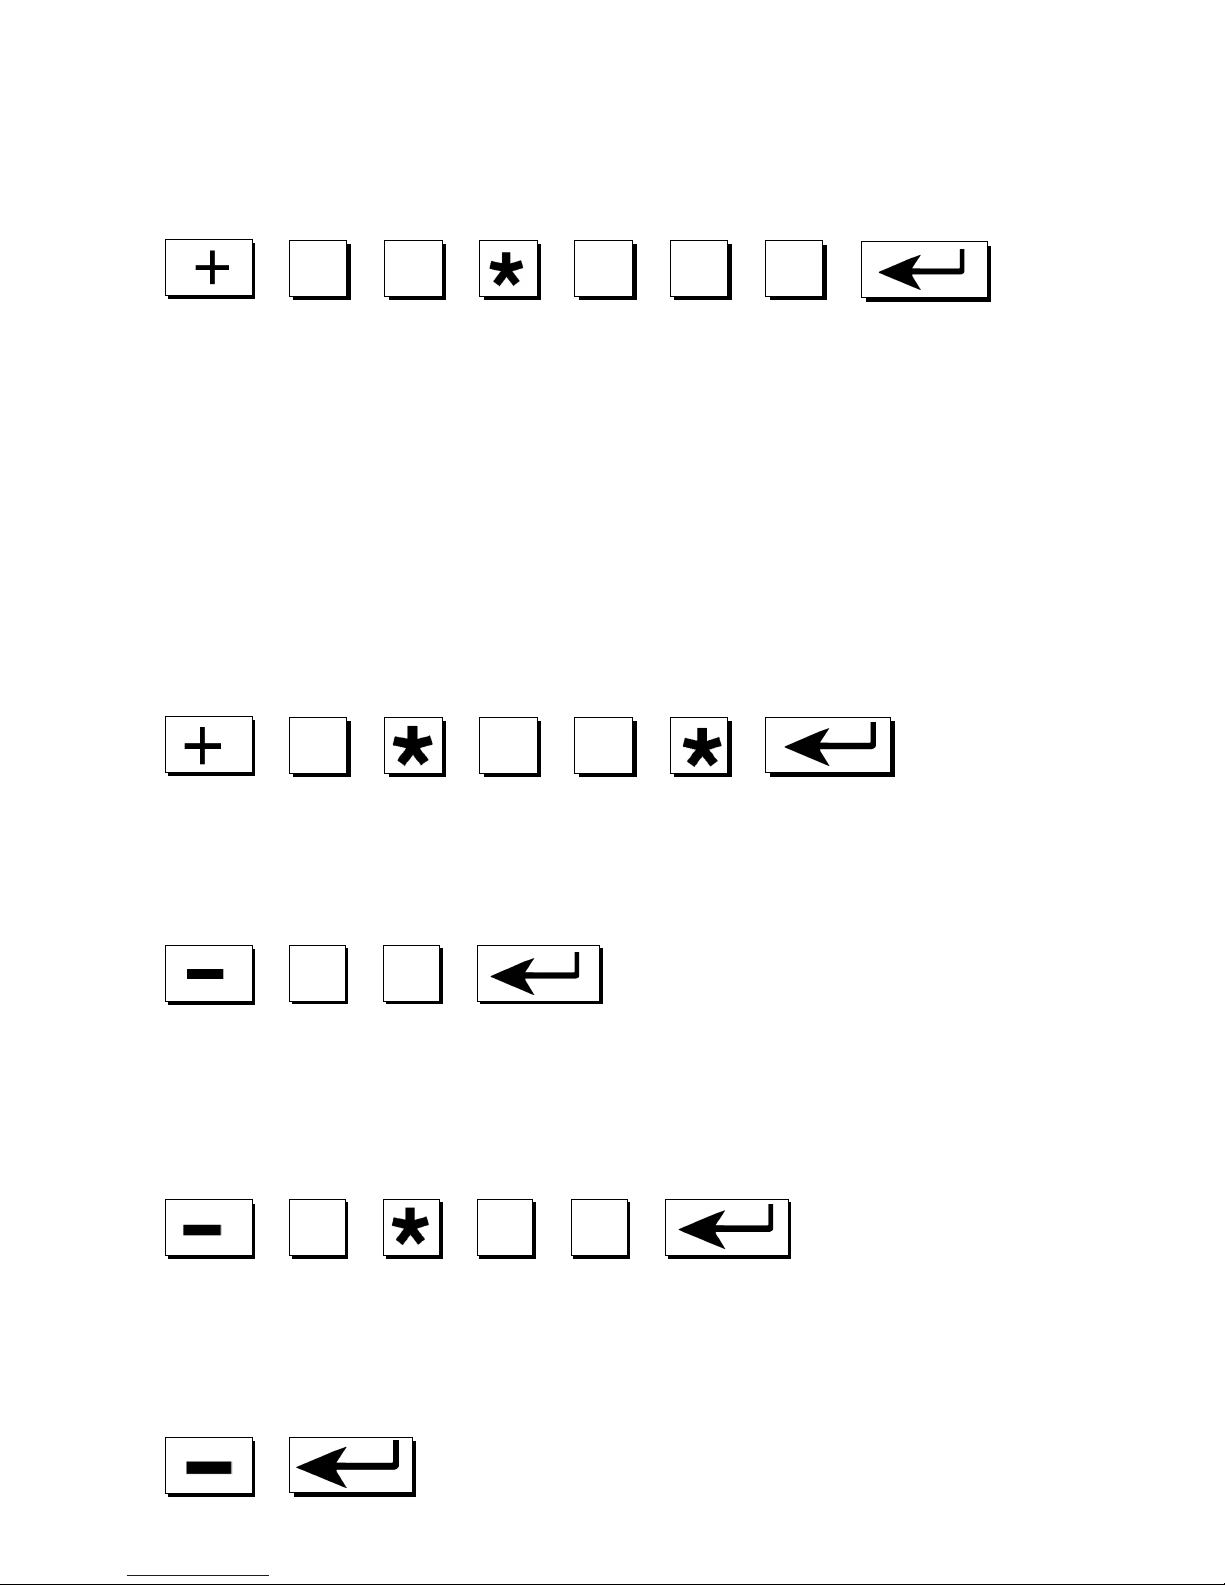
Add a PIN to the System:Add a PIN to the System:
Add a PIN to the System:Add a PIN to the System:
Add a PIN to the System:
EnterPassword.PressENTER. PressADD,entertheUserNumber,press ADD,
enterthe4-digitPINCode,thenPressENTER.
+ 1 + 4 + + 3 + 2 + 5 + 3 +
Change your Password:Change your Password:
Change your Password:Change your Password:
Change your Password:
EnteryourcurrentPassword.PressENTER. Press*,thenenterthenewPassword
(exactly5digits). Press*again,thenre-enterthenewPasswordandpressENTER. A
greenlightandbeepmeansthePasswordwaschanged. Notethat12345isthe
default(factory)password;useanothernumbersequenceforbestsecurity.
+ 5 + 4 + 3 + 2 + 1 +
+ 5 + 4 + 3 + 2 + 1 +
Set the Latch Timer:Set the Latch Timer:
Set the Latch Timer:Set the Latch Timer:
Set the Latch Timer:
Enter Password. Press ENTER. Press SET TIMER. Enter the number of
seconds (0-30). Press ENTER. A green light and beep means the Latch Timer
settingwaschanged.
+ 5 +
Set the Operating Mode:Set the Operating Mode:
Set the Operating Mode:Set the Operating Mode:
Set the Operating Mode:
Enter Password. Press ENTER. PressMODE, thenpress1, 2or3andpress
ENTER. The Access Control Unit will exit Programming Mode and enter the
selected Mode. Selections are:
1.Active (Normal)--LED isOff
2.Inactive(ReaderDisabled)--LEDblinksRed
3.Door Unlocked -- LEDblinks Green
+ 2 +

To Exit Programming Mode Immediately:To Exit Programming Mode Immediately:
To Exit Programming Mode Immediately:To Exit Programming Mode Immediately:
To Exit Programming Mode Immediately:
PressMODE,press1,thenpressENTER. Thisreturnstheunittonormalmode
immediately, bypassing the 15 second timeout.
+ 1 +
PROGRAMMING HINTSPROGRAMMING HINTS
PROGRAMMING HINTSPROGRAMMING HINTS
PROGRAMMING HINTS
Password:Password:
Password:Password:
Password:
If the password is lost or forgotten it can be restored to the factory
default. Remove the RK600 unit from the mounting plate, disconnect power
(unplug the connector from J1 or disconnect the DC power supply) Press and
HOLD the reset switch (SW1, on the reader circuit board) restore power, then
releasethe switch.Note thatthis willalso resetthe latchtimer andreader mode
tothe factory default.
LatchTimer:LatchTimer:
LatchTimer:LatchTimer:
LatchTimer:
The latch timer controls the latch/alarm shunt relay. The latch
timecanbechangedtoany value from 0.25-30seconds. Ifthelatchtimeris set
to0seconds,thispulsesthelatchrelayfor0.25second,sufficientformostelectric
turnstiles. The beeper and green LED are always fixed at one second.
Operating Mode:Operating Mode:
Operating Mode:Operating Mode:
Operating Mode:
Three operating modes are possible. For normal
operationselectMode 1;totemporarilylockalltranspondersoutselectMode2;
to hold the door open continuously select Mode 3.
BASIC OPERATIONBASIC OPERATION
BASIC OPERATIONBASIC OPERATION
BASIC OPERATION
USINGRADIOKEY®TRANSPONDERS
TouseRadioKey®600,simplyholdyourRadioKey®TransponderneartheRK600
Unit or optional Auxiliary Reader. If the Transponder ID Number is stored in
memory, the latch relay is activated, unlocking the controlled door or gate and
shunting any external alarms. A green light and a beep indicates that access is
granted. IftheTransponderIDNumberisnotstoredinmemory,thedoororgate
remains locked and a red light and three rapid beeps indicate that access is
denied.Otherwise the LED is normallyoff.
USINGKEYPADENTRY
ForPINentry,enteryourUserNumber,4-digitPIN,thenpress*.Leadingzeroes
can be omitted for the user number, but can’t be omitted for the PIN Code.
(MODE) (ENTER)
5428
www.SecuraKeyStore.com
(800) 878-7829
Table of contents


