Seecode 20264 User manual

DE (2) | EN (8) | FR (14) | NL (20)
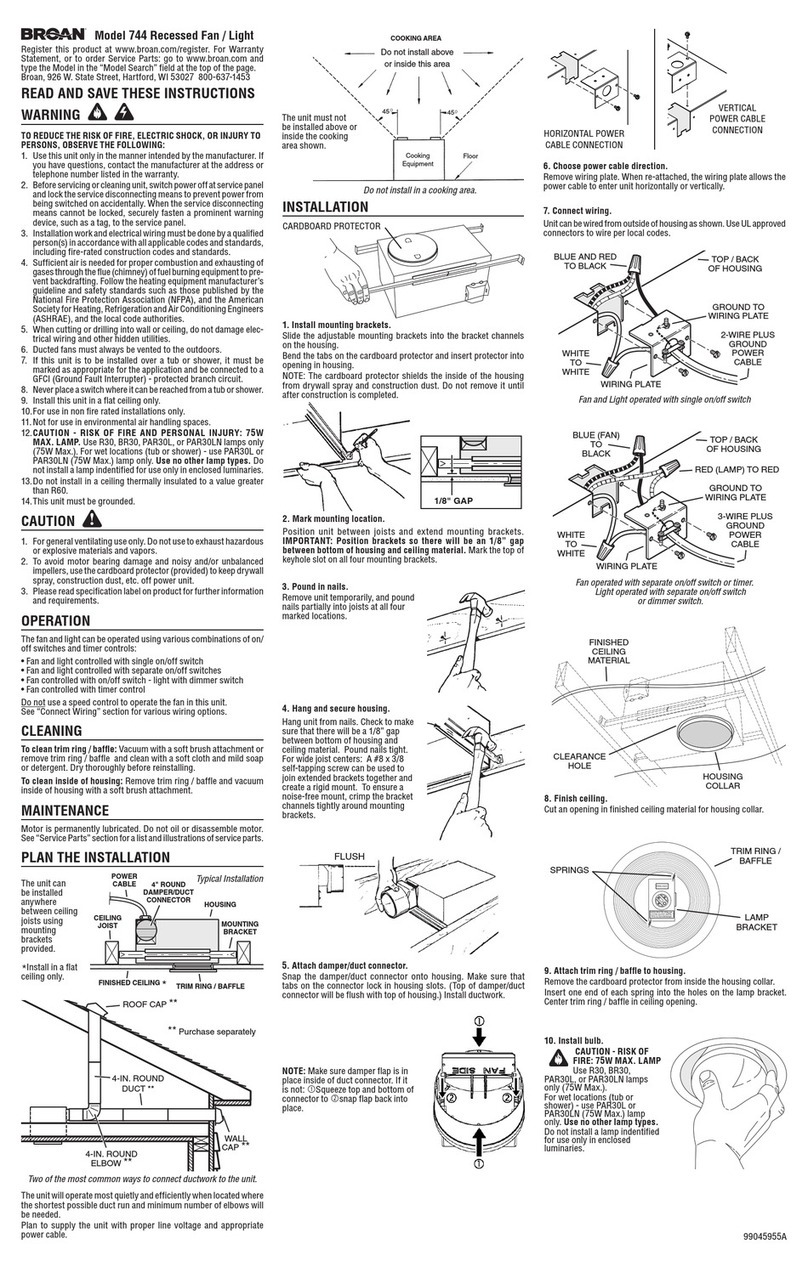
SEECODE Touch-Screen Nebelventilator
SEECODE Touch-Screen Fog Fan
220-240V~,50Hz, 90W
Art. Nr. 20264

2
GEBRAUCHSANLEITUNG
Vielen Dank für den Kauf unseres SEECODE Touch-Screen Nebelventilators. Damit Sie lange
Freude an Ihrem Produkt haben und es vollumfänglich nutzen können, lesen Sie bitte diese
Bedienungsanleitung sorgfältig durch, bevor Sie Ihr Gerät an das Stromnetz anschließen,
um Beschädigungen durch falsche Bedienung zu vermeiden. Schenken Sie den Sicherheits-
informationen bitte besondere Aufmerksamkeit. Wenn Sie das Gerät einem Dritten überlassen,
muss auch diese Bedienungsanleitung mit überreicht werden.
WARNUNG - Bei der Verwendung elektrischer Geräte müssen immer einige grundsätzliche
Vorsichtsmaßnahmen beachtet werden, um die Gefahr von Feuer, Stromschlag und Verletzun-
gen zu verringern.
SICHERHEITSINFORMATIONEN
1. Falsche Bedienung und unsachgemäße Handhabung können zu Störungen am Gerät und
zu Verletzungen des Benutzers führen.
2. Es kann keine Haftung für mögliche Schäden übernommen werden, die durch unsachge-
mäßen Gebrauch oder falsche Handhabung verursacht werden.
3. Bitte vergewissern Sie sich, dass die Stromart und Netzspannung den Angaben auf dem
Typenschild an der Geräteunterseite entsprechen, bevor Sie den Stecker in die Steckdose
stecken.
4. Tauchen Sie das Gerät und den Netzstecker nicht in Wasser oder andere Flüssigkeiten.
Es besteht Lebensgefahr durch Stromschlag! Wenn das Gerät oder der Stecker nass ge-
worden ist, ziehen Sie umgehend den Stecker und lassen Sie das Gerät vor dem nächsten
Gebrauch von einem Fachmann überprüfen.
5. Benutzen Sie das Gerät nicht, wenn das Netzkabel oder der Netzstecker sichtbare Schä-
den aufweisen und wenn das Gerät auf den Boden gefallen ist oder anderweitig beschä-
digt wurde. Bringen Sie das Gerät in solchen Fällen zur Überprüfung und evtl. Reparatur in
eine Fachwerkstatt.
6. Ziehen Sie niemals den Stecker des Netzkabels mit nassen Händen oder durch Ziehen am
Netzkabel aus der Steckdose.
7. Achten Sie darauf, dass das Netzkabel nicht über scharfe Kanten hängt oder eingeklemmt
wird.
8. Halten Sie das Gerät von Feuchtigkeit fern und schützen Sie es vor Spritzern.
9. Halten Sie das Gerät von heißen Objekten (z. B. Herdplatten) und offenen Flammen fern.
10. Wenn die Netzanschlussleitung dieses Gerätes beschädigt wird, muss sie durch den
Hersteller oder seinen Kundendienst oder eine ähnlich qualizierte Person ersetzt werden,
um Gefährdungen zu vermeiden.
11. Dieses Gerät kann von Kindern ab 8 Jahren und von Personen mit eingeschränkten phy-
sischen, sensorischen oder geistigen Fähigkeiten oder ohne Erfahrung und/oder Wissen
benutzt werden, wenn diese durch eine für ihre Sicherheit zuständige Person beaufsichtigt
werden oder von ihr Anweisungen erhielten, wie das Gerät sicher zu benutzen ist und sie
auf die Risiken aufmerksam gemacht wurden.
12. Dieses Gerät ist kein Spielzeug.

13. Kinder sollten dieses Gerät nicht unbeaufsichtigt reinigen oder warten.
14. Bewahren Sie das Gerät und sein Netzkabel außerhalb des Zugriffs von Kindern unter 8
Jahren auf.
15. Das Gerät darf nicht mit Hilfe einer externen Zeitschaltuhr oder eines separaten Systems
mit einer nicht dem Gerät beiliegenden, fremden Fernbedienung eingeschaltet werden.
16. Stellen Sie das Gerät auf einen geraden, trockenen und hitzebeständigen Untergrund.
17. Dieses Gerät ist für die Verwendung im Haushalt oder für ähnliche Anwendungen vor-
gesehen.
18. Lassen Sie das Gerät niemals unbeaufsichtigt, während es sich im Betrieb bendet.
19. Lagern oder verwenden Sie das Gerät nicht im Freien.
20. Bewahren Sie das Gerät an einem trockenen Ort und außerhalb der Reichweite von
Kindern (in seiner Verpackung) auf.
21. Führen Sie niemals Finger oder andere Objekte durch die Schutzgitter des Ventilators,
während dieser sich im Betrieb bendet.
22. Das Gerät muss vor Gebrauch vollständig zusammengebaut sein.
23. Achten Sie auf lange Haare! Diese können sich aufgrund der Luftturbulenzen im
Ventilator verfangen.
24. Richten Sie den Luftstrom nicht für längere Zeit auf Personen.
25. Vergewissern Sie sich, dass der Ventilator vom Stromnetz getrennt ist, bevor Sie das
Schutzgitter abnehmen!
Geräteteile
1. Zerstäuber
2. Frontgitter
3. Befestigungsmutter
für den Zerstäuber
4. Befestigungsmutter
für das Blatt
5. Blätter
6. Befestigungsmutter für das Gitter
7. Heckgitter
8. Antriebswelle des Motors
9. Motorabdeckung
10. Gitterring
11. Befestigungsmutter für das Gitter
12. Motorhalterung
13. Anschlusshalterung
14. Kabelrohr
15. Fixierschraube für die Halterung
16. Hauptgehäuse
17. Wassertank
18. Befestigungsmutter für die Wassereinleitung

4
19. Sockel
20. Befestigungsmutter für den Sockel
21. Räder
22. Zerstäuberschlauch
23. Bedientafel
24. Fernbedienung
25. Dekorativ-Paneel
26. Wasserstandsanzeiger
Zusammenbau
• Anschlusskabel und Stange in den Rumpf stecken und den Fixierknopf festziehen, die
Schraube muss dabei in das Positionsloch gedreht werden.
• Räder in den Sockel drücken.
• Fixierschraube der Halterung durch den Sockel stecken und den Sockel unten am Rumpf
befestigen.
• Heckgitter, Gittermutter, Blatt, Blattmutter und Netzklemme montieren.
• Zerstäuber in den gewellten Schlauch drücken und den Zerstäuber mit den Schrauben am
Frontgitter befestigen.
• Frontgitter an der Netzklemme anbringen, die Netzklemme anschrauben und dann die
Schrauben festziehen. Gewellten Schlauch oben am Rumpf montieren.
GEBRAUCHSANWEISUNG
• ON/OFF(STROM) : Einmal auf On/Off-Taste drücken, um den Ventilator zu aktivieren.
Erneut auf On/Off-Taste drücken, um den Ventilator anzuschalten. Auf ON/OFF-Taste
drücken, um das angeschaltete Gerät auszuschalten.
• GESCHWINDIGKEIT : Schaltsequenz schwach – mittel – hoch – schwach .
• TIMER : Schaltsequenz 0,5 Std. – 1 Std. – 2 Std. – 4 Std. Wenn das Gerät in Betrieb ist,
können Sie den Timer einstellen, damit sich der Ventilator nach Ablauf der eingestellten
Zeit abschaltet. Drücken Sie wiederholt auf den Knopf, um die gewünschte Zeitdauer in
30-Minuten-Schritten zu erhöhen: von 0,5 Std. bis 7,5 Std. Auf dem Bedienfeld geht die
zugehörige Kontrollleuchte an. Ist keine der Leuchten aktiv, so ist keine Zeit eingestellt und
das Gerät läuft so lange, bis Sie es von Hand abschalten.
• NEBEL : Schaltsequenz schwach – mittel – hoch.
• MODUS : Schaltsequenz normaler Luftstrom – natürlicher Luftstrom – Luftstrom
„Schlaf“
• OSC (Schwenkfunktion) : Schwenkt den Ventilator von links nach rechts.

Bedienfeld Fernbedienung
Kontrollleuchte:
1. Anzeige für natürlichen Modus
2. Anzeige für Schlafmodus
3. Schwenkfunktion
4. Zerstäuberleistung: Minimum–Medium–Maximum
5. Timer
6. Geschwindigkeit: schwach–mittel–hoch
7. Einschaltanzeige
Knöpfe:
A. ON/OFF
B.GESCHWINDIGKEIT
C. MODUS
D. TIMER
E. OSC (SCHWENKUNG)
F. ZERSTÄUBER
Feuchtigkeitsfunktion
• Wassertank aus dem Rumpf entfernen und Deckel im Gegenuhrzeigersinn abschrauben.
• Wassertank mit kaltem Wasser füllen (das Wasser darf nicht wärmer als 40° C sein),
Deckel festschrauben und auf undichte Stellen prüfen.
Lösen Festziehen

6
• Wassertank wie abgebildet angewinkelt in den Rumpf einsetzen und einige Minuten war-
ten, bis sich der Speicher im Rumpf mit Wasser füllt.
• Nach Drücken auf den Luftbefeuchtungsknopf geht das Kontrolllicht an und das Gerät
beginnt, die Luft zu befeuchten.
• Hinweis: Ein blinkendes Kontrolllicht (für 10 Sekunden) zeigt an, dass nicht genug Wasser
vorhanden ist, kontrollieren Sie, ob der Schwimmer im Rumpfspeicher treibt oder der Tank
richtig eingesetzt ist.
• HINWEIS: Lassen Sie vor dem Transport immer erst das Wasser im Rumpf ab. Entfernen
Sie die Federklemme und den Stöpsel und lassen Sie das Restwasser aus dem Gerät ab.
Technische Daten
• 3 Geschwindigkeitsstufen
• Sensor Touch Display / Fernbedienung
• 7,5 Stunden Timer
• Rotorkorb aus Stahlblech
• Leistung: 90 Watt
• Wassertank 3,0 Liter
• 90° Rotation
• max 55 dB, geräuscharm
• Maße: 40 x 120 x 40 cm
• Material: ABS Kunststoff
• Gewicht: 5,6 kg
• Mit Oszillation, Timer und 2 wählbaren Zusatz-Modi
• Komfortables Sensor-Touch-Display. Bequem auch per Fernbedienung zu steuern.
• Gehäuse aus Kunststoff in elegantem Mattschwarz/-weiß
• Abnehmbarer 3-l-Tank für ca. 10 Std. Sprühnebel
• Timer-Funktion (30 – 450 Minuten)
• Auf 5 Rollen leicht zu verschieben.
REINIGUNG UND WARTUNG
HINWEIS: Ziehen Sie immer erst den Netzstecker aus der Steckerbuchse, bevor Sie das Gerät
reinigen.
1. Tauchen Sie das Gerät NICHT in Wasser. Bespritzen Sie es auch nicht mit anderen
Flüssigkeiten.
2. Reinigen Sie das Gerät NICHT mit Lösungsmitteln oder anderen chemischen Produkten.
Wenn Sie ihn nicht brauchen, bewahren Sie den gereinigten Ventilator an einem trockenen
Ort auf.
3. Stauben Sie den Ventilator am Ende der Nutzungsperiode ab, um ihn für die nächste
Nutzungsperiode betriebsbereit zu halten. Nehmen Sie nötigenfalls das Gitter ab und ent-
fernen Sie den Rotor. Reinigen Sie diese mit einem feuchten Tuch.
4. Leeren Sie das Wasser aus dem Tank und reinigen Sie diesen mit lauwarmem Wasser,
setzen Sie ihn erst wieder in das Gerät ein, wenn er ganz trocken ist. Entwässern Sie das

Gerät, indem Sie einen Behälter unter den Abuss stellen (siehe Pfeil auf nachfolgender
Abbildung) und warten Sie, bis alles Wasser aus dem Speicher abgeossen ist.
Wasserabuss--------------------------------
Gebrauchte Batterien dürfen nicht im Hausabfall entsorgt werden, weil sie giftige Bestand-
teile und Schwermetalle enthalten können, die umweltschädlich und gesundheitsschädlich
sein können. Geben Sie leere Batterien an eine geeignete Recycling-Einrichtung.
Garantie/Gewährleistung
Die Gewährleistungsfrist beträgt 24 Monate ab Kaufdatum. Als Beleg hierfür gilt der Kaufbeleg.
Produkt wurde vor dem Versenden gründlich auf Qualität und Funktionalität geprüft. Ein Aus-
schluss der Garantie ndet unter folgenden Fällen statt:
• bei fehlerhafter Installation
• bei Veränderungen des Systems ohne unsere Genehmigung
• bei Schäden durch Feuchtigkeit, Fallschäden oder beschädigte Kabel
• wenn kein Kaufbeleg vorliegt
Bestimmungsgemäße Verwendung
Dieses Gerät ist nur zur o.g. Nutzung bestimmt. Eine andere oder darüberhinausgehende Be-
nutzung gilt als nicht bestimmungsgemäß.
CE-Konformitätserklärung
Hiermit erklärt Mobiset GmbH, dass sich dieses Produkt in Übereinstimmung mit den
grundlegenden Anforderungen der zutreffenden europäischen Richtlinien bendet.
Allgemeine Hinweise
Urheberrecht
Dieses Dokument ist urheberrechtlich geschützt. Jede Vervielfältigung bzw. jeder Nachdruck,
auch auszugsweise, sowie die Wiedergabe der Abbildungen, auch im veränderten Zustand, ist
nur mit schriftlicher Zustimmung des Herstellers gestattet.
Hinweise zum Umweltschutz
Die verwendeten Verpackungsmaterialien sind recyclebar. Entsorgen Sie nicht mehr be-
nötigte Verpackungsmaterialien gemäß den örtlich geltenden Vorschriften.
Dieses Produkt darf innerhalb der Europäischen Union nicht im normalen Hausmüll ent-
sorgt werden. Entsorgen Sie das Gerät über die kommunalen Sammelstellen.
EU-Konformitätserklärung
DECLARATION OF CONFIRMITY
Mobiset GmbH
Rösratherstr. 333
D-51107 Köln
Tel.: 0221 –98 95 20
erklärt hiermit, dass das nachfolgend aufgeführte Produkt bei bestimmungsgemäßer Verwendung den
grundlegenden Anforderungen folgender Richtlinien entsprechen:
Declares herewith, that the products designated below comply with the relevantfundamental
requirements of the following EG directives:
EMC 2014/30/EU
LVD 2014/35/EU
ROHS 2011/65/EU and its amendment Directive (EU) 2015/863
Directive 2009/125/EG Commission Regulation (EU) 2019/1782
Produkt / product: Teleskop Ventilator / teleskopic fan
Typ/Type: 20227
Folgende Normen wurden angewendet: following Standards are used:
Köln, Cologne
20.05.2020
____________________________
Dietmar Jung CEO / Geschäftsführer
EN 55014-1:2017; EN 55014-2:2015
EN 61000-3-2:2014; EN 61000-3-3:2013
IEC 60335-1:2010+A1:2013+A2:2016
IEC 60335-2-23:2015
IEC62321-4-2013+A1:2017; IEC 62321-5-2013
IEC 62321-7-2-2017; IEC 62321-6-2015
IEC 62321-8-2017

8
USER MANUAL
Thank you for purchasing our SEECODE Touch-Screen Fog Fan. To ensure that you can enjoy
your product for a long time and make full use of it, please read these operating instructions
carefully before connecting your appliance to the mains to avoid damage due to incorrect ope-
ration. Please pay particular attention to the safety information. If you hand over the appliance
to a third party, this instruction manual must also be handed over.
WARNING
When using electrical appliances, basic safety precautions should always be followed to reduce
the risk of re, electrical shock and personal injury.
SAFETY INFORMTION
1. Incorrect operation and improper handling can lead to faults on the device and injuries to
the user.
2. In the event of improper use or incorrect handling, no liability can be accepted for any
damage that may occur.
3. Before you put the plug into the socket, please check that the type of current and mains
voltage correspond to the instructions on the rating label on the underside of the appliance.
4. Do not immerse the unit or mains plug in water or other liquids. There is danger to life due
to electric shock! However, if this should occur, remove the mains plug immediately and
then have the unit checked by an expert before using it again.
5. Do not operate the device if the mains cable or the mains plug show signs of damage, if
the device has fallen on the oor or has been otherwise damaged. Insuch cases take the
device to a specialist for checking and repair, if necessary.
6. Never remove the mains plug from the socket by pulling on the mains cable, or with wet
hands.
7. Ensure that the mains cable does not hang over sharp edges or allow it to become trap-
ped.
8. Keep the appliance away from humidity, and protect from splashes.
9. Keep the appliance away from hot objects (e.g. hotplates) and open ames.
10. If the supply cord is damaged, it must be replaced by the manufacturer, its service agent or
similarly.
11. This appliance can be used by children aged from 8 years and above and persons with
reduced physical, sensory or mental capabilities or lack of experience and knowledge if
they have been given supervision of instruction concerning use of the appliance in a safe
way and understand the hazards involved.
12. Children shall not play with the appliance.
13. Cleaning and user maintenance shall not be made by children without supervision.
14. Keep the appliance and its cord out of reach of children of less than 8 years.
15. The appliance should not be operated by means of an external timer – switch or by means
of a separate system with remote control not originally belonging to this appliance.
16. Use the appliance on a at, dry and heat resistant surface.
17. This appliance is intended to be used in households and similar applications.

18. Never leave the device unattended during use.
19. Do not store or operate the appliance in the open air.
20. Keep the appliance in a dry place, inaccessible to children (in its packaging).
21. Never put ngers or any other objects through the grilles (fan guards) when the fan is
running.
22. The appliance must be assembled completely before use.
23. Watch out for long hair! It can be caught in the fan owing to the air turbulence.
24. Do not point the air ow to the people for a long time.
25. Ensure that the fan is switched off from the supply mains before removing the guard.
Part Description
1. Misting Board
2. Front Grill
3. Misting Board Lock Screws
4. Blade Lock Nut
5. Blades
6. Grill Lock Nut
7. Back Grill
8. Motor Shaft
9. Motor Cover
10. Grill Ring
11. Grill Lock Nut
12. Motor Holder
13. Connection Holder
14. Main Holder
15. Holder Fixed Screw
16. Main Body
17. Water Tank
18. Water Outlet Lock nut
19. Base
20. Base Lock Net
21. Wheels
22. Misting Tube
23. Control Panel
24. Remote Control
25. Decorate Panel
26. Water Indicator

10
Assemble
• Insert the connecting wire and the post into the main unit then tighten the fastening knob
ensure to drive the screw into the positioning hole.
• Press the wheels into the base.
• Put holder xed screw through the base, and x the base to the main unit bottom.
• Mount the rear grill, grill nut, blade, blade nut and net clamp.
• Press the misting board into the corrugated hose, and x the misting board with screws on
the front grill.
• Mount the front grill into the net clamp, screw in the net clamp and then tighten the
screws. Mount the corrugated hose on the top of the main unit.
INSTRUCTIONS FOR USE
• ON/OFF(POWER) : Press On/Off button one time to activate the fan. Press On/Off but-
ton a second time to turn on the fan. Press On/Off button when the unit is on to turn off it.
• SPEED : it cycles in the sequence of low - mid - high - low .
• TIMER : it cycles in the sequence of 0.5H-1H-2H-4H. When the unit is operating, you
can set the timer to switch the fan off automatically after the set time. Press the timer
button repeatedly to select the desired time period in half hours increments: from 0,5h to
7,5h. The related indicator light will illuminate on the control panel. When all the light are
off means that time is not setted and the unit will continuously work until you switch off
manually the unit.
• MIST : it cycles in the sequence of low - mid - high.
• MODE : it cycles in the sequence of Normal wind - Natural wind - Sleep wind .
• OSC (oscilation) : it controls the left and right swinging.
Control panel Remote Control

Indicator light:
1. Natural mode indicator
2. Sleeping mode indicator
3. Oscillation
4. Mist volume indicator: minimum-medium-maximum
5. Timer
6. Speed: low-medium-high
7. Power on indicator
Buttons:
A. ON/OFF
B. SPEED
C.MODE
D.TIMER
E.OSC(Oscillation)
F. MIST
Humidify function
• Remove the water tank from the host, and unscrew the water tank cap counter-clockwise.
• Fill the water tank with cold water (The water must not be warmer than 40°C.), tighten the
water tank cap and check for leakage.
Loosen Tighten
• As is shown, put the water tank into the host according to the angle, and wait a few minu-
tes until the host sink is lled with water.
• After the humidify button is pressed, the indicator lights up to start humidify.
• Note: If the indicator ashes (off after 10 seconds), it indicates insufcient water or low
water level, please check whether the oat in the sink of the host has oated or the water
tank is properly placed.
• NOTE: Always drain the main unit before transport. Remove the spring clamp and drain
plug, and clear the machine of the remaining water.

12
Technical data
• 3 speed levels
• Sensor touch display / remote control
• 7.5 hour timer
• Rotor basket made of sheet steel
• Power: 90 Watt
• Water tank 3.0 litres
• 90° rotation
• max 55 dB, low noise
• Dimensions: 40 x 120 x 40 cm
• Material: ABS plastic
• Weight: 5,6 kg
• With oscillation, timer and 2 selectable additional modes
• Convenient sensor touch display. Can also be conveniently controlled by remote control.
• Housing made of plastic in elegant matt black/white
• Removable 3-litre tank for approx. 10 hours of spray mist
• Timer function (30 - 450 minutes)
• Easy to move on 5 castors.
CLEANING AND MAINTENANCE
NOTED: Before cleaning the appliance always disconnect the power plug from the receptacle.
1. DO NOT dip the device in water, or splash it with any other liquids.
2. DO NOT use solvents or any other chemical products for cleaning it. When you do not use
it, after cleaning it, store the fan in a dry place.
3. When you have nished using the fan at the end of the season, wipe off any dust to main-
tain it in good working order for the next season; if necessary disassemble the grille and
remove the fan; clean them with a soft damp cloth.
4. Remove the water tank and clean it with lukewarm water; before replace the water tank in
the unit make sure it is completely dry. Draining the water out of the unit placing a contai-
ner underneath the water drain (indicated with an arrow in below picture) and let any water
remaining in the water reservoir drain out.
water drain--------------------------------

Used batteries must not be disposed of through household garbage,since they might con-
tain toxic elements and heavy metals that can be harmful to the environment and human
health. Return empty batter-ies to an appropriate recycling facility.
Warranty / Guarantee
The warranty period is 24 months from the date of purchase. The proof of purchase is valid as
proof of this. Product has been thoroughly checked for quality and functionality before dispatch.
The warranty is excluded in the following cases:
- in the event of faulty installation
- in the event of modications to the system without our approval
- in the event of damage due to moisture, drop damage or damaged cables
- if there is no proof of purchase
Intended use
This unit is only intended for the above-mentioned use. Any other use or use beyond this is
considered improper use.
CE Declaration of Conformity
Mobiset GmbH hereby declares that this product is in conformity with the essential requi-
rements of the applicable European directives.
General information
Copyright
This document is protected by copyright. Any duplication or reprinting, including excerpts, as
well as the reproduction of illustrations, even in modied form, is only permitted with the written
consent of the manufacturer.
Notes on environmental protection
The packaging materials used can be recycled. Dispose of packaging materials that are
no longer needed in accordance with the locally applicable regulations.
This product must not be disposed of in normal household waste within the European
Union. Dispose of the appliance at municipal collection points.
EU-Konformitätserklärung
DECLARATION OF CONFIRMITY
Mobiset GmbH
Rösratherstr. 333
D-51107 Köln
Tel.: 0221 –98 95 20
erklärt hiermit, dass das nachfolgend aufgeführte Produkt bei bestimmungsgemäßer Verwendung den
grundlegenden Anforderungen folgender Richtlinien entsprechen:
Declares herewith, that the products designated below comply with the relevantfundamental
requirements of the following EG directives:
EMC 2014/30/EU
LVD 2014/35/EU
ROHS 2011/65/EU and its amendment Directive (EU) 2015/863
Directive 2009/125/EG Commission Regulation (EU) 2019/1782
Produkt / product: Teleskop Ventilator / teleskopic fan
Typ/Type: 20227
Folgende Normen wurden angewendet: following Standards are used:
Köln, Cologne
20.05.2020
____________________________
Dietmar Jung CEO / Geschäftsführer
EN 55014-1:2017; EN 55014-2:2015
EN 61000-3-2:2014; EN 61000-3-3:2013
IEC 60335-1:2010+A1:2013+A2:2016
IEC 60335-2-23:2015
IEC62321-4-2013+A1:2017; IEC 62321-5-2013
IEC 62321-7-2-2017; IEC 62321-6-2015
IEC 62321-8-2017

14
MANUEL DE L‘UTILISATEUR
Merci d‘avoir acheté notre ventilateur de brumisation à écran tactile SEECODE. An de proter
longtemps de votre produit et de l‘utiliser pleinement, veuillez lire attentivement ce manuel
avant de brancher votre appareil sur le secteur pour éviter tout dommage dû à un mauvais
fonctionnement. Veuillez prêter une attention particulière aux informations relatives à la sécuri-
té. Si vous remettez l‘appareil à un tiers, ce mode d‘emploi doit également être remis.
AVERTISSEMENT
Lors de l’utilisation d’un appareil électrique, des précautions de sécurité de base doivent
toujours être observées an de réduire les risques d’incendie, de chocs électriques ou de
blessures corporelles.
CONSIGNES DE SECURITÉ
1. Une mauvaise utilisation et un mauvais maniement peuvent causer des dysfonctionne-
ments de l’appareil et des dommages corporels aux utilisateurs.
2. En cas de mauvaise utilisation ou de manipulation inappropriée, aucune garantie ne peut
être assumée pour les dommages éventuels.
3. Vériez avant de brancher l’appareil si le type de courant et la tension du réseau corre-
spondent aux indications gurant sur la plaquette signalétique située sous l’appareil.
4. N’immergez pas l’appareil, son cordon secteur ou sa prise dans l’eau ou dans tout autre
liquide. Il y a un risque vital en cas de choc électrique ! Néanmoins, si tel est le cas, dé-
branchez immédiatement l’appareil du réseau puis faites - le vérier par un specialist avant
de l’utiliser à nouveau.
5. N’utilisez pas l’appareil si le cordon ou la prise d’alimentation électrique présente des
signes de dommage. Si l’appareil est tombé au sol ou a été endommagé d’une autre ma-
nière. En pareil cas, emmenez l’appareil chez un spécialiste qui le vériera et le réparera
si nécessaire.
6. Ne jamais débrancher la che secteur de la prise de courant en tirant sur le cordon d’ali-
mentation ou avec les mains mouillées.
7. S’assurer que le cordon d’alimentation n’est pas posé sur des bords tranchants ou Coincé.
8. Tenir l’appareil à l’abri de l’humidité et le protéger des éclaboussures.
9. Tenir l’appareil à l’écart des objets émettant de la chaleur (ex: plaques chauffantes) et des
ammes.
10. S’il est endommagé, le cordon d’alimentation doit être remplacé par le fabricant, ses
agents de réparation ou une personne qualiée an d’éviter tout risque d’accident.
11. Cet appareil peut être utilisé par les enfants à partir de 8 ans et les personnes souffrant
dedécience physique, sensorielle et mentale ou manquant d’expérience et de connais-
sance àconditions qu’elles soient sous surveillance ou aient reçu des instructions sécuritai-
res relatives à l’utilisation de l’appareil et comprennent les risques impliqués.
12. Les enfants ne doivent pas jouer avec l’appareil.
13. Le nettoyage et l’entretien par l’utilisateur ne doivent pas être effectués par les enfants
sans surveillance.
14. Conservez l’appareil et son cordon hors de la portée des enfants de moins de 8 ans.

15. L’appareil ne doit pas être mis en marche au moyen d’une prise minuteur externe ou au
moyen d’un système de télécommande séparé n’appartenant pas à l’appareil.
16. Placez l’appareil sur une surface plate, sèche et résistante à la chaleur.
17. Cet appareil est conçu pour être utilisé dans les ménages et dans les lieux similaires.
18. Ne jamais laisser l’appareil sans surveillance en cours d’utilisation.
19. Ne pas ranger ou utiliser l’appareil à l’extérieur.
20. Conserver l’appareil dans un endroit sec, hors de la portée des enfants (dans son emballa-
ge).
21. Ne jamais placer les doigts ou autres objets à travers les grilles (grilles de protection)
lorsque le ventilateur fonctionne.
22. L’appareil doit être entièrement assemblé avant toute utilisation.
23. Attention aux cheveux longs ! Ceux‐ci pourraient se coincer dans le ventilateur en raison
des mouvements d’air.
24. Ne pas diriger le ux d’air vers des personnes pendant de longues périodes.
25. S’assurer que le ventilateur est débranché du réseau d’alimentation avant de retirer la.
Description des pièces
1. Plaque de brumisation
2. Grille avant
3. Vis de verrouillage de la plaque
de brumisation
4. Écrou de blocage de l’hélice
5. Hélice
6. Écrou de blocage de la grille
7. Grille arrière
8. Arbre moteur
9. Carter moteur
10. Cercle de grille
11. Écrou de blocage de la grille
12. Support moteur
13. Support de connexion
14. Support principal
15. Écrou xe du support
16. Corps principal
17. Réservoir d’eau
18. Écrou de blocage de sortie d’eau
19. Socle
20. Écrou de verrouillage du socle
21. Roulettes
22. Tube de brumisation
23. Panneau de commande

16
24. Télécommande
25. Cache
26. Témoin de niveau d’eau
Montage
• Insérer le câble de branchement et la tige dans l’unité principale, puis serrer la poignée de
serrage en veillant à visser dans l’orice prévu.
• Appuyer sur les roulettes pour les xer sur le socle.
• Placer l’écrou xe du support dans le socle et xer le socle sur la partie inférieure de l‘unité
principale.
• Monter la grille arrière, l’écrou de grille, l’hélice, l’écrou d’hélice et le cercle de serrage.
• Appuyer sur la plaque de brumisation pour qu’elle rentre dans le tuyau ondulé et la xer à
l‘aide des vis sur la grille avant.
• Monter la grille avant sur le cercle de serrage, visser le cercle de serrage puis serrer. Fixer
le tuyau ondulé sur la partie supérieure de l’unité principale.
MODE D’EMPLOI
• ON/OFF(MISE SOUS TENSION) : Appuyer sur le bouton On/Off une fois pour allumer
le ventilateur. Appuyer sur le bouton On/Off une seconde fois pour démarrer le ventilateur.
Appuyer sur le bouton On/Off lorsque l’unité est sous tension pour l’éteindre.
• VITESSE : la séquence de réglage est faible - moyen - fort - faible .
• MINUTEUR : la séquence de réglage est 0,5H-1H-2H-4H. Lorsque l’unité fonctionne,
vous pouvez paramétrer le minuteur pour que le ventilateur s’éteigne automatiquement
après la durée prédénie. Appuyer sur le bouton du minuteur à plusieurs reprises pour
sélectionner la durée souhaitée par tranche de 30 minutes : de 0,5 h à 7,5 h. Le témoin
lumineux correspondant s’allume sur le panneau de commande. Lorsque tous les témoins
sont éteints, aucune durée n’est paramétrée et l’unité fonctionne en continu jusqu’à ce
qu’elle soit arrêtée manuellement.
• BRUMISATION : la séquence de réglage est faible - moyenne - forte.
• MODE : la séquence de réglage est Ventilation normale – Ventilation naturelle - Ven-
tilation silencieuse .
• OSC (oscillation) : contrôle l’oscillation du ventilateur.

Panneau de commande Télécommande
Témoin lumineux:
1. Témoin mode naturel
2. Témoin mode silencieux
3. Oscillation
4. Témoin volume brumisation: minimum-moyen-maximum
5. Minuteur
6. Vitesse : faible-moyenne-haute
7. Témoin de mise sous tension
Boutons:
A. ON/OFF (marche/arrêt)
B. SPEED (vitesse)
C. MODE
D. TIMER (minuteur)
E. OSC (oscillation)
F. MIST (brumisation)
Fonction Humidier
• Retirer le réservoir d’eau de l‘unité et dévisser le bouchon du réservoir d’eau dans le sens
antihoraire.
• Remplir le réservoir d’eau avec de l’eau froide (la température de l’eau ne doit pas dépas-
ser 40°C), serrer le bouchon du réservoir et vérier qu’il ne fuit pas.
Desserrer Serrer

18
• Comme illustré, placer le réservoir d’eau dans l’unité selon l’angle indiqué et patienter
quelques minutes pour que la base de l’unité se remplisse d’eau.
• En appuyant sur le bouton Humidier, le témoin s’allume pour démarrer la fonction Humi-
dier.
• Remarque : si le témoin clignote (s’éteint après 10 secondes), le niveau d’eau est insuf-
sant. Vérier que le otteur de l’unité otte ou que le réservoir d’eau est correctement
installé.
• REMARQUE : Toujours purger l’unité principale avant un transport. Retirer la pince à
ressort et le bouchon de vidange et évacuer l’eau de la machine.
Spécications techniques
• 3 niveaux de vitesse
• Afchage tactile des capteurs / télécommande
• 7,5 heures de chronométrage
• Panier de rotor en tôle d‘acier
• Puissance : 90 Watt
• Réservoir d‘eau 3,0 litres
• Rotation de 90°.
• max 55 dB, faible bruit
• Dimensions : 40 x 120 x 40 cm
• Matériau : plastique ABS
• Poids : 5,6 kg
• Avec oscillation, minuterie et 2 modes supplémentaires sélectionnables
• Écran tactile à capteur confortable. Il peut également être commandé à distance.
• Boîtier en plastique dans un élégant noir/blanc mat
• Réservoir amovible de 3 litres pour environ 10 heures de brouillard de pulvérisation
• Fonction de minuterie (30 - 450 minutes)
• Facile à déplacer sur 5 roulettes.
NETTOYAGE ET MAINTENANCE
REMARQUE : Avant de nettoyer l’appareil, toujours débrancher la prise d’alimentation du
réceptacle.
1. NE PAS plonger l’appareil dans l’eau ou l’asperger de tout autre liquide.
2. NE PAS utiliser de solvants ou tout autre produit chimique pour nettoyer l’appareil. Après
nettoyage, lorsque le ventilateur n’est pas utilisé, le ranger dans un lieu sec.
3. À la n de la saison d’utilisation du ventilateur, nettoyer la poussière à l’aide d’un chiffon
pour assurer le bon fonctionnement pour la saison suivante ; si nécessaire, démonter la
grille et retirer l’hélice, puis nettoyer avec un chiffon humide doux.
4. Retirer le réservoir d’eau et le nettoyer à l’eau tiède ; avant de remettre le réservoir d’eau
dans l’unité, veiller à le sécher totalement. Purger l’eau de l’unité en plaçant un récipient
sous la sortie de purge (indiquée par une èche dans l’illustration ci-dessous) et laisser
couler l’eau présente dans le réservoir.

sortie de purge--------------------------------
Les piles usees ne doivent pas etre jetees avec les ordures menageres, car elles sont
susceptible de contenir des elements toxiques et des metaux lourds nocifs pour l‘environ-
nement et dangereux pour la sante. Rapportez les piles usees a un centre de recyclage
approprie.
Garantie / Garantie
La période de garantie est de 24 mois à compter de la date d‘achat. La preuve d‘achat en est la
preuve. La qualité et la fonctionnalité du produit ont été soigneusement vériées avant l‘expédi-
tion. Une exclusion de la garantie a lieu dans les cas suivants :
• en cas d‘installation défectueuse
• en cas de modication du système sans notre accord
• en cas de dommages causés par l‘humidité, les chutes ou les câbles endommagés
• si aucune preuve d‘achat n‘est disponible
Utilisation prévue
Cet appareil est uniquement destiné à l‘utilisation mentionnée ci-dessus. Toute autre utilisation
ou utilisation au-delà est considérée comme une utilisation abusive.
Déclaration de conformité CE
Mobiset GmbH déclare par la présente que ce produit est conforme aux exigences
essentielles des directives européennes applicables.
Informations générales
Copyright
Ce document est protégé par le droit d‘auteur. Toute duplication ou réimpression, y compris
d‘extraits, ainsi que la reproduction des illustrations, même sous forme modiée, ne sont autor-
isées qu‘avec l‘accord écrit du fabricant.
Notes sur la protection de l‘environnement
Les matériaux d‘emballage utilisés peuvent être recyclés. Éliminez les matériaux d‘em-
ballage qui ne sont plus nécessaires conformément à la réglementation locale en vigueur.
Ce produit ne doit pas être éliminé avec les autres déchets ménagers dans l‘Union euro-
péenne. Jetez l‘appareil dans les points de collecte municipaux.
EU-Konformitätserklärung
DECLARATION OF CONFIRMITY
Mobiset GmbH
Rösratherstr. 333
D-51107 Köln
Tel.: 0221 –98 95 20
erklärt hiermit, dass das nachfolgend aufgeführte Produkt bei bestimmungsgemäßer Verwendung den
grundlegenden Anforderungen folgender Richtlinien entsprechen:
Declares herewith, that the products designated below comply with the relevantfundamental
requirements of the following EG directives:
EMC 2014/30/EU
LVD 2014/35/EU
ROHS 2011/65/EU and its amendment Directive (EU) 2015/863
Directive 2009/125/EG Commission Regulation (EU) 2019/1782
Produkt / product: Teleskop Ventilator / teleskopic fan
Typ/Type: 20227
Folgende Normen wurden angewendet: following Standards are used:
Köln, Cologne
20.05.2020
____________________________
Dietmar Jung CEO / Geschäftsführer
EN 55014-1:2017; EN 55014-2:2015
EN 61000-3-2:2014; EN 61000-3-3:2013
IEC 60335-1:2010+A1:2013+A2:2016
IEC 60335-2-23:2015
IEC62321-4-2013+A1:2017; IEC 62321-5-2013
IEC 62321-7-2-2017; IEC 62321-6-2015
IEC 62321-8-2017

20
GEBRUIKER HANDLEIDING
Bedankt voor de aankoop van onze SEECODE touch screen misting fan. Om lang van uw
product te kunnen genieten en het optimaal te kunnen gebruiken, dient u deze handleiding
zorgvuldig door te lezen voordat u het apparaat op het lichtnet aansluit, om schade als gevolg
van een verkeerde bediening te voorkomen. Gelieve bijzondere aandacht te besteden aan de
veiligheidsinformatie. Als u het apparaat aan een derde partij overhandigt, moet deze bedie-
ningshandleiding ook worden overhandigd.
WAARSCHUWING
tijdens het gebruik van elektrische apparaten dienen altijd enkele fundamentele voorzorgs-
maatregelen in acht genomen te worden, om gevaar van vuur, elektrische schok en letsel te
verminderen.
VEILIGHEIDSINFORMATIE
1. Foutieve bediening en ondeskundig gebruik kunnen tot storingen aan het apparaat en
letsel van de gebruiker leiden.
2. Wij zijn niet aansprakelijk voor schade, die door ondeskundig gebruik of foutieve bediening
werden veroorzaakt.
3. Controleer, of de stroomsoort en de spanning overeenkomen met het op het typeplaatje
aan de onderkant van het apparaat aangegeven gegevens, voordat u de stekker in het
stopcontact steekt.
4. Dompel het apparaat en de stekker niet in water of andere vloeistoffen. Er bestaat levens-
gevaar door elektrische schokken! Als het apparaat of de stekker nat zijn geworden, dient
u de stekker direct uit het stopcontact te halen en het apparaat voor de volgende ingebru-
ikname door een deskundige te laten controleren.
5. Gebruik het apparaat niet, als de kabel of de stekker zichtbare beschadigingen hebben en
als het apparaat op de grond is gevallen of op een andere manier werd beschadigd. Breng
het apparaat in dergelijke gevallen ter controle en eventueel reparatie naar een service-
werkplaats.
6. Trek nooit met natte handen aan de stekker van de kabel en trek nooit aan de kabel om de
stekker uit het stopcontact te halen.
7. Let erop, dat de kabel niet over scherpe randen hangt of wordt vastgeklemd.
8. Houd het apparaat uit de buurt van vocht en bescherm het tegen spatters.
9. Houd het apparaat uit de buurt van hete voorwerpen (bijv. kookplaten) en open vuur.
10. Als de kabel van dit apparaat beschadigd wordt, moet het door de fabrikant of zijn klan-
tenservice of een soortgelijk gekwaliceerde persoon worden vervangen, om gevaren te
voorkomen.
11. Dit apparaat kan door kinderen vanaf 8 jaar en door personen met beperkte fysieke,
sensorische of mentale vaardigheden of zonder ervaring en/of kennis worden gebruikt, als
deze persoon door een voor diens veiligheid verantwoordelijke persoon in de gaten wordt
gehouden of van deze persoon instructies heeft gekregen, over hoe men het apparaat
veilig gebruikt en attent werd gemaakt op de risico‘s.
12. Dit apparaat is geen speelgoed.
Table of contents
Languages:
Popular Fan manuals by other brands

Luminance Brands
Luminance Brands HF1161BQ00 owner's manual
Maico
Maico EVR 31 Mounting and operating instructions
Phaesun
Phaesun Cool Breeze 12 manual
SolarVenti
SolarVenti SV7 installation manual

GSI Outdoors
GSI Outdoors 2000 Series installation manual
Maico
Maico ECA 150 ipro VZC Mounting and operating instructions
Fanimation
Fanimation Islander FP320 Series Specification sheet

Kendal Lighting
Kendal Lighting AC-22054 Installation and operation manual
Modern Fan Co
Modern Fan Co IC/Air3 DC Series Installation instructions and owner's manual

ERA
ERA COMFORT 4 operation instruction

Progress Lighting
Progress Lighting AirPro CALERA installation manual

Lunos
Lunos RA 15-60 installation instructions
