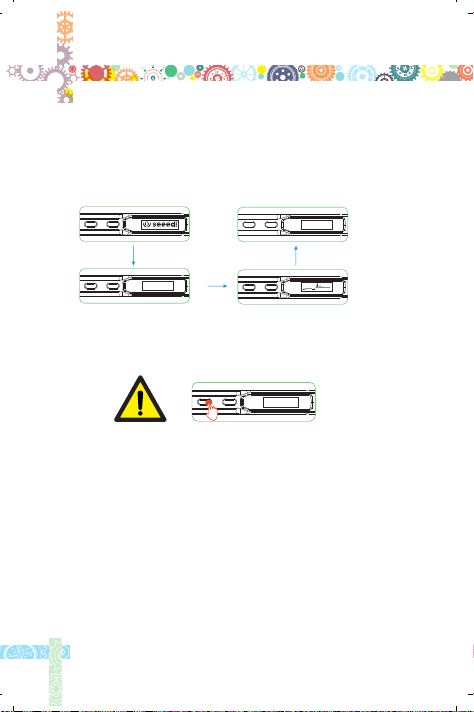
Seeed Mini Soldering iron User manual

Instruction Manual
Version 1.1
For your own safety, please read the manual before
installing the device
(The current version of this instruction manual is APPV2.70)
C
M
Y
CM
MY
CY
CMY
K
tiny电烙铁 使用说明.pdf 1 2015/12/7 10:06:56

C
M
Y
CM
MY
CY
CMY
K
tiny电烙铁 使用说明.pdf 2 2015/12/7 10:06:56

Safety Statement
Legal Statements
Technical Support
WARNING:Failure to comply with the WARNING may cause
serious injury to the user or others.
CAUTION: Failure to comply with the CAUTION may cause
damage to the product or other objects.
Please pay attention to the Annotations, Operation notes and
Additional information.
Overview P3
Power Adaptor
Selection P5
Operation P6
P14
P16
Trouble Shooting
Guide
P18
P20
Soldering Iron Tip
C
M
Y
CM
MY
CY
CMY
K
tiny电烙铁 使用说明.pdf 3 2015/12/7 10:06:56

Safety Statement
1
1.1 General Safety
Keep out of reach of children
Please choose the certified power source/adapter from your
region.
(For more detailed information, please refer to 3.0 )
Do not operate under wet condition.
Do not operate near flammable or explosive materials.
Keeping the surface of the equipment clean and dry.
1.2 Working Condition
Working
Condition
Temperature
Humidity
In operation state: from 0℃ to +50℃
In idle state: from -20℃ to +60℃
In operation state: from 40℃ to 50℃, 0% to 60% RH
In operation state: from 0℃ to 40℃, 10% to 90% RH
In idle state: high temperature: from 40℃
to 60℃, 5% to 60% RH
In idle state: low temperature: from 0℃ to
40℃, 5% to 90% RH
C
M
Y
CM
MY
CY
CMY
K
tiny电烙铁 使用说明.pdf 4 2015/12/7 10:06:56

2
1.3 Warnings
Turn the power off when not in use, or left unattended.
When the power is ON, the tip temperature will rise between
100℃~400℃ (212℉~752℉)
Please do not wet the tool or operate it when your hands are wet
1.4 Cautions
Please avoid any severe shocks, for the control part is created
with precision electronic components.
The temperature of control knob will reach 50~60℃ after 40-
minute continuous use over 350℃.
A small chain of smoke may come out due to the high temperature
when use for the first time.
Do not attempt to repair the Mini Soldering Iron, or the warranty
will be invalidated.
1.5 Liability Statement
The user ought to undertake the responsibilities if any special,
indirect, consequential, incidental or secondary damages and
liabilities are caused out of any reason.
C
M
Y
CM
MY
CY
CMY
K
tiny电烙铁 使用说明.pdf 5 2015/12/7 10:06:56

3
Overview
2.1 Name of Parts
01. Solder iron tip fixing screw
02. Button A
03. Button B
04. Set screw
05. Power port
06. Micro USB
07. DC5525 12-24V port
08. Solder iron tip connection port
09. solder iron connection side
10. Solder iron heating element
1
4
23
8
7
6
10
9
5
C
M
Y
CM
MY
CY
CMY
K
tiny电烙铁 使用说明.pdf 6 2015/12/7 10:06:57

4
Overview
2.2 Specifications
Screen OLED
USB port Micro USB
Power port DC5525
Dimensions Control knob
Heating Part
Length: 96mm,
Diameter: 16.5mm
Length: 33mm,
Diameter: 5.5mm
2.3 Operation Specifications
Power 65W
Temperature range 100℃~400℃(max)
Temperature stability ±2%
Operation temperature under
heat environment
Soldering tip resistance value
to the ground
C
M
Y
CM
MY
CY
CMY
K
tiny电烙铁 使用说明.pdf 7 2015/12/7 10:06:57

5
Power Adaptor Selection
Please ensure the DC5525(12-24V)power adapter is in good
condition before connecting it with the Mini soldering iron.Please
choose the certificated standard adapters only
12V
16V
19V
24V
17W
30W
40W
65W
40s
20s
15s
11s
1.4A
1.9A
2.1A
2.7A
Operation
voltage Power Electric
current Time
Time for tip temperature rise from 30℃ to 300℃ under standard
operating voltage, power and currents
C
M
Y
CM
MY
CY
CMY
K
tiny电烙铁 使用说明.pdf 8 2015/12/7 10:06:57

6
Operation
4.1 Mini Soldering Iron Installation
1.Unscrew the tip setscrew, insert the solder tip into the con-
nection port, and then tighten screw.
2.Connect the ground wires with the ground set screw.
3.Connect the DC connector to Mini Soldering Iron, plug the
power cord and turn on the device accordingly.
Note: Solder tip is connected inappropriate when “sen-err”is
displayed on the screen , please reconnect under proper ins-
truction.
℃
3℃
200℃
100℃~400℃
(
Max
)
4.2 Default Settings
(Default)
(Default)
Sl
A
C
M
Y
CM
MY
CY
CMY
K
tiny电烙铁 使用说明.pdf 9 2015/12/7 10:06:57

7
Operation
4.3 Basic Control
4.3.1 Screen Display
When the DC12-24V power adapter is plugged into the control
part, the boot logo, version number, thermometer and standby
image will be displayed in sequence.
Ver2 01
.
Press
DFU1.0
To enter DFU mode,press Button A after DC12-24V power adapter
is plugged into the control part .The OLED screen will display "DFU
1.0" when you operate properly.
To exit DFU mode, unplug the power supply and turn the device
on again without pressing any button to enter the standby mode.
C
M
Y
CM
MY
CY
CMY
K
tiny电烙铁 使用说明.pdf 10 2015/12/7 10:06:58

8
Press Button B in standby mode to enter the thermometer mode
Operation
4.3 Basic Control
4.3.2 Automatic Calibration
Press
24℃
24℃
VCal_V
In thermometer mode press two buttons
simultaneously to enter the calibration mode
Cal_X
To exit thermometer mode, long-press any button
Long press any button to exit thermometer mode
Note: Please operate Calibration Mode when the device is at
room temperature.
Calibration failedCalibration success
C
M
Y
CM
MY
CY
CMY
K
tiny电烙铁 使用说明.pdf 11 2015/12/7 10:06:58

Pressing Button A in standby mode, the temperature of Mini
Soldering Iron will rise to the preset temperatures
9
Operation
4.3 Basic Control
4.3.3 Heating up
Press 30 0℃
30 0℃
Ready for soldering
In operation mode, press two buttons simultaneously for 3 seconds
will return to standby mode
C
M
Y
CM
MY
CY
CMY
K
tiny电烙铁 使用说明.pdf 12 2015/12/7 10:06:58

10
Press button A in Standby
Mode to enter Temperature
Adjustment Mode
Operation
4.3 Basic Control
4.3.4 Temperature Adjustment
30 0℃
246℃ 20 0℃
30 0℃
30 0℃
30 0℃
Lower Temperature: Press button
A for at least 2 minutes in
Temperature Adjustment Mode,
and release the button when the
temperature reaches the expected
value.
The temperature of Mini Sold-
ering Iron is now decreasing to
the level you expect
Increasing temperature: Press
Button B at least 2 seconds in
Temperature Adjustment Mo-
de and release the button wh-
en the temperature reaches
your expectation
When the temperature increases
to the level you expect then rel-
ease the button
C
M
Y
CM
MY
CY
CMY
K
tiny电烙铁 使用说明.pdf 13 2015/12/7 10:06:58

11
Note: Left /Right Arrow ( or ) indicates the temperature
has reached the maximum or minimum temperature, the s-
etting in current state will not be saved when the user turns
the power off.
Remark: Maximum temperature: 400℃
Minimum temperature: 100℃
Operation
4.3 Basic Control
4.3.4 Temperature Adjustment
100℃
40 0℃
298 ℃
Soldering Iron will enter into the Automatic Compensation Mode
when the custom temperature stabilizes for 60 seconds (Tem-
perature will be compensated every 5-8 seconds)
The rightmost digital image represents the following meanings
respectively
Up-arrows : heating Down-arrows:cooling
Wave lines :Temperature stabilized
C
M
Y
CM
MY
CY
CMY
K
tiny电烙铁 使用说明.pdf 14 2015/12/7 10:06:58

12
Rest the Mini Soldiering Iron for 180 seconds ( 3 minutes in de-
fault)in Operating Mode will trigger the Sleep Mode and back to
the custom sleep mode temperature.
Operation
4.3 Basic Control
4.3.5 Sleep Mode
Press
20 0℃
30 0℃
It will go back to operating temperature mode (300℃ in default)
when the user moves the device again.
In Sleep Mode, the device will then enter the Standby Mode if it is
not operated longer than the IDLE-TIME setting.
Note: IDLE_TIME ( 6 minutes in default) can be customized and
should not be shorter than 5 minutes minimum
C
M
Y
CM
MY
CY
CMY
K
tiny电烙铁 使用说明.pdf 15 2015/12/7 10:06:59

13
Operation
4.4 System Parameters
Parameter Description Default adjustable
range
Sleep mode
temperature
Operation
mode
temperature
Standby mode
time
Sleep mode
time
Temperature
increase
Protection
voltage
Unit setting
Temperature
calibration
Standby mode
temperature
Mini solder iron operation
temperature
Length of Sleep Mode to
Standby Mode
Time from operation
mode to sleep mode
When set to "1", each step
will progress in 1.2.5.25
When set to 2-25, each step
will progress according to
setting
Temperature unit selection
When operation voltage is
lower than default voltage
MINI SOLDERING IRON will
return to standby mode
Temperature calibration
parameter MINI SOLDERING
IRON automatic adjustment
200℃
180
seconds
360
seconds
10
10V
℃
100℃~400℃
300℃
60~9999
seconds
300~9999
seconds
5-25
9-12V
0 is ℃
1 is ℉
300℃
no manual
setting required
Note: The default parameter will be updated to Mini Soldering
Iron automatically after saving it.
C
M
Y
CM
MY
CY
CMY
K
tiny电烙铁 使用说明.pdf 16 2015/12/7 10:06:59

14
Soldering Iron Tips
5.1 Assemble the Solder Tip
1. Make sure the power is turned off before changing the tip
2. Remove the screw on operation side
3. Remove the tip and replace with another one
4. Fix the tip with the screw
Note: An"sen-err" image on the screen indicates the tip is not
properly installed
C
M
Y
CM
MY
CY
CMY
K
tiny电烙铁 使用说明.pdf 17 2015/12/7 10:06:59

15
5.2 Choosing Soldering Iron Tips
Note: Selecting a right tip will help you work more efficiently
Soldering Iron Tips
11.5
45°
TS-D24 TS-BC2TS-K TS-B2
10.010.0
15.0
45°
(1) Wipe the tip's soldering side with some solder before turning
it off.
(2) Do not leave the tip in high temperature for too long as the
high temperature may degrade the tip.
(3) To prevent the tip from damages, please use the soldering
iron in a proper strength.
(4) Do not use rough material to clean the tip.
(5) If the tip is covered with oxide and difficult to joint the solder,
please apply 600~800 grit sandpaper and wipe the tip with Etha-
nol or Isopropyl alcohol. Increase the tip temperature to 200℃
and joint solder immediately to avoid it oxidize.
(6) Do not use Flux which contains high chlorine or acid, use the
resin based flux only.
5.3 Soldering Iron Tip Maintenance
5.4 Soldering Iron Tip Lifespan
Please refer to item 5.3 for a better maintenance of the Mini
Soldering Iron. Its lifespan depends highly on how you use it.
C
M
Y
CM
MY
CY
CMY
K
tiny电烙铁 使用说明.pdf 18 2015/12/7 10:06:59

16
Trouble Shooting Guide
Q1: No Display
Q 2: Every time when replace a new tip, the temperature vary dram-
atically
Q3: Soldering iron restarts automatically
Q4: Soldering iron is heating intermittently
Q5: OLED displays "Warning!"
A1. Check whether the cable is in a good condition.
A2. Check whether there are any data in USB mode
A3. Check the screen and see whether it needs to be replaced.
A.The phenomena indicates the device is in Auto-detect Mode, which
is normal
A1. Check the power source, whether it is plugged correctly
A2. Check the voltage, if it is lower than the system parameter's
please reset it.
A1. This may happen occasionally when the tip is used for the first time.
A2. Check if the power cord is in loose or contact defectively?
A3: If the tip temperature is too high, please lower the temperature to
an appropriate value.
Set the temperature in appropriate level
A4: If the tip is dirty, please refer to Part 5.3 Soldering Iron Tip
Maintenance.
A1.The Mini Soldering Iron temperature may be higher than the maxi-
mum operating temperature
The warning sign will disappear after the temperature returns to the
working temperature range
C
M
Y
CM
MY
CY
CMY
K
tiny电烙铁 使用说明.pdf 19 2015/12/7 10:06:59

17
Q6: OLED displays " High-Vt "
Q7: OLED displays " Sen-err"
Q8: The tip fails to take a tin and cause defective joints
Q8: Mini Soldering Iron return to Standby Mode during operation
Trouble Shooting Guide
A1: The voltage may be too high (Excess 24V)
A1: Check if the tip is installed properly
A2: If the tip is installed properly you should consider replacing it
with a new tip.
A1. If the tip temperature rises higher than 400℃, please lower the
temperature.
A2. The tip tins improperly.
A3. If there is not enough flux during operation, please add some
more flux.
A4. Don’t wipe the tip with a high-sulfur sponge or dry fabric.
A5. Don’t use the tip to touch any organic materials such as plastic,
silicone oil or other chemicals.
A1:Check whether the voltage is lower than default (10V). If so,
please adjust or wait until the voltage rises to 10V or higher.
C
M
Y
CM
MY
CY
CMY
K
tiny电烙铁 使用说明.pdf 20 2015/12/7 10:06:59
Table of contents
Popular Power Tools manuals by other brands

Ozito
Ozito OSIK-30 instruction manual

Urrea
Urrea SKB920 User manual and warranty

MMLJ MANUFACTURING
MMLJ MANUFACTURING DUSTLESS BLASTING DB500 user manual

Stark
Stark 53500 Owner's manual and safety instructions

Modern Electronics Factory
Modern Electronics Factory MET1389 user manual

Grizzly
Grizzly G4173 owner's manual