Seeley LCB250 User manual

OWNER’S MANUAL
Evaporative Cooler
Original English Instructions
(English) (LCB, CPL, CPS, BM)

SEELEY INTERNATIONAL - OWNER’S MANUAL |3
TABLE OF CONTENTS
INTRODUCTION 4
WALL CONTROL FUNCTIONS 5
STARTING YOUR COOLER 5
AUTOMATIC MODE 6
MANUAL MODE 6
TIMED AUTOMATIC START 7
TIMED AUTOMATIC STOP 7
USING THE COOLER 8
AIR TOO COLD 8
AIR NOT COLD ENOUGH 8
DRAIN VALVE & BLEED SYSTEM 8
CONTINUOUS BLEED SYSTEM 8
AUTOMATIC DRAIN VALVE 8
MAINTENANCE 9
HEALTH REGULATIONS 9
REMOVAL OF PAD FRAMES 9
END OF SEASON SERVICE 10
PRE-SEASON SERVICE 10
MAINTENANCE SCHEDULE SERVICE CHECKLIST 11
TROUBLESHOOTING GUIDE 12

4 |LCB/CPS/BM Evaporative Cooler
INTRODUCTION
Cooler Models Exhaust
Opening
LCB250 BM500 CPL450 CPS450 2.0m2
LCB350 BM750 CPL700 CPS700 2.5m2
LCB450 BM900 CPL850 CPS850 3.0m2
LCB550 BM1150 CPL1100 CPS1100 4.0m2
* Please note that an average size door is 1.5m2
At Seeley International we manufacture
evaporative coolers from the highest quality
materials, and we have designed the product
to provide many years of economical, trouble-
free cooling.
Please take a few moments to read these
operating instructions, so that the most can
be gained from this investment. Keep these
instructions in a safe place for future reference.
Your installer should demonstrate the features
and procedures set out in these instructions.
The installer should also provide you with a
Model and Serial number, which can be lled
out on the last page.
KEEP THESE INSTRUCTIONS IN A SAFE
PLACE FOR FUTURE REFERENCE.
This appliance is not intended for use by
persons (including children) with reduced
physical, sensory or mental capabilities, or
lack of experience and knowledge, unless they
have been given supervision or instruction
concerning the use of the appliance by a
person responsible for their safety. Children
should be supervised to ensure they do not
play with the appliance.
Important Notes!
In areas where temperatures can cause water
supply pipes to freeze, a drain down facility
should be provided during the installation. This
drain down facility must be activated prior to
freezing conditions, to avoid possible damage
to the cooler components.
If the supply cord is damaged, it must be
replaced by a Seeley service agent or similarly
qualied person in order to avoid hazard.
New hose sets supplied with the appliance
are to be used. Old hose sets (from previous
installations) should not be re-used.
EFFECTIVE COOLING
To provide efcient cooling or ventilation the
building must have sufcient exhaust openings
to outdoors in the form of doors, windows or
other vents. To assist air circulation, open
windows or doors that are furthest from the
outlet vent in each room. In every room that
has an outlet vent, provide an exhaust opening
about 2 or 2.5 times the vent size of the room.
Where the design of the building prevents
adequate exhaust, consideration should be
given to the provision of mechanical extraction
such as an exhaust fan.
Total minimum openings for the whole building

SEELEY INTERNATIONAL - OWNER’S MANUAL |5
WALL CONTROL FUNCTIONS
STARTING YOUR COOLER
The button turns the air cooler on and
off.
There are two modes of operation to choose
from, Automatic mode or Manual mode. When
the air cooler is turned on, it will start in the
mode of operation it was in when last turned
off.
If your air cooler has not been operated for a
while, then when you start it, “Pre Cool Cycle”
may sometimes ash on the display as shown.
This indicates that the water pump will operate
to saturate the cooling pads for a few minutes
before the fan is turned on. This is to ensure
that when the fan starts, only cool air enters
the building.
ILL1128-B
ILL1085-A

6 |LCB/CPS/BM Evaporative Cooler
AUTOMATIC MODE
The button is used to select Automatic
mode or Manual mode. When “Auto” is
displayed the cooler is under Automatic control
and will operate according to the temperature
sensed at the wall control.
When the air cooler is turned on, it will read
the temperature and set the cooler operation
accordingly. If the temperature increases at the
wall control, then the fan speed will increase.
As the temperature decreases the fan speed
will decrease until the cooler turns off.
Press or to override the
automatic cooling level setting and adjust your
room temperature.
MANUAL MODE
To switch to Manual mode, press until
“Man” appears in the display. In Manual mode
the cooling level can be manually adjusted.
In Manual mode, press to choose
between circulating cool air or un-cooled air.
When “Cool” is displayed, fresh cool air will
circulate into the building. When “Vent” is
displayed as shown, fresh un-cooled air will
circulate through the building.
Press to increase the fan speed and
circulate more air. Press to decrease the
fan speed and circulate less air. Press once to
change the speed by one increment. Hold the
button down to change the speed more quickly
ILL1096-A
ILL1097-A
ILL1098-A
WALL CONTROL FUNCTIONS
cont.

SEELEY INTERNATIONAL - OWNER’S MANUAL |7
WALL CONTROL FUNCTIONS
cont.
TIMED AUTOMATIC START
You can set the air cooler so that it will turn on
after a set number of hours.
1. To set the delayed start time, press
button with the cooler turned “Off”. “Starting
in” will be displayed as shown with the last
mode of operation (Manual or Automatic).
2. If you want the air cooler to turn on in
Automatic mode with the previous settings,
then press until “Auto” is displayed.
Alternatively, if you want the air cooler to turn
on in Manual mode, press until “Man”
is displayed and then press and then
or T to set the required fan
speed.
3. To set the time until the start, press .
4. Then press or to adjust the
time. The cooler can start up to 24 hours in
advance.
5. Press again to initiate the timed
automatic start. The timed start will not
repeat.
TIMED AUTOMATIC STOP
You can also set the air cooler so that it will
turn off after a set number of hours.
1. To set a delayed stop time, press
with the cooler running. ”Stopping in” will
display.
2. Press or to adjust the number
of hours before the air cooler will stop. The
maximum delay setting is 24 hours.
3. Press again to begin the timed stop.
ILL1136-A
ILL1137-A

8 |LCB/CPS/BM Evaporative Cooler
USING THE COOLER
Now that you have read these instructions,
press the button to turn your air cooler
on. If the air cooler has not operated for a
while, “Pre Cool Cycle” will ash on the display.
The “Pre Cool Cycle will begin and will take
only a few minutes to complete. After this time,
the fan will come on automatically, and you can
enjoy the comfort of cool fresh air!
AIR TOO COLD
With the cooler running in Automatic mode,
you may nd that you are too cold or that the
air cooler is blowing too much air. Press
to lower the automatic temperature setting and
reduce the amount of cooling.
If you are too cold with the cooler running in
Manual mode, then press to reduce
the fan speed. You can also circulate fresh
un-cooled air by pressing COOL until “Vent”
displays.
AIR NOT COLD ENOUGH
You may nd that with the air cooler running
in Automatic mode, you are not cool enough.
Simply press to increase the cooling
rate.
If you are not cool enough with the air cooler
running in Manual mode, then press to
increase the fan speed. Ensure that cooled air
is circulating by pressing until “Cool”
displays.
You can experiment with the settings on your
wall control. This is the best way to get the
most from your air cooler.
DRAIN VALVE & BLEED
SYSTEM
This cooler comes with a continuous bleed
system (Coolair CPL, Coolair CPS, Braemar
BM) or automatic Drain Valve (standard for
Braemar LCB, optional for CPL, CPS and BM).
CONTINUOUS BLEED SYSTEM
During operation, the bleed system will
drain small amounts of water. This ensures
fresh water is continually added to dilute salt
accumulation in the water caused through
evaporation. This helps keep the air cooler
in good condition and ensure optimum
performance. The bleed rate will depend on
local operating conditions and will be set by the
installer.
AUTOMATIC DRAIN VALVE
If the drain valve was installed instead of the
continuous bleed system then your cooler will
automatically drain periodically. This ensures
the water is always fresh and helps maintain
your cooler in good condition to ensure
optimum cooling performance. The frequency
of the automatic drain may have been adjusted
by your installer according to the general water
quality in your area.
When the cooler is turned off for 72 hours,
the drain valve will open automatically and
empty water from the cooler. When the cooler
is turned on again, fan operation will delay for
a few minutes while the tank rells and the
cooling pads are saturated again.
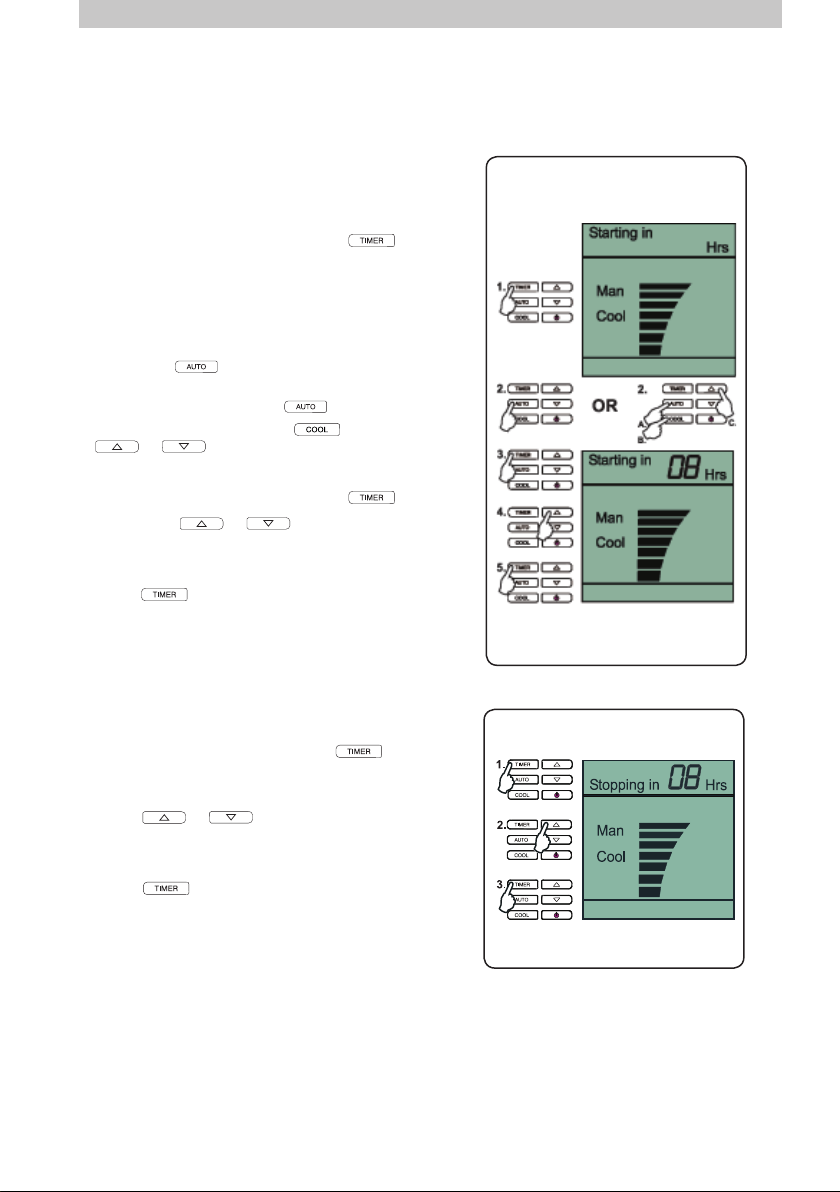
At any time when the thermostat is OFF, you
can drain the cooler by pressing and holding
and for 1 second. The display
will show “dr” to conrm the operation has
activated.
ILL1478-A
WALL CONTROL FUNCTIONS
cont.

SEELEY INTERNATIONAL - OWNER’S MANUAL |9
MAINTENANCE
HEALTH REGULATIONS
In some states, regulations require that
evaporative air coolers be serviced at specic
intervals.
REMOVAL OF PAD FRAMES
To remove a pad frame, insert a at screw
driver tip into the slot as shown and lever until
disengagement occurs.
Take hold of the pad frame and pull it towards
you until the internal side clips disengage.
Pivot the pad frame outwards and lift up. Take
care not to damage the pad. Repeat these
steps for the remaining pad frames.
ILL974-B
ILL976-D
ILL975-C
Maintenance Schedule servicing is essential
to ensure the cooler operates efciently for
many years. Seasonal Maintenance is only
required if you have a cooler tted with a
bleed system. The following pages outline the
suitable maintenance requirements to ensure
that your cooler continues to operate efciently.
If your cooler is tted with a drain valve, no
Seasonal Maintenance is required. However,
we require that the following components and
the operation thereof, be checked after the
rst year, then every 2 years as Maintenance
Schedule servicing.
• Pump.
• Drain valve.
• Solenoid and associated lter / ttings.
• Fan motor operation.
• Float valve.
• Salinity probes.
Routine maintenance may be required
more frequently in adverse environmental
situations or where the appliance is
installed in non-domestic applications.
Seasonal Maintenance services must be
performed before and after the summer
season. Maintenance Schedule servicing
should be performed before the summer
season. It is important to note that all
evaporative coolers have components that
may need periodic replacement (eg. lter pads,
hoses, o-rings etc).
WARNING! As your cooler is mounted on the
roof, we suggest that any maintenance or
checks be carried out by an authorised Seeley
International dealer or service agent. Climbing
onto the roof can be hazardous and could
result in injury to you and damage to your
property.
NOTE: Failure to carry out the Maintenance
Schedule services will affect your warranty
coverage. Refer to the checklist on Page 11.

10 |LCB/CPS/BM Evaporative Cooler
ILL1O60-C
ILL1103-B
ILL1001-B
MAINTENANCE cont.
END OF SEASON SERVICE
• Turn off the power supply to the cooler.
• External inspection
1. Inspect the external cabinet for any
damage or deterioration.
2. Inspect the dropper duct, ashing etc. for
signs of corrosion
3. Check water supply valve for correct
operation and leakage.
• A. Turn off the water supply to the cooler.
• B. Check and clean the lid water channels.
• C. If tted, rst unclip and then remove the
bleed system as shown. Allow the tank water
to drain. Do not lose the o-ring.
• Thoroughly clean the tank and pump lter.
• Do not replace the bleed system. (If a Drain
Valve is tted it will automatically drain.)
• Any time the thermostat is OFF, you can
drain the cooler by pressing and holding
and for 1 second. The display
will show “dr” to conrm the operation has
activated.
• Re-t the pad frames.
PRE-SEASON SERVICE
• Turn off the power supply to the cooler
• Repeat external inspections as per End of
Season Service.
• Remove the pad frames as shown.
• Ensure the power switch in the cooler is off.
• Gently wash the pads to remove any dust
build up during the winter period. If the
pads are in poor condition, replace them.
IMPORTANT! Do not damage the pads
with high pressure water spray.
• Inspect pad retention pins and washers for
damage and that they are securely tted.
• Replace the bleed system if it was removed
during previous maintenance and ensure
the o-ring is tted. (If the cooler is tted with
a drain valve this will not be necessary as
it will automatically close when the cooler
turns on).
• Check the fan motor, mounts and blades for
damage.
• Check electrical isolation switch operates
correctly.
• Turn on the power switch inside the cooler.
• Turn on the water and then the power to the
cooler
• Check oat valve operation.
• Check water pump operation.
• Re-t the pad frames and run the cooler.
• Check the pads are wetting evenly.
• Check there are no water leaks either
internally or external to the cooler.
• Check Drain Valve/Bleed Funnel operation.
• Check Wall Control operation.
1. Manual and Auto modes
2. Speed Control
3. Display Panel

SEELEY INTERNATIONAL - OWNER’S MANUAL |11
MAINTENANCE SCHEDULE SERVICE CHECKLIST
Service Item Check/Adjust Clean Replace
WATER DISTRIBUTION SYSTEM 123451234512345
Chillcel pads (replace as required)
Pad retaining washers / pins
Base / water reservoir
Pump and lter basket
Water probes
Water distribution system
Washers and seals and o-rings
(replace as required)
Drain valve
Bleed rate set (where required)
COMPONENT FUNCTION
Pump operation
Drain valve operation
Motor operation (set motor amps
where required)
Solenoid operation
Wall control operation
GENERAL OPERATION
Water level set point
Water ll time
Water drain time
Water distribution across pads (no
dry spots)
Airow through system/outlets
General product condition
Note! Includes correct retting of all components and items, and any required replacements.
Service No. Service Date Service Technician Service Company
No.1 ........................... ...................................... ............................................
No.2 ........................... ....................................... ............................................
No.3 ............................ ....................................... ............................................
No.4 ............................ ....................................... ............................................
No.5 ............................ ....................................... ............................................

12 |LCB/CPS/BM Evaporative Cooler
TROUBLESHOOTING GUIDE
Symptom Cause Action
Unpleasant odour Odour from the new pads Fill tank, run pump for a short
period to wash pads, drain tank,
rell and repeat several times
if odour persists. Odour will
dissipate after a number of hours of
operation.
Inadequate cooling Dry pads Ensure the water supply is turned
on. Then check the water ow to
the pads.
Insufcient exhaust openings
for conditioned air
Ensure sufcient exhaust openings.
Excessive ambient humidity On days during the summer when
the ambient humidity is high,
the cooler will not reduce the
temperature as much as on drier
days.
Cooler turns ON and OFF Fault in the cooler Contact the Dealer or
Service number.
If your controller prompts you to call a service agent, please contact your local Dealer or the
Service number on the back of this manual.
Note! If on initial start up the word “Service” appears on the controller and by pushing the on/off
button nothing happens, then you will need to establish communication between the wall control
and the electronic controller. Simply push and hold the “DOWN” button for approx. 10 seconds or
until the word “Service” disappears. If by pushing the on/off button a number appears, contact your
local Dealer or the Service number on the back of this manual.
ILL1911-A

seeleyinternational.com
Warranty Service
Australia 1-300-650-644
seeleyinternational.com
It is the policy of Seeley International to introduce continual product improvement.
Accordingly, specications are subject to change without notice.
Please consult with your dealer to conrm the specications of the model selected.
When you contact your Dealer regarding service or warranty
please quote the cooler model number as shown below.
AU 1509
864549-B
Afx serial & model
numbers sticker here
Other manuals for LCB250
1
This manual suits for next models
15
Table of contents
Other Seeley Air Cleaner manuals

Seeley
Seeley Braemar RPCQi Series User manual

Seeley
Seeley BREEZAIR EXVQ User manual

Seeley
Seeley Breezair EXV User manual

Seeley
Seeley TBA250 User manual

Seeley
Seeley Convair CTA500 User manual

Seeley
Seeley EXQ User manual

Seeley
Seeley Breezair TBA Series User manual

Seeley
Seeley LCQ User manual

Seeley
Seeley LCB250 User manual

Seeley
Seeley MobileMAX Series User manual