Sejoy BG-207b User manual

Owner’s Booklet
BG-207b Blood Glucose Monitoring System
Advanced Diabetes Management System

Contents
Important Safety information ·······································
Important Health-Related information ····························
Meter (battery included) ··········································
Test Strips ························································
Lancing Device ····················································
Lancet ····························································
Control Solution ···················································
Setting the date and time ··········································
Setting the measuring unit ········································
Setting the test reminder ·········································
Bluetooth connection ···········································
Preparing the lancing device ······································
Blood sampling ····················································
Testing ····························································
Interpreting unexpected test results ·····························
When to perform a control test ···································
Performing a control test ·········································
Understanding out-of-range control test results ··················
Maintenance ······················································
Replacing the battery ·············································
Introduction ························································
Getting to know your system ··································
Setting up your meter·············································
Testing your blood glucose ·····································
Memory and averages ··········································
Control solution testing ·········································
01
02
03
06
06
07
08
09
09
10
10
11
12
13
15
15
18
20
23
26
28
28
29
30
33
33
Comparing Your Meter Result to a Laboratory Result···· 25
Limitations ························································· 05

Troubleshooting ························································
Technical information ·················································
Specifications ··························································
Disposing of the meter, test strips, lancets and batteries ·····
Warranty ·································································
Symbol Index ····························································
Traceability ·······························································
Performance Characteristics ········································
FCC Information ························································
36
39
39
41
42
46
43
44
48
Caring for your system ···················································· 34
Appendix ··································································49

Introduction
Thank you for choosing Sejoy BG-207b blood glucose monitoring
system. Before you start testing, carefully read this .Owner’s Booklet
Intended Use
It’s intended to be used for the quantitative measurement of glucose(sugar)
in fresh capillary whole blood. The system is intended for use outside the
body (in vitro diagnostic use) by people with diabetes at home and by health
care professional in a clinical setting as an aid to monitor the effectiveness
of diabetes control. It should not be used for the diagnosis.
Test Principle
1
Peel off the insulation film from battery compartment before first use.
*
The strip measures glucose by using amperometric technology
employing a glucose oxidaes reaction.When whole blood or con-trol
solution is drawn into the tip of a test strip,glucose in the sample reacts
with chemicals and produces an electrical current. The meter
measures electrical current and calculates amount of glucose. The
glucose result is displayed as a calculated plasma value.

Introduction
Important Safety information
Warning
• During normal testing, any blood glucose meter or lancing device may
come in contact with blood. All parts of the kit are considered
biohazardous and can potentially transmit infectious diseases from
blood borne pathogens, even after you have performed cleaning and
disinfecting.
• The meter and lancing device should never be used by more than one
person. Do not share the meter and lancing device with anyone, including
family members, due to the risk of infection from blood borne pathogens.
• Cleaning and disinfecting the meter and lancing device destroys most,
but not necessarily all, blood borne pathogens.
• If the meter is being operated by a second person who is providing testing
assistance to the user, the meter and lancing device should be cleaned
and disinfected prior to use by the second person.
• Disinfect the meter and lancing device before allowing anyone else to
handle them. Do not allow anyone else to test with the meter or lancing
device.
• It is important to keep the meter and lancing device clean and disinfected.
Clean and disinfect the lancing device once per week to remove visible dirt or
3
other material for safe handling and/or prior to disinfecting.
For instructions on how to clean and disinfect the meter and lancing device,
see Chapter Maintenance.
• Wash hands thoroughly before and after handling the meter, lancing device,
or test strips.
• Choking hazard. Small parts. Keep away from children.
• Strong electromagnetic fields may interfere with the proper operation of the
meter. Do not use this meter close to sources of strong electromagnetic
radiation.
• To avoid electrostatic discharge, do not use the meter in a very dry
environment, especially one in which synthetic materials are present.
2

Introduction
Important Health-Related information
·Patients undergoing oxygen therapy may receive inaccurate results.
·Some people with diabetes do not experience symptoms of low blood
sugar (hypoglycemia). Others, such as children or people who are
unconscious or have certain disabilities, may not be able to
communicate their symptoms to caregivers. For these reasons, do
not change any treatment without first talking to your doctor
·Run a control test when you open a new box of test strips or if you think
that your test result is incorrect. Running a control test lets you know
that the meter and test strips are working properly.
·DO NOT CHANGE YOUR TREATMENT BASED ON A SINGLE RESULT
THAT DOES NOT MATCH HOW YOU FEEL OR IF YOU BELIEVE THAT
YOUR TEST RESULT COULD BE INCORRECT. If your blood sugar
result doesn’ t match how you feel and you have followed the instructions
in this manual, follow your doctor’s instructions, or call your doctor.
·Children should be taught how to use the meter and any other medical
products appropriately
·Being severely dehydrated or losing a lot of water may give you false
(low) test results. If you think you’re suffering from dehydration, call
your doctor right away.
·If you have followed all the instructions in this booklet and still have
symptoms that don’t seem to match your test results – or if you have
questions – talk to your doctor.
3

Introduction
·The system is designed for using with whole blood samples. Do not use
serum or plasma samples.
·Inaccurate test results may be obtained at high altitude more than
about 3,048 meters above sea level.
4
·BS-302 blood glucose test strip: less than 20%, more than 70% of the
hematocrit ratio will affect the measurement results. Please contact
your doctor to determine your hematocrit ratio.
·Some substances may cause false results with enzymatic tests.
Introduction
5
Limitations
Substance Concentration
The interference listed below have been tested and shown no apparent
influence on results at the normal or higher therapy levels.
Other interfering substances in ISO 15197 Annex A are not verified, it may
also affect the test results.
Acetaminophen 1.11 mmol/L (20 mg/dL)
Bilirubin 2.22 mmol/L (40 mg/dL)
Creatinine 0.56 mmol/L (10 mg/dL)
Gentisic acid 55.56 mmol/L (1000 mg/dL)
Hemoglobin 27.78 mol/L (500 mg/dL)
Ibuprofen 2.78 mmol/L (50 mg/dL)
L-Dopa 0.03 mmol/L (0.5 mg/dL)
Methyldopa 55.56 mmol/L (1000 mg/dL)
Tolbutamide 5.55 mmol/L (100 mg/dL)
Triglycerides 83.33 mmol/L (1500 mg/dL)
Xylose 11.11 mmol/L (200 mg/dL)
EDTA 11.11 mmol/L (200 mg/dL)
Substance Concentration
Ascorbic acid 0.17 mmol/L (3 mg/dL)
Cholesterol 27.78 mmol/L (500 mg/dL)
Dopamine 0.11 mmol/L (2 mg/dL)
Glutathione 5.11 mmol/L (92 mg/dL)
Heparin 500 IU/dL
Icodextrin 60.8 mmol/L (1094.4 mg/dL)
Maltose 555.56 mmol/L (10,000 mg/dL)
Salicylic acid 3.33 mmol/L (60 mg/dL)
Tolazamide 2.22 mmol/L (40 mg/dL)

Getting to know your system
a
b
c
d
a. Meter (battery included)
b. Test Strips
c. Lancing Device
d. Sterile Lancet
e. Control Solution
INCLUDED WITH YOUR KIT
WARNING: Keep the meter and testing supplies away from young
children. Small items such as the battery cover, batteries, test strips,
lancets, protective covers on the lancets, and control solution vial
cap are choking hazards.
e
6
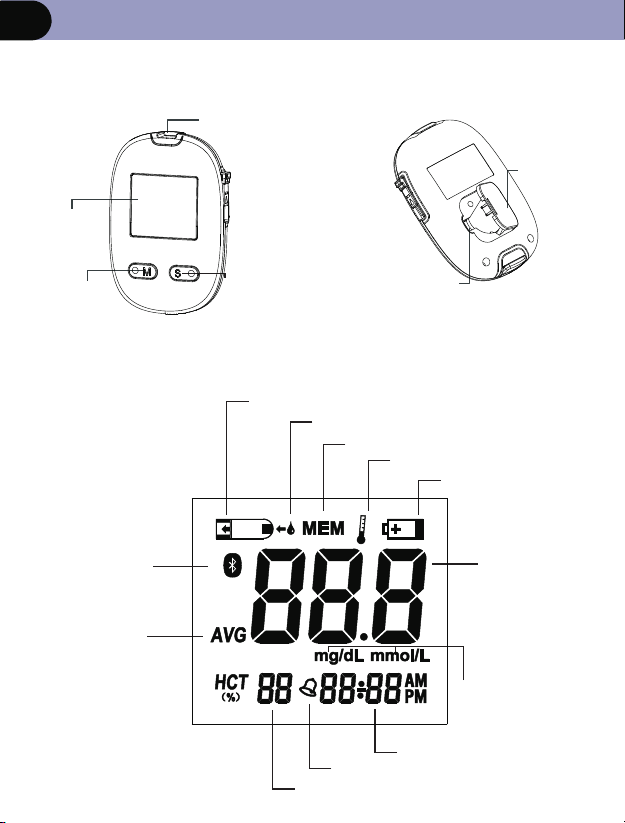
Getting to know your system
a. Meter
Display
Measuring Unit
Test Strip Reminder
Apply Blood Sample Reminder
Memory
Over Operating Temperature
Low Battery Reminder
Test Result
Alarm Clock Reminder
Date And Time
Average
7
Strip Port
LCD
“M”Button “S” Button Battery Compartment
Battery Cover
Alarm Clock Reminder
HCT Result
Bluetooth

Getting to know your system
b. Test Strip
Contact Bar: Insert it into strip port. Push it all the way until it will go
no further.
Top Edge: Apply blood sample here
Confirmation Window: Sample checking area
Important: the meter should only be used with BS-302 test strips.
Using other Test strips with this meter can produce inaccurate results.
Important Test Strip Information
• The system has an operating range of 5℃~45℃(41℉~113℉).
• Store the test strip package in a cool, dry place between 1℃ ~ 30℃
(33.8 ℉ ~ 86℉).
• Use test strips only within the system operating temperature range.
• Keep away from direct sunlight or heat.
• Store your test strips in their original vial only; never transfer them to
another vial or any other container.
• Never store individual test strips outside the vial.
• After removing a test strip from the vial, immediately close the vial cap
tightly.
• With clean, dry hands, you may touch the test strip anywhere when
removing it from the vial or inserting it into the meter.
• Do not use test strips beyond the expiration date. This may cause
inaccurate results.
• Do not bend, cut, or alter test strips.
Warning: The cap or vial contains drying agents that may be
harmful if inhaled or swallowed and may cause skin or eye
irritation.
8
Contact Bars
Top Edge
Confirmation Window

Getting to know your system
d. Lancet
c. Lancing Device
Protective Cover
Lancet Pin
Lancet Ejector
Trigger Button Sliding Barrel
Lancet Carrier
Lancet Needle Cover
Lancing Device Cover
Arrow
Adjustable Tip
9
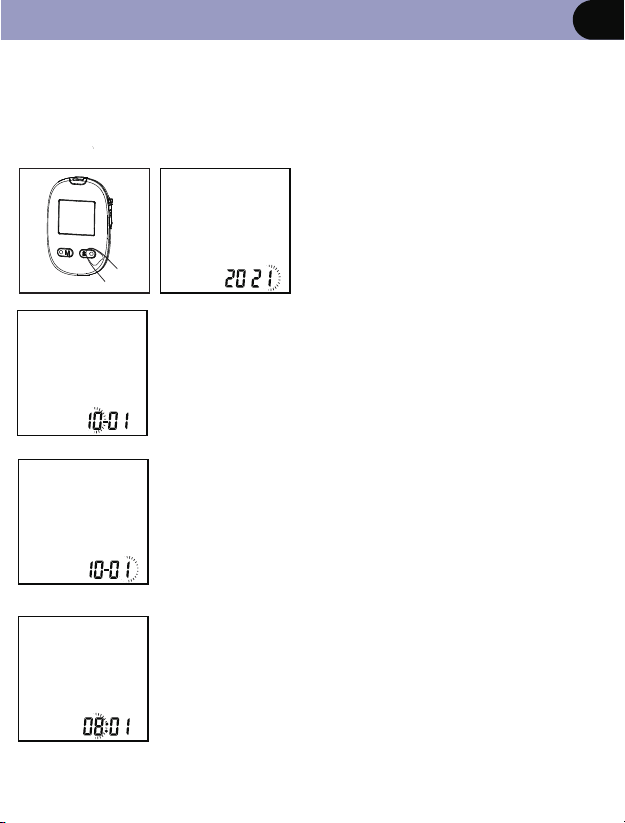
Setting up your meter
When use the meter for the first time, please set the parameters of the
meter. With the meter off, long press button “S” to enter into setting mode.
Set the year
Press and release the button “M”
to advance one year until the correct
year appears .
After the month is set, press button “S”,
the month figure is flashing automatically.
Set the date
Press and release the button “M” to advance one
day until the correct date appears.
After the date is set, press button “S”, the Hour
figure is flashing automatically.
Set the hour
Press and release the button “M” to advance one
hour until the correct hour appears.
After the hour is set, press button “S”, the Minute
figure is flashing automatically.
①
②
③
10
Set the month
Press and release the button “M” to advance one
month month until the correct appears.
After the is set, press button “S”, the date month
figure is flashing automatically.
②

Setting up your meter
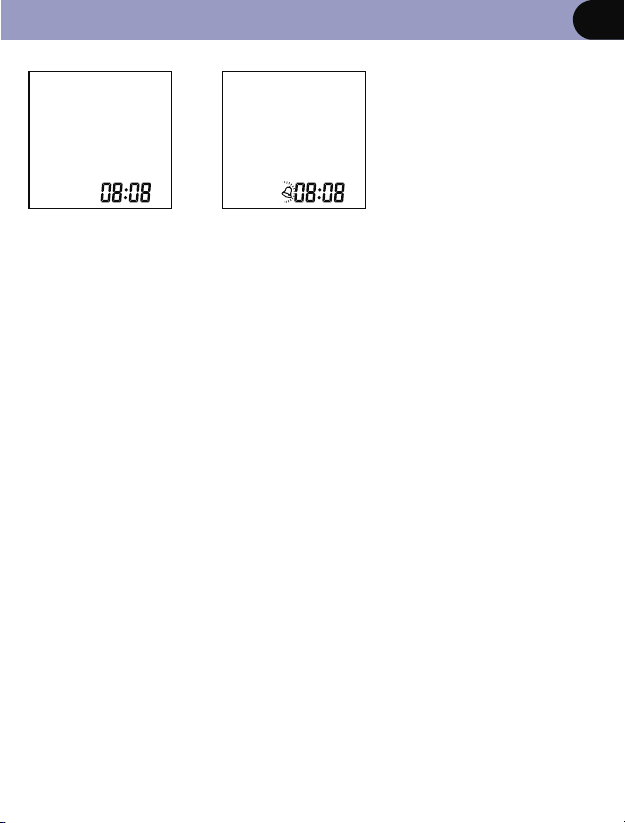
Set the minute
Press and release the button “M” to advance one
minute until the correct minute appears. After the
minute is set, press button “S”, the Time format
figure will appear.
The meter can display the time
in either an AM/PM (12-hour) or
a 24:00 (24-hour) format. Press
and release button “M” to select
the format.
With the preferred time format
on the display, press button “S”,
the measuring unit figure will
appear.
OR
Set the measuring unit
The meter can display test
results in either milligrams per
decilitre (mg/dL) or millimoles
per litre (mmol/L). Press and hold
button"S" and
"M" for 5 seconds
With the measuring unit preferred
format on the display, press button
mg/dL mmol/L
OR
④
Set the time format
⑤
⑥
to select the preferred format.
“S” to enter the Alarm Clock setting.
11
Setting up your meter
OR
Set the alarm clock
The meter can set an alarm
clock to remind you the
time for testing.
Press button “M” to check
the alarm function.
If the alarm is on, press
button “S”, the time figure
is flashing. Please refer to
step 3 and 4 for the time
setting. After the time is
set, press button “S” button
to exit the setting mode.
If there is no alarm function
requirement, press button “S”
to exit the setting mode.
⑦
12

Bluetooth connection
13
Bluetooth requirements
-The monitor requires a device with:
.Bluetooth 4.0 or later
.Android 6.0 or later
.IOS 8.0 or later
And works with:
.iphone , iPod, iPad
. Android Phones and Tablets
Bluetooth connection
-Using for the first time
1.Download the free “JOYTECH healthcare” APP: On your
mobile phone or table go to “www.sejoy.com”.
2.Open the App on your phone or tablet. If requested,you should
enable Bluetooth on your device. You can enable Bluetooth
under the Settings menu on your smart phone or table.
3. Create a new user login, or login with your existing user name
and password.
4. Selection device “Glucose meter system”.
-Pairing your monitor with a Smart Device
1. Open the “Glucose meter system” and follow the pairing
instructions shown on your smart phone.The date and time on
your monitor will automatically be set when you pair it with your
smart device.
2. Confirm that your monitor is connected successfully.When your
monitor is connected successfully to your smart phone, the
“ ” symbol flshes.

Bluetooth connection 14
-Transfer your readings
1. As soon as your measurement is complete, open
the app on your smart phone to transfer your
reedings.
2.You can view your blood sugar readings on the APP.

Testing your blood glucose
Preparing the lancing device
Warning
• During normal testing, any blood glucose meter or lancing device
may come in contact with blood. All parts of the kit are considered
biohazardous and can potentially transmit infectious diseases
from bloodborne pathogens, even after you have performed
1,2
cleaning and disinfecting.
• The meter and lancing device should never be used by more than
one person. Do not share the meter and lancing device with
anyone, including family members, due to the risk of infection
from bloodborne pathogens.
• Cleaning and disinfecting the meter and lancing device destroys
most, but not necessarily all, bloodborne pathogens.
• If the meter is being operated by a second person who is
providing testing assistance to the user, the meter and lancing
device should be cleaned and disinfected prior to use by the
second person.
• Disinfect the meter and lancing device before allowing anyone
else to handle them. Do not allow anyone else to test with the
meter or lancing device.
• It is important to keep the meter and lancing device clean and
disinfected. For instructions on how to clean and disinfect the
meter and lancing device, see Chapter Maintenance.
• Wash hands thoroughly before and after handling the meter,
lancing device, or test strips.
• You must not insert the lancet cap into the lancing device and
simultaneously press the release button or hold the lancing
device with the release button resting on a surface such as a
table top. This could release a lancet and inadvertently cause
injury.
15

Testing your blood glucose
Preparing the lancing device
① Twist off the lancing device cover.
② Insert a new lancet into the lancet carrier firmly.
③ Hold the lancet needle cover and gently twist
it until it separates from the lancet.
④ Replace the lancing device cap.
Avoid touching the lancet pin.
⑤ Adjust the depth setting
The adjustable tip offers 5 levels of skin
penetration. Twist the lancing device cap
until the desired setting appears.
Note: To select the best depth:
1-2 for soft or thin skin 3 for average skin.
4-5 for thick or calloused skin.
①
16

Testing your blood glucose
Preparing the lancing device
⑥ Hold the lancing device cover in one hand.
Using the other hand, slowly pull the sliding
Barrel away from the lancing device cover.
You will hear a click, indicating that the lancet
carrier is locked into position. Release sliding
barrel to return it to its original position.
17
Table of contents
Other Sejoy Blood Glucose Meter manuals


