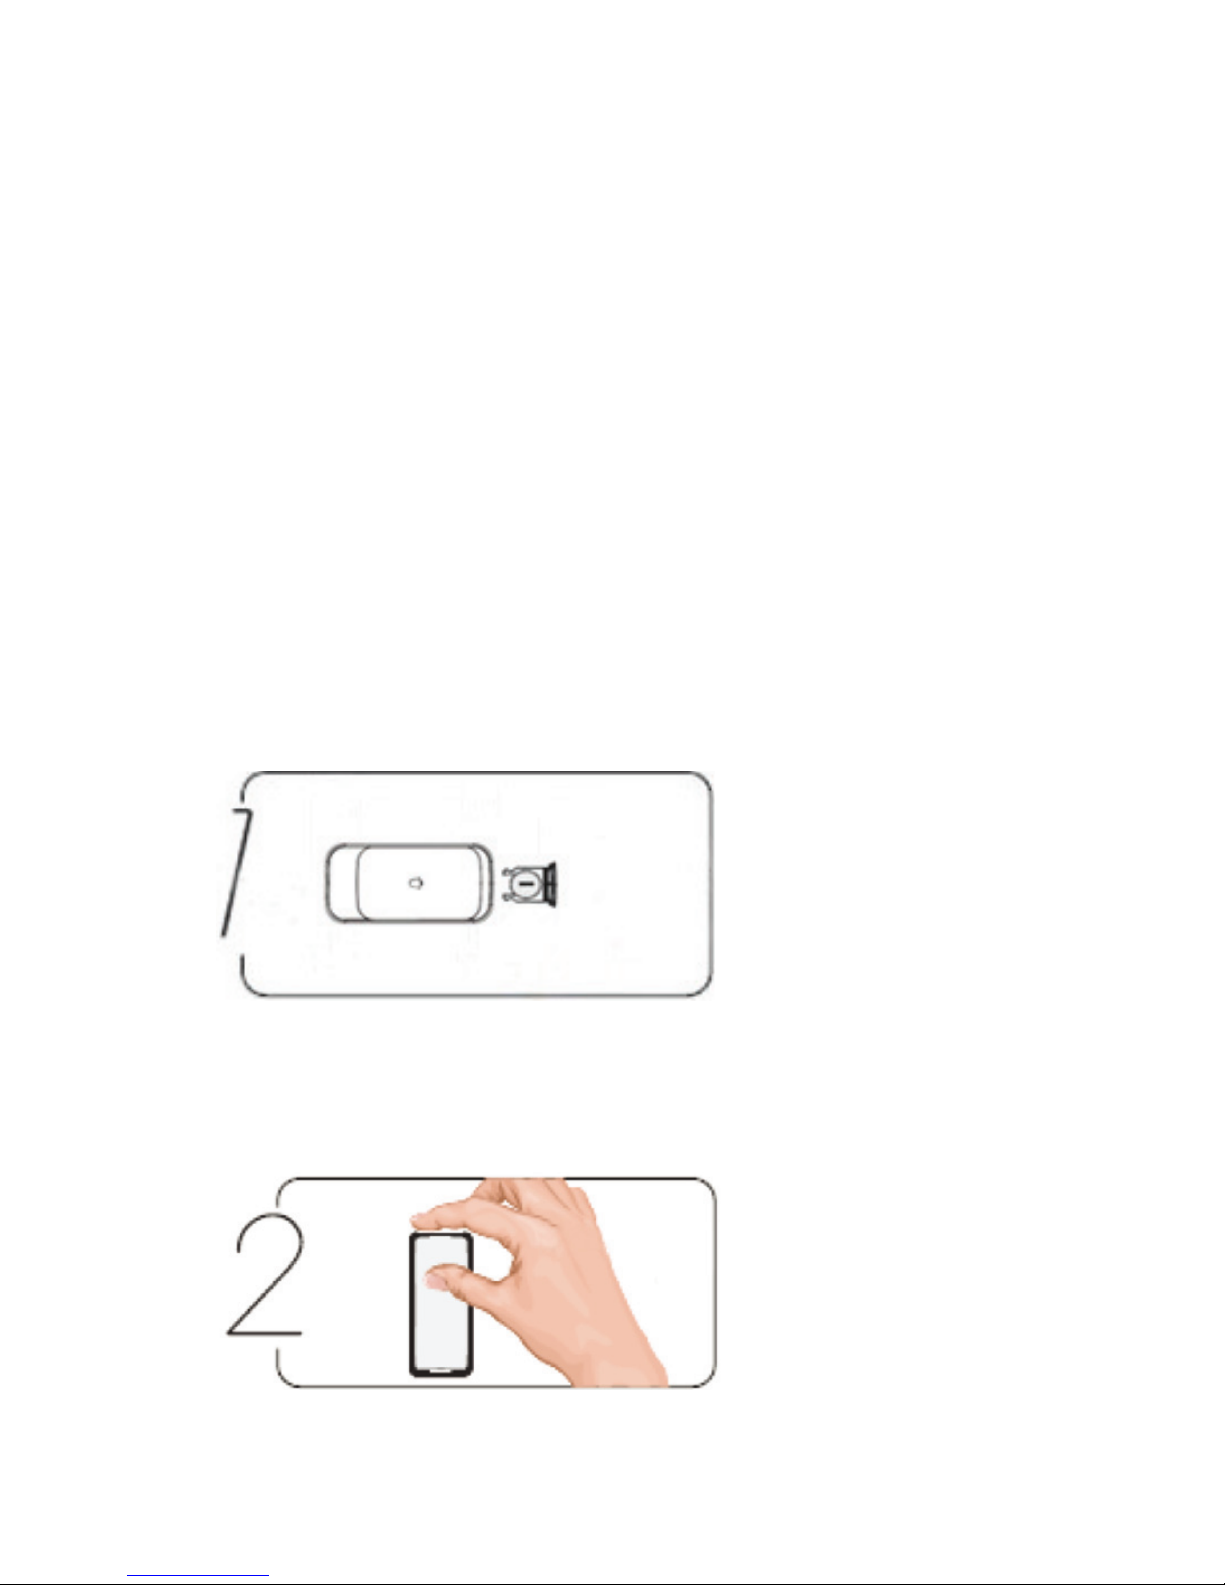
Sencor SWD 130 User manual

SWD 130
EN
CZ
SK
HU
PL
Wireless doorbell -
user’s manual
Bezdrátový domovní
zvonek - návod k obsluze
Bezdrôtový
domový zvonček –
návod na obsluhu
Vezeték nélküli csengő -
használati útmutató
Bezprzewodowy
dzwonek domowy -
instrukcja obsługi


EN-1
Product features
1. All control elements utilise touch technology. No mechanical buttons are
used. The product is characterised by its long lifetime. The design combines
simplicity with classic style. Pleasant music. Function for limiting undesirable
activation and noise.
2. The circuit design engineered by the LCH Dr. team from the USA is
a guarantee of stable operation enabling the use of the remote control at
a distance of up to 150 metres.
3. The transmitter has a waterproof and dustproof design with screws on the
surface.
An automatic shut o function against misuse is available.
4. This product utilises an original switch to standby technology, where the
power consumption of the chip is reduced (measured with a μA meter).
5. The battery compartment in the transmitter has an innovative patented
slide-in design and is compatible with CR 2032 button cell batteries. It is
environmentally friendly and energy ecient.
6. Its innovative superheterodyne learning code enable users to simply setup
the pairing mode.
7. Microprocessor-controlled receiver with a stable double-sided printed circuit
board.
8. Design with isolated high and low voltage for safe operation.
9. The product design, internal structures and printed circuit board designs are
protected by patents.
Installation
Test Negative
Open the packaging, remove the battery insulation foil and close the battery
compartment.
Please make sure that the negative pole of the battery is facing upwards and the
positive pole of the battery downwards.
Sticking
on
Take out the supplied double-sided adhesive tape, remove the sticker from one
side and stick it correctly on to the bottom surface of the transmitter.

EN-2
Installation
Always check that you have good signal reception from your chosen location.
Every structural obstacle reduces the eective range between the doorbell and
the doorbell button.
When installing the doorbell button outdoors, locate it in such a location where
it will not be permanently rained on. Suitable is a recess in a pole or a similar
location. Never locate it inside a metal cover. We recommend smooth and dust-
free surfaces.
Clean the respective area (button installation area), remove the sticker on the
other side of the adhesive tape and stick it on to this area. Push the transmitter
down rmly to ensure secure adhesion.
The button may also be permanently mounted using screws. Pre-marked screw
holes are located on the inside of the cover. These can be used if you wish to
permanently install the doorbell button. It is necessary to seal the holes under the
screw head so that water does not enter through them.
Information about placing a name tag on the button: Use an alcohol-based
marker. If you use a sticker, never apply it over the bell icon.
Power supply
AC
Connect the AC receiver directly to a mains power outlet. The area around the
power socket must remain uncovered and freely accessible.

EN-3
Description of function
Touch the bell button on the transmitter - the LED indicator will be lit and the
receiver will chime.
LED indicator
Bell touch button
Touch the music selection button and select your favourite chime tone. There
are 36 melodies available.
Touch the volume setting button and set the volume level. There are 4 levels
available.
High volume, medium volume, low volume, mute.
Select mute when you are busy and do not wish to be interrupted.
Melody selection
Volume setting
When the doorbell is chiming, the LED indicator is lit; when the chiming stops the
LED indicator turns o.
The frequency of the light corresponds to the speed of the melody. With a fast
melody the light ashes quickly; with a slow melody the light ashes slowly.

EN-4
LED indicator
Music selection
Volume setting
Setting the learning code
1. Delete the prior code:
Because pairing is already set by the manufacturer, this task is only necessary
for repair in the event that the learning code is lost.
If you need to delete the codes, please hold down concurrently the volume
setting button and music selection button for three second.
2. Enter the new code:
Hold down the music setting button for three seconds to activate the
learning mode - the LED indicator on the receiver will start to ash.
When the bell button on the transmitter is pressed, the LED indicator will stop
ashing, i.e. learning is successfully completed.

EN-5
Receiver parameters
Category Parameters and
description
Notes
Power consumption < 0.5 W Stand-by mode
Sensitivity < -105 dBm Built-in highly sensitive
chip
Power source AC (alternating current)
110 - 240 V/50 - 60 Hz
The power adapter is
designed for a wide
range of input voltages
(the DC receiver uses
batteries)
Decoding Microprocessor Eectively prevents
malfunctions
Coding Automatic code learning Simple controls
Bell melodies 36 musical Hi-Fi sounds
(accords)
Pleasant tone
Transmission range Up to 150 metres Open space without
obstacles and
electromagnetic
interference
Button Induction touch sensors No physical buttons
Circuit design Isolation of high and low
voltage circuits
Compatibility with safety
requirements (relates to
the AC receiver)
Transmitter parameters
Category Parameters and
description
Notes
Radio frequency 433 MHz
Battery types CR 2032 DC
(direct current) 3 V Compatible batteries
Transmitter power output < 10 mW
Coding number 106 Learning code
Button Induction touch sensors No physical buttons,
no wear
Installation method Embedded cover IP 44 Waterproof and
protected against
moisture (IP 44)

EN-6
Troubleshooting
Error Cause Remedy Notes
Transmitter
indicator is
not lit
Batteries are
not inserted
correctly
Check the positive
and negative poles
on the high-capacity
batteries: batteries
are inserted into the
battery compartment
with the negative
pole facing the
front part of the
transmitter.
Battery type
CR 2032 may also
be used. It can
be purchased in
supermarkets,
watch repair
stores, toy stores
or in online stores.
The receiver is
not working
Indicator is not lit The power supply
is not connected
correctly or the
batteries are not
inserted correctly.
If you are unable
to resolve this
problem, please
contact the
manufacturer.
The indicator is lit
but the bell does
not chime
The learning code is
incorrect; please reset
it according to the
instructions.
Transmission
distance is
shortened
Transmission
distance is
aected by
the wireless
electronic
product coming
close to metal
objects.
A test eld
demonstrated
that the eective
transmission distance
is reduced when
the transmitter
is installed near
metal doors or in
locations with large
electromagnetic
interference.
Likewise, too many
walls results in
interference to the
signal.
This product
should be installed
away from
metal objects:
when suitable
installation
location are not
available, extend
the distance
between the
transmitter and
metal objects.
No signal is being
received
Batteries are at Replace the batteries
in the transmitter
Sound is
distorted
Batteries are at Replace the batteries

EN-7
Instructions and information about the handling of used packaging
Take the packaging material to a designated municipal waste facility.
Disposal of used electrical and electronic equipment
This symbol on products or accompanying documentation means that
used electric or electronic appliances must not be added to standard
communal waste. For proper disposal and recycling, take these products
to designated collection points. Or as an alternative in some European
Union states or other European countries you may return your products to
the local retailer when buying an equivalent new product.
Correct disposal of this product helps save valuable natural resources and
prevents damage to the environment caused by improper waste disposal.
Ask your local authorities or collection facility for more details.
In accordance with national regulations penalties may be imposed for the
incorrect disposal of this type of waste.
For business entities in European Union states
If you want to dispose of electric or electronic devices, ask your retailer or supplier
for the necessary information.
Disposal in other countries outside the European Union
This symbol is valid in the European Union. If you wish to dispose of this product,
request the necessary information about the correct disposal method from the
local council or from your retailer.
Fast ČR, a.s. declares that SWD 130 conforms to the basic requirements
and other relevant provisions of Directive 1999/5/ES. The device can be
operated in the EU without restriction. The declaration of conformity is
a part of the user's manual or can be found at the website www.sencor.eu.
Changes in the text, design and technical specications may change without prior
notice and we reserve the right to make these changes.
Table of contents
Other Sencor Accessories manuals