Sencrop RAINCROP User manual

RAINCROP
User manual - Manuel d’utilisation

32
List of parts ..........................................................................
Inventaire du matériel
1. p.4 Warranty ...........................................................................
Garantie
10. p.16
Create your account .....................................................
Créer votre compte
12. p.18
Install the app on iOS ...................................................
Installer l’application sur iOS
14. p.20
Access the application ..................................................
Accéder à l’application
11. p.17
Activate your sencrop ...................................................
Activer votre sencrop
13. p.19
Install the app on Android ...........................................
Installer l’application sur Android
15. p.21
Online support team .....................................................
Module de chat
16. p.22
Technical description ........................................................
Description technique
2. p.5
Technical data .....................................................................
Données techniques
3. p.6
Choose your location ........................................................
Choisir son emplacement
4. p.7
Assembling the post ..........................................................
Préparation du mât
5. p.8
Tripod installation (optional) .......................................
Installation du trépied (en option)
6. p.9-10
Set up the station ........................................................
Mise en place de la station
7. p.11-13
Use and maintenance precautions ..............................
Précautions d’emploi et entretien
8. p.14
Product expiration and maintenance ..........................
Fin de vie du produit et recyclage
9. p.15
Summary
Sommaire
54
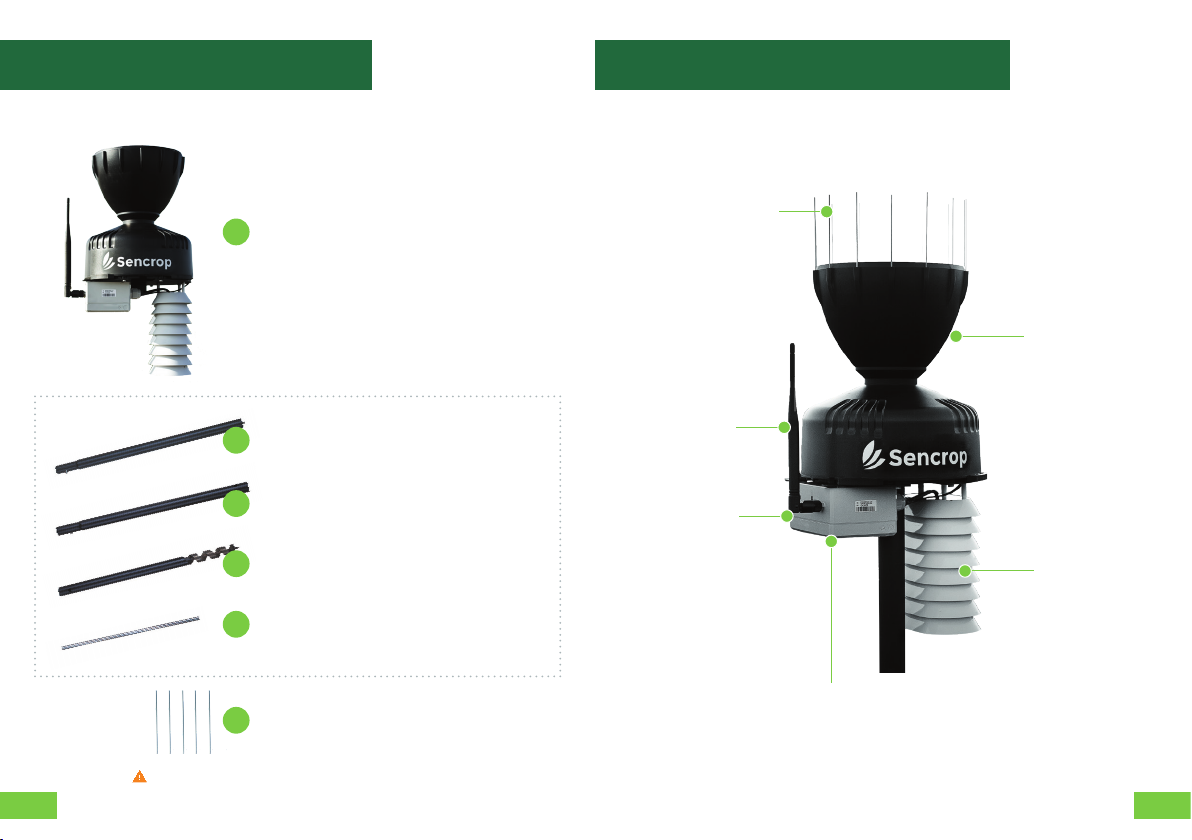
Bird pikes
Pics anti-oiseaux
6
Raincrop
1
Upper segment with screw
Partie supérieure avec vis
2
Middle segment
Partie médiane
3
Lower segment with auger
Partie inférieur avec tarière
4
30 cm steel shaft
Tige en acier 30 cm
5
Post (three segments)
Mât en 3 parties
Les autres pièces livrées avec les pics anti-oiseaux ne servent pas
The other parts delivered with bird spikes are not used
Electronic box
Boîtier électronique
Shield with
sensors
Abri avec
capteurs
Rain gauge
Pluviomètre
Antenna
Antenne
Bird spikes
Pics anti-oiseaux
Switch
Interrupteur
List of parts
Inventaire du matériel
Technical description
Descriptif technique
76
Measurements / Mesures
Rain Gauge / Pluviométrie
Principle of operation / Mécanisme Double tipping buckets / Double auget
basculant
Operating temperature range /
Plage de température de fonctionnement
0 – +85 °C
Measurement range / Plage de mesure 0 – 1039 mm/h
Accuracy / Précision ± 4 % at / à 50 mm/h
Resolution / Résolution 0.254 mm
Temperature and humidity /
Température et hygrométrie
Principle of operation / Mécanisme 3 digital sensors / 3 capteurs numériques
Temperature range / Plage de température -40 °C to / à +125 °C
Humidity range / Plage d’humidité relative 0 % to / à 100 %
Temperature accuracy / Précision en
température
± 0.2 °C typ. / ± 0.3 °C max. (-40 °C to / à
+90 °C)
Humidity accuracy / Précision en hygrométrie ± 2 % typ. / ± 3 % max. from / de 0 °C to / à 80
°C (0 % HR to / à 100 % HR)
Mechanical characteristics / Caractéristiques mécaniques
Post / Mât de support
Material / Matériau Steel with polyzinc treatment / Acier avec
traitement polyzinc
Dimensions / dimensions Length / Longueur 210 cm
Diameter / Diamètre 30 mm
Weight / Poids 3 kg
Shield / Abri météo Material / Matériau ASA
Rain gauge / Pluviomètre
Material / Matériau UV-stabilized ABS plastic / ABS résistant aux UV
Collection area / Surface réceptrice 214 cm²
Support plate / Platine
support
Material / Matériau Stainless steel / Acier inoxydable
General / Général
Battery / Batterie Battery / Pile Lithium-Thionyl Chloride - capacity 19Ah - 3.6V
/ Lithium-Chlorure de Thionyle - capacité 19
Ah - 3,6 V
Temperature range / Plage de température -60°C to / à +85°C
Other sensors / Autres
capteurs
Accelerometer / Accéléromètre
GPS
Communication / Com-
munication
Network / Réseau Sigfox (868 MHz)
Data transmission period / Envoi des
données
Every 15 minutes / Toutes les 15 minutes
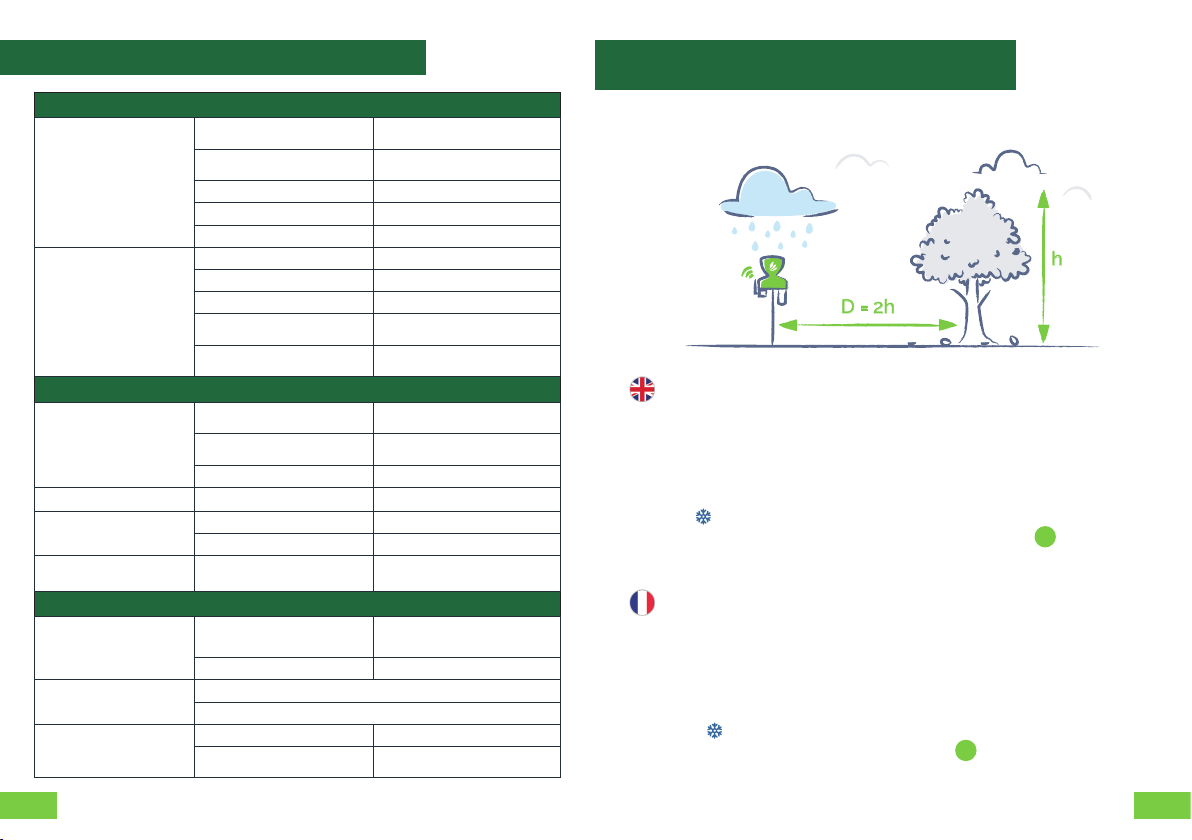
h
D = 2h
Choose a location that is at, clear, and away from obstacles. It
should be placed at least twice away the height of the nearest
obstacle. For Mileos users, it is advisable to place the station at the
height of 1m50, close to your eld
Anytime you couple a station with a Decision Support Tool (DST), it
is important to nd out what the DST creator’s recommendations
are. In viticulture and arboriculture, when dealing with frost, it is
advisable not to position the midsection of the mat in such a way
that the sensors are closer to the ground.
3
Choisir un emplacement plat et dégagé, éloigné de tout obstacle :
à au moins 2 fois la hauteur de l’obstacle le plus proche. Pour les
utilisateurs Mileos®, il est recommandé d’installer la station au pied
des parcelles (zone enherbée) et à 1m50 du sol.
Pour tout couplage de la station avec un OAD, il est nécessaire de
vous rapprocher de l’éditeur de l’OAD pour connaitre ses préconisa-
tions. En viticulture et arboriculture, pour le gel, il est conseillé de
ne pas mettre la partie médiane du mat pour que les capteurs
soient plus proches du sol.
3
Choose your location
Choisir son emplacement
Technical data - Données techniques
98
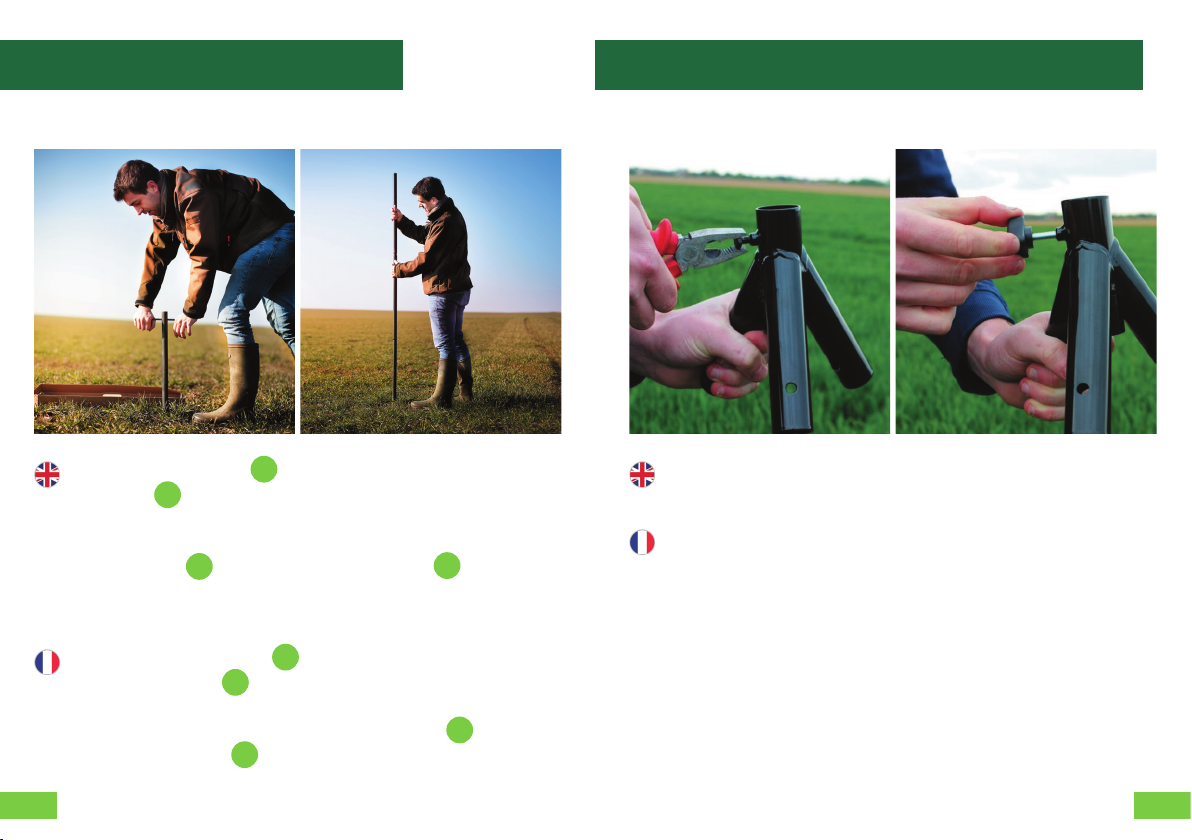
Slide the steel shaft into the opening on the lower
segment . By regularly clearing away the dirt from
the auger, you can insert the lower segment about
40cm deep into the ground. Snap together the mid-
dle segment and the upper segment to the
lower segment of the post that is now anchored in the
ground.
Glisser la tige en acier dans les ouvertures de la
partie inférieure . En enlevant régulièrement
la terre sur la tarière, enfoncer la partie inférieure
d’environ 40cm. Clipser la partie médiane puis la
partie supérieure sur la partie du mât placée en
terre.
5
3
4
2
Using a tool, remove the screw from the tripod.
Screw the plastic thumb wheel into the hole.
A l’aide d’un outil, retirer la vis présente sur le trépied.
Visser la vis à molette plastique dans le trou libéré.
Assembling the post
Préparation du mât
Tripod installation (optional) (1/2)
Installation du trépied (en option) (1/2)
5
3
4
2
1110
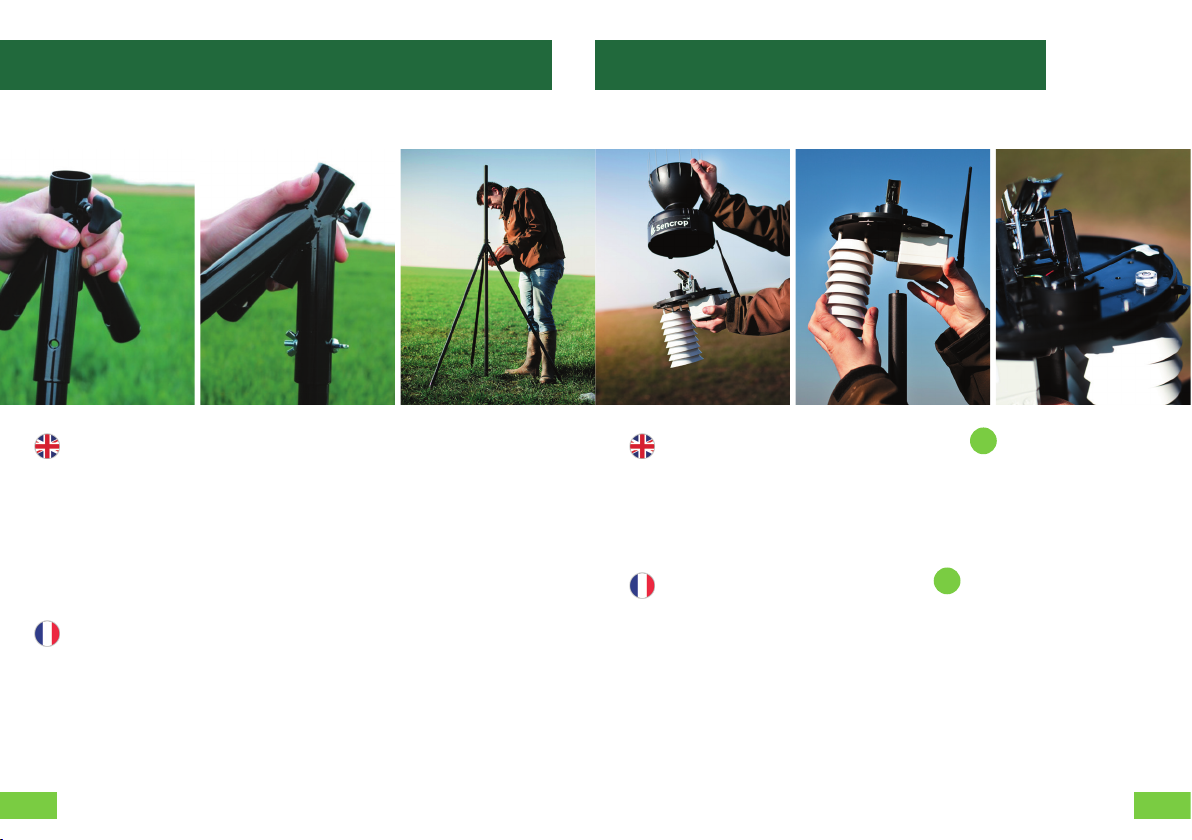
Insert every tripod leg into the tripod and line the
holes up. Insert a buttery nut through the leg and the
tripod from the outside in. Screw the buttery onto
the other side of the nut. Make it as tight as possible
so that the leg and the tripod are rmly tight together.
Repeat these steps for the two remaining tripod legs.
Slide the tripod onto the post from the top.
Insérer chaque pied dans le trépied et aligner les
trous. Insérer la vis papillon à travers le trépied et le
pied, par l’extérieur.Visser l’écrou papillon à l’extrémité
de la vis papillon. Serrer avec fermeté, le pied et le
trépied doivent être solidaires. Répéter l’opération
avec les trois pieds. Glisser le trou central du trépied
sur le mât.
Remove the top of the rain gauge by turning it one
quarter of a turn. Use the level to make sure the rain
gauge is horizontal. A 10° incline distorts measure-
ment by 2%. Orientate the rain gauge so its shield
faces the prevailing wind.
1
Retirer la tête du pluviomètre en tournant celle-ci
d’un quart de tour. Visser la partie inférieure du Rain-
crop sur la partie supérieure du mât via la vis dédiée.
Vérier l’horizontalité du pluviomètre grâce au niveau
à bulle. Une inclinaison de 10° fausse la mesure de
2%. Orienter l’abri météo (partie blanche) face à la
direction du vent dominant.
1
Tripod installation (optional) (2/2)
Installation du trépied (en option) (2/2)
Set up the station (1/3)
Mise en place de la station (1/3)
1312
Once the station has been properly positioned, plant
the tripod into the ground as deep as it will go and
then turn tight the plastic thumbscrew.
Une fois la station bien positionnée, enfoncer le
trépied dans le sol aussi profondément que possible
puis visser fermement la vis à molette plastique.
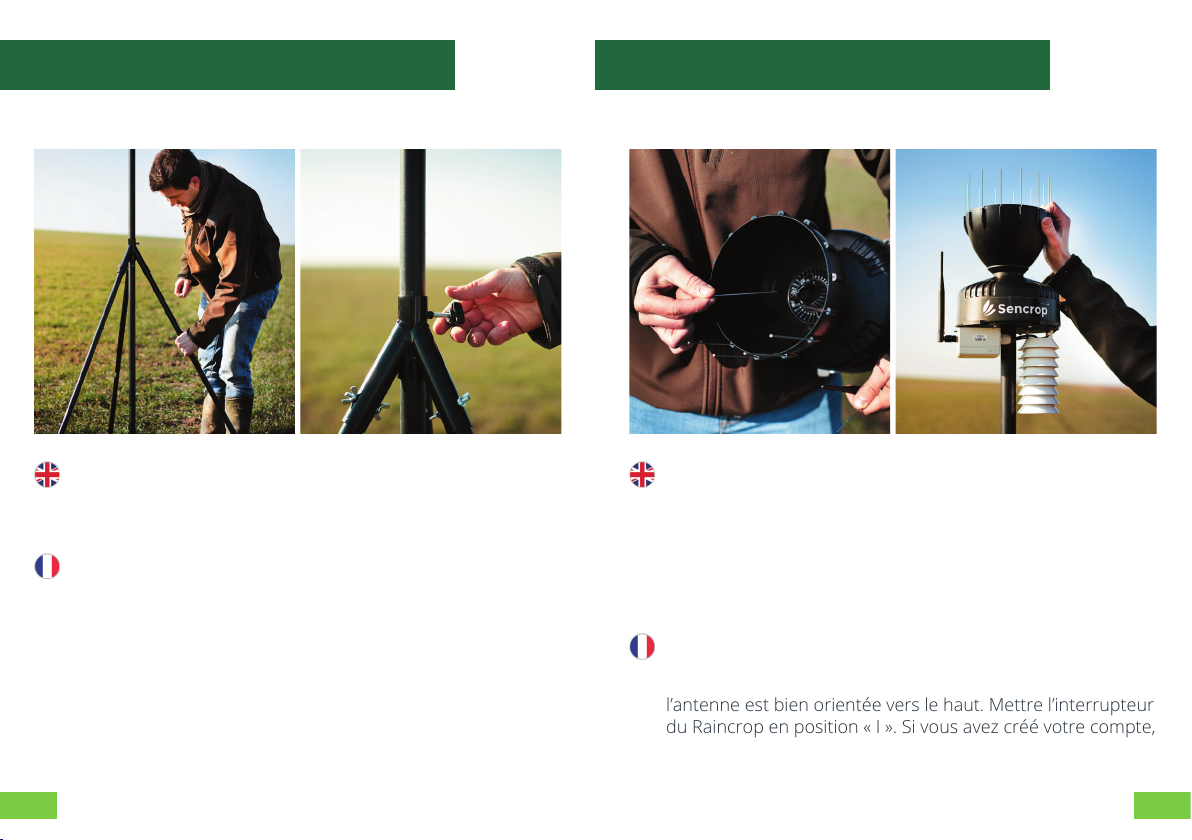
Place the bird spikes all around the rain gauge’s funnel.
Don’t forget to place the central spike. Attach the top of the
raing gauge back onto its base. Make sure that the antenna
is upward. Flip the Raincrop switch to “I”. If your account has
been created, a text message will automatically be sent to
conrm that your station is now activated. Your station is
now geo-positioned.
Placer les pics anti-oiseaux sur l’entonnoir du pluviomètre.
Ne pas oublier de placer le picot central. Remettre la partie
supérieure du pluviomètre sur sa base. Vérier que
l’antenne est bien orientée vers le haut. Mettre l’interrupteur
du Raincrop en position « I ». Si vous avez créé votre compte,
un SMS vous conrme automatiquement l’activation de
votre station. Votre station est désormais géolocalisée.
Set up the station (2/3)
Mise en place de la station (2/3)
Set up the station (3/3)
Mise en place de la station (3/3)

1514
Regularly check that measurement components are kept
clean, including the funnel, buckets, and the sun shield. To
clean the buckets (recommended at least once a month),
turn your station o, remove the upper part of the rain
gauge. You can also clean the grid very easily by removing it
by hand.
Vérier régulièrement que les parties de mesures soient
propres, notamment l’entonnoir, les augets et l’abri-météo.
Pour nettoyer les augets (recommandé au moins une fois
par mois), mettre l’interrupteur du produit sur « O » et retirer
l’entonnoir en le tournant d’un quart de tour. Le pluviomètre
est équipé d’un système anti-bouchage que vous pouvez
retirer manuellement.
The battery provided is not rechargeable, and will need to replaced.
Ensure the +/- polarity is correct to prevent a short circuit. A dead
battery must be removed from the product. When you are not using
Raincrop over a prolonged period of time (>2 months), remove the
battery from the product. If you need to change the battery, contact
the manufacturer. The only battery suitable for this product is the
one provided by the manufacturer. If the battery has been dam-
aged, contact the manufacturer.
Certain components of Raincrop, such as the bird spikes or the post
auger can cause injury. Take precautions when handling these com-
ponents and keep them out of the reach of children. Electrical and
electronic equipment must be recycled. Do not dispose of electrical
or electronic equipment with normal waste; make sure they are cor-
rectly recycled. When changing the battery, recycle it at a collection
centre. Take care of your planet by making an eort to recycle !
La batterie fournie n’est pas rechargeable et ne doit pas être
rechargée. La polarité +/- doit être respectée. Ne pas court-circuiter
les bornes +/-. Une batterie vide doit être retirée du produit. Lor-
sque vous n’utilisez pas le Raincrop pendant une période prolongée
(>2 mois), retirer la batterie du produit. En cas de changement de
batterie, contacter le fabricant. Seule une batterie fournie par le
fabricant doit être utilisée pour ce produit. Si la batterie est endom-
magée, contacter le fabricant. Certaines parties du Raincrop comme
les pics anti oiseaux ou encore la tarière du mât peuvent blesser.
Prendre des précautions lors de la manipulation de ces parties du
produit. Mettre hors de portée des enfants. Les équipements élec-
triques et électroniques font l’objet d’une collecte sélective. Ne pas
se débarrasser des déchets d’équipements électriques et électron-
iques avec les déchets municipaux non triés, mais procéder à leur
collecte sélective. Lors du changement de la batterie, déposer celle-
ci dans un point de collecte. Faites un geste pour la planète, pensez
au tri !
Precautions of use and maintenance
Précautions d’emploi et entretien
Product expiration and maintenance
Précautions d’emploi et n de vie du produit

1716
Need help ?
Besoin d’aide ?
To access the application, you have three options :
- Click on the link that you received in your order conrma-
tion email.
- Access it via the web address
https://app.sencrop.com using Google Chrome, Firefox or
Safari (Internet Explorer is not recommended).
- Go to Sencrop web site then click “Access my application”
Pour accéder à l’application, vous avez trois possibilités :
- Suivre le lien que vous avez reçu dans le mail de conrma-
tion de commande.
- Accéder à l’adresse https://app.sencrop.com depuis Google
Chrome, Firefox ou Safari (Internet Explorer est à éviter).
- Accéder au site Sencrop puis cliquer sur “Accès à mon
application”
Warranty
Garantie
Access the application
Accéder à l’application
Subject to conditions available at
www.sencrop.com/products/raincrop/warranty,
Sencrop guarantees this product to be free from
material and production defects at the time of
purchase. This limited warranty is valid for a two (2)
year period from the date of original purchase. If
your product requires maintenance that is covered
under the warranty, please contact Sencrop’s
information.
Sous réserve des conditions disponibles à l’adresse
www.sencrop.com/produits/raincrop/garantie,
Sencrop garantit que ce Raincrop est exempt de
vices de conception, de matériau et de main d’oeuvre
au moment de l’achat initial. La présente garantie
limitée est valable pour une période de deux (2) ans
à partir de la date d’achat originelle du produit. Si
votre produit nécessite une réparation couverte par la
garantie, contactez le service support de Sencrop
([email protected]) an d’obtenir des
informations complémentaires.
1918
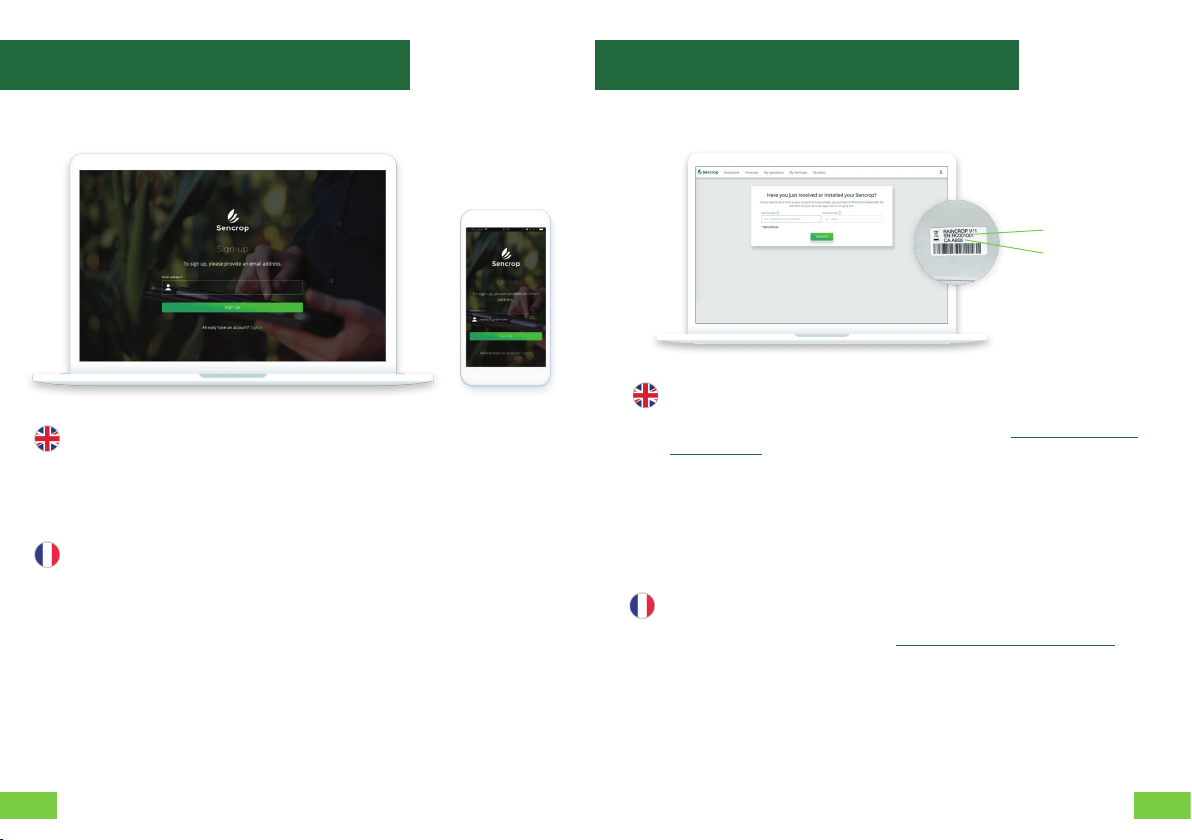
If you have not already done so, you can create your
account by following the link under the login form.
Once you have lled in the information, you will
receive an email conrming your registration.
Si vous n’avez pas encore créé votre compte, vous
pouvez le faire en suivant le lien sous le formulaire
de connexion. Une fois l’information complétée, vous
recevrez une conrmation par email qui validera votre
inscription.
Activating your Sencrop is very easy :
- In the case of a new purchase, you should be directed to the activation
page. Otherwise, you can access the page manually at https://app.sencrop.
com/activation
- Make sure you have your Sencrop codes (SN and CA) on hand. They can be
found on the grey box or on the delivery note.
- Once you’ve completed and validated the form, your stations will be con-
nected and you will be able to access your Dashboard.
In the case of an existing network, you should receive an email invitation and
your stations will be automatically synchronized to your account.
Pour activer votre Sencrop c’est très simple :
- Dans le cadre d’un nouvel achat, vous arriverez directement sur la page
d’activation, sinon accédez à la page https://app.sencrop.com/activation
- Munissez-vous des codes de votre Sencrop (SN et CA) présents sur le boitier
gris de celui-ci ou sur votre bon de livraison.
- Complétez le formulaire puis validez, vos stations seront rattachées et vous
pourrez accéder à votre Dashboard.
Dans le cadre d’un réseau, vous recevrez normalement une invitation par
email et vos stations seront automatiquement rattachées à votre compte.
Serial number
Activation code
Create your account
Créer votre compte
Activate your sencrop
Activer votre sencrop
2120
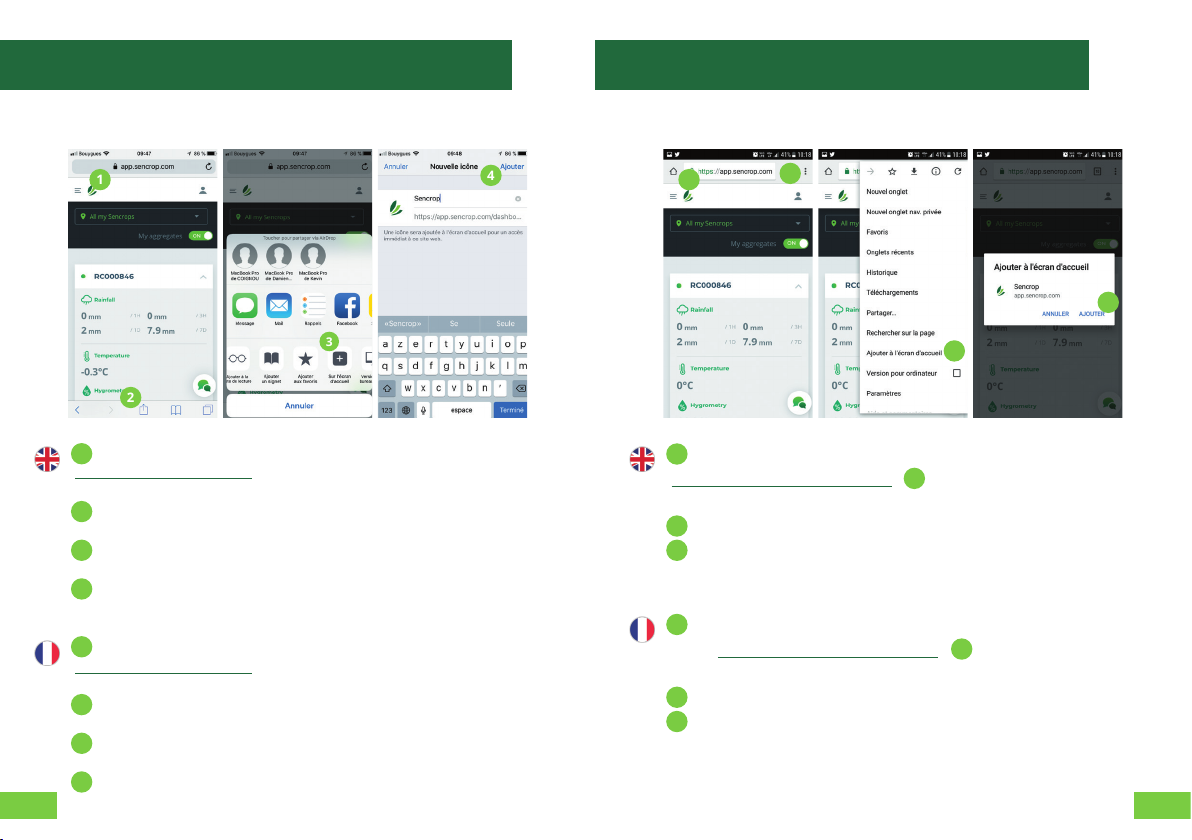
Open Safari and then access the application
(https://app.sencrop.com). Sign in if necessary; otherwise, go to the
Dashboard.
On the bottom taskbar, click on the icon of the square with an
up arrow.
In the list that now appears, scroll right and click on the “+” icon,
“On the home screen”.
Then simply click on “Add” at the top right to create the shortcut
on your phone.
Ouvrez safari puis accédez à l’application
(https://app.sencrop.com). Connectez-vous si besoin, sinon allez sur
le dashboard.
Dans la barre du bas, cliquez sur l’icône représentant un carré et
une èche vers le haut.
Dans la liste qui apparait, faites déler vers la droite puis cliquez
sur l’icône “+”, “Sur l’écran d’accueil”.
Il vous sut ensuite de cliquer sur “Ajouter” en haut à droite et le
raccourci sera créé sur votre téléphone.
3
3
3
4
4
4
2
2
2
1
1
1
Open Chrome, then access the Sencrop application
(https://app.sencrop.com). Click on the 3 vertical
points at the top right.
Select “Add to home screen”.
Then, simply click on “Add”. The shortcut will be
created on your phone.
Ouvrez Chrome puis accédez à l’application Sen-
crop (https://app.sencrop.com). Cliquez sur les 3
points verticaux en haut à droite.
Sélectionnez “Ajouter à l’écran d’accueil”.
Il vous sut ensuite de cliquer sur “Ajouter”. Le
raccourci sera créé sur votre téléphone.
3
4
2
1
3
4
2
2
1
1
Install the app on iOS (Apple)
Installer l’application sur iOS (Apple)
Install the app on Android
Installer l’application sur Android
3
4
22
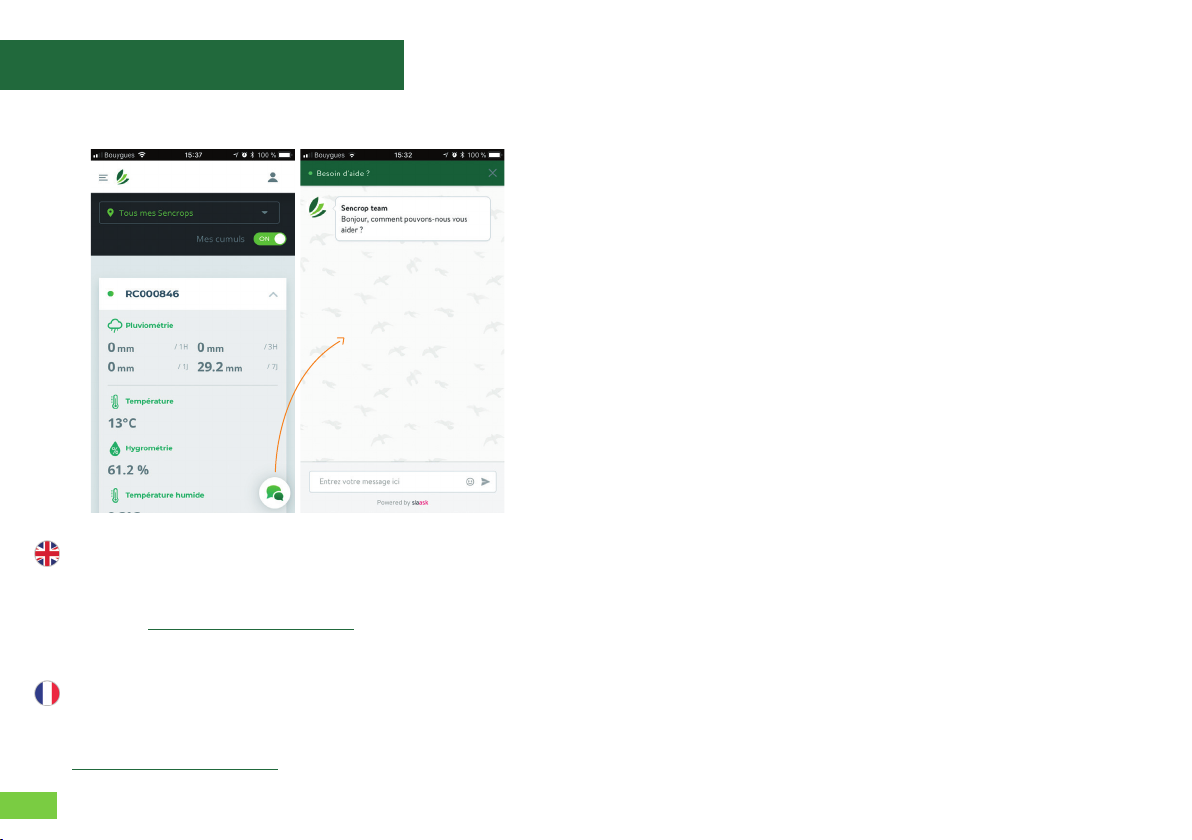
If you have any questions, you can contact our
support team at any time via the online support team
located at the bottom right of the application, or by
are available on working days.
Pour toute question, vous pouvez à tout moment
contacter notre support via le module de chat situé en
bas à droite dans l’application ou à l’adresse
[email protected]. Le support est ouvert les jours
ouvrés.
Online support team
Module de chat

24
sencrop.com+44 20 34 99 73 16
+49 32 221 098 956
+31 (0)6 13 64 01 57
+34 910 920 138
+33 3 60 86 00 76
Table of contents
Other Sencrop Lawn And Garden Equipment manuals


