Senect Oxygen Sensor O2S User manual

Oxygen Sensor O2S
Manual

Product type
2
Product type
Name of product:
SENECT®Oxygen Sensor O2S
Type:
O2S-20-SC
Art.-No.:
2100
Producer:
SENECT GmbH & Co. KG
An 44 –No. 11
76829 Landau / Germany
Important note:
Please read this manual carefully and store it so that you can use
it later. Read the warning and safety notes attentive.
Further information and latest software releases or documents
can be downloaded from:
www.senect.de
© SENECT GmbH & Co. KG - FW 01.10

Table of contents
3
Table of contents
Product type.................................................................................. 2
Table of contents........................................................................... 3
General Security Notes.................................................................. 5
Intended use.................................................................................. 7
Getting started .............................................................................. 8
Getting started –Short version................................................... 11
Maintenance and cleaning .......................................................... 12
Cleaning................................................................................... 12
Sensor disinfection .................................................................. 12
Recalibration ........................................................................... 13
Oxygen signal: 1-Point-calibration .......................................... 15
Short-version: Oxygen signal: 1-Point-calibration................... 17
Oxygen signal: 2-Point-Calibration.......................................... 17
Temperature: 2-Point-Calibration........................................... 18
Sensor Error............................................................................. 19
Salinity / Conductivity correction............................................ 20
Technical data ............................................................................. 22
Information about the correct disposal ...................................... 23
Guarantee.................................................................................... 24
Table of contents
4
Used symbols and wording
DANGER!
Warning of life threatening
dangers.
WARNING!
Warning of possible life
threatening and / or severe
irreversible injuries.
ATTENTION!
Warning of possible medium
or slight injury.
ATTENTION!
Follow the notes to avoid
damage of equipment.
NOTE!
Further information for the
use of the device.
NOTE!
Further information for the
use of the device.
General Security Notes
5
General Security Notes
The oxygen sensor O2S is an electronic unit for the
measurement of the concentration of dissolved oxygen in
water and must be used in combination with SENECT control
units.
Since it is an electronic product the common prerequisites
for a safe instrument usage must be fulfilled. The
corresponding control unit must be operatated
with 230 V AC (~50 Hz). Ensure that all cables are
installed safely so that no obstacles for persons are
built and all. Mount all cables and electric devices
protected against direct environmental impacts
like overheating by direct sunlight and water.
Even if the products are protected against spray
water, the product´s lifetime will be elongated, if it is
mounted on a protected place. The oxygen sensor O2S uses
24 V DC supply voltage which is therefore not of danger for
persons.
For many applications a ground fault circuit interruper
(interrupting current <= 30 mA) is required by law. Inform
yourself about the valid legislation.

General Security Notes
6
The operating temperature of the device must be between
0°C and +40°C. It is not allowed to modify the sensor, to open
the housing or to insert anything into the housing.
The oxygen sensor O2S is designed to be operated by
professional users. However, it can be operated by children
of the age of at least 8 years and persons with limited
physical, sensorial or cognitive ability, if they are supervised
and trained in the usage of the instrument, so that no
dangers or threats can result of the operation.
Please store this manual. We suggest the storage a copy of
the manual in the vicinity of the device.
Technical and optical changes of this manual are subject to
alterations.
Warning: Before starting any maintenance work,
unplug all electrical devices in the water.

Intended use
7
Intended use
The oxygens sensor O2S can be used to measure the
concentration and saturation of dissolved oxygen (O2) in
water in aquaculture applications. It has a measurement
range from 0 to 200% air saturation (a. s.) or 0 to 20 mg O2/
l at temperatures between 0°C and +40°C.
The sensor measures the saturation concentration based on
the principle of luminescence quenching with a resolution of
1% a.s. or 0.1 mg / l and the temperature with a resolution
of 0.1°C. Based on these two measurements, the absolute
concentration of dissolved oxygen in mg O2/ l is calculated.
The sensor is intended to be used in industrial aquaculture
farms in freshwater.

Getting started
8
Getting started
Scope of delivery
o1 x Oxygen sensor O2S
o1 x Manual
Note
Please check directly after delivery, that the
package is not destroyed or damaged or was
opened before. Please check also, that all parts as
listed above are included. If anything is missing or broken,
please contact us as soon as possible within 14 days.
Unfortunately, we cannot accept later information of
damage, which happened during the transport.
Installation and start-up
Choose a place for the electronic interface of the
O2S which is clean, dry and protected from direct
sunlight. Ensure that all cables are placed safely
and all regulations are fulfilled.
Remove the blue protection cap from the sensor and mount
the sensor so that the sensor is submerged.
It is also possible to mount the sensor so that only the lower
sensing part is submerged. Please ensure that the sensor is
Getting started
9
at least to 80% submerged, since the temperature is
measured on the sensor housing.
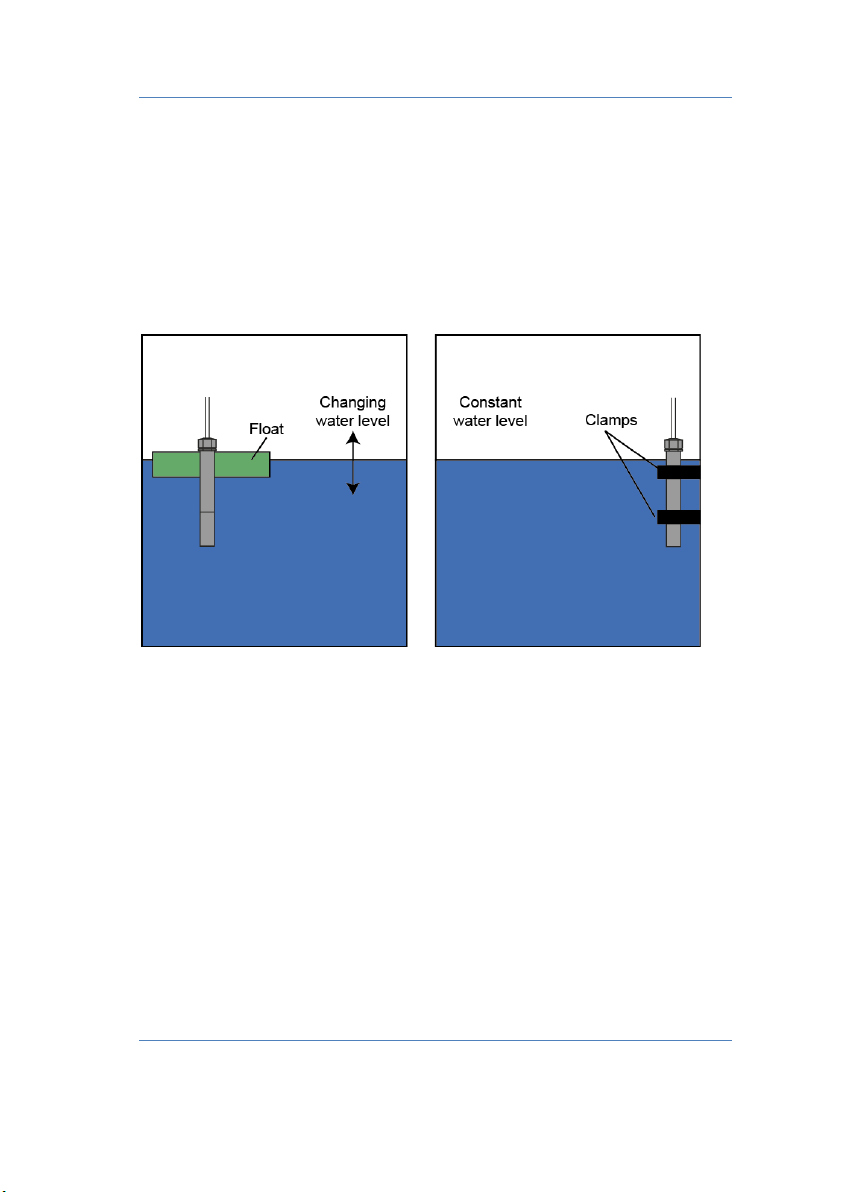
When the sensor will be installed at a location with a
changing water level, it can be mounted free swimming on a
float or completely submerged.
Fig. 1: Mounting possibilities of the sensor.
Please consider when selecting the mounting location that in
surface waters like fish ponds the solar radiation can lead to
a thermal stratification of the water body, associated with
strong gradients in dissolved oxygen.
Ensure to install the sensor at a location, where no rising gas
bubbles can be caught under the sensor.

Getting started
10
Fig. 2: Stainless steel holder Art. No. 2102.
Protect your sensor from fish biting on the sensor
membrane! SENECT offers protection cages.
Connect the blue marked plug of the sensor with a sensor
input port (also blue marked) of your control unit.
The SENECT control units recognize the sensor itself and start
automatically the measurements.
Take into account that the measurement interval is set to
30 s to elongate the lifetime of the sensing cap.

Getting started –Short version
11
The oxygen sensor O2S is factory calibrated and need to be
recalibrated –under for aquaculture typical environmental
conditions –after 6 months.
Getting started –Short version
1. Mount the sensor submerged.
2. Mount the black electronic interface at a protected
location.
3. Connect the sensor cable with a control unit (plug
„SENSOR“).
4. The control unit recognizes the sensor and starts the
measurements.

Maintenance and cleaning
12
Maintenance and cleaning
The O2S oxygen sensor measures the oxygen concentration
optically. This principle enables long-term stable
measurements with a high precision. However, dirt can
influence the measurements. For example, a biofilm on the
sensing membrane can lead to measurements of the oxygen
concentration of the biofilm and not of the surrounding
water.
Cleaning
The sensor should be cleaned regularly by wiping with a soft
water-dipped paper towel or a cotton swab without cleaning
agents.
Avoid the contact with organic solvents like for
example toluol, acetone or chloroform. These
solvents damage the sensing membrane. Also do
not steam-sterilize the sensor.
Sensor disinfection
The sensor can be disinfected with peracetic acid (max. 5
mg / l), methanol, ethanol, isopropanol or 3% H2O2 solution.
Rinse the sensor afterwards with tap water.

Maintenance and cleaning
13
Recalibration
The recalibration is recommended for typical applications
every 6 months. However, a regular weekly check of the
oxygen reading in humid air (should be ~ 100% a.s.) can be
used to check if the sensor needs calibration.
In some applications, e.g. under harsh environmental
conditions, the sensor must be recalibrated more frequently
to guarantee precise measurements. Please check regularly
the oxygen reading of the sensor when it is placed in humid
air.
Since the florescent membrane is prone to photobleaching
effects during the measurement and is therefore an
expendable part, it can be changed by replacing the sensor
cap (Art.-No.: 2101, Type: O2S-ATK). Please note, that the
sensor must be always recalibrated, if the sensing cap is
exchanged. A typical lifetime of the sensor cap is > 2 years.

Maintenance and cleaning
14
Depending on the actual software version, the
menu can be different. You find the latest
manuals at www.senect.de.
OK
123
123
123
123
123
123
123
123
123
123
abc
Sensors
S1: O2S Name
Sensor Calibration
O2 % a. s.
0% a.s.
100% a.s.
Factory settings
Temperature
Calibration Point 1
Calibration Point 2
Information
Info to SENECT
Alarm Threshold
Lower Threshold (O2)
Upper Threshold (O2)
Hysteresis (O2)
Lower Threshold (°C)
Upper Threshold (°C)
Hysteresis (°C)
Alarm On / Off
Plug Name
Salinity Correction
Mode
From sensor cor.
From fix value cor.
Correction Value
With plug
Selection set (default)
Selection not set
Numerical
Confirmation
123
OK FW01.10
123
123

Maintenance and cleaning
15
Oxygen signal: 1-Point-calibration
Place the sensor for several minutes at humid (100% water
vapour saturated) air and ensure, that there are no water
drops on the membrane.
Select in the menu „Sensors“ the oxygen sensor (O2S) and
choose „Sensor calibration/ O2 % a.s.“.
Select 100% a.s. (Calibration Point 2) to take up the 100%
a.s. calibration point. Wait the displayed 120 s and save this
point with OK.
Fig. 1: Calibration diagram with 2 calibration points.

Maintenance and cleaning
16
Alternatively, you can use air saturated water to create a
100% a.s. oxygen solution. Aerate therefore water with an
air pump and diffusor stone. After several minutes, the water
should be equilibrated with the air. This equilibrated water
has by definition an oxygen concentration of 100% air
saturation.
Attention! By using this method, inaccuracies can
be created by:
The air is injected with a pressure
exceeding atmospheric pressure. Therefore, the
partial pressure of O2can also be slightly increased.
The exact timing, when 100% saturation is achieved
is hard to determine, since oversaturation due to the
injection with overpressure can occur.
Oxygen depleting substances in the water can be
present so that 100% a.s. may not be achieved.
Due to these risks, we recommend the calibration on water-
saturated air.
The calibration should be carried out at the same
temperature like in the measured water.

Maintenance and cleaning
17
Short-version: Oxygen signal: 1-Point-calibration
1. Place the sensor in air
2. Menu / Sensors / O2S / Sensor calibration / O2 %
a.s. / 100% a.s.
3. Wait 120 s.
4. Press OK. Finished!
Oxygen signal: 2-Point-Calibration
For the 2-Point-Calibration perform at first the previous step
(calibration of calibration point 2, e.g. in air). Additionally,
perform the same procedure when the sensor is submerged
in oxygen-free water.
You can create an oxygen-free solution by adding 1 tea
spoon of sodium sulphite in 100 ml water (concentration 2
mol / l). Please wait 15 minutes until all oxygen is reduced.
Dip now the sensor in the solution, wait until the
measurement value is stabilized and select in the menu:
0% a.s. (calibration point 1). Save this calibration point.
More background information about the calibration of
oxygen sensors can be found in the DIN EN 25814.

Maintenance and cleaning
18
Temperature: 2-Point-Calibration
To calibrate the temperature signal of the O2S, two
calibration points are necessary. The calibration point 1 must
have a lower temperature (e.g. 0°C) than calibration point 2.
This temperature must be lower than 20°C.
The calibration point 2 (higher temperature) must be
between 30°C and 50°C.
Submerge the sensor in a water bath with the lower
temperature (calibration point 1) and wait, until the sensor
has the same temperature as the water. Select in the menu
“Sensors / O2S / Sensor Calibration / Temperature /
Calibration point 1”. Measure the water temperature with a
reference thermometer and enter this temperature with the
cursor keypad. Confirm the calibration point with OK.
Repeat this procedure for the upper calibration point 2 with
a temperature between 30°C and 50°C.
Tipp: You find the calibration information in the menu under
“Sensors / O2S / Sensor Calibration / Info”.

Maintenance and cleaning
19
Abbr.
Description
SN
Serial number
C0
Raw signal O2 at lower calibration point 1
(0% a.s.)
C1
Raw signal O2 at upper calibration point 2
(100% a.s.)
T0
Raw signal temperature at lower
calibration point 1 (e.g. 0°C)
T1
Raw signal temperature at upper
calibration point 2 (e.g. 0°C)
The SENECT control units measure the
atmospheric pressure and use this value for an
automatic pressure compensation.
Sensor Error
In case the sensor or the sensing membrane is damaged, the
control unit shows an error code. This information (together
with more internal sensor data) can be sent directly to
SENECT for troubleshooting service. Select in the Menu
“Sensors / O2S / Calibration / Info to SENECT”to send the
data via email to SENECT GmbH & Co. KG.

Maintenance and cleaning
20
Salinity / Conductivity correction
By connecting an SENECT conductivity sensor CON to the
SENECT control unit, an automatic salinity correction based
on conductivity measurements for the oxygen measurement
can be made (“Sensors / O2S / Salinity correction” – Mode:
From sensor cor.).
In case there is no conductivity sensor connected, the
conductivity can be entered manually under “Sensors / O2S
/ Salinity correction / Correction value”. Select also as
Mode: From fix value cor.
This manual suits for next models
1
Table of contents
Other Senect Accessories manuals


Popular Accessories manuals by other brands


Ascon tecnologic
Ascon tecnologic TRH 11 manual

Honeywell
Honeywell TRADELINE Y594 user manual

SOMFY
SOMFY Sunis WireFree RTS Light Sensor installation guide

Johnson
Johnson Relax Model Double Instructions for use

Lippert Components
Lippert Components Solera owner's manual

Learning Resources
Learning Resources Eclipse RGB user manual


