Senna M2 User manual

User Manual
M2

User Manual
Contents
1. Vital Precautions.............................................................................................................................. 3
2. Introduction..................................................................................................................................... 4
2.1. Specifications:.......................................................................................................................... 4
2.2. Basic Components................................................................................................................... 4
3. Manual control of M4...................................................................................................................... 5
3.1. Getting started ........................................................................................................................ 5
4. The Menu ........................................................................................................................................ 6
4.1. CCT........................................................................................................................................... 7
4.2. RGBWW................................................................................................................................... 7
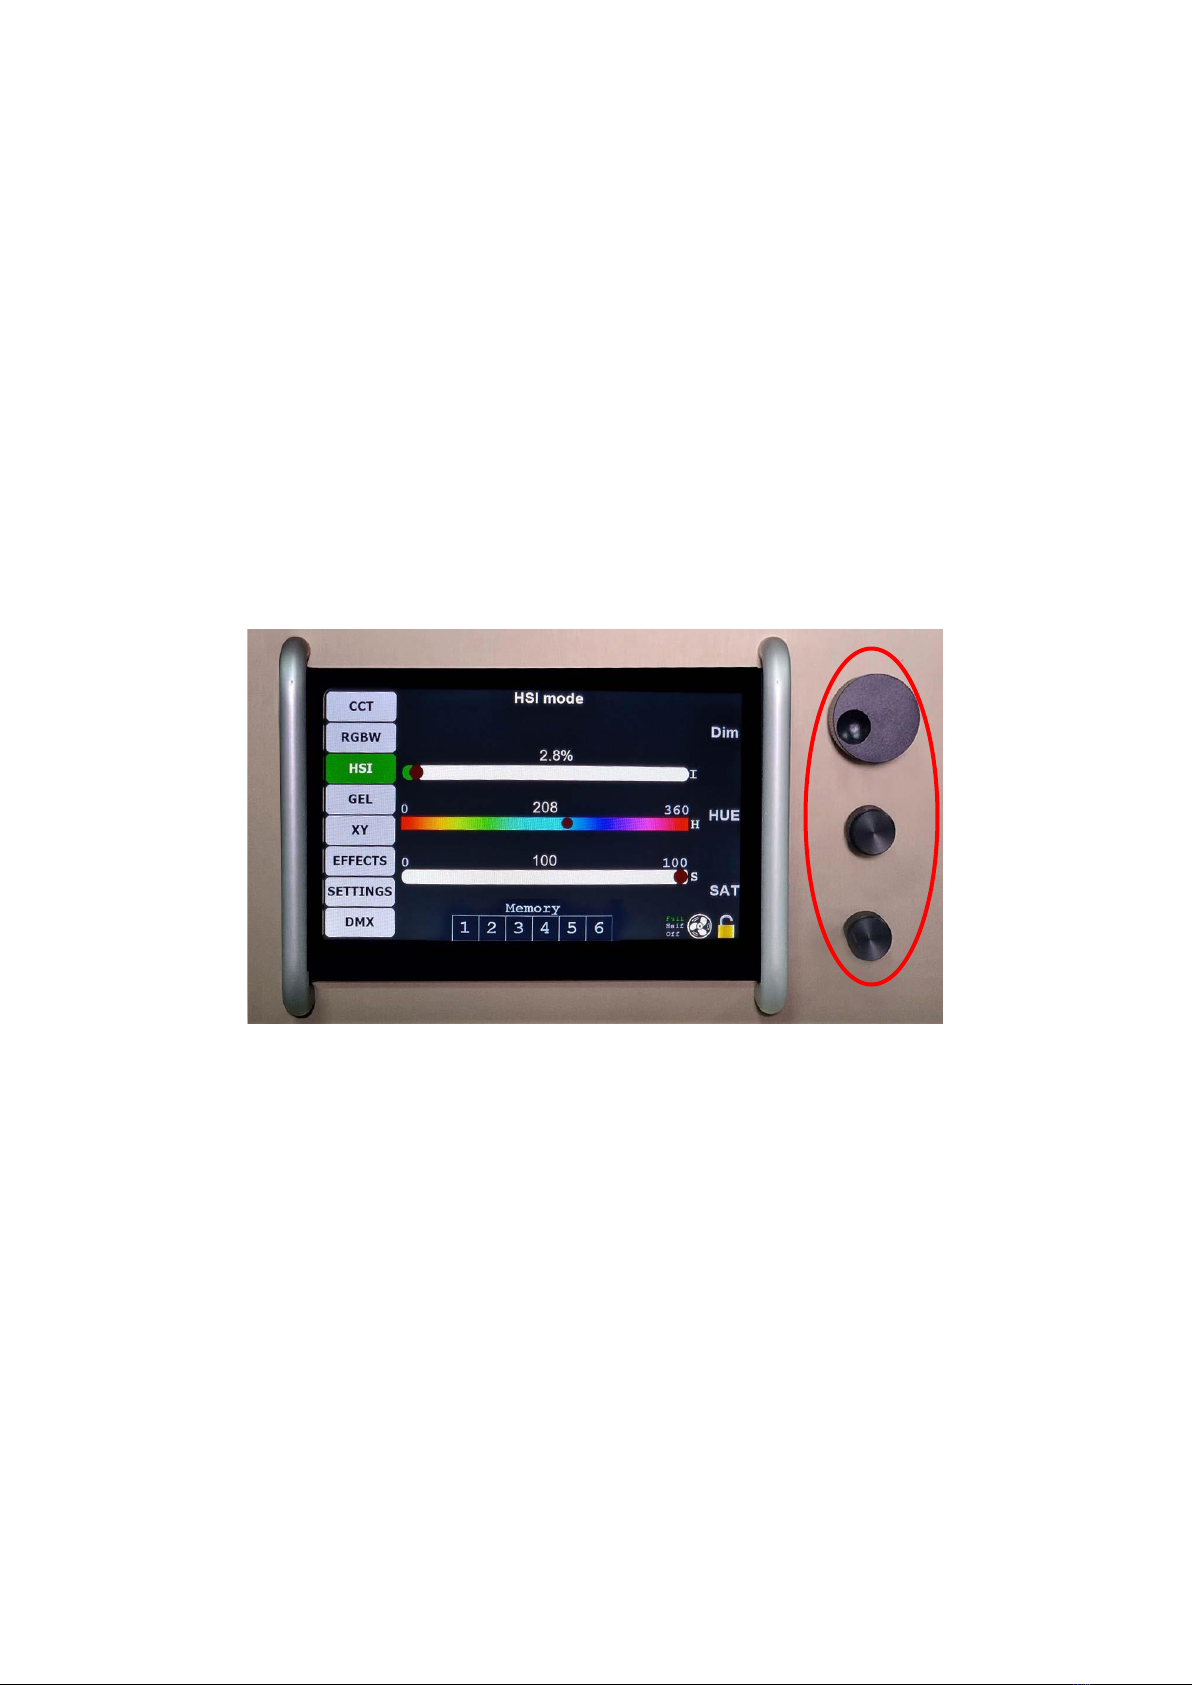
4.3. HSI............................................................................................................................................ 8
4.4. Gel............................................................................................................................................ 9
4.5. XY - This mode will be available soon! ................................................................................. 10
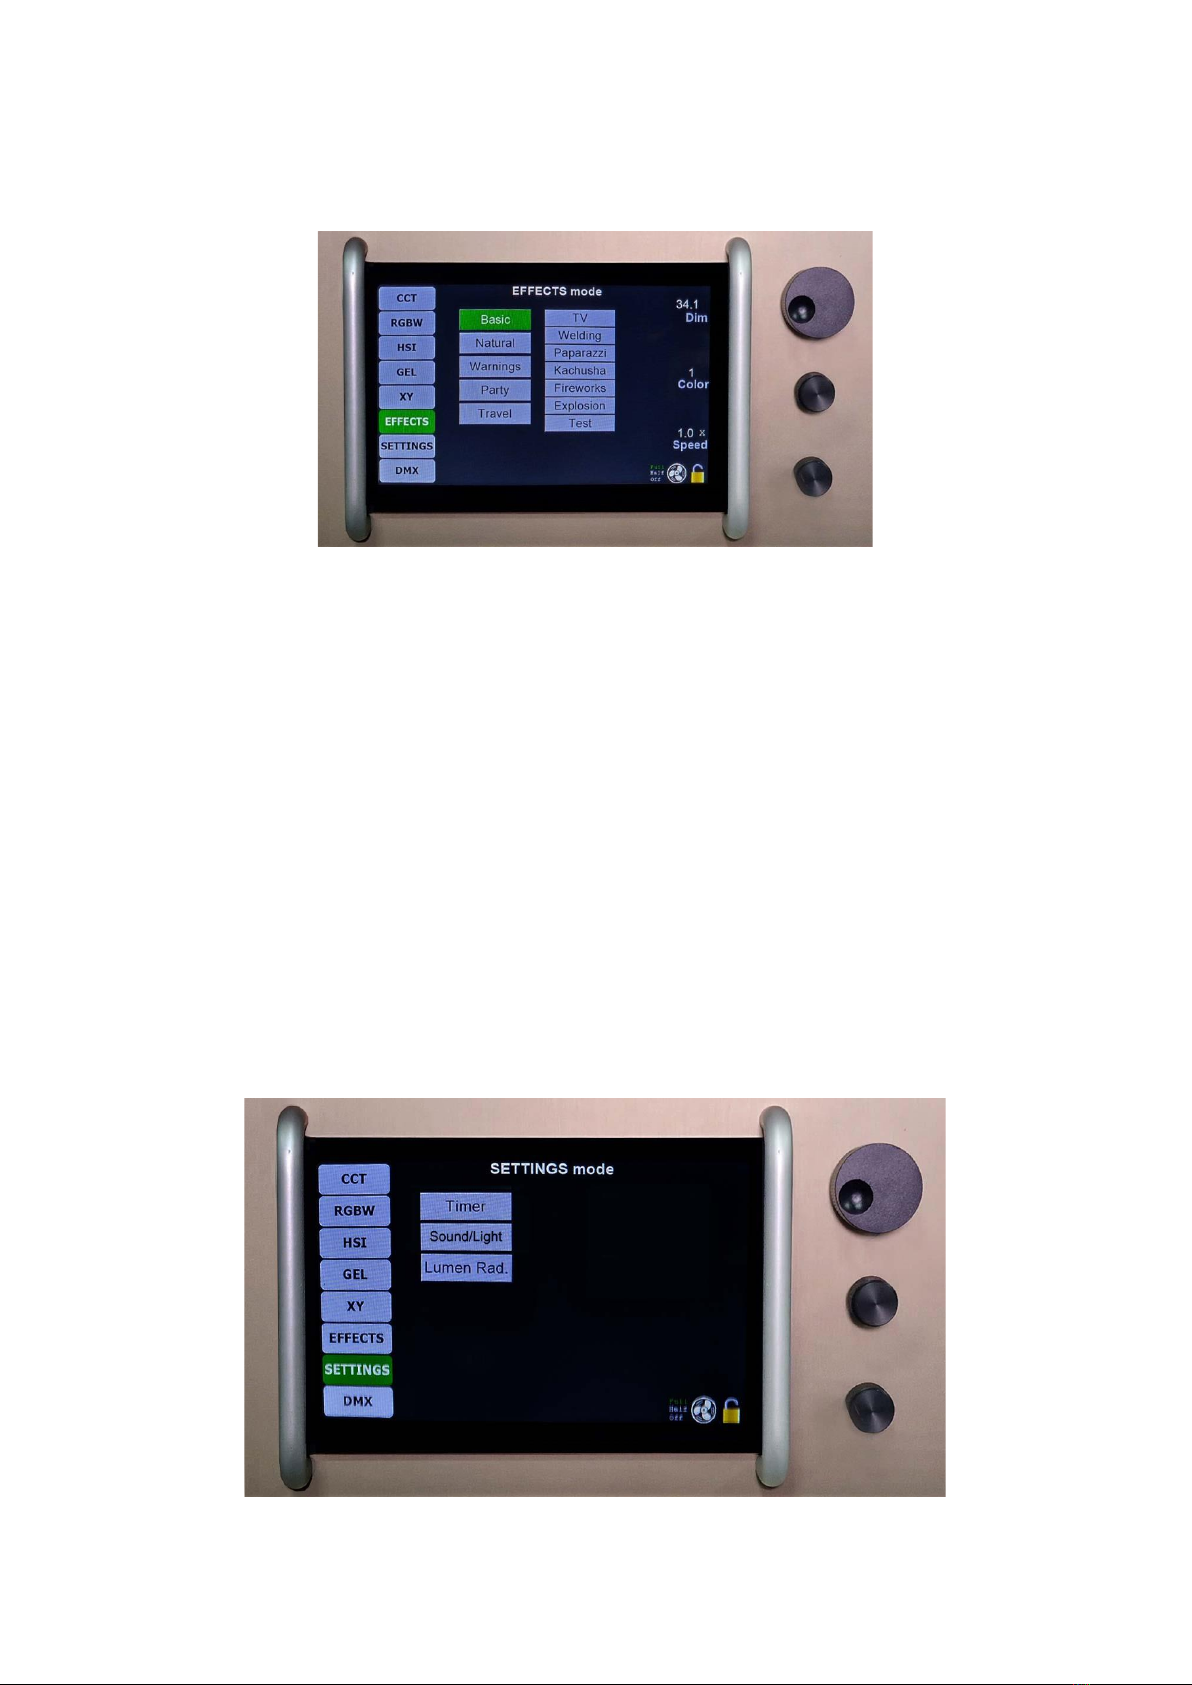
4.6. Effects.................................................................................................................................... 10
4.7. Settings.................................................................................................................................. 10
4.7.1. Timer.............................................................................................................................. 11
4.7.2. Sound/Light ................................................................................................................... 11
4.7.3. Lumen Radio.................................................................................................................. 12
4.8. DMX....................................................................................................................................... 13
4.8.1. CCT DMX Channels Chart............................................................................................... 14
4.8.2. RGBWW DMX Channels Chart....................................................................................... 15
4.8.3. HSI DMX Channels Chart .............................................................................................. 15
4.8.4. GEL DMX Channels Chart............................................................................................... 15
4.8.5. DMX - Ultimate mode.................................................................................................... 18
5. Controlling M4 with SkyBeast console.......................................................................................... 19
5.1. Mode selection...................................................................................................................... 21
5.2. Memory pre-sets................................................................................................................... 22
5.3. Auto Memory recall............................................................................................................... 22
5.4. Memory Loop cycle ............................................................................................................... 23
5.5. General Master Settings........................................................................................................ 23
5.5.1. General dimmer control................................................................................................ 23
5.5.2. Chasing lights................................................................................................................. 24
5.5.3. General memory recall.................................................................................................. 24
6. WARRANTY LETTER ....................................................................................................................... 26

User Manual
1. Vital Precautions
WARNING!
High voltage! Risk of electric shock and fire.
•Read and understand all safety information and operation instructions before you operate
or install the product or the system.
•Use solely and exclusively as described in the instructions.
•Always check that the local AC power matches the voltage and frequency range printed on
the type label of the product before use.
•Always earth the fixture electrically.
•Use only a genuine Senna power supply and connection cable designed for the
Masterpiece.
•Do not connect or disconnect the header cable when powered. The connectors can be
damaged by arcing.
•Never use the cables for transportation. Never hang the product on its cables.
•Never attempt to repair any part of the product on your own.
WARNING!
Humidity and Condensation! Risk of electric shock and fire.
•Never expose the product to rain or moisture.
•Do not use the product for 2 h when it was exposed to big temperature differences as
condensed moisture may damage the product electrically when switched on.
WARNING!
Overheating! Risk of fire.
•Do not operate the product in its full power if the environment temperature exceeds 30°
C.
•When environment temperature exceeds 30° C, the Product must be used on 70% of its
power.
•Intensive use can cause the surface to become hot. Let the product cool down complete
before you handle it.
•Never cover air vents during operation. Keep a minimum clearance around the air vents of
0.5 m.
•Never point a light beam from another luminaire into the diffuser.
•Do not place the product on or nearby heat sources. Intense heat cause damage to the
product or automatic power off during operation.
WARNING!
Intense Light! Risk of injury and fire.
•Do not stare at operating light source.
•Intense light. Do not stare at the light output aperture. Risk of irreversible eye injury.
Wear safety glasses. Keep a minimum distance to an illuminated surface, objects or
persons of 1m.
WARNING!
Heavy weight! Risk of injury and damage.
•Keep your fingers away from joints and moving parts.
•Devices and accessories must be secured against fall when mounted above floor level.
•Always observe common and local safety regulations.
•Disconnect all cables prior to transport.

User Manual
2. Introduction
2.1. Specifications:
M2 - LED PANEL
Parameter
Value
Series
Masterpiece
LED configuration
Full RGB + W + WW
Dimensions
520*300*170mm
Weight
8 kg
Light aperture
500 x 260 mm
Voltage input
48 Vdc +/- 5%
Power consumption
400W maximum
Unit power connection
WEIPU 20 series 4 pin
Dimming
0% to 100% continuous
Flicker
flicker free 10% to 100%
Color temperature
2000K –20.000K
Control
Full onboard touch screen/wired DMX/LumenRadio CRMX
wireless
Beam angle
60° (half peak angle), 15° with optical lens
Color rendering
CRI average > 95
IP rating
IP20
Operation temperature-
Max. power: -20°C to + 30°C; 70% power: >+30°C
M2 - POWER SUPPLY
Parameter
Value
Series
PS400
Dimension
400 x 190 x 110 mm
Weight
approx. 3,5 kg
Input range
100 to 240Vac, 50/60HZ, 450VA max
Output range
48 Vdc, 8A, 380VA max
Power input connection
NEUTRIK power CON 16A / Schuko (EU), 2meter
Power output connection
WEIPU 20 series 4pin
Operation temperature
-20°C to + 35°C
2.2. Basic Components
1. Light fixture
2. Stand adapter
3. Power supply
4. Cabling
5. Carry bag

User Manual
3. Manual control of M2
M2 dashboard
3.1. Getting started
1. Connect the M2 with power supply box with the enclosed cable.
2. Turn the power supply on.
Power supply display
M4 display
3. The display of power supply will show voltage, current, power and energy consumption (see
the picture above)

User Manual
4. The display 1 on the M2 control board will show introduction message. The QR code on the
introduction message takes you to www.senna.hr where you can find more info about M2.
5. After 10 seconds Main Menu will show on the display.
4. The Menu
There are 8 modes available in the
Menu:
1. CCT
2. RGBW
3. HSI
4. GEL
5. XY
6. Effects
7. Settings
8. DMX
-To choose any of these modes simply touch the screen. The icon of the mode you have
selected will turn green.
-In the right down angle there are 2 icons:
Touch to lock/turn off the screen. To turn the screen on again, touch the
screen or turn any knob.
Touch to change the level of fan speed to FULL, HALF or OFF.
Selected level will turn green.

User Manual
4.1. CCT
1. To choose CCT mode simply touch the CCT icon in the left menu in the screen. The icon will
turn green.
2. There are CCT and CCT+ option for your selection. Touch the screen to choose one. The icon
will turn green.
CCT mode provides temperature range from 2.700K to 20.000K (temporary unavailable!)
CCT+ mode provides temperature range from 3.000K to 6.000K
3. To make adjustments of dimmer, temperature and green/magenta point, you can slide your
finger along the lines or use regulation knobs on the right side of the display:
-Use regulation knob 1 to adjust dimmer
-Use regulation knob 2 to adjust temperature
-Use regulation knob 3 to adjust green/magenta
4. To save the adjustments you have made as a memory pre-set simply touch one of 6 memory
buttons at the bottom of the screen. The number of saved memory pre-set will turn green.
4.2. RGBWW

User Manual
1. To choose RGBW mode simply touch the RGBW icon in the left menu in the screen. The icon
will turn green.
2. To select a colour (Red, Green, Blue, White, Warm White) you want to adjust, simply touch
the icon with a color, or use regulation knob 3 (select).
The icon of the colour you have selected will get white frame.
3. To adjust dimmer of a selected color –use regulation knob 2 (single color)
Dimmer percentage will show on the selected color icon.
4. To adjust dimmer in general –use regulation knob 1 (dimmer)
General dimmer percentage will show in the right upper corner of the display.
Please note! General dimmer is limited to 400W power consumption. If you turn all colors to
intensity of 100%, general dimmer will not be 100%, it will get lower in order to maintain
power consumption of 400W.
5. To save the adjustments you have made as a memory pre-set simply touch one of 6 memory
buttons at the bottom of the screen. The number of saved memory pre-set will turn green.
4.3. HSI
1. To choose HSI mode simply touch the HSI icon in the left menu in the screen. The icon will
turn green.
2. To make adjustments of dimmer, hue and saturation you can slide your finger along the lines
or use regulation knobs on the right side of the display:
-Use regulation knob 1 to adjust Dimmer
-Use regulation knob 2 to adjust Hue
-Use regulation knob 3 to adjust Saturation
3. To save the adjustments you have made as a memory pre-set simply touch one of 6 memory
buttons at the bottom of the screen. The number of saved memory pre-set will turn green.

User Manual
4.4. Gel
1. To choose Gel mode simply touch the Gel icon in the left menu in the screen. The icon will
turn green.
2. There are 3 Gel groups available in this mode:
1. Lee Color correction
2. Lee Filters Color
3. Rosco Color
To select one of these groups simply touch its icon. The icon will turn green.
3. Each of the 3 gel groups has different gels for your selection. Choose any of them by touching
its icon or using the regulation knob 3 (Select)
4. Use regulation knob 1 to adjust Dimmer
5. Use regulation knob 2 to adjust Color temperature Base (from 3.200K to 5.600K)
6. To save the adjustments you have made as a memory pre-set simply touch one of 6 memory
buttons at the bottom of the screen. The number of saved memory pre-set will turn green.

User Manual
4.5. XY - This mode will be available soon!
4.6. Effects
1. To choose Effect mode simply touch the Effect icon in the left menu in the screen. The icon
will turn green.
2. There are 5 groups of effects available in this mode:
1. Basic - TV, Welding, Paparazzi, Kachusha, Fireworks, Explosion, Test
2. Natural - Lightning, Fire single, Fire Multi, Candles, Clouds, Comet, Sunrise, Sunset,
Aurora
3. Warning - Police, Security, Warning, Fireman
4. Party –Color Chase, Strobe, Disco ball
5. Travel - Snake, Snake Reverse, Snake White
To select one of these effects simply touch its icon.
The icon will turn green, and the effect will perform.
3. Use regulation knob 1 to adjust Dimmer
4. Use regulation knob 2 to adjust Color temperature
5. Use regulation knob 3 to adjust the Speed of effect
4.7. Settings

User Manual
7. To choose Settings mode simply touch the Settings icon in the left menu in the screen. The
icon will turn green.
8. Display will show these settings:
-Timer
-Sound/Light
-Lumen radio
4.7.1. Timer
To enter timer settings simply touch its icon. Display will show 2 timers:
-General time –shows total time the fixture has been used. This timer cannot be reset!
-User Time –shows time the fixture has been used since last reset of the timer.
To reset User Timer, please follow the steps:
1. Touch the User Timer.
2. You will be asked to enter 4 digits PIN provided by Manufacturer.
3. After you have entered correct pin, press OK
4. User Timer will be set to 00:00
To go back to Settings, simply touch the Settings icon on the left.
4.7.2. Sound/Light
To enter Sound settings simply touch its icon. Display will show 2 settings:
-Volume - If you turn the volume up, the voice will pronounce every command you select in
the menu.

User Manual
To adjust the level of volume and logo light simply slide along the line with your finger.
To go back to Settings, simply touch the Settings icon on the left.
4.7.3. Lumen Radio
Lumen Radio settings enable you to UNLINK M2 from your lumen radio device.
To do that, please follow the steps:
1. Enter Lumen radio settings by touching its icon. The icon will turn green.
2. Display will show the UNLINK button.
3. Touch UNLINK button.
4. Lumen radio is unlinked.

User Manual
4.8. DMX
To enter RGBW mode simply touch the RGBW icon in the left menu. The icon will turn green and
display will show this information:
1. First thing you need to do is to set the range of operation, by choosing the segment(s) of M2
you want to control separately. You can do that by touching the parts in the picture (below).
Selected segment will turn white:
Control the whole fixture
6 DMX channels in use
Control 2 segments of the
fixture separately
13 DMX Channels in use
2. Set DMX address by touching + - buttons
•To set and lock DMX address, turn
the knob 1 until you reach desirable
number and then press knob 1 to lock
your selection. Number will turn red
and you will not be able to change it
with +- buttons.
•To unlock the address, press knob 1
once more.

User Manual
3. Select Dimmer mode. There are 4 dimmer modes available for your selection.
1. Linear
2. Exponent (temporary not available)
3. Logarithm (temporary not available)
4. S curve (temporary not available)
You can select one of these by touching the icon or using the navigation knob 3. Selected
icon will turn green.
4. Now you can select the mode of operation by touching UP or DOWN button or using the
navigation knob 2. Selected icon will turn green.
There are 5 DMX modes available:
1. CCT 8 bit
2. RGBW 8 bit
3. HSI 8 bit
4. GEL
5. ULTIMATE 8 bit
4.8.1. CCT DMX Channels Chart
1 Segment Control
2 Segments Control
Seg. 1
1. Dimmer
2. Color Temp.
3. Green/Magenta
Seg. 1
1. General Dim
2. Dimmer
3. Color Temp.
4. Green/Magenta
Seg. 2
5. Dimmer
6. Color Temp.
7. Green/Magenta

User Manual
4.8.2. RGBW DMX Channels Chart
1 Segment Control
2 Segments Control
Seg. 1
1. Dimmer
2. RED dim.
3. GREEN dim.
4. BLUE dim.
5. WHITE dim.
6. W.WHITE dim.
Seg. 1
1. General Dim
2. Dimmer
3. RED dim.
4. GREEN dim.
5. BLUE dim.
6. WHITE dim.
7. W.WHITE dim.
Seg. 2
8. Dimmer
9. RED dim.
10. GREEN dim.
11. BLUE dim.
12. WHITE dim.
13. W.WHITE dim.
4.8.3. HSI DMX Channels Chart
1 Segment Control
2 Segments Control
Seg. 1
1.Dimmer
2. Hue
3. Saturation
Seg. 1
1.General Dim
2. Dimmer
3. Hue
4. Saturation
Seg. 2
5.Dimmer
6. Hue
7. Saturation
4.8.4. GEL DMX Channels Chart
1 Segment control only
1. Channel –Dimmer
2. Channel –Color temperature base
3. Channel –1 group (Lee Color Correction)Gel selection –range 5-104
4. Channel –2 group (Lee Filter Color)Gel selection–range 5-94
5. Channel –3 group (Rosco Color)Gel selection –range 5-99

User Manual
4.8.4.1. GEL Groups Charts
Group 1 - Lee Color Correction
Gel range
Gel Name
Gel Number
5-9
Eighth 1/8 CTO
223
10-14
Quarter 1/4 CTO
206
15-19
Half 1/2 CTO
205
20-24
Three quarters 3/4CTO
285
25-29
Full 1/1 CTO
204
30-34
Double 2/1 CTO
287
35-39
Eighth 1/8 CTB
218
40-44
Quarter 1/4 CTB
203
45-49
Half 1/2 CTB
202
50-54
Three quarters 3/4 CTB
281
55-59
Full 1/1 CTB
201
60-64
Double 2/1 CTB
200
65-69
Plus Green 1/8
278
70-74
Plus Green 1/4
246
75-79
Plus Green 1/2
245
80-84
Plus Green 1/1
244
85-89
Minus Green 1/8
279
90-94
Minus Green 1/4
249
95-99
Minus Green 1/2
248
100-104
Minus Green 1/1
247
105-109
Fluorescent 5700K
241
110-104
Fluorescent 4300K
242
Group 2- Lee Filters Color
Gel range
Gel Name
Gel Number
5-9
Rose Pink
2
10-14
Dark Magenta
46
15-19
Lavender
58
20-24
Pale Blue
63
25-29
Sky Blue
68

User Manual
30-34
Evening Blue
75
35-39
Moss Green
89
40-44
Dark Yellow Green
90
45-49
Bright Pink
128
50-54
Deep Blue
120
55-59
Yellow
101
60-64
Golden Amber
134
65-69
Apricot
147
70-74
Fire
19
75-79
Cosmetic Peach
184
80-84
Industry Sodium
650
85-89
Sodium
651
90-94
Urban Sodium
652
Group 3- Rosco Color
Gel range
Gel Name
Gel Number
5-9
30 Magenta
4730
10-14
60 Magenta
4760
15-19
90 Magenta
4790
20-24
15 Cyan
4315
25-29
30 Cyan
4330
30-34
60 Cyan
4360
35-39
90 Cyan
4390
40-44
30 Green
4430
45-49
60 Green
4460
50-54
90 Green
4490
55-59
15 Yellow
4515
60-64
30 Yellow
4530
65-69
60 Yellow
4560
70-74
Salmon
R41
75-79
Deep Salmon
R42
80-84
Middle Rose
R44
85-89
Daylight Blue
R65
90-94
Green Blue
R77
95-99
Primary Blue
R80

User Manual
4.8.5. DMX - Ultimate mode
Ultimate mode enables you to control all the modes at once with your DMX control plate.
To select the Ultimate mode touch UP or DOWN button or use the navigation knob 2 until you reach
Ultimate mode icon. Selected icon will turn green. Once Ultimate mode is selected, the channels on
your DMX control plate will control:
*Effects Selection
Effect range
Effect Name
0-9
No effect
10-15
TV
16-20
Welding
21-25
Paparazzi
26-30
Kachusa
Effect range
Effect Name
71-75
Comet
76-80
Sunrise
81-85
Sunset
86-90
Aurora
91-95
Police
Channel
Modes
1. Channel
All modes - general dimmer
2. Channel
Mode selection:
-CCT (Channel 1-9)
-HSI (Channel 10-19)
-RGBW (Channel 20-29)
-GEL (Channel 30-39)
-EFFECTS (Channel 40-49)
3. Channel
-For CCT mode –Color temperature
-For HSI mode –HUE
-For RGBW –RED dimmer
-For GEL –Color Temp. base selection
-For Effect –Effect Select* (0-140)
4. Channel
-For CCT mode –Green/Magenta
-For HSI mode –Saturation
-For RGBW –GREEN dimmer
-For GEL –Gel selection (Group 1)
-For Effects –Speed 0.5-1.5s (0-255)
5. Channel
-For RGBW –BLUE dimmer
-For GEL –Gel selection (Group 2)
-For Effects –Fade 0-25.5m/s (0-225)
6. Channel
-For RGBWW–WHITE dimmer
-For GEL –Gel selection (Group 3)
-For EFFECTS –Stop (0-100)/Go (101-
255)
7. Channel
-For RGBW –WARM WHITE dimmer

User Manual
31-35
Fireworks
36-40
Explosion
41-45
Test
46-50
Lightning
51-55
Fire Single
56-60
Fire Multi
61-65
Candles
66-70
Clouds
96-100
Security
101-105
Warning
106-110
Fireman
111-115
Color Chase
116-120
Strobe
121-125
Disco Ball
126-130
Snake
131-135
Snake Reverse
136-140
Snake White
5. Controlling M2 with SkyBeast console
Pairing your devices
To be able to control your M2 with SkyBeast console, you should first pair these two devices.
•Here are the settings you need to make on your M2:
1. Select DMX mode on your M2
2. Select Ultimate mode (8 bit or 16 bit)
3. Set Lumen radio –ON
4. Select desirable DMX channel of your M2.
Pay attention that the number of DMX channel selected on your M2 must match the number
of the selected bank on your SkyBeast console!
The picture below shows the necessary selections:

User Manual
•Here are the settings you need to make on your SkyBeast:
•Pres and hold the Menu button for
5 seconds to enter the menu
•Use General Master (-) and Mode
Select (+)buttons to navigate the
menu until your reach command
Link Lumenradio
•Press Menu button shortly to
confirm selection
•Display will show Linking
LumenRadio…
•When display returns to settings
LumenRadio is linked.
•Press and hold Menu button for 5
sec to enter the Menu once again
•Use General Master (-) and Mode
Select (+)buttons to navigate the
menu until your reach command
Masterpiece by Senna
•Press Menu button shortly to
confirm selection
•Display will show Masterpiece
selected
•When display shows DMX
channels M2 is paired to the
SkyBeast
Please make sure that the number of DMX channel selected on your M2 matches the number of the
selected bank on your SkyBeast console! There are 16 bank available on your SkyBeast console (each
containing 30 channels) + 4 standard mode channels.
Here are the steps you need to take to select a bank on your SkyBeast console:
1. Press shortly buttons General Master and Mode
select together.
2. The number of the bank on display will start
blinking.
3. Use navigation buttons - General Master (-) and
Mode Select (+) until the desirable DMX bank
number is shown on the display.
4. To confirm your choice press buttons General
Master and Mode select at the same time again
shortly.
You should follow the same steps (above) when you are controlling more than one fixture with
your SkyBeast control, and you want to navigate from one fixture to another!
Table of contents
Other Senna Lighting Equipment manuals