Sensa Core Hemo Spark User manual

MEM
%
HCT
g/dL
n
WARRANTYWARRANTY
YEARSYEARS
33
3
YEARS
Blood Hemoglobin Measuring System
ISO
9001
ISO
13485
Obelis s.a., Bd General Wahis 53, 1030,
Brussels, Belgium. Tel:+(32) 2 732-59-54
Fax:+(32) 2 732-60-03 [email protected]


Table of Contents
Section 3
Section 4
Section 5
Section 6
Section 8
Section 9
Section 10
Section 11
Appendix 1
Appendix 2
Appendix 3
Section 1
Section 7
Section 2 Contents in Hemo Spark Kit............................................................ 6
Components...................................................................................... 7
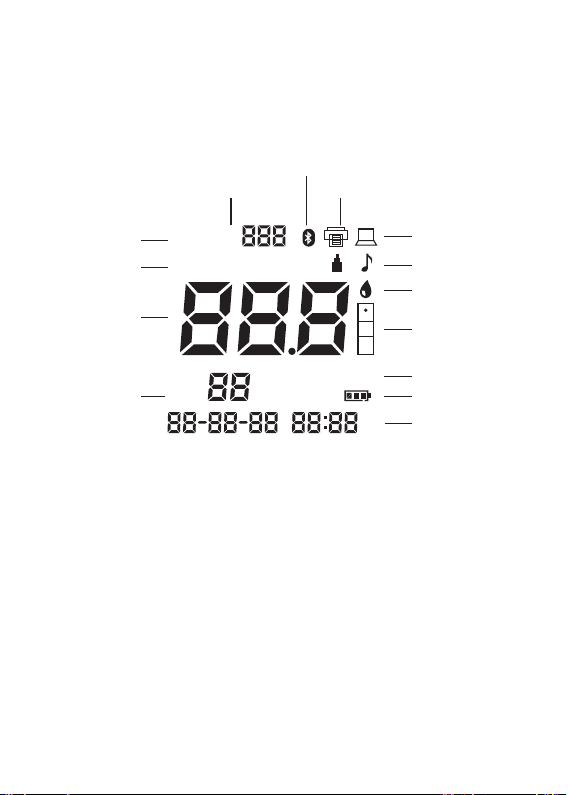
Meter.............................................................................................7
Test Strips.....................................................................................10
Test Strips Storage and Handling.................................................12
Test Strips Precautions and Instructions for Use........................12
Initial Setup......................................................................................14
Power Supply...............................................................................14
Meter Setup and Options ...............................................................16
Test Number Setup .....................................................................17
Meter Setup ................................................................................18
Testing .............................................................................................20
Instructions for use of Lancing Device.......................................21
Instructions for use of Safety Lancets ...................................... 24
Data Transfer / Transmission.......................................................28
Deleting Data............................................................................... 28
Optical System Check..................................................................... 30
Maintenance ...................................................................................32
Cleaning.......................................................................................32
Recharging or Replacing the Batteries ......................................32
Precautions......................................................................................33
Troubleshooting...............................................................................34
Meter Specifications.......................................................................35
Index of Symbols.............................................................................36
Warranty..........................................................................................37
Introduction.......................................................................................4
Data/Communication .....................................................................28
Coding the Meter.........................................................................15
Code Chip Sample Count .............................................................15
Strip Testing ................................................................................ 26
Control Strips / Control Solutions................................................12
Strip Test Processing ................................................................. 25
Alternate Test Sites......................................................................5

Section 1 Introduction
Intended Use
The Hemo Spark Blood Hemoglobin(Hb) Measuring System is intended for the quantitative
determination of hemoglobin (Hb) in capillary, venous & arterial human whole blood . The
testing system is designed for in vitro diagnostic use only (external use only).
The Hemo Spark Blood Hemoglobin Measuring System is for professional in vitro diagnostic
use only. Simply add a drop of blood to the test strip, and the result is displayed on the
screen in less than 30 seconds. This device has not been evaluated for pediatric subjects.
4
* Read instructions carefully. Complete any necessary training before use.
* Only use Hemo Spark Hemoglobin (Hb) Test Strips with the Hemo Spark Hemoglobin (Hb) Meter.
* For Professional in vitro diagnostic use only.
* Test only whole blood specimens. Blood samples with EDTA or heparin anticoagulants can be used.
* This device has not been evaluated for pediatric subjects.
* Keep out of reach of children.
* For any queries, please contact Customer Support at 1800 212 2880
The Hemoglobin Test strip includes a mesh covered sample reaction zone. Sample is applied
to the center of the sample reaction zone. The mesh functions to separate the sample evenly
on the entire reaction layer. The reagents on the reagent layer function to hemolyze and
release the hemoglobin. The hemoglobin is converted to methemoglobin to cause a color
Principle of Operation for the Methodology
The meter reads the reflection of the strip at every second until the end point of the reaction
is detected. The reflection at the end point is directly proportional to the hemoglobin
concentration. The end point is defined as following:
To ensure accurate results:
change on the strip.
The reflection changes between ±1% in three continuous second. Then the reflection at the
last second will be read as the end point.
The Hemo Spark Blood Hemoglobin(Hb) Measuring System provides results in less than
30 seconds. The test only requires 10 μL drop of whole blood. The meter can store up to
1,000 results and can be powered by 3 AAA rechargeable batteries (Lithium/NiMH /Zinc/ZnCl
Carbon) or an optional AC adapter.

Upper arm
Forearm
Hand
Fingertips
Thigh
Calf
The human figure above shows the areas where you can test with the
. Avoid moles, veins, Hemo Spark Blood Hemoglobin(Hb) Measuring System
bones and tendons.
Suggested Test
Areas for the Hand
Alternate Test Sites
Warning:
We recommend that you test on your finger tips for better results.
Hemo Spark Blood Hemoglobin(Hb) Measuring System uses 10 µL sample.
So you can test on a variety of locations shown above.
Note :
5

Carrying Case: Provides portability for testing wherever you go.
Control Strip or Control Solution: Verifies the proper operation of the meter by checking that
the meter can detect a pre-calibrated value / defined ranges respectively as mentioned in insert
Control Strip or Control Solution Package Insert: Provides detailed instructions on using
the Hb Hemoglobin Control Strip or Control Solution.
Hemo Spark Hemoglobin (Hb) Meter: Reads the Test Strips. Displays the hemoglobin (Hb)
concentration and the estimated hematocrit (Hct) value.
User's Manual: Provides detailed instructions on how to use the Blood Hemoglobin (Hb)
Measuring System.
Section 2 Contents in Hemo Spark Kit
Hemo Spark kit will have the items as per CONTENTS mentioned on the kit box
Before testing, read the instructions carefully and learn about all the components of the
Hemo Spark Blood Hemoglobin(Hb) Measuring System.
The following items are needed to perform a test:
Items in the Package
1. Hemo Spark Hemoglobin(Hb) Meter
2. Hemo Spark Blood Hemoglobin Measuring System User Manual
3. Hemo Spark Hemoglobin Control Strips*
4. Hemoglobin Control Strip Insert Sheet*
5. Hemoglobin Control Solutions*
6. Hemoglobin Control Solution Insert Sheet*
7. USB Cable*
8. (Lithium/NiMH /Zinc Carbon)3 AAA rechargeable batteries /ZnCl
9. Lancing Device
10. Warranty Card
11. Lancets
12. Power Adapter*
13. Carrying Case
sheet.
Note: Components with * are optional and are provided based on requirement.
6

Section 3 Components
The Hemo Spark Hemoglobin (Hb) Meter reads the test strips and displays the hemoglobin
(Hb) concentration and hematocrit (Hct) value. Below diagram describes the parts of your
meter.
Meter
1. LCD (Liquid Crystal Display)
2. Left Arrow Button
4. Strip Channel
3. Setup Button
5. Right Arrow Button
◄
◄
6
1
7
8
5
2
4
9
3
10
7. Battery Cover
8. Serial Port
9. Printer Interface/USB
6. On/Off Button
10. Code Chip
7

Meter Display
During testing, the Hemo Spark Hemoglobin (Hb) Meter will display icons showing the status,
options available and prompts for testing:
Sound Icon: Appears when the sound is turned on.
Battery: Flashes when the battery should be recharged or replaced.
Test Number: Indicates assigned test number.
Test Result Area: Indicates test result or displays menu options.
Memory: Indicates a test result is being recalled from memory.
Measurement Units: Indicates the units for the test result.
Hct Value: Shows calculated Hct value.
Test Strip and Blood Drop Symbols:
Indicates when to insert test strip or apply sample/specimen.
MEM CHK C
%
Lev
HCT
mmol/L
CAL
g/dL
AM
PM
CODE
SET n
Link computer
Sound
Blood drop symbol
Test / Control strip symbol
Unit
Battery
Date and Time
SET mode
Memory
Test result area
HCT value
Test number
Bluetooth
Printer
8

Meter Use and Precautions
* Do not get water or other liquids on or inside the meter.
* Keep the test strip channel clean.
* Keep the meter dry. Avoid exposure to extreme temperatures or humidity.
* Do not drop the meter or get it wet. If either has occurred, ensure the meter is working
properly by running an Optical Check. Refer to Section 8 Optical System Check for details.
* Do not take the meter apart. This will void the warranty.
* Refer to Section 9 Maintenance for details on how to clean the meter.
* Keep the meter and all associated parts out of reach of children.
Note:
Follow proper precautions and all local regulations
when disposing of the meter and used batteries.
All Hb Systems Preventive Warnings with Regard to EMC
This instrument is tested for immunity to electrostatic discharge, as specified in IEC
61000-4-2. However, use of this instrument in a dry environment, especially if synthetic
materials are present (synthetic clothing, carpets, etc.) may cause damaging static
discharges that can cause erroneous results.
This instrument complies with the emission and immunity requirements described in
IEC 61000-4-8 and IEC 61000-4-3. Do not use this instrument in close proximity to
strong sources of electromagnetic radiation. These may interfere with proper
operation of the meter.
For professional use, the electromagnetic environment should be evaluated prior to
operation of the system.
1.
2.
3.
9

Front Back
1
2
3
Test Strips
The Hemo Spark Blood Hemoglobin (Hb) Measuring Test strips are made out of plastic.
A reagent layer within the test strip contains a chemical reagent system that works with the
Hemo Spark Hemoglobin (Hb) Meter to measure the hemoglobin (Hb) concentration in
capillary and venous whole blood or arterial whole blood.
1. Insert Arrows:
Located on the front of the test strip. These arrows indicate the direction in which the test
strip should be inserted.
2. Sample Application Area:
After the test strip is inserted into the strip Channel, apply 10 µL of blood to the center of
3. Handle:
Located on the end of the test strip. This handle is used to insert and remove the test strip
from the meter.
Test strip appears as shown below:
the test strip.
10

Sample Application
For best results, fill the sample application area with approximately 10 µL of blood. Incorrect
results may occur if the sample is not applied correctly or if the sample application area is
not filled.
After applying the sample, ensure the sample application area is completely covered as
shown in the above picture. This area should remain covered throughout the entire test. If it
is not covered, or if there is too much specimen covering the area, repeat the test with a new
test strip.
Note:
Do not add more blood to the test strip if the sample applied to the sample application
area. When a “Lo” or “E-5” appears on the display, check the back side of the sample
application area to confirm whether or not enough blood has been applied as in the
above picture. Discard the used strip and retest with a new strip.
Each package of test strips is printed with a code number (Code), lot number (Lot),
expiration date (Exp), and test quantity (Quantity) in a vial. Whenever a new vial is opened,
mark the date on the label.
Code Number
11

Test Strips Storage and Handling
* Store test strips in a cool, dry place. Store away from heat and direct sunlight.
* Store as packaged in the closed vial at room temperature 2-40°C (35.6 - 104ºF)
* Do not freeze or refrigerate.
* Replace the cap on the test strip vial immediately after removing it from container.
* Do not use your test strips past the unopened expiration date printed on the label. Using
the test strips past the unopened expiration date may produce incorrect test results.
Test Strips Precautions and Instructions for Use
* Test strips must be stored in the original vial with the cap tightly closed.
* Immediately close the cap on the test strip vial immediately after removing a test strip.
* For in vitro diagnostic use. Test strips are to be used for external blood testing purpose only.
* Do not use test strips that are damaged in any way. Do not reuse test strips.
Control Strips / Control Solutions
The Hemo Spark Hemoglobin (Hb) Meter Control Strip is a plastic strip containing a
brown reference pad which works with the Hemo Spark Hemoglobin (Hb) Meter to
ensure the optical system is working properly. After the control strip is inserted into
the meter, the optical system of meter detects the color intensity of the control strip.
The meter displays value based on QC Level range. The proper results indicates that
the meter is functioning properly. Refer to Section 8 Optical Check for details. The
control strip appears as shown below:
HB
QC 1
HB
QC 2
HB
QC 3
Levels Strip Front Side Strip Back Side
Level 1
Level 2
Level 3 Reference Pad
Reference Pad
Reference Pad
The Hemo Spark hemoglobin control solution test is performed with Hemo Spark test strips.
The sample of one drop is used to get Control Solution result. The results displayed for
Quality Control levels should be with in the range mentioned on the Quality Control solution
bottle label. For detailed testing procedure refer Quality Control insert sheet. The proper
results indicates that the meter is functioning properly.
12

* Store the control strips in the closed vial at temperature within 2-40°C (35.6 - 104ºF)
and avoid exposing it to direct sunlight, extreme temperature or humidity.
Control strip should be stored in a zip cover to keep them in good working condition
* Do not freeze or refrigerate.
* Keep the control strip clean and do not bend. Do not touch the test area of the strip.
* Do not use contaminated, discolored, bent or damaged control strip.
* Do not use after the expiration date.
* For in vitro diagnostic use only.
Precautions
* Store control strip in a cool, dry place. Store away from heat and direct sunlight.
* Transport and store the control strips in its closed vial within 2-40°C (35.6 - 104ºF),
* Do not freeze or refrigerate.
* Replace the cap on the control strips vial immediately after removing it from container.
* A new control strip can be used for before expiry date. Write the opened expiration
date on the vial label after opening. Discard the control strip after expiry date. Usage
after this period may result in inaccurate readings.
Storage and Handling
less than 95% humidity.
* Transport and store the control solutions at 18-25°C (64.4 - 77ºF).
* Store the control solutions at temperature 18-25°C (64.4 - 77ºF) and avoid exposing it to
direct sunlight, extreme temperature or humidity
(Refer to the control strip insert sheet).
(Refer to the control solutions insert sheet).
13

Section 4 Initial Setup
Before testing, ensure the following procedures are followed.
The meter can be operated using the certified AC Adapter (output: 5.0V DC, 1.0A) or 3 AAA
rechargeable batteries (Lithium/NiMH/ZnCl/ Zinc Carbon).
To use the meter with batteries, insert 3 AAA rechargeable batteries (Lithium/NiMH/ZnCl/Zinc
Carbon) into the battery compartment located on the back of the meter.
To use the meter with AC Adapter (output: 5.0V DC, 1.0A), connect the Mini USB port of the
power adapter to the USB port located on the top of the meter with a USB cable, and plug the
adaptor into a 100-240V AC, 50/60Hz primary power outlet.
Note: If the meter is having batteries, they will recharge automatically while the meter is
connected with the AC Adapter power supply.
The meter can also be powered from the USB port of a personal computer, connected by a
USB cable. The meter will turn on automatically after the batteries are inserted. Refer to
Section 5 Meter Setup for details.
Press button to turn the meter on. The screen will briefly display all of the LCD symbols.
Observe the LCD at startup to ensure all segments and display elements are turned on, and
there are no missing icons or elements. After startup, observe there are no permanently
turned on segments or icons.
The meter will turn off automatically after 5 minutes of inactivity.
14
Power Supply

Code Chip Sample Count
Insert the code chip in to the meter, and check an Indication
of leftover sample to perform test will appear as shown.
n
Coding the Meter
Each time a new box of test strips is used, the code chip packaged with the new box of test
strips must be inserted into the meter. Take the code chip from the test strip box. Compare
the code number on the code chip with the code number printed on the test strip vial
label. Results may be inaccurate if the two numbers are not identical. If the code number on
the code chip does not match the number on the test strip vial with which it was
packaged, Please contact your local distributor immediately.
Insert the new code chip into the code chip slot of the meter. It should easily snap into the
place. The code chip should remain in the meter. Do not take it out until a new box of test
strips is used. The code number will appear on the Initial screen.
Please contact your local distributor immediately. If the code number on the code chip does
not match the number that is displayed on the screen.
15

Section 5 Meter Setup and Options
With the meter turned on, long press setup button to enter Meter Setup
mode shown below.
Press button to display several setup sub-modes. Press or to select and press
button to enter following setup sub-modes:
◄
◄
No. SEt
Test number setup. The test number can be from 1 to 999.
Refer to Page 17
CHE
Optical Check mode. Refer to Section 8
SYS
System Setup mode. Refer to Page 18
PC
Data transfer mode. Refer to Section 7
dEL
Deleting Data mode. Refer to Section 7
Exit setup mode. Confirm exit by button
n
16

n
From the No. SEt screen, press button to enter Test Number Setup mode.
Test Number Setup
The test number can be set to any number from 1 - 999.
Press or until the correct test number is displayed.
Press to save and return to No. SEt screen.
◄
◄
Note: Once the meter reaches test number 999, the next test number will be 1.
n
17

Press ◄ or ►until the correct month is displayed.
Press button to save.
The day will flash with d displayed on the screen. Press ◄ or ► until the correct day is displayed.
Month and Date Setup
Next, with m displayed on test result area with month flashing at the bottom of the screen.
Press ◄ or ► until the correct year is displayed
single dash(-) with year flashing and y displayed on test result area.
Then press button to save and proceed to setup time.
Press ◄ or ► until the SYS is displayed
From the SEt screen, . Press to enter Meter
Meter Setup
The first option sets the clock to either 12 or 24 hour mode. Press ◄ or ► to switch between
the two settings.
Hour Setup
OR
Press to save and advance to setting the year.
Year Setup
The year, month & date will appear at the bottom of the display. They will be separated by a
Press button to save and start setting month and date.
Setup mode
18

The hour and minutes will appear at the top of the display. They will be separated by a colon,
with flashing hour.
Press ◄ or ► until the correct hour is displayed. Press to save and proceed to setup minute.
Note: The meter will display AM or PM if the 12H time setting is chosen.
Minutes will flash. Press ◄ or ► until the correct Minutes are displayed. Press button
to save and proceed to Test Number Reset Setup.
Time Setup
Test Number Reset Setup
Press ◄ or ► to turn the test number reset ON or OFF. The test number will reset to 1 for
each new day of testing when the test number reset is turned on. Press to save and proceed
to setup unit.
“OFF” means test number will continue the last number when meter turns off at last time.
“On” means test number will start from No. 1 and do not continue the last number.
Press button to save.
Units Setup
Press ◄ or ► to select either g/dL, g/L, or mmol/L.
OR OR
Press button to save.
Sound Set Up
Press ◄ or ► to turn the sound ON or OFF. The Sound Symbol will appear on the display
when the sound is turned on. Press button to save and return to the setup screen.
Press ◄ or ► until Elt is displayed and press button to exit setup. The screen will briefly
go blank and display the initial screen.
mmol/Lg/dL
19

Section 6 Testing
Before performing any test, review the Hemo Spark Hemoglobin (Hb) meter User’s manual.
The following steps shows how to measure the hemoglobin (Hb) concentration.
Sample Collection
The Hemo Spark Hemoglobin (Hb) Meter requires a very small specimen. This may be
obtained from fresh capillary whole blood. EDTA venous whole blood may be used as well.
Before testing, choose a clean, dry work surface. Review the procedure. Make sure all of
the items needed to obtain a drop of blood are available.
Venous Blood & Arterial Blood Testing
For fresh whole venous blood specimens, collect the venous blood in a closed container with
EDTA-K2, EDTA-K3, and EDTA-Na2 anticoagulants. Mix the specimen well. Then collect
approximately 10 μL into a capillary transfer tube. Apply it to the center hole of the sample
application area of the strip. Do not touch the test strip with the tube.
• Whole Blood must be tested within 8 hours of collection.
• Mix the sample well before testing. This is to ensure the cellular components are evenly
distributed.
• Allow the sample to reach a temperature between 2-40°C (35.6 - 104ºF), approximately
15 minutes if the sample has been refrigerated.
• Anticoagulants other than EDTA-K2, EDTA-K3, EDTA-Na2 are not recommended for use.
Note:
Refer to the Clinical and Laboratory Standards Institute (CLSI) Documents H3-A6, Collection
of Diagnostic Blood Specimens by Venipuncture
Fingertip Blood Testing
Here is an example of how to use a Lancing device with sterile Lancets for fingertip blood
sampling. Refer page 21 for detailed instructions.
20
Other manuals for Hemo Spark
1
Table of contents