SensComp 600 Series User manual
Description
SensComp, Inc.
36704 Commerce Rd.
Livonia, MI 48150
Telephone: (734) 953-4783
Fax: (734) 953-4518
www.senscomp.com
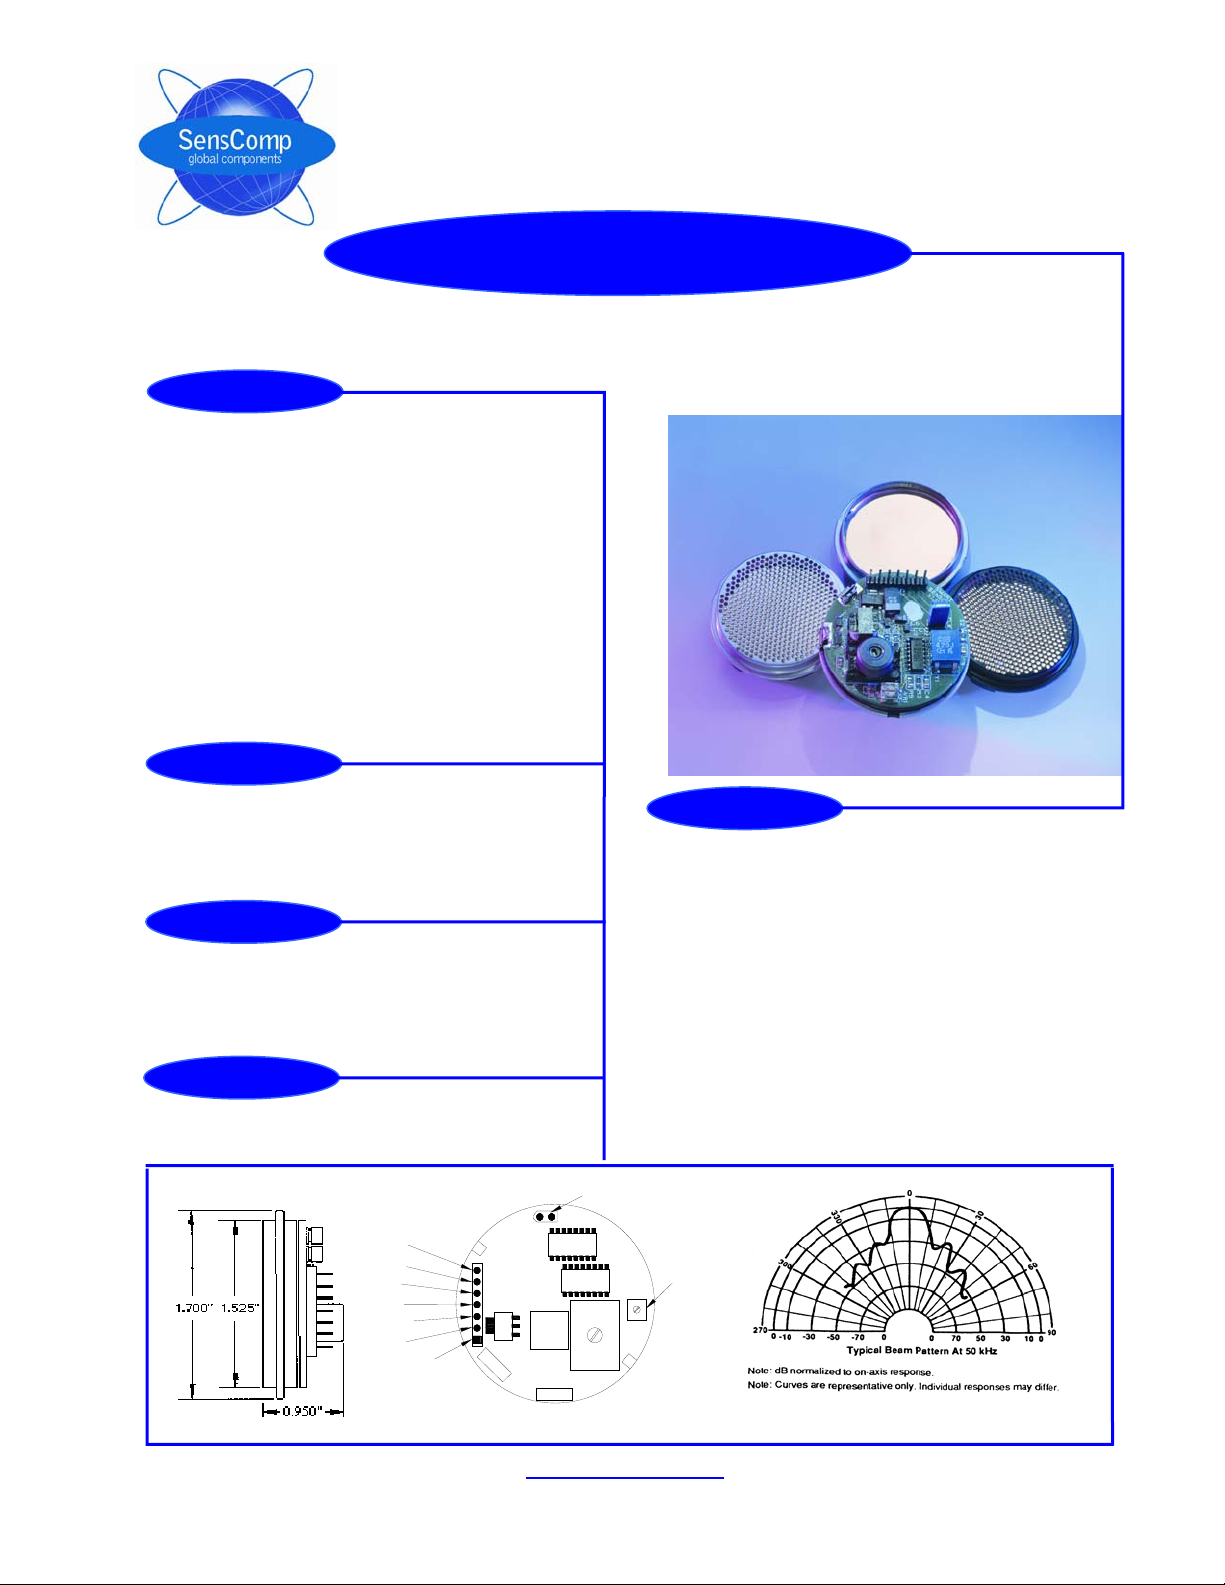
SensComp's totally integrated Series 600 Smart Sensor simplifies product design and packaging.
Features:
50 KHz Electrostatic Transducer
Integrated SMT Drive Electronics
TTL Compatible
Convenient Pin Terminal Connection
Monostable and Astable Modes of Operation
Voltage Regulated
Beam Angle of 15° at -6 dB
Low Ring Characteristics
Ranges from 6” to 35’
Excellent Receive Sensitivity
Available with all Series 600 Transducers
Specifically intended for operation in air at ultrasonic
Frequencies
PID# 615088 – Instrument Grade Smart Sensor
PID# 615089 – Environmental Grade Smart Sensor
PID# 615090 – Open Face Smart Sensor
PID# 615095 – Environmental Grade Smart Sensor w/Parylene
Self Contained Compact Design
Easy to Interface with Minimum of External Components
Can be Triggered Internally or Externally
Will Operate on a Power Source from 6 to 24 VDC
Level Measurement, Proximity Detection, Presence Detection,
Robotics, Educational Products
The new SensComp Smart Sensor is based on the ultra-sensitive
Series 600 Electrostatic Transducer line with an enhanced
version of our 6500 ranging module on board. The new voltage
regulated circuitry allows the sensor to operate from a 6 to 24
VDC power source.
The TTL compatible open collector outputs include pull-up
resistors. Configuration of the new oscillator circuit enables the
unit to be externally triggered or continually sense at 5 Hz.
The digitally controlled gain and variable bandwidth amplifier
minimizes noise and side lobe detection in sonar applications.
The typical absolute accuracy is ±1% of the reading over the
entire range.
This new compact integrated design of SensComp’s Series 600
Smart Sensor will expedite the product development process
For more information, visit our website: www.senscomp.com Copyright © 2004 SensComp. Inc. 02/05/09
Features
Part No.
Benefits
Smart Senso
r
Specifications
Applications
Smart Sensor (CLK)
Programmable Jumpe
r
OSC
ECHO
6-24 VDC
GND
BINH
INIT
BLN
K
Gain
J1 Adjust
(VR1)

Series 600 Smart Sensor Specifications
Distance Range ...................................... 0.15 to 10.7 M
(0.5 to 35 Ft)
Accuracy (over entire range) .................. ± 0.1%
Beam Pattern.......................................... See Graph
Typically 15° nominal.
Repetition Rate (astable)........................ 5 Hz
May be externally triggered
Outputs ................................................... 2 + (INIT)
Internal Pull-up resistors to +5 VDC
Inputs (TTL Compatible) ......................... 2 + (ext INIT)
Power Requirements
Voltage............................................. 6 to 24 VDC
Current, during transmit ................... 2 A
Current, after transmit (nominal) ...... 55 mA
Operating Temperature ......................0° to +70° C
(32° to 158° F)
Dimensions:
Thickness .....................................0.950 inch
Diameter........................................1.700 inch
Mounting Diameter..............................1.525 inch
Housing, Standard Finish
Instrument Grade ........................Cold Rolled Steel
Painted Flat Black
Environmental Grade ..................304 Stainless Steel
Open Face ....................................Parylene Coated
304 Stainless Steel
Weight..................................................19 grams (0.7 oz)
Specifications subject to change without notice
System Wiring Information
Pin 1 – Power Supply ------Requires a +6 to +24 VDC regulated power source with a 100 mA current capacity, with
short burst capability to 2 amperes during transmit.
Pin 2 – Common-------------Return for DC power supply, TTL outputs and clock signals.
Pin 3 – Echo Output --------TTL compatible logic level output (0-5 VDC). Changes state when an echo signal is
received.
Pin 4 – OSC Output---------TTL compatible logic level output (0-5 VDC). The internal 49.4 kHz oscillator output Note:
this output is on only when the INIT signal (pin 5) is high.
Pin 5 – INIT Input------------TTL compatible logic level input or output (see “Programmable Jumper”): Initializes a
Transmit/receive cycle on the low to high transition. This signal must remain high for the
duration of the target detection period.
Pin 6 – BINH Input ----------TTL compatible logic level input: Enables multiple target detection when high. Leave un-
connected or connected to pin 2 for normal operation.
Pin 7 – BLNK Input----------TTL compatible logic level input. This input, when high, resets the receiver’s threshold so
that multiple echoes’ can be detected after a single transmit. Leave un-connected or
connected to pin 2 for normal operation.
Programmable Jumper---Internal 5 Hz repetition rate selected when jumper installed. Remove for external INIT
input. When connected, an internal oscillator provides the INIT signal, and the INIT pin is
an output.
Absolute Maximum Ratings over Operating Free-air temperature range
Voltage from any input/output pin to ground ........................................................................................................ 7 VDC
Supply Voltage Input ........................................................................................................................................... 26 VDC
Recommended Operating Conditions
MIN MAX UNIT
Supply Voltage, Vcc 6.0 24.0 V
High-level Input Voltage, VIH BLNK, BINH, INIT** 2.1 V
Low-level Input Voltage, VIL BLNK, BINH, INIT** 0.6 V
INIT, ECHO and OSC Output Voltage 6.8 V
Delay Time, Power Up to INIT High 5 ms
Recycle Period 80 ms
Operating Free-air Temperature, TA0 70 °C
** INIT is a TTL compatible input for External Triggering; INIT is a TTL compatible output for Internal Triggering
For more information, visit our website: www.senscomp.com Copyright © 2004 SensComp. Inc. 02/05/09
Smart Sensor--- page 2
Electrical Characteristics over Recommended Ranges
of Supply Voltage and Operating Free-Air Temperature
PARAMETER TEST COND. MIN TYP MAX UNIT
Input Current BLNK, BINH, INIT** VI = 2.1 V 1 mA
High-level Output Current, IOH ECHO, OSC, INIT** VOH = 5.5V 100 μA
Low-level Output Voltage, VOL, ECHO, OSC, INIT** IO L= 1.6 mA 0.4 V
Internal Blanking Interval 2.38 ms
XMIT Drive Signal Duration 1.1 ms
Frequency During 16-pulse OSC output 49.4 kHz
Transmit Period XMIT output 49.4 kHz
Frequency After 16-pulse OSC output 93.3 kHz
Transmit Period XMIT output 0 kHz
Supply Current, During transmit period 2000 mA
After transmit period 100 mA
** INIT is a TTL compatible input for External Triggering; INIT is a TTL compatible output for Internal Triggering
Operation
The Series 600 Smart Sensor has two basic modes of operation: Single-echo mode and multiple-echo mode. The
application of power (VCC), the application of the initiate (INIT) input, the resulting transmit output, and the use of the
Blanking Inhibit (BINH) input are basically the same for either mode of operation. After applying power, a minimum of 5
milliseconds must elapse before the INIT signal can be taken high. During this time, all internal circuitry is reset and the
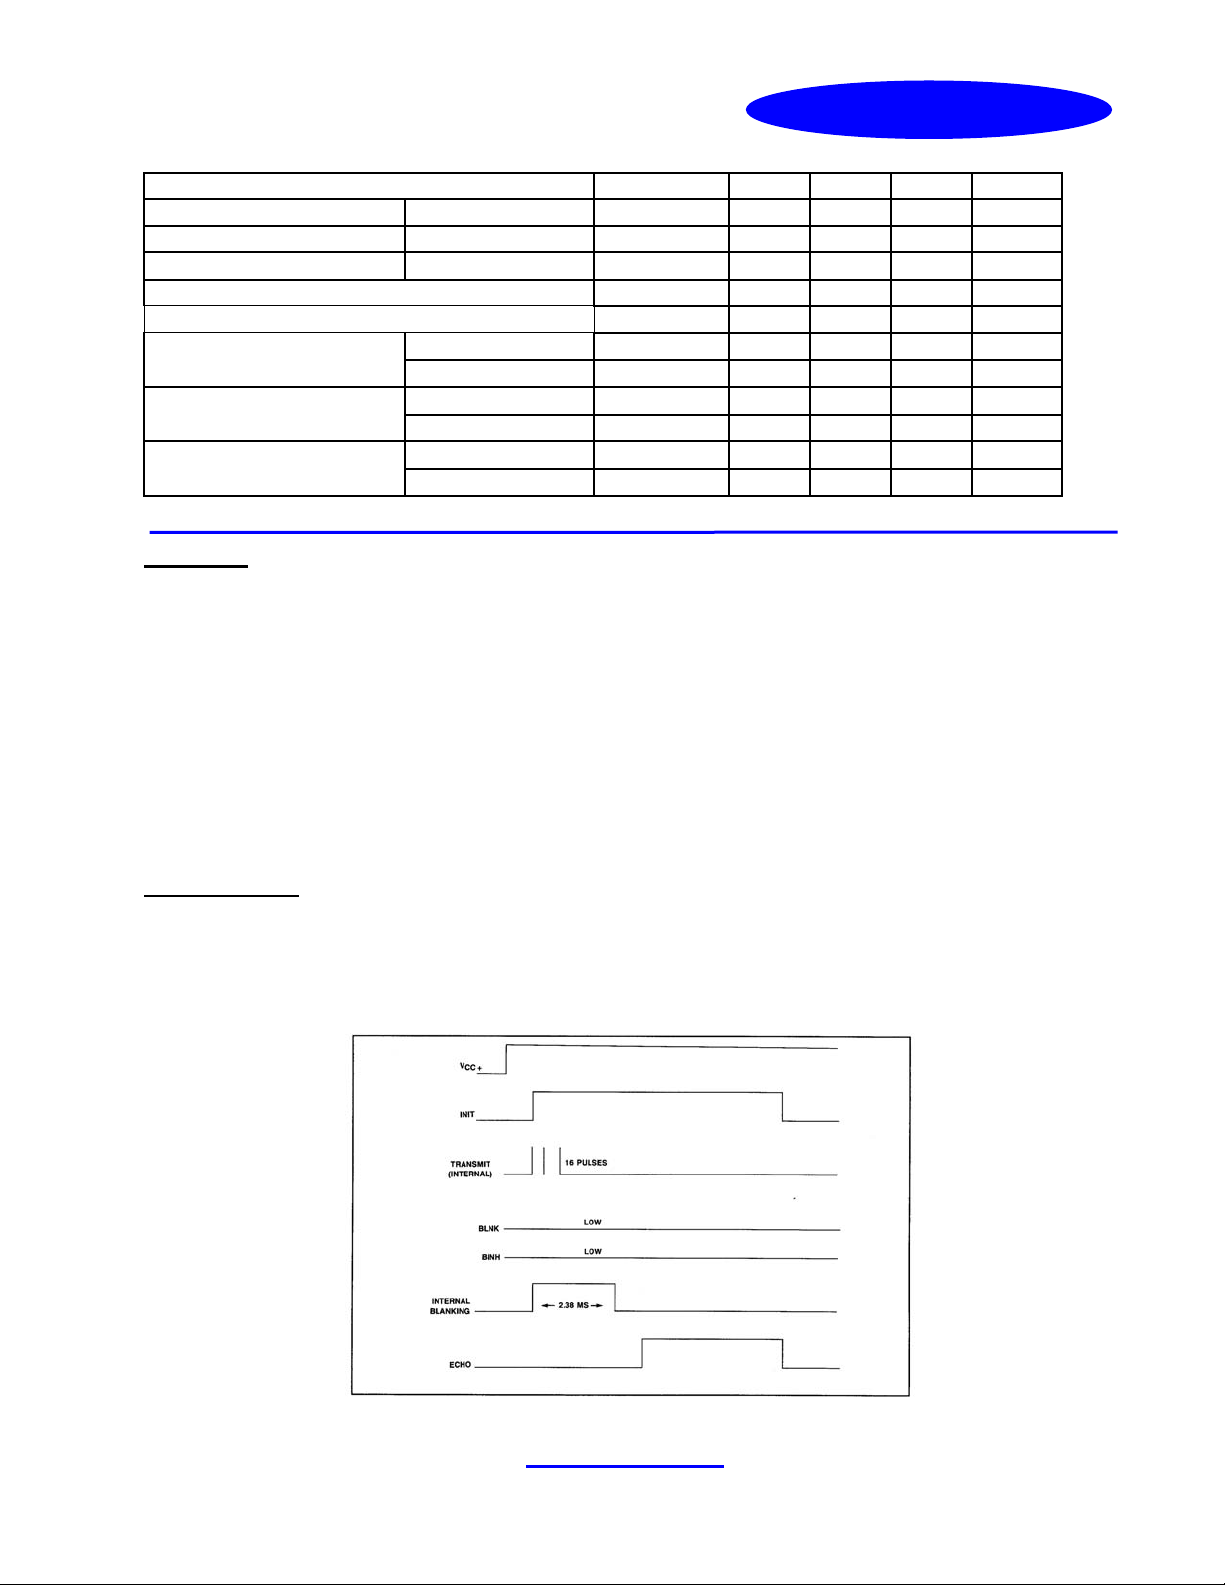
internal oscillator stabilizes. When INIT is raised to a high level, a transmit drive to the transducer (XDCR) occurs. Sixteen
pulses at 49.4 kHz are transmitted from the transducer. At the end of the 16 transmitted pulses, a 200 VDC bias remains
on the transducer (as recommended) for optimum receiving operation.
In order to eliminate the inherent ringing of the transducer after transmitting from being detected as a returning echo, the
Receive (REC) input of the ranging control IC is inhibited by internal blanking for 2.38 milliseconds after the initiate (INIT)
signal. If a reduced blanking time is desired, then the input BINH can be taken high to end the blanking of the Receive
input any time prior to internal blanking. This may be desirable to detect objects closer than 1.33 feet (corresponding to
2.38 milliseconds) and may be done if transducer damping is sufficient so that ringing is not detected as a return signal.
Single Echo Mode
In the single-echo mode of operation (Figure 1), all that must be done next is to wait for the return of the transmitted signal,
traveling at approximately 0.9 milliseconds per foot out and back. The returning signal is amplified and appears as a high
logic level echo output. The time between INIT going high and the Echo (ECHO) output going high is proportional to the
distance of the target from the transducer. If desired, the cycle can now be repeated by returning INIT to a low logic level
and then taking it high when the next transmission is desired.
FIGURE 1: EXAMPLE OF A SINGLE-ECHO-MODE CYCLE WITHOUT BLANKING INPUT
For more information, visit our website: www.senscomp.com Copyright © 2004 SensComp. Inc. 02/05/09
Smart Sensor--- page 3

D7
CR4
CR2CR1 CR3C5
U4
Q1
C7 R2 R1F
R1
R1V
R9
R8
J1 D3 R7R6 U3
C6 CL
K
C3
Y1
C2
R5
R3
C1
C4
U1
U2
L1
T1
VR1
BLN
K
INIT
BINH
GND
6-24 VDC
ECHO
OSC
Programmable Jumpe
r
(CLK)
Smart Senso
r
Multiple Echo Mode
The Series 600 Smart Sensor has an external blanking input, BLNK, enabling selective echo exclusion for operation in a
multiple echo mode and can differentiate echoes from objects that are only three inches apart. If there is more than one
target and a single transmission detects multiple echoes, then the cycle is slightly different (Figure 2). After receiving the
first return signal which causes the ECHO output to go high, the Blanking (BLNK) input must be taken high then back low
to reset the ECHO output for the next return signal. The blanking signal must be at least 0.44 milliseconds in duration to
account for all 16 returning pulses from the first target and allow for internal delay times. This corresponds to the two
targets being 3 inches apart.
Gain Control and Gain Adjustment
During a cycle starting with INIT going high, the receiver amplifier gain is increased at discrete times (Figure 3) since the
transmitted signal is attenuated with distance. At approximately 38 milliseconds, the maximum gain is attained. To
calibrate the GAIN potentiometer, place the target at the maximum desired detection distance. Rotate the GAIN ADJUST
potentiometer VR1 fully counter-clockwise (CCW). Then slowly rotate the GAIN control clockwise (CW) until detection
occurs. Rotate the Gain control CW an additional 1/16 turn.
Note: Always calibrate the GAIN control for minimum gain required for reliable detection. Excessive gain may result in
false target detection.
Schematic and Component Layout
For more information, visit our website: www.senscomp.com Copyright © 2004 SensComp. Inc. 02/05/09
Smart Sensor--- page 4
This manual suits for next models
4
Other SensComp Accessories manuals


