Sensus Pain Management System User manual

User Manual
GET RELIEF GET ACTIVE GET SLEEP


SENSUS™Pain Management User Manual 1
TABLE OF CONTENTS
Chapter 1: Overview.................................................................... 3
Introduction ................................................................................... 3
What You Should Have Received.................................................. 4
Device Components...................................................................... 6
Chapter 2: Quick Start Instructions ........................................... 7
Chapter 3: SENSUS Device Basics ............................................ 9
Checking Battery.......................................................................... 9
Charging Battery ........................................................................... 9
Attaching Electrode..................................................................... 11
Device Placement........................................................................ 12
Chapter 4: Configuring SENSUS.............................................. 13
Chapter 5: Pain Therapy with SENSUS ................................... 14
Preparing for Therapy Session.................................................... 15
Starting Therapy Session ............................................................ 15
Adjusting Intensity During Therapy Session................................ 16
Ending Therapy Session.............................................................. 17
Setting Continuous Mode ........................................................... 18
Chapter 6: Using SENSUS During Sleep ................................. 19
Chapter 7: SENSUS Electrodes................................................ 19
Chapter 8: Skin Care.................................................................. 21

SENSUS™Pain Management User Manual
2
TABLE OF CONTENTS CONT.
Chapter 9: Maintenance, Safety, and Service......................... 24
Maintenance................................................................................ 24
Cleaning ...................................................................................... 24
Device Storage............................................................................ 24
Disposal....................................................................................... 24
Limited Warranty ......................................................................... 24
APPENDIX A: Indicator Light.................................................... 27
APPENDIX B: Troubleshooting............................................28-31
APPENDIX C: Frequently Asked Questions .......................32-33
APPENDIX D: Alternate Sites ................................................... 34
APPENDIX E: Technical Specifications ..............................35-37
APPENDIX F: Prescribing Information................................38-41
APPENDIX G: Symbols.............................................................. 42
APPENDIX H: Electromagnetic Compatibility Declaration.... 43

SENSUS™Pain Management User Manual 3
Chapter 1: Overview
Introduction
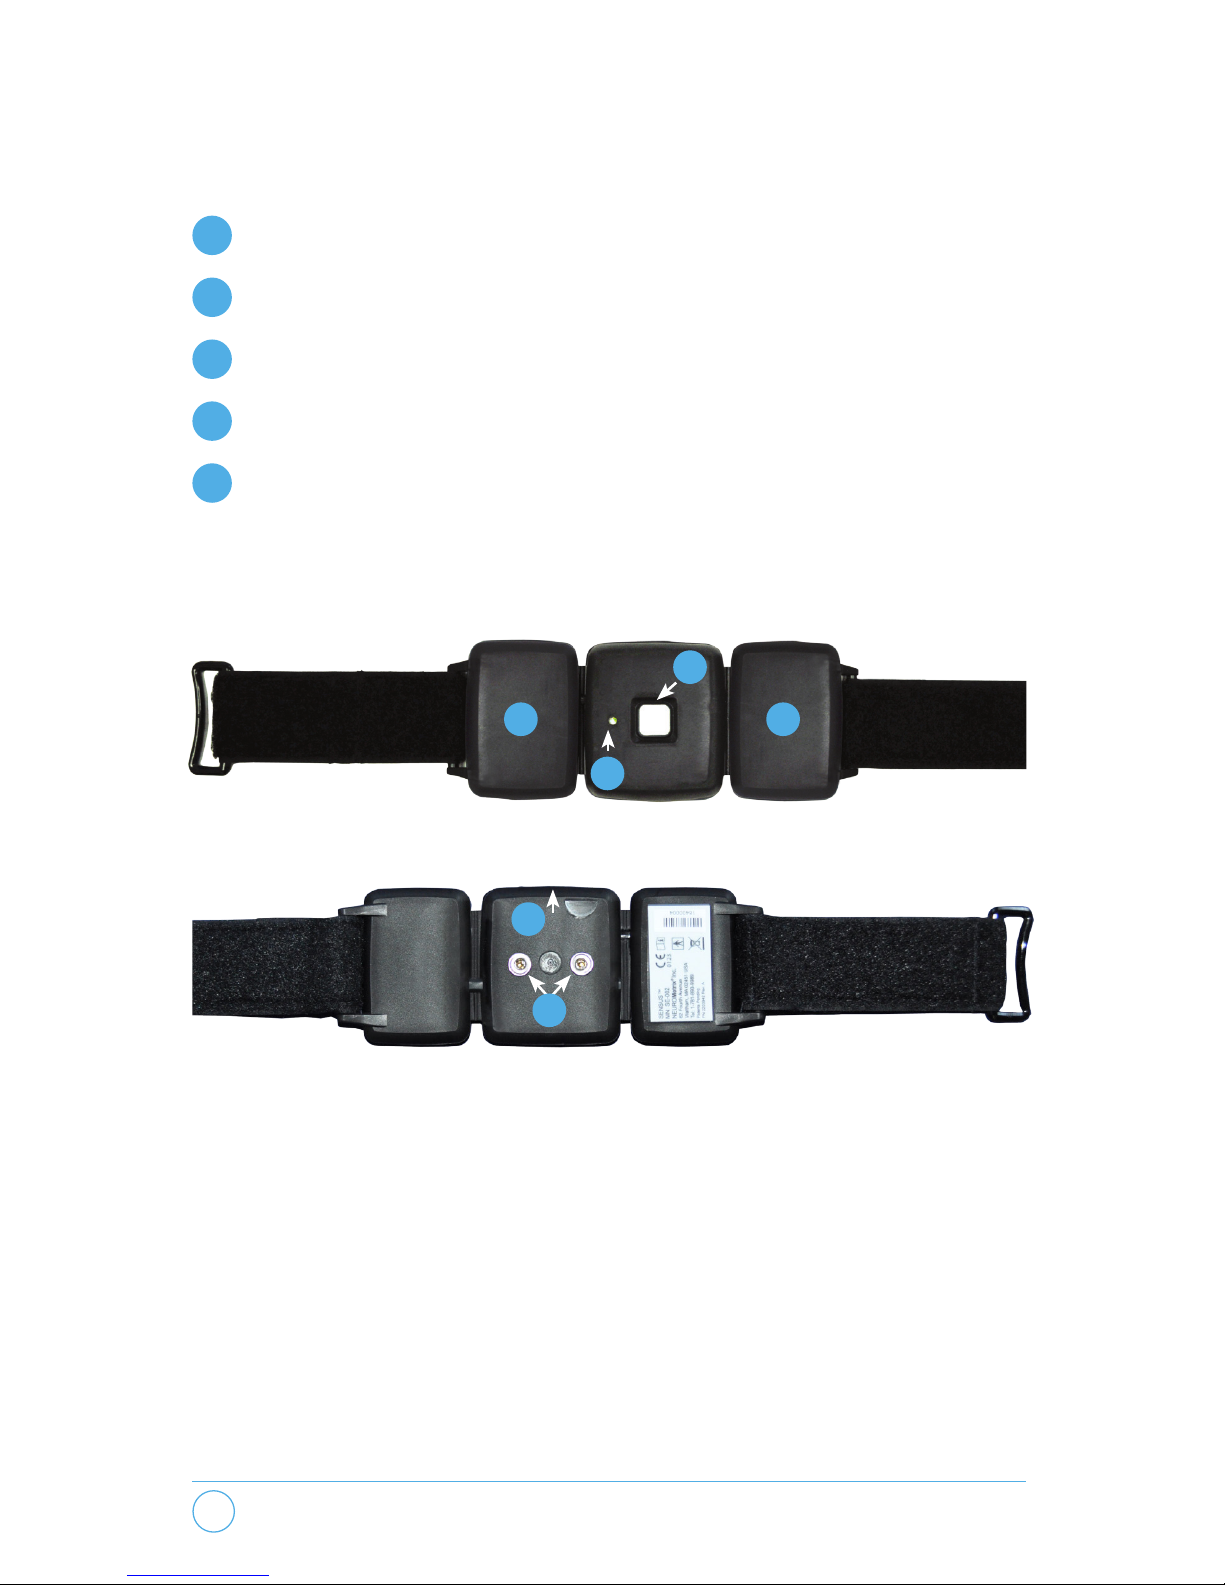
The SENSUS™Pain Management System provides relief from
chronic pain. It consists of a device and an electrode that
attaches to the device. The device is worn on your upper calf, just
below the knee. Your doctor may prescribe one or two SENSUS
devices. If you have been prescribed two devices, they can be
used at the same time (one on each leg).
SENSUS provides pain relief by comfortably stimulating your
sensory nerves, which decreases the perception of pain. Each
therapy session lasts 60 minutes and is initiated by pressing a
button on the device. Pain relief usually begins within 15 minutes
and may last for 30 minutes after the session ends. At the end of
a session, you may either leave the device on your leg or remove
it until you are ready for another session. You may start a therapy
session anytime you need pain relief.
It is important that you use SENSUS correctly in order to gain
the most benet. You should review this User Manual carefully.
Chapter 2 provides basic instruction on how to set up and use the
device. Chapters 3–5 provide detailed instruction on device use.
Chapter 6 provides information on using the device during sleep.
Chapter 7 provides tips for taking care of the electrodes. Chapter
8 provides information on preventing skin irritation, particularly if
you have sensitive or dry skin. Appendix C provides answers to
frequently asked questions.
If you have any questions about how to use SENSUS please
contact your supplier, call NeuroMetrix customer service at
(888) 786-7287, or speak with your doctor.

SENSUS™Pain Management User Manual
4
What You Should Have Received
Upon receiving your SENSUS Pain Management System you
should inspect its contents to make sure all of the following are
included and undamaged (see Figure 1).
A. SENSUS Device*
B. Small and Large Replacement Straps*
C. USB Cable*
D. AC Adapter*
E. User Manual
*Two are provided if your doctor prescribed two devices.
You may also have received 1 or more electrode packages
(Figure 2). If any of the items appear damaged, contact
your supplier.
ONLY USE SENSUS ELECTRODES MANUFACTURED
BY NEUROMETRIX, INC.

SENSUS™Pain Management User Manual 5
Figure 2.
Figure 1.
A
B
C D
User Manual
Get Relief Get Active Get Sleep
Carrying
Case
E

SENSUS™Pain Management User Manual
6
Device Components
The device has the following components:
1Push button
2Indicator light
3Adjustable Velcro®strap
4Two electrode connector snaps
5USB port
1
3
2
3
4
5

SENSUS™Pain Management User Manual 7
Briey press and release the button.
Indicator Light Flash
charged
recharge
Snap in a new electrode.
Step 1: Check Battery
Step 2: Attach Electrode
Chapter 2: Quick Start Instructions
Press and hold button for 10 seconds until the indicator light is
steady green. Briey press the button every time you feel a tingling
sensation under the electrode. When the light turns off, congura-
tion is complete. This should take about 1 minute.
Step 3: Place Device
Remove liner and place the
device on your upper calf 1-2
inches below knee; the exact
position is not critical.
Step 4: Configure
The following instructions will help you start using SENSUS quickly. For
detailed instructions, please review Chapters 3-8. These instructions are
also available in video format. Please visit www.SENSUSRx.com and
click on the
Resources for Users
tab.

SENSUS™Pain Management User Manual
8
If you need assistance, call customer service at:
1-888-786-7287
Helpful Tips
• Entire electrode should contact skin
• Every few hours and before sleep, make sure strap is snug
• Every 2-3 days or if gel is dry, run electrode under water
• Change electrode every 2 weeks
Press and hold button for a few seconds,
release the button when the indicator light
starts blinking green. Stimulation should
feel strong but comfortable.
To decrease: Briey press the button. Each
press will decrease the intensity.
To increase: Press and hold the button.
The intensity will increase while the button
is held down.
To stop therapy, tap center compartment
twice while keeping leg still.
Step 5: 60 Minute Therapy Session
Ventilate skin after wearing SENSUS for several hours and
after overnight use. Watch for skin irritation.

SENSUS™Pain Management User Manual 9
Chapter 3: SENSUS Device Basics
Checking Battery
With the device in your hand, briey press and release the button
to check the battery (Figure 3). The indicator light will ash green
if the battery has sufcient charge. If indicator light ashes red or
does not ash at all, the battery needs to be recharged (see below
for charging instructions).
Charging Battery
A fully charged battery should provide
20-40 hours of use.
To charge the battery:
1. Plug the USB cable into the USB
port on the side of the device. The
USB port is protected by a rubber
cover. To access the USB port,
rotate the cover until the connector
is exposed (Figure 4).
2. Plug the other end of the cable into the AC Adapter
(Figure 5). The cable should not be plugged into a computer
USB port for charging.
3. The AC Adapter should then be plugged into a standard
electrical outlet (Figure 6). The indicator light will show steady
green during charging and will turn off when the battery is fully
charged. It will take approximately 3 hours to charge an empty
battery. When the battery is fully charged, unplug the cable
from the device.
Figure 3.

SENSUS™Pain Management User Manual
10
A blinking red light indicates that charging has failed.
If the battery is too low to start a therapy session, you can
charge the device for approximately 20 minutes to provide
enough charge for a single therapy session. To conrm that it has
enough charge, disconnect the USB cable from the device and
briey press and release the button. If the indicator light ashes
green, there is enough charge. If the indicator light ashes red,
reconnect the USB cable and continue charging.
You should never use your SENSUS device with the USB
cable connected.
Figure 4.
Figure 5.

SENSUS™Pain Management User Manual 11
Figure 6.
Attaching Electrode
You will need to attach a new electrode prior to rst use of the
device and every 2 weeks thereafter (can be extended up to
3 days if a new electrode is not available). Two electrodes are
included in each pouch. You should reseal the pouch if it contains
an electrode. To attach an electrode, snap the electrode into the
two connectors as shown in Figure 7.
ONLY USE SENSUS ELECTRODES MANUFACTURED BY
NEUROMETRIX, INC.
Remove the plastic liner covering the electrode (Figure 8) prior to
placing the device on your leg. Remember to keep the liner as it
should be re-applied to protect the electrode when not in use.
Figure 7.
Turn the device so that
the snap connectors
are visible.
Align the snaps on the electrode to the
snap connectors on the device. Insert
snaps until they are securely fastened.

SENSUS™Pain Management User Manual
12
A white label is
afxed to each
electrode liner
(Figure 9). The
rst time you use
a new electrode,
write the date
on the label. The
electrode should be replaced 2 weeks from this date (can
be extended up to 3 days if a new electrode is not available).
Device Placement
Place the device on your upper calf about
1-2 inches below the knee (Figure 10). Be
sure the electrode is only covering healthy
skin that is not irritated and does not have
cuts or other wounds. Position the device
so that it is comfortable, the button is
accessible, the indicator light is visible, and
stimulation does not cause discomfort. You
may position the device with the button on
the inside, outside, or back of the leg; it is your choice. However,
you should avoid placing the device on the front of the leg.
If the device cannot be placed in the standard location as shown
in Figure 10 then refer to Appendix D for alternate site options.
Loop the strap through the buckle and secure it with the Velcro®
fastener as shown in Figure 11. The device should t securely
around your leg and be comfortable to wear. The strap should
not be so tight that the device and electrode substantially indent
the skin. The electrode should make smooth contact with the
skin. If there is buckling of the electrode, loosen the strap, smooth
the electrode and re-secure the strap. It is important that each
of the four electrode pads are in contact with your skin. If the
Figure 10.
Figure 8. Figure 9.

SENSUS™Pain Management User Manual 13
Figure 11.
pads are only partially on the skin, then the stimulation may feel
uncomfortable.
Your device comes with small, medium and large straps. It is
shipped with the medium strap attached. If you require a different
strap, remove the medium strap and attach either the small or
large strap.
Chapter 4: Configuring SENSUS
Before you begin using your device for the rst time you will need
to congure it for the right intensity level for you. You should
also re-congure your device if you feel that the intensity is no
longer providing pain relief. The conguration process consists
of placing the device on your leg, pressing the button for 10
seconds to start conguration, then briey
pressing the button every time you feel
a tingling sensation under the electrode.
Conguration should only take about one
minute.
You should carry out the conguration
process in a quiet area without distractions.
One comfortable way to congure your
Figure 12.

SENSUS™Pain Management User Manual
14
device is seated in a chair, lying in bed or on a sofa with your leg
crossed over for easy access (Figure 12). You should not congure
within an hour of a therapy session. It is best to congure using
a new electrode. If you have difculty with conguration, call
NeuroMetrix customer service at (888) 786-7287.
Conguration Process
Snap electrode to device.
Remove electrode liner and place the device on
your upper calf 1-2 inches below knee. The exact
position is not critical.
Press and hold button for 10 seconds until the
indicator light is steady green. Briey press the
button every time you feel a tingling sensation
under the electrode. When the light turns off,
conguration is complete. This should take
about 1 minute.
If your doctor prescribed two devices, please congure one
device at a time. You may congure both devices on one leg,
or one device on each leg.
Chapter 5: Pain Therapy
with SENSUS
During a therapy session, the device will comfortably stimulate
the sensory nerves in your leg to provide pain relief. Each therapy
session lasts 60 minutes.
STEP 1
STEP 2
STEP 3

SENSUS™Pain Management User Manual 15
To maximize pain relief, it is important that the stimulation feels
strong. However, it should also feel comfortable. The intensity
that you will require is estimated based on your conguration.
However, because of differences among people, this estimated
intensity may be too low, and it will feel weak or too high and may
feel uncomfortable. In either case, you should adjust the intensity
as described on page 16. The greatest pain relief will be obtained
when you set the intensity to the highest level that is also
comfortable. The device will remember changes to the intensity
and you should not need to adjust the intensity often. Please
follow the steps on the following pages for a therapy session.
Preparing for Therapy Session
Before starting a therapy session make sure you have an
electrode attached to the device. You should also check the
battery to ensure it has an adequate charge.
Place the device on your leg as described in Chapter 3.
Starting Therapy Session
To start a therapy session, press and
hold button (Figure 13) for a few seconds
until the indicator light starts blinking
green. The indicator light will continue
blinking green for the duration of the
therapy session.
The intensity will gradually increase to
the intensity which was determined when you congured your
device. This intensity will be stronger than what you experienced
during conguration. You may not feel anything for the rst 10-15
seconds. However, the blinking green light indicates the device
is functioning properly. Stimulation will continue for a total of 60
minutes. The intensity may feel strong at rst but that sensation
will typically fade to a comfortable level after a couple of minutes.
Figure 13.

SENSUS™Pain Management User Manual
16
Please be patient because it is important for pain relief that the
intensity feels strong but comfortable. However, if the intensity is
uncomfortable or painful, you should decrease it as described in
the next section.
Once your therapy session has begun, you may cover the device
with your clothing. You should be careful not to dislodge the
device and electrode when covering with clothing. It is best not to
wear tight tting clothing that makes it difcult for you to access
the device. You may go about your normal activities during a
therapy session. Do not shower, bathe or swim with the device
on your leg.
Adjusting Intensity During Therapy Session
Frequent adjustments should not be necessary; however, if the
intensity does not feel strong, if it feels uncomfortable, or your
calf muscle is twitching, please follow the instructions below:
To decrease the intensity:
• Briey press the button. Each press will decrease the intensity.
Repeat as many times as needed to reach a strong but
comfortable intensity.
To increase the intensity:
• Press and hold the button. The intensity will increase while the
button is held down. Release the button when the intensity
reaches a strong but comfortable intensity.
You may adjust the intensity at any time during a therapy session.
Maximum pain relief will be obtained at the highest intensity
level that is also comfortable.

SENSUS™Pain Management User Manual 17
Ending Therapy Session
A therapy session automatically stops
after 60 minutes. If the device is in
continuous mode, a new therapy
session will automatically start 60
minutes following the end of prior
session (see page 18 for explanation
of continuous mode).
You can end a therapy session early by
tapping the center compartment with
your hand twice, while keeping your leg still, as shown in Figure
14. You should not remove the device while it is stimulating, so
make sure that the indicator light is not blinking green before
removing the device and electrode from your leg.
After completing a therapy session, you may either leave the
device on your leg, or remove it. If you remove it, be careful not
to damage the electrode and remember to reapply the plastic
liner and store the device in the carrying case (see page 20 for
instructions on removing electrode).
If you leave the device on your leg for long periods of time, you
should check your skin frequently to make sure that it does not
get irritated. Chapter 8 provides information on skin care.
Ventilate your skin after wearing for several hours and after
overnight use. Refer to Chapter 8 for skin care.
If a problem arises during a therapy session, stimulation
will stop and the indicator light will blink red for 10 minutes.
Refer to Appendix B for troubleshooting assistance.
Figure 14.

SENSUS™Pain Management User Manual
18
Setting Continuous Mode
A device in continuous mode will restart therapy an hour after
your last session has completed. This may be convenient if you
choose to wear it during sleep or if you need extended pain
relief during the day. When you receive your device, continuous
mode is off. You may toggle the continuous mode from off to on
or vice versa. With the device in your hand, without an electrode
attached, press the button for at least 10 seconds, and you will
then see either a green or red light. A green light means you are
now in continuous mode; a red light means you are now out of
continuous mode (i.e., device is in single therapy session mode).
Notes about Continuous Mode
• The rst therapy session after toggling continuous mode to
on must be started manually. Press and hold the button until
indicator light starts blinking green.
• If you are in continuous mode but notice that therapy has not
restarted, you may initiate a session manually. There are a few
reasons a restart may not have occurred:
• Previous therapy session was halted by user
• Device was removed from the skin
• It has been less than an hour from the last therapy session
• Battery is low
• Even if you are in continuous mode, you can always start a
therapy session at any time. It is recommended that you wait at
least 30 minutes following the prior session.
Table of contents