Serafin Ultisow User manual
OPERATOR MANUAL
NARROW FOLD SINGLE DISC
OPERATOR MANUAL

2
Table of Contents
Introduction .................................................................................................................................... 3
IMPORTANT NUMBERS .......................................................................................................... 3
Conservation Agriculture ................................................................................................................ 4
No-Till Systems .............................................................................................................................. 4
General Information ....................................................................................................................... 5
Safety ............................................................................................................................................. 6
Operation of the Machine .......................................................................................................... 6
Disconnecting the Machine ....................................................................................................... 6
Operator Safety ......................................................................................................................... 7
Personal Protective Equipment – PPE ...................................................................................... 8
Crushing Hazards ..................................................................................................................... 9
Connecting or Disconnecting Implement Hazards .................................................................. 10
High Pressure Hydraulic Fluid Hazards .................................................................................. 11
Environmental Hazards ........................................................................................................... 12
Hazards when maintaining the Machine ................................................................................. 13
Before You Start .......................................................................................................................... 15
Checklist ................................................................................................................................. 15
Tighten Wheel Nuts & Bearings .............................................................................................. 15
Guidelines for Use .................................................................................................................. 15
Connecting to the Seed Box ................................................................................................... 16
Checking the Wing Fold Operation ......................................................................................... 16
Seed Unit Hydraulic Down Pressure System .......................................................................... 16
Transport Guidelines .................................................................................................................... 17
Transport on Public Roads ...................................................................................................... 17
Manual/Electric Pressure Valve Setup ......................................................................................... 18
Machine Operation/Field Setup .................................................................................................... 19
Lubrication ................................................................................................................................... 20
Seeding Unit ........................................................................................................................... 20
Grease Points ......................................................................................................................... 21
Maintenance ................................................................................................................................ 23
Maintaining the Machine ......................................................................................................... 23
Replacing Discs/Seed Boot Adjustment ....................................................................................... 23
Disc Wear .................................................................................................................................... 24
Effects of Worn Discs ................................................................................................................... 24
Wheel Studs / Rims ..................................................................................................................... 25
Cleaning & Storage ...................................................................................................................... 26
Tyres ............................................................................................................................................ 26
Gason Quick Reference Guide .................................................................................................... 27
Troubleshooting ........................................................................................................................... 31
PARTS CATALOGUE .................................................................................................................. 33

3
INTRODUCTION
Congratulations on the purchase of your new SERAFIN ULTISOW!
Serafin Machinery is based in Griffith, NSW in the heart of one of Australia’s leading agricultural
centres. Serafin Machinery has more than 20 years’ experience in manufacturing and designing
high quality farm machinery for some of the most demanding farming requirements.
The team at Serafin Machinery are totally committed to the No-Till concept of disc seeders for
cereals and pastures. Serafin Machinery’s dedicated parts support and back up service ensures
customers receive exceptional service every time.
Our aim is to continually improve our machinery to ensure low maintenance costs, reliability and
long-lasting machinery that does the best job possible.
Serafin Machinery work hard to keep developing new models of seeders to meet the demand of
our future customers and strive for continual improvement of our imported components from our
suppliers. We hope you enjoy using your new seeder as much as we enjoyed producing it.
Happy planting!
IMPORTANT NUMBERS
Serafin Machinery – Head Office 02 6963 5588
Spare Parts Manager 0458 635 588
Service Manager 0487 055 588
Sales Manager 0459 755 881
Check us out online – serafinmachinery.com.au

4
CONSERVATION AGRICULTURE
According to the FAO (Food and Agriculture Organization of the United Nations), “Conservation
Agriculture” (CA) aims to achieve sustainable and profitable agriculture and subsequently aims at
improved livelihoods of farmers through the application of the three CA principles: Minimal soil
disturbance, permanent soil cover and crop rotations.
CA holds tremendous potential for all sizes of farms and agro-ecological systems, but its adoption
is perhaps most urgently required by smallholder farmers, especially those facing acute labour
shortages. It is a way to combine profitable agricultural production with environmental concerns
and sustainability and it has been proven to work in a variety of agro-ecological zones and farming
systems. It is been perceived by practitioners as a valid tool for Sustainable Land Management
(SLM).”
Head to the Food and Agriculture Organisation website for more information:
http://www.fao.org/ag/ca/index.html
NO-TILL SYSTEMS
“No-Tillage” is a ‘cornerstone’ of CA and can be practiced in both large and small farming
systems. With No-Till (also termed zero tillage and direct drilling) the only tillage operations are
low disturbance seeding techniques for the application of seeds and fertilisers directly into the
stubble of the previous crop. Gradually, organic matter of the surface layers of zero tilled land
increases, due to reduced erosion, increasing yields and resulting in more crop residue added to
the soil surface.
Gradually, organic mulch is developed on the soil surface, and this is eventually converted to
stable soil organic matter because of reduced biological oxidation compared to conventionally
tilled soils. No-Tillage is effective in mitigating many of the negative on-farm and off-site effects of
tillage, principally humidity loss, organic matter loss, reduced biodiversity and reduced runoff.
These conditions are replaced with permanent soil cover, improvements in soil structure,
improved organic matter status, improved water use efficiency and improved soil biology and
nutrient cycling.

5
GENERAL INFORMATION
Read this manual carefully to learn how to operate and service your machine correctly. Failure to
do so could result in personal injury or equipment damage and will not be covered by the warranty
and/or insurance.
This manual is part of your machine and must always remain with the machine. Right hand and
left-hand sides are determined by facing in the direction the machine will travel when going
forward.
Warranty is provided as part of the Serafin Machinery support program for customers who operate
and maintain their equipment as described in this manual. The warranty is explained on the
warranty certificate which you will receive when the machine is delivered.
Set up is the responsibility of the operator. Correct seed depth and amount of soil coverage is
adjustable for each sowing situation. Cover and press wheel pressure are also adjustable. There
is no standard factory setting for all situations as each requirement is different.
Serafin Machinery will demonstrate all adjustments necessary on set up of machine.
Serafin Machinery will NOT be responsible or liable for seeding rate, depth of seed/fertiliser
or closing wheel pressures.
Consult your agronomist for sowing depth and seeding rate.

6
SAFETY
Read all safety instructions before operating the machine. If you do not understand any
part of this manual and need assistance, please contact Serafin Machinery.
Operation of the Machine
Carefully read and understand the instruction manual before use.
Serafin Machinery will instruct correct use of the machine during installation/delivery. It is
the owner’s responsibility to train staff/operator prior to using the machine.
Ensure no one is near the machine while it is attached to the tractor and the tractor is
running.
Incorrect handling of this equipment could result in serious or fatal accidents.
Adhere to all working (12km/h) and transport (30km/h) speeds, in rough terrain and turning
speeds will need to be reduced further to prevent damage or roll over.
Unauthorised modifications to the machine may impair the function and/or safety and effect
machine life. This will also void warranty.
Disconnecting the Machine
Be sure to clear the area around the machine before raising or lowering the machine or
wings.
Stop the tractor on level ground before raising or lowering wings.
Operate the machine from the tractor seat only.
Ensure safety locks are fitted to wings if storing in folded position.
Lower machine to the ground
Turn tractor off and remove key.
Release any hydraulic pressure on remotes.
Disconnect hydraulic couplers, electric couplers and any primary hose breakaway couplers
and fold onto machine.
Disconnect hitch from tractor.

7
OPERATOR SAFETY
Read and understand
Operators manual
Wear appropriate Personal
Protective Equipment
Do not operate machine
when under the influence
of drugs or alcohol
Use Seat Belts
WARNING TO AVOID SERIOUS INJURY OR DEATH DO THE FOLLOWING:
READ, UNDERSTAND and FOLLOW Operator's Manual instructions, Warnings and Safety
Messages.
WEAR PERSONAL PROTECTIVE EQUIPMENT when operating or repairing equipment.
DO NOT USE DRUGS or ALCOHOL before or while operating equipment
DO NOT ALLOW anyone to operate equipment under the influence of drug or alcohol.
CONSULT medical professional for medication impairment side effects.
STAY ALERT, prolonged operation can cause fatigue; STOP and REST.
GENERAL OPERATING SAFETY
Visibility Conditions while in use
OPERATE IN DAYLIGHT or with lights that give clear workplace visibility
Tractor operator must be able to see seeder operation without obstruction
Tractor operator must be able to see ahead and avoid obstructions while operating equipment
Ground Speed while operating
Operator should control ground speed to achieve optimum seeding performance
Adjust working speed to suit terrain conditions
Reduce speed near steep slopes, ditches or foreign objects
Safety Signs and Warning Decals
Replace missing, damaged or unreadable safety signs immediately
Safety Shielding and Sensors
Never remove or modify any safety devices
Communication
Verbal communication can be difficult and dangerous near the seeder
Operating instructions and directions should be made prior to operation
Never allow anyone to approach seeder while in operation
Riding Passengers
Never allow passengers
to
ride on
seeder
.

8
PERSONAL PROTECTIVE EQUIPMENT - PPE
Wear hearing
protection
Wear Hi-
Visibility
clothing.
Wear eye
protection.
Wear enclosed
footwear.
WE RECOMMEND THIS MACHINERY IS USED WITH A TRACTOR THAT IS FITTED WITH A
CABIN. IF THE OPERATION OF THIS EQUIPMENT IS DONE USING A TRACTOR WITH AN
OPEN CABIN, IT IS SUGGESTED THAT PERSONAL PROTECTIVE EQUIPMENT IS WORN
BY THE OPERATOR.
ALWAYS FOLLOW SUGGESTIONS CONCERNING ALL PROTECTIVE CLOTHING AND
PERSONAL PROTECTIVE EQUIPMENT ISSUED TO YOU, OR CALLED BY FOR THE JOB
CONDITIONS. THIS SHOULD ALWAYS INCLUDE;
USE HEARING PROTECTION if using open cab tractor to stop hearing fatigue when
operation for extended times
WEAR HI VISIBILITY CLOTHING to ensure you are visible to others on the worksite
WEAR EYE PROTECTION if using open cab tractor to stop dust or other foreign matter
entering your eyes
WEAR SAFETY FOOT WEAR to protect feet from crush hazards
RESPIRATION PROTECTION if using open cab tractor to stop dust or other foreign matter
entering your lungs
9
CRUSHING HAZARDS
STAY CLEAR OF MACHINE WHILE HYDRAULIC SYSTEM PRESSURISED
WARNING DEPRESSURISE HYDRAULIC SYSTEM TO AVOID SERIOUS INJURY OR
DEATH FROM ACCIDENTAL MACHINE MOVEMENT CAUSING POTENTIAL
CRUSH INJURIES.
THIS SEEDER USES HYDRAULIC ACTUATION TO MOVE PARTS DURING OPERATION OR WHILE
STATIONARY. BE AWARE OF CRUSHING HAZARDS WHEN THE MACHINES HYDRAULIC SYSTEM
IS PRESSURISED.
TO AVOID CRUSH INJURIES
OPERATE FROM TRACTOR SEAT never operate machine from the ground or in close proximity
to moving parts.
DO NOT OPERATE WHILE MAINTAINING MACHINE ensure all people are clear prior to
operation.
TO AVOID FALLING OFF IMPLEMENT
USE EXTREME CARE WHEN CLIMBING ONTO EQUIPMENT. Always use three-point contact
using available handles and steps on implement while exiting.
Never attempt to mount the implement while unit is moving.
TO AVOID CHILDREN FALLING OFF OR BEING CRUSHED BY EQUIPMENT:
NEVER ALLOW children to play on or around tractor or equipment.
CRUSHING BY TRAPPING FINGERS/HANDS/ARMS in EQUIPMENT
KEEP ARMS AND LEGS CLEAR of hydraulic actuators and ground engaging parts
KEEP SEATED while operating the machinery
LOWER WINGS AND ROW UNITS AND STOP TRACTOR ENGINE before attempting
maintenance
KEEP CLEAR OF TRACTOR DRAWBAR when connecting and disconnecting machine

10
CONNECTING OR DISCONNECTING IMPLEMENT HAZARDS
FOOT CRUSHING HAZARD
HAND CRUSH
STOP TRACTOR, REMOVE KEY
READ OPERATING MANUAL
WARNING TO AVOID SERIOUS INJURY OR DEATH FROM BEING CRUSHED BY
TRACTOR OR
IMPLEMENT
:
WHEN ATTACHING UNIT TO TRACTOR:
DO NOT ALLOW BYSTANDERS between tractor and seeder
KEEP HANDS AND BODY CLEAR of drawbar and fold points
BEFORE CONNECTING OR DISCONNECTING COMPONENTS
STOP TRACTOR ENGINE before connecting hydraulic hoses.
WHEN CONNECTING OR DISCONNECTING SEEDER TO TRACTOR DRAWBAR OR
LINKAGE:
DO NOT CRAWL OR WALK under seeder whilst in storage position

11
HIGH PRESSURE HYDRAULIC FLUID HAZARDS
HYDRAULIC FLUID INJECTION
HAZARD
WARNING TO AVOID SERIOUS INJURY OR DEATH FROM HYDRAULIC FLUID
IN
JECTION INJURY
:
WHEN ATTACHING HYDRAULIC HOSES:
INSPECT HOSES for wear and leaks prior to connecting implement to tractor
INSPECT HYDRAULIC COUPLINGS for leaks and damage whilst connecting to tractor
WHEN USING THE IMPLEMENT
CHECK ALL HOSES FOR WEAR & LEAKS prior to operating implement.

12
ENVIRONMENTAL HAZARDS
DUST HAZARD NOISE HAZARD
DUST HAZARD
IMPORTANT TO AVOID INJURY FROM DUST INJESTION OR TEMPORARY
HEARING ISSUES IS RECOMMENDED
:
We recommend operation of this seeder be done using a tractor with a cabin. If you intend
to use this implement with an open type tractor cabin, observe the following use of
Personal Protective Equipment;
WHEN IMPLEMENT IS IN OPERATION:
USE RESPIRATION PROTECTION to reduce dust ingestion
WEAR HEARING PROTECTION
WEAR GOGGLES to reduce dust irritating the operators eyes

13
HAZARDS WHEN MAINTAINING THE MACHINE
PERIODICALLY INSPECT ALL
MOVING PARTS AND TIGHTEN
ALL FASTENERS
STOP TRACTOR ENGINE &
HYDRAULICS BEFORE
CONDUCTING MAINTENANCE
PLACE UNIT ONTO GROUND
BEFORE DOING ANY
MAINTENANCE
WARNING AVOID SERIOUS INJURY OR DEATH FROM COMPONENT FAILURE BY
KEEPING
IMPLEMENT IN GOOD OPERATING CONDITION BY PERFORMING CORRECT
SERVICE, REPAIRS, AND MAINTENA
NCE.
WARNING BEFORE CARRYING OUT ANY MAINTENANCE ENSURE THE TRACTOR
ENGINE IS SWITCHED OFF, KEY REMOVED AND PARK BRAKE ENGAGED.
BEFORE PERFORMING SERVICE, REPAIRS, AND MAINTENANCE ON THE IMPLEMENT:
SECURE EQUIPMENT FOR SERVICE
STOP TRACTOR ENGINE , engage parking brake, and allow all moving parts to stop
LOWER WINGS ONTO GROUND Before commencing work
CYCLE HYDRAULIC CONTROLS to release any trapped hydraulic pressure
WEAR SAFETY GLASSES, PROTECTIVE GLOVES AND FOLLOW SAFETY PROCEDURES WHEN
PERFORMING SERVICE, REPAIRS, AND MAINTENANCE ON THE IMPLEMENT:
Always WEAR GLOVES to guard against worn component with sharp edges.
Always WEAR SAFETY GLASSES when servicing components
AVOID CONTACT with hot hydraulic oil.
SECURELY support or BLOCK UP raised implement, framework, and lifted components before
working underneath equipment.
STOP any implement movements and SHUT-OFF TRACTOR engine before doing any work
procedures.
USE stepladder or raised stands to reach high equipment areas inaccessible from ground.
ENSURE good footing by standing on solid flat surfaces when getting on implement to perform
work
FOLLOW manufacturer's instructions in handling oils, solvents, cleansers, and other chemical
agents.
DO NOT change any factory-set hydraulic calibrations to avoid component or equipment failures.
DO NOT modify or alter implement, functions or components.

14
HAZARDS WHEN MAINTAINING THE MACHINE (CONTINUED)
PERIODICALLY INSPECT ALL
MOVING PARTS AND TIGHTEN
ALL FASTENERS
STOP TRACTOR ENGINE &
HYDRAULICS BEFORE
CONDUCTING MAINTENANCE
PLACE UNIT ONTO GROUND
BEFORE DOING ANY MAITENANCE
WARNING AVOID SERIOUS INJURY OR DEATH FROM COMPONENT FAILURE BY
KEEPING
IMPLEMENT IN GOOD OPERATING CONDITION BY PERFORMING
CORRECT
SERVICE, REPAIRS, AND MAINTENANCE.
PERFORM SERVICE, REPAIRS, LUBRICATION AND MAINTENANCE OUTLINED IN
IMPLEMENT
MAINTENANCE SECTION:
INSPECT before each use for loose fasteners, worn or broken parts, leaky or loose fittings
and all moving parts for wear.
REPLACE any worn or broken parts with new parts.
LUBRICATE unit as specified by maintenance checklist.
NEVER lubricate, adjust or remove material while it is running or in motion.
TORQUE all bolts and nuts as specified.
CHECK tire conditions.
AVOID CONTACT with recently used equipment that may still be hot.
DO NOT MODIFY or alter equipment
DO NOT CRAWL or walk under unsecured raised equipment.
SAFETY SHIELDS, GUARDS AND SAFETY DEVICES INSPECTION:
MAINTAIN SAFETY SIGNS and Decals in good readable condition.
REPLACE any missing, broken or worn safety shields, guards and safety devices.

15
BEFORE YOU START
Check List
1. Read and understand operator’s manual on how to operate correctly.
2. Check tyre pressure and inflate to required pressure minimum (40 PSI). Refer to page 26
3. Lubricate frame and units with recommended grease at stated service intervals. Refer to
Page 20
4. Inspect for loose, damaged or missing parts. Repair or replace before use.
5. Make sure air and hydraulic hoses do not interfere with moving parts. If there is
interference, relocate hoses and secure in position.
Tighten Wheel Nuts & Wheel Bearings
Tighten all wheel nuts after first 4 hours and wheel bearings during the first week of operation and
check periodically after that. Refer to page 25. This is a part of general servicing.
To adjust wheel bearings:
1. Jack up machine.
2. Remove centre hub cap and split pin.
3. Tighten nut until there is a slight drag on the bearings, while turning wheel.
4. Back nut off until split pin can be placed in hole.
5. Replace hub cap.
6. Torque wheel nuts to 255ftlb as per recommendation page. Refer to page 25.
Guidelines for Use
1. Ensure units are fully raised before lowering or raising the wings.
2. Clear wing area of people and obstacles and ensure locking pins are removed before
lowering or raising the wings.
3. Raise units fully out of the ground before making sharp turns, such as at row ends or
turnarounds or when backing up the machine.
4. Have machine moving forward before lowering units, to avoid blockages.
5. When units are in working position, operate at a maximum ground speed of up to 12 km/h.
If conditions are rough or unfavourable you will need to reduce your ground speed to suit.
6. Travelling speed with units raised and wings folded is a maximum of 30km/h. It is desirable
to run machine in straight lines and refrain from 90 degree turns. As this will create excess
wear of the seeding unit and possible damage to the cover wheel arm.

16
Connecting to the Seed Box
Ensure all hydraulic lines and machine connections are in correct position before operation.
Check that couplers are clicked in correctly, especially on low pressure return or case drain
hoses to avoid blowing motor seals on fan.
Checking the Wing Fold Operation
1. Ensure units are fully raised and locking pins removed before lowering or raising the wings.
2. Keep all persons away from the machine when raising or lowering wings.
3. Always locate machine on level ground when raising or lowering wings.
4. Never raise or lower wings when moving.
5. Use with care when raising wings near electricity lines to avoid contact. Serious injury or
death can result from contact with electricity lines.
Seed Unit Hydraulic Down Pressure System
NOTE: The active hydraulic system requires a tractor with closed-centre or pressure/flow
compensated hydraulics. Valve set up is on page 18.
The active hydraulic system keeps the depth wheels in contact with the soil surface to follow
ground contours over uneven terrain. The setting of the depth wheels determines seed depth,
NOT the hydraulic pressure.
The amount of hydraulic pressure needed to keep the depth wheels in contact with the surface
depends upon soil compaction, moisture and stubble covering. Too little pressure causes
insufficient spring compression and inconsistent disc penetration resulting in uneven seed depth.
Excess pressure can cause premature damage to the depth wheel tyre, rim and shaft.

17
TRANSPORT GUIDELINES
1. Proceed cautiously under overhead power lines and around utility poles.
2. Know the transport height and width of your machine.
3. Electrocution can occur with direct contact to overhead electrical lines.
4. Always fold wings fully and install transport locks before transport.
5. Do not transport with tractor that under specified for this seeder - EG: Too light.
6. When transporting, latch the tractor brakes together.
7. To improve stability when travelling through the field, wings should be unfolded from
transport position as soon as possible after leaving the roadway.
8. Adhere to recommended MAX speed 30km/h.
Transport on Public Roads
1. Always travel at a reasonable and safe speed. Never exceed 30 km/h.
2. Always use the flashing warning lights when transporting on public roadway. Keep
reflective material and flags clean and visible. Ensure oversize signs are fitted and visible –
front and rear.
3. Prevent collisions between motorist and slow-moving equipment on public roads.
4. Frequently check for traffic from the rear, especially in turns and use the turn signals.
5. Shift the tractor into a lower gear when transporting down steep slopes or hills.
6. It is not recommended to transport with seed or fertiliser in bins.
7. Never transport the machine with air seeder fan running.
8. It is recommended you check the Roads and Maritime Services website for rules and
regulations while transporting agricultural machinery in your area.
Head to the RMS website for more information: https://www.rms.nsw.gov.au/

18
MANUAL/ELECTRIC PRESSUE VALVE SET UP
Down pressure is important to ensure even seed depth across the machine on variable soil
conditions. But the depth wheel is the main control for depth. Each paddock can vary in soil
hardness, so adjust accordingly.
There is a Hex head screw under the manual valve. See image below.
Loosen the lock nut, to reduce pressure turn the screw anti clockwise, to increase pressure
turn clockwise.
To set pressure lower the units, drive forward five metres then check the depth wheels.
Optimum pressure you should be able to just turn the depth wheel while the disc is in the
ground. This way most of the pressure is on the disc not the depth gauge wheel. The depth
wheel is designed to follow the ground, not carry the unit or the machine.
Excess pressure will cause damage to the depth wheel rims and tyres and may void your
warranty.
Pressure ranges between 500psi and 800psi are considered to be in the acceptable range.
In some sandy and lighter soils pressures of 350 psi is recommended.
Avoid running pressures exceeding 1000psi especially for extended periods. This may
cause premature wear of the units and void your warranty.
When setting pressure, it is normal to see the pressure gauge drop 150 – 200psi quickly
and settle. This is because you are overloading the valve with oil and it will drain back to
where you have set the valve. EG. If you have set the valve at 500psi it may build up to
700psi and when you let the remote go it will quickly settle back to 500psi.
Electric Valve
Electric valve pressure is controlled by the dial on the control box in the cab. Adjust the dial
and push the remote, this will build the pressure up to where it is set on the dial and divert
the rest of the oil back to tank.
DO NOT run electric or manual pressure valves in constant flow.
Hex Head
Screw to adjust
down pressure
Manual Valve Electric Valve
19
MACHINE OPERATION/FIELD SET UP
Ensure all hydraulic hoses have been correctly fitted.
Ensure all primary breakaway couplers are correctly connected where necessary. (Tow
behind models)
Connect all electrical plugs.
Power up monitor and run fan, walk around seeder to ensure air is getting to all units and
there are no blockages. Turn fan off when you are happy with even air distribution.
Calibrate product (it is recommended to use clean graded seed to prevent blockages or
bridging).
Once desired rate is achieved you can fill bins.
Assess paddock to be planted for conditions and stubble/trash load.
Set estimated down pressure.
Adjust 4 row unit depth wheels to desired depth, drive forward 20m stop and check depth
wheel is touching the surface. Try to turn the depth wheel, if the depth wheel can be turned
with some resistance pressure is ok. If the depth wheel is not touching the surface more
pressure will need to be applied. If you cannot turn the depth wheel excess pressure is
being applied and will need to be reduced.
Check correct depth directly behind the disc is being achieved, if not change position on the
depth adjuster handle to achieve desired depth. Once desired depth and pressure are
achieved set all row units to the same position ready to plant.
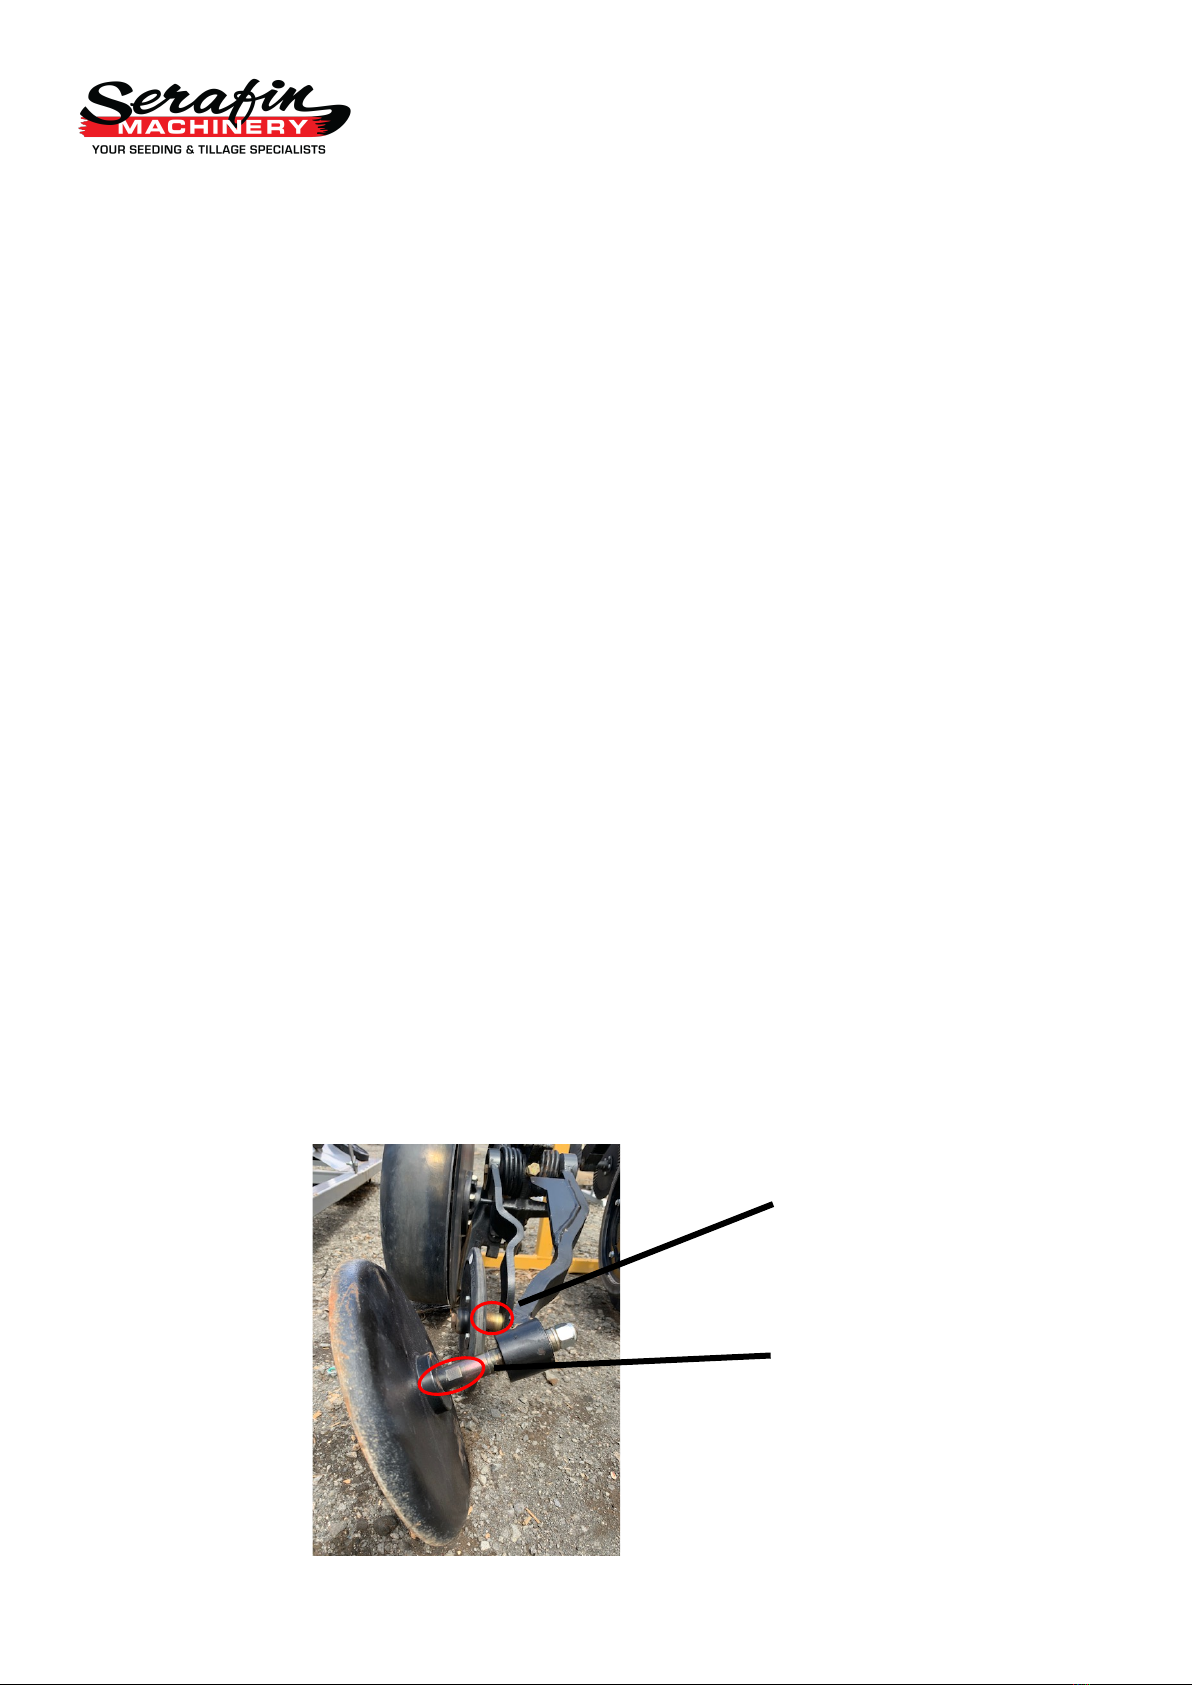
Check press wheel behind the disc is pressing over the seed in the furrow. There are
washers either side of the press wheel which can be swapped to achieve this.
Check the rear cover wheel is closing the furrow correctly. If the ground is heavily
compacted, you may need to swap spacers on the shaft to move the wheel closer to the
furrow edge. There is also spring adjustment around the pivot at the top of the arm which
can be tightened to press firmer. If you are in soft or sandy soil you may need to move the
wheel further away from the furrow and reduce spring pressure. Image Below: Press and
Cover Wheel
PW Spaces
CW Spaces
20
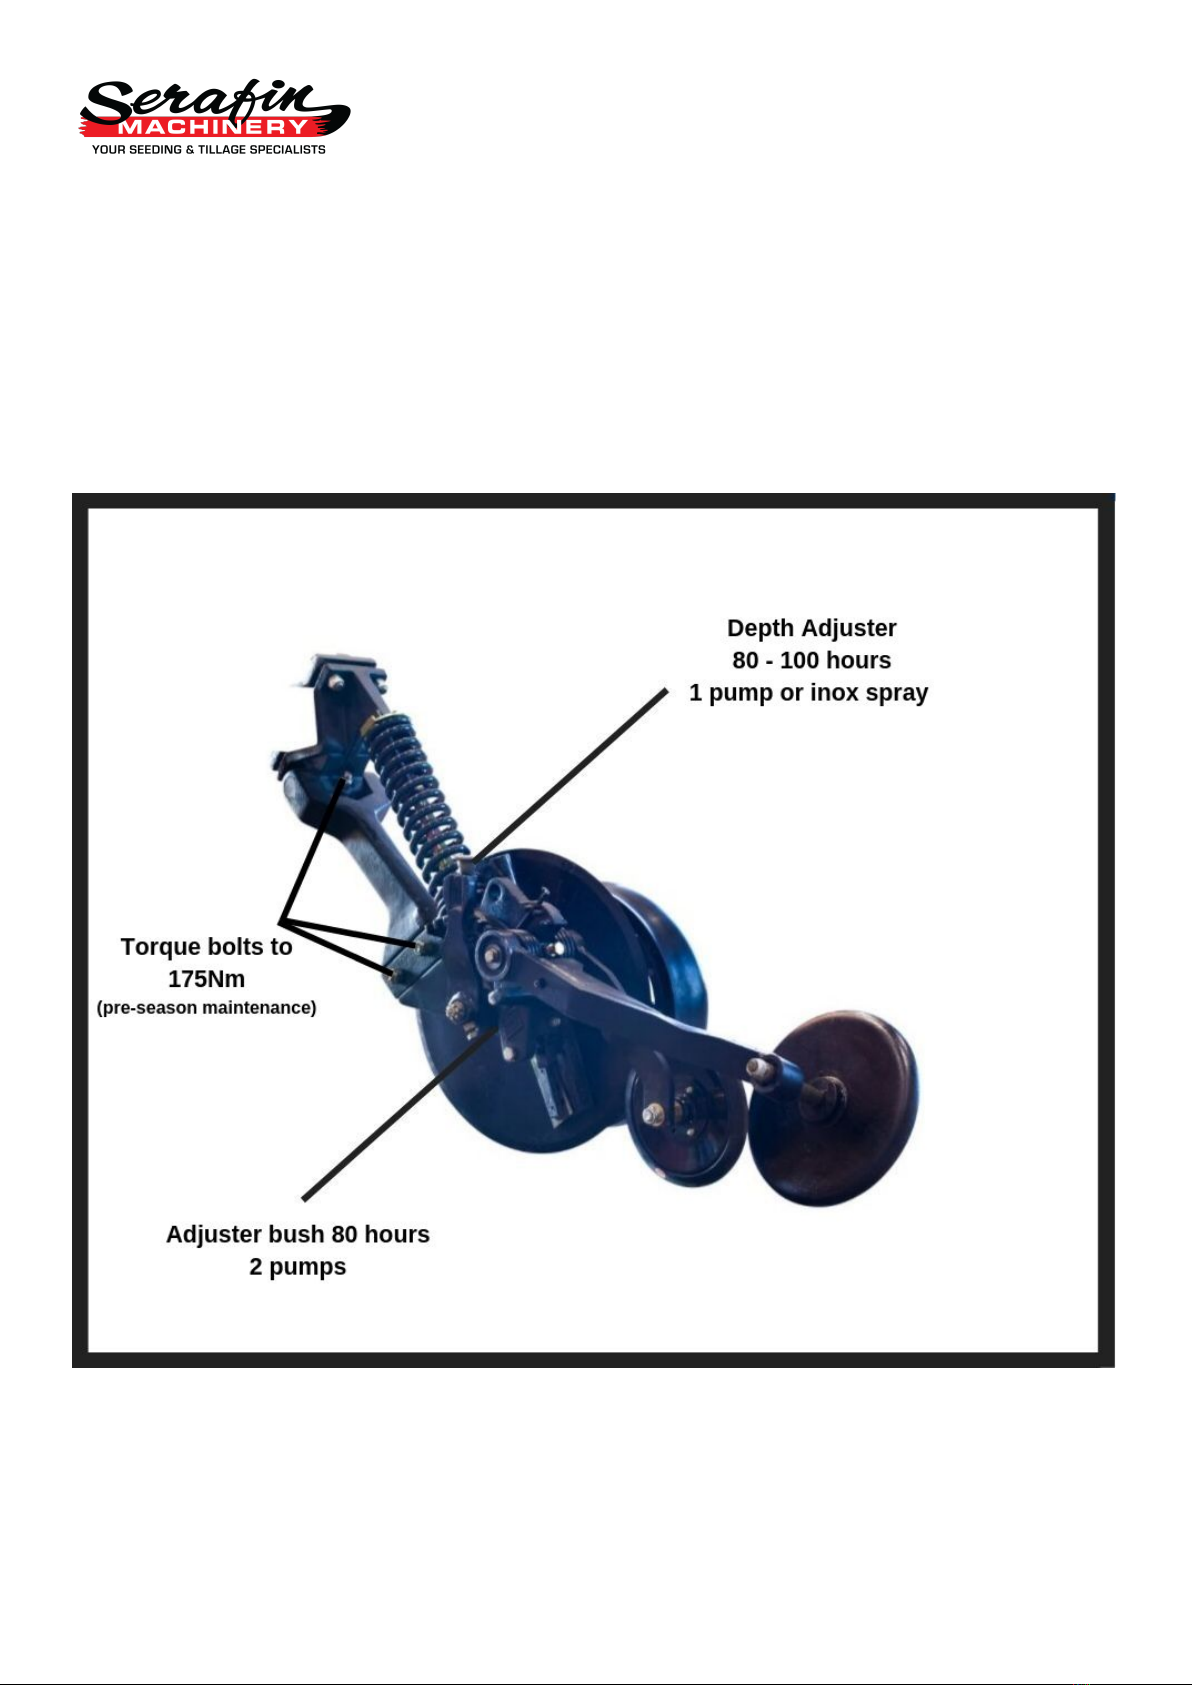
Lubrication
HI-TEC super red grease EP2 or equivalent recommended. Lubricate grease points shown below
between 80 and 100 working hours. Shown below.
Apply recommended pumps of grease below to each to grease point.
Seeding Unit
Table of contents
Popular Farm Equipment manuals by other brands

Schaffert
Schaffert Rebounder Mounting instructions

Stocks AG
Stocks AG Fan Jet Pro Plus 65 Original Operating Manual and parts list

Cumberland
Cumberland Integra Feed-Link Installation and operation manual

BROWN
BROWN BDHP-1250 Owner's/operator's manual

Molon
Molon BCS operating instructions

Vaderstad
Vaderstad Rapid Series instructions


