SereneLife SLBKBLU28 User manual


www.SereneLifeHome.com2
THIS MANUAL CONTAINS IMPORTANT SAFETY, PERFORMANCE AND MAINTENANCE INFORMATION.
READ THE MANUAL BEFORE TAKING YOUR FIRST RIDE ON YOUR NEW BICYCLE,
AND KEEP THE MANUAL HANDY OF FUTURE REFERENCE
CONTENTS
Parts List 3-4
Installation Instructions 5-7
Maintenance Instructions 8
Safety Checklist 9-12
Safety Information 13-15
Correct tting
Make sure your helmet
covers your forehead.
Incorrect tting
Forehead is exposed and
vulnerable to serious injury.

www.SereneLifeHome.com 3
PARTS LIST
High-End Kid's Bicycle
Get to know the parts of your bicycle.This will help with assembly, maintenance, and troubleshooting.
Models vary in color and style.
Caution: Over-tightening of stem bolts or other clamping devices may cause injury to the rider
www.SereneLifeHome.com4
PRODUCT INFORMATION
Product Color: Black/Bule/Orange
Main Materials: Magnesium alloy, Steel, PP
Applicable Age: 4 years old and above
Execution Standards:
16 CFR Part 1512,CPSIA 101 (Lead),
16 CFR Part 1501,16 CFR Part 1500.20
PRODUCT FEATURES:
•High strength, lightweight and corrosion resistant
•One-piece formed magnesium alloy, stylish appearance
•Balance training wheels, three points of support, safe and stable
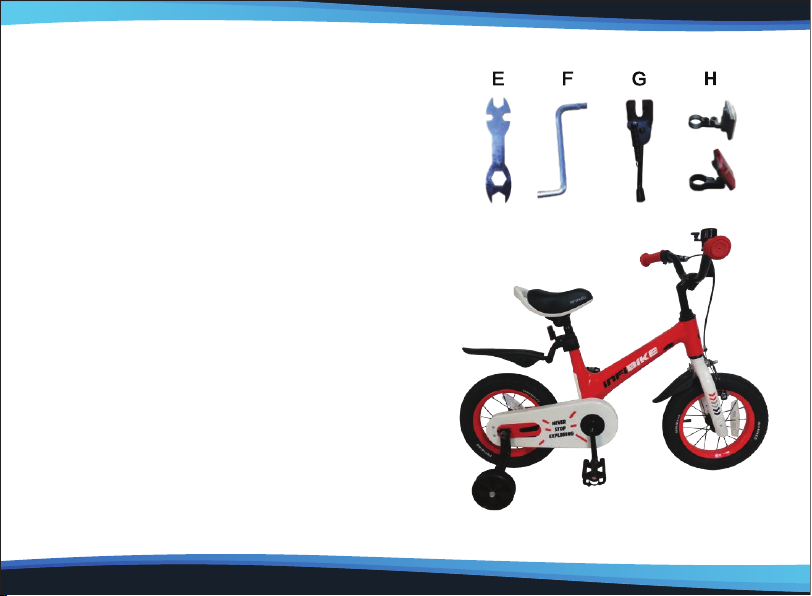
PARTS LIST:
A. Handlebar X1
B. Frame X1
C. Pedal X2
D. Training Wheel X2
E. Multi-function tool X1
F. Hexagonal Key X1
G. Kickstand X1
H. Front/Rear Reector X1

www.SereneLifeHome.com 5
INSTALLATION INSTRUCTIONS
Install Training Wheels
Install Kickstand
•Use multi-function tool to remove the nuts and spacers from
the left and right sides of the rear wheel.
•Install the training wheels, spacers and nuts in order as
shown in the diagram and lock them in place with a multi-
function tool. (The locking torque is not less than 18N.m)
•Training wheel height from the ground between 0.5-1cm is
best, before riding must conrm that all screws have been
tightened.
•Remove the nut with a wrench and take o both sides of
the training wheels.
•Install the kickstand into the corresponding frame screw
hole and tighten the nut with a wrench.
•Check the kickstand retraction and stand function.
Suggestion:
Install the kickstand after the user has mastered the balance
www.SereneLifeHome.com6
Install Pedal
Install Front/Rear Reector
•Use multi-function tool to remove the nuts and spacers from
the left and right sides of the rear wheel.
•Install the training wheels, spacers and nuts in order as
shown in the diagram and lock them in place with a multi-
function tool. (The locking torque is not less than 18N.m)
•Training wheel height from the ground between 0.5-1cm is
best, before riding must conrm that all screws have been
tightened.
•Remove the nut with a wrench and take o both sides of
the training wheels.
•Install the kickstand into the corresponding frame screw
hole and tighten the nut with a wrench.
•Check the kickstand retraction and stand function.
Suggestion:
Install the kickstand after the user has mastered the balance
•Put the corresponding L/R pedals into the corresponding left
and right cranks, and use a multi-function tool to turn and
lock in the direction of the front wheel (the locking torque is
not less than 45N.m).
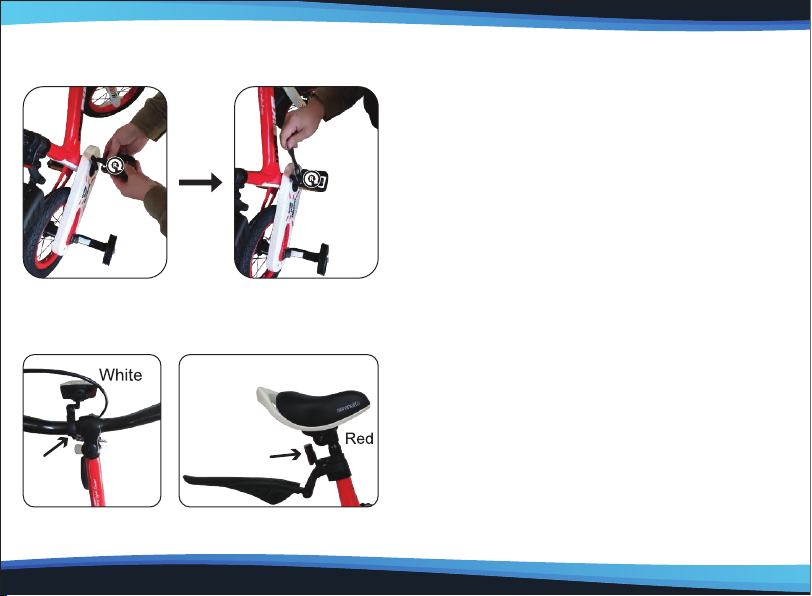
•Install the front reector (white) on the handlebar as shown
in the picture, lock it with a screwdriver.
•Install the rear reector (red) on the seat tube as shown in
the picture, and lock it with a screwdriver.

www.SereneLifeHome.com 7
Install Handlebar •Remove the waterproof plug from the installed handlebar.
•Pull o the assembled handlebar protector, insert it into the
fork hole, adjust the angle (the center point of the handlebar
is perpendicular to the front wheel), make sure you can
insert the handlebar below the safety line into the head
tube of the frame, and lock it tight with hexagonal key.
•Make sure the handlebars are locked tight and do not move
from side to side (the locking torque is not less than 12N.m)
•Put the waterproof plug back in its original position.
•Put the corresponding L/R pedals into the corresponding left
and right cranks, and use a multi-function tool to turn and
lock in the direction of the front wheel (the locking torque is
not less than 45N.m).
•Install the front reector (white) on the handlebar as shown
in the picture, lock it with a screwdriver.
•Install the rear reector (red) on the seat tube as shown in
the picture, and lock it with a screwdriver.

•Remove the waterproof plug from the installed handlebar.
•Pull o the assembled handlebar protector, insert it into the
fork hole, adjust the angle (the center point of the handlebar
is perpendicular to the front wheel), make sure you can
insert the handlebar below the safety line into the head
tube of the frame, and lock it tight with hexagonal key.
•Make sure the handlebars are locked tight and do not move
from side to side (the locking torque is not less than 12N.m)
•Put the waterproof plug back in its original position.
www.SereneLifeHome.com8
MAINTENANCE INSTRUCTIONS
Adjusting Calliper Brakes
Throughout the life of your bike, the front calliper brakes may need adjusting if the brake cable has streched or the brake arms
have been knocked during use.
Adjusting the Caliper Cable Tension
1a
1a. Adjust the Brake Cable
The brake cable must be adjusted to ensure that the
brakes are close as possible to the wheel rim when no
pressure is applied to the brake lever but still allowing
freedom of wheel to rotate.
Using a suitable spanner or socket, loosen the cable
anchor nut until the brake inner wire/or cable is free to
move.
Pull the brake cable until the brake pads are approximately
3 to 4 mm from the wheel rim. Retighten the cable anchor
nut while holding the brake cable position.
www.SereneLifeHome.com 9
SAFETY CHECKLIST
Before Riding
You should perfonn the following checks before riding your bike to ensure it is safe to use and operating correctly.
1. Is the saddle Secure?
While standing next to the bike, try and move the saddle from side to side.
If the saddle moves you should retighten the seat post bolt or the saddle clamp bolts.
2. Are the Front and Rear Tires Inated Correctly?
Squeeze the sides of the front and rear tires. If they are soft they will need inating.
Re-inate to the pressure indicated on the sides of the tires using approved bicycle pump.
3. Are the Pedals Tight?
Using the supplied multi-tool, ensure both the left and right pedals are fully tight.
Remember that the threaded shafts of the left and right pedals tighten in dierent directions.

www.SereneLifeHome.com10
4. Do the Brakes Work?
Stand next to the bike and apply the front brake and push forwards. If the wheels move, the front brake may not be
working correctly. If required, adjust the front brakes as described in the User Manual.
Repeat the above check for the rear brake.
5. Do the Handlebars Move?
Hold the front wheel between your legs and try to move the handlebars. If the handlebars move, the stem bolt may have
become loose. Retighten the stem bolt.
6. Is the bike Clean?
The bike should be cleaned and re-oiled regularty to ensure it operates correctly.
Using the Brakes
This bike is tted with a front clamp brake and a rear coaster brake to stop the bike eectively.
The breaks are operated using one brake lever mounted on the handlebar.
The left-hand brake lever operates the front brake.
This manual suits for next models
8
Table of contents


