JVC KW-V420BT User manual

B5A-0863-00 (EN)© 2015 JVC KENWOOD Corporation
MONITOR WITH DVD RECEIVER
INSTRUCTION MANUAL
KW-V420BT
KW-V320BT
KW-V220BT
This instruction manual is used to describe models listed below. Model availability and features
(functions) may dier depending on the country and sales area.
t3FHJPO%7%3FHJPO$PEFBSFB
2016KW-VEntryE.indb1 2015/10/0115:05

2
CONTENTSCONTENTS
BEFORE USE............................................................ 2
How to reset your unit.................................................... 3
INITIAL SETTINGS .................................................. 4
Initial setup......................................................................... 4
Clock settings .................................................................... 4
BASICS .................................................................... 5
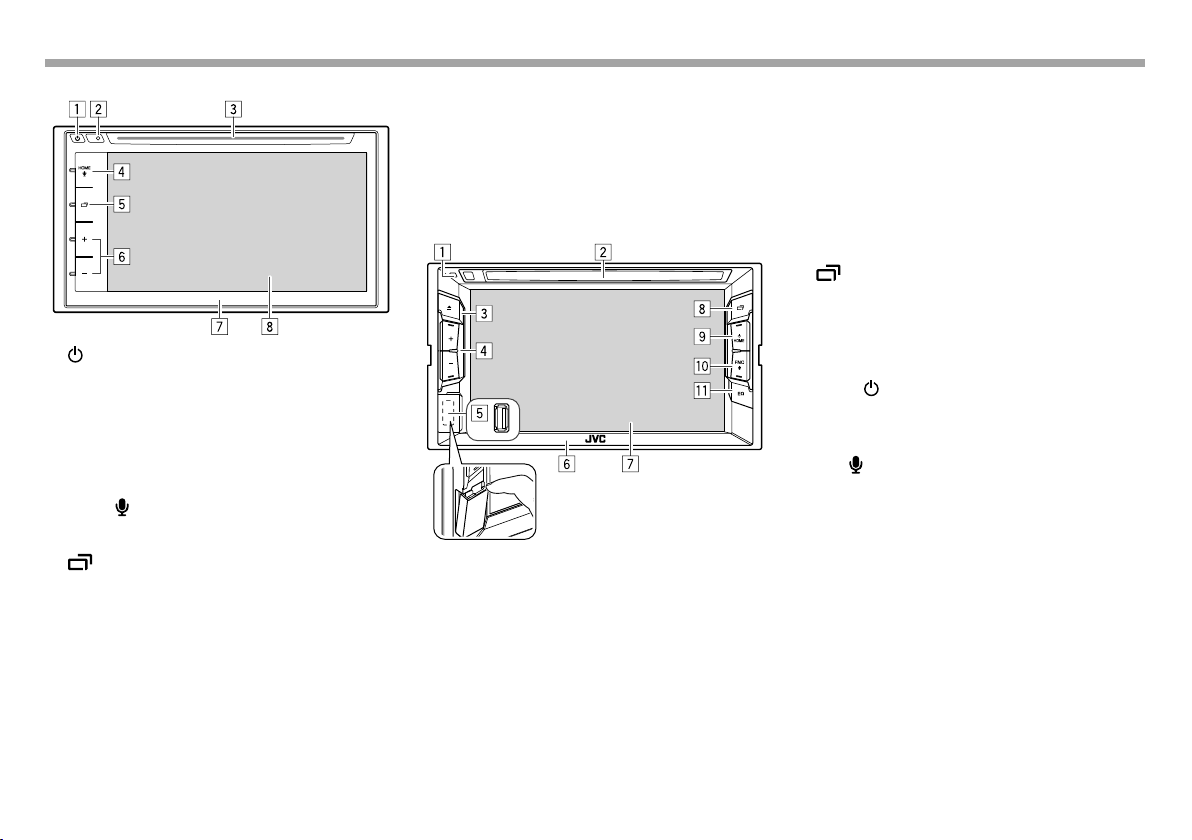
Component names and functions............................. 5
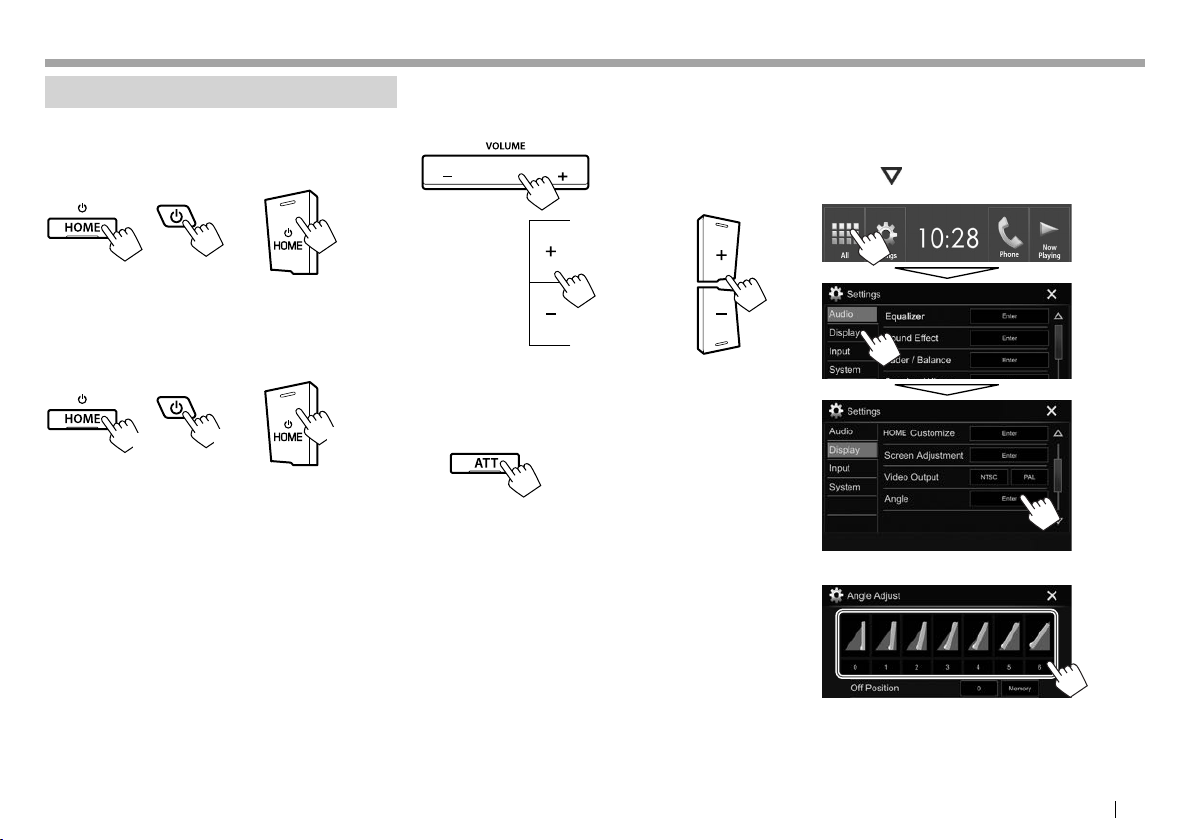
Common operations....................................................... 7
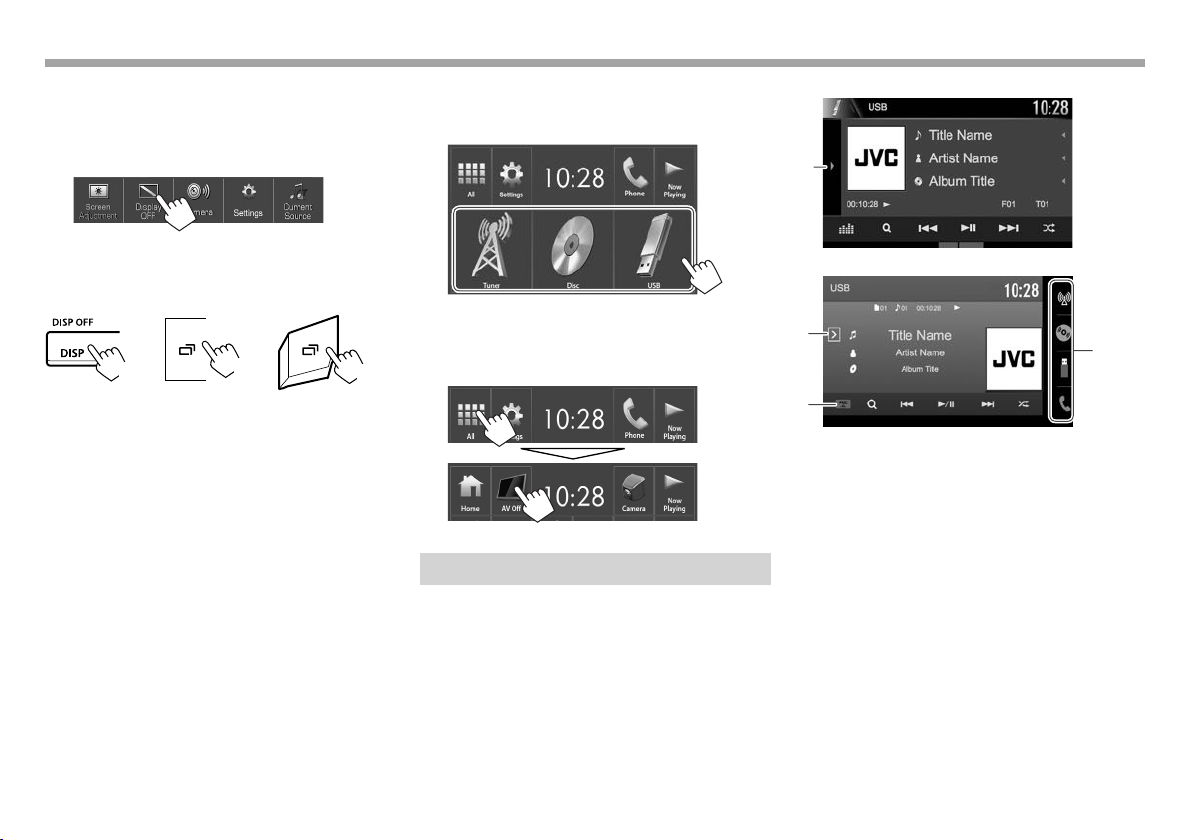
Common screen operations......................................... 8
Selecting the playback source...................................10
Using the pop-up short-cut menu...........................11
DISCS .................................................................... 12
USB........................................................................ 17
Android ................................................................ 19
iPod/iPhone ......................................................... 21
APPs...................................................................... 23
TUNER................................................................... 24
OTHER EXTERNAL COMPONENTS ...................... 28
Using the rear view camera........................................28
Using external audio/video players—AV-IN ........30
BLUETOOTH ......................................................... 31
SETTINGS.............................................................. 39
Settings for using applications of iPod touch/
iPhone/Android ..............................................................39
Sound adjustment .........................................................40
Adjustment for video playback.................................43
Changing the display design.....................................44
Customizing the Home screen..................................45
Customizing the system settings .............................46
Setting menu items.......................................................48
REMOTE CONTROLLER ........................................ 51
CONNECTION/INSTALLATION ............................ 53
REFERENCES......................................................... 58
Maintenance....................................................................58
More information...........................................................58
Error message list...........................................................62
Troubleshooting.............................................................62
Specifications...................................................................65
BEFORE USEBEFORE USE
IMPORTANT
To ensure proper use, please read through this
manual before using this product. It is especially
important that you read and observe WARNINGS
and CAUTIONS in this manual. Please keep the
manual in a safe and accessible place for future
reference.
VWARNINGS: (To prevent accidents and
damage)
• DO NOT install any unit or wire any cable in a
location where;
– it may obstruct the steering wheel and gearshift
lever operations.
– it may obstruct the operation of safety devices
such as air bags.
– it may obstruct visibility.
• DO NOT operate the unit while driving.
If you need to operate the unit while driving, be
sure to look around carefully.
• The driver must not watch the monitor while
driving.
The marking of products using lasers
The label is attached to the chassis/case and says
that the component uses laser beams that have
been classified as Class 1. It means that the unit is
utilizing laser beams that are of a weaker class. There
is no danger of hazardous radiation outside the unit.
How to read this manual:
• Illustrations of KW-V420BT Region 2 are mainly used for explanation. The displays and panels shown in
this manual are examples used to provide clear explanations of the operations. For this reason, they may
be different from the actual displays or panels.
• This manual mainly explains operations using the buttons on the monitor panel and touch panel. For
operations using the separately purchased remote controller (available only for KW-V420BT Region 2/
KW-V320BT Region 2/KW-V220BT Region 2), see page51.
• < > indicates the various screens/menus/operations/settings that appear on the touch panel.
• [ ] indicates the buttons on the touch panel.
• Indication language: English indications are used for the purpose of explanation. You can select the
indication language from the <Settings> menu. (Page50)
• Updated information (the latest Instruction Manual, system updates, new functions, etc.) is available
from <http://www.jvc.net/cs/car/>.
2016KW-VEntryE.indb22016KW-VEntryE.indb2 2015/10/0115:052015/10/0115:05

ENGLISH 3
Information on Disposal of Old Electrical and
Electronic Equipment and Batteries (applicable
for countries that have adopted separate waste
collection systems)
Products and batteries with the symbol (crossed-
out wheeled bin) cannot be disposed as household
waste.
Old electrical and electronic equipment and
batteries should be recycled at a facility capable of
handling these items and their waste byproducts.
Contact your local authority for details in locating a
recycle facility nearest to you.
Proper recycling and waste disposal will help
conserve resources whilst preventing detrimental
effects on our health and the environment.
Notice: The sign “Pb” below the symbol for batteries
indicates that this battery contains lead.
For Israel
VCautions on the monitor:
• The monitor built into this unit has been
produced with high precision, but it may have
some ineffective dots. This is inevitable and is not
considered defective.
• Do not expose the monitor to direct sunlight.
• Do not operate the touch panel using a ball-point
pen or similar tool with a sharp tip.
Touch the buttons on the touch panel with your
finger directly (if you are wearing a glove, take it
off).
• When the temperature is very cold or very hot...
– Chemical changes occur inside, causing
malfunction.
– Pictures may not appear clearly or may move
slowly. Pictures may not be synchronized with
the sound or picture quality may decline in such
environments.
For safety...
• Do not raise the volume level too much, as this
will make driving dangerous by blocking outside
sounds, and may cause hearing loss.
• Stop the car before performing any complicated
operations.
Temperature inside the car...
If you have parked the car for a long time in hot or
cold weather, wait until the temperature in the car
becomes normal before operating the unit.
❏How to reset your unit
If the unit fails to operate properly, press the reset
button.
KW-V420BT
KW-V320BT
KW-V220BT
BEFORE USEBEFORE USE
2016KW-VEntryE.indb32016KW-VEntryE.indb3 2015/10/0115:052015/10/0115:05

4
INITIAL SETTINGSINITIAL SETTINGS
Initial setup
When you power on the unit for the first time or
reset the unit, the initial setting screen appears.
• You can also change the settings on the
<Settings> screen. (Page48)
1Perform the initial settings.
*
<Demonstration>
(Page49)
Activate or deactivate the
display demonstration.
<Language>
(Page50)
Select the text language
used for on-screen
information.
• Set <GUI Language>
to display the operation
buttons and menu items
in the selected language
([Local]) or English
([English]).
<Angle>*
(Page7)
Adjust the panel angle.
<iPod Setup>
(Page21)
Select the connection
method of iPod/iPhone.
<Rear Camera>
(Page28)
Configure the settings to
display the picture from
the connected rear view
camera.
<User
Customize>
(Page44)
Change the display design.
2Finish the procedure.
The Home screen is displayed.
*Only for KW-V420BT.
Clock settings
1Display the Home screen.
On the monitor panel:
KW-V420BT KW-V320BT KW-V220BT
2 Display the <Clock> setting screen.
• You can also display the <Clock> setting
screen by touching the clock area on the
Home screen.
2016KW-VEntryE.indb42016KW-VEntryE.indb4 2015/10/0115:052015/10/0115:05

ENGLISH 5
INITIAL SETTINGSINITIAL SETTINGS
3Set the clock time.
<Radio Data
System>
Synchronizes the clock time with
FM Radio Data System.
<OFF> Sets the clock manually. (See
below.)
When selecting <OFF>:
Adjust the hour (1), then adjust the minute (2).
• Press [Reset] to set the minute to “00”.
4Finish the procedure.
BASICSBASICS
Component names and functions
VCaution on the volume setting:
Digital devices produce very little noise compared
with other sources. Lower the volume before
playing these digital sources to avoid damaging
the speakers by sudden increase of the output
level.
KW-V420BT
1Screen (touch panel)
2Monitor panel*
3VOLUME –/+ button
Adjusts the audio volume. (Page 7)
4ATT button
Attenuates the sound. (Page 7)
5HOME/ button
• Displays the Home screen. (Press) (Page 9)
• Turns on the power. (Press) (Page 7)
• Turns off the power. (Hold) (Page 7)
6FNC/ button
• Pops up the short-cut menu. (Press)
(Page 11)
• Activates the voice dialing. (Hold) (Page 36)
7DISP/DISP OFF button
• Switches the screen. (Press)
– The screen switched to depends on the
<Navigation Input> setting (Page 49).
• Turns off the screen. (Hold) (Page 8)
• Turns on the screen. (Hold) (Page 8)
8M(Eject) button
Ejects the disc. (Tilts the monitor panel fully.)
(Page 12)
9Reset button
Resets the unit. (Page 3)
* You can change the color of the buttons on the monitor panel.
(Page 44)
2016KW-VEntryE.indb52016KW-VEntryE.indb5 2015/10/0115:052015/10/0115:05

6
BASICSBASICS
KW-V320BT
1button
• Turns on the power. (Press) (Page 7)
• Turns off the power. (Hold) (Page 7)
• Pops up the short-cut menu. (Press)
(Page 11)
2Reset button
Resets the unit. (Page 3)
3Loading slot
4HOME/ button
• Displays the Home screen. (Press) (Page 9)
• Activates the voice dialing. (Hold) (Page 36)
5button
• Switches the screen. (Press)
– The screen switched to depends on the
<Navigation Input> setting (Page 49).
• Turns off the screen. (Hold) (Page 8)
• Turns on the screen. (Hold) (Page 8)
6Volume +/– button
Adjusts the audio volume. (Page 7)
7Monitor panel*
8Screen (touch panel)
* You can change the color of the buttons on the monitor panel.
(Page 44)
KW-V220BT
1Reset button
Resets the unit. (Page 3)
2Loading slot
3M(Eject) button
Ejects the disc. (Press) (Page 12)
4Volume +/– button
Adjusts the audio volume. (Page 7)
5USB input terminal (Page 55)
6Monitor panel
7Screen (touch panel)
8button
• Switches the screen. (Press)
– The screen switched to depends on the
<Navigation Input> setting (Page 49).
• Turns off the screen. (Hold) (Page 8)
• Turns on the screen. (Hold) (Page 8)
9HOME/ button
• Displays the Home screen. (Press) (Page 9)
• Turns on the power. (Press) (Page 7)
• Turns off the power. (Hold) (Page 7)
pFNC/ button
• Pops up the short-cut menu. (Press)
(Page 11)
• Activates the voice dialing. (Hold) (Page 36)
qEQ button
Displays the <Equalizer> screen. (Page 40)
2016KW-VEntryE.indb62016KW-VEntryE.indb6 2015/10/0115:052015/10/0115:05

ENGLISH 7
BASICSBASICS
Common operations
❏Turning on the power
KW-V420BT KW-V320BT KW-V220BT
❏Turning off the power
KW-V420BT KW-V320BT KW-V220BT
(Hold) (Hold) (Hold)
❏Adjusting the volume
To adjust the volume (00 to 35)
KW-V420BT
KW-V320BT KW-V220BT
Press + to increase, and press −to decrease.
• Holding the button increases/decreases the
volume continuously.
To attenuate the sound (only for KW-V420BT)
The ATT indicator lights up.
To cancel the attenuation: Press the same button
again.
❏Adjusting the panel angle (only for
KW-V420BT)
1Display the <Angle Adjust> screen.
On the Home screen:
• Press [ ] repeatedly to change the page on
the <Display> menu screen.
2Select an angle (0 – 6).
• To set the current position as the power off
position, select [Memory].
2016KW-VEntryE.indb72016KW-VEntryE.indb7 2015/10/0115:052015/10/0115:05

8
BASICSBASICS
❏Turning off the screen
On the pop-up short-cut menu (Page11):
Display the pop-up short-cut menu by pressing FNC
(for KW-V420BT/KW-V220BT) or B(for KW-V320BT)
on the monitor panel, then select [Display OFF].
On the monitor panel:
KW-V420BT KW-V320BT KW-V220BT
(Hold) (Hold) (Hold)
To turn on the screen: Press and the hold the same
button, or touch the display.
❏Turning on/off the AV source
You can activate the AV function by selecting a
source on the Home screen.
To select a source not displayed on the Home
screen: Press [All]. (Page 10)
To turn off the AV source:
Common screen operations
❏Common screen descriptions
You can display other screens any time to change
the source, show the information, or change the
settings, etc.
Source control screen
Performs source playback operations.
• The operation buttons and information displayed
vary depending on the selected source.
KW-V420BT/KW-V220BT
1
KW-V320BT
2
1
3
Common operating buttons:
1Displays the other operation button window.*
2Only for KW-V320BT: FNC button
Pops up the short-cut menu. (Page 11)
3Only for KW-V320BT: Source buttons
Changes the playback source. (Page 10)
• The source buttons shown on the Home screen
is displayed. (Page 9)
*Does not appear when there are no other operation buttons other
than those currently shown on the source control screen.
2016KW-VEntryE.indb82016KW-VEntryE.indb8 2015/10/0115:052015/10/0115:05

ENGLISH 9
BASICSBASICS
Gesture control on the source control screen:
You can also control playback by moving your finger
on the touch panel as follows (for some sources, the
gesture control is not available).
• Sliding the finger towards up/down: Functions
same as pressing [ ] [ ].
• Sliding the finger towards left/right: Functions
same as pressing [S]/[T].
• Moving your finger clockwise or counter-
clockwise: increases/decreases the volume.
Home screen
Displays the source control screen and settings
screen.
• You can arrange the items to display on the Home
screen.(Page 45)
KW-V420BT/KW-V220BT
12 543
6
Common operating buttons:
1Displays all playback sources and items.
(Page10)
2Displays the <Settings> screen. (See the right
column.)
3Displays the <Clock> setting screen. (Page4)
4Displays the phone control screen. (Page35)
5Displays the source currently played back.
6Changes the playback source. (Page 11)
KW-V320BT
5
6
7
3
4
1
2
1
Common operating buttons:
1Changes the playback source. (Page 11)
2Displays the <Clock> setting screen. (Page4)
3M(Eject) button: Ejects the disc. (Press)
(Page 12)
4button: Displays the <User Customize>
screen. (Page 44)
5button: Displays the <Settings> screen. (See
the right column.)
6button: Displays all playback sources and
items. (Page10)
7[Phone] button: Displays the phone control
screen. (Page35)
<Settings> screen
Changes the detailed settings. (Page 48)
1
2
3
4
Common operating buttons:
1Selects the menu category.
2Changes the page.
3Closes the current setting screen and returns to
the current source control screen.
4Returns to the previous screen.
2016KW-VEntryE.indb92016KW-VEntryE.indb9 2015/10/0115:052015/10/0115:05

10
BASICSBASICS
❏Touch screen operations
1
3
2
4
1Displays the video control menu while playing a
video.
2Displays the source control screen while playing
a video.
• The operation buttons disappear when the
screen is touched or when no operation is
done for about 5 seconds.
3Goes to the previous chapter/track.*
4Goes to the next chapter/track.*
* Not available for video from an external component.
Selecting the playback source
On the Home screen:
[AV Off] Turns off the AV source.
(Page 8)
[Camera] Switches to a camera connected
to the rear view camera input.
(Page 28)
[Now Playing] Displays the source currently
played back.
[Tuner] Switches to the radio broadcast.
(Page 24)
[Disc] Plays a disc. (Page 12)
[USB] Plays files on a USB device.
(Page 17)
[iPod] Plays an iPod/iPhone. (Page 21)
[Android™] Plays an Android device.
(Page19)
[BT Audio]
Plays a Bluetooth audio player.
(Page 37)
[AV-IN]* Switches to an external
component connected to the
iPod/AV-IN input terminal.
(Page 30)
[Apps] Switches to the App screen from
the connected iPod touch/iPhone/
Android device. (Page 23)
To return to the Home screen
*Selectable only when <iPod Setup> is set to [USB 1
Wire]. (Page21)
2016KW-VEntryE.indb102016KW-VEntryE.indb10 2015/10/0115:052015/10/0115:05

ENGLISH 11
BASICSBASICS
❏Selecting the playback source on the
Home screen
• You can change the items to display on the Home
screen. (Page45)
Using the pop-up short-cut menu
While displaying the source control screen, you can
jump to the other screen from the pop-up short-cut
menu.
1Display the pop-up short-cut menu.
KW-V320BTKW-V420BT KW-V220BT
• Only for KW-V320BT: You can also display the
pop-up short-cut menu by pressing [FNC] on
the source control screen.
2Select an item to jump to.
For KW-V420BT/KW-V220BT
[Screen
Adjustment]
Displays the picture adjustment
screen. (Page43)
[Display OFF] Turns off the screen.
(Page8)
[Camera] Displays the picture from the
rear view camera. (Page28)
[Settings] Displays the <Settings> screen.
(Page48)
[Current
Source]
Displays the current source
control screen.
For KW-V320BT
[Phone] Displays the phone control
screen. (Page35)
[Voice] Activates the voice dialing.
(Page 36)
[EQ] Displays the <Equalizer>
screen. (Page 40)
[Picture
Adjust]
Displays the picture adjustment
screen. (Page43)
[User
Customize]
Displays the <User Customize>
screen. (Page 44)
To close the pop-up menu: Touch the screen
anywhere other than the pop-up short-cut menu.
2016KW-VEntryE.indb112016KW-VEntryE.indb11 2015/10/0115:052015/10/0115:05

12
DISCSDISCS
Playing a disc
• If a disc does not have a disc menu, all tracks on
it will be played repeatedly until you change the
source or eject the disc.
• For playable disc types/file types, see page 59.
❏Inserting a disc
Insert a disc with the label side facing up.
KW-V420BT
KW-V320BT
KW-V220BT
The source changes to “DISC” and playback starts.
• The IN indicator lights up while a disc is inserted.
• If “ ” appears on the screen, the unit cannot
accept the operation you have tried to do.
– In some cases, without showing “ ,”
operations will not be accepted.
• When playing back a multi-channel encoded
disc, the multi-channel signals are downmixed
to stereo.
❏Ejecting a disc
KW-V420BT KW-V220BT
KW-V320BT
Press [M] on the Home screen or “DISC” source
control screen.
• When removing a disc, pull it horizontally.
• You can eject a disc when playing another AV
source.
• If the ejected disc is not removed within
15 seconds, the disc is automatically inserted
again into the loading slot to protect it from dust.
Closing the monitor panel (only for KW-V420BT)
After removing the disc, press Mon the monitor
panel. The monitor panel closes.
Playback operations
When the operation buttons are
not displayed on the screen, touch
the area shown on the illustration.
• To change settings for video
playback, see page43.
❏Indications and buttons on the source
control screen
For video playback
32
567
41
Playback information
• The information displayed on the screen differs
depending on the type of disc/file being played
back.
1Media type
2Playback status
3Current playback item information (title no./
chapter no./folder no./file no./track no.)
4Playing time
5IN indicator
6Playback mode (Page15)
7File type
2016KW-VEntryE.indb122016KW-VEntryE.indb12 2015/10/0115:052015/10/0115:05

ENGLISH 13
DISCSDISCS
Operation buttons
• Available buttons on the screen and operations
differ depending on the type of disc/file being
played back.
[ ]/[ ]*Displays the other operation button
window.
• To hide the window, press [ ]/[ ]*.
[ ] Displays the <Equalizer> screen.
(Page40)
[ ] Displays the folder/track list.
(Page14)
[S] [T]• Selects a chapter/track. (Press)
• Reverse/forward search. (Hold)
• Plays in slow-motion during pause.
(Hold)
[IW]Starts/pauses playback.
[ ] Selects Random playback mode.
(Page15)
[ ] [ ] Selects a folder.
[ ] Selects Repeat playback mode.
(Page15)
[o]Stops playback.
[MODE] Changes the settings for disc playback
on the <DISC Mode> screen.
(Page16)
• To display all available operation buttons, press
[ ]/[ ]* to display the other operation button
window.
*The appearance of the buttons differs depending on the model:
[ ] or [ ] for KW-V420BT/KW-V220BT/[ ] or [ ] for
KW-V320BT.
For audio playback
2
54673
1
8
Playback information
• The information displayed on the screen differs
depending on the type of disc/file being played
back.
1Media type
2Track/file information
• Pressing [H]scrolls the text if not all of the text
is shown.
3Playing time
4IN indicator
5Playback status
6Playback mode (Page15)
7File type
8Current playback item information (folder no./file
no./track no.)
Operation buttons
• Available buttons on the screen and operations
differ depending on the type of disc/file being
played back.
[ ]/[ ]*Displays the other operation button
window.
• To hide the window, press [ ]/[ ]*.
[ ] Displays the <Equalizer> screen.
(Page40)
[ ] Displays the folder/track list.
(Page14)
[S] [T]• Selects a track. (Press)
• Reverse/forward search. (Hold)
[IW]Starts/pauses playback.
[o]Stops playback.
[ ] Selects Random playback mode.
(Page15)
[ ] [ ] Selects a folder.
[ ] Selects Repeat playback mode.
(Page15)
[MODE] Changes the settings for disc playback
on the <DISC Mode> screen.
(Page16)
• To display all available operation buttons, press
[ ]/[ ]* to display the other operation button
window.
*The appearance of the buttons differs depending on the model:
[ ] or [ ] for KW-V420BT/KW-V220BT/[ ] or [ ] for
KW-V320BT.
2016KW-VEntryE.indb132016KW-VEntryE.indb13 2015/10/0115:052015/10/0115:05

14
DISCSDISCS
❏Selecting a folder/track on the list
1
2Select the folder (1), then the item in the
selected folder (2).
• Repeat the procedure until you select the
desired track.
• You can change the page to display more
items by pressing [ ]/[ ].
• Press [ ] to return to the root folder.
• Press [ ] to return to the upper layer.
• If you want to play all tracks in the folder,
press [I] on the right of the desired folder.
❏Video menu operations
You can display the video menu screen during video
playback.
• The operation buttons disappear when the screen
is touched or when no operation is done for about
5 seconds.
For video playback except VCD
• Available buttons on the screen and operations
differ depending on the type of disc/file being
played back.
[ MENU] Displays the disc menu (DVD).
[T MENU] Displays the disc menu (DVD).
[Highlight] Switches to the direct disc menu
mode. Touch the target item to
select.
• To restore the screen, press
[ ].
[CUR] Displays the menu/scene
selection screen.
• [J] [K] [H] [I]: Selects an
item.
• [Enter]: Confirms the
selection.
• [Return]: Returns to the
previous screen.
[ZOOM] Displays the picture size
selection screen. (Page44)
[Aspect] Selects the aspect ratio.
(Page43)
[PictureAdjust] Displays the picture adjustment
screen. (Page43)
[Audio] Selects the audio type.
[Subtitle] Selects the subtitle type.
[Angle] Selects the view angle.
2016KW-VEntryE.indb142016KW-VEntryE.indb14 2015/10/0115:052015/10/0115:05

ENGLISH 15
DISCSDISCS
For VCD
[ MENU] Displays the disc menu.
[Audio] Selects the audio channel (ST:
stereo, L: left, R: right).
[Direct] Displays/hides the direct
selection buttons. (See the right
column.)
[Return] Displays the previous screen or
menu.
[ZOOM] Displays the picture size
selection screen. (Page44)
[Aspect] Selects the aspect ratio.
(Page43)
[PictureAdjust] Displays the picture adjustment
screen. (Page43)
To select a track directly on a VCD
• When playing a VCD with PBC activated, stop
playback to deactivate the PBC function, then
use the direct selecting buttons to select a track
number.
• When you enter a wrong number, press [DIR/CLR]
to delete the last entry.
❏Selecting playback mode
To select Repeat playback mode
To select Random playback mode
• The location of the buttons differ depending on
the type of disc/file being played back.
– When [ ] is not displayed, display the other
operation button window by pressing [ ]/[ ]*.
• Available playback modes differ depending on the
type of disc/file being played back.
• You cannot activate the repeat mode and the
random mode at the same time.
• Each time you press the button, the playback
mode changes. (The corresponding indicator
lights up.)
– Available items differ depending on the type of
disc/file being played back.
C Repeats current chapter.
T Repeats current title/program.
Repeats current track.
FO Repeats all tracks of the current
folder.
FO Randomly plays all tracks of the
current folder, then tracks of the
next folders.
Randomly plays all tracks.
To cancel Repeat/Random playback: Press the
button repeatedly until the indicator disappears.
*The appearance of the buttons differs depending on the model:
[ ] for KW-V420BT/KW-V220BT/[ ] for KW-V320BT.
2016KW-VEntryE.indb152016KW-VEntryE.indb15 2015/10/0115:052015/10/0115:05

16
DISCSDISCS
Settings for disc playback—<DISC
Mode>
1
2
• Available items shown on the <DISC Mode>
screen differ depending on the type of disc/file
being played back.
❏Setting items
<Menu
Language>
Select the initial disc menu language.
(Initial: English for KW-V420BT
Region 2/KW-V320BT Region 2/
KW-V220BT Region2/Руccĸий for
KW-V420BT Region 5/KW-V320BT
Region 5/KW-V220BT Region 5)
(Page61)
<Subtitle
Language>
Select the initial subtitle language
or turn subtitles off (Off). (Initial:
English for KW-V420BT Region 2/
KW-V320BT Region 2/KW-V220BT
Region2/Руccĸий for KW-V420BT
Region 5/KW-V320BT Region 5/KW-
V220BT Region 5) (Page61)
<Audio
Language>
Select the initial audio language.
(Initial: English for KW-V420BT
Region 2/KW-V320BT Region 2/
KW-V220BT Region2/Руccĸий for
KW-V420BT Region 5/KW-V320BT
Region 5/KW-V220BT Region 5)
(Page61)
<Dynamic
Range
Control>
You can change the dynamic range
while playing using Dolby Digital
software.
• Wide: Select this to enjoy a
powerful sound at a low volume
level with its full dynamic range.
• Normal: Select this to reduce the
dynamic range a little.
• Dialog (Initial): Select this to
reproduce movie dialog more
clearly.
<Down Mix> When playing back a multi-channel
disc, this setting affects the signals
reproduced through the front and/or
rear speakers.
• Dolby Surround: Select this to
enjoy multi-channel surround
sound by connecting an amplifier
compatible with Dolby Surround.
• Stereo (initial): Normally select
this.
<Screen
Ratio>
Select the monitor type to watch a
wide screen picture on the external
monitor.
16:9 (Initial) 4:3 LB 4:3 PS
<File Type>* Select the playback file type when a
disc contains different types of files.
• Audio: Plays back audio files.
• Still Image: Plays back picture files.
• Video: Plays back video files.
• Audio&Video (initial): Plays back
audio files and video files.
*For playable file types, see page 58.
If the disc contains no files of the selected type, the existing files are
played in the following priority: audio, video, then still picture. You
can change these settings only while playback is stopped.
2016KW-VEntryE.indb162016KW-VEntryE.indb16 2015/10/0115:052015/10/0115:05

ENGLISH 17
USBUSB
Connecting a USB device
You can connect a USB mass storage class device
such as a USB memory, Digital Audio Player etc. to
the unit.
• For details about connecting USB devices, see
page 55.
• You cannot connect a computer or portable HDD
to the USB input terminal.
• For playable file types and notes on using USB
devices, see page 60.
When a USB device is connected...
The source changes to “USB” and playback starts.
• All tracks in the USB device will be played
repeatedly until you change the source.
To disconnect the USB device safely:
Press [M], then disconnect the USB device after “No
Device” appears.
Playback operations
When the operation buttons are
not displayed on the screen, touch
the area shown on the illustration.
• To change settings for video
playback, see page43.
❏Indications and buttons on the source
control screen
21
4563 7
Playback information
• The information displayed on the screen differs
depending on the type of file being played back.
1Jacket picture (Shown while playing if the file has
tag data that includes the jacket picture)
2Track/file information
• Pressing [H]scrolls the text if not all of the text
is shown.
3Playing time
4Playback status
5Playback mode (See the right column.)
6File type
7Current playback item information (folder no./file
no.)
Operation buttons
• Available buttons on the screen and operations
differ depending on the type of file being played
back.
[ ]/[ ]*1Displays the other operation button
window.
• To hide the window, press [ ]/[ ]*1.
[ ] Displays the <Equalizer> screen.
(Page40)
[ ] Displays the folder/track list.
(Page18)
[S] [T]• Selects a track. (Press)
• Reverse/forward search. (Hold)
[IW]Starts/pauses playback.
[ ] Selects random playback
mode.*2*3
• FO : Randomly plays all tracks/
files in the folder.
• : Randomly plays all tracks/files.
[ ] [ ] Selects a folder.
[ ] Selects repeat playback mode.*2*3
• : Repeats the current track/file.
• FO : Repeats all tracks/files in the
current folder.
[M]Disconnects the USB device safely.
[MODE] Changes the settings for USB
playback on the <USB Mode> screen.
(Page18)
• To display all available operation buttons, press
[ ]/[ ]*1to display the other operation button
window.
*1The appearance of the buttons differs depending on the model:
[ ] or [ ] for KW-V420BT/KW-V220BT/[ ] or [ ] for
KW-V320BT.
*2 To cancel random or repeat mode, press the button repeatedly until
the indicator disappears.
*3 You cannot activate the repeat mode and the random mode at the
same time.
2016KW-VEntryE.indb172016KW-VEntryE.indb17 2015/10/0115:052015/10/0115:05

18
USBUSB
❏Settings for USB playback—<USB
Mode>
1
2
<File Type>* Select the playback file type when a
disc contains different types of files.
• Audio: Plays back audio files.
• Still Image: Plays back picture files.
• Video: Plays back video files.
• Audio&Video (initial): Plays back
audio files and video files.
<Screen
Ratio>
Select the monitor type to watch a
wide screen picture on the external
monitor.
16:9 (Initial) 4:3 LB 4:3 PS
<Drive
Select>
Switches between internal memory
and the memory source of the
connected device (such as mobile
phone). Press [Next].
*For playable files, see page 58. If the USB device contains no files
of the selected type, the existing files are played in the following
priority: audio, video, then still picture.
❏Selecting a folder/track on the list
1
2Select the folder (1), then the item in the
selected folder (2).
• Repeat the procedure until you select the
desired track.
• You can change the page to display more
items by pressing [ ]/[ ].
• Press [ ] to return to the root folder.
• Press [ ] to return to the upper layer.
• If you want to play all tracks in the folder,
press [I] on the right of the desired folder.
2016KW-VEntryE.indb182016KW-VEntryE.indb18 2015/10/0115:052015/10/0115:05

ENGLISH 19
AndroidAndroid
Preparation
❏Installing JVC Music Play
Install the Android™ application JVC Music Play on
your Android device beforehand.
• When a compatible Android device is connected,
“Press [VIEW] to install JVC MUSIC PLAY APP”
is shown on the Android device. Follow the
instructions to install the application. You can
also install the latest version of the JVC Music
Play application on your Android device before
connecting.
About JVC Music Play
• This unit supports the Android™ application JVC
Music Play.
• When you use JVC Music Play, you can search for
audio files by Genre, Artist, Album, Playlist, and
Song.
• JVC Music Play is available on the following web
site: <http://www.jvc.net/cs/car/>
❏Connecting an Android device
Connect an Android device with a cable.
• For details about connecting Android devices, see
page55.
Compatible Android device
• This unit supports Android OS 4.1 and above.
• Some Android devices (with OS 4.1 and above)
may not fully support Android Open Accessory
(AOA) 2.0.
• If the Android device supports both mass storage
class device and AOA 2.0, this unit always plays
back via AOA 2.0 as priority.
• For more information and the latest compatible
list, see: <http://www.jvc.net/cs/car/>
❏Starting playback
1Start JVC Music Play on your Android
device.
2Select “Android™” as the source.
(Page10)
Playback operations
❏Indications and buttons on the source
control screen
21
4653
Playback information
1Artwork (Shown if the song contains artwork)
2Track information
• Pressing [H]scrolls the text if not all of the text
is shown.
3Playing time
4Playback status
5Playback mode (See the right column.)
6Track no./Total track number
Operation buttons
[ ]/[ ]*1Displays the other operation button
window.
• To hide the window, press [ ]/[ ]*1.
[ ] Displays the <Equalizer> screen.
(Page40)
[ ] Displays the track list. (Page20)
[S] [T]• Selects a track. (Press)
• Reverse/forward search. (Hold)
[IW]Starts/pauses playback.
[ ] Selects random playback mode.*2
• : Randomly plays all tracks.
• Album: Randomly plays all
tracks in the current album.
[ ] Selects repeat playback mode.
• 1: Repeats the current track.
• All: Repeats all tracks.
• : Cancels the repeat mode.
[MODE] Changes the settings for Android
playback on the <Android Mode>
screen. (Page20)
• To display all available operation buttons, press
[ ]/[ ]*1to display the other operation button
window.
*1The appearance of the buttons differs depending on the model:
[ ] or [ ] for KW-V420BT/KW-V220BT/[ ] or [ ] for
KW-V320BT.
*2To cancel random mode, press the button repeatedly until the
indicator disappears.
2016KW-VEntryE.indb192016KW-VEntryE.indb19 2015/10/0115:052015/10/0115:05

20
AndroidAndroid
❏Selecting a track from the menu
1
2Select a category (1), then a desired item
(2).
• Select an item in each layer until you reach
and select the desired file.
• You can change the page to display more
items by pressing [ ]/[ ].
• Press [ ] to return to the top layer.
• Press [ ] to return to the upper layer.
❏Settings for playback on the Android
device—<Android Mode>
1
2
<Artwork> Shows/hides artwork of the Android
device.
<Android
Setup>
• AUTO MODE:Controls from the
unit (using the JVC Music Play
application).
• AUDIO MODE: Controls other
media player applications from the
Android device (without using the
JVC Music Play application).
– You can play/pause or skip files
from the unit.
2016KW-VEntryE.indb202016KW-VEntryE.indb20 2015/10/0115:052015/10/0115:05
Other manuals for KW-V420BT
1
This manual suits for next models
5
Table of contents
Other JVC Car Video System manuals

JVC
JVC EXAD KW-AVX820 User manual

JVC
JVC Car LCD Monitor KV-M70 User manual

JVC
JVC KV-MR9010 User manual

JVC
JVC KV-MH6510 User manual

JVC
JVC KW-NSX700 User manual

JVC
JVC KW-NSX700 User manual

JVC
JVC EXAD KW-AVX700 User manual

JVC
JVC KV-M705 User manual

JVC
JVC KV-M705 User manual

JVC
JVC MRD900 - KV - DVD Player User manual