setro miniK10m User manual
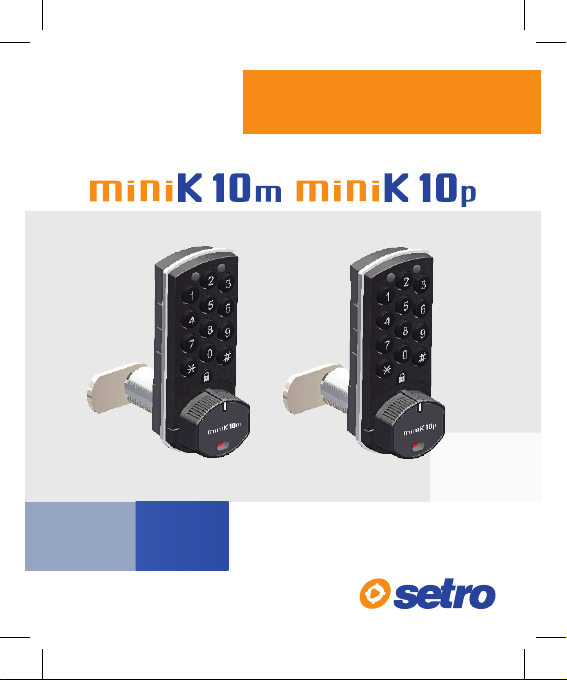
CABINETS | LOCKERS | BOXES
Operating
manual
The easy lock
in every aspect

Index
Operating manual
Introduction
Description
Usage
Initial setup
Assign Master card
Selecting Operation option of the miniK10
Assign/Delete Service card / cards
Assign User card / cards
Deleting User card
Operating instructions
Personal operation with card (if selected)
To Unlock
To Lock
Locker mode operation with card (if selected)
To Lock
To Unlock
Cardless personal operation (if selected)
Change Password
To Unlock with Password
To Unlock with Cards
To Lock with Password
To Lock with Card
Cardless locker mode operation (if selected)
To Lock with Password
To Lock with Card
To Unlock with Password
To Unlock with Cards
Locker Mode Operation with Card
or Password to Lock/Unlock (if selected)
To Lock with Password
To Unlock with Password
To Lock with any card
To Unlock with any card
4
4
5
5
5
5
6
6
6
7
7
7
7
7
7
8
8
8
8
8
9
9
9
9
9
10
10
11
11
11
12
12

Index
Programming instructions
Restore Default Settings: Press 0 - 1
Default Settings are
Mute Operation: Press 2 - 0
Audible Operation: Press 2 - 1
Penalty Operation: Press 3 - 1
Delete All Uvser Cards: Press 4 - 0
Reset User Password: Press 4 - 1
Locking with password / card: (1) Press 6 - 0
Automatic Locking (without password/card): (1) Press 6 - 1
Warning of open door : (1) Press 7 - 1
Resetting User Password with Service card usage: (1), (2) Press 8 - 1
Blocking the lock : (2) Press 9 - 1
Light and audio warning
Maintenance
General warnings
Cams
Other
Limited warranty
Liability limits
Technical specications
K10p card specications
K10m Appropriate card
Thank you
Quick info
Installation
Installation Overview
Mounting on Left & Right Door
Mounting Template
Joint erect lock assembly measurements
Recessed cover assembly measurements
Overlapping / external cover assembly measurements
Replacing existing lock
New Install
Warnings for mounting
13
13
13
13
13
13
13
13
14
14
14
14
14
14
16
16
16
16
17
17
17
18
18
18
19
21
22
23
26
27
28
29
30
30
31

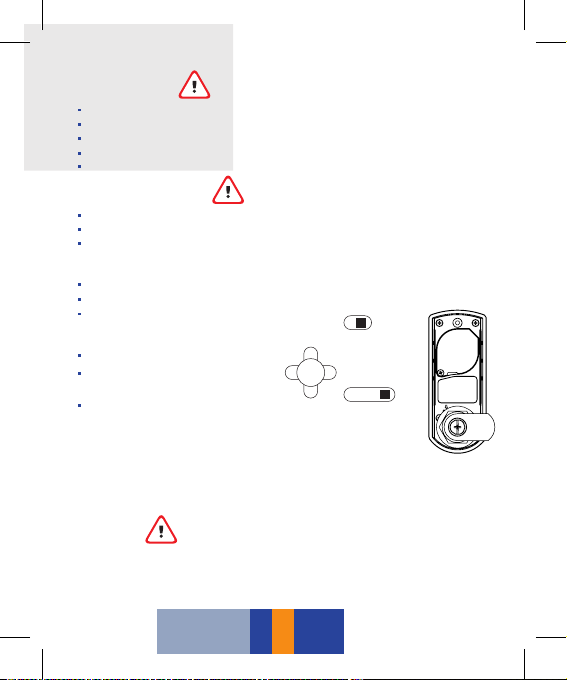
1. Red LED
2. Green LED
3. Keypad
4. Lock Body
5. Closing Position
6. Knob Indicator
7. Opening Position
8. Knob
9. Mounting Screw
10. Lock Body
11. Battery Cover
12. Battery Cover Screw
13. ID Label
14. Hand Knob Frame
15. Cam
16. Cam Screw
17. Cylinder Nut, R/L Stop Cam
Front Back
Introduction
19
10
11
12
13
14
15
16
17
2
3
4
5
15
6
77
8
Besides the stylish and enriching design of the miniK10m / miniK10p cabinet lock, there
are various features that make the lock dierent from others, such as allowing to use
with wet hands, easy and quick installation at wood and steel cabinets, easy application
at existing cabinets, easy application at right/left cabinet doors, higher battery life with
very low energy consumption, high reliability and operating with a contactless card.
Description:
4
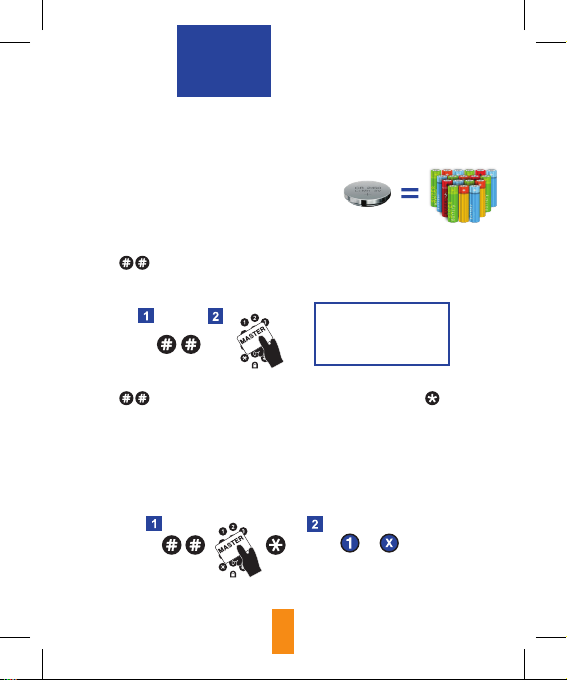
Contactless card lock can be used with three types of cards:“User Card,
Service Card and Master Card”. Also, the lock can be used with a password
by selecting the user card free operation. Service card is passive by default.
You should center the card when holding over the keypad to enable accurate
reading. Since the device enters the sleep mode to oer low
energy consumption, you need to wake the lock
up by pressing any button before each operation.
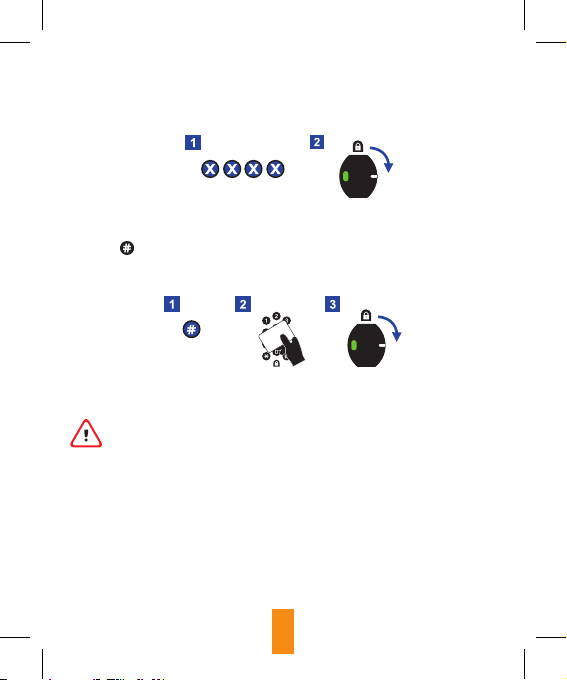
Assign Master card:
1- Press , two tone beep is heard.
2- And then present the master card to the keypad until one tone beep
is heard and green led blinks.
Selecting Operation option of the miniK10:
1- Press , present the master card to the keypad and press ,
green and red leds blink.
2- Press 1 for selecting operation options. And then
Press 0 for personal operation with card.
Press 1 for locker mode operation with card.
Press 2 for cardless personal operation.
Press 3 for cardless locker mode operation.
Press 4 for locker mode operation card or password.
Usage:
Initial setup:
This step is valid if
there is no assigned
Master Card before.
5

Assign/Delete Service card / cards:
(If you don’t need to use any service card, skip this step)
1- Press , present the master card to the keypad and press ,
green and red leds blink.
2- Press 5 for selecting service card assign / delete option. And then
Press 0 for all service cards are deleted.
Press 1 for assignment of 1. service card.
Press 2 for assignment of 2. service card.
Press 3 for assignment of 3. service card.
3- Present that service card to lock.
Assign User card / cards:
(If you don’t need to use any user card, skip this step, when personal operation
with card option is selected)
1- Press and then present master card to the keypad, press again.
2- Then enter the sequence number of user card
3- Present that card to lock.
Deleting User card:
(If you don’t need to use any user
card, skip this step, when personal
operation with card option is selected)
1- Press and then present master
card to the keypad, press .
2- Then enter the sequence number of user card.
Sequence
Number
Sequence
Number
6

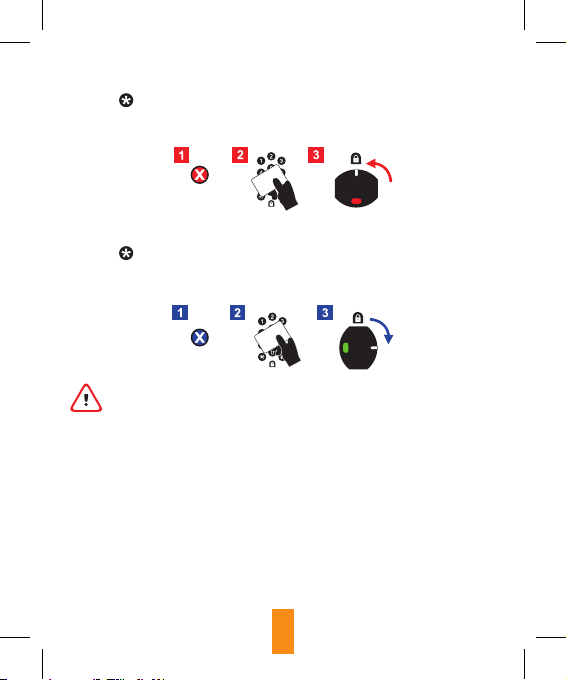
Personal operation with card (if selected)
To Unlock:
1- Press any number button for wake the lock up.
2- Present any assigned user card / master card /
service card to the keypad in 3 seconds.
3- turn the handle to the unlocked position.
To Lock:
1- Press any number button for wake the lock up.
2- Present any assigned user card / master card to the keypad in 3 seconds.
3- Turn the handle to the locked position.
Locker mode operation with card (if selected)
To Lock:
1- Press any number button for wake the lock up.
2- Present any card / master card to the keypad in 3 seconds.
3- Turn the handle to the locked position.
Operating instructions:
7
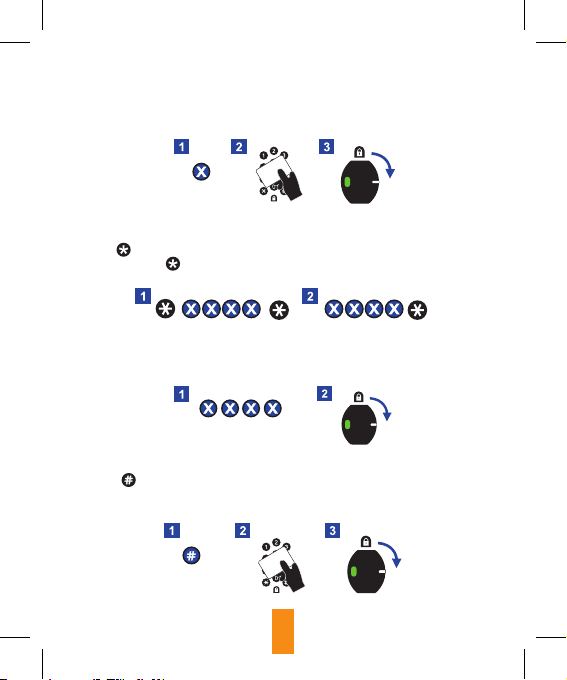
To Unlock:
1- Press any number button for wake the lock up.
2- Present any card / master card / service card to the keypad in 3 sec.
3- Turn the handle to the unlocked position.
Cardless personal operation (if selected)
Change Password: (default “1010”)
1- Press and then enter the old password by pressing number
buttons, press again.
2- And then enter the new password by pressing number button, press
To Unlock with Password: (default “1010”)
1- Enter the user password. 2- Turn the handle to the unlocked position.
To Unlock with Cards:
1- Press button for wake the lock up.
2- Present master card / service card to the keypad in 3 seconds.
3- Turn the handle to the unlocked position.
USER PASSWORD
OLD PASSWORD NEW PASSWORD
8
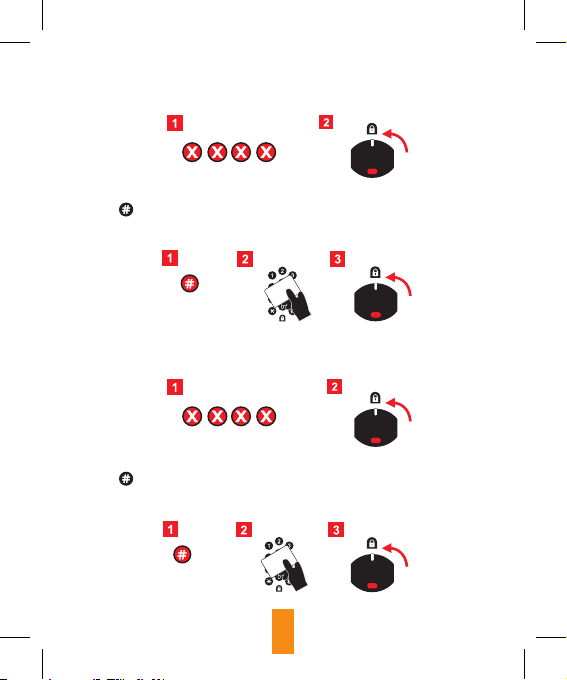
To Lock with Password: (default “1010”)
1- Enter the user password. 2- Turn the handle to the locked position.
To Lock with Card:
1- Press button for wake the lock up.
2- Present master card to the keypad in 3 seconds
3- Turn the handle to the locked position.
To Lock with Card:
1- Press button for wake the lock up.
2- Present master card to the keypad in 3 seconds
3- Turn the handle to the locked position.
Cardless locker mode operation (if selected)
To Lock with Password: (default “1010”)
1- Enter the new password. 2- Turn the keypad to the locked position.
USER PASSWORD
LOCKER MODE PASSWORD
9
To Unlock with Password:
1- Enter the same password with locking operation.
2- Turn the handle to the unlocked position.
To Unlock with Cards:
1- Press button for wake the lock up.
2- Present master card / service card to the keypad in 3 seconds
3- Turn the handle to the unlocked position.
LOCKER MODE PASSWORD
The unlocking direction depends on the type of door where miniK10 is
used. All locking and unlocking illustrations depict right handed door
installation.
10

Locker Mode Operation with Card or
Password to Lock/Unlock
(if selected)
To Lock with Password: (default “1010”)
1- Enter the new password.
2- Turn the keypad to the locked posit
To Unlock with Password:
1- Enter the same password with locking operation.
2- Turn the handle to the unlocked position.
If you lock the cam lock with password you have to open
it with password not with card.
LOCKER MODE PASSWORD
LOCKER MODE PASSWORD
11
To Lock with any card:
1- Press button for wake the lock up.
2- Present any card to the keypad in 3 seconds.
3- Turn the handle to the locked position.
To Unlock with any card:
1- Press button for wake the lock up.
2- Present any card to the keypad in 3 seconds.
3- Turn the handle to the unlocked position.
If you lock the cam lock with any card, you have to open it with
presented card not with password.
12
Restore Default Settings: Press 0 - 1
Default Settings are:
Locker mode operation with card, audible operation, penalty operation is not
active, service card is not active, locking with password, door open warning is
not active, resetting user password with service card usage is not active, block-
ing the lock is not active.
Mute Operation: Press 2 - 0
All audio warnings can be turned o if mute operation is selected (except
warning beeps).
Audible Operation: Press 2 - 1
Button feedback, warnings and conrmation are audible.
Penalty Operation: Press 3 - 1
Prevents tampering of lock by unauth orized people. Lock is blocked for
5 minutes if wrong password / card is entered three times consecutively.
Factory default is that this feature is not active. Press 3 - 0
Delete All Uvser Cards: Press 4 - 0
It deletes all user cards assigned in the Personal operation with card option.
Reset User Password: Press 4 - 1
User password is restored to default “1010” in the Cardless personal operation
option.
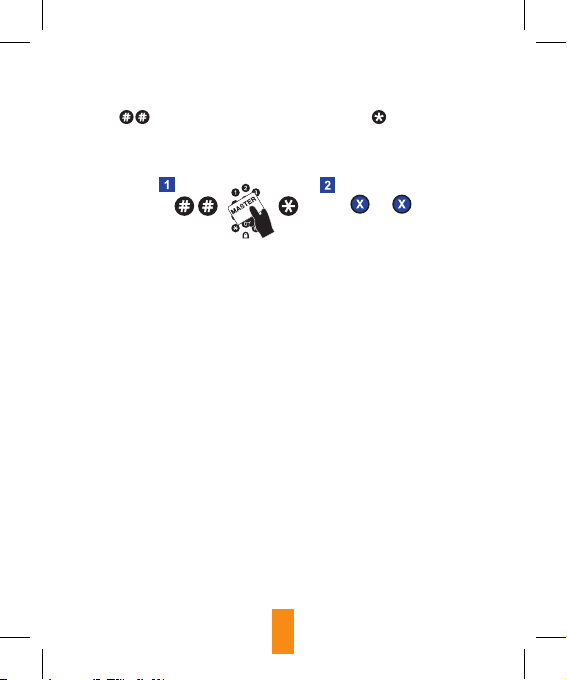
1- Press , present the master card and then press ,
green and red leds blink.
2- Enter the program number to be customized and then enter the selected
settings number. (Press Program Number and then Selection Number)
Programming instructions:
13

Locking with password / card: (1) Press 6 - 0
Locking operation require a password / card to lock.
Automatic Locking (without password/card): (1) Press 6 - 1
Locking operation does not require a password / card to lock.
Warning of open door : (1) Press 7 - 1
After door is open for one minute, lock gives an audible warning to user
with 8 beeps every seconds to notify user that the door has been left open.
Factory default is that this feature is not active. Press 7 - 0
Resetting User Password with Service card usage: (1), (2) Press 8 - 1
When the lock is unlocked with the service card, the user password is
reset. The user password is restored to default, which is “1010”.
Factory default is that this feature is not active. Press 8 - 0
Blocking the lock : (2) Press 9 - 1
If lock opened with service card, it can be blocked from further user card
access.This would insure service card is only used to access locks for
emergency lockouts. Master card access would then be required to set
up user card again.
Factory default is that this feature is not active. Press 9 - 0
(1): valid for personal operation with card or cardless personal operation options.
(2): valid if any service card is active.
Light and audio warning:
Password / card is accepted Green LED blinks with 2 repeated audio warnings.
Wrong password / card Red LED blinks with 4 repeated audio warnings.
Low batterty Red LED blinks 5 times after each operation.
Lock is open
8 audio warnings heard at every second (K10m)
/ every 5 seconds (K10p) after one minute of
opening the lock.
14

01
Factory Settings:
Prog. No 1-1: Locker mode operation with card
Prog. No 2-1: Audible beeps and conrmations
Prog. No 3-0: Penalty operation PASSIVE
Prog. No 4-0: Delete all user card
Prog. No 5-0: Service card PASSIVE
Prog. No 6-1: Locking with password
Prog. No 7-0: Warning of open door PASSIVE
Prog. No 8-0: Resetting User Password with Service card usage PASSIVE
Prog. No 9-0: Lock block PASSIVE (if service card is active)
1
0Personal Operation with card (individual operation)
1Locker Mode Operation with card (multiple user)
2Cardless Personal Operation (individual operation)
3Cardless Locker Mode Operation (multiple user)
4Locker Mode Operation with Card or Password
20Mute Operation
1Audible Operation
30Penalty PASSIVE
1Penalty ACTIVE
40Delete all user cards
1User password is restored to default, which is “1010”
5
0Service Card PASSIVE / DELETE
1Assignment of 1.Service Card
2Assignment of 2.Service Card
3Assignment of 3.Service Card
60Locking with Password
1Automatic Locking
70Warning of door open PASSIVE
1Warning of door open ACTIVE
80Resetting User Password with Service card usage PASSIVE
1Resetting User Password with Service card usage ACTIVE
90Block the Lock PASSIVE (if service card is active)
1Block the Lock ACTIVE (if service card is active)
PROG. NO
SELECT. NO
15
Maintenance:
General warnings:
Cams:
Other:
Clean front of lock with a mild damp cloth with detergent if needed.
Use only Ethanol (Ethyl Alcohol) for disinfecting.
Do not use any hard or scratching cleanser.
Do not clean with chemical materials that melt plastic (thinner, acetone, etc.)
Be careful not to spill water on lock.
Read manual before using lock.
Periodically check nuts and screws to be tightened.
Do not over-tighten nuts or screws. Do not use an electric screw gun during
installation unless equipped with a torque adjuster.The maximum torque on
the cylinder screw is 2Nm.
Not possible for front side of lock to be opened
by breaking or trying to force open lock.
Use CR2450 3.0V Lithium batteries.
Two cams are included
Cams can be placed at
increments of 90 degrees
The Stop Cam (#4) in installation
instructions can be positioned for turning
the cam clockwise or counter-clockwise
Battery failure override- The miniK10 has 2 external nodes surrounding the red and
green indicator lights where an external battery can be connected long enough to
enter in the correct code to open the lock allowing new batteries to be installed
7/8” Straight
Cam 22mm
1-1/2” Straight
Cam 38mm
ATTENTION:
In case of any failure, inform the vendor in writing of the detailed description of
the failure. In case of any intervention in the device, such as attempting to repair
the device, the device gets OUT OF WARRANTY.
16

Limited warranty:
Liability limits:
Vemus Ltd. oers a one year limited warranty all products to be free from man-
ufacturing defects in materials and workmanship. This warranty does not cover
the battery, lost combinations or damages caused by improper mounting,
improper or unreasonable use.
This is a limited warranty and is in lieu of all other warranties (including the
implied warranties of merchantability and tness for use) and under no
circumstanc es shall Kilitronik be liable for any incidental or consequential
damages or losses.
ATTENTION
(*) Battery life may vary in accordance with battery brand, programming
parameters and environmental conditions of the product is used.
ATTENTION
Remember to write down your passwords after programming and prior to in-
stalling lock.It is not possible to open lock if it is in installed and you forget your
passwords.
ATTENTION
miniK10 is made for only interior usage.
Technical specications:
Weight 70,4 g (2.48 oz) (excluding cam and mounting)
Key Pad Silicone Keypad with metal dome
Operating Temperature +10 / +50 °C (50 - 122 °F)
Storage Temperature +0 / +60 °C (32 - 140 °F)
Operating Moisture 20% - 80% Rh (without condensation)
Replaceable Battery 3V Lithium CR2450
Battery Life (*) At least 5 years (for 10 uses a day)
17
Thank you
Congratulations for making this eco-friendly choice! By purchas-
ing a miniK10, you will prevent additional batteries going to
the landlls over the up to 5 years. This period may be reduced
according to battery performance, environmental conditions and
frequency of use.
K10m Appropriate card:
MIFARE Classic®, MIFARE® DESFire® cards...
K10p card specications:
Transponder Chip EM4100 Compatible
Frequency 125Khz
ID Size 64 bit Read Only
Encoding Manchester Encoding
18
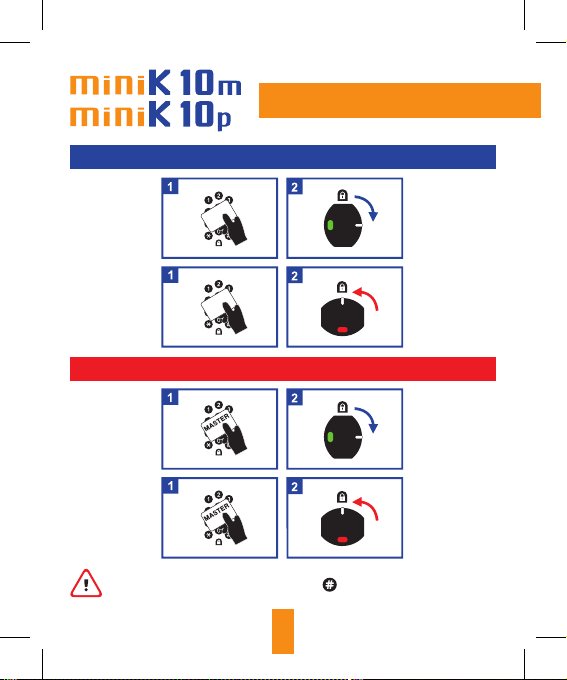
LOCKING / UNLOCKING WITH USER CARD
LOCKING / UNLOCKING WITH MASTER CARD
quick info
If cardless personal operation option or cardless locker mode operation
option is selected, you should press button at rst to lock and
unlock by using the master card.
19

20
This manual suits for next models
1
Table of contents
Other setro Lock manuals

Popular Lock manuals by other brands

Simons Voss Technologies
Simons Voss Technologies PegaSys 2.1 quick guide

Andersen
Andersen 400 Series Change guide

SCS Sentinel
SCS Sentinel XO 404 Installation and operation manual

ZKTeco
ZKTeco AL10B user manual

Yale
Yale Assure Lock Lever Touchscreen YRL226 Installation and programming instructions

Borglocks
Borglocks BL2605MG Installation Guide, Parts List & Maintenance Instructions


