Sevenoak SKM-W1 User manual

2021 Sevenoak inc.Visit us on the
web at www.sevenoak.biz
SKM-W1
Ultracompact 2.4GHz Wireless
Microphone System
2.4GHz迷你无线麦克风套装

Thank you for purchasing Sevenoak!
Please read this manual carefully before using and strictly operate and store in
accordance with the instructions. Please save the manual for future reference.
If the user manual can not help you to solve problems, please ask your retailer for
further assistance or email us: www.sevenoak.biz.
1. Please do not dismantle the outer case.
2. Don't place this unit close to heat sources such as heater, oven, or other devices
that produce heat.
3. Please do not replace the battery on your own.
4. Only use a soft, dry cloth to clean the product.
5. When using and storing, please pay attention to dust and moisture.
The Sevenoak SKM-W1 is an ultracompact and portable 2.4GHz wireless lavalier
microphone system. Used with dierent detachable adapters, it is compatible with
multiple devices such as smartphones, tablets and cameras. The SKM-W1 is ideal for
live video streaming, Vlog creation, and other audio capturing applications.
2.4GHz wireless transmission technology
Ideal for live video streaming, Vlog creation, etc
Built-in professional microphone
Detachable adapter for multi-device compatibility
Mute function & gain control
Compact and easy to carry
Statement
Cautions
Introduction
Features
01

Fur Windshield
×1
SKM-W1 TX
×1
SKM-W1 RX
×1
3.5mm
TRS Adapter
×1
11.8’’ (30cm) Type-C
to USB-A Charging Cable
×2
Carrying Case
×1
User Manual
×1
Warranty Card
×1
User manual
Packing List
02
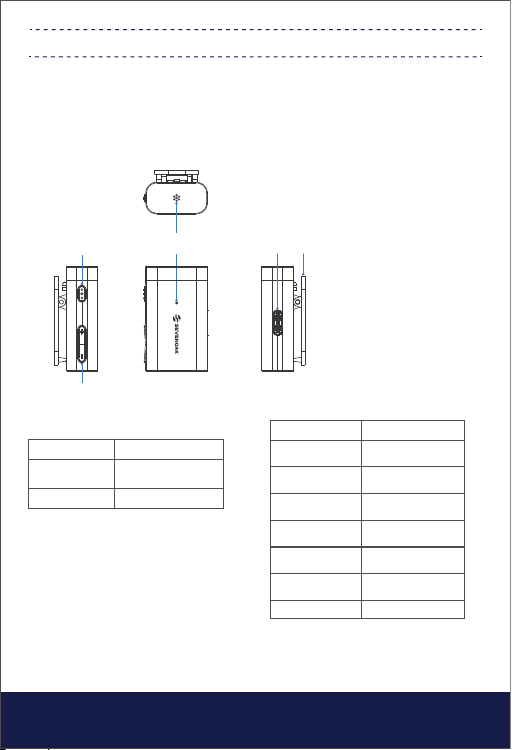
1. SKM-W1 TX
The SKM-W1 TX is an ultracompact and easy-to-use wireless lavalier transmitter.
It features the functions of mute and gain control. With a high-quality built-in
microphone, it can realize the best possible wireless transmission.
⑤ Type-C Charging Port
⑥ Belt Clip
Mode
Unpaired
Pairing
Paired
Successfully
Mute ON
Low Battery
Charging
Fully Charged
Indicator Status
Slowly flashing
blue light
Quickly flashing
blue light
Solid blue light
Slowly flashing
red light
Quickly flashing
red light
Solid red light
Light o
① Power/Mute Button
② +/-Button
③ Built-in Microphone
④ Indicator
Function
Power ON/OFF
Mute ON/OFF
Operation
Press and hold the
button for 3 seconds
Press the button
Adjusts gain for microphone level
input.
The setting is retained even after
the power is turned o.
②
①④
③
⑤ ⑥
Product Structure
03

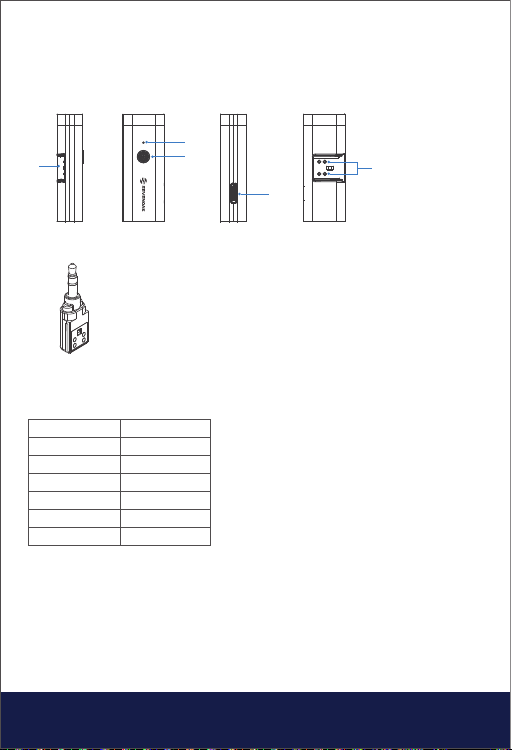
2. SKM-W1 RX
SKM-W1 RX is an ultracompact wireless receiver. Used with dierent detachable
adapters, it is compatible with multiple devices such as smartphone and camera.
③
②
①
④
⑥
⑤
②Power Button
① Indicator
Mode
Unpaired
Pairing
Paired
Successfully
Low Battery
Charging
Fully Charged
Indicator Status
Slowly flashing
blue light
Quickly flashing
blue light
Solid blue light
Quickly flashing
red light
Solid red light
Light o
③Type-C Charging Port
④Adapter Slot
⑤Contacts
⑥3.5mm TRS Adapter
Press and hold the button for 3 seconds to turn
on/o the SKM-W1 RX.
For DSLR, camcorder, recorder and other devices
with a 3.5mm TRS jack.
04
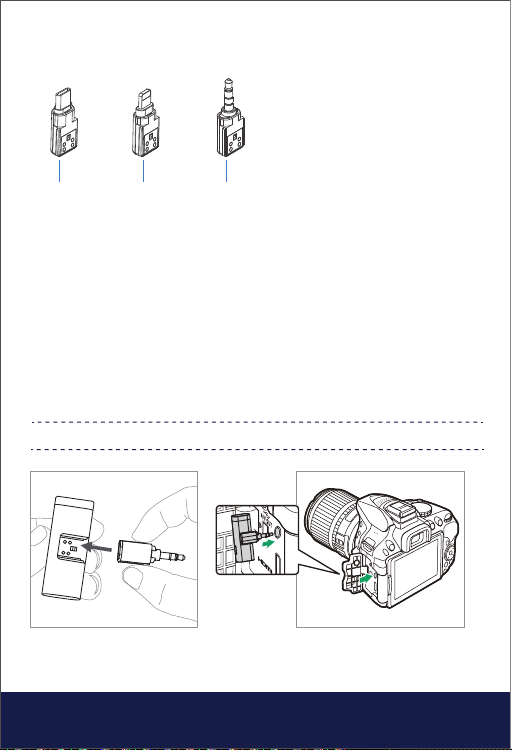
Note: Lightning adapter, 3.5mm TRRS adapter and Type-C adapter are not included,
please purchase separately if needed.
Optional Accessories
② ③①
①TYPE-C Adapter
For most Android phones and other Type-C devices.
②MFi Certificated Lightning Adapter
For iPhone, iPad, iPod.
③3.5mm TRRS Adapter
For smartphone, laptop, tablet and other devices with a 3.5mm TRRS jack.
05
Accessories Installation

Operation Guide
1. Press and hold the Power button for 3 seconds to turn on the transmitter TX.
2. Insert the right adapter into the receiver RX according to your needs (Please refer to
“Accessories Installation” for detailed operation). Press and hold the Power button for
3 seconds to turn on the receiver RX.
3. Transmitter and Receiver pairing
Before leaving factory, the system has been paired successfully. If they are
disconnected or unpaired, please see below for pairing instructions:
①With the system powered on, double-click the Power button of the receiver. The
receiver indicator will flash rapidly in blue.
②When the receiver indicator flashes rapidly in blue, double-click the Power button
of the transmitter to enter pairing mode. When paired successfully, the indicators will
be in a solid blue state.
4. Connect the receiver to your camera.
5. You are ready to record.
Note: Due to 2.4GHz wireless frequency, signal can be easily attenuated. Please try to
avoid obstacles, such as walls and buildings, and avoid close proximity to devices with
2.4GHz signal, such as high-power wifi antennas, smartphones with wifi in use, radios,
etc.
06
This device complies with part 15 of the FCC Rules. Operation is subject to the
following two conditions:(1) This device may not cause harmful interference, and (2)
this device must accept any interference received, including interference that may
cause undesired operation.
Any Changes or modifications not expressly approved by the party responsible for
compliance could void the user's authority to operate the equipment.
This equipment has been tested and found to comply with the limits for a Class B
digital device, pursuant to part 15 of the FCC Rules. These limits are designed to
provide reasonable protection against harmful interference in a residential
installation. This equipment generates uses and can radiate radio frequency energy
and, if not installed and used in accordance with the instructions, may cause harmful
interference to radio communications. However, there is no guarantee that
interference will not occur in a particular installation. If this equipment does cause
harmful interference to radio or television reception, which can be determined by
turning the equipment o and on, the user is encouraged to try to correct the
interference by one or more of the following measures:
FCC Warning

Specifications
Transmission Type
Polar Pattern
Frequency Response
SNR
Sensitivity
Operating Range
RF Output Power
Battery Life
Battery Capacity
Charging Port
Dimensions
Weight
Operating Temperature
Storage Temperature
2.4GHz
Built-in Microphone: Omnidirectional
20Hz-16kHz
>80dB
-42dB
30m (without obstacle)
3.16mW
TX: About 4 Hours
RX: About 4 Hours
TX: 85mAh
RX: 65mAh
Type-C
TX: 38×23.1×16mm
RX: 48×18.4×11.7mm
TX: 8g
RX: 11g
0℃to 50℃
-20℃to +55℃
07
- Reorient or relocate the receiving antenna.
- Increase the separation between the equipment and receiver.
- Connect the equipment into an outlet on a circuit dierent from that to which the
receiver is connected.
- Consult the dealer or an experienced radio/TV technician for help.
The device has been evaluated to meet general RF exposure requirement. The
device can be used in portable exposure condition without restriction.
FCC ID: 2ARN3-SKM-W1RX

声明
感谢您选择七棵橡树!
请在使用前仔细阅读本手册,并严格按照说明进行操作和存储。请妥善保存好说明书
以供将来参考。 如果用户手册不能帮助您解决某些问题,请向零售商寻求帮助或给我
们发送电子邮件:www.sevenoak.biz。
注意事项
1.请勿擅自拆开机壳;
2.请勿将本机靠近热源,如加热器、烤箱或其他产生热量的设备;
3.电池不可自行更换;
4.请使用柔软的干布清洁本设备;
5.在使用和储存时,请注意防尘和防潮。
简介
七棵橡树SKM-W1是一款小巧便携的2.4GHz无线领夹式麦克风系统。搭配不同类型可
拆卸转接头,可兼容智能手机、平板电脑、相机等多种设备。七棵橡树SKM-W1适用于
手机直播、视频内容创作等应用场景。
特点
2.4GHz信号传输技术
手机直播、视频创作的理想选择
内置专业数字硅麦
搭配不同转接头,可实现多设备兼容性
具备静音、增益调节功能
体积小巧,便于携带
08
08

包装清单
09
3.5mm
TRS 转接头
×1
防风毛套
×1
SKM-W1 TX
×1
SKM-W1 RX
×1
30cm Type-C
转 USB-A充电线
×2
拉链包
×1
用户手册
×1
保修卡
×1
User manual
09

① 电源/静音键
② +/-键
③ 内置麦克风
④ 指示灯
麦克风增益调节。
即使在电源关闭后,该参数设定仍
然保留。
功能
开/关机
静音开启/关闭
操作
长按电源键3秒
短按电源键
⑤ 充电孔(标准Type-C接口)
⑥ 背夹
模式
未联机状态
对码中状态
联机成功状态
静音开启状态
低电量状态
充电状态
充满电状态
指示灯状态
蓝灯慢闪
蓝灯快闪
蓝灯常亮
红灯慢闪
红灯快闪
红灯常亮
红灯熄灭
10
产品结构
1.领夹式发射器(SKM-W1 TX)
SKM-W1 TX是一款小巧便携的领夹式无线发射器,具有一键静音、增益调节等功能,
产品内置高品质数字硅麦,无须外接麦克风,操作简便,可实现最佳的无线传输效果
。
②
①④
③
⑤⑥
10
2. 便携式接收器(SKM-W1 RX)
SKM-W1 RX是一款超紧凑型无线接收器。搭配不同可拆卸转接头使用,可与智能手
机和相机等多种设备兼容。
② 电源键
③ 充电孔(标准Type-C接口)
④ RX转接头卡槽
⑤ 触点
⑥ 3.5mm TRS转接头
适配单反、摄像机、录音笔以及其他带
3.5mm TRS插孔的设备。
长按电源键3秒,使产品开机/关机。
① 指示灯
模式
未联机状态
对码中状态
联机成功状态
低电量状态
充电状态
充满电状态
指示灯状态
蓝灯慢闪
蓝灯快闪
蓝灯常亮
红灯快闪
红灯常亮
红灯熄灭
11
③
②
①
④⑤
⑥
11

注意:Lightning转接头、3.5mm TRRS转接头、Type-C转接头
不包括在内,请根据需要自行购买。
① TYPE-C转接头
适配主流安卓手机以及其他TYPE-C设备。
② MFi认证Lightning转接头
适配 iPhone, iPad, iPod等苹果设备。
③ 3.5mm TRRS转接头
适配手机、笔记本、平板以及其他带3.5mm TRRS插孔的设备。
3. 可选配组件
② ③①
08
12

配件安装指南
操作指南
1.长按电源键3秒,启动发射器。
2.参考“配件安装指南”,根据需要将正确的转接头插入接收器。长按电源键3秒,启动
接收器。
3.发射器和接收器配对。
发射器和接收器在出厂默认设置是已配对成功,若无成功连接,请进行下一步配对操
作:
①在发射器和接收器开机状态下,双击接收器电源键,接收器指示灯呈蓝灯快闪;
②在接收器指示灯呈蓝灯快闪状态时,双击发射器电源键,发射器和接收器会在10秒
内完成对码。当配对成功,指示灯呈蓝灯常亮。
4.将接收器连接至相机。
5.可以开始录音。
注意: 由于在2.4GHz频谱下,信号很容易受干扰,请尽量避开墙壁和建筑物等障碍物
,避免接近2.4GHz频率的设备,如大功率WiFi天线、正在使用WiFi的智能手机、收音
机等。
09 13

参数
传输类型
拾音模式
频率响应
信噪比
灵敏度
操作范围
射频输出功率
电池续航
电池容量
充电接口
尺寸
重量
操作温度
储存温度
2.4GHz
内置麦克风:全向型
20Hz-16KHz
>80dB
-42dB
30米(无障碍)
3.16mW
TX: 约4小时
RX: 约4小时
TX: 85mAh
RX: 65mAh
Type-C
TX: 38×23.1×16mm
RX: 48×18.4×11.7mm
TX: 8g
RX: 11g
0℃ - 50℃
-20℃ - 55℃
14

SHENZHEN JIAYZ PHOTO INDUSTRIAL., LTD.
The SEVENOAK logo is a trademark which is registered and owned by
Shenzhen Jiayz Photo Industrial., Ltd.
深圳市长丰影像器材有限公司 地址: 广东省深圳市龙华区观澜街道大富
社区硅谷动力智能终端产业园A16栋
TEL: 400 6131096
www.sevenoak.biz
2021 Sevenoak inc.Visit us on the
web at www.sevenoak.biz
This manual suits for next models
2
Table of contents
Popular Microphone System manuals by other brands


Auburn Gear
Auburn Gear Power Wheel Model 8 Service manual

Twin Disc
Twin Disc Technodrive TMC 40M operating manual

CSI
CSI FIBERLINK XA-1900 user manual

Shure
Shure PSM1000 manual

Lucent Technologies
Lucent Technologies TransTalk 9000 installation instructions

Wharfedale Pro
Wharfedale Pro CONTACT 502A Operating manual and user guide