SEVERIN HV 7173 User manual

Kabelloser 2-in1-Hand- und Stielsauger 5
Cordless 2-in-1 handheld and stick vacuum cleaner 13
Aspirateur à main et à manche sans fil 2 en 1 20
Snoerloze 2 in-1 hand- en steelstofzuiger 28
Aspirador de mano y escoba sin cable 2 en 1 35
Aspirapolvere verticale senza fili 2 in 1 43
Ledningsfri 2-i-1 hånd- og stangstøvsuger 51
Batteridriven 2-i-1 hand- och skaftdammsugare 58
Akkukäyttöinen “2-in1” -käsi- ja varsi-imuri 65
Aspirador portátil e em bastão, sem fio, 2 em 1 72
Bezprzewodowy odkurzacz ręczny i pionowy 2 w 1 80
Ασύρματη ηλεκτρική σκούπα χειρός 2 σε 1 με κοντάρι 88
142 x 208 mm
ART.-NO. HV 7173
DE Gebrauchsanleitung
GB Instructions for use
FR Mode d’emploi
NL Gebruiksaanwijzing
ES Instrucciones de uso
IT Manuale d’uso
DK Brugsanvisning
SE Bruksanvisning
FI Käyttöohje
PT Manual de instruções
PL Instrukcja obsługi
GR Oδηγίες χρήσεως

2
142 x 208 mm
2
I
6
9
10
5
4
3
1
8
7
11
12
15
14
13

3
142 x 208 mm
II

4
142 x 208 mm
Technische Daten / Technical Data / Caractéristiques techniques / Technische gegevens /
Datos técnicos / Dati tecnici / Tekniske data / Tekniska data / Tekniset tiedot /
Dados técnicos / Dane techniczne / Τεχνικά χαρακτηριστικά
Art.Nr. / Item no. / Art. nº / Art.nr. / Nr. º Art. / Num. art. / Artikelnr. / Art.nr. / Tuotenro /
N.º Art.º / Nr art. / Αρ. πρ. HV 7173
Li-Ionen Akku / Lithium-ion battery / Batterie aux ions lithium / Li-ion-accu /
Batería de Li-Ion / Batteria ricaricabile agli ioni di litio / Li-ion-akku / Li-jonbatter /
Litiumioniakku / Bateria de iões de lítio / Akumulator litowo-jonowy /
Επαναφορτιζόμενη μπαταρία ιόντων λιθίου
18,5 V
2.200 mAh
Netzteil / Mains adapter / Bloc d’alimentation / Voeding / Fuente de alimentación /
Alimentatore / Strømforsyning / Nätdel / Verkkolaite / Fonte de alimentação / Zasilacz /
Τροφοδοτικό
22,5 V DC
500 mA
Leistung / Power / Puissance / Vermogen / Potencia / Potenza / Effekt / Effekt / Teho /
Potência / Moc / Ισχύς 120 W
Kapazität Staub / Dust capacity / Volume poussière / Capaciteit stof / Capacidad para
polvo / Capacità di raccolta polvere / Støvkapacitet / Kapacitet damm / Pölykapasiteetti /
Capacidade de pó / Pojemność dla pyłu / Χωρητικότητα συγκέντρωσης σκόνης
600 ml
Saugkraft / Suction power / Puissance d’aspiration / Zuigkracht / Fuerza de aspiración /
Forza di aspirazione / Sugekraft / Sugkraft / Imuvoima / Potência de sucção / Siła ssąca /
Ισχύς αναρρόφησης
8 kPa
Laufzeit / Runtime / Autonomie / Looptijd / Tiempo de funcionamiento / Durata / Driftstid /
Drifttid / Käyttöaika / Autonomia / Czas pracy / Αυτονομία
~ 18 Min. (Power-Modus)
~ 18 min (Power mode)
~ 18 min (mode Power)
~ 18 min. (Power-modus)
~ 18 min (modo Power)
~ 18 min (modalità Power)
~ 18 min. (Power-tilstand)
~ 18 min (Power-läge)
~ 18 min (Power-tila)
~ 18 minutos (modo Power)
~ 18 min (tryb Power)
~ 18 min (λειτουργία Power)
~ 32 Min. (Eco-Modus)
~ 32 min (Eco mode)
~ 32 min (mode Eco)
~ 32 min. (Eco-modus)
~ 32 min. (modo Eco)
~ 32 min (modalità Eco)
~ 32 min. (ECO-tilstand)
~ 32 min. (Eco-läge)
~ 32 min (Eco-tila)
~ 32 minutos (modo Eco)
~ 32 min (tryb Eco)
~ 32 min. (λειτουργία Eco)
Nur verwenden mit Netzteil / Use only with the power
supply unit / N’utilisez l’appareil qu’avec le bloc d’alimentation /
Alleen gebruiken met netvoeding / Utilícela únicamente con fuente de
alimentación / Da utilizzare solo con l’alimentatore / Må kun anvendes
med strømforsyning / Används bara med nätdel / Käytä vain verkko-
osan kanssa / Utilizar apenas com fonte de alimentação / Stosować
wyłącznie z zasilaczem / Να χρησιμοποιείται μόνο με το τροφοδοτικό
SEU 012A-22 50 50

5
142 x 208 mm
Kabelloser 2-in1-Hand- und Stielsauger
Liebe Kundin, lieber Kunde,
die Gebrauchsanweisung sorgfältig vor der Benutzung des Gerätes durchlesen und
für den weiteren Gebrauch aufbewahren. Das Gerät darf nur von Personen benutzt
werden, die mit den Sicherheitsanweisungen vertraut sind.
Sicherheitshinweise
Bestimmte Personengruppen
∙Dieses Gerät kann von Kindern ab 8 Jahren und von Personen mit verminderten
körperlichen, sensorischen oder geistigen Fähigkeiten oder Mangel an Erfahrung
und/oder Wissen bedient werden, wenn sie beaufsichtigt werden oder auf den
sicheren Gebrauch des Geräts hingewiesen wurden und die damit verbundenen
Gefahren kennen.
∙Kinder dürfen nicht mit dem Gerät spielen oder sich auf das Gerät stellen oder
setzen.
∙Reinigung und Benutzer-Wartung dürfen nicht durch Kinder ohne Beaufsichtigung
durchgeführt werden.
∙Kinder unter 8 Jahren müssen vom Gerät sowie vom Netzteil ferngehalten werden.
∙Verpackungsmaterial darf nicht zum Spielen verwendet werden. Es besteht
Erstickungsgefahr.
Gerät sicher anschließen
Das Gerät wird mit elektrischem Strom aufgeladen, dabei besteht grundsätzlich die
Gefahr eines elektrischen Schlags.
Deshalb:
∙Gerät und Netzteil vor dem Benutzen auf eventuelle Beschädigungen kontrollieren.
Niemals ein defektes Gerät oder ein Gerät mit defektem Netzteil betreiben.
∙Netzteil nur an Steckdosen anschließen, die den Angaben auf dem Typenschild
des Netzteils entsprechen.
∙Niemals versuchen, Gerät oder Netzteil eigenständig zu reparieren. Um
Gefährdungen zu vermeiden, dürfen Reparaturen an Gerät und Netzteil nur durch
unseren Kundendienst durchgeführt werden. Ein defektes Gerät zur Reparatur
an einen Fachhändler geben oder Kontakt mit dem SEVERIN-Kundendienst
aufnehmen (siehe Service-Adressen im separaten Garantieheft oder auf
www.severin.de).
DE

6
142 x 208 mm
∙Gerät oder Netzteil nicht in Wasser oder andere Flüssigkeiten tauchen oder mit
Flüssigkeiten behandeln. Gerät und Netzteil von Regen und Nässe fernhalten.
Gerät und Netzteil nicht im Freien oder in Räumen mit hoher Luftfeuchtigkeit
betreiben.
∙Gerät und Netzteil nicht mit nassen Händen anfassen. Beim Herausziehen des
Netzteils aus der Steckdose immer direkt am Netzteil ziehen.
∙Darauf achten, dass das Kabel des Netzteils nicht geknickt, eingeklemmt oder
überfahren wird oder mit Hitzequellen, Feuchtigkeit oder scharfen Kanten
in Berührung kommt. Darauf achten, dass das Kabel des Netzteils nicht zur
Stolperfalle wird.
∙Vor dem Reinigen oder Warten des Geräts sowie vor dem Zubehörwechsel Gerät
ausschalten und sicherstellen, dass das Netzteil nicht angeschlossen ist.
Sicherheit beim Umgang mit Akkus
∙Bei falschem Umgang mit Akkus besteht Verletzungs- und Explosionsgefahr.
∙Dieses Gerät enthält einen Akku, der nur von geschulten Personen ausgetauscht
werden kann.
∙Den Akku nicht aus dem Gerät entfernen. Den Akku niemals durch andere Akkus
oder Batterien ersetzen. Akkus niemals kurzschließen, d.h. nicht die Pole zur
gleichen Zeit berühren, insbesondere nicht mit elektrisch leitenden Gegenständen.
∙WARNUNG! Zum Auaden des Akkus ausschließlich das mitgelieferte Netzteil
verwenden (siehe Technische Daten). Den Akku keinesfalls mit einem anderen
Netzteil laden. Das mitgelieferte Netzteil wiederum ausschließlich zum Auaden
des Akkus verwenden.
∙Das Gerät mit Akku nach Lebensdauer-Ende umgehend an eine entsprechende
Sammelstelle in Ihrer Nähe übergeben und so einer sicheren und umweltgerechten
Entsorgung zuführen. Gerät mit Akku niemals über den Hausmüll entsorgen.
∙Das Gerät mit Akku niemals auseinandernehmen, hohen Temperaturen aussetzen
oder ins Feuer werfen.
∙Bei unsachgemäßem Umgang kann Flüssigkeit aus dem Akku austreten. Das
Gerät nicht länger verwenden, wenn es beschädigt ist oder gar Flüssigkeit austritt.
- Falls Flüssigkeit ausgetreten ist, Kontakt mit der Flüssigkeit vermeiden.
- Falls es zu Kontakt mit der Flüssigkeit gekommen ist, diese umgehend mit
reichlich Wasser abspülen. Bei Folgeerscheinungen (egal welcher Art) einen Arzt
aufsuchen.

7
142 x 208 mm
Rotierende Bürstwalze
Das Gerät besitzt eine angetriebene Bürstwalze in der Bodendüse. Diese kann
Verletzungen hervorrufen. Daher Folgendes beachten:
∙Vor der Reinigung oder der Wartung des Geräts sicherstellen, dass das Gerät
ausgeschaltet ist und nicht lädt.
∙WARNUNG! Darauf achten, dass zu keiner Zeit Körperteile unter die Bürstwalze
gelangen können.
∙Nicht in der Nähe von Kabeln, Leitungen und langen Fransen saugen. Zum einen
besteht die Gefahr, dass die Kabelisolierung beschädigt wird. Zum anderen
können sich diese Gegenstände in der Bürstwalze verfangen und so das Gerät
beschädigen.
LED-Beleuchtung
∙Im Handgerät und an der Bodendüse sind LEDs verbaut, die den Arbeitsbereich
vor dem Gerät ausleuchten.
∙Während des Betriebs nicht in die LEDs blicken.
∙Ein Austausch der LEDs ist nicht möglich.
Bestimmungsgemäße Verwendung
∙Das Gerät ist ausschließlich für die Verwendung im privaten Bereich bestimmt.
∙Das Gerät darf ausschließlich für das Reinigen auf ebenen, normal verschmutzten
Oberächen, kurzorigen Teppichen oder Polstern, die den Belastungen der rotie-
renden Bürste unbeschadet standhalten, genutzt werden.
∙Jede weitere Verwendung gilt als nicht bestimmungsgemäß und ist untersagt.
Um Verletzungen, Bränden und Schäden vorzubeugen, darf das Gerät nicht
eingesetzt werden für das Saugen von:
∙Menschen, Tieren oder Panzen. Gerät stets von sämtlichen Körperteilen, Haaren
und Kleidungsstücken (z.B. Schnürsenkeln) fernhalten. Nicht in Kopfnähe saugen.
∙glühenden, brennenden oder glimmenden Partikeln (wie z. B. Asche, Kohle,
Holzkohle, Zigaretten, Streichhölzer).
∙explosiven oder leicht entzündlichen Stoffen oder Toner.
∙spitzen Gegenständen wie Glassplittern, Nägeln oder Bauschutt.
∙Feinstaub wie Gips, Zement, feinster Bohrstaub oder Puder.
∙Wasser oder anderen Flüssigkeiten.

8
142 x 208 mm
Verboten ist außerdem:
∙Selbstständiges Umbauen oder Reparieren des Geräts oder des Netzteils.
∙Hineinstecken von Gegenständen in Öffnungen des Geräts. Hiervon
ausgenommen ist das dafür vorgesehene Zubehör.
∙Gebrauch, Aufbewahrung oder Auaden im Freien.
∙Benutzung des Gerätes ohne eingesetzte Filter.
Falls das Gerät defekt ist
∙Geben Sie ein defektes Gerät zur Reparatur an einen Fachhändler oder den
Kundendienst (Kontaktdaten im Anhang dieser Gebrauchsanleitung oder auf
www.severin.de).
CE-Kennzeichnung
Das Gerät entspricht den EU-Richtlinien, die für die CE-Kennzeichnung verbindlich
sind.
Geräteaufbau und Lieferumfang
1. Bedienfeld Handgriff
Ein-/Aus-Taster
Power-Modus H
Eco-Modus L
2. Taste zum Knicken des Handgriffs
3. Taste zum Lösen des Handgeräts vom Handgriff
4. Ladebuchse für Netzteil am Handgerät
5. Ein-/Aus-Schalter Handgerät
6. LED-Anzeige
7. Taste zum Lösen des Staubbehälters
8. LED-Leuchten
9. Staubbehälter mit innenliegendem Filter
10. lange Fugendüse
11. kurze Fugendüse
12. Bürstenaufsatz
13. Bodendüse mit Bürstwalze
14. Ladebuchse für Netzteil am Handgriff (Handgriff-Rückseite)
15. Gerät montiert
Ohne Abbildung:
Netzteil mit Netzstecker und Anschlussleitung
Gerät montieren und laden
Gerät montieren
∙Alle Verpackungsreste vom Gerät entfernen.
∙Gegebenenfalls Staubbehälter montieren (siehe Kapitel „Staubbehälter und Filter reinigen“), Filter einsetzen und
Filterabdeckung montieren.
Bei Benutzung als Handstaubsauger
∙Die lange oder kurze Fugendüse auf das Handgerät aufstecken.
∙Der Bürstenaufsatz kann auf die lange Fugendüse aufgesteckt werden, um z.B. Möbel abzusaugen.

9
142 x 208 mm
Bei Benutzung als Bodenstaubsauger
∙Das Handgerät mit der Saugöffnung nach unten in den Handgriff einsetzen, bis es einrastet.
∙Zum Lösen des Handgerätes nach dem Gebrauch die Taste drücken und das Handgerät abnehmen.
Tipp: Um bequem an tiefe Stellen zu gelangen oder das Gerät platzsparend zu verstauen, die Taste drücken, um den
Handgriff zu knicken.
Akku laden
Der Akku muss vor der ersten Verwendung über das Netzteil geladen werden. Akku am besten vor jedem Gebrauch
laden, insbesondere nach längerem Nichtgebrauch. Dies erhöht die Lebensdauer des Akkus und sorgt für möglichst lange
Reinigungszyklen.
1. Sicherstellen, dass das Gerät ausgeschaltet ist.
Laden mit Handgerät im Handgriff:
2. Sicherstellen, dass das Handgerät im Handgriff eingerastet ist. Den Netzteiladapter in die Ladebuchse am Handgriff
stecken.
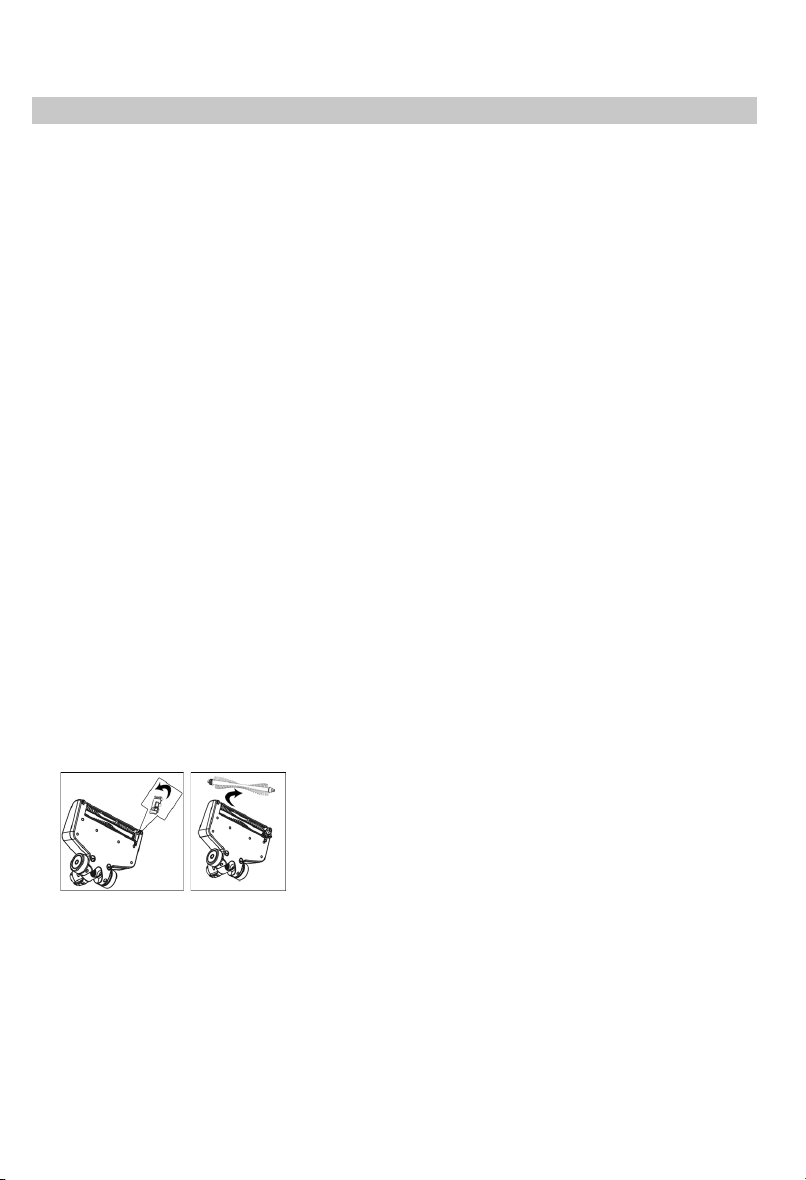
Laden des Handgeräts ohne Handgriff:
2. Den Netzteiladapter in die Ladebuchse am Gerät stecken.
3. Das Netzteil an einer Steckdose anschließen.
LED am Handgerät blinkt rot. Der Ladevorgang startet.
LED leuchtet dauerhaft grün, wenn der Akku vollständig geladen ist. Der Ladevorgang dauert bei leerem Akku ca. 5
Stunden.
Staubsaugen
TIPP! Stets die Reinigungs- und Pegehinweise der Bodenbelag-, Teppich- oder Möbelhersteller einhalten. Nur
unbeschädigte Düsen einsetzen. Beschädigte Düsen können Oberächen zerkratzen.
Tipp! Im Eco-Modus wird mit reduzierter Leistung gesaugt. Das Gerät verbraucht weniger Energie und die Betriebszeit des
Akkus verlängert sich.
Mit Handgerät saugen
1. Eine Fugendüse bzw. den Bürstenaufsatz mit der langen Fugendüse am Gerät anbringen.
2. Den Ein-/Aus-Schalter in Stellung I(Eco-Modus) oder II (Power-Modus) schieben, um das Gerät einzuschalten.
Das Gerät saugt.
Die LED am Handgerät leuchtet gelb (Eco-Modu) oder grün (Power-Modus).
3. Die Oberäche absaugen.
4. Den Ein-/Aus-Schalter auf Stellung OFF schieben, um das Gerät auszuschalten.
5. Das Zubehör abnehmen.
6. Den Staubbehälter entleeren und reinigen (siehe ‚Staubbehälter und Filter reinigen‘).
Mit Bodenstaubsauber saugen
1. Das Handgerät in den Handgriff einsetzen.
2. Den Ein-/Aus-Taster im Handgriff drücken, um das Gerät einzuschalten. Das Gerät startet im Eco-Modus.
3. Durch Drücken der Tasten Lund Hzwischen Eco-Modus (L) oder Power-Modus (H) umschalten.
Das Gerät saugt.
Die LED am Handgerät leuchtet gelb (Eco-Modus) oder grün (Power-Modus).
4. Die Oberäche absaugen.
5. Den Ein-/Aus-Taster im Handgriff drücken, um das Gerät auszuschalten.
6. Die Taste drücken und das Gerät vom Handgriff abnehmen.
7. Staubbehälter entleeren und reinigen (siehe ‚Staubbehälter und Filter reinigen‘).
TIPP: Zur mühelosen Reinigung unter Möbeln, die Taste drücken und den Handgriff nach vorn klappen.
∙Die LED am Handgerät blinkt, wenn die Akkuladung nachlässt und blinkt abwechselnd rot und grün, wenn der Akku leer
ist.
∙Das Gerät schaltet sich bei zu geringer Akkuladung automatisch ab. Dann den Akku laden. (siehe ‚Gerät montieren und
laden‘).

10
142 x 208 mm
Gerät reinigen und warten
Für schnelle Informationen zur Reinigung siehe Abbildung II am Anfang der Anleitung.
Staubbehälter leeren
Der Staubbehälter kann nur begrenzte Schmutzmengen aufnehmen.
Den Staubbehälter daher am besten nach jedem Reinigungsvorgang leeren.
1. Sicherstellen, dass das Gerät ausgeschaltet ist und das Gerät nicht lädt.
2. Das Handgerät vom Handgriff abnehmen.
3. Das Gerät mit Saugöffnung nach unten halten.
4. Die Entriegelungstaste drücken, um den Staubbehälter von der Motoreinheit zu trennen.
5. Den Staubbehälter abnehmen.
6. Den Filter und Filterhalter entnehmen.
7. Den Staubbehälter in einen Mülleimer entleeren.
Staubbehälter und Filter reinigen
Wir empfehlen die Filter nach jeder Benutzungen zu reinigen, spätestens aber, wenn bei vollem Akku die Saugleistung
nachlässt.
1. Sicherstellen, dass das Gerät ausgeschaltet ist und nicht lädt.
2. Den Staubbehälter entriegeln, entnehmen und leeren (siehe ‚Staubbehälter leeren‘).
3. Filterhalter samt Filter aus dem Staubbehälter nehmen.
4. Filter gegen den Uhrzeigersinn drehen, um ihn vom Filterhalter zu entriegeln.
5. Filter und Filterhalter über einem Mülleimer ausklopfen, ggf. Schmutz mit einer weichen Bürste entfernen.
6. Staubbehälter mit klarem Wasser ausspülen.
7. Wenn nötig, Filter in Seifenlösung auswaschen und schließen vollständig trocknen lassen.
8. Den vollständig trockenen Filter in den Filterhalter einsetzen und im Uhrzeigersinn verriegeln.
9. Filterhalter in den Staubbehälter einsetzen. Das Gerät darf nicht ohne eingesetzten Filter benutzt werden.
10. Staubbehälter wieder am Gerät verriegeln.
Bürstwalze in Bodendüse reinigen
Durch Verschmutzung kann sich die Bürstwalze möglicherweise nicht mehr frei drehen. Reinigen Sie die Bürstwalze
regelmäßig.
1. Sicherstellen, dass das Gerät ausgeschaltet ist und das Gerät nicht lädt.
2. Handgerät aus Handgriff entnehmen, sofern es eingesetzt ist.
3. Die Arretierung der Bürste an der Unterseite der Bodendüse lösen und die Bürste entnehmen.
4. Bürste von Haaren und Schmutz befreien, ggf. vorsichtig eine Pinzette oder Schere benutzen.
5. Bürste zuerst mit der runden Seite am Zahnrad der Bodendüse einsetzen. Dann die quadratische Seite der Bodendüse
auf der anderen Seite einsetzen.
6. Die Arretierung wieder einsetzen und herunterdrücken, bis sie hörbar einrastet.
Gerät reinigen
1. Sicherstellen, dass das Gerät ausgeschaltet ist und das Gerät nicht lädt.
2. Gehäuse und Handgriff mit einem leicht angefeuchteten Tuch abwischen und anschließend trockenreiben.
TIPP: Zur Reinigung keine scharfen, scheuernden Reinigungsmittel oder harte Bürsten verwenden.

11
142 x 208 mm
Gerät aufbewahren
∙Gerät und Zubehör kühl, trocken und außerhalb der Reichweite von Kindern aufbewahren.
∙Zum einfachen Verstauen die Taste drücken und den Handgriff einklappen.
Ersatzteile und Zubehör
Ersatzteile oder Zubehör können bequem im Internet auf unserer Website http://www.severin.de unter dem Unterpunkt
„Service Center / Ersatzteil-Shop“ bestellt werden.
Bestellnummer Zubehör/Ersatzteil
9814-048 Filter-Set
6982-048 Staubbehälter mit Filter
2361-048 Netzteil mit Anschlussleitung
3709-048 Bodendüse
3627-048 Bürstwalze für Bodendüse
0024-048 kurze Fugendüse
9812-048 lange Fugendüse
9811-048 Bürstenaufsatz
Probleme beheben
Probleme selbst beheben
Damit keine Probleme auftreten, ist es wichtig, den Staubbehälter rechtzeitig zu leeren sowie bei dieser Gelegenheit die
Filter zu kontrollieren und je nach Verschmutzung zu reinigen. Sollten Sie dennoch einmal Probleme mit dem Gerät haben,
überprüfen Sie anhand der folgenden Tabelle, ob Sie das Problem selbst beheben können.
Vor der Fehlersuche sicherstellen, dass das Gerät ausgeschaltet ist und nicht lädt.
Problem mögliche Ursache / Lösung
Gerät lässt sich nicht
einschalten.
Akku ist völlig leer, LED leuchtet nicht mehr. Gerät ausschalten und Akku laden. ►Kapitel
„Akku laden“
Gerät lässt sich nicht
laden (LEDs blinken
nicht).
Netzteil oder Gerät ist nicht korrekt eingesteckt. Prüfen, ob der Netzteiladapter korrekt in der
Ladebuchse des Handgeräts sitzt. Prüfen, ob Netzteil korrekt in der Steckdose sitzt.
Bei Verwendung der Ladebuchse auf der Rückseite des Handgriffs prüfen, ob der Stecker
richtig in der Ladebuchse sitzt und das Handgerät richtig eingerastet ist.
►Kapitel „Akku laden“
Akku ist voll, aber Gerät
nimmt kaum Schmutz auf.
Staubbehälter muss geleert oder Filter gereinigt werden. ►Kapitel „Gerät reinigen und
warten“
Betriebsdauer verkürzt
sich zunehmend.
Bürstwalze ist verschmutzt und muss gereinigt werden, ►Kapitel „Bürstwalze reinigen“
Filter muss gereinigt werden. ►Kapitel „Gerät reinigen und warten“
Bürstwalze dreht
sich langsam oder
unregelmäßig.
Bürstwalze ist verschmutzt und muss gereinigt werden. ►Kapitel „Bürstwalze reinigen“
Wenn Ihnen diese Tabelle nicht weiterhilft, wenden Sie sich an unsere Servicehotline an (siehe Kontaktdaten im separaten
Garantieheft).

12
142 x 208 mm
Entsorgen
Geräte und Akkus, die mit diesem Symbol gekennzeichnet sind, müssen getrennt vom Hausmüll entsorgt werden.
Diese Geräte und Akkus enthalten wertvolle Rohstoffe, die wiederverwertet werden können. Eine ordnungsgemäße
Entsorgung schützt die Umwelt und die Gesundheit Ihrer Mitmenschen. Gerät mit dem Akku separat zur
Entsorgung an die entsprechenden Sammelstellen geben. Ihre Gemeindeverwaltung oder Ihr Fachhändler gibt Auskunft zur
ordnungsgemäßen Entsorgung.

13
142 x 208 mm
Cordless 2-in-1 handheld and stick vacuum cleaner
Dear Customer,
Before using the appliance, read the following instructions carefully and keep this
manual for future reference. The appliance must only be used by those familiar with
the instructions below.
Safety instructions
Certain groups of persons
∙This appliance may only be operated by children over the age of 8 and by persons
with reduced physical, sensory or mental capacities or a lack of experience and/or
knowledge if they are supervised or have been instructed about the safe use of the
appliance and are aware of the dangers associated with its use.
∙Children are not allowed to play with the appliance or stand or sit on it.
∙Cleaning and user maintenance may not be performed by children without
supervision.
∙Children under the age of 8 must be kept away from the appliance and the mains
adapter.
∙The packaging material must not be used for play purposes. There is a risk of
suffocation.
Connecting the appliance safely
The appliance is charged with electrical current. Thus, there is a risk of electric
shock.
Therefore:
∙Check the appliance and mains adapter for possible damage before use. Never
operate a defective appliance or an appliance with a defective mains adapter.
∙Only connect the mains adapter to sockets which match the specications on the
mains adapter type plate.
∙Never attempt to repair the appliance or its mains adapter yourself. To prevent
hazards, repairs to the appliance and the mains adapter may only be made by our
customer service. Arrange repair of a defective appliance with a specialist dealer
or contact SEVERIN customer service (see our service addresses in the separate
warranty booklet or on www.severin.de).
∙Do not immerse the appliance or mains adapter in water or other liquids, or treat
with liquids. Keep the appliance and the mains adapter away from rain and wet
conditions. Do not operate the appliance and mains adapter outdoors or in rooms
GB

14
142 x 208 mm
with high humidity.
∙Do not handle the appliance or mains adapter with wet hands. When unplugging
the mains adapter from the socket, always pull directly on the plug.
∙Make sure that the cable of the mains adapter is not kinked, pinched or run over
and that it does not come in contact with sources of heat, humidity and sharp
edges. Make sure that the cable of the mains adapter does not become a trip
hazard.
∙Before cleaning or servicing the appliance and before changing accessories, switch
off the appliance and make sure that the mains adapter is not connected.
Safety when handling rechargeable batteries
∙If rechargeable batteries are handled improperly, there is a risk of injury and
explosion.
∙This appliance has a rechargeable battery that can only be replaced by trained
personnel.
∙Do not remove the battery from the appliance. Never replace the rechargeable
batteries with other rechargeable or non-rechargeable batteries. Never short-circuit
rechargeable batteries, i.e. never touch the poles at the same time, especially not
with objects that conduct electricity.
∙WARNING! Use only the included power supply unit to charge the battery (see
Technical Data). Never use another power supply unit to charge the batteries. The
power supply unit provided must, in turn, only be used to charge the appliance
batteries provided.
∙At the end of its useful life, take the appliance with the rechargeable battery to
an appropriate collection point nearby without delay, thus ensuring safe and
environmentally-appropriate disposal. Never dispose of the appliance with the
rechargeable battery in household waste.
∙Never take the appliance with the rechargeable battery apart, expose it to high
temperatures or throw it into the re.
∙If the battery is handled incorrectly, liquid may leak from it. Do not use the
appliance if it is damaged or leaking liquid.
- If liquid has escaped, avoid contact with the liquid.
- In case of contact with the liquid, rinse it off immediately with copious amounts of
water. In case of after effects (irrespective of type), consult a doctor.

15
142 x 208 mm
Rotating brush roller
The appliance’s oor nozzle has a powered brush roller. It can cause injuries.
Therefore, please note the following:
∙Before cleaning or maintaining the appliance, make sure that the appliance is
switched off and is not on charge.
∙WARNING! Always keep parts of your body clear of the brush roller.
∙Do not vacuum near cables, wires and long fringes. On the one hand, there is
a danger that the cable’s insulation will be damaged. On the other hand, these
objects can get caught in the brush roller and thereby damage the appliance.
LED lighting
∙The handset and the oor nozzle are tted with LEDs that illuminate the working
area in front of the appliance.
∙Do not look into the LEDs during operation.
∙It is not possible to exchange the LEDs.
Intended use
∙The appliance is intended solely for use in the private sphere.
∙The appliance should only be used for cleaning normally soiled at surfaces, short-
pile carpets or upholstery that can withstand exposure to the rotating brush without
damage.
∙Any other use is deemed improper and is forbidden.
In order to prevent injuries, res and damage, the appliance must not be used
to vacuum:
∙People, animals or plants. Always keep the device well away from all parts of the
body, and from hair and clothing (e.g. shoelaces). Do not use near to your head.
∙Glowing, burning or smouldering particles (such as ash, coal, charcoal, cigarettes,
matches).
∙Explosive or highly ammable substances or toners.
∙Sharp objects, such as glass splinters, nails or construction waste.
∙Fine dust, such as plaster, cement, ne drilling dust or powder.
∙Water or other liquids.
The following is also forbidden:
∙Independent alteration or repair of the appliance or its mains adapter.
∙Inserting objects into the appliance’s openings. The specially provided accessories
are the exception to this rule.
∙Use, storage or charging outdoors.
∙Use of the appliance without lters in place.

16
142 x 208 mm
If the appliance is defective
∙Have a defective appliance repaired by a specialist dealer or customer service (see
contact information in the appendix to this instruction manual or at
www.severin.de).
CE Marking
This device is compliant with the mandatory EU directives for CE marking.
Appliance parts and items included
1. Handpiece control panel
On/off button
Power mode H
Eco mode L
2. Button for bending the handpiece
3. Button for detaching the handset from the handpiece
4. Charging socket for the mains adapter on the handset
5. On/off switch on the handset
6. LED indication
7. Dust container release button
8. LED lights
9. Dust container with built-in lter
10. Long crevice tool
11. Short crevice tool
12. Brush attachment
13. Floor tool with brush roller
14. Charging socket for the mains adapter on the handpiece (back of the handpiece)
15. Assembled appliance
Not illustrated:
Mains adapter with mains plug and connection cable
Installing and charging the appliance
Assembling the appliance
∙Remove all packaging residues from the appliance.
∙Fit the dust container if necessary (see chapter “Cleaning the dust container and lter”), insert the lter and replace the
lter cover.
Using as a handheld vacuum cleaner
∙Attach the long or short crevice tool to the handset.
∙You can also t the brush attachment on the long crevice tool, e.g. to vacuum furniture.
Using as a oor vacuum cleaner
∙Fit the handset into the handpiece until it clicks into place with the suction opening facing downwards.
∙After use, press the button to detach the handset.
Tip: Press the button to bend the handpiece to easily reach recessed areas or fold up the unit for space-saving storage.
Charging the battery
Use the mains adapter to charge the battery before rst use. It is recommended to charge the battery before each use,
especially if the appliance has not been used for a while. This extends battery life and ensures the longest possible cleaning
cycles.

17
142 x 208 mm
1. Make sure that the appliance is switched off.
Charging the handset with the handpiece:
2. Check that the handset is securely locked into the handpiece. Plug the mains adapter into the charging socket on the
handpiece.
Charging the handset without the handpiece:
2. Plug the mains adapter into the charging socket on the appliance.
3. Connect the mains adapter to a power socket.
The handset LED ashes red. The charging process starts.
The LEDs light up green continuously if the rechargeable battery is fully charged. The charging process takes around 5
hours when the rechargeable battery is empty.
Vacuum cleaning
TIP: The oor nozzle can also be used without the suction tube in order to vacuum furniture, for instance. When doing so,
make sure that the surface can withstand the contact with the brush roller without sustaining damage.
Tip! In Eco mode, the vacuum cleaner operates at reduced power. The appliance draws less energy, and the battery runtime
is extended.
Vacuuming with a handset
1. Attach a crevice tool or the brush attachment with the long crevice tool to the appliance.
2. Push the on/off switch to position I(Eco mode) or II (Power mode) to power on the appliance.
The appliance sucks air.
The handset LED lights up yellow (Eco mode) or green (Power mode).
3. Vacuum the surface.
4. Push the on/off switch to position OFF to power off the appliance.
5. Remove the accessories.
6. Empty the dust container and clean it (see “Cleaning the dust container and lter”).
Vacuuming with a oor vacuum cleaner
1. Fit the handset into the handpiece.
2. Press the on/off button on the handpiece to turn on the appliance. The appliance runs in ECO mode.
3. Press the Land Hbuttons to toggle between Eco mode (L) and Power mode (H).
The appliance sucks air.
The handset LED lights up yellow (Eco mode) or green (Power mode).
4. Vacuum the surface.
5. Press the on/off button on the handpiece to turn off the appliance.
6. Press the button to detach the unit from the handpiece.
7. Empty the dust container and clean it (see “Cleaning the dust container and lter”).
TIP: Use the button to bend the handle forwards for easy cleaning under furniture.
∙The handset LED ashes when the battery is low and alternates between red and green when the battery is empty.
∙When the battery level is too low, the appliance powers off automatically. You should then charge the battery. (See
“Installing and charging the appliance”).

18
142 x 208 mm
Cleaning and maintaining the appliance
For a quick guide on cleaning, see Figure II at the beginning of the manual.
Emptying the dust container
The dust container can hold only a limited amount of dirt.
Therefore, it is reasonable to empty the dust container after each use.
1. Make sure that the appliance is switched off and is not on charge.
2. Remove the handset from the handpiece.
3. Hold the appliance with its suction opening facing downwards.
4. Press the release button to detach the dust container from the motor unit.
5. Remove the dust container.
6. Remove the lter and lter holder.
7. Empty the dust container into a dustbin.
Cleaning the dust container
We recommend cleaning the lters after each use or when the unit poorly sucks air when the battery is fully charged.
1. Make sure that the appliance is switched off and is not on charge.
2. Unlatch, remove and empty the dust container (See “Emptying the dust container”)
3. Remove the lter holder, together with the lter, from the dust container.
4. Turn the lter anti-clockwise to release it from the lter holder.
5. Knock out the lter and lter holder over a waste bin and remove any dirt with a soft brush as necessary.
6. Rinse the dust container with clean water.
7. If necessary, wash out the lter in soap solution and then allow it to dry completely.
8. When completely dry, insert the lter into the lter holder and lock it in place by turning it clockwise.
9. Fit the lter holder into the dust container. Never use the appliance without the lter in place.
10. Secure the dust container on the appliance again.
Cleaning the brush roller in the oor tool and the upholstery tool
Soiling may prevent the brush roller from rotating freely. Clean the brush roller regularly.
1. Make sure that the appliance is switched off and is not on charge.
2. Remove the handset from the handpiece if necessary.
3. Release the brush lock on the underside of the oor nozzle and remove the brush.
4. Remove any hair and dirt from the brush, using a pair of tweezers or scissors carefully, if necessary.
5. Fit the brush rst with the round side on the gear of the oor nozzle. Then attach the square side of the oor nozzle to the
other side.
6. Lock the brush back in place and press it down until it clicks into place.
Cleaning the appliance
1. Make sure that the appliance is switched off and is not on charge.
2. Wipe the housing and handpiece with a slightly damp cloth and then rub them dry.
TIP: Do not use any sharp, abrasive cleaning agents or hard brushes for cleaning.
Storing the appliance
∙Store the appliance and accessories in a cool, dry place out of the reach of children.
∙Press the button to fold up the handpiece for convenient storage.

19
142 x 208 mm
Order number Accessories/spare part
9814-048 Filter set
6982-048 Dust container with lter
2361-048 Mains adapter with connection cable
3709-048 Floor nozzle
3627-048 Brush roller for oor tool
0024-048 Short crevice tool
9812-048 Long crevice tool
9811-048 Brush attachment
Troubleshooting
Troubleshooting by yourself
To ensure that you do not encounter any problems, it is important to empty the dust container regularly and
take this opportunity to check the lters and clean them if they are dirty. However, if you do encounter any
problems with the appliance, use the following table to determine whether you can solve the problem yourself.
Before troubleshooting, ensure the unit is switched off and not charging.
Problem Possible cause / solution
Appliance cannotbe switched
on.
The battery is dead and the LED is off. Switch off the appliance and charge the battery.
►Chapter “Charging the battery”
The appliance cannot be
charged (LEDs do not ash).
The mains adapter or appliance is not correctly inserted. Check that the mains adapter
is correctly seated in the charging socket of the handset. Check that the mains adapter
is properly connected to the power outlet.
When using the charging socket on the back of the handpiece, check that the plug is
correctly seated in the charging socket and that the handset is correctly engaged.
►Chapter “Charging the battery”
The rechargeable battery is
fully charged but the appliance
is hardly picking up any dirt.
Empty the dust container or clean the lter. ►Chapter “Cleaning and servicing the
appliance”
Operating duration
is becoming ever shorter.
The brush roller is soiled and must be cleaned; ►chapter “Cleaning the brush roller”
Clean the lter. ►Chapter “Cleaning and servicing the appliance”
The brush rollerrotates slowly
or irregularly.
The brush roller is soiled and must be cleaned. ►Chapter “Cleaning the brush roller”
If this table does not help, please contact our service hotline (see contact details in the separate warranty booklet).
Disposal
Devices and batteries marked with this symbol must be disposed of separately from household waste. These
appliances and rechargeable batteries contain valuable raw materials that can be recycled. Proper disposal of
these items protects the environment and public health. Return the appliance and the rechargeable battery
separately to the appropriate collection points for disposal. Your local authority or dealer can provide information about
proper disposal.

20
142 x 208 mm
Aspirateur à main et à manche sans l 2 en 1
Chère cliente, Cher client,
Avant d’utiliser cet appareil, veuillez lire soigneusement les instructions suivantes et
conserver ce manuel pour future référence. L’appareil doit être utilisé uniquement par
les personnes ayant pris connaissance des conditions d’utilisation ci-dessous.
Consignes de sécurité
Groupes de personnes cibles
∙Les enfants âgés de 8 ans et plus ainsi que les personnes ayant des déciences
physiques, sensorielles ou mentales ou un manque d’expérience ou de
connaissances peuvent utiliser ce produit à condition d’être sous surveillance ou
d’avoir reçu des instructions concernant l’utilisation de l’appareil en toute sécurité
et de comprendre les dangers qui en résultent.
∙Il est interdit aux enfants de jouer avec l’appareil, ainsi que de monter ou de
s’asseoir dessus.
∙Le nettoyage et l’entretien de l’appareil ne doivent pas être exécutés par des
enfants sauf s’ils ont plus de 8 ans et sont sous surveillance.
∙Les enfants de moins de 8 ans ne doivent pas s’approcher de l’appareil, ni du bloc
d’alimentation.
∙Ne pas jouer avec le matériel d’emballage. Il existe un risque d’asphyxie.
Branchement de l’appareil en toute sécurité
L’appareil est chargé par du courant électrique, il existe donc un risque
d’électrocution.
Par conséquent :
∙Vériez avant usage que l’appareil et le cordon électrique sont exempts de défauts.
Ne mettez jamais en marche un appareil défectueux ou dont le bloc d’alimentation
est défectueux.
∙Branchez le bloc d’alimentation uniquement sur des prises de courant dont les
caractéristiques correspondent aux indications de la plaque signalétique du bloc
d’alimentation.
∙N’essayez jamais de pratiquer vous-même des réparations sur l’appareil ou sur le
bloc d’alimentation. Pour éviter tout risque, les réparations doivent être effectuées
exclusivement par notre SAV. Amenez l’appareil défectueux dans un magasin
spécialisé ou contactez le SAV de SEVERIN (voir les coordonnées du service dans
le carnet de garantie séparé ou sur le site web www.severin.de).
FR
Table of contents
Languages:
Other SEVERIN Vacuum Cleaner manuals

SEVERIN
SEVERIN 7169 User manual

SEVERIN
SEVERIN RB 7026 User manual

SEVERIN
SEVERIN SC 7171 User manual

SEVERIN
SEVERIN 7025 User manual

SEVERIN
SEVERIN 7157 User manual

SEVERIN
SEVERIN 7030 User manual

SEVERIN
SEVERIN CY 7089 User manual

SEVERIN
SEVERIN AH 7909 User manual

SEVERIN
SEVERIN AH 7908 - User guide

SEVERIN
SEVERIN RB7028 User manual

SEVERIN
SEVERIN BR 7948 User manual

SEVERIN
SEVERIN MY 7114 User manual

SEVERIN
SEVERIN 7025 User manual

SEVERIN
SEVERIN RB7025 User manual

SEVERIN
SEVERIN HV 7166 User manual

SEVERIN
SEVERIN CY 7103 User manual

SEVERIN
SEVERIN 7158 User manual

SEVERIN
SEVERIN BODENSTAUBSAUGER BR 7951 User manual

SEVERIN
SEVERIN SC 7172 User manual

SEVERIN
SEVERIN HV 7144 User manual