SEVERIN KS 9886 - CAVE A VIN User manual

Weintemperierschrank
Temperature-controlled wine cabinet
Armoire à vin avec régulation thermique
Temperatuur gecontroleerd wijn kabinet
Vinoteca con regulación de la temperatura
Cantinetta per vini a temperature controllata
Vinskab med termostat
Tempererat vinskåp
Lämpötilan säädöllä varustettu viinikaappi
Chłodziarka do win z regulatorem temperatury
Ντουλπι κρασιν ελεγχμενης θερμοκρασας
Винный шкаф с регулятором
температуры
Gebrauchsanweisung
Instructions for use
Mode d'emploi
Gebruiksaanwijzing
Instrucciones de uso
Manuale d’uso
Brugsanvisning
Bruksanvisning
Käyttöohje
Instrukcja obsługi
Οδηγες χρσεως
Руководство по
эксплуатации
FIN
RUS

2
Lieber Kunde!
Sie haben sich für ein SEVERIN-Qualitätsprodukt entschieden,
vielen Dank für Ihr Vertrauen!
Seit 1952 werden Elektrogeräte der Marke SEVERIN produziert.
Durch diese jahrzehntelange Erfahrung und mehrere modernste
Produktionsstätten wird der hohe Qualitätsstandard der Produkte
garantiert.
Mit über 160 verschiedenen Produkten bietet SEVERIN wie kaum
ein anderer Hersteller dieser Branche ein nahezu komplettes
Sortiment im Bereich Elektrokleingeräte an.
So umfaßt das SEVERIN-Sortiment neben den traditionellen
Küchengeräten wie Kaffeeautomaten, Toaster, Kochplatten oder
Waffelautomaten auch vielseitige Grillgeräte, Produkte für die
Haarpflege sowie verschiedene Heizgeräte und Ventilatoren.
Jedes Gerät, das die Marke SEVERIN trägt, wurde mit Sorgfalt
hergestellt und geprüft.
Bitte lesen Sie diese Gebrauchsanweisung sorgfältig durch, bevor Sie
Ihr Gerät in Betrieb nehmen.
Wir wünschen Ihnen an Ihrem SEVERIN-Gerät viel Freude!
Aktion zum Schutz der Umwelt:
Nehmen auch Sie aktiv am Umweltschutz teil.
Papier und Kartons, aber auch Glas, Kunststoff und Metalle sind wertvolle Rohstoffe, die
wieder aufbereitet werden können.
Achten Sie deshalb auf die örtlichen Sammelstellen, denn der sparsame Umgang mit
Rohstoffen ist aktiver Umweltschutz.
Geschäftsleitung und Mitarbeiter
der SEVERIN-Unternehmen

Liebe Kundin, lieber Kunde,
jeder Benutzer sollte vor dem Gebrauch die Gebrauchsanweisung aufmerksam durchlesen.
Anschluss
Das Gerät nur an eine vorschriftsmäßig installierte Schutzkontaktsteckdose anschließen. Die
Netzspannung muss der auf dem Typenschild des Gerätes angegebenen Spannung
entsprechen. Das Gerät entspricht den Richtlinien, die für die CE-Kennzeichnung
verbindlich sind.
●Das Gerät nicht an Wechselrichter oder zusammen mit anderen Geräten über ein
Verlängerungskabel anschließen.
●Die Anschlussleitung sollte nicht die Rückseite, wie z.B. den Wärmetauscher berühren,
um eventuelle Vibrationsgeräusche zu vermeiden.
Allgemein
Das Gerät ist ein Kompressorkühlgerät mit Glastür, welches für die Kühlung und
Aufbewahrung von Weinen geeignet ist.
Das Gerät erfüllt alle Anforderungen, die an Kühlgeräte gestellt werden.
Sicherheitshinweise
●Zur Vermeidung von Personen- und Sachschäden, das Gerät nur verpackt transportieren
und mit zwei Personen aufstellen.
●Das Gerät enthält das umweltfreundliche, jedoch brennbare
Kältemittel Isobutan (R600a). Daher ist darauf zu achten, dass das
Kältesystem beim Transport und auch nach Aufstellung des Gerätes
geschützt wird. Bei Beschädigung des Systems darf das Gerät nicht in
Betrieb genommen werden. Offenes Feuer oder Zündquellen in der
Nähe des Kältemittels entfernen und den Raum gut lüften.
●Warnung! Kühlkreislauf nicht beschädigen. Herausspritzendes Kältemittel kann zu
Augenverletzungen führen.
●Warnung! Belüftungsöffnungen der Geräteverkleidung oder des Aufbaus von
Einbaumöbeln nicht verschließen. Es muss eine ausreichende Luftzirkulation
gewährleistet sein.
●Warnung! Zum Beschleunigen der Abtauung keine anderen mechanischen
Einrichtungen oder sonstige Mittel, z.B. Heizgeräte, als die in dieser Anleitung
beschriebenen benutzen.
●Warnung! Keine elektrischen Geräte (z.B. Eisbereiter usw.) innerhalb des
Weinlagerraumes betreiben.
●Vor dem Anschließen des Gerätes ist zu überprüfen, ob das Gerät und die
Netzanschlussleitung keine Transportschäden aufweisen.
●Überprüfen Sie die Anschlussleitung regelmäßig auf Beschädigungen. Im Falle einer
Beschädigung darf das Gerät nicht benutzt werden.
●Legen Sie keine Elektrowärmegeräte auf das Gerät, um Brandgefahren zu vermeiden.
Stellen Sie auch keine Wasserkocher auf das Gerät, damit überkochende Flüssigkeiten
keine elektrischen Isolierungen beeinträchtigen können.
3
Weintemperierschrank

●Nur Wein im Gerät lagern.
●Ablagen, Tür usw. nicht als Trittfläche oder zum Aufstützen missbrauchen.
●Im Geräteinnenraum nicht mit offenem Feuer oder Zündquellen hantieren.
●Netzstecker ziehen,
-bei Störungen während des Betriebes,
-vor dem Abtauen des Gerätes
-vor jeder Reinigung.
●Personen (einschließlich Kinder), die aufgrund ihrer physischen, sensorischen oder
geistigen Fähigkeiten oder ihrer Unerfahrenheit oder Unkenntnis nicht in der Lage sind,
das Gerät sicher zu benutzen, sollten dieses Gerät nicht ohne Aufsicht oder Anweisung
durch eine verantwortliche Person benutzen.
●Kinder sollten beaufsichtigt werden, um sicherzustellen, dass sie nicht mit dem Gerät
spielen.
●Sind Reparaturen oder Eingriffe am Gerät erforderlich, müssen diese von einem
autorisierten Kundendienst durchgeführt werden, da Sicherheitsbestimmungen zu
beachten sind und um Gefährdungen zu vermeiden. Dies gilt auch für den Austausch der
Anschlussleitung.
●Technische Änderungen behalten wir uns vor.
●Ist das Gerät für längere Zeit außer Betrieb, sollte die Gerätetür geöffnet bleiben.
●Bei Verkauf, bei Übergabe oder Abgabe zur Wiederverwertung ist auf das Treibmittel
Cyclopenthan C5H10 in der Isolation sowie das Kältemittel R600a hinzuweisen.
Aufbau
1. Verdampfer (innenliegend)
2. Glastür
3. verstellbare Aufstellfüße
4. Temperaturregler
5. herausnehmbare Ablage
Vor Inbetriebnahme
-
Entfernen Sie alle äußeren und inneren Verpackungsmaterialien vollständig vom Gerät.
●Vor dem Anschließen des Gerätes ist zu überprüfen, ob das Gerät und die
Netzanschlussleitung keine Transportschäden aufweisen.
-
Gerät wie unter Abtauen und Reinigung beschrieben reinigen.
Aufstellung
Für die Aufstellung des Gerätes sollte ein trockener und gut gelüfteter Raum ausgesucht
werden. Das Gerät kann bei Umgebungstemperaturen von 16 bis 32 °C und einer
Luftfeuchtigkeit von max. 70 % betrieben werden. Es ist vor direkter Sonneneinstrahlung zu
schützen und sollte nicht in der Nähe von Wärmequellen (Ofen, Radiator usw.) aufgestellt
werden. Wenn sich dieses jedoch nicht vermeiden lässt, muss eine Isolierung zwischen
Wärmequelle und Gerät verwendet werden.
Der Abstand der Rückseite zur Wand muss mindestens 5 cm betragen, damit die Luft
4
2
1
5
4
3

ausreichend zirkulieren kann.
Unebenheiten des Bodens können durch die justierbaren Füße ausgeglichen werden, damit
eine sichere Standfestigkeit gegeben ist. Damit sich die Tür des Gerätes von selbst schließt,
muss das Gerät so aufgestellt werden, dass es eine leichte Neigung nach hinten hat. Achten
Sie beim Einstellen jedoch darauf, dass die beiden vorderen Füße gleichhoch sind.
Lüftung
Die durch das Gerät aufgewärmte Luft muss frei zirkulieren können. Aus diesem Grunde
die Luftzirkulation um das Gerät nicht beeinträchtigen.
Türanschlag
Die Konstruktion des Gerätes lässt es zu, dass die Tür bei Bedarf von Rechts- auf
Linksanschlag geändert werden kann. Für diesen Fall sind dem Gerät zusätzliche
Verschlussstopfen in einem Kunststoffbeutel beigefügt.
-
Entfernen Sie die obere Scharnierabdeckung
(1).
-
Entfernen Sie mit einem
Schlitzschraubendreher die Abdeckungen (5).
-
Drehen Sie die Schrauben (2), die das obere
Scharnier (3) auf der rechten Gehäuseseite
befestigen, mit einem Schraubendreher
heraus.
-
Heben Sie die Tür vorsichtig an und stellen Sie
diese auf einer gepolsterten Fläche ab, um
Kratzer an der Tür zu vermeiden.
-
Entfernen Sie den Abdeckstopfen (9) und
stecken Sie ihn in das Loch auf der rechten
Seite der Tür. Drücken Sie ihn fest in das
Loch.
-
Entfernen Sie die beiden Schrauben (7), die das untere Scharnier (4) auf der rechten
Seite fixieren.
-
Drehen Sie den verstellbaren Aufstellfuß (8) heraus und schrauben Sie ihn auf der
rechten Seite des Gerätes wieder ein.
-
Setzen Sie die Tür in die neue Position. Achten Sie darauf, dass der Bolzen im Loch
unten am Gehäuse sitzt.
-
Befestigen Sie das obere Scharnier (3) mit den Schrauben (2). Achten Sie darauf, dass
der Bolzen im Loch der Tür sitzt.
-
Setzen Sie das untere Scharnier (4) unten an die Tür und befestigen Sie es mit den
Schrauben (7). Ziehen Sie die Schrauben (7) jedoch erst fest an, wenn sich die Tür in der
geschlossenen Position befindet.
-
Stecken Sie die Abdeckungen (5) in die Löcher auf der rechten Seite.
-
Setzen Sie die obere Scharnierabdeckung (1) auf das obere Scharnier (3).
Steuergeräte
Das Gerät wird in Betrieb genommen, indem der Netzstecker in eine Steckdose gesteckt
wird. Eine komplette Ausschaltung erfolgt nur durch Ziehen des Netzsteckers.
Anmerkung : Der Temperaturregler schaltet in der Position „0“ nur den Kompressor ab.
5

Die Temperatur im Geräteinnenraum wird mit dem Temperaturreglerknopf
eingestellt. Wird der Reglerknopf im Uhrzeigersinn gedreht, sinkt die
Temperatur im Innenraum, umgekehrt steigt sie.
Drehen Sie zu Beginn den Temperaturregler in die Position „5“. Nach ca. 20
Minuten drehen Sie den Temperaturregler in die Position „3“. Diese Position
ist die optimale Einstellung für den normalen Gebrauch.
Wird die Stromversorgung des Gerätes unterbrochen, warten Sie ca. 3-5 Minuten bevor Sie
das Gerät wieder in Betrieb nehmen. Wenn Sie das Gerät vorher einschalten möchten, lässt
sich das Gerät nicht in Betrieb nehmen.
Aufbewahrung des Weines
-
Die Temperatur im Kühlraum hängt von der Umgebungstemperatur, von der Stellung
des Temperaturreglers, und von der Menge des aufbewahrten Weines ab.
-
Stellen Sie den Temperaturreglerknopf in die gewünschte Position.
-
Achten Sie darauf, dass die Tür richtig geschlossen ist und nicht durch Weinflaschen
blockiert wird.
Abtauen und Reinigung
Der Verdampfer des Gerätes ist in den Wänden eingeschäumt, daher können die hinteren
Wände im Kühlteil mit Reif bedeckt sein. In den Zeiten, in denen der Kompressor nicht
arbeitet, kann Reif abtauen. Das entstehende Wasser wird durch ein Schlauchsystem auf die
Wanne am Kompressor geführt, wo es durch die entstehende Wärme verdampft. Das Gerät
muss nicht abgetaut, sondern nur gereinigt werden.
●Achten Sie darauf, dass die Ablaufrinne und die Ablauföffnung nicht verstopft sind,
damit das entstehende Wasser im Kühlteil immer ungehindert abfließen kann.
Bei der Reinigung des Gerätes oder bei einer Abschaltung
-
den Netzstecker aus der Steckdose ziehen,
-
Lebensmittel aus dem Gerät nehmen,
-
die Tür geöffnet lassen.
Um einen unangenehmen Geruch im Kühlraum zu vermeiden, das Gerät mindestens einmal
alle zwei Monate reinigen. Reinigen Sie das Gerät und die Ablaufrinne mit Warmwasser,
gegebenenfalls unter Zugabe von Spülmittel. Nach der Reinigung das Gerät trockenreiben
und lüften.
Das Typenschild im Kühlraum bei der Reinigung nicht beschädigen oder gar entfernen.
Die Staubablagerung außen am Gerät regelmäßig mit einem Pinsel oder einem Staubsauger
entfernen. Staubablagerungen erhöhen den Energieverbrauch.
Anmerkung: Verwenden Sie keine Teile mit alkoholhaltigen und aggressiven
Reinigungsmitteln. Verwenden Sie auch keine elektrischen Geräte zum Auftauen oder
Reinigen wie z.B. Dampfreinigungsgeräte.
Störungen
Es entstehen typische Betriebsgeräusche, wenn das Gerät eingeschaltet ist. Das sind:
-
Geräusche des elektrischen Motors vom arbeitenden
Kompressor. Bei Betriebsbeginn des Kompressors sind die
Geräusche für kurze Zeit etwas lauter.
-
Geräusche in den Röhrchen bei der Zirkulation des
Kältemittels.
6

Störung
Das ans Netz angeschlossene Gerät
arbeitet nicht.
Ungewöhnliche Geräusche während des
Betriebes.
Beim Öffnen der Tür springt die Dichtung
vor.
Im Gerät sammelt sich Wasser am Boden.
Mögliche Ursache und Beseitigung
Die Steckdose ist nicht spannungsführend
oder es gibt Kontaktschwierigkeiten.
Steckdose und Stecker prüfen!
Entweder ist das Gerät nicht richtig
aufgestellt (z.B. unebener Boden) oder der
Kühlkreislauf an der Rückseite des
Gerätes berührt Wände, Gegenstände
oder die Netzzuleitung. Prüfen Sie, ob alle
Angaben der Bedienungsanleitung über
die Aufstellung eingehalten wurden.
Dichtung richtig einsetzen. Dabei den
inneren Teil der Dichtung stärker
andrücken. Ist die Dichtung mit
fetthaltigen Flüssigkeiten verschmutzt,
muss die Dichtung und die Tür vor dem
Einsetzen mit Geschirrspülmittel gereinigt
und getrocknet werden.
Das Abführsystem des Schmelzwassers ist
verstopft. Die Ablaufrinne ist zu reinigen.
Transport des Gerätes
Das Gerät nur vertikal transportieren.
Das Gerät um nicht mehr als 30° neigen. Während des Transportes das Gerät zuverlässig
befestigen, um Stöße und Verschiebungen zu vermeiden.
Entsorgung
Das Gerät wurde aus wiederverwertbaren Materialien hergestellt. Ziehen Sie den
Netzstecker aus der Steckdose und trennen Sie die Anschlussleitung vom Gerät. Die
Entsorgung muss gemäß den örtlichen Bestimmungen der Abfallbeseitigung erfolgen.
Das Kältemittel und das Treibmittel in der Isolation muss fachgerecht entsorgt werden.
Beachten Sie, dass die Rohre des Kühlkreislaufes bis zur fachgerechten Entsorgung nicht
beschädigt werden dürfen.
Garantie
Severin gewährt Ihnen eine Herstellergarantie von zwei Jahren ab Kaufdatum. In diesem
Zeitraum beseitigen wir kostenlos alle Mängel, die nachweislich auf Material- oder
Fertigungsfehlern beruhen und die Funktion wesentlich beeinträchtigen. Weitere Ansprüche
7
Nachfolgend eine Tabelle mit möglichen Störungen und Beseitigungsmethoden. Prüfen Sie,
ob durch die Beseitigungsmethoden die Störungen behoben werden können. Falls dies nicht
der Fall ist, muss das Gerät vom Netz getrennt und der Kundendienst benachrichtigt
werden.

sind ausgeschlossen. Von der Garantie ausgenommen sind: Schäden, die auf Nichtbeachtung
der Gebrauchsanweisung, unsachgemäße Behandlung oder normalen Verschleiß
zurückzuführen sind, ebenso leicht zerbrechliche Teile wie z. B. Glas, Kunststoff oder
Glühlampen. Die Garantie erlischt bei Eingriff nicht von uns autorisierter Stellen. Die
gesetzlichen Gewährleistungsrechte gegenüber dem Verkäufer und eventuelle
Verkäufergarantien bleiben unberührt.
Angaben für Kundendienst
Sollte eine Reparatur erforderlich werden, wenden Sie sich mit Fehlererklärung direkt an
den Kundendienst. Die Anschrift finden Sie im Anhang der Anleitung. Notieren Sie sich
vorher die Art.-Nr. KS ... vom Typenschild des Gerätes (siehe Abb.), da diese für die
optimale Abwicklung benötigt wird.
Technische Daten
Art.-Nr. KS 9886
Geräteart Kühlgerät
Energieverbrauch :
kWh/24 h 0,28
kWh/Jahr 103
Der tatsächliche Verbrauch hängt von der Nutzung und vom Standort des Gerätes ab
Nutzinhalt Kühlteil, l 50
Umgebungstemperatur, °C 16 - 32
Abmessungen (H x B x T), mm 515 x 435 x 455
Tiefe bei geöffneter Tür, mm 865
Flaschenmenge, Stück 16
Masse, kg 18
Elektrische Daten siehe Typenschild
Isolationsschaum C5H10
Geräuschemission 38 dB(A)
8

Dear Customer,
Before using the appliance, the user should read the following instructions carefully.
Connection to the mains supply
The appliance should only be connected to an earthed socket installed in accordance with
the regulations. Make sure that the supply voltage corresponds with the voltage marked on
the rating label. This product complies with all binding CE labelling directives.
●Do not operate this unit by means of a transformer or, together with other electrical
appliances, by means of an extension cable.
●To prevent noise vibration, ensure that the power cord does not touch any part of the
rear of the unit (e.g. the heat-exchanger).
General information
This appliance is a compressor refrigerator with integral glass door designed for cooling and
storing wine.
It complies with all relevant norms for domestic refrigeration appliances.
Important safety instructions
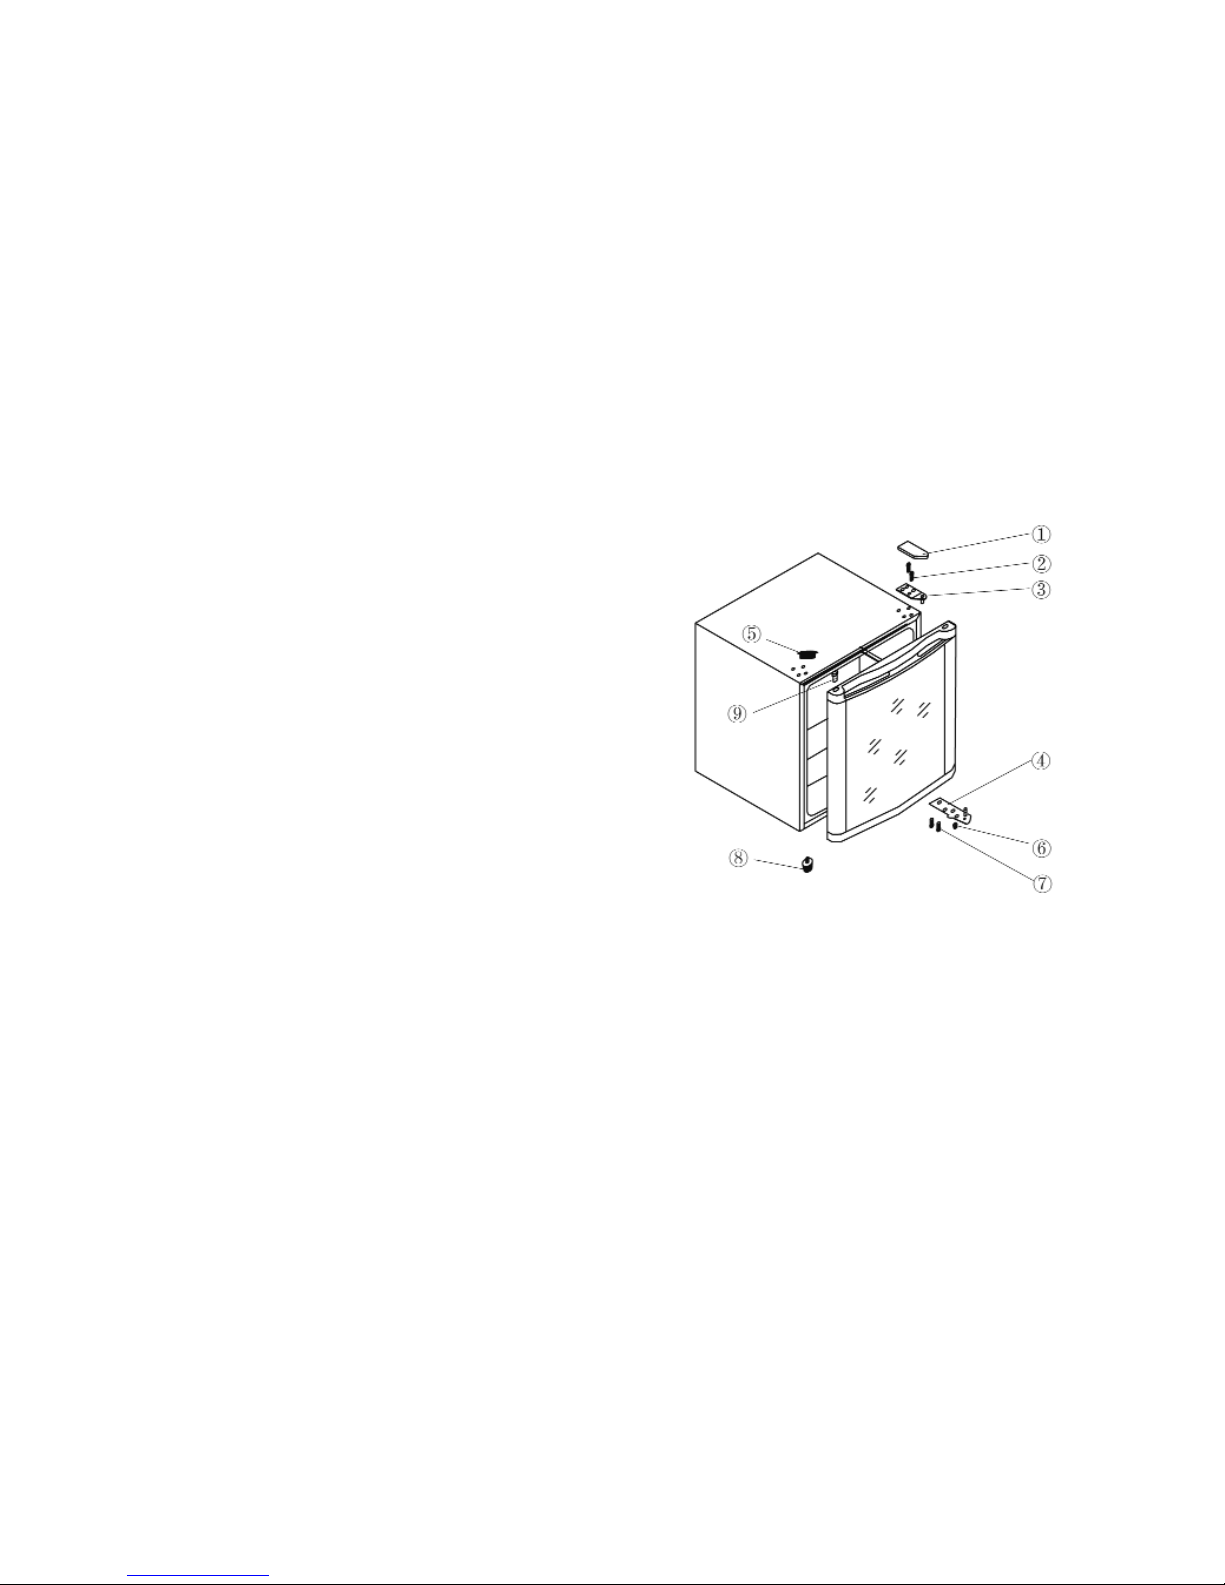
●To prevent the risk of personal injury or damage to the unit, it must only be transported
while in its original packaging. Two people are required for unpacking and installation.
●The cooling circuit in this appliance contains the refrigerant isobutane
(R600a), a natural gas with a high level of environmental
compatibility, which is nevertheless flammable. Ensure, therefore,
that none of the components of the refrigerant circuit become
damaged during transportation and installation of the appliance. If
damage to the cooling circuit does occur, do not switch on or connect
the appliance to the mains power. If there should be an open flame or any other source
of ignition in the vicinity of the refrigerant gas, make sure it is removed immediately
from the area and that the room is then thoroughly ventilated.
●Warning: Do not damage the cooling circuit. Any escaping refrigerant may cause
damage to the eyes.
●Warning: Keep ventilation openings, in the appliance enclosure or in a built-in structure,
clear of obstruction. Sufficient ventilation must be ensured at all times.
●Warning: Do not use any external device (e.g. a heater or heating fan) to accelerate de-
frosting; follow only the methods recommended in this manual.
●Warning: Do not operate any electrical appliances (e.g. an ice maker) inside the
compartment.
●Before the unit is connected to the mains power, it must be thoroughly checked for
transport damage, including its power cord.
●The power cord should be regularly examined for any signs of damage. In the event of
such damage being found, the appliance must no longer be used.
●To avoid the risk of fire, do not place any thermo-electric appliances on top of the unit.
In order to avoid liquid boiling over and damaging the electrical insulation, do not
operate electric water kettles on top of the unit.
9
Temperature-controlled wine cabinet

●This appliance is designed for storing wine only.
●Do not lean or put undue weight on the shelves, door etc.
●Protect the inside of the unit at all times from open flames and any other sources of
ignition.
●Remove the plug from the wall socket
-in case of any malfunction,
-before de-frosting,
-during cleaning.
●This appliance is not intended for use by any person (including children) with reduced
physical, sensory or mental capabilities, or lacking experience and knowledge, unless
they have been given supervision or instruction concerning the use of the appliance by a
person responsible for their safety.
●Children should be supervised to ensure that they do not play with the appliance.
●In order to comply with safety regulations and to avoid hazards, any repairs or
modifications to this unit must be carried out by our authorised service personnel,
including the replacement of the power cord.
●We reserve the right to introduce technical modifications.
●If the unit is not used for an extended period of time, we recommend keeping the door
open.
●If the unit is sold, handed over to a third party or disposed of at a suitable recycling
facility, attention must be drawn to the presence of the insulation agent ‘cyclopenthane’
(C5H10) as well as to the refrigerant R 600 a.
Familiarisation
1. Evaporator (internal)
2. Glass door
3. Adjustable feet
4. Temperature control
5. Removable shelf
Before using for the first time
-
Remove any exterior and interior packaging materials completely.
●Before it is connected to the mains, the unit must be thoroughly checked for transport
damage, including its power cord.
-
Clean the unit according to the instructions given in the De-frosting and cleaning section
below.
Installation
The appliance should be set up in a well-ventilated, dry room. It should be operated in an
ambient temperature of 16 to 32 °C and a relative humidity of max. 70 %. Do not expose the
appliance to direct sunlight, and do not position it next to any heat sources (radiators,
cookers etc). If this cannot be avoided, however, suitable insulation must be in installed
between the heat source and the unit.
10
2
1
5
4
3

To ensure sufficient air circulation, maintain a minimum distance of 50 mm between the rear
of the unit and the wall.
If the floor is uneven, the adjustable feet can be used to compensate and ensure optimum
stability. The unit should be installed at a slight angle in such a way that it leans to the rear:
this will ensure that the door will close automatically and cannot be left open by mistake.
Ensure, however, that both front feet are set to the same height.
Ventilation
The heated air around the unit must be able to circulate freely. Therefore, ensure that the
circulation is not obstructed.
Reversible door
The design provides for the door to be reversed, i.e. for right-hinged (default installation) to
become left-hinged. Additional blind covers are enclosed in a plastic bag in case the door
needs to be reversed.
-
Remove the upper hinge cover (1).
-
Use a suitable screw-driver to remove the
covers (5).
-
Use a screw-driver to remove the two screws
(2) holding the upper hinge to the right side of
the housing.
-
Carefully lift up the door and place it on a soft
surface to protect it from scratches.
-
Remove the blind cover (9) for the hinge
mounting hole and fit it in the corresponding
place on the right-hand side of the door.
Ensure that the cover is firmly pushed down
into the hole.
-
Pull off the two bolts (7) which hold the lower
hinge (4) in position on the right.
-
Unscrew the adjustable foot (8) and re-fit it on the right-hand side.
-
Replace the door in its new position. Ensure that the hinge pin is inserted into the guide
bushing (hole) on the lower part of the housing.
-
Install the upper hinge (3) on the left-hand side, using the screws (2). Ensure that the
hinge pin is inserted into the guide bushing (hole) on the upper part of the housing.
-
Install the lower hinge (4) loosely. The bolts (7) should be tightened only after the door
is closed and adjusted to its proper position.
-
Replace the cover (5) in the corresponding holes on the right.
-
Replace the hinge cover (1) on the upper hinge.
Controls
The unit is activated by connecting it to the mains. It is only switched off completely when
the plug is removed from the wall socket.
In position ‘0’, the cooling function is switched off, though the appliance is still connected to
the mains.
The temperature in the cabinet can be adjusted by setting the temperature control. Turning
the control clockwise will decrease the temperature, while turning it anti-clockwise will
11

increase it.
After switching on, the temperature control should be set to position 5. After
approx. 20 minutes, the setting should be changed to position 3. This setting is
usually sufficient for normal use.
Following a power interruption, or if the unit has been switched off on purpose,
always wait 3 to 5 minutes before switching on again. The unit cannot be re-activated
without this delay.
Storing wine
-
The temperature in the cabinet largely depends on factors such as the ambient
temperature, the setting and the number of wine bottles stored.
-
Turn the temperature control to the desired position.
-
Always ensure that the door is properly closed and that the seal is not obstructed by
bottles stored inside the cabinet.
De-frosting and cleaning
The integral evaporator is sealed in foam within the walls; you may therefore notice a build-
up of frost around the rear area. This layer of frost will start melting when the compressor is
not working. Through a system of hoses, the melt-water drains into the collection tray below
the compressor, where it will be absorbed into the surrounding air. The unit does not
therefore require de-frosting, but only proper cleaning.
●To enable the melt-water to drain freely, always ensure that the channel and discharge
opening in the cabinet are free of any blockage.
Cleaning the unit / periods of non-use
-
remove the plug from the wall socket
-
remove the bottles from the cabinet
-
leave the door open
To prevent any unpleasant odour within the cabinet, it should be cleaned at least every two
months. The surfaces and the drain channel may be cleaned with warm water. If necessary, a
mild detergent can be used. Wipe thoroughly dry and air out afterwards.
Take care not to remove or damage the rating plate inside the cabinet during cleaning.
Any dust deposits around the ventilation slots on the outside of the unit should be regularly
removed using a suitable brush or a vacuum cleaner. The build-up of dust will otherwise
cause an increase in energy consumption.
Remark: Do not use abrasive tools, materials containing alcohol or harsh cleaning solutions.
Do not use any electrical appliances, such as steam cleaners, for de-frosting or cleaning.
Trouble-shooting
Certain typical sounds can be heard when the appliance is switched on. These sounds are
caused by:
-
the electric motor within the compressor assembly; during
compressor start-up the sound level will be slightly higher for
a short time.
-
the cooling agent flowing through the circuit.
The following table lists possible malfunctions, their probable causes and solutions. In the
event of operational problems, check first whether a solution can be found using this table. If
12

13
Problem
The appliance is connected to the mains
but fails to operate properly.
Abnormal noise can be heard during
operation.
When opening the door, the rubber seal
pops out.
Water collects on the bottom of the
cabinet.
Possible cause and solution
The wall socket has no power, or there are
contact problems. Check the wall socket
and the plug.
Either the unit has been improperly set up
(e.g. on an uneven floor) or there is contact
between the rear-mounted cooling circuit
and the power cord, the wall or other
object or surface. Verify that all
installation instructions in this manual
have been complied with.
The seal must be re-fitted properly, by
pressing in the inner part of the seal. If the
seal shows signs of a greasy residue, the
seal and the door must be properly cleaned
with water and a mild detergent, and then
thoroughly dried before the seal is
replaced on the door.
The melt-water drain system is blocked.
Remove blockage and clean the drain
system.
Transporting the appliance
The unit must be transported only in its vertical position.
Do not tilt it any more than 30°. During transport, ensure that the unit is properly secured
and protected against shock, vibration and shifting.
Disposal
This appliance has been manufactured from recyclable materials. After removing the
plug from the wall socket, the unit should be rendered unusable by cutting off the
power cord before being disposed of through special waste collection points in
accordance with local regulations. The refrigerant and the chemical agent in the insulation
foam must be disposed of through a competent agency. Take special care not to damage the
cooling circuit before the unit is handed over for competent disposal.
Guarantee
This product is guaranteed against defects in materials and workmanship for a period of two
years from the date of purchase. Under this guarantee the manufacturer undertakes to
repair or replace any parts found to be defective, providing the product is returned to one of
our authorised service centres. This guarantee is only valid if the appliance has been used in
the problem persists, disconnect the appliance from the mains power and contact our
Customer Service Department.

accordance with the instructions, and provided that it has not been modified, repaired or
interfered with by any unauthorised person, or damaged through misuse.
This guarantee naturally does not cover wear and tear, nor breakables such as glass and
ceramic items, bulbs etc.
Information needed by the Customer Service
Should repairs to the appliance become necessary, please contact our Customer Service
(address in the appendix to this manual), providing a detailed fault description and quoting
the model number KS ... on the rating plate of the appliance (see picture). This information
will help us to handle your request efficiently.
Technical specifications
Art. KS 9886
Type of appliance Refrigerator
Energy consumption:
kWh/24 h 0.28
kWh/ year 103
The actual consumption depends on the pattern of use and the location of the appliance
Usable refrigerator capacity (litres) 50
Ambient temperature range, °C 16 - 32
Dimensions (H x W x D), mm 515 x 435 x 455
Depth with door opened, mm 865
Number of bottles 16
Weight (kg) 18
Electrical specifications See rating plate
Insulation foam C5H10
Noise emission 38 dB(A)
14

Chère Cliente, Cher Client,
Avant d’utiliser cet appareil, veuillez lire attentivement les instructions suivantes.
Branchement au secteur
Cet appareil doit être branché sur une prise de terre installée selon les normes en vigueur.
Assurez-vous que la tension d’alimentation correspond à la tension indiquée sur la plaque
signalétique de l’appareil. Ce produit est conforme à toutes les directives relatives au
marquage “CE”.
●Ne pas brancher cet appareil sur un transformateur, ni sur une rallonge avec d’autres
appareils électriques.
●Pour éviter tout bruit de vibration, vérifiez que le cordon ne touche aucune partie à
l’arrière de l’appareil (ex. l’échangeur de chaleur).
Informations générales
Cet appareil est un réfrigérateur compresseur, doté d’une porte en verre, destiné à la
réfrigération et la conservation du vin.
Il est conforme à toutes les normes relatives aux appareils de réfrigération domestiques.
Importantes consignes de sécurité
●Veuillez conserver l’appareil dans son emballage d’origine pour le transporter afin
d’éviter tout dommage ou accident. Le déballage et l’installation nécessitent deux
personnes.
●Le réfrigérant contenu dans le circuit de refroidissement de cet
appareil est l’isobutane (R600a), un gaz naturel non polluant, mais qui
est, cependant, inflammable. Par conséquent, évitez d’endommager
les composants du système de refroidissement pendant le transport et
l’installation de l’appareil. Si, toutefois, le circuit de refroidissement
s’avère endommagé, ne pas mettre en marche l’appareil et ne pas le
connecter au secteur. Si une flamme ou autre source d’allumage se trouve à proximité du
gaz réfrigérant, retirez immédiatement l’appareil de la zone, puis aérez amplement la
pièce.
●Avertissement : Ne pas endommager le circuit de refroidissement. Le gaz qui s’en
échappe peut endommager les yeux.
●Avertissement : Ne pas obstruer les grilles de ventilation situées dans le caisson ou la
structure. Une ventilation suffisante doit être maintenue en continu.
●Avertissement : Ne pas accélérer le dégivrage à l’aide d’un appareil externe (ex.
chauffage rayonnant ou soufflant); conformez-vous uniquement aux procédures
recommandées dans ce manuel.
●Avertissement : Ne faire fonctionner aucun appareil électrique (ex. machine à glace) à
l’intérieur.
●Avant de le brancher sur le secteur, vérifiez minutieusement l’appareil, y compris le
cordon d’alimentation, pour tout signe de dommages survenus pendant le transport.
●Examinez régulièrement le cordon pour vous assurer de son parfait état. Ne pas utiliser
l’appareil si le cordon est endommagé.
15
Armoire à vin avec régulation thermique

●Pour éviter tout risque d’incendie, ne placez aucun appareil thermoélectrique sur
l’armoire. Ne pas faire fonctionner de bouilloire électrique sur l’appareil afin d’éviter
que l’eau bouillante ne se renverse et endommage l’isolation électrique.
●Cet appareil est destiné uniquement à la conservation du vin.
●Ne vous appuyez pas sur l'appareil ou sur les clayettes et ne vous suspendez pas à la
porte.
●Protégez l’intérieur de l’armoire à vin contre les flammes ou tout autre source
susceptible de provoquer des flammes.
●Débranchez toujours la fiche de la prise murale
-en cas de fonctionnement défectueux,
-avant de dégivrer l’appareil,
-avant de nettoyer l’appareil.
●Cet appareil ne doit pas être utilisé par une personne (y compris un enfant) souffrant
d’une déficience physique, sensorielle ou mentale, ou manquant d’expérience ou de
connaissances, sauf si cette personne a été formée à l’utilisation de l’appareil par une
personne responsable de sa sécurité, ou est surveillée par celle-ci.
●Les enfants doivent être surveillés afin qu’ils ne jouent pas avec l’appareil.
●Afin de se conformer aux normes de sécurité en vigueur et d’éviter tout risque, la
réparation ou la modification de cet appareil, y compris le remplacement du cordon
d’alimentation, doit être effectuée par un de nos agents agréés.
●Nous nous réservons le droit d'apporter à cet appareil toute modification technique
quelconque.
●Si l’appareil reste longtemps sans être utilisé, nous vous recommandons de laisser la
porte ouverte.
●En cas de vente ou cession de l’appareil à un tiers, ou sa remise à un centre de recyclage
agréé, il est important de signaler la présence de la matière isolante ‘cyclopentane’ C5H10
et également du réfrigérant R 600a.
Familiarisez-vous avec votre appareil
1. Evaporateur (interne)
2. Porte vitrée
3. Pieds réglables
4. Thermostat
5. Etagère amovible
Première utilisation
-
Retirez tous les emballages extérieurs et intérieurs.
●Avant de le brancher sur le secteur, vérifiez minutieusement l’appareil, y compris le
cordon d’alimentation, pour tout signe de dommages survenus pendant le transport.
-
Nettoyez l’appareil en suivant les instructions figurant à la rubrique Dégivrage et
nettoyage ci-après.
16
2
1
5
4
3

Installation
L’appareil doit être installé dans une pièce sèche et bien aérée. Il doit fonctionner par une
température ambiante comprise entre 16 et 32 °C et une humidité relative maximum de
70%. Ne pas exposer l’armoire au soleil et ne pas la positionner à proximité d’une source de
chaleur quelconque (radiateur, cuisinière etc.). Si cela n’est pas possible, mettez en place un
dispositif isolant entre la source de chaleur et l’appareil.
Afin d’assurer une ventilation adéquate, maintenez une distance de 50 mm entre la partie
arrière de l’appareil et le mur.
Les dénivelées du sol peuvent être rattrapés à l’aide des pieds réglables, assurant ainsi une
stabilité parfaite. L’appareil doit être installé légèrement incliné vers l’arrière, de façon à
assurer la fermeture automatique de la porte et éviter la déperdition du froid par une porte
laissée entrouverte. Vérifiez cependant que les deux pieds de devant maintiennent l’appareil
au même niveau de chaque côté.
Ventilation
Veuillez vous assurer que vous avez laissé suffisamment d’espace autour de l’appareil pour
permettre une libre circulation de l’air chaud.
Porte réversible
La porte peut être montée pour une ouverture à
droite ou à gauche. Des capuchons de charnière
supplémentaires sont fournis dans un sac en
plastique au cas où le sens d’ouverture de la porte
aurait besoin d’être changé.
-
Retirez le capot de la charnière supérieure (1).
-
Retirez le cache (5) à l’aide d’un tournevis
adapté.
-
À l’aide d’un tournevis, retirez les deux vis (2)
fixant la charnière supérieure sur le caisson
droit.
-
Retirez soigneusement la porte, puis placez-la
sur une surface molle afin d’éviter toute
rayure.
-
Retirez le bouchon du trou de fixation (9), puis
fixez-le à l’endroit prévu sur le côté droit en appuyant fermement.
-
Retirez les deux vis (7) retenant la charnière inférieure (4) à droite.
-
Dévissez le pied réglable (8), puis repositionnez-le sur le côté droit.
-
Mettez en place la porte à sa nouvelle position. Assurez-vous que la charnière est bien
insérée dans la bague (trou) en partie inférieure.
-
Installez la charnière supérieure (3) sur le côté gauche en utilisant les vis (2). Assurez-
vous que la charnière est bien insérée dans la bague (trou) en partie supérieure.
-
Fixez en place la charnière inférieure (4) sans serrer. Serrez les vis (7) que lorsque la;
porte est fermée et correctement positionnée.
-
Remettez le cache (5) dans les trous prévus sur le côté droit.
-
Remettez le capot (1) sur la charnière supérieure.
17

Thermostat
Cet appareil est mis en marche automatiquement par son branchement au secteur. Il n’est
éteint que lorsque la fiche est retirée de la prise murale.
Sur la position ‘0’, la fonction de refroidissement est arrêtée, mais l’appareil reste branché au
secteur.
La température à l’intérieur est réglable à l’aide du bouton du thermostat.
Vous réduisez la température en tournant le bouton du thermostat dans le sens
des aiguilles d’une montre, et vous augmentez la température en le tournant
dans le sens inverse des aiguilles d’une montre.
A la mise en service de l’appareil, mettez le bouton du thermostat sur la
position 5. Après environ 20 minutes, mettez-le sur la position 3. Ce programme est
habituellement suffisant pour une utilisation dans des conditions normales.
Si l’appareil s’arrête de fonctionner à la suite d’une coupure de courant ou s’il a été éteint
volontairement, veuillez attendre 3 à 5 minutes avant de le remettre en marche. Sinon
l’appareil ne peut fonctionner correctement.
Conservation du vin
-
La température à l’intérieur de l’armoire dépend largement de facteurs tels que la
température ambiante de la pièce, la façon dont les bouteilles sont rangées et leur
nombre.
-
Réglez le thermostat sur la position désirée.
-
Assurez-vous que la porte est fermée correctement et que les bouteilles ne font pas
obstruction au joint d’étanchéité.
Dégivrage et nettoyage
Le vaporisateur intégré est hermétiquement encastré dans de la mousse dans la partie
arrière de l’appareil et vous noterez peut être une accumulation de glace à l’arrière de
l’appareil. Cette couche de glace se dégivre lorsque le compresseur est à l’arrêt. L’eau de
dégivrage est alors évacuée par un système de tuyaux et se vide dans un bac situé sous le
compresseur et prévu à cet effet, dans lequel elle s’évaporera. Vous n’avez donc pas besoin
de dégivrer votre appareil, mais simplement de le nettoyer.
●Pour permettre à l’eau de dégivrage de s’évacuer correctement, assurez toujours que le
tuyau d’évacuation et son embouchure dans l’armoire ne sont pas bouchés.
Nettoyage de l’appareil et périodes de non utilisation
-
Débranchez l’appareil de la prise murale
-
Retirez les bouteilles de l’armoire
-
Laissez la porte entrouverte
Afin d’éviter toute odeur déplaisante à l’intérieur de l’armoire, nettoyez environ tous les
deux mois. Les surfaces et le tuyau d’évacuation peuvent être nettoyés à l’eau chaude. Un
produit ménager doux peut être employé, si nécessaire. Essuyez soigneusement et laissez
ensuite ouvert.
Lors du nettoyage, prenez soin de ne pas endommager ni casser la plaque signalétique à
l’intérieur.
Tout dépôt de poussière autour des grilles de ventilation à l’extérieur de l’appareil doit être
retiré régulièrement à l’aide d’une brosse adaptée ou d’un aspirateur. L’accumulation de
poussière augmente la consommation en électricité de l’appareil.
18

Remarque : N’utilisez aucun outil abrasif ni produit à base d’alcool, ni produit de nettoyage
surpuissant. Pour le dégivrage et le nettoyage de l’intérieur de l’armoire, n’utilisez aucun
appareil électrique, tel qu’un nettoyeur à vapeur.
Dépistage des pannes
Lors de la mise en marche, certains sons sont audibles. Ces sons sont dus :
-
au moteur électrique du bloc compresseur; lors de la mise en
route du compresseur, le niveau du son reste élevé pendant un
certain temps.
-
au flux de réfrigérant dans le circuit de refroidissement.
Le tableau suivant présente les pannes possibles, leurs causes et solutions. En cas de
problème de fonctionnement, vérifiez d’abord si la solution figure dans ce tableau. Si le
problème persiste, débranchez l’appareil du secteur, puis appelez notre Service Clientèle.
19
Problème
L’appareil est branché au secteur mais ne
fonctionne pas.
Un bruit anormal est constaté lors du
fonctionnement du congélateur.
Lors de l’ouverture de la porte, le joint en
caoutchouc sort de sa rainure.
De l’eau s’accumule dans le fond de
l’appareil.
Cause possible et solution
La prise murale n’est pas alimentée ou il y
a un mauvais contact. Vérifiez la prise et la
fiche.
Soit l’appareil est mal installé (ex. sur un
sol irrégulier), soit il y a contact entre le
système de refroidissement à l’arrière et le
cordon d’alimentation, le mur, ou un autre
objet ou surface quelconque. Vérifiez que
toutes les consignes d’installation de ce
manuel ont été respectées.
Le joint doit être remis en place en
enfonçant la face intérieure du joint. Si le
joint montre des traces de graisse, nettoyez
soigneusement le joint et la porte à l’eau
tiède additionnée d’un détergeant doux.
Séchez complètement la porte et le joint
avant de remettre celui-ci en position.
Le tube d’évacuation d’eau est obstrué.
Retirez l’obstruction et nettoyez le
système.

Transport
L’appareil doit être transporté en position verticale uniquement.
Ne pas le pencher plus de 30°. Pendant le transport, protégez l’appareil contre les chocs et
vibrations et vérifiez qu’il ne bouge pas pendant le voyage.
Mise au rebut
Cet appareil est fabriqué à partir de matières recyclées. Après avoir retiré la fiche de
la prise murale, rendez l’appareil inutilisable en coupant le cordon d’alimentation.
Apportez-le ensuite à un centre de collecte, conformément à la réglementation locale
en vigueur. Le réfrigérant et le produit chimique contenu dans la mousse isolante doivent
être traités par un service compétent agréé. Prenez soin de ne pas endommager le circuit de
refroidissement avant de remettre l’appareil aux services compétents.
Garantie
Cet appareil est garanti par le fabricant pendant une durée de deux ans à partir de la date
d’achat, contre tous défauts de matière et vices de fabrication. Au cours de cette période,
toute pièce défectueuse sera remplacée gratuitement. Cette garantie ne couvre pas l’usure
normale de l’appareil, les pièces cassables telles que du verre, des ampoules, etc., ni les
détériorations provoquées par une mauvaise utilisation et le non-respect du mode d’emploi.
Aucune garantie ne sera due si l’appareil a fait l’objet d’une intervention à titre de
réparation ou d’entretien par des personnes non-agréées par nous-mêmes.
Informations à fournir au Service Clientèle
Si une réparation de l’appareil s’avère nécessaire, veuillez contacter notre Service Clientèle
(vous trouverez l’adresse de ce service dans l’appendice de ce manuel), en leur fournissant
un résumé détaillé du défaut et le numéro d’article KS ... figurant sur la plaque signalétique
de l’appareil (voir schéma). Ces informations nous permettront de traiter votre demande de
manière efficace.
20
This manual suits for next models
1
Table of contents
Languages:
Other SEVERIN Wine Cooler manuals

SEVERIN
SEVERIN KS9894 User manual

SEVERIN
SEVERIN KS 9888 User manual

SEVERIN
SEVERIN SEVINZO 28 Duo User manual

SEVERIN
SEVERIN KS 9887 User guide

SEVERIN
SEVERIN KS 9888 User guide

SEVERIN
SEVERIN KS 9886 User guide

SEVERIN
SEVERIN KS 9883 User guide

SEVERIN
SEVERIN KS 9889 User manual

SEVERIN
SEVERIN KS 9883 - CAVE A VIN User manual

SEVERIN
SEVERIN KS9894 User manual