Sewell SW-USBDVI-HR User manual

SW-USBDVI-HR
USB External Video Card
User’s Manual

USB 2.0 Display Adapter User’s Manual
ABOUT THIS MANUAL
This manual is designed for use with the USB Display Adapter –HD . Information in this document
has been carefully checked for accuracy; however, no guarantee is given to the correctness of the
contents. The information in this document is subject to change without notice. The manufacturer
does not make any representations or warranties (implied or otherwise) regarding the accuracy and
completeness of this document and shall in no event be liable for any loss of profit or any
commercial damage, including but not limited to special, incidental, consequential, or other damage.
SAFETY INSTRUCTIONS
Always read the safety instructions carefully:
Keep this User’s Manual for future reference
Keep this equipment away from humidity
If any of the following situation arises, get the equipment checked by a service technician:
•The equipment has been exposed to moisture.
•The equipment has been dropped and damaged.
•The equipment has obvious sign of breakage.
•The equipment has not been working well or you cannot get it to work according to the
User’s Manual.
COPYRIGHT
This document contains proprietary information protected by copyright. All right are reserved. No
part of this manual may be reproduced by any mechanical, electronic or other means, in any form,
without prior written permission of the manufacturer.
i

Table of Contents
Table of Contents
1. Introduction.......................................................................................................1
Applications ........................................................................................................2
Features..............................................................................................................2
Package Contents...............................................................................................3
System Requirements.........................................................................................3
2. Installation .........................................................................................................5
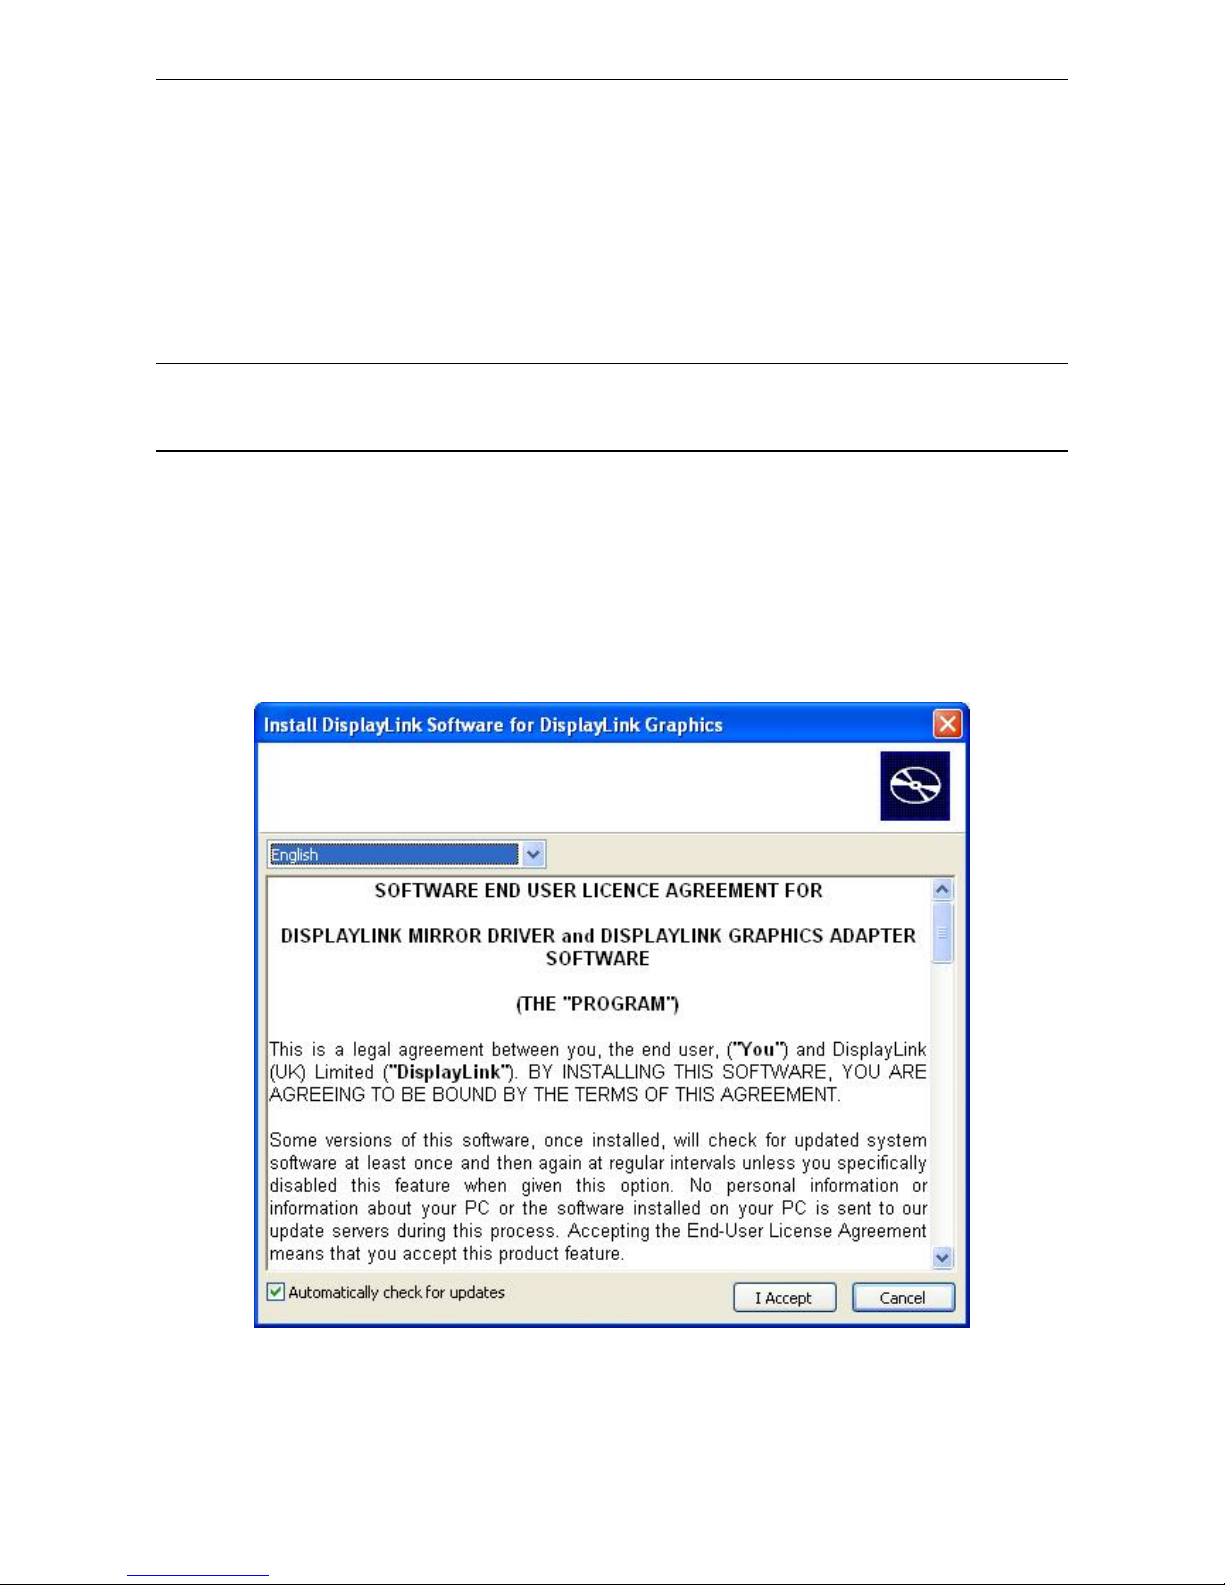
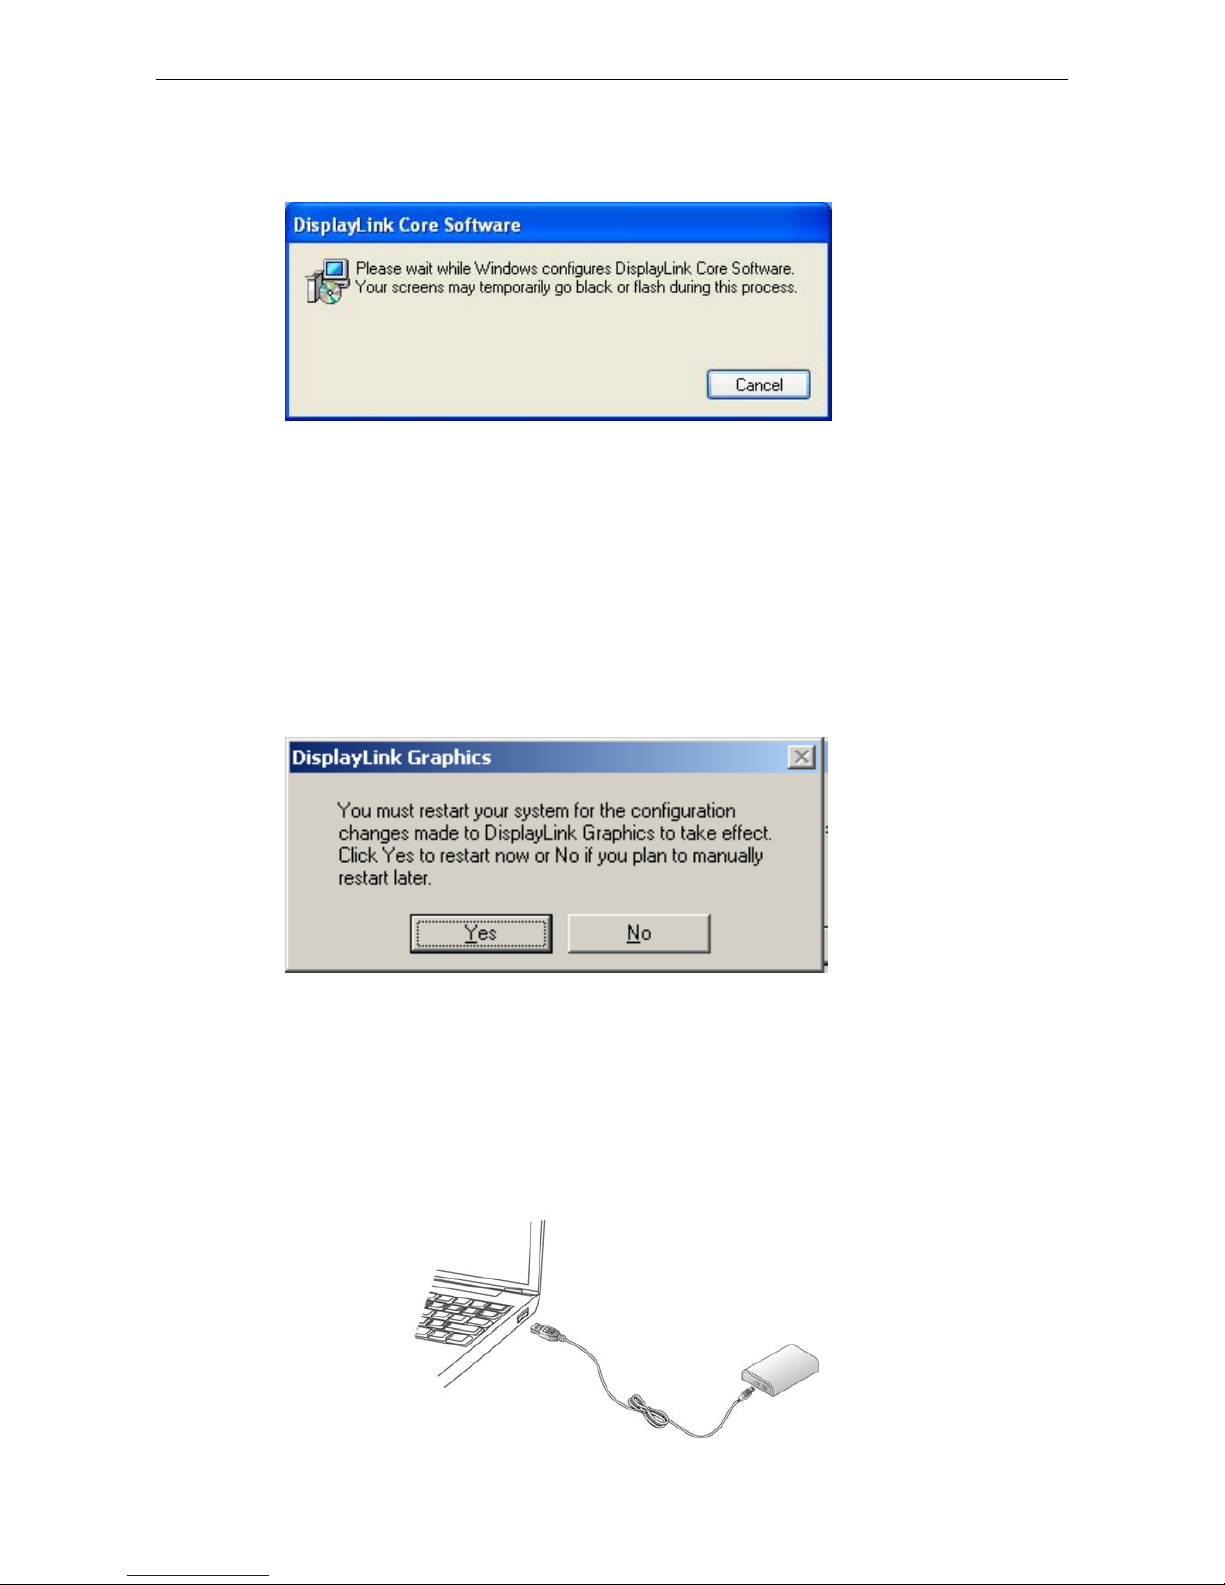
On Windows 2000 and XP..................................................................................5
On Windows Vista...............................................................................................9
Connected to the adapter and monitor..............................................................12
3. Using the Adapter ...........................................................................................14
Display Properties.............................................................................................14
Display Modes ..................................................................................................15
Extend Your Windows Desktop to Add-on Monitor (Default)......................16
Mirror Your Windows Desktop ...................................................................18
Be the Primary Monitor ..............................................................................19
Adjusting Resolution, Color Depth and Refresh Rate .......................................20
Configure the components.........................................................................21
Standby and Hibernate, Shut Down and Restart...............................................24
Disconnecting the Adapter ................................................................................24
Using Dual Adapters .........................................................................................24
Verifying the Driver Installation..........................................................................26
Uninstall the Adapter and Driver .......................................................................27
4. Troubleshooting..............................................................................................28
5. Specifications..................................................................................................30
6. Regulatory Compliance..................................................................................32
FCC Conditions ................................................................................................32
CE.....................................................................................................................32
WEEE Information ............................................................................................32
ii

1. Introduction
1. Introduction
This USB 2.0 Display Adapter enables you to connect one more monitor, LCD or projector
to a computer with a USB 2.0 port. For desktop users adding an extra monitor via USB
connection is easier than ever without having to open the computer chassis to install an
internal video card. Once the installation is done, the USB-attached monitor soon wakes up.
No function key hassle to swap a second monitor.
With this handy adapter, you can enjoy many benefits brought by an add-on monitor. The
most obvious one is that you get more desktop area to have more applications visible at
one time. For example, you may work on one monitor while your family watching video on
the other. No more stacking windows within the confines of a single display. Or you may
span an application, e.g. spreadsheets, across two sides of displays. What’s more, the
adapter is hot pluggable. If you are not using the extra monitor, just unplug the adapter at
any time; no reboot needed.
System performance is an important issue when using multiple monitors. Another benefit of
this adapter is that it uses little computer resource; ensuring users get quality display
without comprising computer performance.
VGA or DVI monitor
USB-enabled computer
1

USB 2.0 Display Adapter - HD User’s Manual
Applications
Office workstation
View your large spreadsheets across two screens with display continuity
Multitask more effectively without overlapping windows
Edit on one screen while surfing the Internet information on the other
On the road
Do multiple screen presentations without bringing another computer
Easily provide multiple screen exhibitions in a trade show
Graphics workstation
Use second display for palettes/tools
Get a panoramic view of large documents
Editing workstation
Type documents on one screen while viewing reference material on the other
Compare two documents simultaneously across two screens
Financial analysis
Have one monitor per data stream
View charts and live data at the same time
Entertainment
View videos/TV on one screen and reviews on the other
Get additional perspectives when playing games
Features
Add-on monitor, LCD or projector through a single USB 2.0 port
Hot-plug ; add or remove monitor without system reboot
Small in size, works with all VGA / DVI-I displays.
Supports High Resolution up to WUXGA 1920 x 1200
Video streaming is supported up to 1080p
Extend and Mirror mode support.
Resumes from hibernation and suspend modes
Supports up to 6 USB display adapters to work simultaneously
2

1. Introduction
Package Contents
Before installation, please check the items in the package. The package should
contain the following items:
USB Display Adapter x1
Driver CD x1
USBCable x1
Quick Installation Guide x1
DVI to VGA Adapter (Optional) x1
System Requirements
The minimum requirements for the PC are:
With Single Core CPU at 1.2GHz or higher processor clock. Intel®
Pentium®/Celeron®family, or AMD®K6®/Athlon™/Duron™family, or
compatible processor
512MB memory
At least one USB2.0 port
30Mb of available disk space
Windows®2000 SP 4 , XP Home or Professional (Including Table edition)
SP2 or SP3 and Vista™SP1 (32-bit or 64-bit)
Super VGA (800 x 600) or higher resolution monitor
To play DVD on the adapter-attached monitor, in addition to the requirements
above, the following requirements should also be met:
With dual core CPU at 2.0 GHz processor clock
The adapter screen resolution be set to 800x600 with 16bit color
3

USB 2.0 Display Adapter - HD User’s Manual
In addition to the following processor and memory configurations (base on usage
model)
For 1-2 monitors, business usage, productivity target.
This may not provide full frame rate DVD playback at full screen.
1.2GHz Single Core CPU
512MB memory
For 3 monitors, where 1 could run DVD video while also targeting productivity and
business apps.
Will support only 1 video of DVD resolution at full screen:.
1.8GHz CPU
1GB memory
For 6 screen where 1 screen can run full screen DVD video:
1.6GHz Core Duo
1GB memory
4

2. Installation
2. Installation
On Windows 2000 and XP
Caution: DO NOT connect the USB display adapter to your computer before you install the
provided driver. You will be instructed to do so later.
Follow the procedures below to install the driver and then connect the adapter:
1. Insert the provided CD into your disc drive and the installer program will run
automatically when the Driver CD is inserted, and your may see the Licence
agreement screen prompted as below. Please click on I Accept to start the Driver
install.
If the installer program doesn’t run automatically, please locate and double-click on
the Autorun.exe file in the CD to launch the install program.
5

USB 2.0 Display Adapter - HD User’s Manual
2. Please wait while Windows configures DisplayLink Core Software. Your screens
may temporarily go black or flash during this process.
*Actual strings depend on your operation system. These screen shots are from Windows XP
and might vary slightly for each operation system.
Notice for Windows 2000 users:
If prompted to restart your computer, click Yes to restart or No to manually
restart later. Note that a reboot is always needed for a successful installation.
If the reboot prompt doesn’t appear, make sure to manually reboot your
computer.
3. When finished, the installation screen will disappear and you will return to your
desktop.
4. Connect the USB display adapter to your computer and monitor. Connect the smaller
end of the USB cable to the adapter. Then connect the other end of the USB cable to
an USB 2.0 port on your computer.
6

2. Installation
5. After the connection, a pop-up message will appear in the notification area indicating
the Found New Hardware.
6. When you see the Found New Hardware Wizard screen prompted as below, please
follow the steps and Click on Next to continue the display adapter installing.
7

USB 2.0 Display Adapter - HD User’s Manual
7. Click on OK and Finish to complete the Found New Hardware Wizard installation.
Notice for users:
If prompted to restart your computer, click Yes to restart or No to manually
restart later. Note that a reboot is always needed for a successful installation.
If the reboot prompt doesn’t appear, make sure to manually reboot your
computer.
8. After installation is completed, the popup message will appear in the notification area
as following. You may click on the icon to control the new display and start to enjoy
using the USB display adapter now.
8

2. Installation
On Windows Vista
Caution: DO NOT connect the USB display adapter to your computer before you install the
provided driver. You will be instructed to do so later.
Follow the procedures below to install the driver and then connect the adapter:
1. Insert the provided CD into your disc drive and installer program will run automatically
when the Driver CD is inserted. Please click on Run Setup.exe to execute the installer
program.
Note:
If the installer program doesn’t run automatically, please locate and double-click on
the Setup.exe file in the Driver folder to launch the setup program.
If you encounter a User Account Control dialog box when attempting to install a
program, enter an administrator password or click Allow to start the installation.
9

USB 2.0 Display Adapter - HD User’s Manual
2. When you see the Licence Agreement screen prompted as below, please click on I
Accept to install the software for USB display adapter...
3. Please wait while Windows configures DisplayLink Core Software. Your screens may
temporarily go black or flash during this process.
4. When finished, the installation screen will disappear and you will return to your
desktop.
10

2. Installation
5. Connect the USB display adapter to your computer and monitor. Connect the smaller
end of the USB cable to the adapter. Then connect the other end of the USB cable to
an USB 2.0 port on your computer.
6. After installation is completed, the popup message will appear in the notification area
as following. You may click on the icon to control the new display and start to enjoy
using the USB display adapter now.
*Actual strings depend on your operation system. These screen shots are from Windows Vista 32-bit
and might vary slightly for each operation system.
11

USB 2.0 Display Adapter - HD User’s Manual
Connected to the adapter and monitor
If your monitor is not yet connected to the adapter, make the connection and power on your
monitor.
For VGA model: Use a VGA cable (not provided) to connect the VGA jack to a
monitor equipped with VGA input jack.
For DVI model: The equipped DVI-I (DVI-Integrated) connector transmits both the
digital and analog signals. This means it supports either of these two connection
types:
•It can be connected to a DVI-D (digital) monitor using a DVI cable (not
provided)
•Or, it can be connected to an analog VGA monitor using the privided DVI-I
to VGA adapter and a VGA cable (not provided).
12

2. Installation
4. After you connect the adapter, Windows will automatically complete the
installation.
5. Once the installation is done, an extended screen will appear on the add-on
monitor.
For Windows Vista, if the add-on monitor is blank, please reboot your
system again.
If required, you can connect and disconnect the add-on monitor any time
without disconnecting the adapter from the USB port on your computer.
To change the display mode, see next chapter for instructions.
During the installation, it’s normal that the screen flicks black a couple of times.
Sometimes it takes time for the add-on monitor to show the video.
13

USB 2.0 Display Adapter - HD User’s Manual
3. Using the Adapter
Display Properties
Display Properties allows you to configuration the display mode, color quality, screen
resolution, and physical arrangement of your monitors.
*The USB display adapter Display mode and adjusting Resolution, Color Depth and Refresh Rate. Please
refer to the “Display mode” and Adjusting Resolution, Color Depth and Refresh Rate “” section for details.
Easy Setting
Click on the DisplayLink Device icon and select Advanced to configuration Display
Properties as above or manually setting as below description.
Manually Setting
Position the mouse anywhere on your computer desktop, right-click and select Personalize
> Display Settings on Vista or Properties > Settings on XP/2000.
14

3. Using the Adapter
Display Modes
There is several ways you can utilize the monitor attached on the adapter. The add-on
monitor can be configured to use either “mirror mode”, “extended mode” or be the primary
display as described in this section.
Click on the DisplayLink Device icon to change the display modes or select Off to switch
to normal display mode.
15

USB 2.0 Display Adapter - HD User’s Manual
Extend Your Windows Desktop to Add-on Monitor (Default)
In this so-called “extended mode”, your display will be spread over the add-on monitor(s).
This mode allows you to perform multiple tasks more effectively without overlapping
windows.
Easy Setting
Click on the DisplayLink Device icon and select Exchange or Extend to Right; Left;
Above; Below to configuration the setting as above, or manually setting as below
description.
Manually Setting
Extended mode is the default setting. To set up the adapter to use or restore extended
mode, follow these steps:
1. Position the mouse anywhere on your computer desktop, right-click and select
Personalize > Display Settings on Vista or Properties > Settings on XP/2000.
2. In the Display drop-down menu, select the option with the string “DisplayLink
Graphics Adapter”.
3. Check the Extend the desktop onto this monitor box on Vista or Extend my
Windows desktop onto this monitor box on XP/2000.
16

3. Using the Adapter
4. Drag the icons in the window at the top of the screen to match the physical
arrangement of your primary monitor and add-on monitor.
The add-on monitor connected to the adapter may be identified as either "2" or “3”,
depending on your computer, although there may not be a total of 3 screens
connected.
5. Click OK to close the settings screen.
Once the setting is done, to use your extended desktop, simply drag and drop your
open windows over to your second monitor. However, note that some applications
may not support display on the extended desktop.
Cursor disappeared ?
If you’re in extneded mode but the add-on monitor is not connected, the desktop
still pans to the add-on monitor and it’s possible that your cursor has moved to
the extended desktop so that you cannot find it on the primary display. To solve
the problem in such a case, connect the add-on monitor to the adapter or keep
moving your mouse to try or unplug the adapter first to restore the cursor.
Video and DVD Playback in Extened Mode
On Windows Vista with extended mode, it’s suggested that you run video or DVD
playback programs on your primary monitor instead of the add-on monitor to
ensure the playback performance.
c.
a.
b.
17
Table of contents
Popular Video Card manuals by other brands

HP
HP Visualize b1000 install guide

ATI Technologies
ATI Technologies ALL-IN-WONDER PRO Installation and setup

IOGear
IOGear GUC2015V installation guide

ATI Technologies
ATI Technologies 9600 - Radeon XT 128 MB DDR Video Adapter Installation and setup guide

Gigabyte
Gigabyte GV-N275UD-18I user manual

TerraTec
TerraTec Mystify 5800 Ultra Product information