SEWOO LK-P400 User manual

P400 ENG Rev. C 02/2021
28-6, Gajangsaneopdong-ro, Osan-si, Gyeonggi-do ,18103, Republic of Korea
+82-31-8077-5000 / +82-31-624-5310 / http://www.miniprinter.com

MOBILE PRINTER(Wi-Fi & Bluetooth)
All specications are subject to change without notice

the user that changes or modications not expressly approved by the Aroot Co., Ltd. responsible for
compliance could void the user's authority to operate the equipment.
This equipment has been tested and found to comply with the limits for a Class B
digital device, pursuant to part 15 of the FCC Rules. These limits are designed to provide reasonable
protection against harmful interference in a residential installation. This equipment generates, uses and
can radiate radio frequency energy and, if not installed and used in accordance with the instructions, may
cause harmful interference to radio communications. However, there is no guarantee that interference will
not occur in a particular installation.
If this equipment does cause harmful interference to radio or television reception, which can be
determined by turning the equipment o and on, the user is encouraged to try to correct the
interference by one or more of the following measures:
-Reorient or relocate the receiving antenna.
-Increase the separation between the equipment and receiver.
-Connect the equipment into an outlet on a circuit dierent from that to which the receiver is connected.
-Consult the dealer or an experienced radio/TV technician for help.
The responsible party for Supplier's Declaration of Conformity must be located within the United States,
so you have to include following information in manual.
Aroot Co., Ltd. (Manager : Vic Barczyk)
19700 S. Vermont Ave. STE 200, Torrance, CA 90502 | USA
(TEL) +310-561-8030 / (FAX) +82-31-459-8880
http://www.miniprinter.com
Use of the Made for Apple badge means that an accessory has been designed to connect
specically to the Apple product(s) identied in the badge, and has been certied by the
developer to meet Apple performance standards.
Apple is not responsible for the operation of this device or its compliance with safety and
regulatory standards.

1) This device may not cause harmful interference, and
2) This device must accept any interference received, including interference that may
cause undesired operation.
-replacement of a battery with anincorrect type that can defeat a safeguard
(for example, in the case of same lithium battery types)
-disposal ofa battery into re or a hot oven, ormechanically crushing or cutting of a battery,
that can result in an explosion;
-leaving a battery in an extremely high temperature surrounding environment that can result in
an explosion or the leakage of ammable liquid or gas ; and
-a battery subjected to extrmely low air pressure that may result in an explosion or the leakage of
ammable liquid or gas.
-remplacement d'une batterie par un type incorrect qui peut faire échouer une sauvegarde
(par exemple, dans le cas des mêmes types de batteries au lithium)
-la mise au rebut d'une batterie dans un feu ou un four chaud, ou l'écrasement ou la coupure
mécanique d'une batterie, qui peut provoquer une explosion;
-laisser une batterie dans un environnement environnant à température extrêmement élevée
pouvant entraîner une explosion ou une fuite de liquide ou de gaz inammable; et
-une batterie soumise à une pression d'air extrêmement basse qui peut provoquer une explosion
ou une fuite de liquide ou de gaz inammable.
This symbol on the product or on its packaging indicates that this product shall not be
treated as household waste. Instead it shall be handed over to the applicable collection
point for the recycling of electrical and electronics equipment. For more detailed
information about recycling of this product, please contact your local city oce, your
household waste disposal service or the shop where you purchased the product.
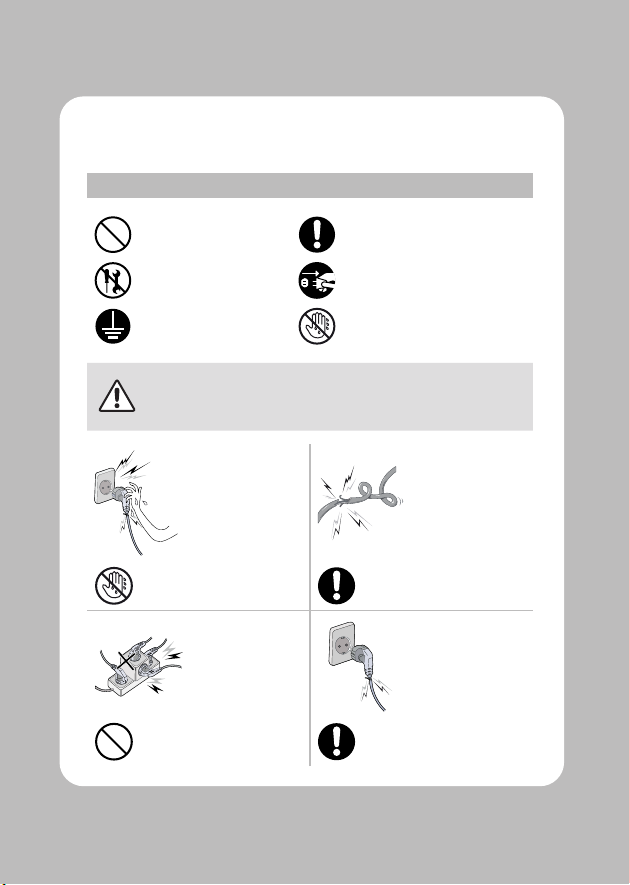
For better safety and reliability, adhere to the following precautionary measures.
Read and follow the instructions carefully before operation of the product.
Prohibition Must follow
Do not disassemble
Unplug the power from the
outlet
Grounding to prevent
electric shock
Do not handle the product with
wet hands
Failure to follow these instructions could result in re, electric shock,
other injuries, or property damage.
Potential risk of
electric shock or re
Potential risk of
electric shock or re
Potential risk of
electric shock or re
Potential risk of
electric shock or re

Failure to follow these instructions could result in re, electric shock,
other injuries, or property damage.
Turn o the power
using the power
button
Potential risk of
malfunction, electric
shock, or re. When
the product needs to
be repaired, please
contact your reseller
Failure to follow these instructions could result in re, electric shock,
other injuries, or property damage.
May cause
damage or injury
Potential risk of re
or unit malfunction
Potential risk of re
or unit malfunction
Potential risk of
re or property
damage

1. Unpacking 2
2. Product overview 3
3. Control Panel Usage 4
4. Paper Installation 5
5. Battery 6
5-1. Battery Installation 6
5-2. Battery Removal 7
5-3. Battery Charging 8
5-4. Charging Cradle(optioanl) 9
6. Belt Strap 10
7. Self Test 11
8. Peripheral Connection 13
8-1. Bluetooth Connection 13
8-2. Wi-Fi Connection 13
8-3. NFC Connection 14
8-4. Interface Cable Connection 15

9. Cleaning the Printer 16
9-1. Print-Head Cleaning 16
9-2. Platen Roller Cleaning 17
10. JAM Error 18
11. Black Mark 19
12. Gap 20
13. Printer Specication 21
14. Utilities 23
15. S/W 24

2
Printer Battery Charger USB Cable
Quick Manual CD (Manual) Roll Paper Belt Strap Cleaning Pen
Large Battery Charging Cradle
Car Charger Shoulder Strap
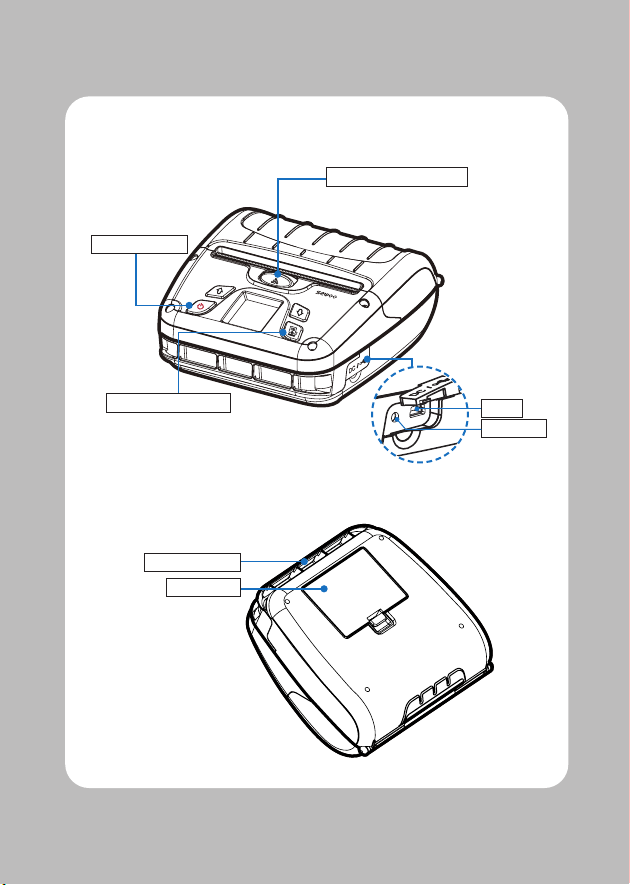
3
POWER Button
Paper FEED Button
COVER OPEN Button
USB
DC POWER
Strap Bracket
Battery
4
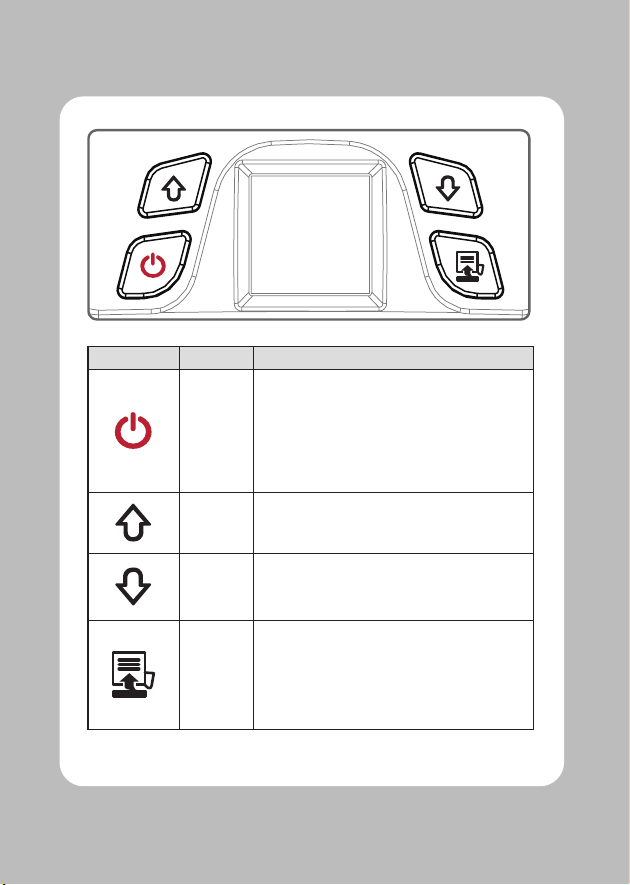
Power
Button
-This button is used to turn the printer on and o.
-When the printer is o, press this button for
approximately 3 seconds and the printer will
power on.
-When you press this button while the printer is
powered on, the printer will turn o.
Up Button
-Selects the highlighted menu option.
Menu
Enter
Button
-Moves up through menu options.
Paper
Feed
Button
-This button can be used to manually feed the paper.
-Additionally, this button is also used to initiate
self-tests and Hexadecimal Dumping.
※ Refer to 11
-Use ENTER to enter the menu.

5
Paper guide
COVER OPEN button
Press the COVER OPEN button up to open the
Paper cover. You can set the width of paper
guide by turning the knob with your nger.
Place the paper roll as shown. Make sure
the paper is placed in the right direction.
Pull a short length of paper out of the
printer and close the cover.
Please tear the paper down.
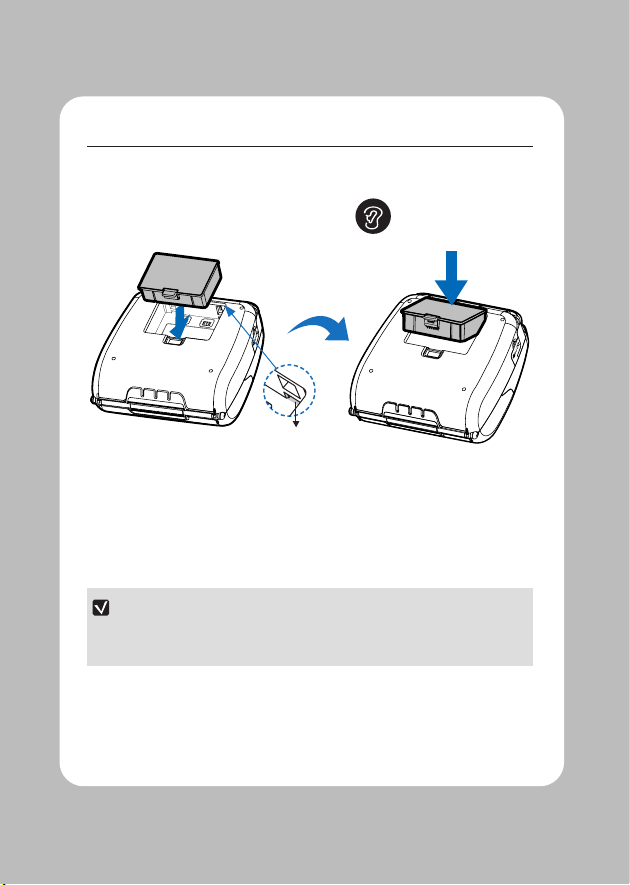
6
Please make sure you
hear the closing sound
of the upper cover.
HOOK
Align battery hook as shown in the picture.
Push the battery into the printer until it locks in place.
As the battery is not charged at the time of your purchase, charge the
battery prior to using the printer.
7
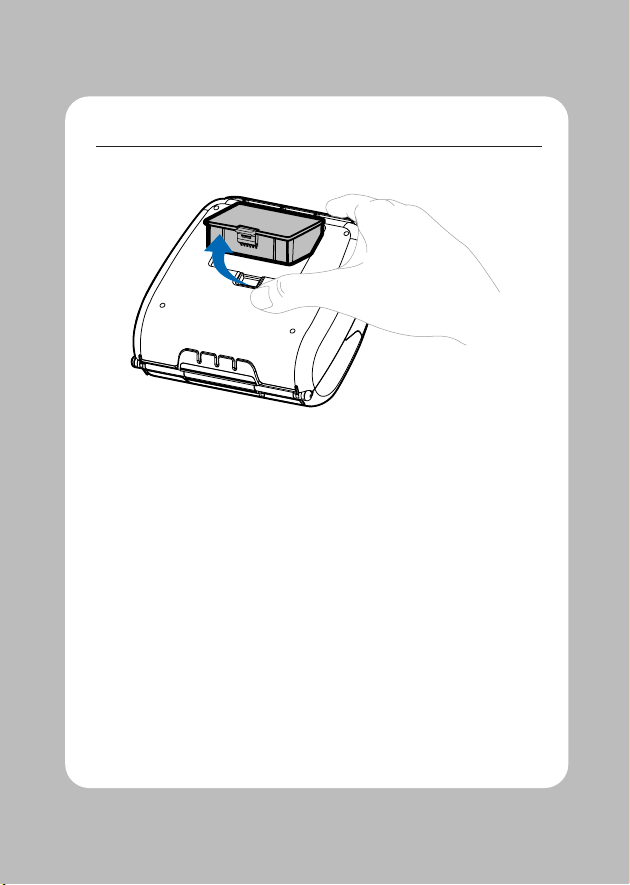
REMOVE
Remove the battery as shown.
Press up on the battery handle and lift it up.
Remove the battery.
8
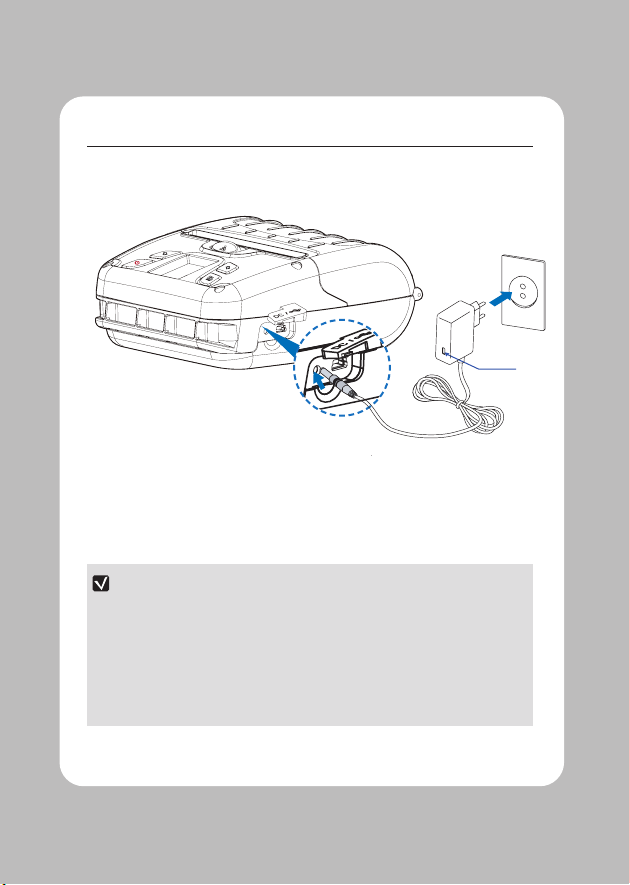
Lamp
Make sure the printer is turned o.
After opening the DC JACK cover, connect the DC JACK to the printer.
Plug the power cord into the electrical outlet.
If the charger provided by the manufacturer is not used, the printer can be
damaged, and the manufacturer is not liable for the consequential damage.
Before removing the battery, make sure that power is turned o.
The printer does not work when only connected to the charger.
While charging, do not turn on the power.
Do not operate the printer while charging the battery.

9
Lamp
Insert the battery into the battery charger as shown above.
Connect the DC JACK to the electrical outlet.
Plug the power cord into the electrical outlet.
Once the charging is completed, remove the battery from the charger.
Charging Lamp Red Green
In the case the battery is not inserted properly, the red LED will blink.
Remove and reinsert the battery.
Optional
10
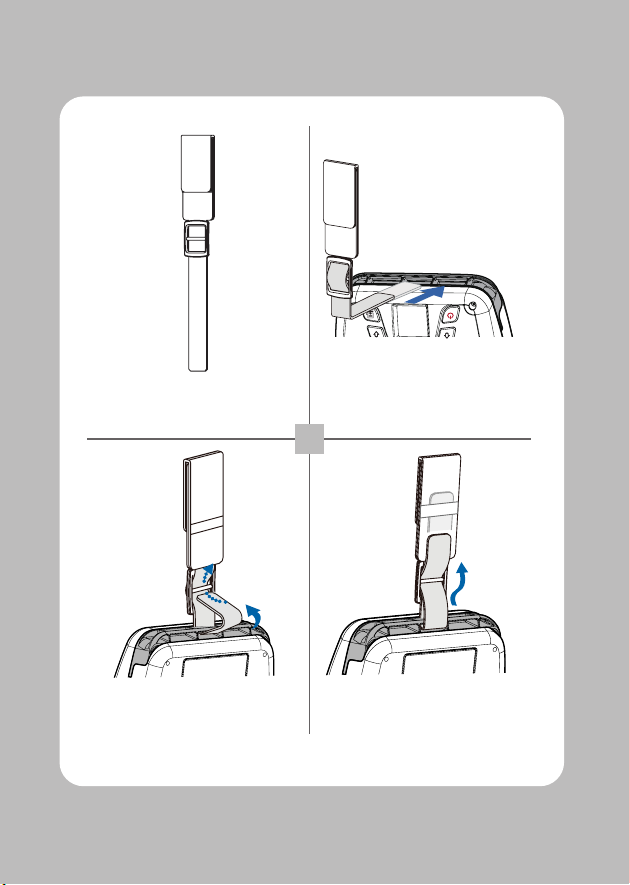
Prepare the belt strap. Put the strap into the strap bracket hole
as shown.
Turn the strap and printer over and
put the strap into the hook as shown.
Adjust the strap length for the user’s
convenience.

11
Turn o the power by pressing the
power button for approximately
3 seconds.
While you are holding the FEED button,
press the power button.
To enter hex dump mode, press
the FEED button once more.
If the FEED button is not pressed,
the self-test will automatically
nish after 3 seconds.
The self-test will print.

12
Upon initial installation or for
troubleshooting, you can run the
diagnostic test to get information
about:
-Firmware version, emulation,
codepage, sensor settings,
interface settings, etc.
If no issues are found with the
diagnostic test, examine other
devices and software.
The diagnostic test is working
independently of devices and software.
To prevent the motor from
overheating, stop the printer for at
least 30 seconds after continuously
printing 1.5 meters.
13
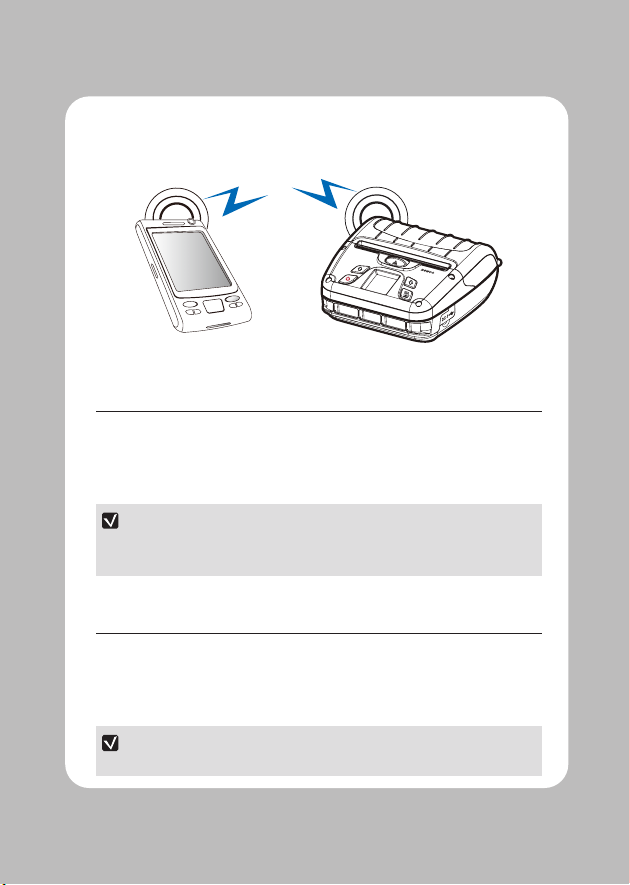
This product can communicate with other devices via Bluetooth, Wi-Fi, or a
communication cable.
The Printer can be connected to devices equipped with Bluetooth
communication capabilities (PDAs, PCs, etc.).
Use the Bluetooth connection function supported by your device to connect to
the printer.
-This model supports NUMERIC COMPARISON function.
-Please refer to the conguration manual for details.
The Printer can be connected to devices equipped with Wi-Fi communication
capabilities (PDAs, PCs, etc.).
Use the Wi-Fi connection function supported by the device to connect to the
printer.
-Please refer to the CONFIGURATION MANUAL for details.
Other manuals for LK-P400
2
Table of contents
Other SEWOO Printer manuals

SEWOO
SEWOO LK-P31 User manual

SEWOO
SEWOO SLK-T21EB Series User manual

SEWOO
SEWOO LK-T12 User manual

SEWOO
SEWOO LK-P21 User manual

SEWOO
SEWOO SLK-TL12X Series User manual

SEWOO
SEWOO SLK-TL32X Series User manual

SEWOO
SEWOO LK-P43II User manual

SEWOO
SEWOO LK-P30 Installation instructions

SEWOO
SEWOO LK-P300 User manual

SEWOO
SEWOO LK-P11B User manual

SEWOO
SEWOO LK-P30 User manual

SEWOO
SEWOO SLK-TL122 User manual

SEWOO
SEWOO SLK-T32EB II User manual

SEWOO
SEWOO LK-P20B User manual

SEWOO
SEWOO LK-P43 User guide

SEWOO
SEWOO WTP-100 User manual

SEWOO
SEWOO SLK-T12EB User manual

SEWOO
SEWOO WTP-150 User manual

SEWOO
SEWOO LK-P30B User manual

SEWOO
SEWOO LK-P41W User manual


