SF SF-H67P User manual
SF-H67P/H52P
SF-67P/52P
Operation Manual


1
Warning: This kind of machine is allowed to cut printed paper, books or soft leathers only. It is
forbidden to cut any metal sheets or other hard objects which do harm to the machine quality.
Children must not operate this machine.
Do not reach beneath the blade.
Do not extract or transport the materials or blade
without protection.
2
Note: Please read this manual carefully before use the machine. It will help you improve the
work efficiency, bring into play the function of the machine, prolong the service life of the
machine.
Do not cut hard materials or materials which may
splinter.
Paper clips or hard materials will damage the
cutting blade.

3
Safety Cautions
According to relevant standards, to avoid accident and injury, only professional operator
is allowed to operate this machine(children or non-professional operators are forbidden to use).
When you use or maintenance these machines, please pay high attention to safety cautions
below:
Handling and Placement
As the machine is heavy, please handle it carefully and put it horizontally on the
clean ground.
Power
The power source should be steady 380V/220V+10 %, 50Hz, 2.5-3.5KW.
Machine may run irregularly if the voltage is too high or too low. We suggest you
use alternating current(AC) power source with steady voltage to improve work
efficiency.
Ground connection
For safety you should use electric supply socket with ground wire connected.
Power overload
Please do not connect many electric equipment at one socket. It is dangerous and
may cause fire or electric shock.
Maintenance
Must turn off the power and remove the power plug before you clean or
maintenance the machine.
Waterproof
Prevent water or other liquid flow into machine inner side.
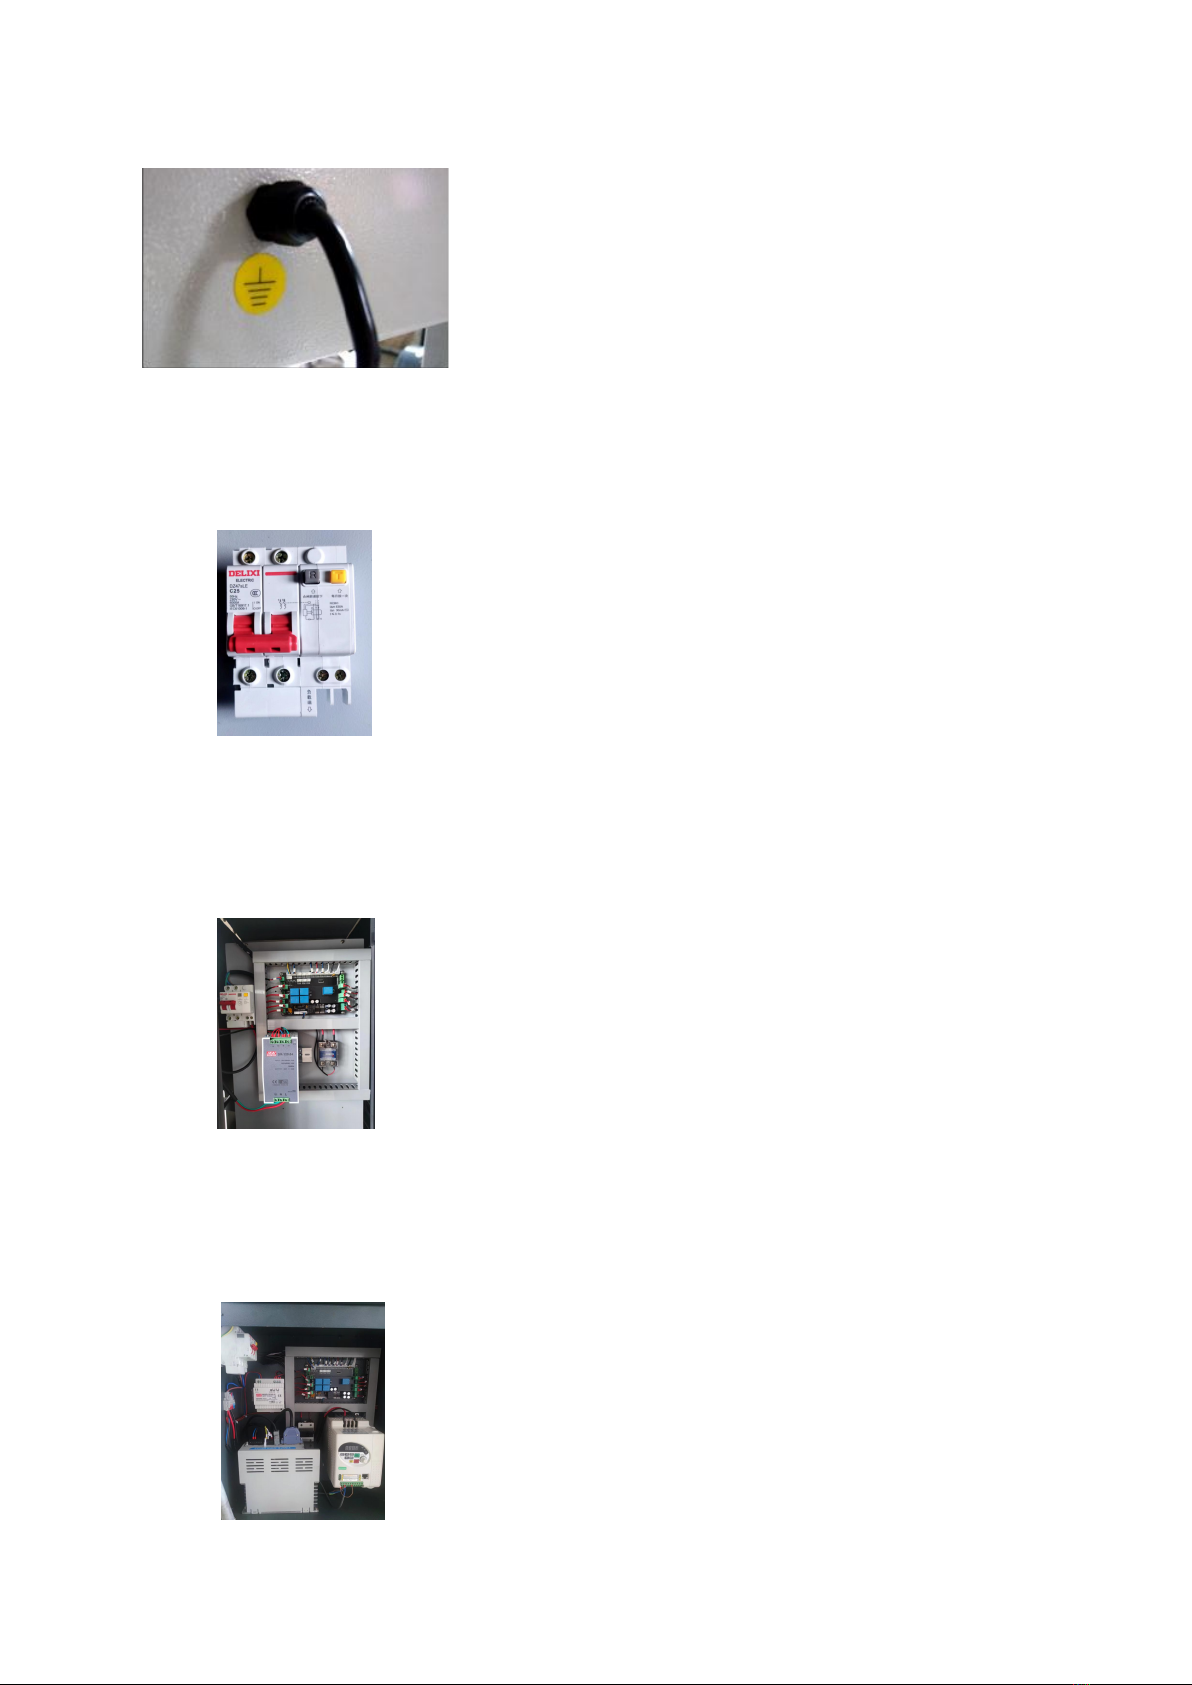
4
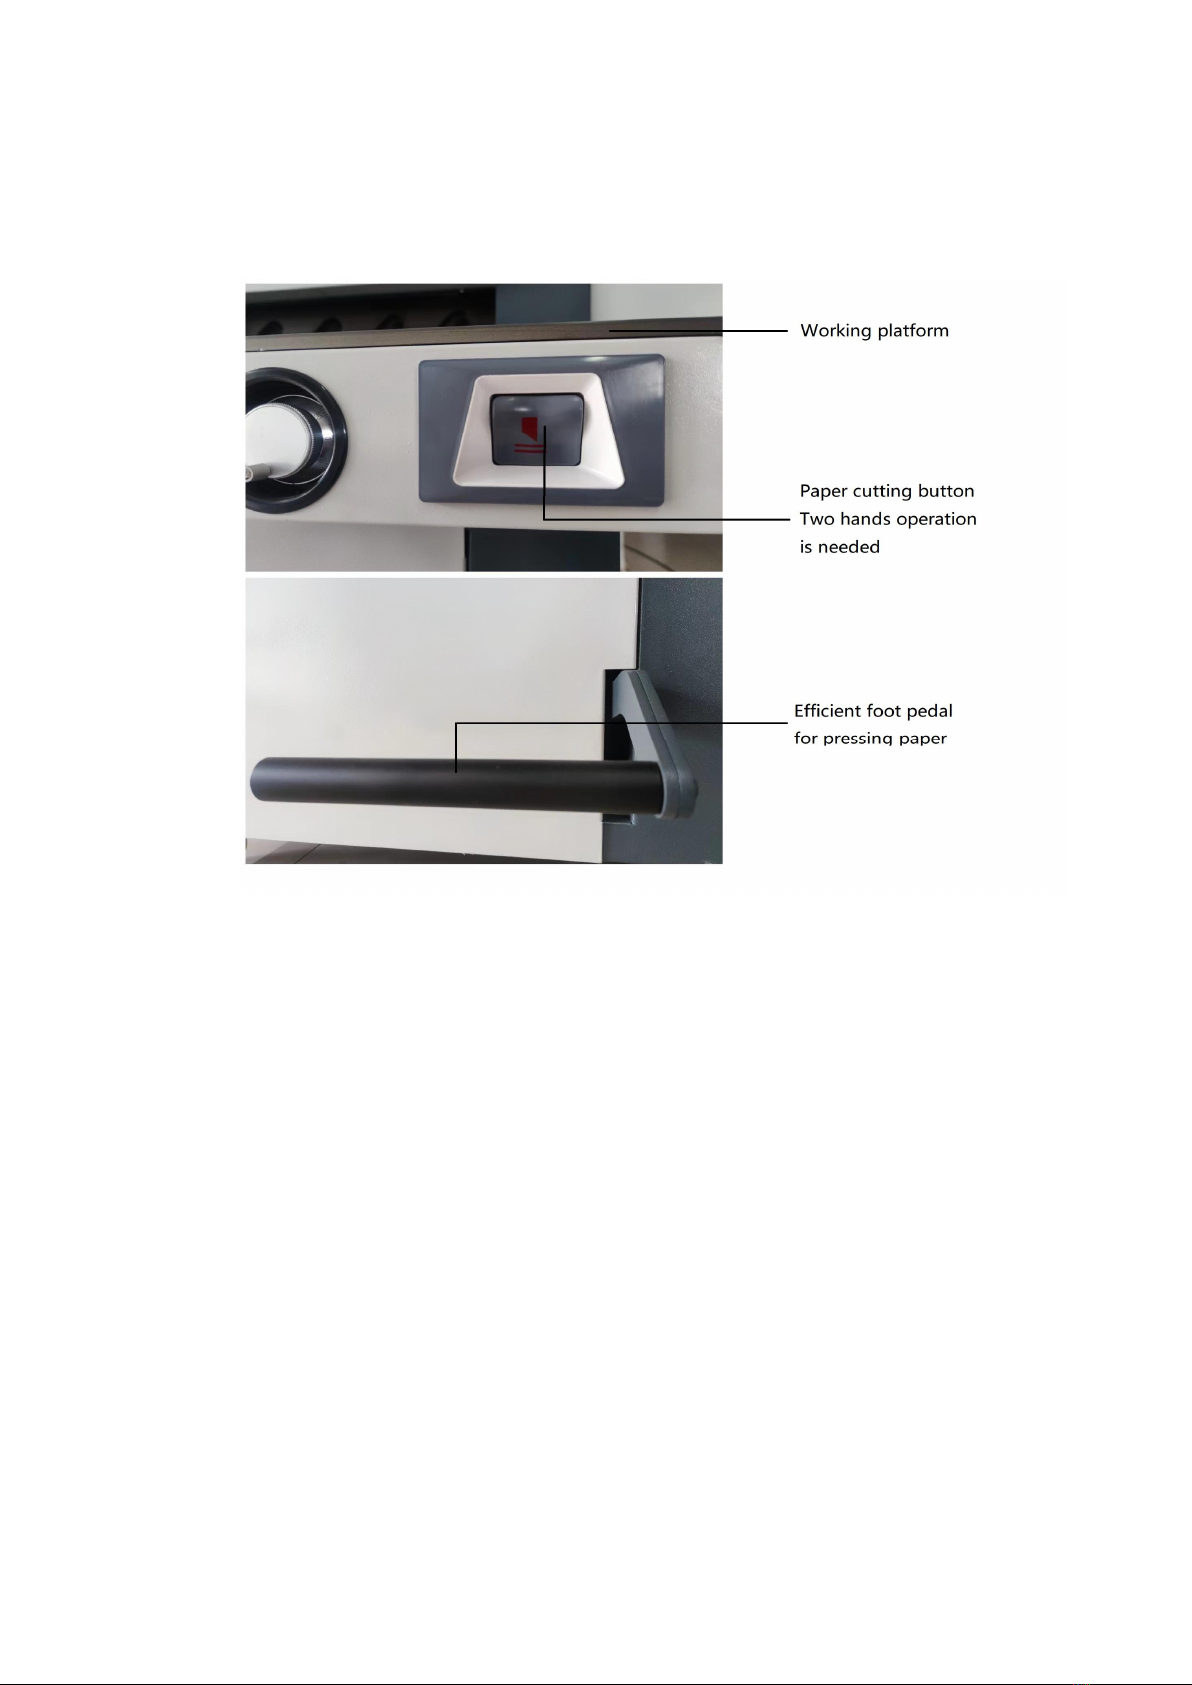
Must use socket with ground wire connected.
Leakage protection switch, non-professional person is
not allowed to open, avoid dangerous.
QC670BC/QC520BC Electrical control cabinet
SF-H67P/SF-H52P Electrical control cabinet

5
Content
Warning.......................................................................................................................................1
Safety Cautions...........................................................................................................................3
Chapter I Safety cautions before installation...........................................................................6
1. Check machine ……………………………………………………............................6
2. Settlement of the machine………………………………………………………........6
3. Environmental conditions…………………………………………………………....6
4. Special suggestion…………………………………………………………………....7
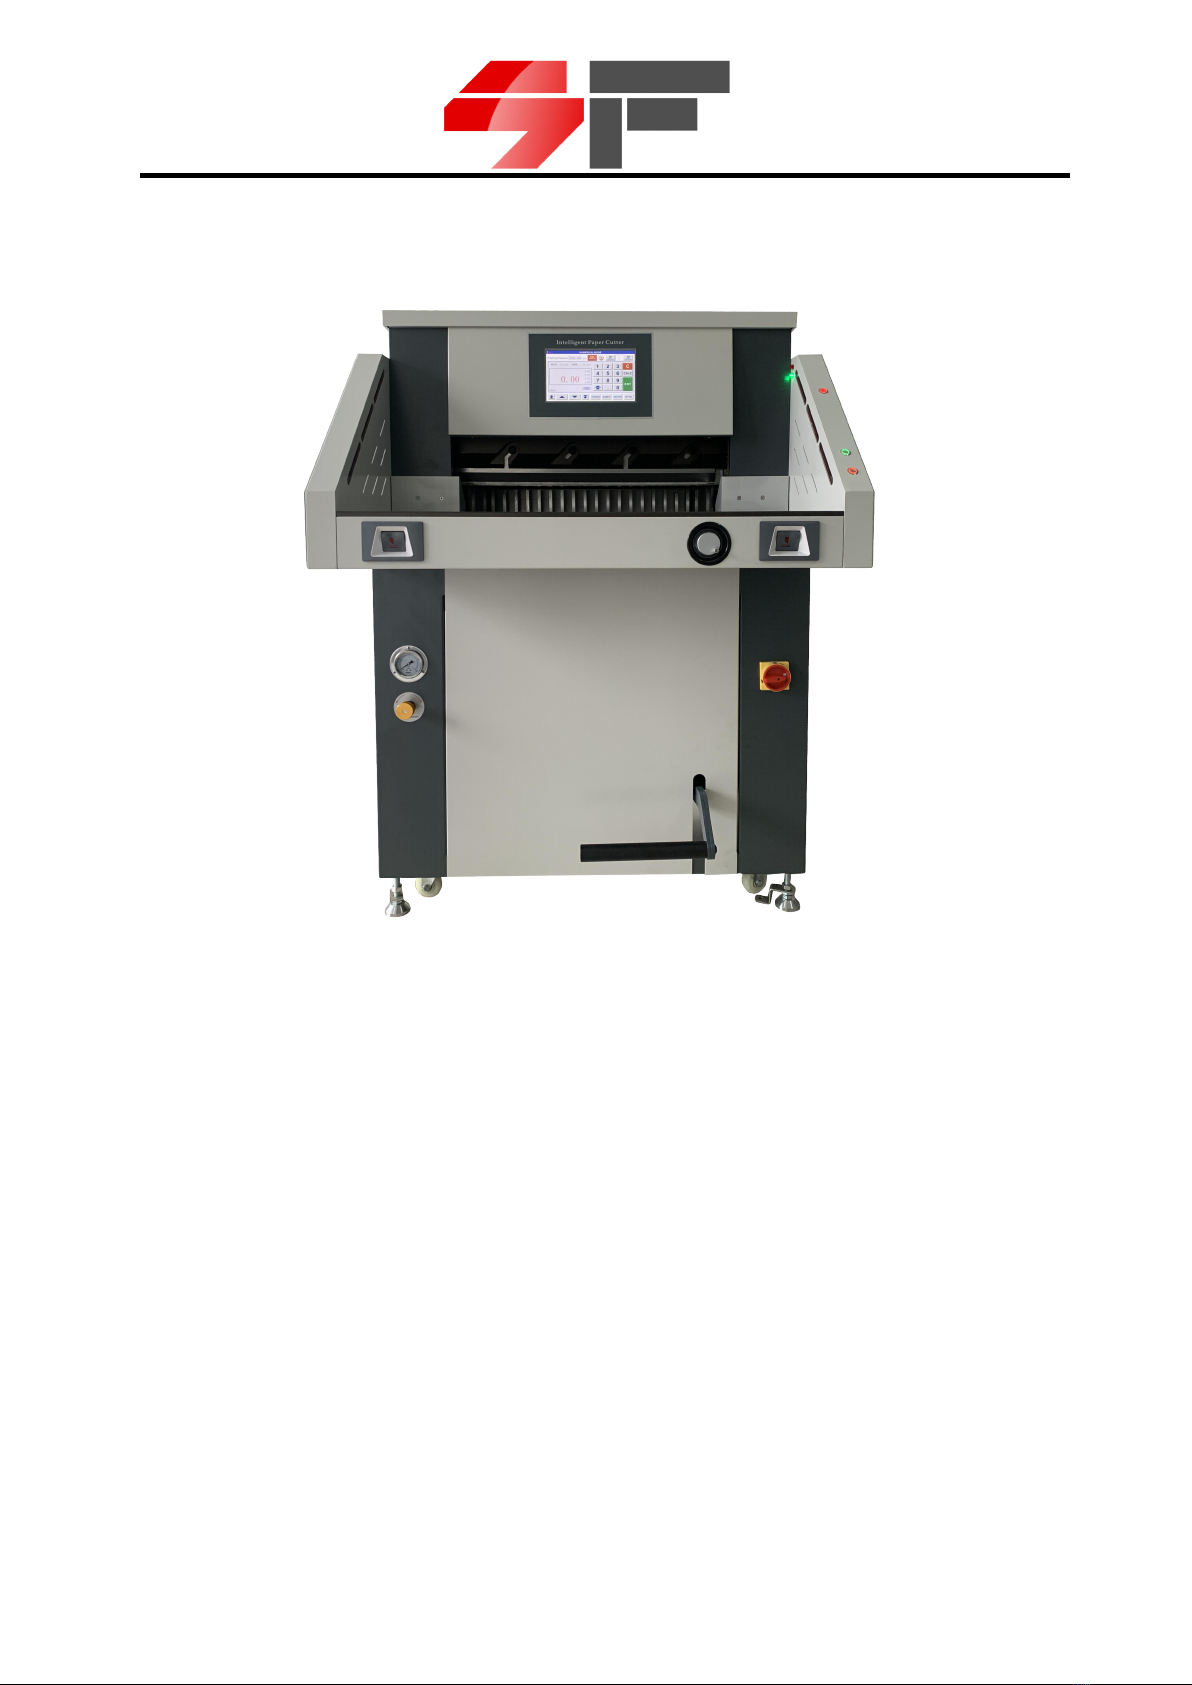
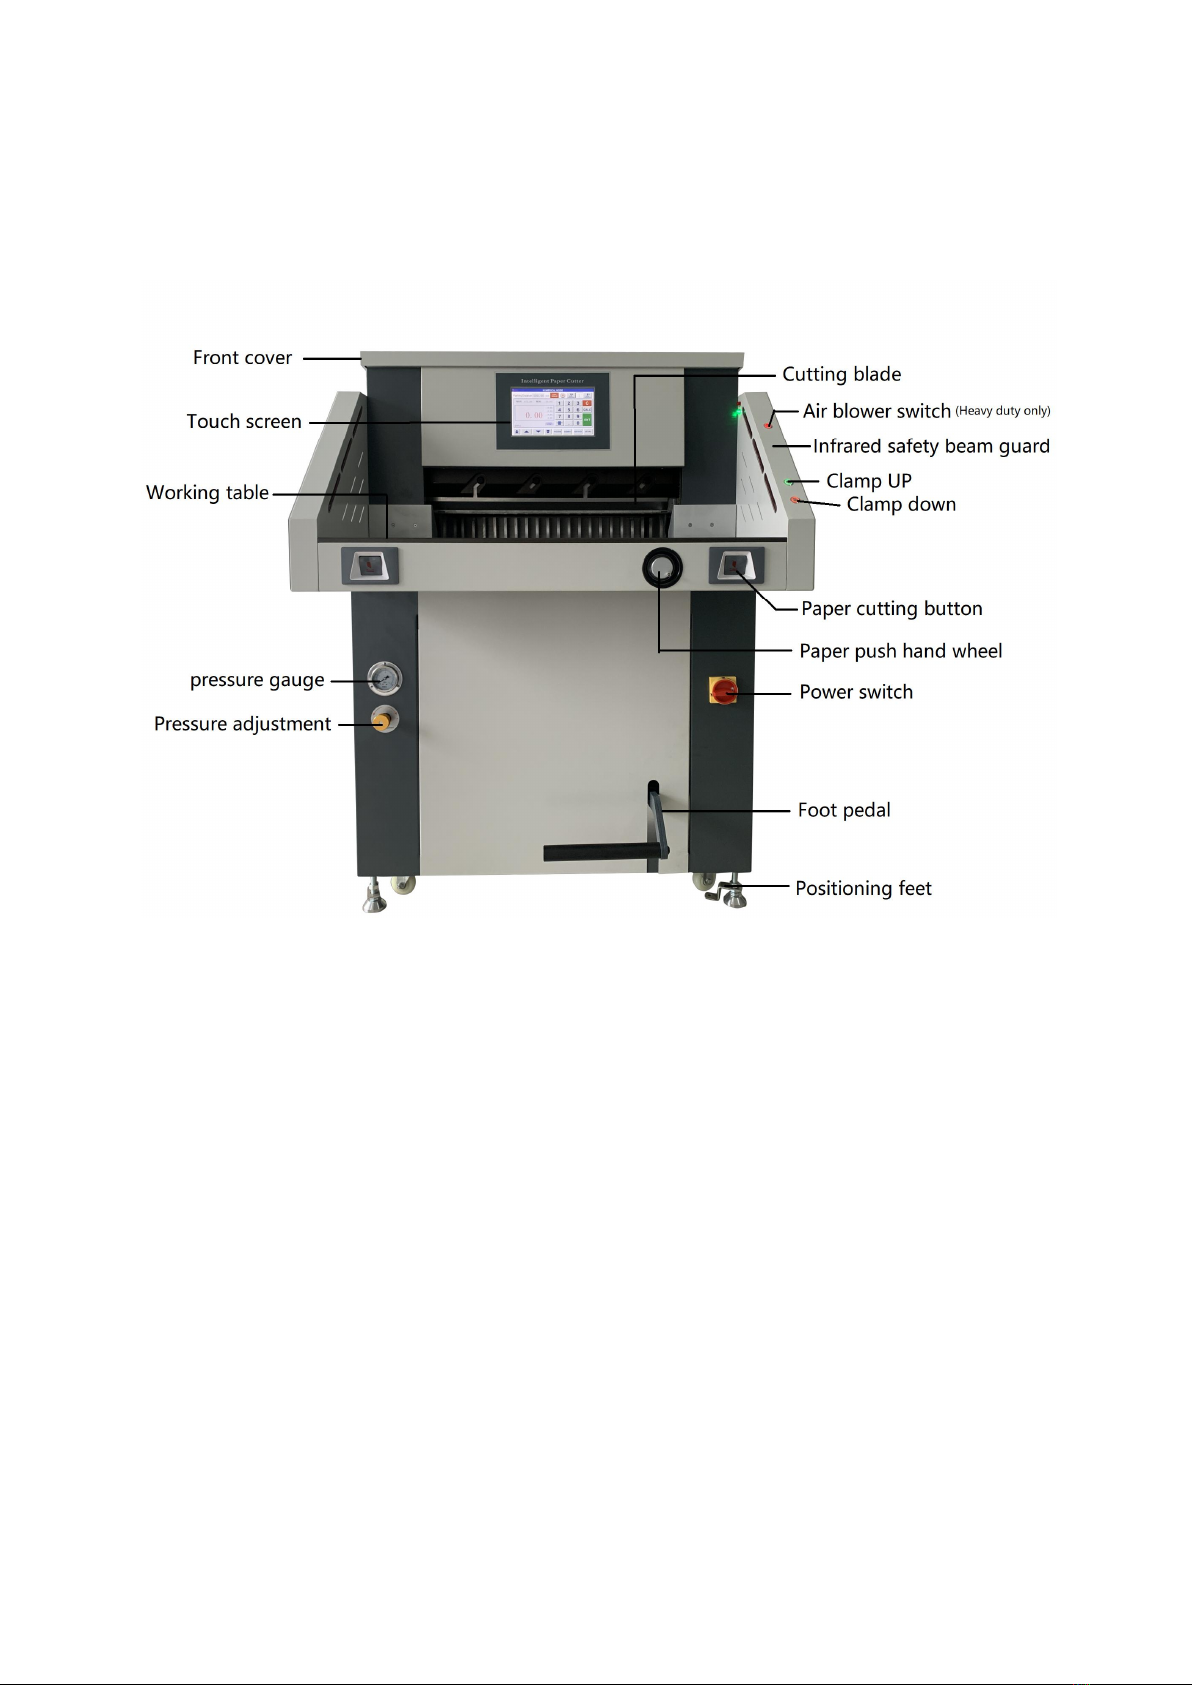
Chapter II Brief instruction of the paper cutter......................................................................8
1. Parts description……………………………………………………………………...8
2. Performance features………………………………………………………………...8
3. Principal technical parameter………………………………………………………...9
4. Operating the cutter………………………………………………………………......9
4-1 Operating button and functions …………………………………........................9
4-2 Operation for the touch screen...................................…………..........................10
Chapter III Basic operation and adjustment.........................................................................12
1. Basic operation...........................................................................................................12
1-1 Turn on the machine............................................................................................12
1-2 Operation instruction...........................................................................................12
2. Basic adjustment.........................................................................................................13
2-1 Cutting depth adjustment......................................................................................13
2-2 Blade replacement................................................................................................14
2-3 Cutting stick adjustment.......................................................................................15
2-4 Clamping pressure adjustment.............................................................................15
2-5 Hydraulic system troubleshooting........................................................................15
Chapter IV Lubrication and maintenance.............................................................................16
1. Lubrication...................................................................................................................16
2. Maintenance.................................................................................................................16
Chapter V General failures and troubleshoot........................................................................17

6
Chapter I Safety cautions before installation
1. Check machine
When you open the package of the machine, firstly please check the machine with relevant
accessories. Please contact the dealer if there is any damage or shortage.
1Machine 1 set
2Operation Manual 1 set
3Tool 1 set
4Maintenance warrant 1 piece
5Cutting blade 1 piece
6Cutting stick 1 piece
7Discharge blade rod 2 pieces
2. Settlement of the machine
8Open the wooden case, take out the machine’s packaging and discharge fixed screws
on the base plate of the main machine; The hydraulic machine should be unloaded by forklift.
Fixing screws
Check the packing list is complete or not.
Check all the parts of machine and clean them.
3. Environmental conditions
The machine should be placed in clean working environment, keep away from
direct sunlight and wind;
Temperature of the operating environment: 10-30℃, can not higher than 32℃;
Humidity level of the operating environment: 50-80%;
Power supply:380V/220V+10%, 50-60Hz, 2.0-3.0KW;
Connect the ground wire correctly.

7
4. Special suggestions
Remember only one professional operator is allowed to work on the machine;
When your hands or other things into the cutting area, turn off the power
immediately;
Two hands operation is needed;
Please do not disassembly infrared safety cover;
When replace cutting blade, you should firmly comply with the blade replace
instruction;
You are not allowed to re-equip the inner construction and circuit of the
machine by yourself.
8
Chapter II Brief instruction of the paper cutter
1. Parts description
2. Performance features
◆Standard models
1. Steel knife holder
2. Ductile iron adjustment plate
3. Aviation aluminum hard anodized platform
4. Double ball screw and double guide rail
5. Stepping closed-loop motor to push paper, 0.28KW
6.10 inch touch screen
7. Enclosed safety photoelectric, 15 channels
8. Mechanical pedal
9.220V, single-phase, 2.2KW motor, with silent oil pump
10. Dual hydraulic system
11. Optional air pump
9
12. Optional auxiliary platform
◆Heavy duty models
1. Thickened beam
2. Aluminum hard anodized tool holder
3. Wear-resistant nylon adjustment plate
4. Thicken and increase the column
5. Thicken the bottom plate
6. Aviation aluminum hard anodized platform
7. Double ball screw double guide rail
8. Servo motor push paper, 0.4KW
9.10 inch touch screen
10. Enclosed safety photoelectric, 15 channels
11. Mechanical pedal
12.220V, single-phase, 2.2KW motor input, with inverter, to 380V, three-phase output
13. Dual hydraulic system
14. Configure the air pump
15. Optional auxiliary platform
3. Principal technical parameter
SF-H67P SF-H52P SF-67P SF-52P
Max cut width (mm) 670 520 670 520
Min cut depth (mm) 30
Max cut height (mm) 80
Cut accuracy (mm) 0.2
Clamp and cut system Hydraulic + Foot pedal
Back gauge control Servo motor+Programmable Stepper motor+Programmable
Air table Yes No
Display mode 10 inch touch screen
Safety protection Enclosed safety photoelectric, 15 channels
Power supply 220V, 50-60Hz, 2.6Kw 220V, 50-60Hz, 2.2Kw 220V, 50-60Hz, 2.4Kw 220V, 50-60Hz, 2.0Kw
Dimension (W*D*H) 1450x1150x1470mm 1300x1000x1470mm 1430x150x1460mm 1280x1000x1460mm
Net weight (kg) 465 415 405 355
Blade carrier material Aluminum hard anodized blade carrier Steel blade carrier
10
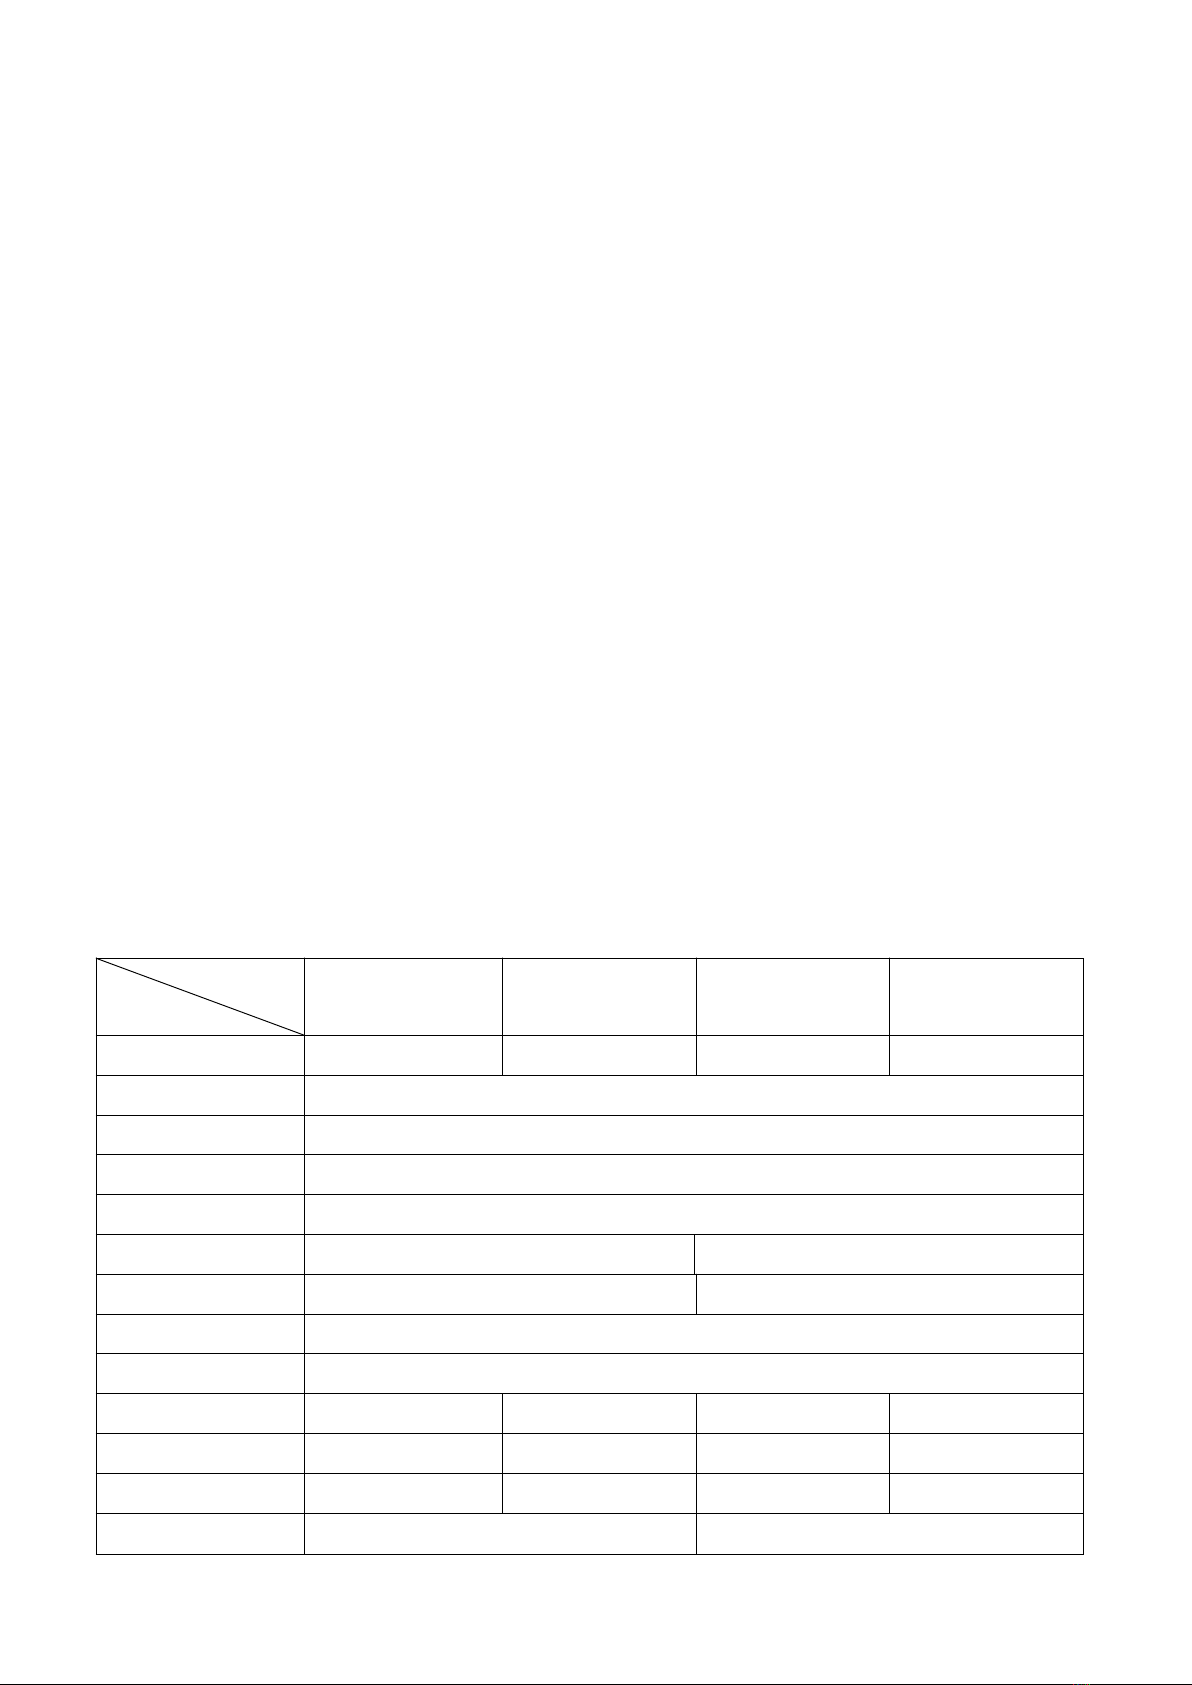
4. Operating the cutter
4-1 Operating button and functions
Wired up, turn the power switch “ON”. Screen and cut position light work, back gauge
reset automatically, which means the machine is ready for working.
Operate Way: Stand in front of the machine, with both hands pressing two CUT Buttons
at same time. (or downward the foot pedal for clamping make sure cutting position is
accurate, then cut the papers) As shown:

11
4-2 Operation for the touch screen
4-2-1 Touch screen
1. Numerical mode
Enter the number you want, press “ENT”, the back gauge will go to the position you want
and machine gets to cut, for example, if you want to cut a length of 270.50, enter the number
270.5 in the touch screen and press “ENT” will make the back gauge go to this dimension
and ready for work.
2. Program mode:
100 programs , with 30 steps each. On touch screen, it is production number, production
model, number of segments. For A3 paper, you can set the first step to be 297, press
“ENTER” to confirm, then set the second step to be 422, press “ENT” to confirm, for the
third step to be 420, press “ENT” to confirm, select 3 in the numbers of segments. It means
this production you have 3 lengths can be set, then press “ENT” to get machine to cut. In
program mode, there is a PUSH key, when it is available, the machine will push the paper 15
cm forwards after each cut (for customers to take out the paper easily). To cancel the
function, press the PUSH key then it will be invalid.

12
3. Segment mode
4 parameters to be set: the max length, first length, the second length and third length.
Set the max length same with current size.
After setting the max length, another three lengths can be set: for example, the first one is
10mm, second one is 20mm, the third one is 25mm. As it is, the machine can cut one by one
until the paper left is less than 30mm( Minimum cut depth ia 30mm ), the back gauge will be
back to the original position you set and gets to do next cuts repeatedly. It means the cutter
will cut the papers for 10mm, 20mm, 25mm step by step repeated.
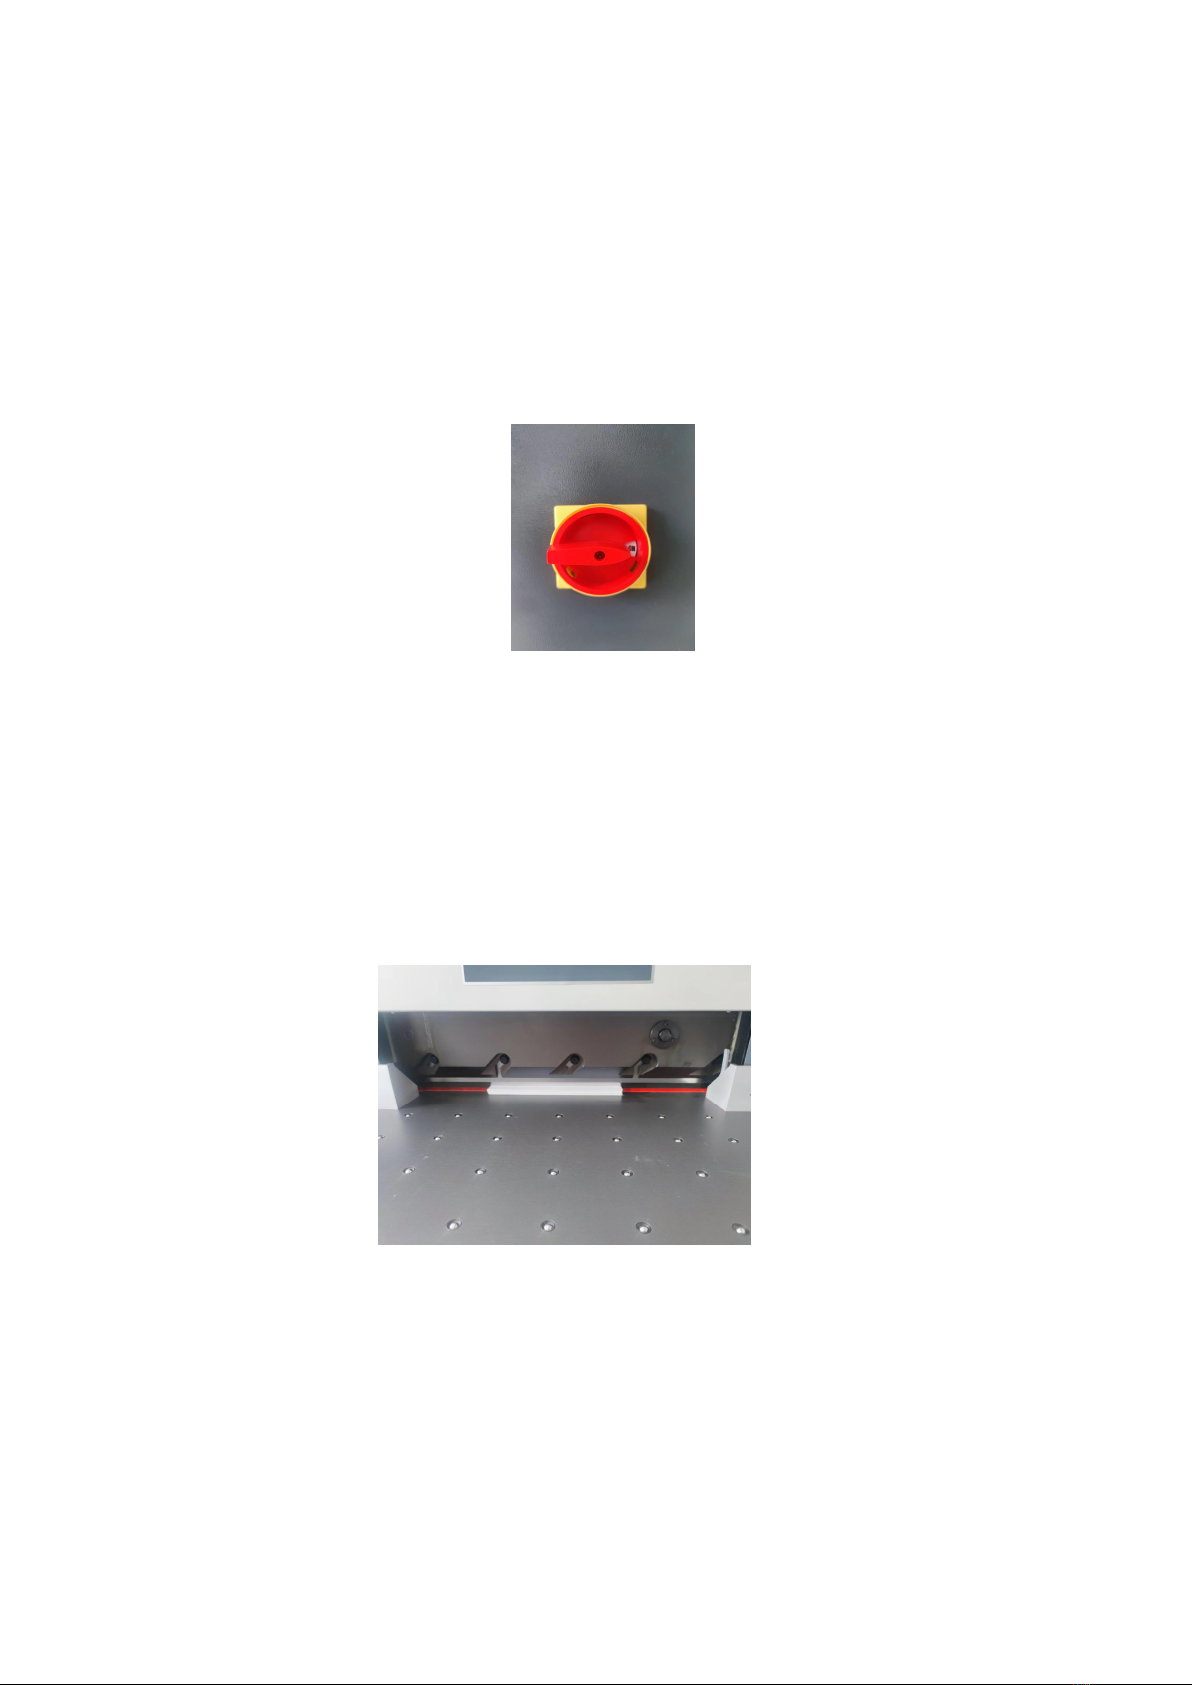
4-2-2 System setting
1. Cutting depth
When customers want to cut, if there is one or two papers in the bottom can not be cut
completely, you can adjust the cutting depth, there are totally 64 positions to be set. The
bigger number set, the deeper cutting does.
2. Original position ( Start position ) set
When the paper cut dimension is different from the display dimensions, you can adjust the
number to fix it
For example, the cut paper dimension is 110 mm, while it shows 120 mm on the display. Enter
110 in the size calibration box to complete the size calibration
4-2-3 Exchange between mm and inch
In display, when the paper size is 152.5mm, press the number for inch, same way for change
from inch to mm.
13
Chapter III Basic operation and adjustment
1. Basic operation
1-1 Turn on the machine
◆Make sure there is nothing else but the papers to be cut, clean the machine firstly;
◆Plug the machine to socket for 380V/220V +/- 10%, 50Hz, 4Kw;
◆Turn on the electric control, turn the main power to “ON” position, screen is on, light of
the machine is on, means it is ready for work.
1-2 Operation instruction
1) Electronic wheel use. Clockwise rotation makes the back gauge move forwards.
Anticlockwise rotation makes the back gauge move backwards. The accuracy can reach
0.1 mm.
2) When put the paper or books on the machine, make sure they are tidy and aligned against
the left side of the machine and scale.
3) After the cut size confirmed and paper put in the right position, downward the foot pedal,
clamp the papers, both two hands on the cut buttons to start cutting. Or you don’t have to
use the foot pedal, only to press the cut buttons with two hands to start the clamp and cut
automatically. If you find anything wrong, release the cut bottom to stop the clamp and
blade, press only clamp back switch to make the clamp up, make sure everything is right
then cut.

14
4) When finishing cut, press “PUSH” key to push the papers or books out(if you have set push
function it will be done automatically after every cut), then a cut is completed.
2. Basic Adjustment
2-1 Cutting depth adjustment
B◆Turn to blade change, as follows
◆Enter data in the blank of “Cutting Depth Adjust”. The larger the value, the
deeper the crop.
◆After fixed well, take another one piece paper to test, until the paper can be
cut completely.
◆Then press and hold “Back” 3s for new cut.
Three functions:
1.Blade depth adjustment: When the last sheet can not be cut completely, this function can be
choose, there are 64 number to adjust with
2.Blade start position set: When the real cut dimension is not same with dimension the
screen display, we need to amend the start position. Directly enter the size of the actual
cutting measurement in the size calibration box
3.Pressing delay time adjustment, the range is between 20-200. The larger the value, the
Down arrow key to adjust cutter depth
increase
Up arrow key to adjust cutter depth reduction
15
longer the pressing time.
2-2 Blade replacement( Be more careful to operate)
◆Go to “System Setting” as follows, press “Cutter change”
◆Press cut buttons, the blade comes down;
◆Release two open notched fasten screw(see 1) on the blade carrier;
◆Take off the fasten screws, except No 2 screw;
◆Press cut buttons, blade rises, revolve two screws clockwise,take off
other fasten screws including No 2;
◆Revolve the two screw stems anticlockwise for half circle, then take out
the blade. Please wear gloves or use cotton cloth to wrap the blade to
avoid being hurt;
◆Be careful when taking a new blade out. The blade cutter pointing must
not be to the body. When installing the blade, screw up the screw stems.
Set the blade on the blade carrier, use screw strip to fasten and fix up, then
adjust it according to cutting depth adjustment method.
◆Do blade sharpening in a professional factory.
Note: Cutting thick paper or pasteboard frequently will make the blade dull.
Prepare one replacement on hand.
Be careful when change the blade.
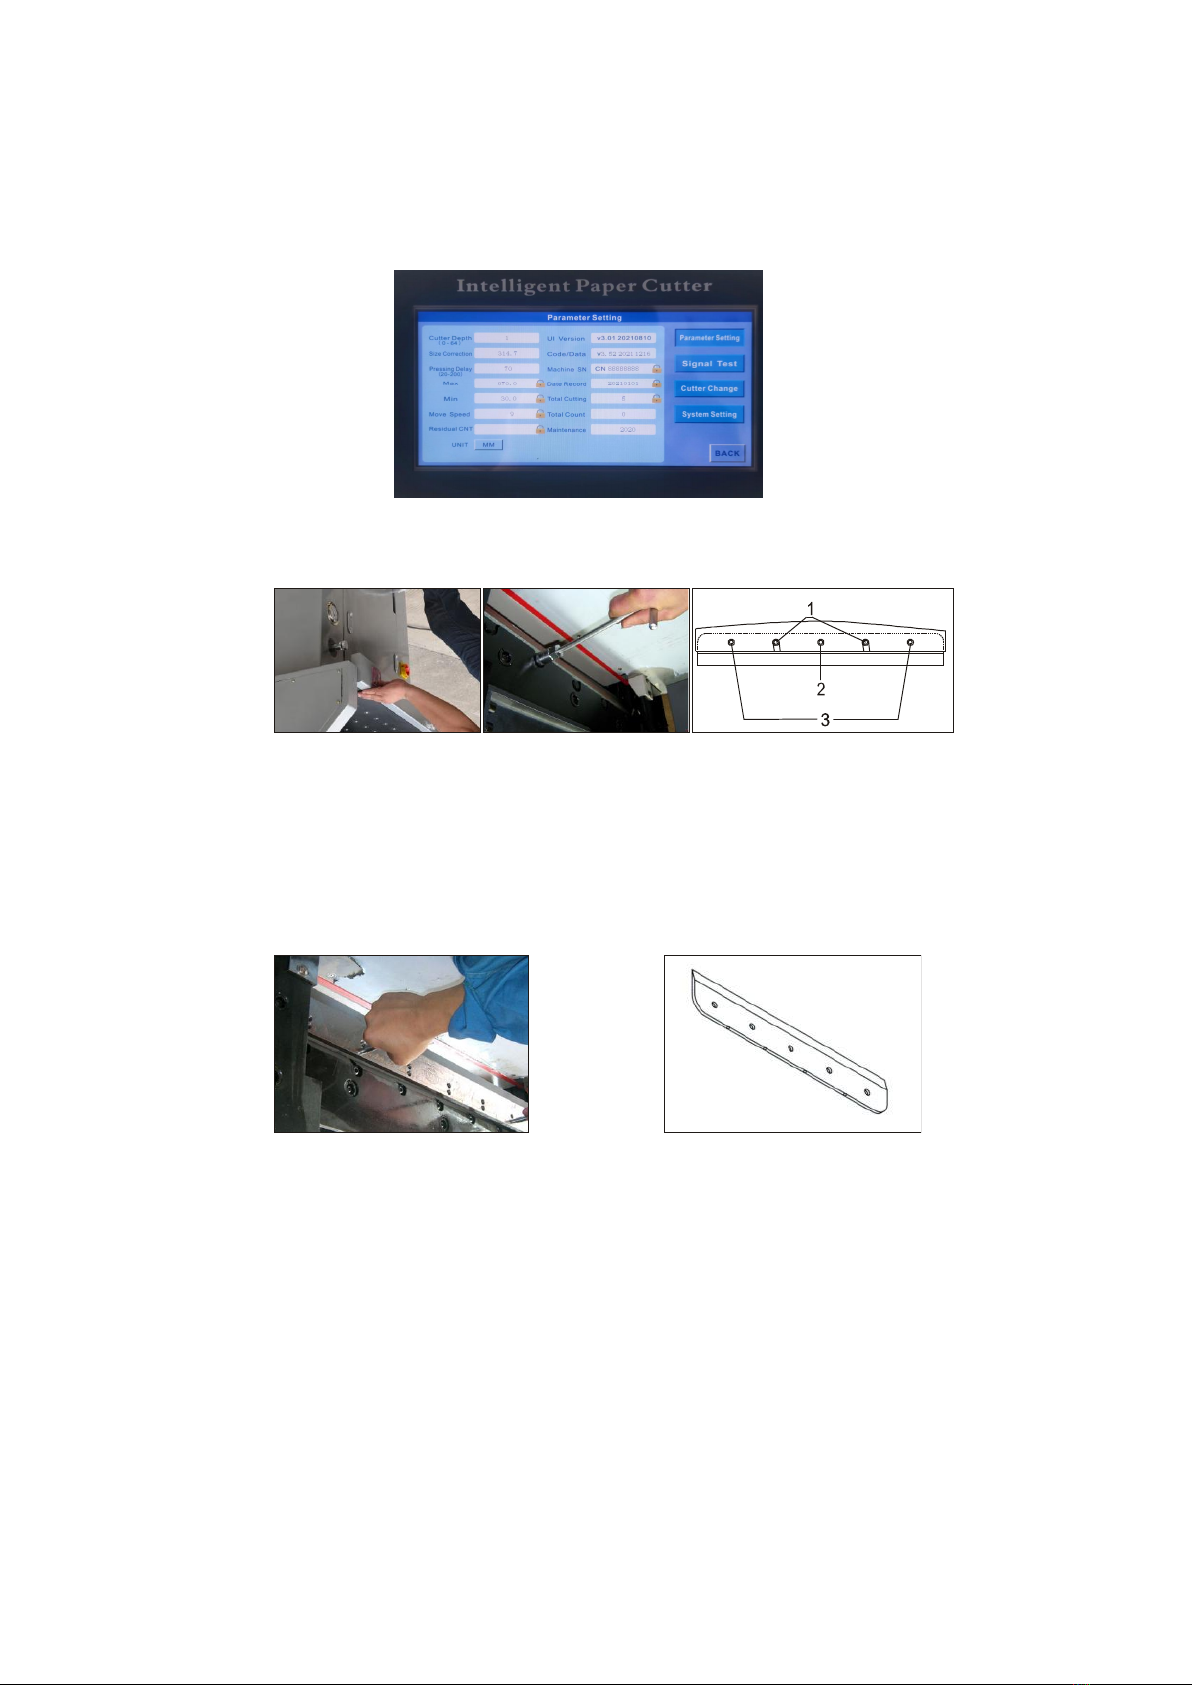
2-3 Cutting stick adjustment
◆One cutter stick can be used for 4 times;

16
◆Adjust or change the stick if deep slash;
◆Reinstall the stick flat on cutting desk after taken out;
◆Set cutter stick lean to the left side;
Note: Adjust blade after changing cutter stick for service life.
2-4 Pressure adjustment
◆Press cut switches with both two hands, the clamp will be down to compress the paper,
showing pressure in the pressure meter. Standard pressure is: 30KG/CM2~50KG/CM2.
◆Clockwise rotation, higher pressure; anticlockwise rotation, lower pressure.
◆New pressure will be show after press clamp or cut buttons
2-5 Hydraulic system troubleshooting
1. System noisy after starting the machine
1) Lack of oil, add 32# or 46# hydraulic oil
2) Oil filter blocks, clean up the oil filter
2. Under pressure
1) Check connect joints of the hydraulic system to avoid leak.
2) Abnormal electrical motor or wrong voltage.
Chapter IV Lubrication and maintenance
1. Lubrication
Check machine every month. Open the cover plate, clean and fasten parts and oil in

17
moving parts. Don’t drop oil on electric circuit or electronic components.
2. Maintenance
1) Before work, Keep machine clean to avoid hard objects to damage the blade.Don’t cut
book with staples.
2) Work done, clean machine, remove debris, wax cutting blade and cut off the power.
Chapter V General failures and troubleshoot
Error Phenomenon Troubleshoot
No power Indicate light doesn’t
bright
1. Check the power socket
2. Check the switch
3. Check the power wire
Motor capacitor is
damaged
Abnormal pressure or
motor sound
Change the capacitor
Papers being cut
are not vertical
Papers are not neat Displacement of block gauge, loosen
the fastening screws, with straightedge
to adjust the angle of scale and pushing
cardboard, fixed screws again.
Blade won’t go
back to the top
position
Blade is in the bottom
position
1. 1. The lower limit sensor of the cutter
is damaged or the solenoid valve is
blocked
2. motherboard failure
Touch screen is
abnormal
Power supply is invalid Check the touch screen, motherboard
and power supply
The back gague
cannot be reset
automatically
when the machine
is turned on
The back gague doesn’t
work when the machine is
turned on
1. Check the power supply of the paper
push motor
2. Check the driver
3. Check the motherboard
Button is invalid and can
not cut
1. Check the security photoelectric
2. Check the motherboard
Can cut, but blade can not
go back to the to position
1. Check the lower limit sensor of the
cutter
2. Check the motherboard
Can be cut, but the paper
press cannot be returned
1. Check the upper limit sensor of the
cutter
2. Check the motherboard
Clamp can’t be in the
normal position
1. Check the top clamp limit sensor
2. Check the motherboard
Can cut, but back gauge is 1. Check the rear limit sensor of the

18
abnormal back gauge
2. Check the motherboard
SUNFUNG TECHNOLOGY CORPORATION LTD
NO 259 Wensan Road, Xihu District, Hangzhou, 310012 CHINA
Tel:(86)571 85175095
Website:https://.sunfung-tech.com
Email:info@sunfung-tech.com
This manual suits for next models
3
Table of contents
Popular Industrial Equipment manuals by other brands


Siemens
Siemens SIRIUS 3RV29 Series operating instructions

Techniks
Techniks EEPM Operation manual

Interactive Instruments
Interactive Instruments Jet Stream 500 instruction manual

Autonics
Autonics AiCA-D-EC Series product manual

SCHUNK
SCHUNK EGN 80 Assembly and operating manual

MAKSIWA
MAKSIWA CBC.P user manual

ABB
ABB HT846414 Operation manual

Siemens
Siemens SIMATIC KP Series Original instructions

Freedom
Freedom HP6 Setup, operating, maintenance instructions

NuAire
NuAire FumeGard E Series Operation and maintenance manual

Pratt Burnerd
Pratt Burnerd Atlas EZ Set manual

Tolomatic
Tolomatic MXP63PTP quick start guide