Shad Nadsa D0Q200 User manual
TOP CASE D0Q200
MANUAL DEL USUARIO- OWNERS MANUAL - MANUEL D’UTILISATION
BEDIENUNGSANWEISUNG - MANUALE PER L’UTENTE
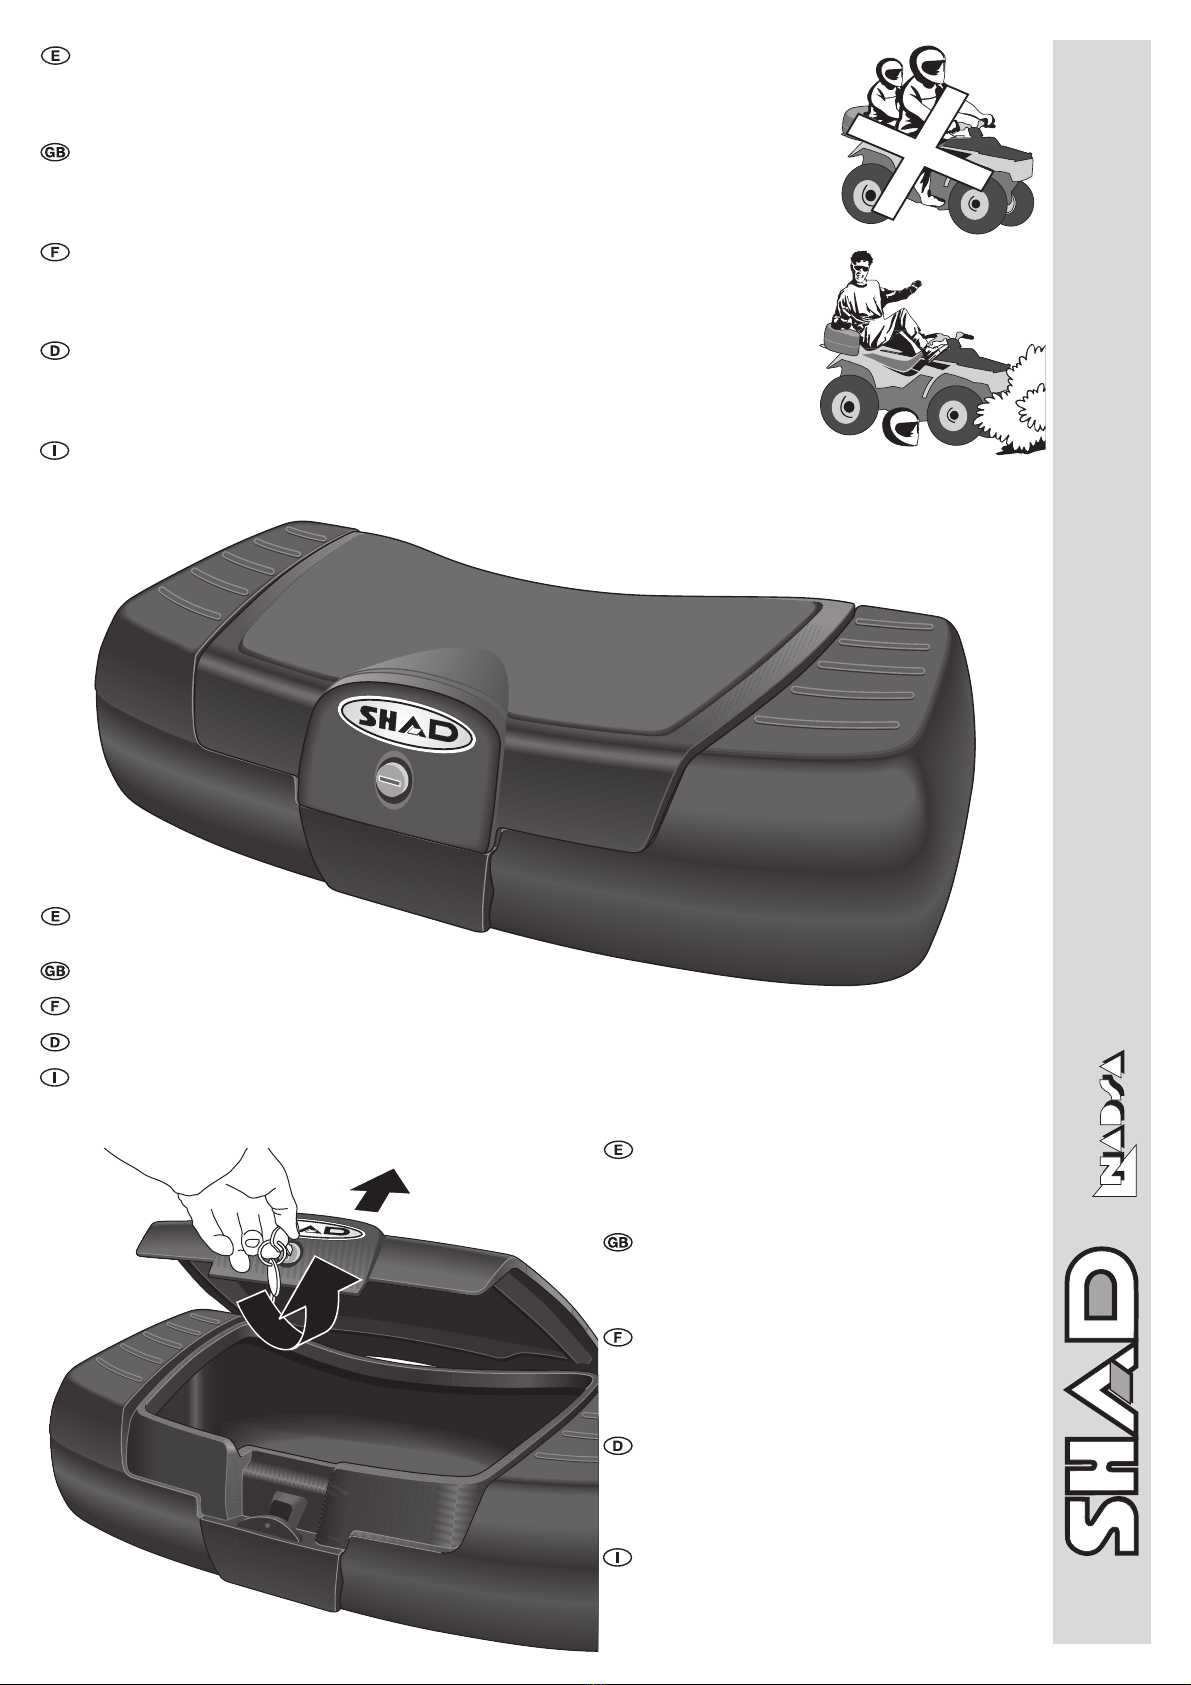
APERTURA Y CIERRE DE LA MALETA
Para abrirla, girar la llave en sentido antihorario (posición vertival) y
levantar la tapa. Para cerrarla, bajar la tapa y girar la llave en sentido
horario (posición horizontal).
MUY IMPORTANTE:
Comprobar
siempre antes de circular, que la tapa esté bien cerrada con la llave.
OPENNING AND CLOSING OF THE TRUNK
To open it, turn the key counter clockwise (vertical position) and raise
the lid. To close it, lower the lid and turn the key clockwise
(horizontal position). VERY IMPORTANT: Always verify that the lid
was well closed with the key before circulating.
OUVERTURE ET FERMETURE DU COFFRE
Pour l’ouvrir, tourner la clé dans le sens contraire d’une aiguille d’une
montre (position verticale) et relever le couvercle. Pour le fermer, baisser
le couvercle et tourner la clé dans le sens d’une aiguille d’une montre
(position horizontale). TRÈS IMPORTANT: Vérifier toujours avant de
circuler, que le couvercle a bien été fermé avec la clé.
ÖFFNEN UND SCHLIESEN DES KOFFERS/KASTEN
Zum öffnen drehen Sie den Schlüssel gegen den Uhrzeigersinn
(vertikale Position) und heben Sie den Deckel. Zum schliesen,
schliesen Sie den Deckel und drehen Sie den Schlüssel in
Uhrzeigersinn (waagerechte Position). SEHR WICHTIG: Vor dem
fahren überprüfen Sie immer, dass der Deckel abgeschlossen ist.
APERTURA E CHIUSURA DEL BAULETTO
Per aprirlo, girare la chiave in senso antiorario (posizione verticale) e
sollevare il coperchio. Per chiuderlo, abbassare il coperchio e girare la
chiave in senso orario (posizione orizzontale).
MOLTO IMPORTANTE: Controllare sempre, prima di circolare, che il
coperchio sia ben chiuso con la chiave.
IMPORTANTE:
¡CUANDO EL VEHÍCULO SE ENCUENTRE EN FUNCIONAMIENTO, CERRAR SIEMPRE EL COFRE CON LLAVE!
¡ATENCIÓN¡
PROHIBIDO SU USO PARA TRANSPORTE DE PASAJEROS: Este producto no ha sido pensado o diseñado para
transportar pasajeros.
PARA SU SEGURIDAD:
El centro de gravedad de la carga debe situarse en línea o delante del eje posterior y en
línea o detrás del eje anterior del quad.
PRECAUCIÓN:
NO TRANSPORTAR MATERIAL INFLAMABLE como gasolina, en el interior del compartimiento.
IMPORTANT:
¡WHEN THE VEHICLE IS FUNCTIONING, ALWAYS CLOSE THE CHEST WITH THE KEY!
¡ATTENTION¡ ITS USE IS FOR TRANSPORTING PASSENGERS IS PROHIBITED:
This product has not been thought or designed for
transporting passengers.
FOR YOUR SAFETY:
The gravity center of the load has to be located aligned with or in front of the back axis
and aligned with or behind the front axis of the quad bike.
PRECAUTION:
DO NOT TRANSPORT FLAMMABLE MATERIAL such as petrol, in the interior compartment.
IMPORTANT:
LORSQUE LE VÉHICULE EST EN MARCHE, FERMEZ TOUJOURS LE COFFRE À CLÉ!
ATTENTION, LE TRANSPORT DE PASSAGERS EST INTERDIT!:
Ce produit n’est pas destiné ou conçu pour transporter des passagers.
POUR VOTRE SÉCURITÉ:
Le centre de gravité de la charge doit se situer en ligne ou devant l'axe postérieur et en ligne ou derrière
l'axe antérieur du quad.
PRÉCAUTION:
INTERDICTION DE TRANSPORTER MATÉRIEL INFLAMMABLE tel qu’essence, à l’intérieur du compartiment.
WICHTIG:
BEI LAUFENDEM FAHRZEUG, SCHLIESSEN SIE DEN VERSTAURAUM MIT DEM SCHLÜSSEL AB!
ACHTUNG! FÜR PASSAGIERTRANSPORT NICHT ZUGELASSEN:
Dieses Produkt ist nicht für den Passagiertransport entworfen
worden.
FÜR IHRE SICHERHEIT:
Der Schwerpunkt der Last muss vor oder mit der Hinterachse aliniert und hinter oder mit der
Vorderachse aliniert des Quad platziert werden.
VORSICHT:
ENTZÜNDLICHES MATERIAL, wie Benzin, darf nicht im Innenraum transportiert werden.
IMPORTANTE
: QUANDO IL VEICOLO É IN FUNZIONAMENTO, CHIUDERE SEMPRE IL BAULE CON CHIAVE!
ATTENZIONE! NE É VIETATO L’USO PER TRASPORTO DI PASSEGGERI!
Questo prodotto non é stato pensato o disegnato per
trasporto di passeggeri.
PER LA SUA SICUREZZA:
Il centro di gravità del carico deve essere situato in linea o davanti all'asse posteriore e in linea o dietro all'asse
anteriore del quad.
PRECAUZIONE:
NON TRASPORTARE MATERIALI INFIAMMABILI, come la benzina, all’interno dello scompartimento.
Nota: Este cofre puede ser instalado tanto
en la parte delantera como en la trasera del quad.
Comprobar la compatibilidad de sus equipos en el concesionario.
Note: This trunk can be installed in the front as well as in the back part of the
quad bike. Check the equipments compatibility with the franchise holder.
Remarque: Ce coffre peut être installé aussi bien dans la partie antérieure que dans la partie postérieure du quad.
Vérifier la comptabilité de ses équipements chez le concessionnaire.
Anmerkung: Dieser Koffer/Kasten kann sowohl auf dem vorderm Teil oder auf dem hinterem Teil des Quad instaliert werden. Überprüfen sie vorort im
Quadhandel, die Verträglichkeit mit Ihrer Ausrüstung.
Nota: Questo bauletto può essere installato sia nella parte anteriore che nella parte posteriore del quad. Comprovare la compatibilità dei suoi
accessori dal concessionario.

min. 25 mm / 1”
5/16”
3
4
5
1
2
INSTALACIÓN PERMANENTE:
Se incluye un conjunto de bridas para el montaje permanente y
que han sido diseñadas para adaptar la mayoría de los
portaequipajes metálicos o de plástico (se requiere una
perforación en algunos portaequipajes de plástico).
Colocar el cofre en el portaequipajes para determinar la mejor
localización posible de las bridas que deberían situarse lo más
lejos posible las unas de las otras (disposición cuatro
esquinas), preferiblemente apoyándose en las intersecciones de
los tubos o de los refuerzos del portaequipajes para evitar que
el cofre se deslice. Hacer unas marcas a un mínimo de 25 mm
de los bordes externos del cofre.
Retirar el cofre para la perforación, comprobar de nuevo el
espacio entre los agujeros de las bridas antes de perforar.
Utilizar una broca convencional de 5/16”.
Instalar las bridas (3) y las placas de apoyo (2) según la
ilustración. Apretar con moderación tras la colocación de todos
las bridas. Evitar que las placas de apoyo de metal se doblen a
causa de una presión excesiva.
PERMANENT INSTALLATION:
There is a set of clamps included for permanent installation
and that have been designed to adapt the majority of metallic
or plastic luggage racks (a perforation is required in some
plastic luggage racks). Place the chest in the luggage rack to
determine the best location possible for the clamps that should
be placed the farthest possible from each other (four corner
layout), preferably being supported in the tube intersections or
on the luggage rack supports to avoid the chest from sliding.
Make marks at a minimum of 25 mm of the external borders of
the chest.
Remove the chest for the perforation, check again the space
between the holes of the clamps before perforating. Use a
conventional drill bit of 5/16”.
Install the clamps (3) and the support plates (2) according to
the illustration. Tighten with moderation after the placing of all
the clamps. Avoid bending the support plates because of
excessive pressure.
INSTALLATION PERMANENTE:
Un ensemble de boulons est inclus pour le montage
permanent. Les boulons sont conçus pour accommoder la
plupart des porte-bagages métalliques ou en plastique (perçage
requis pour certains porte-bagages en plastique). Placez le
coffre sur le porte-bagages afin d’identifier la meilleure
localisation possible des boulons qui devraient être aussi
éloignés que possible les uns des autres (disposition quatre
coins), préférablement en s’appuyant sur les intersections des
tubes ou des renforts du porte-bagages afin d’éviter que le
coffre glisse. Faire des marques, minimum à 25 mm des
bordures extérieures du coffre.
Retirer le coffre pour le perçage, vérifier à nouveau
l’espacement des trous pour les boulons avant de percer.
Utiliser un foret conventionnel de 5/16".
Installer les boulons (3) et plaques d’appui (2) selon
l’illustration. Serrer modérément après la mise en place de tous
les boulons. Éviter de courber les plaques d’appui par un
serrage excessif.
STÄNDIGE INSTALLATION:
Mitgeliefert wird ein Set Flansche zur ständigen Montage wird
mitgeliefert, die an die meisten Gepäckträger aus Metall oder
Plastik angepasst werden können (einige lastikgepäckträger
müssen durchbohrt werden). Setzen Sie den Verstauraum auf,
um die besten Stellen für die Flansche zu finden, die
möglichst weit auseinander liegend angebracht werden sollen
(an vier Ecken anbringen), möglichst bei den Rohren oder der
Verstärkung des Gepäckträgers, um ein Verrutschen des
Verstauraums zu vermeiden. Markieren Sie die Stellen 25 mm
von den Aussenkanten des Verstauraums.
Nehmen Sie den Verstauraum zum Durchbohren ab, und
überprüfen Sie vor der Bohrung nochmals den Abstand
zwischen den Löchern und den Flanschen. Benützen Sie einen
konventionellen 5/16" Bohrer.
Legen Sie die Flansche (3) und die Stützplatten (2) wie auf
der Illustration gezeigt auf. Ziehen Sie die Flansche nach dem
Auflegen mittelfest an. Vermeiden Sie das Verbiegen der
Metallplatten durch Druck von außen.
INSTALLAZIONE PERMANENTE:
Si acclude in completo di briglie per il montaggio permanente
e che sono state disegnate per adattare la maggioranza dei
portabagagli metallici o di plastica (in qualche portabagagli di
plastica é necessaria una perforazione). Collocare il baule sul
portabagagli per determinare la migliore ubicazione possibile
delle cinchie che si dovranno situare il piú lontano possibile
l’una dall’altra (disposizione quattro angoli), preferibilmente
appoggiandosi alle intersezioni dei tubi o dei rinforzi del
portabagagli per evitare chi il baule scivoli. Fare un segnale a
un minimo di 25 mm dai bordi esterni del baule.
Ritirare il baule per la perforazione, comprovare di nuovo lo
spazio fra i buchi delle briglie prima di perforare. Usare una
punta convenzionale di 5/16”.
Installare le briglie (3) e le placche d’appoggio (2) come
mostra la figura. Stringere con moderazione dopo la
collocazione di tutte le briglie. Evitare che le placche
d’appoggio metalliche si pieghino a causa di una pressione
eccessiva.
TOP CASE D0Q200
MANUAL DEL USUARIO- OWNERS MANUAL - MANUEL D’UTILISATION
BEDIENUNGSANWEISUNG - MANUALE PER L’UTENTE
REF. 500744
1.
2.

COMPONENTES / PARTS / COMPOSANTES / EINZELBAUTEILE / COMPONENTI:
Pos. Ref. Cant.
1 304221 4
Tornillo M6x45 DIN 7380 -
Screw -
Vis -
Schraube -
Vite
2 303049 4
Arandela esp Ø45xØ9x25 -
Washer
- Rondelle -
Scheibe
- Rondella
3 200457 4
Bridas -
Bridles
- Brides -
Flansch
- Fascette
4 303021 4 Arandela Ø6 -
Washer
- Rondelle -
Scheibe
- Rondella
5 302021 4 Tuerca -
Nuts
- Ecrou -
Schraubenmutter
- Dado
NOTAS DE INSTALACIÓN:
• Para su seguridad, el centro de gravedad de la carga deberá situarse delante
o alineado con el eje trasero y detrás o alineado con el eje delantero del
quad. Planificar la posición del cofre anticipando la carga.
• Optimizar la posición para preservar el acceso a la parte inferior del sillín del
quad para su mantenimiento. El cojín de asiento del cofre puede levantarse
un poco para esta operación.
• Para la instalación del cofre en la parte delantera del quad, tener en cuenta
que para no incumplir las normas de circulación no se debe tapar el foco de
alumbrado.
OPCIÓN BARRA ANTIVUELCO: aunque los cofres de alojamiento sean
compatibles con la barra antivuelco, la apertura total de las tapas se verá
reducida.
INSTALLATION NOTES:
• For your safety, the gravity center of the load will have to be located in front
of or aligned with the back axis or aligned with the front axis of the quad.
Plan the trunk position by anticipating the load.
• Optimize the position to protect the access to the lower part of the quad
chair for its maintenance.
• For the installation of the trunk in the front part of the quad, take into
account that in order to avoid braking the traffic laws we do not have to
cover the spotlight.
ROLL PYLON OPTION: although the accommodation chests may be compatible
with the roll pylon, the total opening of the covers will be reduced.
REMARQUES POUR L’INSTALLATION:
• Pour votre sécurité, le centre de gravité de la charge devra se situer devant
ou aligné avec l’axe arrière ou aligné avec l’axe avant du quad. Planifier la
position du coffre en anticipant la charge.
• Optimiser la position pour préserver l’accès á la partie inférieur de la selle du
quad pour son maintien.
• Pour l’installation du coffre dans la partie avant du quad, prendre en compte
que pour ne pas négliger les normes de circulation on ne doit pas couvrir la
zone d’éclairage.
OPTION BARRE ANTI-ROULIS: bien que les coffres de rangement soient
compatibles avec la barre anti-roulis, l’ouverture totale des couvercles sera
réduite.
ANMERKUNGEN ZUR INSTALLATION:
• Zu ihrer Sicherheit, muss der Schwerpunkt der last vor oder mit der
Hinterachse aliniert und hinter oder mit der Vorderachse aliniert des Quad
platziert werden. Planen sie die Position des Koffers/Kasten gemäs der Last
ein.
• Die Position muss so ausgerichtet sein, dass der Weg zum Raum unter dem
Sitz des Quads, für Wartungszwecke, nicht gestört wird. Der Sitzkissen des
Koffers/Kasten kann hierfür, etwas bewegt werden.
• Falls der Koffer/kasten auf dem vorderem teil des Quads plaziert wird, Bitte
beachten Sie, Normgemäss, dass die Scheinwerfer nicht verdeckt werden.
OPTION ANTISTURZ-STANGE: obwohl die verstauräume mit der antisturz-
stange kompatibel sind, wird dadurch die gesamtöffnung der abdeckungen
reduziert.
NOTE D’INSTALLAZIONE:
• Per la propria sicurezza, il centro di gravità del carico dovrà essere situato
davanti o allineato con l'asse posteriore e dietro o allineato con l'asse
anteriore del quad. Pianificare la posizione del bauletto considerando prima
il carico.
• Ottimizzare la posizione per lasciare libero l'accesso alla parte inferiore della
sella del quad per la manutenzione. Il cuscino da sedile del bauletto può
essere sollevato un po' per questa operazione.
• Per installare il bauletto nella parte anteriore del quad, tener presente che
secondo il Codice Stradale non deve tappare il faro.
OPZIONE SBARRA ANTIRIBALTAMENTO: anche se i bauli sono compatibili
con la sbarra antiribaltamento, questa ne ridurrá l’apertura totale dei coperchi.
NORMAS DE USO:
CARGA: Los compartimientos son muy resistentes pero no son totalmente
estancos. Proteger el equipo frágil con bolsas de plástico o continentes
precintados. No transportar materias inflamables peligrosas.
CIRCULACIÓN: Sujetar las cargas de cierto peso para que no puedan afectar la
estabilidad.
LIMPIEZA: Retirar la carga y lavar con agua y un jabón neutro. Para realzar el
acabado, puede utilizar un protector de plástico y goma a base de silicona y
que se encuentra fácilmente en el mercado. Lubricar las cerraduras a
intervalos regulares para proteger del agua, el óxido y el hielo.
NOTA IMPORTANTE: El uso óptimo del cofre puede verse disminuido por la
presencia o a la instalación de otros equipos, Ejemplo: La apertura del cofre
de alojamiento.
USE NORMS:
LOAD:
The compartments are very resistant but the aren’t totally watertight.
Protect fragile equipment with plastic bags or sealed containers. Do not
transport dangerous flammable material.
CIRCULATION: Attach the loads of a certain weight so that they do not affect
the stability.
CLEANING: Remove the load and wash with water and neutral soap. To do the
finishing, you may use a silicon based plastic and rubber protector that is
easily found in the market. Lubricate locks at regular intervals to protect from
water, rust and ice.
IMPORTANT NOTE: The optimum use of the chest may be reduced by the
presence or the installation of other equipment, example: The opening of the
accommodation chest.
NORMES D’UTILISATION:
CHARGE: Les compartiments sont très résistants mais il ne sont pas
complètement étanches. Protéger l’équipement fragile avec des sacs en
plastique ou des contenants scellés. Ne pas transporter de matières
inflammables dangereuses.
CIRCULATION: Attacher les charges d’un certain poids pour qu’ils ne puissent
pas affecter la stabilité.
NETTOYAGE: Retirer la charge et laver à l’eau avec du savon doux. Pour
rehausser sa finition, vous pouvez utiliser un protecteur en plastique et
caoutchouc à base de silicone retrouvé communément sur le marché. Lubrifier
les serrures par intervalles régulières afin de protéger de l’eau, la rouille ou du
gel.
REMARQUE IMPORTANTE: L’utilisation optimale du coffre peut être diminuée
due à la présence ou à l’installation d’autres équipements. Exemple:
L’ouverture du coffre de rangement.
NORMEN ZUM GEBRAUCH:
FRACHT: Die Abteile sind sehr widerstandsfähig, aber nicht vollkommen dicht.
Schützen Sie die zerbrechliche Ausrüstung mit Plastiktaschen oder
abgedichteten Behältern. Transportieren Sie keinesfalls gefährliches
entzündliches Material.
WÄHREND DES FAHRENS: Die Lasten sichern damit die Stabilität des Quads
nicht gefährdet ist.
REINIGUNG: Entfernen Sie die Fracht und reinigen Sie das Fahrzeug mit
Wasser und neutraler Seife. Zur Endbearbeitung können Sie einen
Plastikschutz und ein Silikongummi benützen, das Sie einfach finden können.
Ölen Sie die Schlösser regelmäßig, um sie gegen Wasser, Rost und Eis zu
schützen.
WICHTIGE ANMERKUNG: Wenn andere Ausrüstungen benützt werden, kann
der Verstauraum nicht zur Gänze ausgenützt werden, zum Beispiel die Öffnung
des Abstellplatzes.
NORME DI USO:
CARICA: Gli scompartimenti sono molto resistenti, ma non sono
completamente ermetici. Proteggere il bagaglio fragile con borse di plastica o
contenitori precintati. Non trasportare materiali infiammabili pericolosi.
CIRCOLAZIONE: Fissare i carichi con un certo peso perché non riducano la
stabilità.
PULIZIA: Ritirare la carica e lavare con acqua e sapone neutro. Per dare un
aspetto piú terso alle rifiniture, si puó usare un protettore per plastica e
gomma a base di silicone facilmente disponibile sul mercato. Lubricare
regolarmente le serrature per proteggerle dall’acqua, la ruggine e dal gelo.
NOTA IMPORTANTE: L’uso ottimo del baule puó vedersi diminuito dalla
presenza o l’installazione di altri optional. Esempio: l’apertura del baula.
TOP CASE D0Q200
MANUAL DEL USUARIO- OWNERS MANUAL - MANUEL D’UTILISATION
BEDIENUNGSANWEISUNG - MANUALE PER L’UTENTE
REF. 500744
Other Shad Automobile Accessories manuals


Popular Automobile Accessories manuals by other brands

SKS-Kinkel
SKS-Kinkel il vetro installation instructions

Front Runner
Front Runner PRO UNDER RACK TABLE bracket quick start guide

VEVOR
VEVOR 16A-TYPE2 user manual

Caliber
Caliber CXQ30 owner's manual

travall
travall TDG 1627 Fitting instructions

Alexo Sweden
Alexo Sweden 612-0900 Installation and operating instructions


