Seat YOU&Mii COLOUR CONNECTION User manual

YOU&Mii
COLOUR CONNECTION
Owner’s manual
1SL012720CB
Inglés 1SL012720CB (08.16)

SEAT S.A. is permanently concerned about continuous development of its types and models. For this reason we ask you to under-
stand, that at any given time, changes regarding shape, equipment and technique may take place on the car delivered. For this reason
no right at all may derive based on the data, drawings and descriptions in this current handbook.
All texts, illustrations and standards in this handbook are based on the status of information at the time of printing. Except for error
or omission, the information included in the current handbook is valid as of the date of closing print.
Re-printing, copying or translating, whether total or partial is not allowed unless SEAT allows it in written form.
SEAT reserves all rights in accordance with the “Copyright” Act.
All rights on changes are reserved.
❀This paper has been manufactured using bleached non-chlorine cellulose.
© SEAT S.A. - Reprint: 15.08.16
About this manual
This manual contains information, recommen-
dations, advice and warnings related to your
radio system. The other publications in the
vehicle documentation contain further infor-
mation of which you should be aware for your
own safety and for that of your passengers.
Ensure that the onboard documentation is
kept in the vehicle at all times. This is espe-
cially important when lending or selling the
vehicle to another person.
This manual contains a description of the
equipment supplied with the vehicle at the
time of press. Some of the units described
herein will not be available until a later date or
is only available in certain markets.
The illustrations are intended as a general
guide and may vary from the equipment fitted
in your vehicle in some details.
The screen colour and the colour of the infor-
mation displayed on it can vary according to
vehicle model.
Directions and positions of components (e.g.
right, left, front, rear) are always relative to the
direction of travel of the vehicle unless other-
wise stated.
The equipment marked with an aster-
isk* is fitted as standard only in certain
versions, and is only supplied as op-
tional extras for some versions, or are
only offered in certain countries.
® All registered marks are indicated with
®. Although the copyright symbol does
not appear, it is a copyrighted mark.
>> The section is continued on the follow-
ing page.
WARNING
Texts preceded by this symbol contain infor-
mation on safety. They warn you about possi-
ble dangers of accident or injury.
CAUTION
Texts with this symbol draw your attention to
potential sources of damage to your vehicle.
For the sake of the environment
Texts preceded by this symbol contain rele-
vant information concerning environmental
protection.
Note
Texts preceded by this symbol contain additio-
nal information.

Table of Contents
Table of Contents
Overview . . . . . . . . . . . . . . . . . . . . . . . . . . . . . 2
Unit overview . . . . . . . . . . . . . . . . . . . . . . . . . . . 2
Introduction . . . . . . . . . . . . . . . . . . . . . . . . . . 4
General operating information . . . . . . . . . . . . . 4
Audio mode . . . . . . . . . . . . . . . . . . . . . . . . . . . 6
Radio mode . . . . . . . . . . . . . . . . . . . . . . . . . . . . 6
Digital radio mode (DAB, DAB+ and audio
DMB)* . . . . . . . . . . . . . . . . . . . . . . . . . . . . . . . . . 9
Media mode . . . . . . . . . . . . . . . . . . . . . . . . . . . . 11
Telephone management . . . . . . . . . . . . . . . . . . 16
Drive Mii App* . . . . . . . . . . . . . . . . . . . . . . . . . . 19
Settings menu . . . . . . . . . . . . . . . . . . . . . . . . 21
System and functions settings (SETUP) . . . . . . 21
Other information . . . . . . . . . . . . . . . . . . . . . 24
Abbreviations . . . . . . . . . . . . . . . . . . . . . . . . . . . 24
Index . . . . . . . . . . . . . . . . . . . . . . . . . . . . . . . . . 25
1

Overview
Main menus
●To access the main menu, press the equi-
pment's MENU button ››› Fig. 1 10 .
●To select a function, rotate the set Button
››› Fig. 1 5 until observing it and press said
setting button.
Radio
RADIO Main menu ››› page 6
RDS ››› page 6
TP Function ››› page 7
Change frequency band ››› page 8
Changing station ››› page 8
Storing stations ››› page 9
Tuning in to stored stations ››› page 9
Digital Radio Mode ››› page 9
Media
Media sources and audio files ››› page 11
Playback order ››› page 11
Selecting a Media source ››› page 12
SD card ››› page 13
USB port ››› page 13
Bluetooth ››› page 14
AUX-IN socket ››› page 15
Track information ››› page 15
Changing the playback mode ››› page 16
Sound Sound and volume setup ››› table on page 21
Telephone
Connection and operation ››› page 16
Telephone functions ››› page 17
Favourites ››› page 18
Using the telephone ››› page 18
Connected telephone settings ››› page 18
Drive Mii App ››› page 19
Setup
Radio ››› table on page 21
Media ››› table on page 21
Application connection ››› table on page 21
Telephone ››› table on page 21
Sound ››› table on page 21
System ››› table on page 21
Drive Mii App*Connection and operation ››› page 19
3

Introduction
Introduction
General operating information
Safety notes
WARNING
Distracting the driver in any way can lead to
an accident and cause injuries. Operating the
radio system while driving can distract you
from the road traffic.
●Always drive responsibly paying careful at-
tention to the traffic.
●Select volume settings that allow you to
easily hear signals from outside the vehicle
at all times (e.g. emergency services sirens
and horns).
●Hearing may be impaired if using too high a
volume setting, even if only for short periods
of time.
WARNING
The volume level may suddenly change when
you switch audio source or connect a new au-
dio source.
●Reduce the base volume before switching
audio source or connecting a new audio
source.
WARNING
Connecting, inserting or removing a data me-
dium while driving can distract your attention
from the traffic and cause an accident.
WARNING
Connecting leads for external devices may
obstruct the driver.
●Arrange the connecting leads so that they
do not obstruct the driver.
WARNING
External devices that may be loose or not
properly secured, could move be thrown
around the passenger compartment during a
sudden driving or braking manoeuvre or an
accident and cause damage or injury.
●Never place or set external devices on the
doors, on top of or near the area marked with
the word “AIRBAG” of the steering wheel, the
dash board or the backrests, nor between
these areas and the passengers. External de-
vices can cause serious injury in the event of
an accident, especially when the airbags in-
flate.
CAUTION
The vehicle loudspeakers may be damaged if
the volume is too high or the sound is distor-
ted.
Additional displays
Depending on the vehicle, the factory-set as-
sistance systems are temporarily displayed
on the screen. These displays disappear au-
tomatically when they are no longer required.
All instructions appear only after completely
restarting the radio system.
Note
●To operate the equipment just press the
buttons gently.
●Due to country-specific legislation, certain
functions cannot be selected when the vehi-
cle is travelling above a certain speed.
●Using a mobile telephone in the vehicle
may cause noise from the vehicle loudspeak-
ers.
●On some vehicles with ParkPilot, the vol-
ume of the audio source is automatically low-
ered when reverse gear is selected.
Rotary/push knobs, unit and function
buttons
Overview
●Rotary/push knobs.
●Labelled unit buttons (hard keys).
●Function buttons (soft keys).
4

Introduction
Rotary/push knobs
Left rotary knob ››› Fig. 1 1 is used as the
volume control or on/off button.
The right-hand rotary/push knob 5 is refer-
red to as the setting knob.
Unit buttons and function buttons
The labelled buttons on the unit are referred
to as “unit buttons” and are pictured as a
button symbol with blue content, e.g. MEDIA
unit button ››› Fig. 1 7.
There are 6 unlabelled unit buttons below the
screen ››› Fig. 1 8. These unit buttons are re-
ferred to as “function buttons” as their func-
tions depend on the active function mode.
The function assigned to a function button is
shown on the corresponding button in the
lower section of the display (e.g. ››› Fig. 2).
Switching on and off
●To manually switch the Infotainment sys-
tem on and off, briefly press rotary knob
››› Fig. 1 1.
When the unit is switched on the system
starts up. The last audio source used shall be
replayed at the last selected volume setting,
provided this does not exceed the preselec-
ted “switch-on volume” ( Volume
››› page 21).
Depending on the unit and country in ques-
tion, the unit is switched off when the engine
is turned off or the key is removed. If the unit
comes on again without the ignition being
switched on, it will switch off automatically
after 30 minutes (switch-off delay).
Energy management
If, when the ignition is switched off and the
unit switched on, the battery voltage falls be-
low the minimum onboard power supply volt-
age, an audible warning sounds and LOW
BATTERY appears. You should switch the
unit off.
Anti-theft encryption
Once the anti-theft code has been entered for
the first time, it remains stored in the vehicle
(convenience radio coding). If the anti-theft
code has to be inserted manually, e.g. due to
the unit having been installed in another ve-
hicle, please contact a SEAT dealership.
If only the battery terminals have been dis-
connected, switch the ignition on before turn-
ing the unit on again.
Changing basic volume
Function Operation
Increasing the
volume.
Turn the volume control
››› Fig. 1 1
clockwise.
Function Operation
Decreasing
the volume.
Turn the volume control
anti-clock-
wise.
Changes to the basic volume are indicated by
a “bar shown briefly on the screen”.
It is possible to preset certain volume set-
tings and adjustments ››› page 21.
Muting the unit
●Turn the volume control anti-clockwise
until it displays .
●OR: briefly press the volume control to
activate or deactivate the volume muting
function.
The Media source currently being played is
stopped while the unit is muted.
Note
If the base volume has been considerably in-
creased to play a certain audio source, lower
the volume again before switching to another
audio source.
5

Audio mode
Audio mode
Radio mode
Introduction
The radio system is supplied in different ver-
sions depending on the country and model
and the vehicle equipment in which it is in-
stalled. Some units are also equipped with a
DAB radio receiver ››› page 9. The possible
radio system versions appear in the overview
of the controls ››› page 2.
Note
●Bear in mind that being underground, in
tunnels, in areas with tall buildings or moun-
tains can interfere with radio signals.
●Foil or metal-coated stickers attached to
the windows may affect reception on vehicles
with a window aerial.
RADIO main menu
Fig. 2 RADIO main menu: selecting the fre-
quency band.
Fig. 3 RADIO main menu: Station buttons dis-
played.
●Press the RADIO button in order to start Ra-
dio mode.
After changing to Radio mode, the available
frequency bands (FM, AM1) and DAB1)) are in-
itially displayed in the bottom line of the
screen ››› Fig. 2. If the RADIO unit button is
pressed again, the functions for the radio re-
ceiver shall be shown ››› Fig. 3.
You have the following available options:
●Searching for the next station.
●Turning a stored station back on.
●Switching on the TP function ››› page 7.
●Store the selected station ››› page 9.
The station that you are currently listening to
is shown in the middle of the screen. If the
station accepts RDS and the reception is
good, the station name shall be displayed in-
stead of the frequency, e.g. RADIO 21.
RDS and automatic station tracking
RDS is a radio data service that allows the
display of the station name, automatic sta-
tion tracking and the TP function (traffic infor-
mation station ››› page 7).
With the automatic station tracking the unit
always switches to the frequency that offers
the best reception of the current radio station
as the vehicle travels from one area to the
next. If the reception is poor, the unit may be
muted for a short time as it searches for alter-
native frequencies (AF).
1) This depends on the country and unit in question.
6

Audio mode
RDS is not available everywhere or on every
FM radio station.
Depending on the country and the unit, the
RDS and switching to alternative frequencies
(AF) may be deactivated in the system set-
tings ››› page 21.
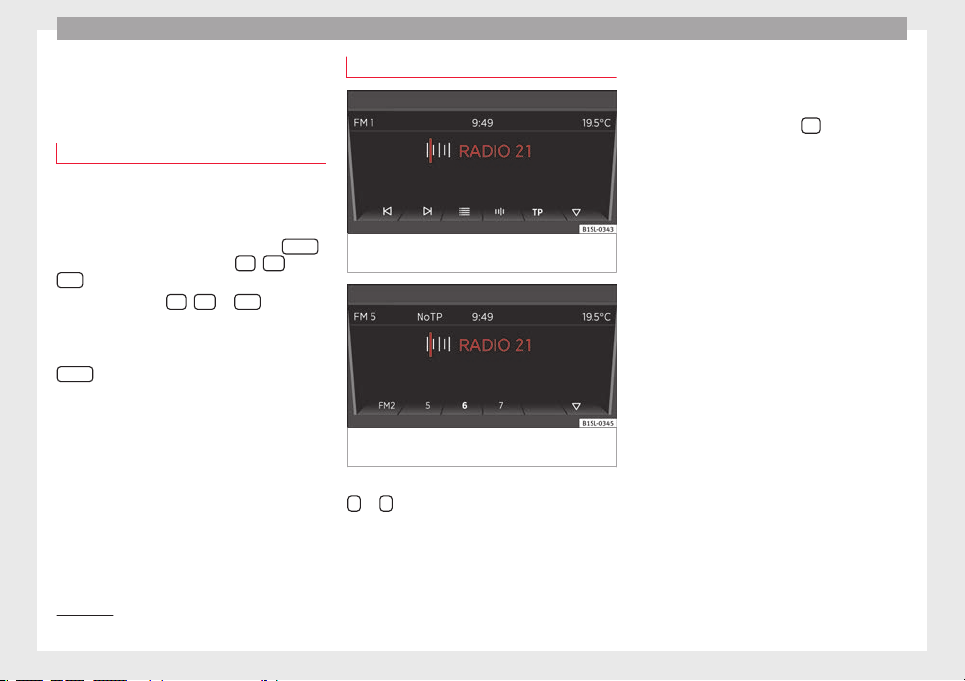
TP Fucntion (traffic news stations)
Fig. 4 TP function active.
The TP function is an RDS radio data service.
››› page 6. If your unit has DAB ››› page 9,
you may also use the TP function without
having RDS ››› page 7.
Traffic news monitoring with the TP function
is only possible when a tuning in a traffic
news station.
While traffic news monitoring is on (display:
TP ››› Fig. 4), traffic announcements are
heard directly in the Audio mode.
Traffic news station tracking is not possible
on the AM1) frequency bands.
Some stations that do not broadcast their
own traffic news support the TP function by
broadcasting traffic reports by other stations
(EON). Traffic announcements broadcast by
the corresponding traffic news stations di-
rectly interrupt the current audio mode.
Switching the TP function on and off
●Press the TP function button.
If the TP function is activated in areas where
there is no support for TP, the following no-
tice shall appear on the screen: NO TP.
●Press the TP function button again to dis-
connect the TP function again.
TP function activated
As long as the traffic news station tracking is
active and ready for functioning, the TP func-
tion button is shown ››› Fig. 4.
In Radio mode the station that is being lis-
tened to has to accept the TP function, or it
has to have a DAB or EON station available
that may accept the TP function If both re-
quirements are fulfilled, traffic news station
tracking is not possible.
If the traffic news station that is being lis-
tened to cannot continue getting reception, a
manual search shall have to be initiated with
arrow buttons and ››› page 6.
If searching for a station using the arrow
keys, NO TP is displayed if the station set is
not currently compatible with TP.
In Media mode or as long as the volume may
be muted, a traffic news station is automati-
cally tuned in the background, provided the
signal of said station can be tuned in. This
operation may take some time depending on
the situation.
Incoming traffic announcement (INFO)
In active Audio mode, an incoming traffic an-
nouncement shall be directly played.
●If necessary, the radio moves to the traffic
news station (EON) for the duration of the
traffic announcement.
●The Media mode will be paused and the
volume will be adjusted to the preset level.
●The traffic announcement volume can be
modified with the volume control . This set-
ting shall also apply to subsequent an-
nouncements. »
1) This depends on the country and unit in question. 7

Audio mode
●There is a pop-up message to cancel the
traffic announcement (Cancel) or deactivate
the TP function (Deactivate).
Changing frequency band
The selected frequency band (FM, AM1) or
DAB1)) is shown on the upper left display
area ››› Fig. 5.
●Briefly press the Radio mode on the RADIO
button of the unit to show the FM , AM 1) and
DAB 1) ››› Fig. 2 function buttons.
●Press one of the FM , AM or DAB function
buttons to change to the desired frequency
band.
●OR: Press the unit button several times
RADIO in order to switch between the various
function buttons at the bottom of the screen.
Changing stations
Fig. 5 Changing stations with the arrow but-
tons to the next available station.
Fig. 6 Changing stations with the arrow but-
tons is only possible with stored stations.
●Briefly press the arrow buttons on the unit
or on the screen.
Under the selected setting for the search
mode (Buttons with arrows:) to switch
between stations that can be set and those
that are already set ››› page 21.
Tuning manually to a station frequency
●Select the desired frequency band
››› page 6.
●Press the function button Frequency
band.
●Turn the setting knob until the desired sta-
tion frequency (e.g. 89.9 MHz) is displayed
on the screen.
●OR: Press one of both dual arrow buttons
››› Fig. 8 until the desired frequency is dis-
played.
1) This depends on the country and unit in question.
8

Audio mode
Storing stations on the station but-
tons
Fig. 7 Stored FM frequency band station in
station button 6.
Fig. 8 Additional radio functions.
When storing a station to a station button,
any station already stored to the same sta-
tion button in the same memory level will be
overwritten.
Assigning individual station buttons manual-
ly
●Select the frequency band ››› page 8.
●Select the station ››› page 8.
●Change to the station buttons. To do this,
press button ››› Fig. 9
●Press and hold the chosen station button
until you hear a tone.
●The station currently playing (RADIO 21)
will then be stored to that station button.
The station button to which the current sta-
tion is shown highlighted on the screen
››› Fig. 7.
The three stations with the best reception are
automatically stored and can be tuned in on
the station list ››› Fig. 8.
You can update the list of stations by keeping
the RADIO unit button pressed or via the
function button ››› Fig. 8.
Tuning in to stored stations
Fig. 9 Radio mode display: change a station
using the arrow buttons.
Fig. 10 Stored stations.
●Select the frequency band in which the sta-
tion sought is stored.
●Press the function button ››› Fig. 9.
●Briefly press ››› Fig. 10 the station button to
which the desired station is stored.
Depending on the settings it is possible to
switch between stations of a frequency band
with the arrow buttons and (Buttons
with arrows: ››› page 21).
A stored station can only be played if it can
be received at your current location.
Digital radio mode (DAB, DAB+
and audio DMB)*
Introduction
Some units are equipped with an additional
DAB radio receiver. »
9

Audio mode
The DAB radio receiver supports the DAB,
DAB+ and DMB-Audio broadcasting stand-
ards.
In Europe, digital radio is transmitted via
Band III frequencies (174 MHz to 240 MHz)
and the L Band (1452 MHz to 1492 MHz).
The frequencies of the two bands are referred
to as “channels” and each has a channel
name e.g. 12 A.
Several DAB stations are combined into one
channel with the additional services availa-
ble in a “block”.
DAB is currently not available in all areas. In
areas without DAB, is displayed in DAB ra-
dio mode. The system and functions settings
allow in this case a change of FM station
››› page 21. In the system and functions
settings there is the configuration of other
settings for the tracking of stations and for
playing DAB notifications.
Note
The radio stations are responsible for the
content of the information sent.
Operation
Fig. 11 RADIO main menu: Selecting a memo-
ry level and frequency band.
Fig. 12 RADIO main menu: Station buttons
displayed.
Starting DAB radio mode
●Press the RADIO unit button.
●Press the DAB function button ››› Fig. 11 to
open the DAB Radio mode.
After changing the DAB radio mode, the
available frequency bands (FM, AM1) and
DAB1)) are initially displayed on the bottom
line of the screen ››› Fig. 11. After roughly 5
seconds, they are replaced by the “station
buttons” ››› Fig. 12.
The last DAB radio station tuned in (RADIO
21) is displayed in the centre line of the
screen and is played, if it can still be received
in the current location. The selected group at
that time (DAB 5) is shown in the top line of
the screen ››› Fig. 12.
Changing the DAB Radio station and Autos-
tore
Functioning and operation are carried out
similarly to how it was described for the FM
and AM1) ››› page 6 Radio mode.
Changing DAB frequency band channels by
hand
●Turn the adjustment knob.
The channel selected is displayed in the cen-
tre of the screen. If a DAB group is broadcast
on the channel selected, its name will be dis-
played at the top right of the screen and the
first DAB station of that group will be played.
1) This depends on the country and unit in question.
10

Audio mode
Initiating station update
Fig. 13 Additional DAB functions.
Fig. 14 Active station update.
The station update, the unit seeks available
station groups in the place where it is loca-
ted.
●Press the function button on the station
view ››› Fig. 12 to visualise additional
available stations ››› Fig. 13.
●Press the function button ››› Fig. 13, the
message from which the station update is ac-
tive is shown in the upper bar of the screen
››› Fig. 14.
●The update can last a few seconds. The sta-
tion update stops when the indication dis-
appears.
The radio will be muted during station up-
date.
Media mode
Introduction
“Media sources” are audio sources contain-
ing audio files on various different data me-
dia (e.g. CD, external MP3 player). These au-
dio files can be played by the respective data
media or by the radio input sockets.
Requirements for Media sources and
audio files
Restrictions and notes
Contamination, exposure to high tempera-
tures and mechanical damage may render a
data medium unusable. Please observe the
manufacturer's instructions.
Please observe copyright laws.
The unit may be unable to read individual
tracks or the entire data device due to the da-
ta device configuration or the devices and
programs used for recording. Information
about the best ways to create audio files and
data media (compression rate, ID3 tag, etc.)
shall be found, for example, on the Internet.
Complex folder structures can also slow
down the reading of data.
Playlists only determine a certain playing or-
der. There are no files stored in a playlist. The
unit will not play a playlist if the files are not
stored on the data medium at the locations
referred to by the playlist (relative file paths).
Playing order of files and folders
Fig. 15 Example of the data device structure
with MP3 files. »
11

Audio mode
The audio files stored on data storage devi-
ces are often organised by means of folders
and playlists to determine a certain
playing order.
Tracks, folders and playback lists on a data
device are each sorted based on name in al-
phanumeric order.
Sub-folders are treated as folders and are
numbered in accordance with the sequence
found on the CD.
The illustration ››› Fig. 15 shows an example
of a MP3 data device, that contains tracks, ,
folders and sub-folders .
The tracks and folders on this data device are
displayed and played based on the following
order:
Tracks 1 and 2 in the root directory
(ROOT) of the data media.
Tracks 3 and 4 in the first folder F1 of
the root directory of the data device (dis-
play: 01).
Track 5 in the first subfolder F1.1 of the
folder F1 (display: 02).
Track 6 in the first subfolder F1.1.1 of
the subfolder F1.1 (display: 03).
Track 7 in the second subfolder F1.2 of
the folder F1 (display: 04).
Tracks 8 and 9 in the second folder F2
(display: 05).
1.
2.
3.
4.
5.
6.
With regard to the playing order, playlists
are treated like folders.
Note
The play order can be modified by selecting
different playback modes (MIX) ››› page 16.
Change the media source
Fig. 16 Select a Media mode.
Pressing the MEDIA unit button takes you to
the Media mode.
After you switch to Media mode, the available
media sources are initially displayed in the
bottom line of the screen for several sec-
onds. The track that is currently playing is
highlighted.
Opening the Media selection menu manually
and selecting a media source
●In Media mode, press the MEDIA unit but-
ton to display the selection menu for availa-
ble media.
●Select the desired media source by press-
ing its function button.
●OR: Repeatedly press the MEDIA unit but-
ton as often as required to switch between
the available media sources.
Function button: media source
SD card in the SD card slot ››› page 13.
USB data medium in the USB socket
››› page 13. You will find the location of the
connection in the instruction manual of your
vehicle ››› Booklet Instruction manual, chap-
ter Storage tray.
Smartphone paired via Bluetooth
››› page 14
External audio source connected to the AUX-
IN multimedia socket ››› page 15.
When a Media source that was previously
used is selected again, playback is resumed
from the point at which it was stopped.(with
the exception of: AUX ››› page 15).
12

Audio mode
RSD card playback
Fig. 17 SD card slot. Track display.
●Insert the SD card first with the recorded
side facing up and with the label to the left in
the slot for SD cards ››› Fig. 1 2.
●Press the MEDIA unit button.
Playback of the media source last played is
resumed. To play an SD card, press the
button.
In the folder display, navigate with the func-
tion button and the adjust button
››› Fig. 1 5. Press to access a higher fold-
er level and rotate the setting button to se-
lect the desired folder.
To change to the following or to the previous
title, press one of the function buttons or
.
Keep one of the arrow buttons pressed to for-
ward or rewind playback.
During playback you have the following func-
tion buttons at your disposal on the lower
edge of the screen. The active function but-
tons are highlighted.
Function button: Meaninga)
Displaying the playback list. Here you can al-
so select a track directly with setting button
››› Fig. 1 5 ››› Fig. 17.
Previous track or go back.
To begin playing. It can also be pressed to
pause playback. In this case the symbol
changes to
Next track or go forward.
Random play ››› page 16.
To repeat a folder or track ››› page 16. The
symbol indicates that the track being
played is being repeated.
a) Valid for Media sources: TSD card, USB port and Bluetooth
Audio
You have the following options at your dis-
posal in the playback lists view (button):
Function button: Meaning
To change the main directory of the SD card.
To access a higher folder level. Another audio
source can be selected by means of the but-
ton in the folders view
››› page 12.
To begin playing. It can also be pressed to
pause playback.
Function button: Meaning
Random play ››› page 16.
To repeat a folder or track. The
symbol in-
dicates that the track being played is being
repeated ››› page 16.
Eject SD card
The connected data media must be prepared
for disconnection before it can be removed.
●Press the Infotainment button MENU , then
press System settings.
●Select Safely remove the source,
then the SD Card. After correctly ejecting
the data storage device from the system, the
function button becomes inactive (grey col-
our).
●The SD card can be ejected now.
External data storage device connec-
ted through the USB port
Depending on the country and the unit, there
may be one or several USB ports in the
vehicle.
The location of the USB ports depends on
the vehicle in question ››› Booklet Instruc-
tions manual, chapter Storage compartment.»
13

Audio mode
Audio files on an external data medium con-
nected to the USB port can be played and
controlled via the Infotainment system.
Where this manual refers to external data
storage devices, this means USB mass stor-
age devices containing supported audio
files, such as MP3 players, iPods™ and USB
sticks.
Only compatible audio files are shown. Other
files are ignored.
The remaining operations for handling exter-
nal data media (change of track, track selec-
tion and activating playback modes) are per-
formed similarly to those of the other audio
sources (e.g “Playing SD card” ››› page 13.
Instructions and restrictions
The number of USB ports and the compat-
ibility with Apple™ devices, as well as with
other media players, depend on the unit.
The USB port supplies the usual USB volt-
age of 5 volts for a USB connection.
Due to the large number of different data me-
dia and various iPod™, iPad™ and iPhone™
generations available, it is not possible to
guarantee error-free operation of all func-
tions described here.
Take into account all other instructions and
limitations regarding requirements for media
sources ››› page 11.
Disconnecting
The connected data media must be prepared
for disconnection before it can be removed.
●Press the Infotainment button MENU , then
press System settings .
●Select Safely remove the source , then the
USB . After correctly ejecting the data stor-
age device from the system, the function but-
ton becomes inactive (grey colour).
●Now the data storage device can be discon-
nected.
Playback via Bluetooth®
Connection of an audio source via Bluetooth
In Bluetooth Audio mode® audio files being
played on a Bluetooth, allows you to listen to
audio files being played on a Bluetooth®
(e.g., a mobile telephone) connected by
Bluetooth® (audio playback by Bluetooth®).
Requirements
●The Bluetooth® audio source has to be
compatible with the A2DP Bluetooth profile®.
●In the Bluetooth settings menu, the
Audio BT (A2DP/AVRCP) ››› table on page 21
function has to be active.
Starting the audio transmission by Blue-
tooth®
●Activate Bluetooth® visibility on the exter-
nal Bluetooth® audio source (e.g., mobile tel-
ephone).
●Lower the base volume on the Infotainment
system.
●Press the MEDIA unit button.
●Press the function button to select Blue-
tooth® as a media source.
●Initiate a search of the Bluetooth® device
desired.
●Please refer to the instructions on the
screen of the Infotainment system and on the
Bluetooth® audio source regarding the rest
of the procedure.
You may still need to manually start playback
on the Bluetooth® source. When playback on
the Bluetooth® audio source is stopped, the
Infotainment system remains in Bluetooth®
Audio mode.
Controlling playback
The extent to which the Bluetooth® audio
source can be controlled via the Infotainment
system depends on the connected Blue-
tooth® audio source.
With media players that support the AVRCP
Bluetooth® profile, playback on the Blue-
tooth® audio source can be automatically
started or stopped when the unit is switched
14

Audio mode
to Bluetooth® Audio mode or to a different
audio source. In addition, it is possible to
view or change the track via the Infotainment
system.
Note
●Due to the large number of different Blue-
tooth® audio sources in existence, it is not
possible to guarantee that all of the descri-
bed functions may be performed fault-free for
all these sources.
●To manage the media with the Bluetooth®
connected device, consult and take into con-
sideration the manufacturer’s electronics in-
struction manual.
●Only use compatible Bluetooth® devices.
You can request information concerning Blue-
tooth® products compatible with SEAT serv-
ice or through the Internet.
An external audio source connected to
the AUX-IN multimedia socket
Depending on the level of vehicle equipment,
there is an AUX-IN multimedia socket on the
radio front ››› Fig. 1 4 in the stowage com-
partment on the front passenger side, in the
centre console, or in the armrest between the
two front seats.
The AUX-IN multimedia socket can only be
used with a 3.5 mm jack plug.
An external audio source connected to it can
only be played over the vehicle speakers, but
cannot be controlled via the radio.
The AUX-IN multimedia socket should be acti-
vated in the system setting ››› page 21 in
order for it to appear in the Media selection
menu ››› page 12.
Connecting an external audio source to the
AUX-IN multimedia socket
●Reduce the base volume on the radio.
●Connect the external audio source to the
AUX-IN multimedia socket.
●Start playback on the external audio
source.
●In Media mode, press the MEDIA unit but-
ton to display the selection menu for availa-
ble media sources ››› page 12.
●Press the function button .
The output volume of a connected external
audio source should be adjusted to that of
the other audio sources.
Adjusting the output volume
If you need to increase the output volume for
the external audio source, first lower the
base volume on the radio.
If the sound from the external audio source is
too low, increase the output volume on the
external audio source if possible. If this is not
enough, set the input volume in the system
settings to level 2 or level 3
››› page 21.
If the sound from the connected external au-
dio source is too loud or distorted, lower the
output volume on the external audio source if
possible. If this is not enough, change the in-
put volume to level 2 or level 1.
Note
●If playback of the external audio source fin-
ishes or if the connector of the AUX-IN multi-
media socket is unplugged, the radio will re-
main in the AUX menu.
●Interference noise may be heard if the ex-
ternal audio source is powered from the 12-
volt power socket of the vehicle.
●Please read and observe the manufactur-
er's instruction manual for the external audio
source.
Track information display
When playing audio files containing addition-
al track information (ID3 tag with MP3 files)
››› Fig. 17, various types of stored track infor-
mation can be displayed.
15

Audio mode
Changing playback mode
Fig. 18 SD card slot. Possible playback
modes.
Refer to the information on the playing order
of files and folders ››› page 11.
Selecting play modes
●Press a function button to start the corre-
sponding playback mode. The function but-
ton is underlined.
Random play: The tracks play in random
order. Random playback remains active for
the corresponding media source until it is
closed for that source.
Repetition: The tracks from the playback
list are replayed.
●Press the function button again to termi-
nate the current playback mode on the track
being played.
●Press the function button again to replay
only the track being played. After pressing
once again the repeat function is deactiva-
ted.
Telephone management
Connection and use
Requirements for telephone management:
Your mobile telephone is connected via Blue-
tooth® to the infotainment system.
Connection between the mobile telephone
and the infotainment system
●Please note the information concerning
››› page 14
●Press the PHONE unit button.
●In the Bluetooth® menu of your mobile tel-
ephone, search for the name that is shown
on the screen.
●If necessary, please note the instrucctions
concerning ››› page 14
●To complete the pairing of the telephone,
respond to the respective references of both
devices.
Changing the volume
Playback of media and telephone calls stem-
ming from the connected mobile telephone is
realised through the vehicle’s speaker.
If the voice control in the connected mobile
telephone is activated, the voice communica-
tions are also broadcast through the vehi-
cle’s speaker.
The playback volume can be modified with
the volume control .
In addition, the volume of the navigation in-
structions can be regulated in the sound
settings menu.
If the unit volume (display: ), is muted, it
also stops a media source that may be re-
peating in the connected Smartphone.
Note
●To manage the media and the telephone
with the connected mobile telephone, consult
and take into consideration the manufactur-
er’s electronics instruction manual.
●Only use compatible Bluetooth® devices.
You can request information concerning Blue-
tooth® products compatible with SEAT serv-
ice or through the Internet.
16

Audio mode
Telephone functions
Fig. 19 Connected telephone.
Fig. 20 Dialling the number with the menu
button.
Once the telephone is properly connected,
you can manage the call functions from mo-
bile telephone paired with the infotainment
system ››› Fig. 19.
Dialling numbers:
Press the function button ››› Fig. 19 to
show the dialled number panel ››› Fig. 20.
You can select a number here with the right
rotary knob and confirm by pressing it. If the
number is complete, the call can be initiated
through the handset ››› Fig. 20.
In addition, there are the following possibili-
ties here:
●: dial the emergency call1).
●: it connects you to the SEAT breakdown
service1).
●: it takes to the SEAT information hotline1).
●: it initiates a call to your inbox. For that,
the first time that you may select it, it shall be
requested that you insert your inbox number.
Directory:
Press the function button ››› Fig. 19 to
show the directory. You shall find all of the
contacts from your mobile telephone in the
directory, that you may select one by one
with the right rotary knob and establish the
communication by pressing it, or for a start
access a list of available numbers. For that,
during the first connection, you must have
confirmed the transfer of the mobile tele-
phone contacts. You shall be able to save a
selected contact as a favourite via the star
button.
Record of calls:
Press the function button ››› Fig. 19 to
show the record of calls. All of the calls from
your mobile telephone shall be shown here
once you have confirmed the transfer of the
mobile telephone contacts.
●ALL: shows all of the calls in chronological
order.
●: shows only the lost calls.
●: shows only the calls received.
●: shows only the calls made.
The function button saves an entry as a fa-
vourite.
Inbox:
Press the function button ››› Fig. 19 to
hear the content of the inbox. For that, the
first time that you may select it, it shall be re-
quested that you insert your inbox number.
Emergency call:1)
Press the function button ››› Fig. 19 to
make an emergency call.
1) Not in all markets. 17

Audio mode
Favourites
Fig. 21 Favourites view.
Favourites view.
Press the function button ››› Fig. 19 to
change the favourites view ››› Fig. 21. Once a
an empty position from the favourites is se-
lected, you shall access the directory, where
you may select a contact as a favourite. The
selection of an occupied position makes it
necessary to dial the corresponding tele-
phone number.
Using the telephone
Fig. 22 Current phone call.
Incoming call:
If you receive a call, you have three possibili-
ties:
●accepting the call with function button .
●muting the call signal volume with the
function button .
●rejecting the call with the function button
.
The active call
If you accept the incoming call, you have
these possibilities during the call ››› Fig. 22:
●Press the function button to send out
DTMF tones (e.g. to control an answering ma-
chine).
●Press the function button to hold the con-
versation.
●Press the function button to silence the
microphone.
●With ends the call.
Settings on the connected telephone
Through the MENU unit button, the telephone
settings are accessed: The following setting
possibilities are available:
Hands-free: If there is an active call, you can continue
it on the mobile telephone or retake it on the infotain-
ment system.
Telephone selection: Alternating between the tele-
phones recognized by the infotainment system, or
searching for new devices.
User profile: Selecting settings for the currently
connected telephone:
Managing the favourites (e.g. deletion).
Defining or modifying the inbox numbers.
Modifying the directory order sequence.
Downloading the contacts again.
Activating/deactivating the announcement on the
mobile telephone upon turning off the engine.
Select a call tone (only if the telephone does not
transmit any tone).
Bluetooth®: You can choose settings here for the tele-
phone connection. For example, it is possible to delete
known devices.
18
Table of contents
Other Seat Automobile Accessories manuals
Popular Automobile Accessories manuals by other brands

Fishbone Offroad
Fishbone Offroad FB22150 installation instructions

Ecco
Ecco Reflex 5500 Series Installation and operation instructions

Flash Cover
Flash Cover Slim MN009CT installation manual

Uebler
Uebler 15720 Mounting and operating instructions

Brodit
Brodit 804741 ProClip installation instructions

wtw
wtw spectroFlex Car Adapter operating manual