Sharp EL-6850 User manual

ELECTRONIC ORGANIZER
EL-6850
EL-6890
EL-6890S
OPERATION MANUAL
CONTENTS
Using the Organizer for the First Time ........................................ 1
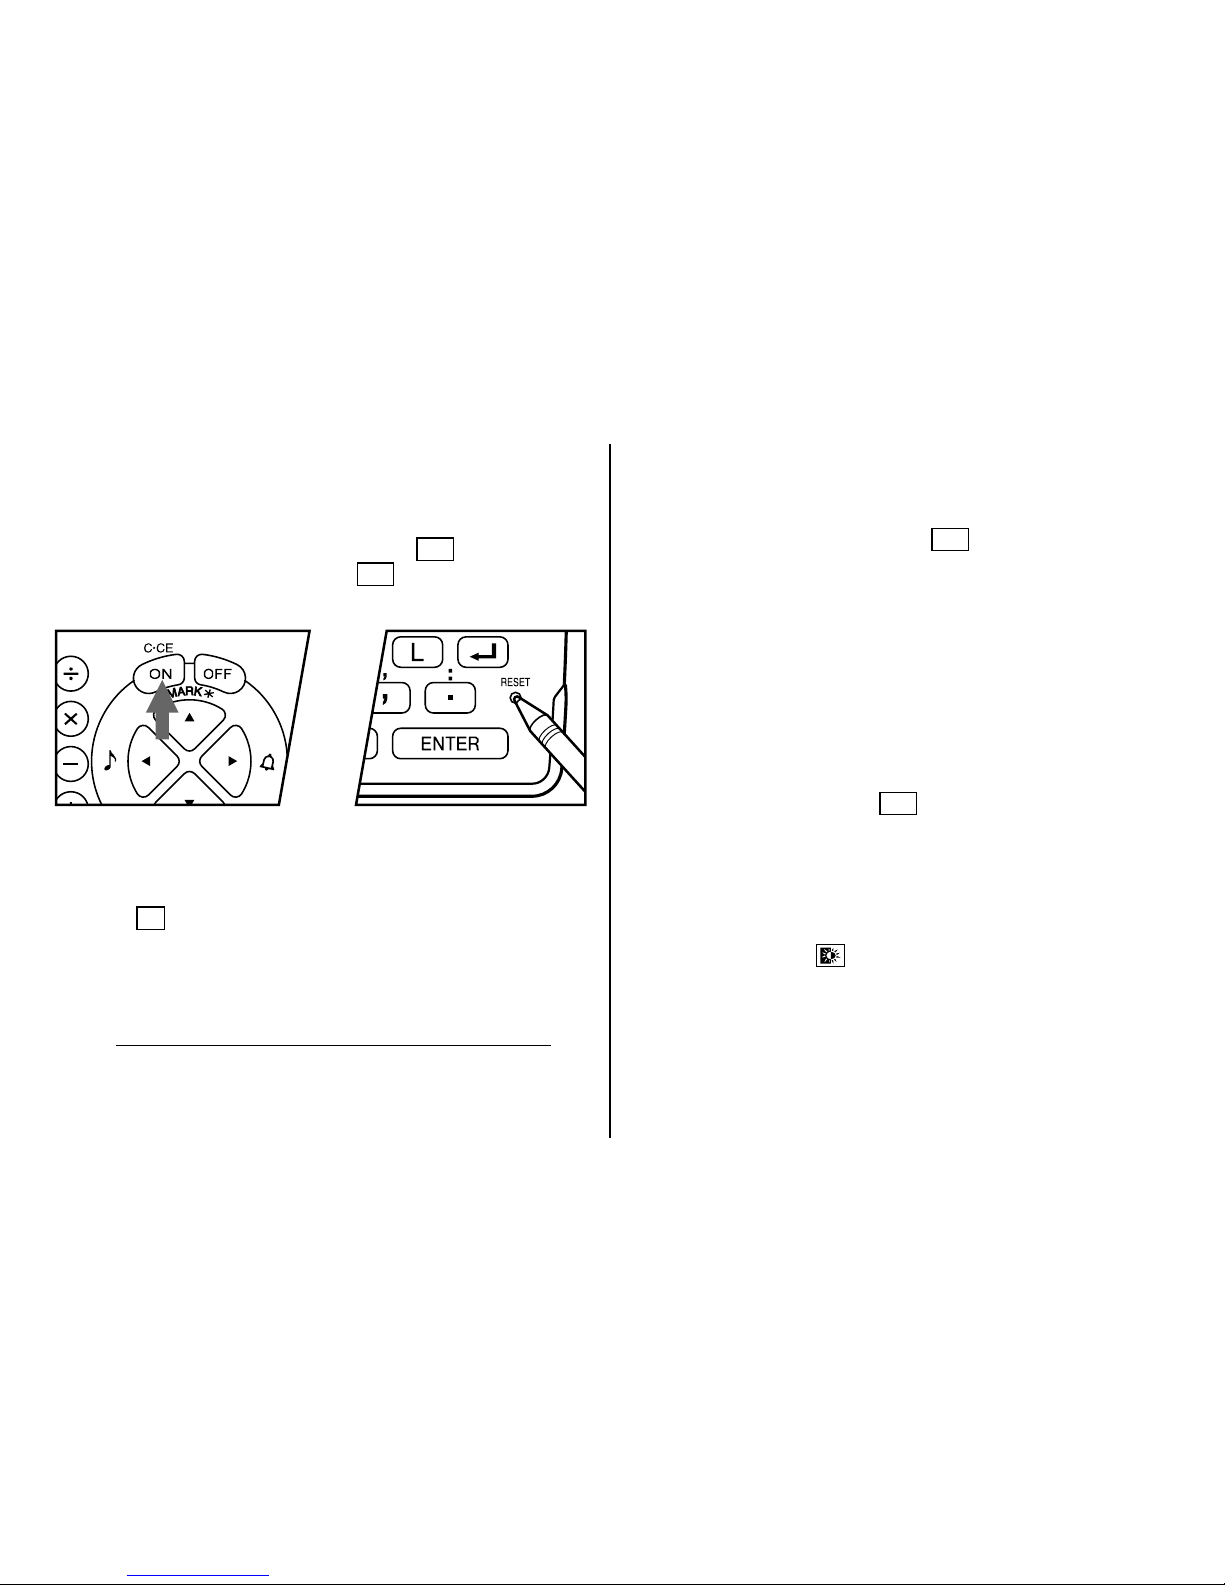
When Abnormal Conditions Cause a Malfunction ....................... 1
Auto Power Off Function ............................................................. 1
Backlight ..................................................................................... 1
Adjusting the LCD Contrast ........................................................ 2
Turning the Key Touch Tone On and Off ...................................... 2
Freeing Up Memory .................................................................... 2
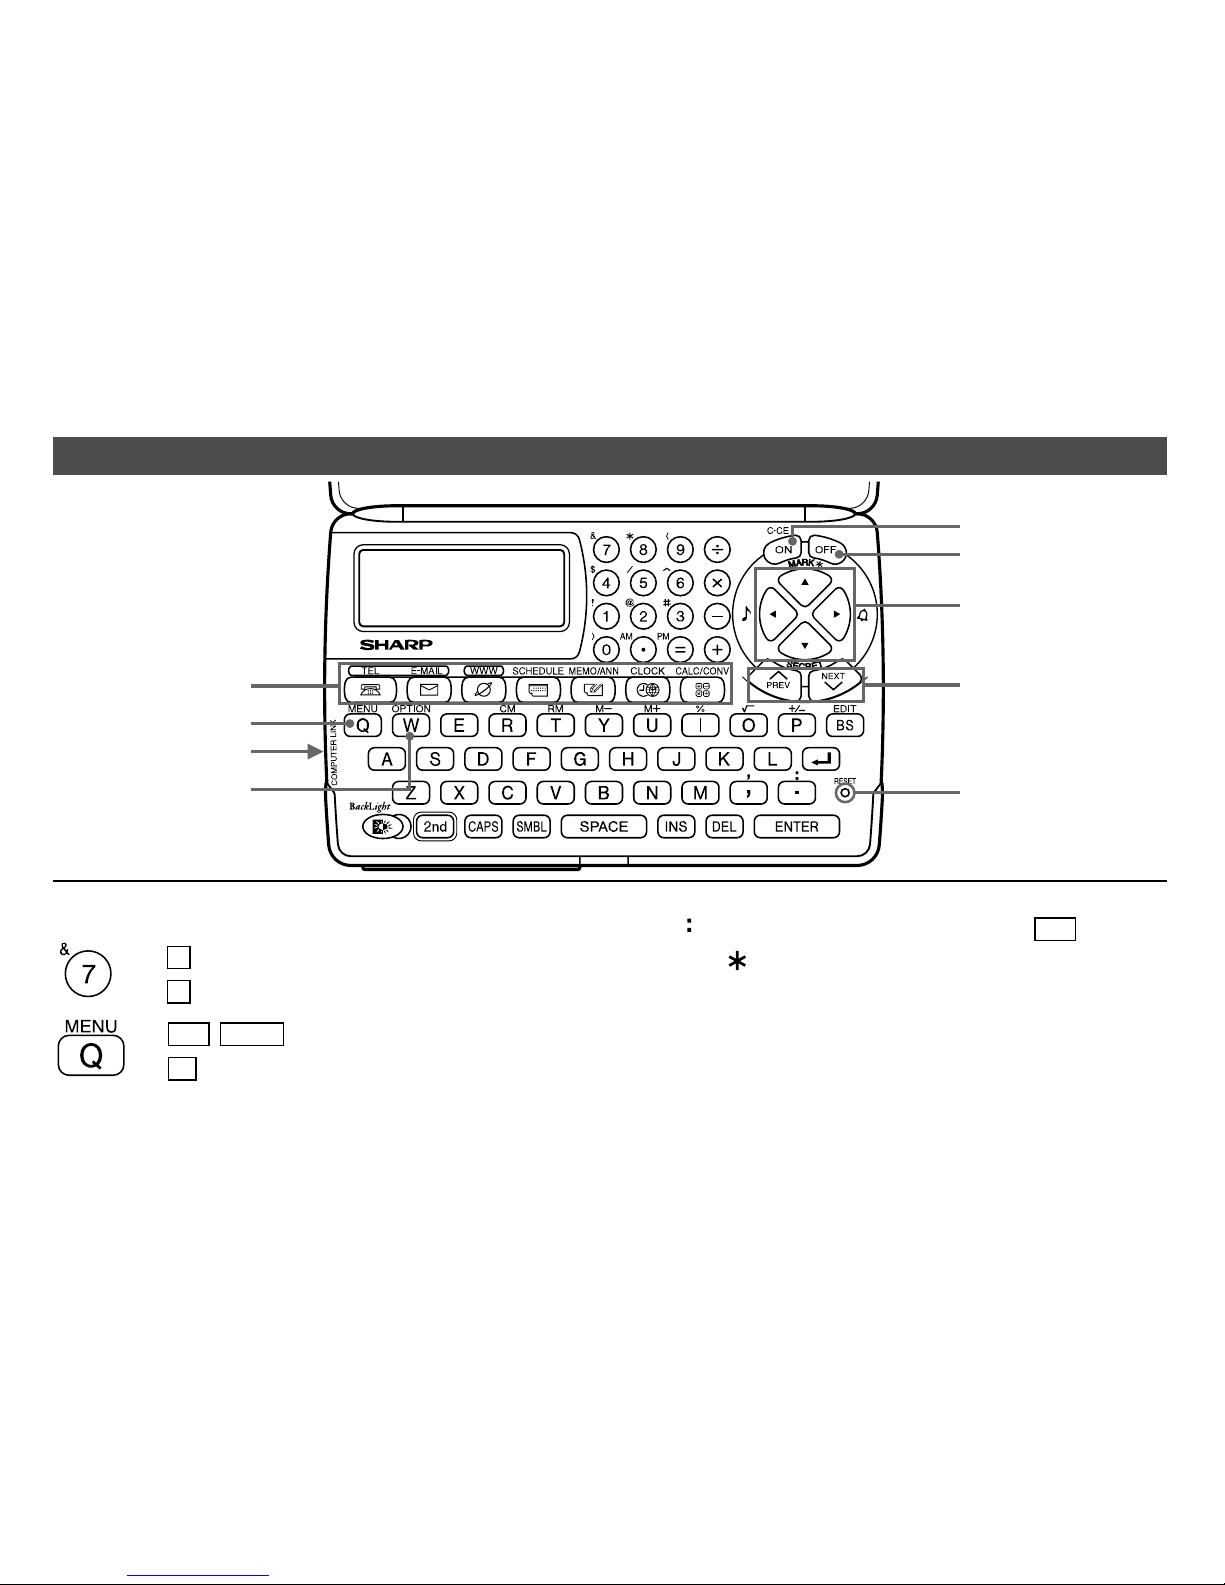
Part Names ...................................................................................... 3
Display Symbols .............................................................................. 4
Entering Characters .......................................................................... 4
Notes for the Built-in Calendar and the Time .................................... 5
Clock Mode ...................................................................................... 5
Note For Storing the Listings ............................................................ 8
Telephone/E-mail Mode .................................................................... 9
WWW Mode ................................................................................... 11
Calendar Mode ............................................................................... 12
Schedule Mode .............................................................................. 13
Memo Mode ................................................................................... 15
Anniversary Mode .......................................................................... 16
Recalling the Listings ..................................................................... 17
Editing the Listings ......................................................................... 19
Deleting the Listings ....................................................................... 19
Secret Function .............................................................................. 20
Calculator Mode ............................................................................. 22
Currency/Unit Conversion Mode .................................................... 23
Miscellaneous Functions ................................................................ 25
Using the Option Function .............................................................. 29
Battery Replacement ...................................................................... 32
Specifications ................................................................................. 35

NOTICE
• SHARP strongly recommends that separate permanent written records be kept of all important data. Data may be lost or
altered in virtually any electronic memory product under certain circumstances. Therefore, SHARP assumes no responsibility
for data lost or otherwise rendered unusable whether as a result of improper use, repairs, defects, battery replacement, use
after the specified battery life has expired, or any other cause.
• SHARP assumes no responsibility, directly or indirectly, for financial losses or claims from third persons resulting from the
use of this product and any of its functions, such as stolen credit card numbers, the loss of or alteration of stored data, etc.
• This Organizer is not designed to visit Web sites or transfer/receive e-mails by using the URL or E-mail addresses you will
store.
• The information provided in this manual is subject to change without notice.
CAUTIONS
• Do not carry the Organizer in the back pocket of slacks or trousers.
• Do not drop the Organizer or apply excessive force to it.
• Do not subject the Organizer to extreme temperatures.
• Since this product is not waterproof, do not use it or store it where fluids can splash onto it. Raindrops, water spray, juice,
coffee, steam, perspiration, etc. will also cause malfunction.
• Clean only with a soft, dry cloth.
• Use only a SHARP approved service facility.
NOTES
• Unless otherwise specified, the text material applies to ALL 3 models.
• Some of the models described in this manual may not be available in some countries.
• All company and/or product names are trademarks and/or registered trademarks of their respective manufactures.

1
Using the Organizer for the First Time
Be sure to perform the following operations before using the
Organizer for the first time.
1. Press the RESET switch while holding ON . Release the
RESET switch and then release ON .
“CLEAR ALL DATA OK (Y/N) ?” is displayed.
• Under certain conditions the message may appear as
“Data has been impaired ! Press [Y] to CLEAR ALL
memory”. Proceed to the next step in either case.
2. Press Y.
3. The Organizer is now initialized. Proceed to set the date
and time of the clock. (Refer to page 7.)
Press the RESET switch with a ball-point pen or similar
object. Do not use an object with a breakable or sharp tip.
When Abnormal Conditions Cause a Malfunction
If the Organizer is subjected to strong, extraneous electrical
noises or shocks during use, an abnormal condition may
occur in which no keys (including ON ) will respond. If this
happens, press the RESET switch.
Noises or shocks may erase some or all of the Organizer’s
memory.
Auto Power Off Function
When none of the keys have been pressed for approximately
7 minutes, the Organizer automatically turns the power off to
save the batteries. (The actual time may vary depending upon
the condition of use.) Press ON to resume operation.
Backlight
The Organizer provides a built-in Backlight, which allows you
to view the display and use the Organizer even in low-light
conditions. Pressing once illuminates the display for as
long as you continue to use the Organizer, until you have not
typed any key for the interval you set. (See the following
section, “Setting up the Backlight”.)

2
• To turn the Backlight off, press again.
• The Backlight may remain on for less than the set interval
or it may not function if the battery level is very low.
• The Backlight does not function during data transfer.
★Do not use the Backlight unnecessarily.
• Since the Backlight drains power from the operating
batteries, excessive use of the Backlight will
significantly reduce the life of your batteries.
• Do not continue using the Organizer after it has
automatically turned itself off while the backlight was
being used. Even if it can be turned on again, the clock
time will be incorrect and other functions may not work
properly until the batteries are replaced.
Setting up the Backlight
You can change the interval after which the Backlight turns
off automatically.
1. Press 2nd MENU
NEXT
3.
2. Press or to change
interval (15 – 60 seconds).
3. Press ENTER .
Adjusting the LCD Contrast
1. Press 2nd
MENU
3.
2. Press or to darken or
lighten the display as
required.
3. Press C•CE after adjusting the contrast.
Turning the Key Touch Tone On and Off
The key touch tone is turned on and off by pressing 2nd .
Freeing Up Memory
When you turn the power on, the following message may be
displayed, asking you to free up memory by deleting
unnecessary space.
Press Yto delete it. Freeing
up memory requires not more
than one minute.
Press Nwhen you wish to
start the operation soon. (Refer to page 28.)
CAPS
<
B/L SETUP
>
TURN OFF AFTER
15 30 45 60
SECONDS
<
LCD CONTRAST
>
–DARK
–LIGHT
CAPS
DO YOU WANT TO
FREE UP
MEMORY ?
(Yes/No)
CAPS

3
Part Names
OPTION key
MENU key
Mode keys
Computer link
Cursor movement keys
Power ON key
Power OFF key
RESET switch
Search keys
: Indicates the &key.
: Indicates the numeric 7key.
: Indicates the MENU key.
: Indicates the alphabetic Qkey.
To access the symbols above the number key (*1) and “ ,”
and “ ”, press the desired key after pressing 2nd .
*1 … &, , (, $, /, ∧, !, @, #, )
* Numbers and letters and space between them for entering
are shown as unboxed numbers and letters.
In this manual the keys are represented by symbols,
for example:
→ &
→ 7
→ 2nd MENU
→ Q

4
Display Symbols
:A “beep” will sound when a key is pressed.
:The schedule alarm will sound.
CAPS
:Capital (uppercase) letters will be entered. To enter
small (lowercase) letters, turn “CAPS” off by
pressing CAPS .
EDIT
:The listing on the display can be edited.
2nd
:Indicates that 2nd has been pressed. The function
or character shown in yellow (or green) above the
keypad can be used next.
:More information exists above the current display.
(Press .)
:More information exists below the current display.
(Press .)
S
:Secret function is in effect. (Secret listings cannot be
recalled without a password.)
:Indicates that the recalled listing is secret.
BATT
:Indicates that the operating battery level is low.
• In this manual, only the symbols necessary for
explanation will be shown.
Entering Characters
1.Moving the Cursor
The cursor ( _ or ) can be moved by pressing (or holding
down) , , , or .
2.Entering Characters
(1) Entering Letters and Numbers
After initializing the Organizer, the default setting for entering
letters will be capital (uppercase) letters. To enter small
(lowercase) letters, turn “CAPS” off by pressing
CAPS
.
• To enter “ ’ ” or “ : ”, press ,or :after pressing 2nd .
(2) Entering graphic symbols and special characters
Press SMBL to display the symbol entry mode, allowing a
total of 90 symbols and characters to be selected. To select
the symbol display containing the desired symbol/special
character, press
NEXT
or PREV , then press the number
corresponding to it.
• The first display is determined by your previous choice.
The 5 most recently used symbols/special characters are
stored and displayed on this display.
Press SMBL to exit the symbol entry mode.

5
3.Making Corrections
(1) Inserting characters
Press INS to change the cursor from “■” (replace) to “ ”
(insert).
Press INS again to change the cursor from “ ” to “■”.
(2) Deleting characters
Press DEL or BS to delete the character.
•DEL and BS will not operate in some cases such as
when inputting time during the schedule entry or when
using the calculator. In these cases, press the C•CE key
and reenter.
• Press C•CE to clear all characters on the current display.
Notes for the Built-in Calendar and the Time
• Calendar, Schedule, and Clock modes allow you to enter
the desired date and time between Jan. 1, 1901 and Dec.
31, 2099.
• If an attempt is made to store an invalid time or date, you
cannot move the cursor to date entering, or cannot store
time and date by pressing ENTER . Enter the correct
value and press ENTER again.
CAPS
NEW YORK [H]
MON JAN 1 01
0:00
Day of the week/
Month/Day/Year
Time
LONDON [W]
MON JAN 1 01
(+
5
00
)5:00
CAPS
Time
Day of the week/
Month/Day/Year
Home city indication World city indication
Clock Mode
The Organizer has both Home and World clocks. The display
switches between Home and World clock each time CLOCK
is pressed.
Home clock World clock
“(+ 5:00)” indicates the time difference from the Home city.
1.Setting the Home Clock
(1) Setting and changing the Home city
Set your local city as the Home city by selecting its zone
number.

6
Zone City Zone City
number number
0 10 MOSCOW
1 AUCKLAND 11 CAIRO
2 NOUMEA 12 PARIS
3 SYDNEY 13 LONDON
3.3 ADELAIDE 14
4 TOKYO 15
5 HONG KONG 16 RIO DE JANEIRO
6 BANGKOK 17 CARACAS
6.3 YANGON 18 NEW YORK
7 DHAKA 19 CHICAGO
7.3 NEW DELHI 20 DENVER
8 KARACHI 21 LOS ANGELES
8.3 KABUL 22 ANCHORAGE
9 DUBAI 23 HONOLULU
9.3 TEHRAN 24 MIDWAY
Zone numbers are based on the distance of the zones from
the international date line (zone number zero). For example,
there is a 13-hour difference between the date line and
London (London is 13 hours behind), so the zone number for
London is 13. Honolulu is 23 hours behind the date line, so
its zone number is 23.
The names and zone numbers of 27 cities are stored in the
Organizer's memory. (Refer to this page.)
1. Press CLOCK once or twice to display the Home clock.
• The initial Home city after initialization of the Organizer is
New York.
2. Press 2nd EDIT to enter the edit mode.
• “18” on the display indicates the time zone.
3. Press
NEXT
or PREV to display the desired city which
correspond to your local zone from the cities stored in the
Organizer.
4. Press ENTER to set the Home city.
• Some city names are abbreviated on the display as
follows:
HONG KONG→HONGKONG, NEW DELHI →DELHI,
RIO DE JANEIRO→RIO, LOS ANGELES→L.A.,
ANCHORAGE→ANC.
• Zone numbers 0, 14, and 15 have no city name display.

7
(2) Setting the Clock
<Example>
Set the date and time to February 8, 2001, 10:05
PM.
1. Press CLOCK once or twice to display the Home clock.
2. Press 2nd EDIT .
• The cursor will flash.
3. Enter the hour and minutes.
1005
PM (For the 24-hour clock, press
2205
.)
(Enter 2 digits each for both hour and minutes.)
4. Enter the month, day, and year.
02082001
Use to skip entering a number that needs no change.
5. Press ENTER . The clock starts from 0 seconds.
• The time can be displayed using either the 12-hour AM/
PM system or the 24-hour system (default). To change the
time system, refer to page 27, “Selecting the Time
System”. AM or PM is displayed for the 12-hour clock. For
this example, set the 12 hour clock.
(Note: 12:00PM: noon, 12:00AM: midnight)
NEW YORK 18
MON JAN 1 01
0:03
CAPS
2.Using the World Clock
(1) Changing the city for the World clock
1. Press CLOCK once or twice to display the World clock.
2. Press 2nd EDIT to enter the edit mode.
3. Press NEXT or PREV to display the city which
corresponds to the desired zone.
4. Press ENTER .
• The date and time need to be changed in the edit mode of
the Home clock.
3.Registering a City Name not Found in the List
If you want to set the city for the World clock to Rome, for
example (Rome belongs to the zone number 12, but is not
included in the city list):
1. Press CLOCK once or twice to display the World clock.
2. Press 2nd EDIT to enter the edit mode.
3. Press
NEXT
(or PREV ) to set the zone number to 12.
(Initially the city is Paris.)
4. Enter the city name (up to 8
characters).
ROME (Press
DEL
to delete unnecessary
character(s), if necessary.)
ROME 12
FRI FEB 9 ©01
4:05A
CAPS

8
(2) World clock
1. Press CLOCK once or twice to display the World clock.
2. Press 2nd EDIT , then 2nd
ENTER
.
Setting DST in the World clock automatically sets the time
one hour ahead.
• When DST is set for one World city, it is used for all cities
displayed in the World clock.
(3) Clearing DST
To clear DST, follow the steps 1 to 4 for Home clock, or
follow the steps 1 and 2 for World clock.
A “ ” disappears.
Note For Storing the Listings
If the memory is full, “MEMORY FULL” will be displayed
briefly and the listing cannot be stored. Delete unnecessary
data and free up memory to make enough space to store new
listings. (Refer to pages 26, 28.)
5. Press ENTER to store the new name.
• To register a city name for the Home clock, first display
the Home clock then 2nd EDIT followed by to
move the cursor to the city name line.
• Only one changed city name can be stored in each of the
Home and World clocks.
• Each changed name is stored until you change the zone
number next time.
4.Setting Daylight Saving Time/Summer Time
If DST (daylight saving time/summer time) is used, the local
time is advanced one hour during the summer.
• DST can be set independently in either the Home or the
World clock. For example, if DST is set for the Home
clock, it does not have to be set for the World clock.
(1) Home clock
1. Press CLOCK once or twice to display the Home clock.
2. Press 2nd EDIT to enter the edit mode.
3. Enter the correct daylight saving time/summer time.
4. Press 2nd ENTER to set the time as DST.
A “ ” appears on the display and DST is now set.

9
Telephone/E-mail Mode
Telephone/E-mail listings can be accessed by pressing either
of TEL or E-MAIL , while both keys recall the same stored
listings respectively in each order on the display.
TEL recalls and displays the listing in the following order:
NAME →NUMBER →ADDRESS →E-MAIL, while E-MAIL
does in the following order: NAME →E-MAIL →NUMBER
→ADDRESS.
Further, Telephone/E-mail listings are divided into 2 files
(TEL/MAIL1, TEL/MAIL2). You can switch them for
convenience by using one for business and one for personal.
The files are cycled each time you press TEL or E-MAIL .
↔
↔
TEL/MAIL 1
NAME ?
( TEL MODE )
CAPS
TEL/MAIL 2
NAME ?
( TEL MODE )
CAPS
TEL/MAIL 1
NAME ?
(E–MAIL MODE)
CAPS
TEL/MAIL 2
NAME ?
(E–MAIL MODE)
CAPS
TEL
E-MAIL
135
the same stored listing
135
the same stored listing
In Telephone/E-mail mode, a listing consists of 4 entries:
name, number, postal address, and E-mail address. The
maximum number of characters that can be entered for each
listing is 512 in all.
Number entry
Address entry
→
E-mail address entry
→
NUMBER ?
CAPS
ADDRESS ?
CAPS
E–MAIL ?
CAPS
Name entry
TEL/MAIL 1
NAME ?
( TEL MODE )
CAPS
←
1.Designating the File Names
You can change each file name up to 10 characters long as
follows:
1. Press 2nd MENU
NEXT
2.
2. Enter the new name for TEL/
MAIL1, then press ENTER .
CAPS
<
FILE NAME
>
1: [TEL/MAIL 1]
2: [TEL/MAIL 2]
3: [URL ]

10
Space
fg.com–
6. Press ENTER , then enter
the E-mail address. For
example,
7. Press ENTER .
“STORED !” will be displayed briefly, then the listing will
be displayed.
• To skip entering the number, address, or E-mail address,
press ENTER when “NUMBER ?”, “ADDRESS ?”, or “E-
MAIL ?” is displayed. However, the name entry can not be
skipped.
• Regardless of the entry order, listings in the Telephone/E-
mail mode are stored internally according to the first
character of the person’s name in the following order:
201–265–5600
CAPS
F 265–1234–
Edwards Bob–
Supervisor
Sales dept.
ABCD co.
15 North St.–
• You can skip changing an each file name by pressing
ENTER .
• To cancel entering the filenames, press C•CE twice.
3. Perform the same procedure as step 2 for TEL/MAIL2 and
URL.
4. Press TEL , E-MAIL , or WWW to check the new file
name(s).
2.Storing Telephone Listings
1. Press TEL to display the TEL/MAIL1 entry prompt.
2. Enter the name. For example,
Edwards Bob
3. Press ENTER .
The number entry prompt is displayed.
4. Enter the phone number.
For example,
201-265-5600
F 265-1234
5. Press ENTER , then enter the address. For example,
Supervisor
Sales dept.
ABCD co.
15 North St.

11
WWW Mode
WWW mode is used exclusively for storing URL (Uniform
Resource Locator) and its remark which reminds you of the
URL contents. In this mode, a WWW listing consists of 3
entries: name, URL, and remark.
1.Storing WWW Listings
1. Press WWW to display the
name entry prompt.
2. Enter the name. For example,
SHARP ELECTRONICS CO.
3. Press ENTER .
The URL entry prompt
including “www.” is
displayed.
• You can edit “www.” if necessary.
4. Enter the URL. For example,
sharp-usa.com
URL
NAME ?
CAPS
www.sharp–usa.
com–
URL ?
CAPS
www.–
5. Press ENTER .
The REMARK entry prompt is displayed.
6. Enter the Remark. For
example,
ELECTRONICS
7. Press ENTER .
“STORED !” will be
displayed briefly, then the
listing will be displayed.
• The maximum number of characters (including “www.”)
that can be entered for each listing is 512 in all.
SHARP ELECTRON
ICS CO.
www.sharp–usa.
com
CAPS
ELECTRONICS–
CAPS

12
Calendar Mode
Calendar mode is selected by pressing SCHEDULE once or
twice. Each time you press this key, the display switches
between Calendar and Schedule modes.
1.Controling the Monthly Calendar Display
The Organizer has a 4-line display and 4 weeks of a month
can be displayed. Use the following keys to control the
display status.
PREV
NEXT
:display the following (or previous) month.
•Hold down either of these keys for rapid
recall.
:move the cursor or scroll the calendar up
(or down) one week.
1. Press SCHEDULE once or
twice to display the Calendar
mode.
•“ ” indicates the first week of the month is hidden
above. To display the first week, press until the cursor
scrolls into the previous screen.
2. Press
NEXT
( PREV ) to display the calendar for the
next (previous) month.
• In the year display, a “ ’ ” is attached to the years 1901 to
1999, while no mark is attached to the years 2000 to
2099.
2.Returning the Calendar to the Current Date
Press 2nd SCHEDULE in Calendar mode.
• The current monthly calendar will be displayed, and the
current date will flash.
4
5
6
7
8
9
10
25
26
27
28
11
12
13
14
15
16
17
18
19
20
21
22
23
24
01
2
CAPS
THU FEB 8 '01
TIME ?
CAPS
4
5
6
7
8
9
10
25
26
27
28
11
12
13
14
15
16
17
18
19
20
21
22
23
24
01
2
CAPS
↔
Calendar mode Schedule mode

13
Schedule Mode
Schedule mode is selected by pressing SCHEDULE once or
twice. Each time you press this key, the display switches
between Schedule mode and Calendar mode.
A schedule listing consists of 3 entries: date, time, and detail.
The maximum number of characters for each detail is 512. In
the date entry, 4 digits can be entered for the year and 2
digits each for the month, day, hour, and minute.
1.Storing Schedule Listings
There are 3 ways to entering the desired date:
(1) Entering the desired date in Calendar mode
(2) Entering the desired date with NEXT (or PREV )
(3) Entering the desired date directly
After the date has been entered, actual entry of time and
detail is the same for all 3 ways.
(1) Entering the desired date in Calendar mode
<Example>
Enter the following data.
“Lunch with Tom” from 11:30 AM to 1:00 PM on
February 24, 2001.
1. Press 2nd SCHEDULE in Calendar mode to display the
calendar for the current date (February 8, 2001).
2. Press , , , or to move the cursor to February
24, 2001.
3. Press SCHEDULE to
change to the Schedule
mode. Time entry prompt is
displayed.
• Multiple listings can be scheduled on the same date.
4. Enter the starting and ending time.
1130
AM
01
PM
(For the 24-hour clock, press 1130 13 .)
“DESCRIPTION ?” is displayed.
• “:00” will be entered automatically.
• You can enter schedule details without the ending time.
Press ENTER (or ) after entering the starting time to
display “DESCRIPTION ?” prompt.
• You can also enter schedule details without specified time,
except details starting with a number. Skip entering time
and start to enter letters for the details as described in
step 5.
• The hour and minute should each consist of 2 digits.
SAT FEB 24 '01
TIME ?
CAPS

14
SAT FEB 24 '01
11:30A~ 1:00P
Lunch with Tom
–
4
5
6
7
8
9
10
25
26
27
28
11
12
13
14
15
16
17
01
2
18
19
20
21
22
23
24
• The time can be set using either the 12-hour or 24-hour
format. When you move the cursor to the next entering,
the time is displayed in the format selected in the Time
System of the MENU functions.
• If an attempt is made to store an invalid time, you cannot
move the cursor to the next entering. Enter the correct
time and follow the next procedure.
5. Enter the schedule detail.
Lunch with Tom
6. Press ENTER to store the listing.
7. Now, press SCHEDULE to
check if the listing is stored
in memory.
• Notice the tag ( ) next to “February 24”. It indicates a
schedule item for that date:
Schedule item beginning in the morning
Anniversary item
Schedule item beginning after the noon
(2) Entering the desired date with
NEXT
(or PREV )
This way is convenient for entering a nearby date. Press
NEXT
(or PREV ) and change the display day by day until
the desired date appears.
<Example>
Enter a schedule listing on February 11, 2001.
1. Press SCHEDULE once or twice to display the Schedule
mode screen.
2. Press 2nd SCHEDULE to display time entry prompt for
the current date (February 8, 2001).
3. Press
NEXT
repeatedly until time entry prompt for
February 11, 2001 appears. Enter the time and detail
following the procedure for “(1) Entering the desired date
in Calendar mode” (from step 4) on page 13.
(3) Entering the desired date directly
When the date is not close to the currently displayed date,
this way is more convenient than the above 2 ways.
<Example>
Enter a schedule listing on November 26, 2001.
1. Press SCHEDULE C•CE
to display the date entry
prompt.
MM/DD/YYYY
MONTH :02
DAY :08
YEAR :2001
CAPS

15
2. Enter the date.
11262001
3. Press ENTER . Time entry prompt (or Calendar) for
November 26, 2001 is displayed. Enter the time and detail
following the procedure for “(1) Entering the desired date
in Calendar mode” from step 4 (or from step 3) on page
13.
• If an attempt is made to store an invalid date, you cannot
move to the time entry prompt. Enter the correct date and
follow the next procedure.
2.Schedule Alarm
Schedule alarm sounds for approximately 20 seconds when
the time set for a schedule listing is reached. The alarm
sounds when a “ ” is on the display.
Press 2nd to turn the “ ” on and off.
• When the “ ” is turned on, alarms will sound for all
schedule listings with that starting time. You cannot
classify or declassify each listing.
• Press C•CE to turn the alarm off.
Memo Mode
Memo mode is selected by pressing
MEMO/ANN
once or
twice.
The maximum number of characters for each memo is 512.
1.Storing Memo Listings
1. Press
MEMO/ANN
once
or twice to display the
Memo entry prompt.
2. Enter the data.
3. Press ENTER .
MEMO
CAPS
TITLE ?

16
Anniversary Mode
Anniversary mode is selected by pressing
MEMO/ANN
once
or twice. Each time you press this key, the display switches
between Memo and Anniversary modes.
In Anniversary mode, you can store anniversaries, such as
birthdays, so that you can recall these important dates easily.
Once a date is stored as an anniversary, the date will be an
anniversary for every year from 1901 to 2099.
The maximum number of characters for each label is 512.
Anniversaries are marked with a tag ( ) in the center right of
the date in the monthly calendar.
1.Storing Anniversary Listings
1. Press
MEMO/ANN
once or
twice to display the
Anniversary entry prompt.
2. Enter the date and press
ENTER (or ) to enter the
label. For example,
0212
ENTER
FEB 12
–ANN–
Nancy's Birthd
ay–
FEB 12
–ANN–
DESCRIPTION ?
FEB 12
–ANN–
Nancy's Birthd
ay
M/D=–/
–ANN–
M=MONTH D=DAY
CAPS
• If an attempt is made to store an invalid date, you cannot
move to the label entry prompt. Enter the correct date and
follow the next procedure.
3. Enter the label of the
anniversary. For example,
Nancy’s Birthday
4. Press ENTER to store in
memory.

17
Recalling the Listings
1.Notes for Recalling the Listings
• Perform searching the listings in each mode other than
Clock, Calculator, or Conversion mode.
• When the symbol “ ” or “ ” is displayed, more
information exists. Pressing or scrolls up or down
one line.
• When there are no more (or relevant) listings to be
recalled or to be searched, “NOT FOUND !” is displayed
briefly and the display returns to the entry prompt.
2.Sequential Search
Recalls listings in order in each mode.
Press NEXT (or PREV ) to recall listings in forward (or
reverse) order. Hold down either of these keys for rapid
recall.
Schedule listings
• When nothing has been entered for that day, only the time
entry prompt is displayed.
• Press 2nd SCHEDULE in Schedule mode to recall
today’s schedule listings. Then press NEXT repeatedly to
check if the other listings are scheduled for today.
• Press 2nd NEXT (or 2nd PREV ) in Schedule mode
repeatedly to recall listings skipping empty dates. Press
C•CE C•CE , then press 2nd NEXT (or 2nd
PREV ) to display the first (or last) listing in chronologi-
cal order. After the last (or first) listing in chronological
order has been found, “NOT FOUND !” is displayed briefly.
3.Direct Search
Recalls listings by the first character(s) of the name (or the
contents) in Telephone/E-mail, WWW, Schedule, or Memo
mode.
1. Enter the first character(s) of the desired name in each
mode.
2. Press NEXT (or PREV ).
• The search in Schedule mode begins from the currently
displayed date in forward (or reverse) order.
• If the desired listing in Telephone/E-mail or WWW mode is
not in memory, the subsequent listing in sequential order
will be displayed.
• Each time NEXT (or PREV ) is pressed, sequential
search will be performed.

18
4.Keyword Search
Recalls listings by a word contained in the desired listing in
Telephone/E-mail, WWW, Schedule, or Memo mode.
<Example>
Recall listings containing the word “ABCD co.”
in the TEL/MAIL1 file.
1. Press TEL to display the TEL/MAIL1 file.
2. Enter the keyword.
ABCD CO.
• The keyword can be entered in either capital (uppercase)
or small (lowercase) letters.
The listings will be recalled regardless of whether the
keyword is entered in capital (uppercase) or small
(lowercase) letters.
3. Press 2nd NEXT .
• Each time 2nd NEXT are
pressed, subsequent listings
containing the word “ABCD
co.” will be displayed.
5.Date Search
Recalls listings by the date in Calendar, Schedule, or
Anniversary mode.
Calendar or Schedule listings
<Example>
Recall the calendar for December 25, 2001.
1. Press SCHEDULE .
2. Press C•CE to display the
date entry prompt. To make
a correction, move the
cursor with or , or
press C•CE to clear the displayed date.
3. Enter the month, day, and year.
12252001
• To enter a single-digit month or day, enter zero and the
digit.
4. Press ENTER .
The specified calendar or schedule will be displayed.
Anniversary listings
In the Anniversary entry prompt, enter the date and then
press NEXT (or PREV ).
MM/DD/YYYY
MONTH :02
DAY :08
YEAR :2001
CAPS
Edwards Bob
201–265–5600
F 265–1234
Supervisor
CAPS
Other manuals for EL-6850
1
This manual suits for next models
3
Table of contents
Other Sharp Organizer manuals

Sharp
Sharp ZQ-190 User manual

Sharp
Sharp EL-6930 User manual

Sharp
Sharp ZQ-800 User manual

Sharp
Sharp EL-6071 User manual

Sharp
Sharp EL-6090 User manual

Sharp
Sharp EL-6920 User manual

Sharp
Sharp Wizard OZ-590A User manual

Sharp
Sharp EL-6050 User manual

Sharp
Sharp EL-6990 Quick start guide

Sharp
Sharp EL-6053S User manual

Sharp
Sharp EL-6053 User manual

Sharp
Sharp OZ-770 User manual

Sharp
Sharp EL-6090 User manual

Sharp
Sharp EL-6930 User manual

Sharp
Sharp OZ-5600 User manual

Sharp
Sharp EL-6810 Series User manual

Sharp
Sharp EL-6320 User manual

Sharp
Sharp YO-480 User manual

Sharp
Sharp YO-270 User manual

Sharp
Sharp YO-470 User manual