ENGLISH
INTRODUCTION
—y
Thank
you
for
purchasing
this
SHARP
product.
We
hope
it
will
give
you
many
years
of
trouble-free
enjoyment.
For
the
best
performance,
read
this
manual
carefully.
It
will
guide
you
in
operating
your
SHARP
product.
Page
PRECAUTIONS
iii
tea
wide
s
s
ewer
dale
ouwaee
giv
on
sadedeane
sa
1
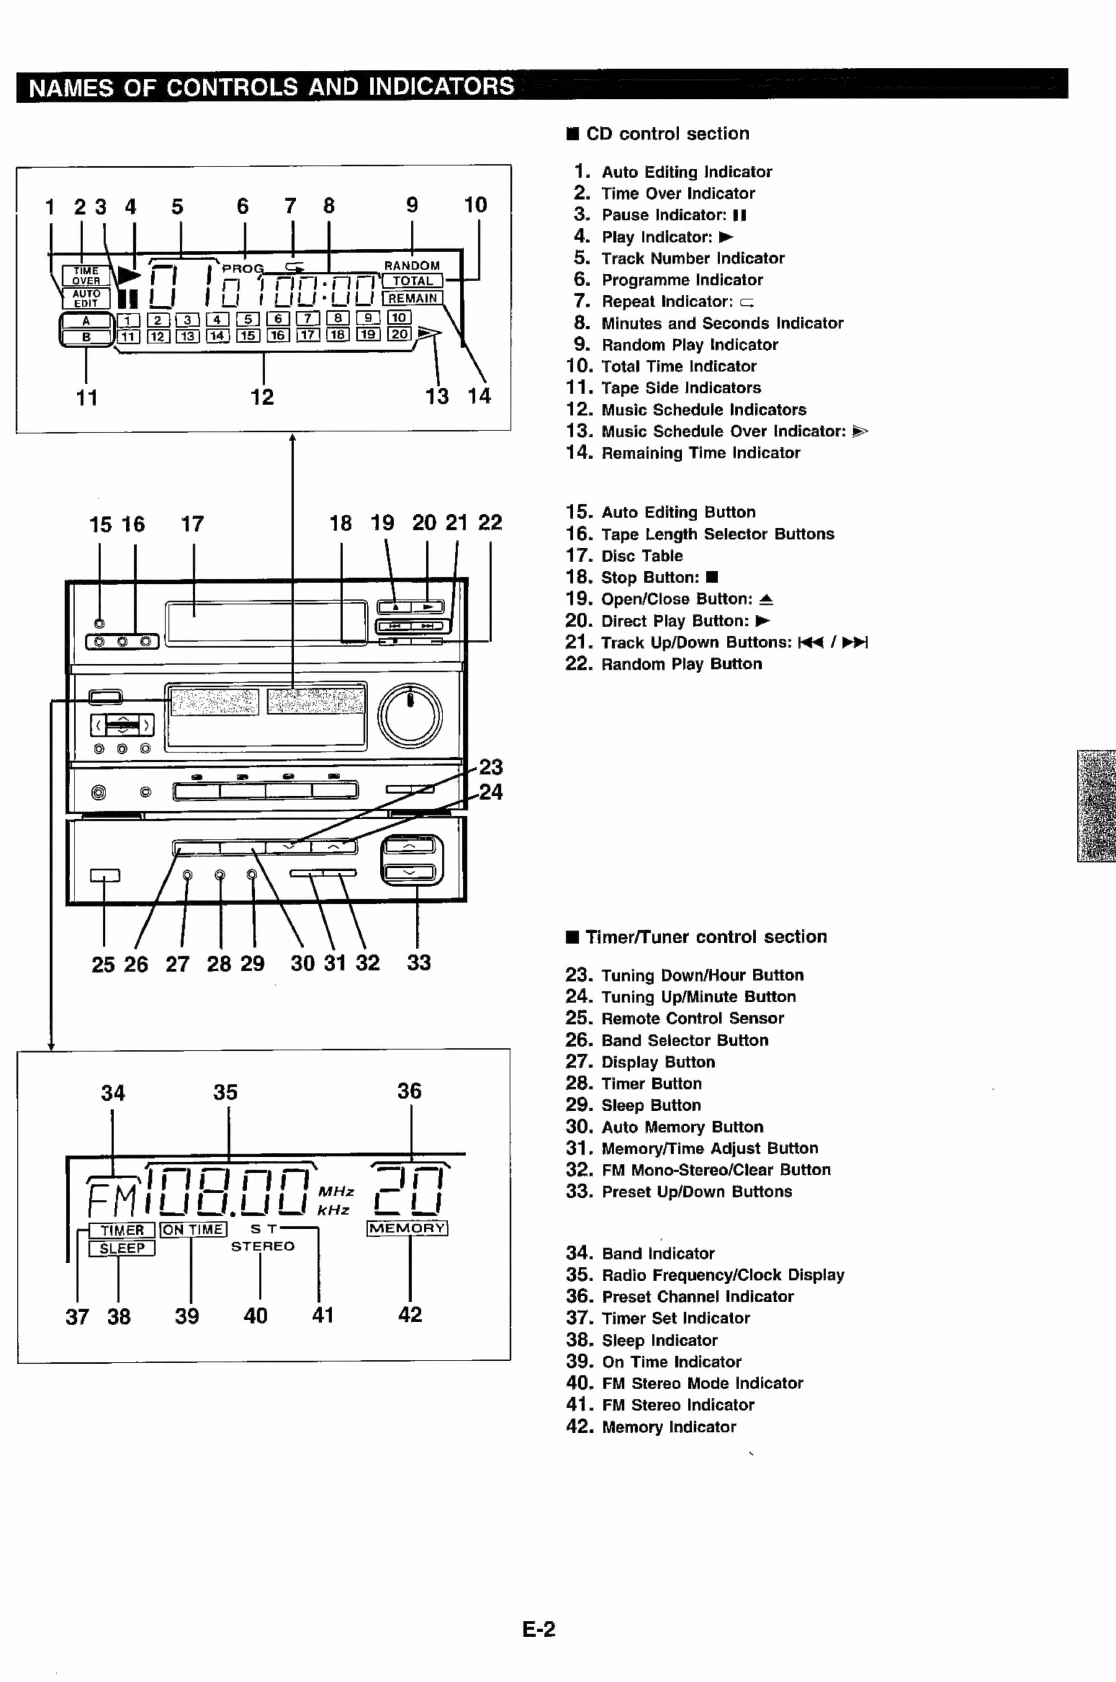
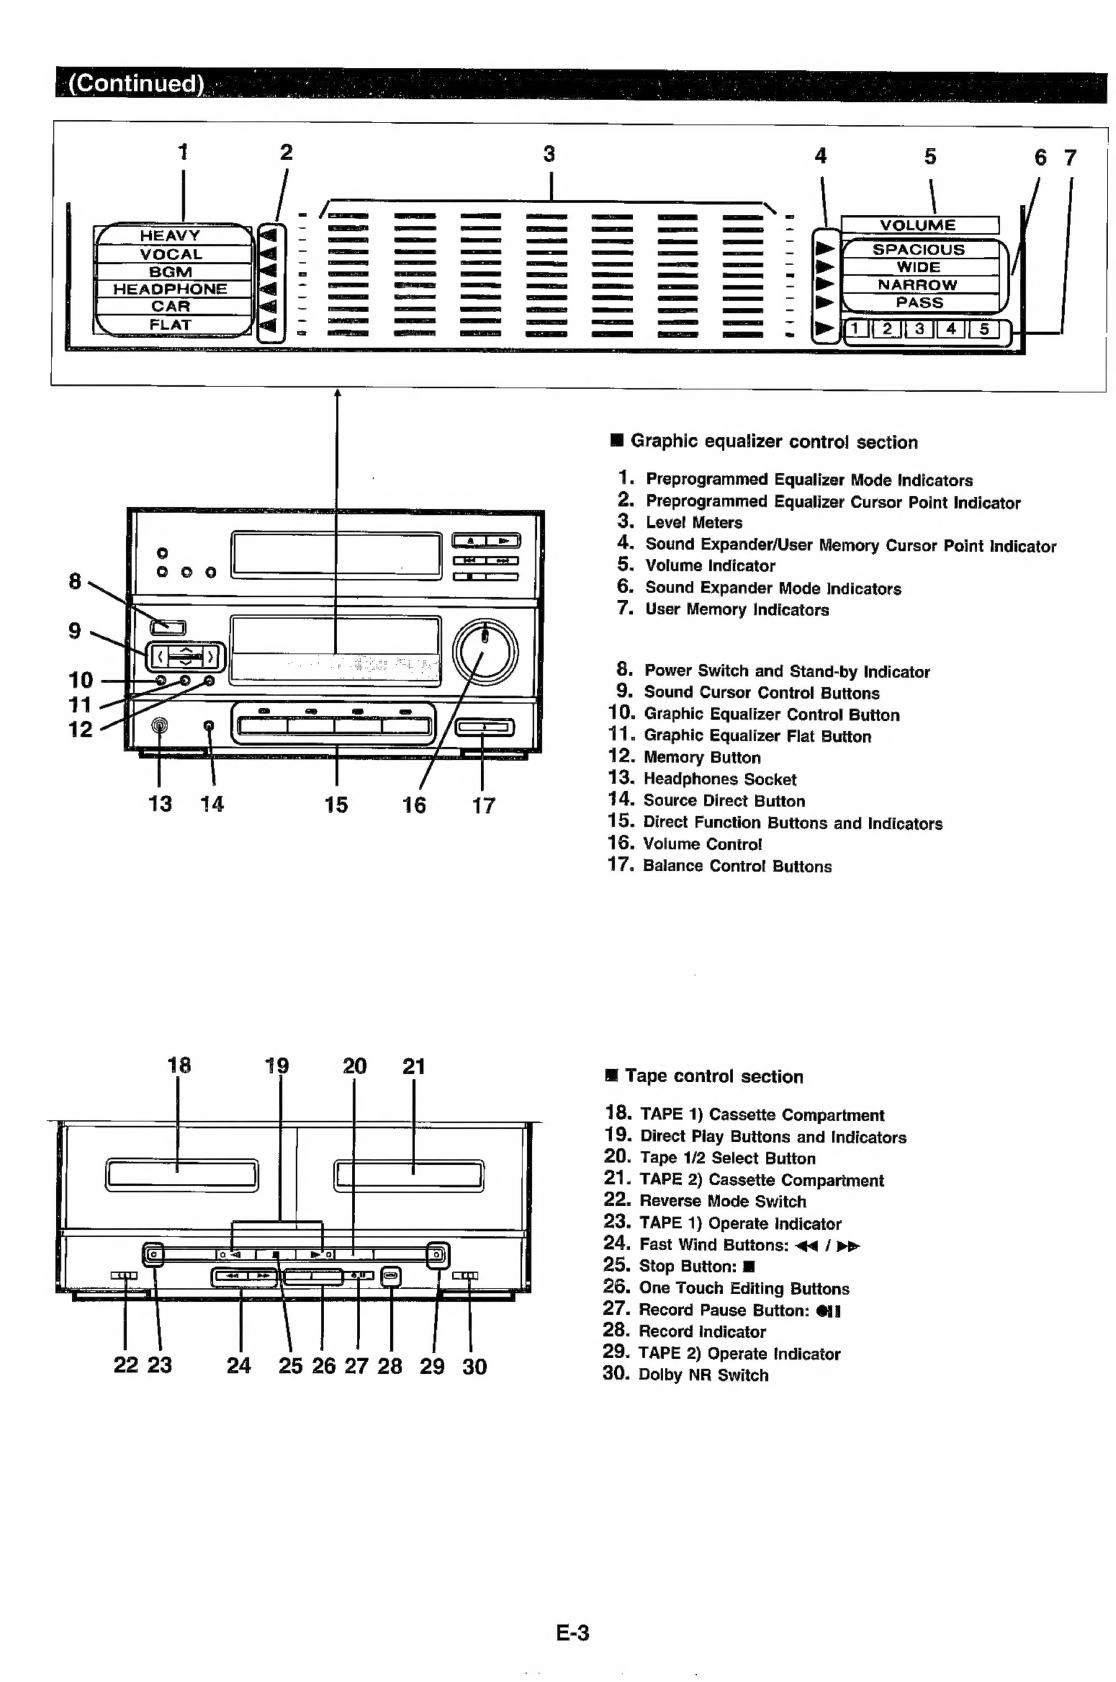
NAMES
OF
CONTROLS
AND
INDICATORS
................
2-4
FEMOTE
CONTROL
ics
4
sisiee
since
vine
euewetan
canes
ena
ines
5-6
PREPARATION
FOR USE
........0
cc
cece
cere
tee tee
nena
7-9
SETTING
THE
CLOCK
.....
ccc
cece
ence
cen
cee
eeenees
10
COMPACT
DISC
OPERATION
.........
ccc
ee
ceeeee
cece
10-15
RADIO
OPERATION
....
2...
ccc
cece
cence
ceca
eee
e
ene
16-17
PRECAUTIONS
Page
CASSETTE
OPERATION
.........00cccucuececceceaecs
18-20
SOUND
CONTROL
............
ccc
ce
ee
enccucceccccunues
21
SOUND
FIELD
CONTROL
...........
ccc
ce
eeeccccenees
22-25
ME
CORDING
i
iii
sin
sa
5ara
dd
ween
ede
orre
er
natie
dca
aoe
26-30
HOW
TO
USE
THE
BUILT-IN
TIMER
...............2....
31-32
USING
EXTERNAL
UNITS
..........
0.0.
.cccceeecceuuucees
33
MAINTENANGE
ii
s’siaia'e
vic
tiacies
bckae
ded
a'owiecbaees
ceva
34
SPECIFICATIONS
..-...ccsscscccacccccuccussacenveceses
34
M@
Do
not
use
oil,
solvents,
petrol,
paint
thinners
or
insecticides
on
the
unit.
@
Do
not
expose
the
unit
to
moisture
or
to
temperatures
higher
than
60°C
(140°F).
HM
Do
not
expose
the
unit
to
extreme
low
temperatures.
M@
Keep
the
unit
away
from
direct
sunlight.
a
Keep
the
unit
away
from
strong
magnetic
fields,
excessive
dust,
humidity
and
electronic/electrical
equipment
(home
computers,
fac-
similes,
etc.)
that
generates
electrical
noise.
@
Hold
the
AC
power
plug
by
the
head
when
removing
it
from
the
AC
outlet,
since
pulling
the
lead
can
damage
internal
wires.
m
Remove
the
AC
power
plug
from
the
wall
socket
before
cleaning
the
heads,
pinch
rollers,
etc.
This
unit
contains
dangerous
voltages.
Do
not
remove
the
outer
cover,
as
this
may
result
in
electric
shock.
Refer
internal
service
to
your
local
SHARP
service
facility.
@
Use
the
unit
on
a
firm,
level
surface
free
from
vibration.
M@
/f
the
unit
does
not
work
properly
whilst
in
use,
set
the
POWER
switch
to
©
STAND-BY
and
then
to
ON
again.
Warning:
The
voltage
used
must
be
the
same
as
that
specified
on
this
unit.
Using
this
product
with
a
higher
voltage
than
that
which
is
specified
is
dangerous
and
may
result
in
a
fire
or
other
type
of
accident
causing
damage.
SHARP
will
not
be
held
responsible
for
any
damage
resulting
from
use
of
this
unit
with
a
voltage
other
than
that
which
is
specified.
@
Condensation
Sudden
temperature
changes
and
storage
or
operation
in
an
extreme-
ly
humid
environment
may
cause
condensation
inside
the
cabinet.
Condensation
can
cause
the
unit
to
malfunction.
Follow
the
procedure
below
to
eliminate
condensation.
@
CD
pickup
Leave
the
power
on
with
no
disc
in
the
unit
until
normal
playback
is
possible
(about
1
hour).
@®
Tape
head
Leave
the
power
on
with
no
cassette
in
the
unit
until
normal
playback
is
possible
(about
1
hour).
Note:
If
condensation
forms
on
the
tape
head,
foreign
matter
may
accumu-
late
during
use.
@
Remote
control
Wipe
off
condensation
on
the
transmitter
window
with
a
soft
cloth
before
operating
the
unit.
@
Volume
control
The
sound
level
at
a
given
volume
setting
depends
on
a
combination
of
speaker
efficiency,
location
and
many
other
factors.
Care
should
be
taken
to
avoid
exposure
to
sudden
high
levels
of
sound,
such
as
occur
when
turning
on
the
unit
with
the
volume
control
Setting
at
high,
and
to
continuous
high
levels
of
sound.


 User manual")
 Instruction manual")