Sharp 21F-A30 User manual

OPERATION MANUAL
COLOUR TELEVISION
Please read this operation manual
carefully before using the colour
television.
MODEL
21F-A30
21F-A30(Front) 10/7/04, 9:16 PM1

E 1
Contents
Preparation
Accessories ...................................................................................... 2
Easy setup ........................................................................................ 3
Safety precautions ............................................................................ 4
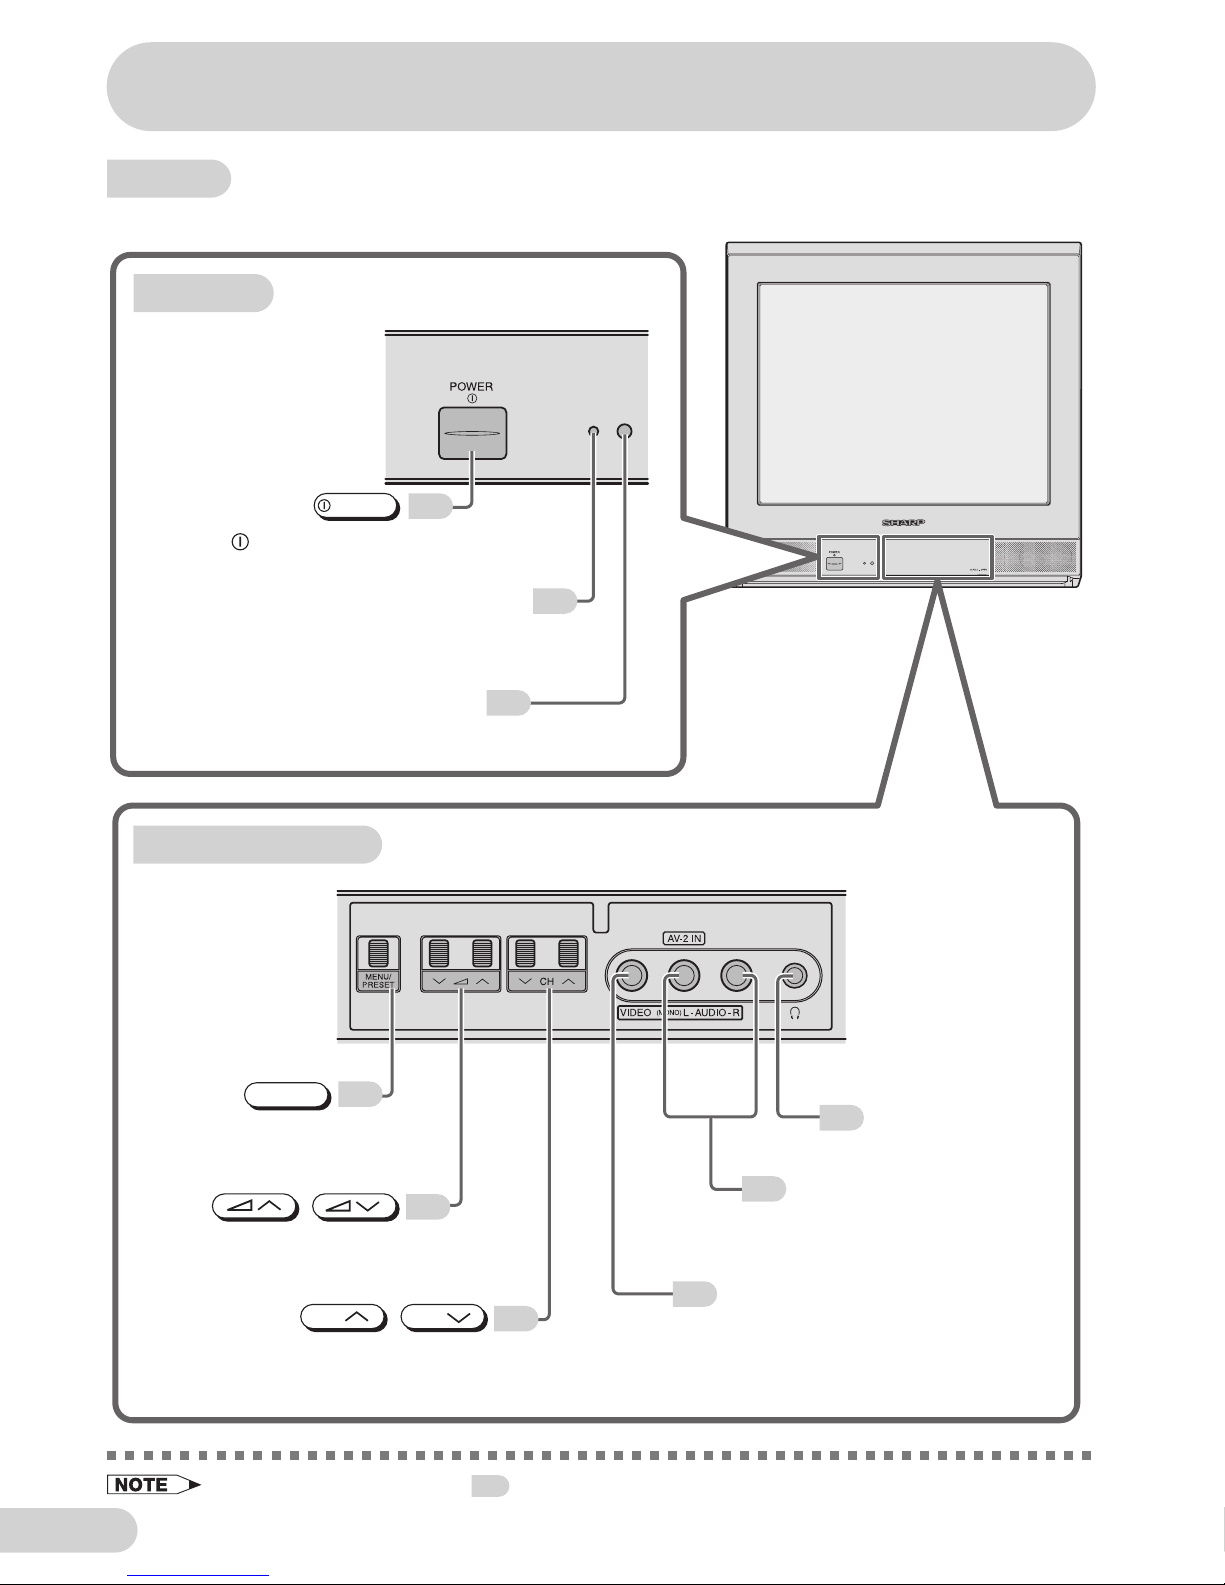
Part names ....................................................................................... 6
Installing batteries in the remote control unit .................................... 6
Watching TV
Watching a TV programme ............................................................... 8
Operating the TV buttons .................................................................. 9
Useful features
Channel/Timer display .................................................................... 10
Mute ............................................................................................... 10
Channel recall ................................................................................ 11
TV/Video selection ......................................................................... 11
Selecting menu items
Selecting a menu item .................................................................... 12
Settings and adjustments
On-screen display language selection ............................................ 13
Auto channel tuning ........................................................................ 14
Manual channel tuning ................................................................... 15
Channel setting .............................................................................. 16
Picture adjustment .......................................................................... 17
Sound adjustment .......................................................................... 18
Surround sound .............................................................................. 19
Mono bilingual system .................................................................... 19
Blue screen .................................................................................... 20
Off timer .......................................................................................... 21
On timer .......................................................................................... 22
Reminder on-screen timer .............................................................. 23
Connections
Connecting to a DVD player ........................................................... 24
Watching DVD Playback ................................................................. 24
Connecting to an antenna .............................................................. 25
Connecting to an antenna via a VCR ............................................. 25
Connecting to video equipment ...................................................... 26
Troubleshooting
Troubleshooting .............................................................................. 27
Specifications
Specifications ................................................................................. 28
21F-A30(01-06) 10/7/04, 9:16 PM1

E 2
Dear SHARP Customer
Thank you for buying SHARP's Colour
Television. We hope you will have many
years of enjoyment from this television
set. To ensure proper operation, please
read this manual carefully, and keep it in
a safe place for future reference.
Remote control Size-AA batteries Operation manual
The following accessories are included with this television.
Accessories
21F-A30
21F-A30(01-06) 10/7/04, 9:16 PM2

E 3
Easy setup
To use your TV set, perform the easy setup procedure below.
The mark indicates the page numbers with more detailed information.
Connect the antenna.
• See 25 to connect the antenna.
Connect any video equipment.
• See 25 , 26 to connect video equipment.
• See the operation manual of your video equipment when
connecting to the TV set.
Insert the batteries into the remote
control.
• Use the two batteries included with the TV.
• See 6.
Insert the AC plug to the power outlet.
• If you will not use the TV set for a considerable length of
time, as a safety precaution, unplug the cord from the
outlet.
Tune the channels.
• Use the buttons on the TV.
• See 14 , 15 .
21F-A30(01-06) 10/7/04, 9:16 PM3

E 4
Safety precautions
Damage
Turn off the power and unplug the power cord from the wall
outlet immediately if the TV set begins to make any unusual
noises or gives off smoke or an unusual smell. Then call your
dealer for service.
Servicing
To reduce the risk of electric shock, do not remove the back of
the cabinet. This TV set contains dangerous voltage.
Unstable surface and shocks
Do not place this TV set on an unstable cart, stand, shelf, or
table. The TV set may fall, causing serious injury to a child or
adult, and serious damage to the set.
Sharp recommends securing the TV set to a stable surface or
wall to prevent the set from falling due to sudden shocks or
impact.
Water
To prevent fire or electrical shock, do not place the TV set near a
bathroom, swimming pool or other area where it may become wet.
Moisture
To prevent electrical shock, do not use the TV set in an
excessively damp place.
Power-cord protection
To prevent electrical shock, do not subject the AC power cord to
damage by bending or twisting it, or by placing heavy items on
top of it and do not place the AC power cord under the TV set. If
the AC power cord becomes damaged, unplug it from the wall
outlet immediately and call your dealer for service.
21F-A30(01-06) 10/7/04, 9:16 PM4

E 5
Safety precautions
Liquid entry
Do not place a flower vase or anything else containing liquid on
the TV set, as liquid spilt on the TV set can cause electrical
shock or failure.
Object entry
Never insert or drop any metallic or inflammable objects into the
ventilation openings of the TV set, as this can cause fire,
electrical shock, or electrical failure.
Ventilation
Do not place this TV set in a confined area, such as on a
bookshelf or in a built-in case. Leave adequate space behind the
TV for proper ventilation.
TV Set position
Do place the TV set onto an even stand, table or track which size
is bigger than the TV set.
If the TV set is put onto a smaller size or uneven stand, table or
track may cause the TV cabinet distort.
Do not put or insert anything between TV set and the stand, table
or track.
Uneven surface and excessive force
Television equipment and cart combination should be moved
with care. Quick stops, excessive force, and uneven surfaces
may cause the equipment and cart combination to overturn.
Fire prevention
To prevent fire, never place any type of candle or naked flames
on the top or near the TV set.
21F-A30(01-06) 10/7/04, 9:16 PM5

E 6
Part names
• Be sure to match the battery j/kterminals with the j/kmarks inside the compartment.
• Remove the batteries if weak or if the unit is not in use for long periods.
• Do not mix old and new batteries.
• Incorrect installation of the batteries may damage the remote control.
With your thumbnail, pull
up at the slit to open the
battery cover.
Insert two batteries
(size AA).
Replace the battery cover.
Installing batteries in the remote control unit
Remote control
The mark indicates the page numbers with more detailed information.
TV
0
1
4
7
2
5
8
3
6
9
CH
CH
TV/VIDEO
MENU
SURROUND
LANGUAGE
NORMAL
MPX
10
Mutes the sound and restores
sound to previous level.
19
Produces a more spacious sound.
SURROUND
13
Changes the on-screen
display language.
LANGUAGE
12
Calls the MENU screen.
MENU
17
Resets all settings.
NORMAL
19
Switches between main
and sub sound.
MPX
10
Displays the channel and timer
settings on the screen.
Infrared transmitter window
Aim this window at the infrared
sensor window on your TV set.
Turns the TV on or to
Standby mode.
8
11
Returns to previously
viewed channel.
11
Switches between TV broadcasts
and A/V input programmes.
TV/VIDEO
8
Switches between one- or two-digit
mode channel selection.
Adjusts the volume.
Used for MENU setup.
/
8
Number buttons
8
Selects the channel.
Used for MENU setup.
CH
CH /
8
21F-A30(01-06) 10/7/04, 9:16 PM6

E 7
TV front
Behind the door
Power indicator
Power can be turned on by
the remote control when the
indicator is dimly.
Infrared sensor window
Receives the infrared wave
from the remote control.
8
8
6
MENU/PRESET button
Tunes the channels.
Used for MENU setup.
12
MENU/PRESET
Volume up/down buttons
Adjusts the volume.
Makes adjustments in PRESET.
8
/
8
Channel up/down buttons
Selects the channels.
Tunes or sets the channels.
CH
CH /
Headphone jack
Use to listen to the
audio with headphone.
9
Audio input terminals
(AV-2)
Connects to a camcorder,
video game, etc.
26
Video input terminal (AV-2)
Connects to a camcorder,
video game, etc.
26
POWER
POWER switch
Turns on and off the main power.
TV set
•When using headphone, see
9
.
Part names
21F-A30(07-11) 10/7/04, 9:16 PM7

E 8
Watching TV
1Turn on power.
•When the power indicator is off, press
POWER
.
•When the power indicator lights up dimly, press on the remote
control. The power indicator changes to bright and a picture appears.
Power indicator
POWER
TV Set
With CH / CH
•Press
CH
and channels change as shown below.
1 /2 / ... /98 /99 /AV1 (or COMPONENT) /AV2 / 0 /1 /2 ...
•Press
CH
and channels change as shown below.
1 /0 /AV2 /AV1 (or COMPONENT) /99 /98 /... /2 /1 /0 ...
VOLUME 10
3Adjust volume using /
.
•The number of oval blocks “ ”
indicates the volume level.
The volume bar disappears
approximately three seconds after
the volume has been adjusted.
2Select channel.
With the number buttons (on remote control)
•To select a one-digit channel, such as 5, press
5
.
If “5-”is indicated, press to select one-digit input, and then
press
5
again.
•To select a two-digit channel, such as 15, press to select
the two-digit input. Press
1
, and then press
5
.
--
1-
15
PAL
•When the power indicator lights up dimly, either
CH
/
CH
on the TV can be pressed to turn on
the power.
•The channel number is displayed in green for channels tuned by auto tuning and displayed in yellow for
channels tuned using fine tuning.
•When the power indicator lights up dimly, the TV is in Standby mode and power is still supplied to the
TV. If you will not watch TV for a while, turn off the main power by pressing
POWER
on the TV set. Also,
if you will not be at home for a considerable length of time, unplug the cord from the outlet.
•The AV1 (or COMPONENT), AV2 input channels cannot be selected using
CH
/
CH
on the
remote control. Use
TV/VIDEO
to select these channel.
•Channels that have been skipped cannot be selected by
CH
/
CH
. See
16
.
•The on-screen displays in this manual may differ from their actual appearance.
CH
CH
Behind the door
Watching a TV programme
Simple operations for watching a TV programme
TV/VIDEO
TV
0
4
7
2
8
3
6
9
CH
CH
1
CH
CH
1
5
5
MENU
SURROUND
LANGUAGE
NORMAL
MPX
21F-A30(07-11) 10/7/04, 9:16 PM8

E 9
•Select an appropriate volume so as not to injure your hearing.
•To avoid injuring your hearing, do not put on the headphone before plugging them into the headphone
jack and before the power is turned on.
•The proper impedance for the headphone is 32 ohms.
•Remove the headphone plug from the jack when not using the headphone.
Operating the TV buttons
Simple operation of the TV set
Using /
Press to increase volume.
Press to decrease volume.
CH
CH
VOLUME 10
5
PAL
Using
CH
/
CH
Press CH to increase channel
number.
Press CH to decrease channel
number.
Using headphone
Insert headphone plug into headphone jack to listen to audio with
headphone.
•The audio from the speakers is turned off.
Behind the door
Behind the door
Watching TV
21F-A30(07-11) 10/7/04, 9:16 PM9

E 10
Channel/Timer display
Displays the current channel number, the timer, and other
settings on the screen.
ON 8:00
OFF 2:30
1:50
5
PAL
2Press again.
•The channel number, colour and
sound system appear on the screen.
1Press .
•The time remaining on the Off timer,
On timer, and Reminder appears on
the screen.
•When no timer is set, the channel
number, colour and sound system
appear on the screen. Press
again to clear these current
settings display on the screen.
Useful features
1Press .
•“ ”appears on the screen, and the
sound is silenced.
2Press again.
•The volume returns to its previous
level.
3Press once again.
•The display disappears.
•Mute will be cancelled if the is pressed at any time.
Mute
Silences the sound.
TV/VIDEO
TV
0
4
7
2
8
3
6
9
CH
CH
1
5
MENU
SURROUND
LANGUAGE
NORMAL
MPX
21F-A30(07-11) 10/7/04, 9:16 PM10

E 11
TV/Video selection
Switches between TV broadcasts and AV input programmes.
Each time you press the
TV/VIDEO
, the
input switches between AV1 (or
COMPONENT), AV2 and TV programme.
Channel recall
Switches back to the channel you were watching just before
the current channel.
25
PAL
AV2
COMPONENT AV1
Press .
•The channel previously viewed returns to
the screen.
Example:
After switching from channel 5 to channel
7, is pressed, the channel will
change to channel 5. Press
again to return to channel 7.
5
PAL
7
PAL
5
PAL
7
PAL
Useful features
TV/VIDEO
TV
CH
CH
TV/VIDEO
MENU
SURROUND
LANGUAGE
NORMAL
0
4
7
2
8
3
6
9
1
5Number
buttons
MPX
or
21F-A30(07-11) 10/7/04, 9:16 PM11

E 12
Selecting a menu item
MENU
PICTURE
SOUND
FEATURE
TIMER
CH-SETTING
1Press
MENU
/
MENU/PRESET
to
call MENU screen.
MENU
PICTURE
SOUND
FEATURE
TIMER
CH-SETTING
3Press / to
enter.
• The corresponding menu screen will
appear.
SOUND
BASS 0
SURROUND OFF
TREBLE 0
BALANCE 0
This TV set allows you to adjust the picture and sound, and set the channels and other features
using the On-screen display with the remote control or from the TV set. Select the desired
menu item by following the steps below and then refer to the indicated page for details.
Remote control
Behind the door
MENU/PRESET
CH
CH
2Press
CH
/
CH
to
select desired menu item.
• The selected item is highlighted in
yellow.
•
If you press
MENU/PRESET
for more than two seconds, the LANGUAGE mode screen will appear instead of the MENU
screen. To display the MENU screen, press
MENU/PRESET
until the normal screen appears, then press the button again.
•
The procedures for setting and selecting the menu items on the following pages are described using the buttons
on the remote control. These procedures can also be performed using the corresponding buttons on the TV set.
Operating guide
MENU
PICTURE
SOUND
FEATURE
TIMER
CH-SETTING
MENU
:ENTER :RETURN
:SELECT
CH
PICTURE
CONTRAST 60
COLOUR 0
BRIGHTNESS 0
TINT
SHARPNESS 0
MENU
:ADJUST :RETURN
:SELECT
CH
SOUND
BASS 0
SURROUND OFF
TREBLE 0
BALANCE 0
MENU
:ADJUST :RETURN
:SELECT
CH
FEATURE
BLUE BACK OFF
WHITE TEMP
MENU
:ADJUST :RETURN
TIMER
OFF --:--
ON --:--
--:--
POSITION
VOLUME
MENU
:ADJUST :RETURN
:SELECT
CH
CH-SETTING menu
16
CH-SETTING
POSITION CH27
COLOUR AUTO
SKIP OFF
FINE 168.25MHz
MENU
:ADJUST :RETURN
:SELECT
CH
PICTURE menu SOUND menu
18
17
FEATURE menu TIMER menu
20 2321 –
Selecting menu items
TV
0
MENU
SURROUND
LANGUAGE
NORMAL
CH
CH
MENU
MPX
CH
CH
21F-A30(12-16) 10/22/04, 3:54 PM12

E 13
Settings and adjustments
On-screen display language selection
The on-screen display language can be set to English or Thai.
ENGLISH
3Press
MENU/PRESET
until normal
screen appears.
2Press
CH
/
CH
to
select desired language.
•Pressing
MENU/PRESET
changes the
screen as shown below.
1Press
MENU/PRESET
for more than
two seconds.
•The language select mode appear.
Language MANUAL
Normal screen
AUTO
MENU/PRESET
CH
CH
Behind the door
TV set
1Press
LANGUAGE
to select desired
language.
•Pressing
LANGUAGE
changes the
language as shown below.
Remote Control
ENGLISH
TV/VIDEO
TV
0
4
7
2
8
3
6
9
CH
CH
1
5
MENU
SURROUND
LANGUAGE
NORMAL
MPX
LANGUAGE
ENGLISH
¿“…“‰∑¬
¿“…“‰∑¬
21F-A30(12-16) 10/22/04, 3:54 PM13

E 14
Auto channel tuning
Automatically tunes in and presets receivable TV stations.
AUTO
VHF 1
48.25MH
z
1Press
MENU/PRESET
for more than
two seconds.
•The language select mode appear.
•AUTO PRESET stores all receivable channels including those which may be very weak and not clearly
visible. To preset only those channels designated for the local viewing region, use MANUAL PRESET.
See
15
.
•Unused channels are automatically skipped.
1
PAL
2Press
MENU/PRESET
again to display
AUTO mode screen.
•Pressing
MENU/PRESET
changes the
screen as shown below.
MENU/PRESET
3Press
/
on TV
set.
•All the TV stations in your area that
can be received by the TV set are
automatically preset between
channels 1 to 99.
•The screen shows whatever is on
channel 1 when auto channel preset
is finished.
Behind the door
Language MANUAL
Normal screen
AUTO
ENGLISH
¿“…“‰∑¬
21F-A30(12-16) 10/22/04, 3:54 PM14

E 15
Manual channel tuning
Enables manual channel tuning to a desired TV station.
1Press
MENU/PRESET
for more than
two seconds.
•The language select mode appear.
2Press
MENU/PRESET
twice to display
MANUAL mode screen.
•Pressing
MENU/PRESET
changes the
screen as shown below.
MANUAL
VHF 1
48.25MH
z
Language MANUAL
Normal screen
AUTO
MANUAL
VHF 5
107.50MH
z
3Press
CH
/
CH
or
number buttons to select channel
position.
4Press / on TV
set to locate channel you wish to
preset to current channel
position.
•Search is initiated and when a TV
signal is received during the search,
the search stops.
5Repeat steps 3 and 4 above, to preset channel positions for
other broadcasts.
6Press
MENU/PRESET
again to display normal screen.
Channel position
MENU/PRESET
CH
CH
Behind the door
Settings and adjustments
TV/VIDEO
TV
0
4
7
2
8
3
6
9
CH
CH
1
5
MENU
SURROUND
LANGUAGE
NORMAL
MPX
CH
CH
Number
buttons
ENGLISH
¿“…“‰∑¬
21F-A30(12-16) 10/22/04, 3:54 PM15

E 16
MENU
PICTURE
SOUND
FEATURE
TIMER
CH-SETTING
CH-SETTING
POSITION CH27
COLOUR AUTO
SKIP OFF
168.25MHz
MENU
:ADJUST :RETURN
:SELECT
CH
FINE
• Switching COLOUR system:
Set the system to “AUTO” for normal TV reception. The AUTO mode automatically detects the receiving
signal system and changes the reception system of the TV set. When the picture is not stable, switching
to an appropriate system may improve the picture quality.
• In a weak reception area, or under bad reception conditions, you can change the frequency by fine tuning.
• When using FINE, the channel number changes from green to yellow.
• To return the channel to its original frequency setting, follow the manual channel tuning procedure.
See
15
.
• Channel setting menu cannot be selected during COMPONENT mode.
CH-SETTING
POSITION AV1
COLOUR AUTO
MENU
:ADJUST :RETURN
:SELECT
CH
AUTO PAL N443 N358
TV/VIDEO
TV
0
4
7
2
8
3
6
9
CH
CH
1
5
MENU
SURROUND
LANGUAGE
NORMAL
MPX
CH
CH
MENU
Channel setting
Enables individual channel setting.
1Press
MENU
to call MENU
screen.
2Press
CH
/
CH
to
select “CH-SETTING”.
3Press / to
display CH-SETTING menu.
4Press
CH
/
CH
to
select desired setting.
5Each time you press
/
, setting for individual
items changes as follows:
•POSITION
The channel position changes to the higher or lower number.
•COLOUR
•SKIP
ON
OFF
Channel numbers with a “”mark on the left are set to SKIP. To turn
off SKIP, press the number buttons to select the desired channel and
then set “SKIP”to “OFF”.
•FINE
The frequency changes to allow fine tuning.
6Press
MENU
until normal
screen appears.
•When you select AV1, AV2 for the
channel position, the CH-SETTING
menu changes as shown on the
right and the colour mode changes
in the following order:
AUTO PAL
21F-A30(12-16) 10/29/04, 8:18 AM16

E 17
Picture adjustment
MENU
PICTURE
SOUND
FEATURE
TIMER
CH-SETTING
1Press
MENU
to call MENU
screen.
2Press
CH
/
CH
to
select “PICTURE”.
PICTURE
CONTRAST 50
COLOUR 0
BRIGHTNESS +10
TINT
SHARPNESS -10
WHITE TEMP
6Repeat steps 4 and 5 above to adjust other items.
7Press
MENU
until normal screen appears.
• Pressing
NORMAL
while a PICTURE selection is displayed, only the
selected mode is reset to the standard (factory-setting) position.
• Pressing
NORMAL
while a PICTURE menu screen is displayed will
reset all the items of PICTURE menu to the standard (factory-setting)
position.
3Press / to
display PICTURE menu.
4Press
CH
/
CH
to
select adjustment items.
-+
CONTRAST 50
5Adjust using / .
• Wait for approximately three seconds
to return to PICTURE menu.
CONTRAST
Selected item Press Press
COLOUR
BRIGHTNESS
TINT
SHARPNESS
To decrease
contrast
For less colour
intensity
For less
brightness
To move tint toward
red
For less
sharpness
To increase
contrast
For more colour
intensity
For more
brightness
To move tint toward
green
For more
sharpness
- +
- +
- +
- +
WHITE TEMP To more reddish
background
To more bluish
background
The following table lists the adjustment items shown in the PICTURE menu and how they change as you
press / .
*: TINT can only be selected and adjusted when receiving NTSC broadcasts. (AV only)
Settings and adjustments
TV/VIDEO
TV
0
4
7
2
8
3
6
9
CH
CH
1
5
MENU
SURROUND
LANGUAGE
NORMAL
MPX
CH
CH
MENU
NORMAL
21F-A30(17-23) 10/22/04, 3:57 PM17

E 18
Sound adjustment
MENU
PICTURE
SOUND
FEATURE
TIMER
CH-SETTING
1Press
MENU
to call MENU
screen.
2Press
CH
/
CH
to
select “SOUND”.
SOUND
BASS -20
SURROUND ON
TREBLE +10
BALANCE 20
-+
TREBLE +10
6Repeat steps 4 and 5 above to adjust other items.
7Press
MENU
until normal screen appears.
•Pressing
NORMAL
while a SOUND selection is displayed, only the
selected mode is reset to the standard (factory-setting) position.
•Pressing
NORMAL
while the SOUND menu screen is displayed will
reset all the items of SOUND menu to the standard (factory-setting)
position.
SURROUND
*
ON ON
TREBLE
BASS
Selected item
To decrease treble
To decrease bass
To increase treble
To increase bass
Press Press
- +
- +
BALANCE To shift balance
toward left
To shift balance
toward right
OFF
3Press / to
display SOUND menu.
4Press
CH
/
CH
to
select adjustment items.
The following table lists the adjustment items shown in the SOUND menu and how they change as you
press / .
5Adjust using / .
•Wait for approximately three
seconds to return to SOUND menu.
*: SURROUND mode can be set to “ON ”, “ON ”or “OFF”. See
19
TV/VIDEO
TV
0
4
7
2
8
3
6
9
CH
CH
1
5
MENU
SURROUND
LANGUAGE
NORMAL
MPX
CH
CH
MENU
NORMAL
21F-A30(17-23) 10/22/04, 3:57 PM18

E 19
Settings and adjustments
Surround sound
TV/VIDEO
TV
0
4
7
2
8
3
6
9
CH
CH
1
5
MENU
SURROUND
LANGUAGE
NORMAL
MPX
MPX
SURROUND
Each time you press
SURROUND
, the
mode changes between ON , ON
and OFF.
OFF: Produces normal sound.
ON : Setting to this mode during stereo
signal reception produces a spacious
sound, making the most of the speakers’
performance.
ON : Setting to this mode during
monaural signal reception creates
monaural sound that is similar to
stereophonic sound.
•The surround effect can be adjusted using the SOUND menu. See
18
.
Produces a virtual surround sound from the TV’s speakers.
SURROUND
ON
SURROUND
OFF
SURROUND
ON
Each time you press
MPX
, the
mode switches between SOUND 1 or
SOUND 2.
Enables selection of reception mode when receiving an
bilingual signal.
Mono bilingual system
49
SOUND1
49
SOUND2
21F-A30(17-23) 10/22/04, 3:57 PM19
Table of contents
Other Sharp TV manuals

Sharp
Sharp 28LF-96EC User manual

Sharp
Sharp 36U-S610 User manual

Sharp
Sharp 21J-FG1GF User manual

Sharp
Sharp 70GS-64SDE User manual

Sharp
Sharp LC-26DV20U - 26" LCD TV User manual

Sharp
Sharp 28JW-74H User manual

Sharp
Sharp 29RX5 User manual

Sharp
Sharp 29F-PE550 User manual

Sharp
Sharp LC-32CHG6452E User manual

Sharp
Sharp Aquos LC-65UB30U User manual

Sharp
Sharp 37GQ-20FP User manual

Sharp
Sharp 70AS-06S User manual

Sharp
Sharp 27L-S500 User manual

Sharp
Sharp LC-32CHG6242E User manual

Sharp
Sharp SX51LF7 User manual

Sharp
Sharp 63CS-03S User manual

Sharp
Sharp 70GS-65S User manual

Sharp
Sharp 21H1-FRU User manual

Sharp
Sharp VT-3428X User manual

Sharp
Sharp CX34N3 User manual