Sharp 28LS-94EC User manual

R
COLOUR TELEVISION
OPERATION MANUAL
28LS-94EC
Please read this operation manual carefully
before using the colour television.
INSTRUKCJA OBS£UGI
TELEWIZORA KOLOROWEGO
Prosimy uwa¿nie przeczytaæ ten podrêcznik
obs³ugi przed rozpoczêciem korzystania
z telewizora.

ENGLISH - 1 -
Contents
SafetyPrecautions...................................................2
Supplied Accessories...............................................4
Remote Control Buttons..........................................5
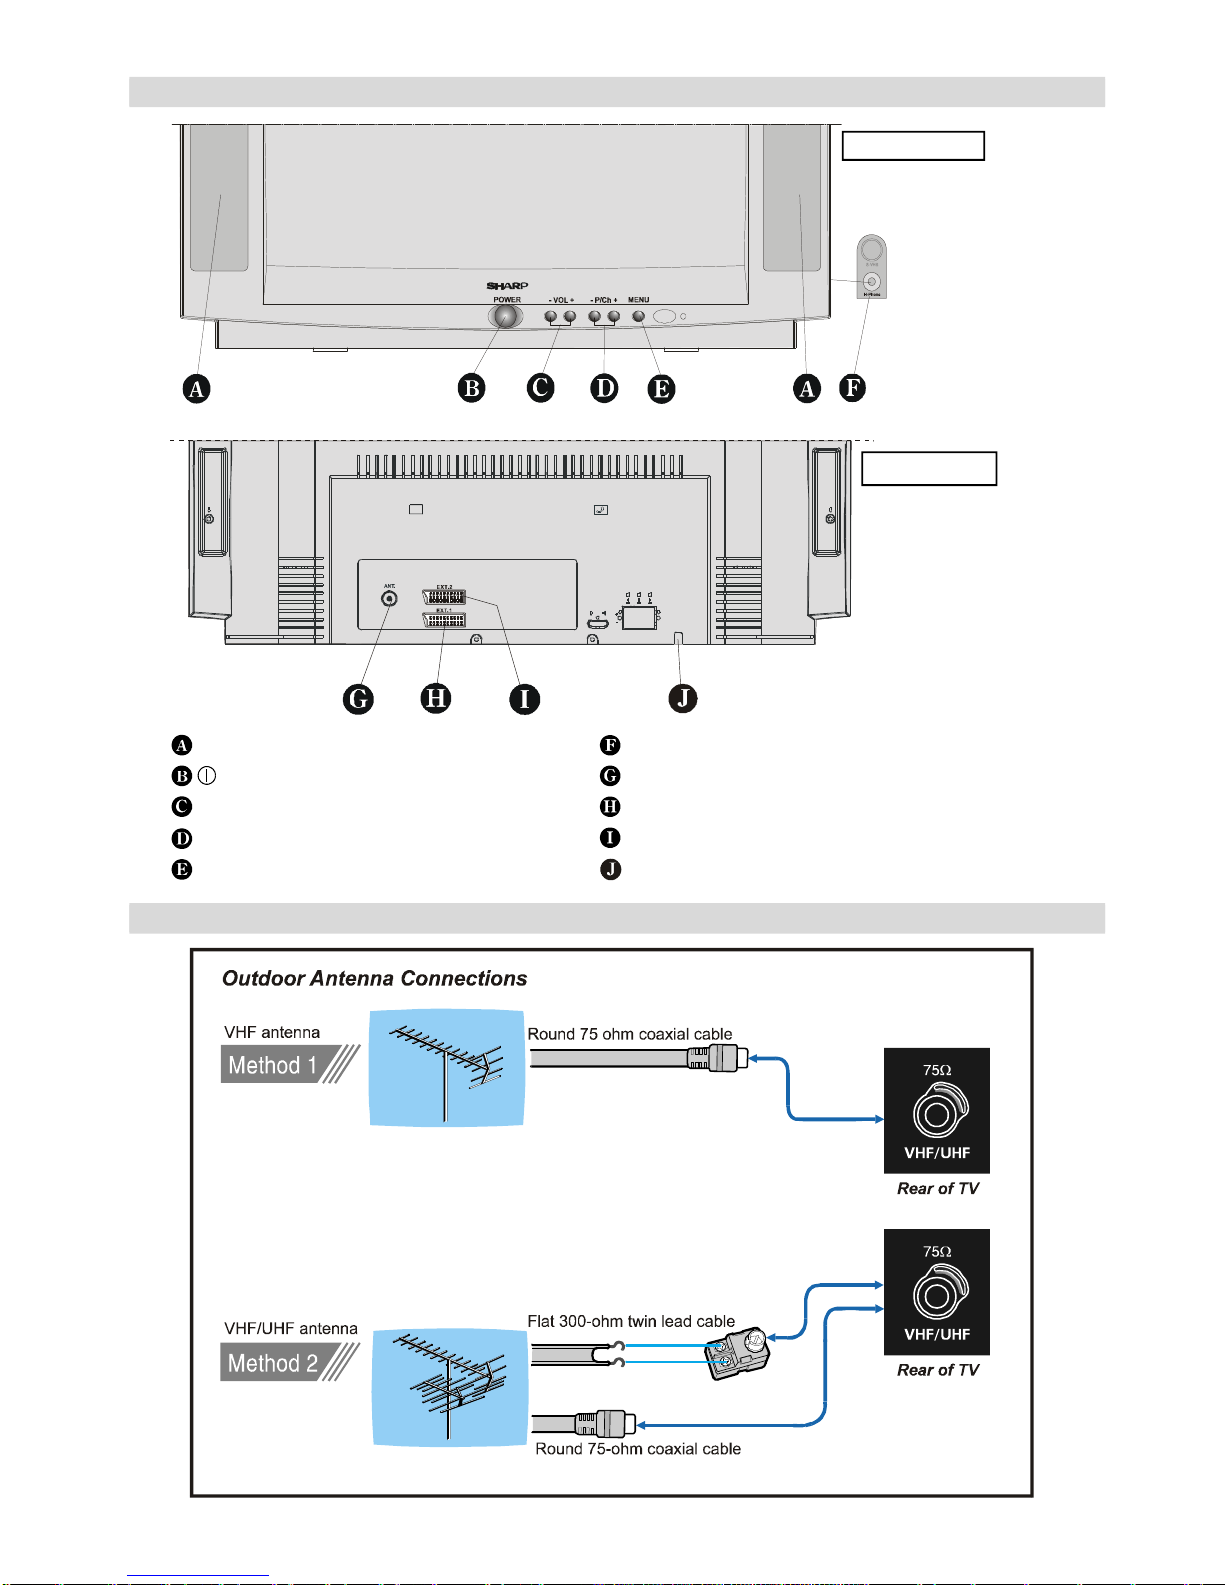
Control Panel Buttons..............................................6
Antenna Connections...............................................6
Preparation................................................................7
Features...........................................................................7
Before Switching on your TV..................................7
Power connection.............................................................7
Aerial Connections...........................................................7
How to connect external equipment................................7
Remote Control Battery Installation..................................7
Switching the TVON/OFF........................................8
Toswitch the TV on..........................................................8
Toswitch the TV off..........................................................8
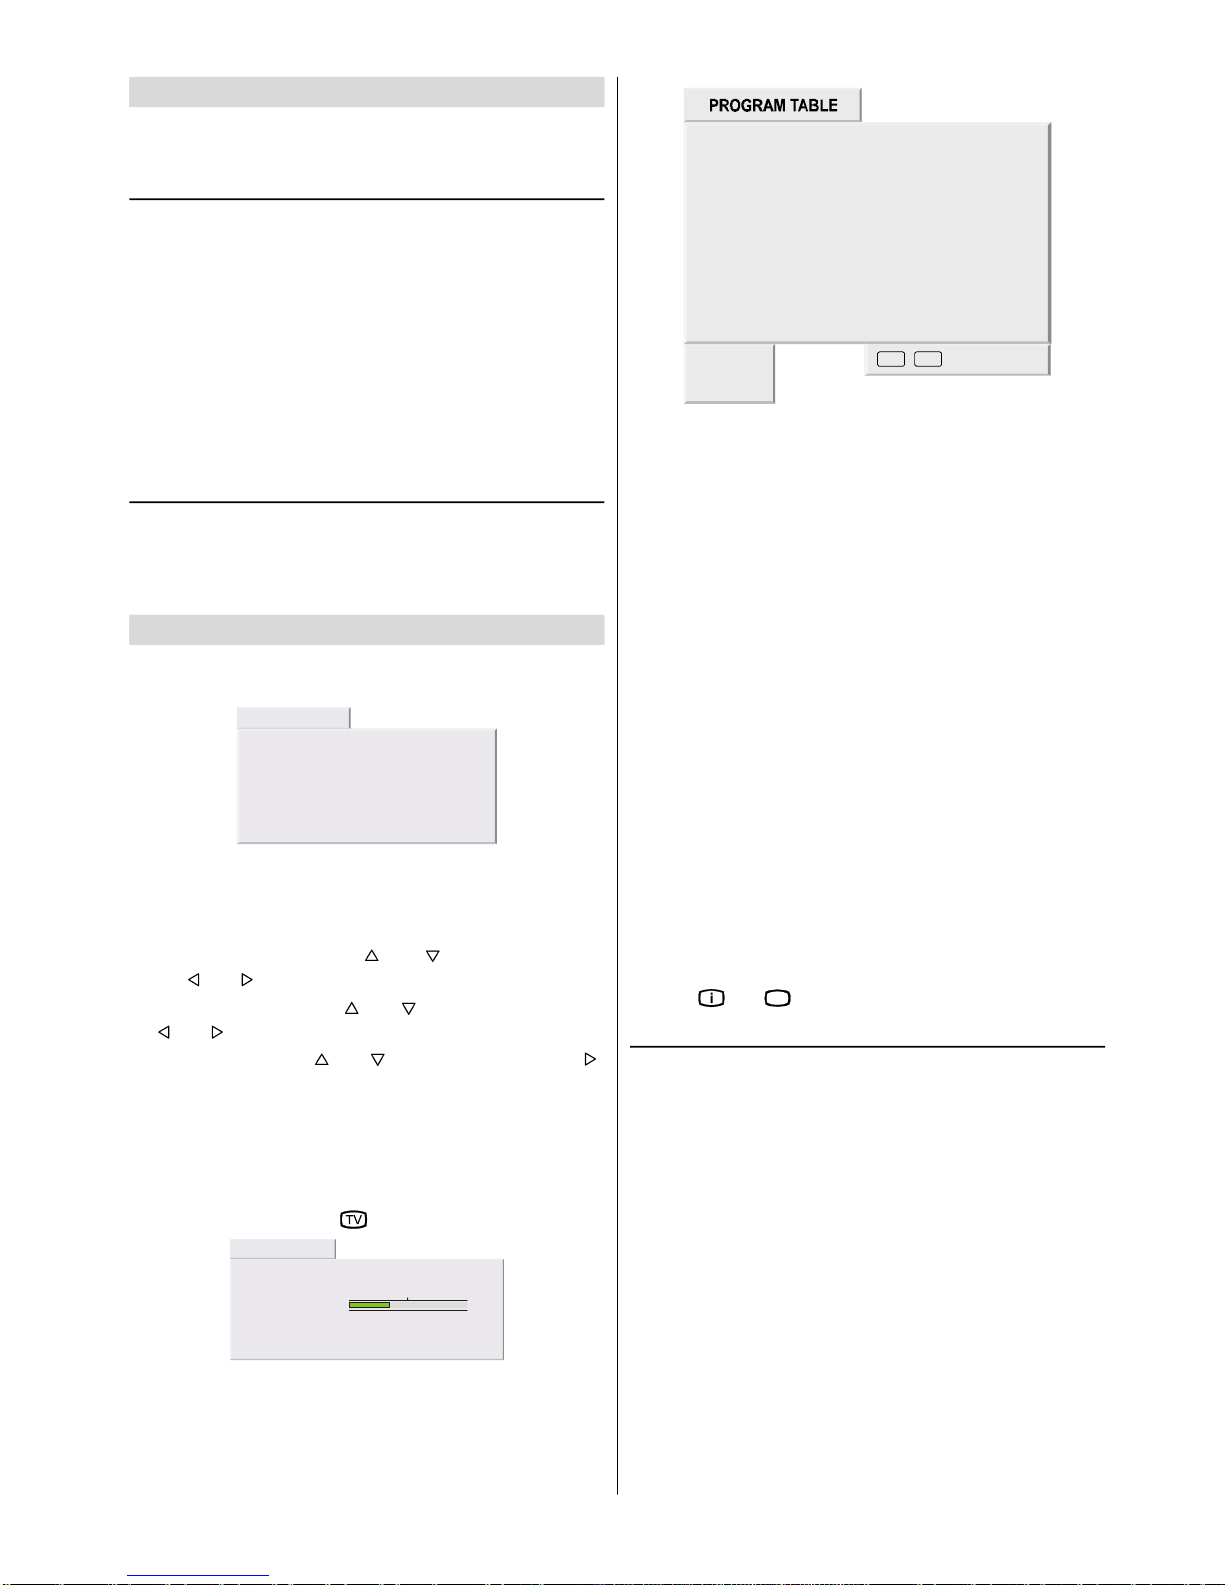
Initial Settings...........................................................8
Operating with the onset buttons......................................8
Operating with Remote Control........................................9
Menu System.............................................................9
Sound menu.....................................................................9
Picture menu..................................................................10
Feature menu.................................................................11
Installation Menu............................................................12
Other Features........................................................14
Information On Screen...................................................14
Sound Mute....................................................................14
Sound Modes.................................................................14
Screen Format...............................................................14
No-Signal Timer Indicator...............................................14
StillPicture.....................................................................14
ToDisplay the Time........................................................14
Flash back ( ).............................................................14
Double-digit (- / - -).........................................................14
AVModes.......................................................................14
Teletext.....................................................................15
Tooperate Teletext.........................................................15
Toselect apage ofTeletext............................................15
ToSelect Index Page.....................................................15
To Select Teletext with a TV Programme.......................15
Searching for apage while watching TV........................15
ToSelect Double Height Text.........................................15
ToReveal “concealed” Information................................15
ToStopAutomatic Page Change...................................15
Split Screen....................................................................15
ToSelect aSubcode Page.............................................15
Fastext...........................................................................15
Toexit Teletext...............................................................16
Connecting external equipment............................16
Via the Euro connector...................................................16
RGB mode.....................................................................16
S-VHS EXT2 Mode........................................................16
Via the ANT (aerial) socket.............................................16
TV and Video Recoder (VCR)........................................16
NTSC Playback..............................................................16
CopyFacility...................................................................16
ConnectingHeadphones................................................16
Connecting external equipment............................17
Typical Connections...............................................18
Typical Connections (Continued)..........................19
Typical Connections (Continued)..........................20
Typical Connections (Continued)..........................21
Typical Connections (Continued)..........................22
21-pin Euro-SCARTand 21-pin Audio/Video........23
Troubleshooting......................................................24
Specifications..........................................................25

ENGLISH - 2 -
SafetyPrecautions
This equipment complies with the requirementsof Direc-
tives 89/336/EEC, 92/31/EEC and 73/23/EEC as amended
by93/68/EEC.
This receiver should only be operated from a 220-240V AC,
50 Hz outlet. Ensure you select the correct voltage setting
for your convenience.
Mains Socket Outlet
AC220~240 V,50Hz
Toprevent fire or electrical shock, do not use the TV set in
anexcessively damp place.
Position the TVset out ofdirect sunlight and awayfrom
heat, as high temperatures can damage the cabinet, CRT,
or otherelectronic parts.
Do not cover ventilation slotswith objectssuch as newspa-
pers, tablecloths,curtains, etc.
Do not cover the ventilation holes at the back ofthe TV set,
this can cause fire orother serious problems. Leave anade-
quateopen space behind the TV setforgood ventilation.
In order to ensure that the television is properly ventilated,
leave aspace ofat least 10 cm around the set.
Do not install this equipment in aconfined space such as a
bookcase or a built-in cabinet.
Televisionequipmentandcart combinationshouldbe
moved with care. Quick stops, excessive force, and uneven
surfaces may cause the equipment and cart combination to
overturn.
Topreventelectricalshock,do notsubjecttheACpower
cordto damage bybendingor twisting it, orby placing
heavy items on top of it and do not place the AC power cord
under the TV set. Ifthe AC power cord becomes damaged,
unplug it from the wall outlet immediately and call your deal-
er for service.
Do not place this television equipment on an unstable cart,
stand, or table. The television equipment may fall, causing
serious injury to achild or an adult, and serious damage to
the equipment.
Use only with acart or stand recommended by the manu-
facturer,or sold withthetelevision equipment.
Never remove the back ofthe cabinet, as there is high volt-
age intheTV set.
Please call forservice.
When replacement partsare required, be sure the service
technician has used replacement partswhich are specified
by the manufacturer or have the same specifications as the
originalone.Unauthorized substitutions may result in fire,
electrical shock,or other hazards.

ENGLISH - 3 -
Unplug the powercord from the walloutlet immediately if
the TV set begins to make unusual noises or give off smoke
or an odd smell, then call your dealer for service.
Always disconnect your television from themains and the
aerial cables duringthunderstorms.
Even ifyour television is switched off,itcan still bedam-
aged by lightning striking the mains and/or aerial cable.
Do notleave yourTV setin Stand-by or operatingmode when
you leave the house.
In orderto preventelectrical shocksand fires,ensurethat
thetelevisionis not subjected to splashesorspillsofwa-
ter,and avoid inserting objects or pouringanytypeof liquid
intotheset.
Toprevent fire, never place anytype ofcandle or naked
flames on the top or near the TV set.
Ifan objector liquidenters the set,disconnect themains
supply and contact technical service.
Wall or shelfmounting should follow the manufacturer’s in-
structions, and should use amounting kit approved by the
manufacturer.
Do place the TV set onto an even stand,table ortrack which
size is bigger thantheTV set.
Ifthe TV set is put onto asmaller size or uneven stand, ta-
ble or track may cause the TV cabinet distort. Do not put or
insertanything between TV set and the stand, tableor track.
The tube ofyour TV has aspecial coating. Do not knock or
rub on the tube face with sharp or hard surfaces, otherwise
you will damagethe coating.
Toprevent damaging the surface of the television screen,
remove finger printsonly withasoft cloth dampened with
glass
cleaner.Do not useanyabrasive cleaners.
Do not use thinner, benzene or other strong chemical clean-
ers.
Warning!
Any intervention contrary to regulations, in particular,
anymodificationofhigh voltageor areplacementof
the picture tube may lead to an increased concentra-
tion ofx-rays.Any televisionmodifiedinthis way no
longer complies withlicense and must not be operated.
Instructions for waste disposal:
Packaging andpackagingaidsarerecyclableand
should principallybe recycled. Packaging materials,
such as foilbag,mustbe keptawayfromchildren.
Batteries, including those which are heavy metal-free,
should not be disposed ofwith household waste.
Please dispose of used batteries in an environmentally
sound manner.Find outabout the legal regulations
which apply in yourarea.
CAUTION: Forenvironmental andsafety reasons, it is recommended that this television set is not leftin stand-by
modewhilst not in use. Switch it offusing the main switch. Duringperiods ofabsencefrom home it is also
wise to disconnect thesetbyunpluggingthe mains plug.

ENGLISH - 4 -
Supplied Accessories
++
Respectthe
environmentand
put used batteries
in a containerthat is
especiallydesigned
for this purpose.
Type-(R03 AAA)
Dry Batteries
Remote
control Operation
Manual
COLOUR TELEVISION
OPERATIONMANUAL
28LS-94EC
Please readthisoperationmanual carefully
before usingthecolourtelevision.
INSTRUKCJAOBS UGI
TELEWIZORAKOLOROWEGO
Prosimyuważnieprzeczytaćten podręcznik
obs ugiprzedrozpoczęciemkorzystania
z telewizora.

ENGLISH - 5 -
Remote Control Buttons
CAUTION
RISK OF ELECTRICSHOCK
The lightning flash with arrowhead symbol, within an equilateral triangle, is intended to alert the user to the presence
ofuninsulated "dangerous voltage" within the product's enclosure that may be ofsufficient magnitude to constitute a
risk ofelectric shock ofpersons.
Theexclamation pointwithin anequilateral triangleis intendedto alertthe userto thepresence ofimportant operating
and maintenance (servicing) instructions in the literature accompanying the appliance.
1
=StandBy
= Cursor Up
=Cursor Right
OK =Store/ Still Picture
= Info (Program Table)
0 - 9 = Direct Program
-/ - - = DoubleDigit
= Screen Format button
P/CH+ = Program Up
+ = Volume +
= TV / Quit Menu
EXT = EXT button (EXT-1, EXT-2-2 or S-VHSEXT2)
Yellow =Feature Menu
Blue =InstallationMenu
=Hold
16
= Update
=Index Page
=Reveal
=Expand
= Mix
21
=Teletext
= Time
23
Red= Sound Menu
Green = Picture Menu
= Mute
I-II =Mono/Stereo - Dual I-II
- =Volume Down
- P/CH = Program Down
= Flashback button
30
M= Menu
31
= Cursor Down
32
= Cursor Leftt

ENGLISH - 6 -
Control Panel Buttons
Antenna Connections
Speakers (left + right)
POWER = Power On / Offf
- VOL + =Volume -/+
- P/Ch + =Program -/+
MENU =Menu
H-Phone =Headphone
ANT =Antenna(75 Ω)
EXT.1 = Scart Socket 1(with RGB)
EXT.2 = Scart Socket2 (with S-VHS)
PowerCable
FRONTPANEL
REAR PANEL

ENGLISH - 7 -
Preparation
Place TV on a solid surface.
For ventilation,leave aspace of atleast10cmfreeall
around the set. Toprevent any fault and unsafesituations,
pleasedonotplace anyobjects ontop of the set.
“Use this apparatus in tropical and moderate climates.”
Features
• RemoteControl Color Television
• 100 UHF / VHF /Cable channel presets
•Cable Channel Compatible
• Menu Driven functions
• 2 Euro connector Sockets
•German+Nicam Stereo
• Full functionteletext (Fastext)
• Direct Channel access
•APS (Automatic Programming system) Tuning
• Program custom name feature
•Automatic search tuning
• Sleep Timer
•Childlock
•Blue mute on no video signals
•Audio mute on novideosignals
•Autoswitch offafter 5mins of no signal
•WSS (wide screen signal decoding)
• NTSC playback
•Headphone
• SplitScreen (Picture andText)
•CTI (Color Transient Improvement)
•Automatic VCR detection
•Simple 100 Hz.
Before Switching on your TV
Power connection
Important: The TV set is designed to operate on 220- 240V
AC,50 Hz.
•Afterunpacking, allow theTVsetto reach the ambient
room temperature before you connect the set to the mains.
Aerial Connections
• Connectthe aerial plug to the aerial input socket locatedat
theback ofthe TV.
Howto connect externalequipment
See “Connecting external equipment” on page17.
•See the instruction manuals provided with the external de-
vices too.
Remote Control Battery Installation
Before using the TV set for the first time, install the supplied
drybatteries in the remote control.
1. With your thumbnail,pull uptheslit as indicatedby the
arrow toremovethe battery cover.
2. Inserttwobatteries1.5 V(R03 AAA size).Be sureto
match the battery +/- terminals with the +/- marks inside
the compartment.
+
+
1,5 V. (AAAR03)
3. Replace thebattery cover.
Notes:
• Remove batteries ifweak or if the unitis not in use forlong
periods.
• Do not mix old andnewbatteries.
•Incorrect installation ofthe batteries may damage the re-
mote control.

ENGLISH - 8 -
Switching the TV ON/OFF
You can operate your TV either using the remote con-
trol handset or directly using the TV onset buttons.
To switch the TVon
Your TV will switchonintwo steps:
1- Pressthepower buttonlocated onthe frontof the TV.
ThentheTV switchesitself tostandby modeandthe
RED LED located belowtheTV turns on.
2- To switch on the TV from stand-by mode either:
Press a digit button or stand-bybutton on the remote control
so that a programmenumber is selected,
or,
Press Power Button and “P/Ch+”or “-P/Ch”buttons on the
TVorontheremote controlrespectively,so theTV will
switchonandthe RED Led will turn GREEN.
To switch theTV off
• Press the stand-by button on the remote control, so the TV
will switch to stand-by mode and the GREEN LED will be-
come RED, or,
• Press thepower buttonlocatedon the frontofthe TV.
Initial Settings
Themessage “PLEASECHECK ANTENNACABLE!”will
bedisplayed when you turn on your TV forthe firsttime.
PLEASE CHECKANTENNACABLE!
LANGUAGEENGLISH
COUNTRYSPAIN
START
TVCANCEL
EXECUTION APS
Note: Ifyou connect Video RecordertoyourTV viaantenna
input (ANT socket); totunethe VCR channel automatically you
must set the VCR inplay mode before you startAPS.(Please
use a PAL/ SECAMVideo Cassette).
1- Select LANGUAGE with“ ”or “ ”button,then press
the “ ” or “ ” button to select amenu language.
2- Select COUNTRY with “ ”or “ ”button, then press the
“ ” or “ ” button to select the correct country..
3- Select START with “ ”or “ ”button, then press the “ ”
button to start APS.
APS,(AutomaticProgrammingSystem) automatically pro-
grammes the receivedchannels inyourTV’sprogramme
numbers. During APS,“APS IS RUNNING PLEASE WAIT”
message will be displayed. After APS is finalized, the “PRO-
GRAMTABLE” appears.
Tocancel APS, press the“ ” button.
EXECUTION APS
APS IS RUNNING, PLEASE WAIT!
PROGRESS 35%
CHANNEL
TV CANCEL
-----
11
12
13
14
15
16
17
18
19
20
-----
-----
-----
-----
-----
-----
-----
-----
-----
-----
21 -----
22 -----
23 -----
24 -----
25 -----
26 -----
27 -----
28 -----
29 -----
30 -----
1 -----
-----
-----
-----
-----
-----
2
3
4
5
6
7 -----
8
9
10
-----
-----
-----
change
delete
TV
i
EXIT
/
Moving cursor tofourdirection you canreach 30 pro-
grammesinthesame page. Byscrollingthepagesup or
down by pressing the navigation buttons you can select all
the programmes.
By cursor action, programme selection is done automatical-
ly.
ProgrammeNumber isbetween 1and99.Programme
Name has aname string with 5characters. After autostore
process the Programme Names are set to:
•Channel search "C-01"or "S-01"(band and channel num-
ber) or name ofthe tuned channel ifdefined.
Change:
This functionisusedtochangetheplaces of thepro-
grammesin ProgramTable.Select the programmeyou
want to move and press BLUE button. Selected programme
will behighlighted.Move thecursortodesiredprogram
placeandpress BLUE button again.
Delete:
Select theprogramme you want to delete and press RED
button.Theprogrammewillbedeletedfrom theProgram
Tablewithoutany warning.
•"delete" string becomes green while the selected channel
is being deleted from the Program Table.
• Press “ ” or “
TV
” buttonto exit ProgramTable.
Operating with the onset buttons
Volume setting and programme selection can be made us-
ingthebuttons on the frontofthe TV.
Volume Setting:
•Press “-VOL”button to decrease volume or “VOL+”button
toincreasevolume,soavolume levelscalewillbedis-
played onthescreen.
Programme Selecting:
•Press “P/Ch+”button to select next programme or “-P/Ch”
button to select the previous programme.
Entering Main Menu:
•Press “MENU”button to entermain menu. In the main
menuselect submenu using“P/Ch+”or “-P/Ch”buttonand
enterthesubmenu using“VOL+”or “-VOL”button.Tolearn
the usage of the menus,refer to “Menu System”on page 9.

ENGLISH - 9 -
Operatingwith Remote Control
The remote control handset ofyour TV is designed to con-
trol allthe functionsofthe model you selected. The func-
tions will be described in accordance with the menu system
of your TV.
Functions which you can use out ofmenu system are de-
scribedbelow.
Volume Setting:
Press “+”button to increase volume.
Press “- ”button to decrease volume.
Programme Selecting (Previous or next programme):
• Press “-P/CH”buttonto select the previous programme.
• Press “P/CH+”button to select the next programme.
Programme Selecting (direct access):
Press digit buttons on the remote control handset to select
programmes between0 and 9. TV will switch to the selected
program after a short delay.
• For a two digit program number press “ - /- -” button. Press
the first digitand then second digit ofthe programme
channel you want towatch.
Menu System
Your TV has been designed with amenu system to provide
an easy manipulation ofamultifunction system. "M"button
has two functions. The first function ofit is open and close
the menu, the second function is closing the submenu and
then opening itsparent menu. The short way in order to en-
ter the menus, press:
“M” buttonMenu
Red buttonSoundmenu
Green buttonPicture menu
YellowbuttonFeature menu
BluebuttonInstallation menu
“ ” buttonProgram Table
When you press "M"button, the following menu appears on
thescreen.
Press “ ”or “ ”button to select amenu title and then “ ”
or “OK” buttonto enter the menu.
Sound menu
First icon belongs to the sound menu. By pressing “ ”or
“OK” button, Sound menu appears on the screen.
You can enterSound menu directly by pressing RED button.
Volume
When you entered the sound menu Volume will be the first
selecteditem. Press “ ”buttontoincrease volumelevel.
Press “ ” button to decreasevolume level.
SOUND
VOLUME
BALANCE
SOUND MODEMONO
SURROUNDMODE OFF
BASS
Balance
By pressing “ ”or “ ”button, select Balance. Press “ ”
button to increase balance rightward. Press“ ”button to
decrease balance leftward.
SOUND
VOLUME
BALANCE
SOUND MODEMONO
SURROUNDMODE OFF
BASS
Sound Mode
By pressing “ ” or “ ” button, select Sound Mode. You can
change the sound mode to MONO, STEREO (NICAMSTE-
REO), DUAL1(NICAM1) or DUAL2(NICAM2) by press-
ing “ ” or “ ” button.
SOUND
VOLUME
BALANCE
SOUND MODEMONO
SURROUNDMODE OFF
BASS
Surround Mode
By pressing “ ”or “ ”button, select Surround Mode. Youou
can change the surround mode to *INCR. STEREO, INCR.
MONO or OFF by pressing “ ” or “ ” button.
*INCR.: Incredible
SOUND
VOLUME
BALANCE
SOUND MODEMONO
SURROUNDMODE OFF
BASS
Bass
By pressing “ ”or “ ”button, select Bass. Press “ ”but-
tontoincreaseBasslevel.Press“ ”buttontodecrease
Bass level.

ENGLISH - 10 -
SOUND
VOLUME
BALANCE
SOUNDMODEMONO
SURROUND MODE OFF
BASS
Treble
By pressing “ ” or “ ” button, select Treble. Press “ ” but-
ton to increase Treble level. Press “ ”button to decrease
Treblelevel.
SOUND
BASS
AVL OFF
TREBLE
HEADPHONE
SURROUND MODE OFF
Headphone Menu
By pressing“ ”or “ ”button,selectHeadphone.Press
“” button to enter Headphone menu.
Volume
By pressing“ ”or “ ”button, selectVolume.Press “ ”
button to increase headphone volume level. Press “ ”but-
ton todecrease headphonevolume level.
HEADPHONE
VOLUME
BALANCE
SOUND MODEMONO
Balance
By pressing“ ”or “ ”button,select Balance.Press“ ”
button to move headphonebalance rightward.Press“ ”but-
tonto move headphonebalance leftward.
Sound Mode
By pressing “ ” or “ ” button, select Sound Mode. You can
change the sound mode to MONO, STEREO (NICAMSTE-
REO), DUAL1(NICAM1) or DUAL2(NICAM2) by press-
ing “ ” or “ ” button.
AVL
Automatic Volume Limiting (AVL) function normalizes sound
to obtain fixed output level between programs, having differ-
ent sound levels. Pressing “ ”or “ ”button will turn ON or
OFF this feature.
SOUND
BASS
AVL OFF
TREBLE
HEADPHONE
SURROUNDMODE OFF
To Store the Settings
• Press “OK” button to store Sound menu settings.
• “STORED” will be displayed at the bottom ofthe menu.
Picturemenu
By pressing “ ” or “ ” button, selectthe second icon.
By pressing “ ”or “OK”button, Picture menu appears on
thescreen.
YoucanenterPicture menu directlybypressing GREEN
button.
Setting Brightness
When you entered the Picture menu Brightness will be the
first selected item. Press “ ”button to increase Brightness
level. Press “ ” button to decrease Brightness level.
PICTURE
BRIGHTNESS
CONTRAST
COLOR
SHARPNESS
TINT
NORMAL
Setting Contrast
• Using “ ” or “ ” button select Contrast.
• Press “ ” buttonto increase contrast level.
• Press “ ” buttonto decrease contrast level.
PICTURE
BRIGHTNESS
CONTRAST
COLOR
SHARPNESS
TINT
NORMAL
SettingColor
• Using “ ” or “ ” button select Color..
• Press “ ” button to increase colorlevel.
• Press “ ” button to decrease colorlevel.
PICTURE
BRIGHTNESS
CONTRAST
COLOR
SHARPNESS
TINT
NORMAL
SettingSharpness
• Using “ ” or “ ” buttonselect Sharpness.
• Press “ ” button to increase sharpness level.
• Press “ ” buttonto decrease sharpness level.
PICTURE
BRIGHTNESS
CONTRAST
COLOR
SHARPNESS
TINT
NORMAL

ENGLISH - 11 -
SettingTint
This itemis used to changethe ColourTemperature. By
pressing “ ”or “ ”button you may select one ofthese op-
tions: COOL,WARM,NORMAL.
PICTURE
BRIGHTNESS
CONTRAST
COLOR
SHARPNESS
TINT
NORMAL
Setting Hue (InAVmode only)
(During Playback NTSC system, this will appear in AV mode
only when NTSC video source is applied. Otherwise, HUE
optionis invisibleinPicture menu.):
• Using “ ” or “ ” button select Hue.
• Press “ ” button toincreasehuelevel.
• Press “ ” buttonto decrease hue level.
PICTURE
TINT
SCREEN FORMAT
PICTURESMART
NORMAL
AUTO
PERSONAL
HUE
SHARPNESS
Screen Format
By pressing “ ”or “ ”button, select Screen Format. Youou
canchangethescreenformatto 4:3,AUTO or 16:9 by
pressing “ ” or “ ” button.
PICTURE
SHARPNESS
SCREEN FORMAT
PICTURE SMART
NORMAL
AUTO
PERSONAL
TINT
COLOR
Screen Format can be set by “ ” button also.
If“ ” button is pressed once, Screen Format indicator ap-
pearsonthe screen. Ifit ispressed one moretime, the
Screen Format will be changed.
Each time you press the “ ”button, the width ofthe pic-
ture changes as indicated:
AUTO*4:316:9
* Auto mode (VPS code):The VPS signal is sent by some
broadcastingstations with informationof theoriginal size.
When the TV is in AUTO mode and receives the VPS sig-
nal, itchanges the sizeautomatically as indicatedbelow:
When theTVis receiving VPScode 16:9 the TV selects
16:9 automatically.
When the TV is receiving VPS code 4:3 the TV selects 4:3
automatically.
External source: Whenyouare watchingtheTV set
through the Euro-SCART EXT.1 terminal and it receives in-
formationof 16:9 format (throughthe audio-videocontrol
pin) the TV selects 16:9 automatically.
Wide Mode (Special detail information)
Special detail information about 16:9and4:3.
16:9
With 16:9Mode you adapt the picture 16:9 format while also
stretching the centre ofview.This is an advantage, for ex-
ample, when watching sportsgames where there is no real
fixed centreofthe picture.
4:3
You can watch 4:3 programs in 4:3 format by switching to
NORMALMode function.
Picture Smart
By pressing“ ”or “ ”button,selectPicture Smart. Youou
can change the picture smart to PERSONAL, RICH,NATU-
RAL or SOFT by pressing “ ” or “ ” button.
PICTURE
SHARPNESS
SCREENFORMAT
PICTURESMART
NORMAL
AUTO
PERSONAL
TINT
COLOR
To Store the Settings
• Press “OK” button to store Picture menu settings.
• “STORED” will be displayed at the bottom ofthe menu.
Feature menu
By pressing “ ” or “ ” button selectthe third icon.
By pressing “ ”or “OK”button, Feature menu appears on
thescreen.
You can enter Feature menu directly by pressing YELLOW
button.
Sleep Timer
As you enter the Featuremenu, Sleep Timer will be the first
selected option. Use “ ”or “ ”button to change the Sleep
Timervaluesbetween OFF,15MIN,30MIN,45MIN,60
MIN,90 MIN,120 MIN, 150 MIN and 180 MIN.

ENGLISH - 12 -
If sleep timerisactivated, at the end ofthe selected the
time, theTV goes automatically to stand-by mode.
FEATURE
SLEEP TIMEROFF
OFF
OFF
TV
CHILD LOCK
BLUESCREEN
EXT2 OUTPUT
ChildLock
You can use this feature to prevent children turning on TV or
changing programs or adjustmentsetc. without remote con-
trol.
The Child Lock feature can be set by “ ”or “ ”button to
either ON or OFF.When OFF is selected, there will be no
difference in the operationofyourTV. When ON is selected,
the TV can only be controlled by the remote control handset.
In this case, the front panel buttons (except the Power On/
Off button)will not work.
FEATURE
SLEEP TIMEROFF
OFF
OFF
TV
CHILD LOCK
BLUE SCREEN
EXT2 OUTPUT
While the CHILD LOCK is ON,pressingany ofthe front/
right panel buttons (except Power on/offbutton) causes the
warning menu to appear onthe middle ofthe screen.
CHILDLOCK
Blue Screen
In case, no valid signal is detected (in TV or AVmode) Blue
Screen is activated. During search process Blue Screen is
not active.
The Blue Screen feature can be set by “ ”or “ ”button to
either ON or OFF.
FEATURE
SLEEPTIMEROFF
OFF
OFF
TV
CHILD LOCK
BLUESCREEN
EXT2 OUTPUT
EXT2 Output
•Youcan use this menu to select the internal or external
source thatwill be output at EXT.2 terminal.
•Inthe“FEATURE”menu select“EXT2 OUTPUT”using
“”or “ ”button. Then select the source you want to be
output at EXT.2 pressing “ ”or“ ”button (one of the
sources: TV, EXT-1 or SCREEN.
FEATURE
SLEEPTIMEROFF
OFF
OFF
TV
CHILD LOCK
BLUESCREEN
EXT2 OUTPUT
To Store the Settings
•Allsettingsarestoredautomatically in Feature menu.
There is no need to press “OK” button.
Installation Menu
By pressing “ ” or “ ” button, selectthe fourth icon.
By pressing “ ”or “OK”button, Installation menu appears
on the screen. You can enter installation menu directly by
pressing BLUE button.
INSTALLATION
LANGUAGEENGLISH
COUNTRY
TXT LANGUAGE UK
WEST EUROPE
PROGRAMMING
EXECUTIONAPS
Language
By pressing “ ”or “ ”button, select Language. You can
select the language bypressing“ ” or “ ” button.
Country
By pressing “ ”or “ ”button, select Country.You can se-
lect the country by pressing “ ” or “ ” button.
Txt Language
By pressing“ ”or “ ”button, selectTxtLanguage. Youou
canselectthe TeletextLanguagebypressing“ ”or“ ”
button. The options are WEST EUROPE, EAST EUROPE,
GREEK - TURKEY and RUSSIAN.
WEST EUROPEEAST EUROPEGREEK-TURKEYRUSSIAN
ENGLISHFRENCHENGLISHCZECH/SLOVAK
FRENCHSWEDISHFRENCHGERMAN/DUTCH
SWEDISHFINNISHSWEDISHRUSSIAN
FINNISHDANNISHFINNISHLITHUANIAN
DANNISHCZECH/SLOVAKDANNISHLETTISH
CZECH/SLOVAKGERMAN/DUTCHGERMAN/DUTCHUKRANIAN
GERMAN/DUTCHITALIANPORTUGUESEESTONIAN
PORTUGUESEHUNGARIANSPANNISHBULGARIAN
SPANNISHPOLISHITALIAN
ITALIANSLOVENIANHUNGARIAN
HUNGARIANRUMANIANTURKISH
ICELANDICCROATIANGREEK
NORWEGIANICELANDIC
Programming
Bypressing“ ”or“ ”button,select Programming.Youou
can enter the programming menu by pressing “ ” button.
PROGRAMMING
PROGRAM12
COLOR NORMAUTO
STANDARDBG
SEARCH
FINETUNING 0

ENGLISH - 13 -
Program
By pressing “ ”or “ ”button, select Program. By pressing
“ ” /“ ”or digit buttons, you can select the program num-
ber. Thereare 100 program storage between0 and99.
ColorNorm
By pressing “ ” or “ ” button, select Color norm. By press-
ing “ ”or “ ”button, you can change the standard to
AUTO, PAL or SECAM.
Standard
By pressing “ ” or “ ” button, select Standard. By pressing
“ ” or “ ”button, you can change the standard to BG,L, I
or DK.
Search
By pressing “ ”or “ ”button, select Search. By pressing
“ ” button,you can enter Search menu.
SEARCH
SEARCH
CHANNEL00
BANDC
Ifyoucannottune to a channel, tryAPS.
Search
By pressing “ ”or “ ”button, select Search. By pressing
“ ” button, you can start Search. When you start the chan-
nel searching “SEARCHING…” is written and when achan-
nel was found which has been searched, “FOUND” is writ-
ten across the SEARCH item inthe menu above.
Whenword “FOUND”it appears,is not possible to select
“CHANNEL” or “BAND” by pressing the “ ” or “ ” button.
Press “M” button to select these items.
Channel
By pressing “ ”or “ ”button, select Channel. By pressing
“ ” / “ ”or digit buttons, you can change the channel num-
ber.
Band
By pressing“ ”or “ ”button,selectBand.By pressing
“” or “ ” button, you can changethe Band to Cor S.
To Store the Settings
• Press “OK” button to store Searchmenu settings.
•“STORED”will be displayed.
To exit the Search menu,press “M” button.
Fine Tuning
By pressing “ ”or “ ”button,selectFine Tuning. By
pressing “ ”or “ ”button, you can fine tune the program
manually.
PROGRAMMING
NAME -- -- -
COLORNORM AUTO
STANDARD BG
SEARCH
FINETUNING 0
Name
By pressing “ ”or “ ”button in Programming menu, se-
lect Name. You can change the program name. When you
select the Name, cursor is on the first letter. By using “ ” or
“ ”‚ buttons you can select the letter.By pressing“ ”or
“ ” button, you can move the cursor to second or third letter
ofthe program name.Name can be 5 digit length.
To Store the Settings
• Press “OK” button tostore Programming menu settings.
• “STORED” will be displayed at the bottom ofthe menu.
• Press “M” button to exit programming menu.
Execution APS:
By pressing “ ”or “ ”button, select Execution APS in In-
stallation menu. By pressing “ ”button, you can enter Exe-
cutionAPS menu.
EXECUTIONAPS
ALL PROGRAMS WILLBE
CLEARED!
OKSTART TV CANCEL
Ifyou want to cancel APS, press “ ”button, you return to
Installationmenu. If “OK”button is pressed, APSfunction
starts andthe following menu comes to the screen.
APSIS RUNNING, PLEASEWAIT!
PROGRESS35%
CHANNEL
TV CANCEL
-----
EXECUTIONAPS
After APSiscompleted,thePROGRAMTABLEis dis-
played.
11
12
13
14
15
16
17
18
19
20
-----
-----
-----
-----
-----
-----
-----
-----
-----
-----
21-----
22-----
23-----
24-----
25-----
26-----
27-----
28-----
29-----
30-----
1-----
-----
-----
-----
-----
-----
2
3
4
5
6
7-----
8
9
10
-----
-----
-----
change
delete
TV
i
EXIT
/
• Press “ ” or “
TV
” button to exit ProgramTable.
Note: Toenter PROGRAMME TABLE directly,press “ ”
button.
• See Page 8 ProgramTable explanation.

ENGLISH - 14 -
Other Features
Information OnScreen
Programme Number, Programme Name (or AV)and
Sound Indicator are displayed on theupperright of the
screen. They are displayed after programme change for 3
seconds.
-- C01
Programme Number and
Programme Name(5 characters)
, , Sound Indicator(Mono, Stereo, Dual)
The alternatives ofSound Indicator are Mono, Stereo, Dual
which shows thecurrent sound mode.
Programme Number,Programme Name and Sound Indica-
tor OSD’ s are displayed when a new programme is entered
by pressing digit or "-/ --"button, " "button, "P/CH+"or
"-P/CH"button.
SleepTimer Indicator (If activated)
Screen format Indicator
Sleep Timer and Screen formatindicators are displayed with
Programme Number,Programme Name and Sound Indica-
tor bypressing "
TV
"button.
Sleep Timer Indicator shows thetimeleftifenabled.
Sound Mute
Tocutoff thesound from theTVpress“ ”button.Torestore
thesound press the“ ”buttonagain oruse the“ +”or “-
”buttons,in thiscase thevolume will start fromminimumset-
ting.
Sound Modes
Thisisastereo option.Thealternatives ofSoundModes
are Mono, Stereo, Dual 1and Dual 2. This indicator is dis-
played in the lower middle side ofthe screen. "I-II"button is
used toselect Mono, Stereo, Dual 1or Dual 2.
In Mono broadcast or in forced-mono (for stereo broadcast).
In Stereo broadcast.
Ifdual broadcast detected. Dual 1is selected in default and
also can be selected afterDual 2 by Remote Control.
If Dual 2 selectedby Remote Control.
Screen Format
The Screen Format OSD is displayed below the sound indi-
cator,byTVsatus OSD's. By pressing“ ”button, the
screen format canbe switched into AUTO, 4:3 or 16:9.
AUTO
FORMAT 4:3
FORMAT 16:9
FORMAT
No-SignalTimer Indicator
It is displayed in the middle ofthe screen when no valid sig-
nal detected. It shows the remained time for the switching to
the Stand-By mode (it will take 5minutes). The indicator is
displayed in3 seconds when thereis no valid signal.
After aRemote Control command (ifNo-Signal Timer is ac-
tive) the timer stopsand ifno signal detected again the tim-
er is initialized to 5 minutes and starts 3 seconds later again
tocount down.
NOSIGNAL
4 :50 MIN
StillPicture
Pressing “OK”button makes the picture on the screen fro-
zen.Pressingthisbutton again enables moving pictures
again.
To Display the Time
•While watching aTV programme withTeletext transmis-
sion press “ “button. The current time information, cap-
tured from Teletext will be displayed at the upper right cor-
nerofthe screen.
•Ifthe programme beingwatcheddoes nothave Teletext
transmission, no time information will be displayed.
•The timeinformation willdisappearafterpressing “ “
buttonagain.
Flash back( )
This button is used to return to the previous viewed preset.
By pressing the " "button repeatedly it is possible to tog-
gle between twopresets.
Double-digit(-/ - -)
This OSD is displayed when the "-/--"button pressed in
place ofthe programme number indicator.
After then, in order to enter a programme it must be pressed
to two digit consecutively.When it is late to press any digit
button this function will be ignored and the display will be
erased.In the same way itmust notbe late to press any dig-
it button after entering the first digit. The limit ofthe delay
time is 3 seconds.
AVModes
By pressing the “ “button you can switch your TV to AVV
modes (except being in Teletext). Pressing this button will
switch the TVin one oftheoptionalAVmodes: EXT-1,
EXT-2, S-VHS EXT2. EXT.1 supports the RGB mode and
EXT.2 supports S-VHS EXT2 modeunless there is an
S-VHS socket..
In order to quit the AVmode press the “
TV
”, digit buttons or
“P/CH+” / “-P/CH” button.

ENGLISH - 15 -
Teletext
Teletext is an information system that displays text on your
TV screen. Using the Teletext information system you can
view apage ofinformation on asubject that is available in
the list ofcontents (index).
Noonscreen display will be available in text mode.
No contrast, brightness or colour control, but volume control
is available in textmode.
Tooperate Teletext
•Select a TV station on which Teletext is being transmitted.
• Press (TELETEXT) “ ”button. Usually the list ofcontents
(index) is displayed on thescreen.
Toselect a pageof Teletext
• Press the appropriate digit buttons for the required Teletext
page number.
The selected page number is displayed at the top left corner
ofthe screen. The Teletext page counter searches until the
selected page number is located, sothat the desired pageis
displayed onthescreen.
• Press “P/CH+” button to move the Teletext screen forward
onepage at a time.
•Press “-P/CH”button to move the Teletext screen back-
ward one page at a time.
To Select Index Page
•Toselectthepagenumber ofthe index (generally page
100), press “ “ button.
To SelectTeletext with a TVProgramme
•Press “ “button. The text is now superimposed over the
programme on the screen.
• Press “ “ buttonagain to return to the Teletext page.
Searching for a page whilewatchingTV
•To search for a specific page whilst viewing the TV picture,
whilst viewingteletext enter thedesiredPage number,
then press the “ button will restore the TV picture. Once
the desired page is found the Header ofthis page will ap-
pear on the screen. Press the “ “button to view the full
page.
ToSelect DoubleHeight Text
•Press “ “button for the top halfofthe information page
tobedisplayed indoubleheighttext.
•Press “ “button again for the bottom half ofthe informa-
tionpagetobe displayedindoubleheighttext.
•Press“ “buttononcemore forthefullpageof normal
heighttext.
ToReveal“concealed”Information
• Pressing “ “button once will reveal answers on a quiz or
games page.
•Pressing “ “button again will conceal the revealed an-
swers.
ToStop Automatic Page Change
The teletext page you have selected may contain more in-
formation than can bedisplayed ononescreen, in such cas-
es thepagewill updateperiodically.
• Press “ “ button to stop the automatic pagechange.
•Press “ “button again to allow the next page to be dis-
played.
Split Screen
•Towatch aTV programme and teletext at the same time
onthescreenthis functionis used.
• While watching a TV programme with teletext transmission
press “ ” button.
•Teletextis displayedonthescreen.Press “ ”button
again. The screen is divided into two parts. TV program is
displayedon theleftsideofthescreen. Teletextis dis-
played on the right sideof thescreen.
•To exit split screen press “ ” button one more time.
To Select a Subcode Page
Subcode pages are subsections oflong teletext pages that
can onlybe displayedonthe screen one section ata time.
•Selecttherequiredteletext page.
•Press “ ”button. number /-- will be displayed on the
left topcorner ofthescreen.
•Select the required subcode page number by pressing 2
digit buttons.(e.g. 05)
•You can go to other subcode pages by pressing “ ” or “ ”
buttons or,
•After number /-- displayed, you can simply press “ ”
button againtoupdate the subcodepages automatically.
Fastext
Teletext mode will be selected according to transmissionau-
tomatically.
Your TV supportsthe 10 pageTeletext system. When the
page number ofany ofthe 10 pages in memory is entered,
the system will not search for the requested page; instead it
will display thepageautomatically.
• Press “ ” button to move the Teletext screen forward one
page ata time.
•Press “ ”button to move the Teletext screen backward
onepage at a time.

ENGLISH - 16 -
For Fastext
The subject-heading for the information may have aparticu-
larcolour or canbe in a form located in a coloured box.
•Pressan appropriate RED, GREEN, YELLOW or BLUE
buttoninorder to reachthe relevant pagequickly.
To exitTeletext
• Press “
TV
” button. The screen will switch to TV mode.
Connecting external equipment
Via the Euroconnector
Your TV set has two euro connector sockets. Ifyou wish to
connect external equipment(e.g.video recorder,decoder,
etc.)which have Euro connectors, to your TV,use the EXT.1
(EXT-1) or EXT.2 (EXT-2) terminals.
Ifan external device is connected via Euro connector sock-
ets the TV will beswitched to AV modeautomatically.
RGB mode
Ifapiece ofequipment outputs RGB signals use the EXT-1
Euro connector as this is RGB ready.
S-VHS EXT2 Mode
If the equipment connected to your TV set supportsS-Video
(Y/C) output from Euroconnector,you can have abetter pic-
ture quality by selecting S-VHS EXT2 mode and connecting
your equipment to the EXT.2 (S-VHS EXT2) terminal ofTV.
Seeyour equipment'sbooklettocheckifyourequipment
has suchfeature.
Via the ANT(aerial) socket
Ifyour equipment does not have an Euroconnector or RCA
jacks, connect it to the TV with an aerial cable. For details,
seethemanual provided withtheequipment.
•Tostore thetest signal thatcomesfromthe equipment,
see“Installation Menu”on page 12 andstore it tothe
programme number0. You can watch images fromthat
equipmenttoselect theprogrammenumberwhichyou
storedthetest signal.
TV and Video Recoder (VCR)
•Connect the Video Recorder to the ANT(antenna input)
socketofthe TV withtheaerial cable.
•Connect the Video Recorder to the EXT.1 or EXT.2 termi-
nal with the SCART cable,or connect it to the terminal with
theaudio and video cables.
•VCR is detected automatically.
NTSC Playback
Connect aNTSC video recorder to aterminal. Then press
“EXT ” buttonto selectthecorresponding AV mode.
NTSC 3.58/4.43 systemis detected automaticallyinAV
mode.
Copy Facility
Youcan output thevideoandaudiosignals whichinputs
from TV,EXT.1 (EXT-1) or SCREEN terminal to the video
recorder connected to the EXT.2 (EXT-2) terminal.
•Toselect the output source, see “EXT2 Output”on page
12.
ConnectingHeadphones
Use the stereo headphone socket on the lower right side of
your TV,to connectheadphones.

ENGLISH - 17 -
Connecting external equipment
Before connecting anything
•Switch off all equipment.
• Read the manuals provided with theequipments.
To select an AV mode
Pressing “ EXT ” button on the remote control selects oneofAV modes (EXT-1, EXT-2, S-VHS EXT2)
•Toreturn to the TV mode, repeatedly press “ EXT ”button.
EXT.1 (EXT-1) terminal: Euroconnector (21-pin, SCART)
•Videoinput,Audio L/RinputsandRGB inputs are available.
•TV broadcast outputs(VideoandAudio L/R) are available.
EXT.2 (EXT-2) terminal: Euroconnector (21-pin, SCART)
•Video input,S-VIDEO (Y/C) input andAudioL/R inputsareavailable.
• Video and Audio L/R outputs are available.(see“EXT2 Output” on page 12.)
EXT.2
EXT.1
Antenna
EXT-2
EXT-1
DECODER FOR SATELLITE RECEIVER
VIDEO
HEADPHONE
AUDIO
CAMERA

ENGLISH - 18 -
Typical Connections
Note: For further details, please refer to operation manual of your VCR.
Aerialconnection - TVsetonly -
Aerial IN
BACKOF TV
Aerial
(Not supplied)
AerialLead
(Not supplied)
ANT. EXT.2
EXT.1
AerialConnections -TVand VCR-
Aerial
(Not supplied)
AerialLead
(Not supplied)
ANT. EXT.2
EXT.1
AerialLead
(Not supplied)
Scart Lead(Not supplied)
BACK OF TV
Aerial IN
BACK OF VCR
Audio/Video
RF OUT
AV/TERMINAL
(EXT-1)
AerialIN

ENGLISH - 19 -
Typical Connections (Continued)
Note: For further details, please refer to operation manuals of your DVD Player,DECODER and VCR.
Connections - TV,DVD Player,DECODERandVCR(Videorecorder)-
AV/TERMINAL
(EXT-1)
BACKOFTV
DVDPLAYER
DECODER
Scart Lead
(Not supplied)
Scart Lead
(Not supplied)
AV/TERMINAL
(EXT-2)
Scart Lead
(Not supplied)
AerialLead
(Notsupplied)
Aerial
(Not supplied)
AerialLead
(Not supplied)
AerialIN
Audio/Video
BACKOFVCR
RFOUT
Aerial IN
Table of contents
Other Sharp TV manuals

Sharp
Sharp LD-26SH3U User manual

Sharp
Sharp 20AG2-SMK3 User manual

Sharp
Sharp 25N M180 User manual

Sharp
Sharp LC-20SH3H User manual

Sharp
Sharp 21HT-15C User manual

Sharp
Sharp 70ES-14S User manual

Sharp
Sharp LC-15AV7U User manual

Sharp
Sharp 27K-S100 User manual

Sharp
Sharp AQUOS LC-60LE830M User manual

Sharp
Sharp 21JF2-SF User manual

Sharp
Sharp 42CL1IA User manual

Sharp
Sharp LC-12A2E User manual

Sharp
Sharp XM-1446G User manual

Sharp
Sharp 21HF2-SS User manual

Sharp
Sharp 29RX5 User manual

Sharp
Sharp LC-40LE660X User manual

Sharp
Sharp 19SV111 User manual

Sharp
Sharp 21K-FG1M User manual

Sharp
Sharp 29H-FD5RU User manual

Sharp
Sharp 20LK32 User manual