Sharp 29LF-92EC User manual


- 1 -
Contents
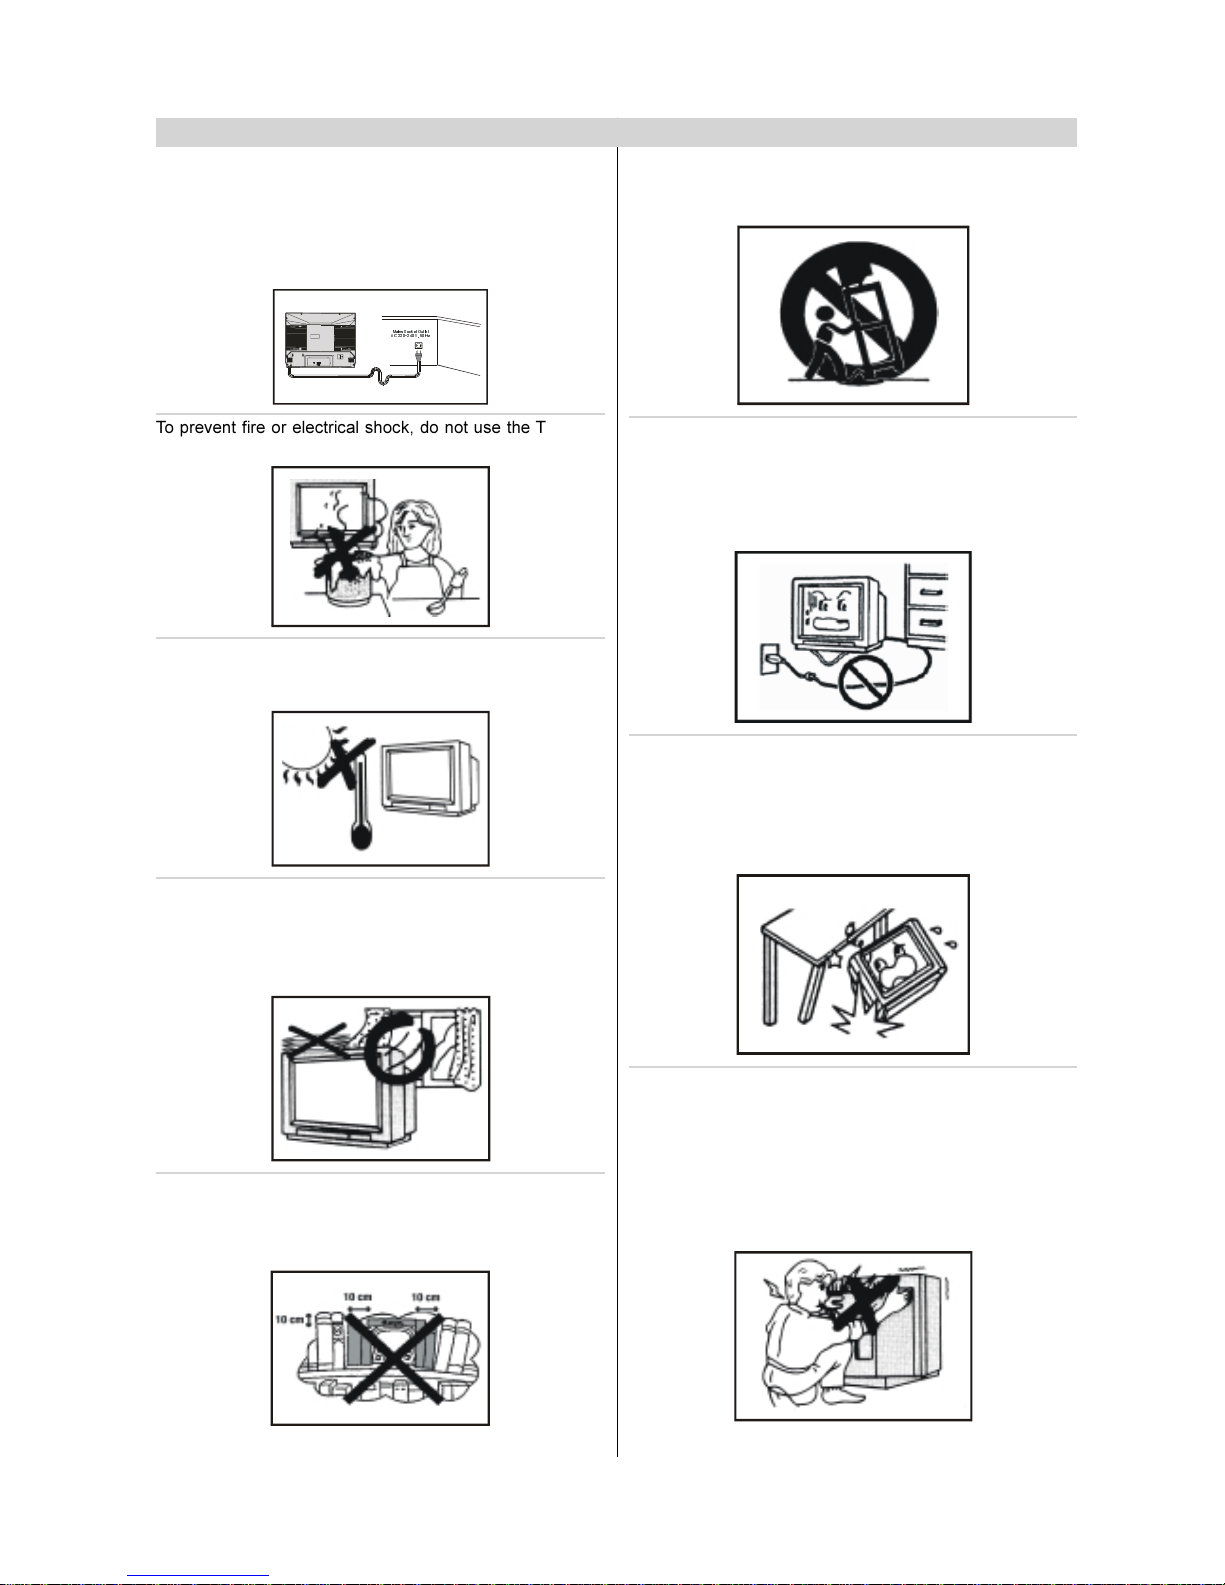
Safety Precautions .................................................. 2
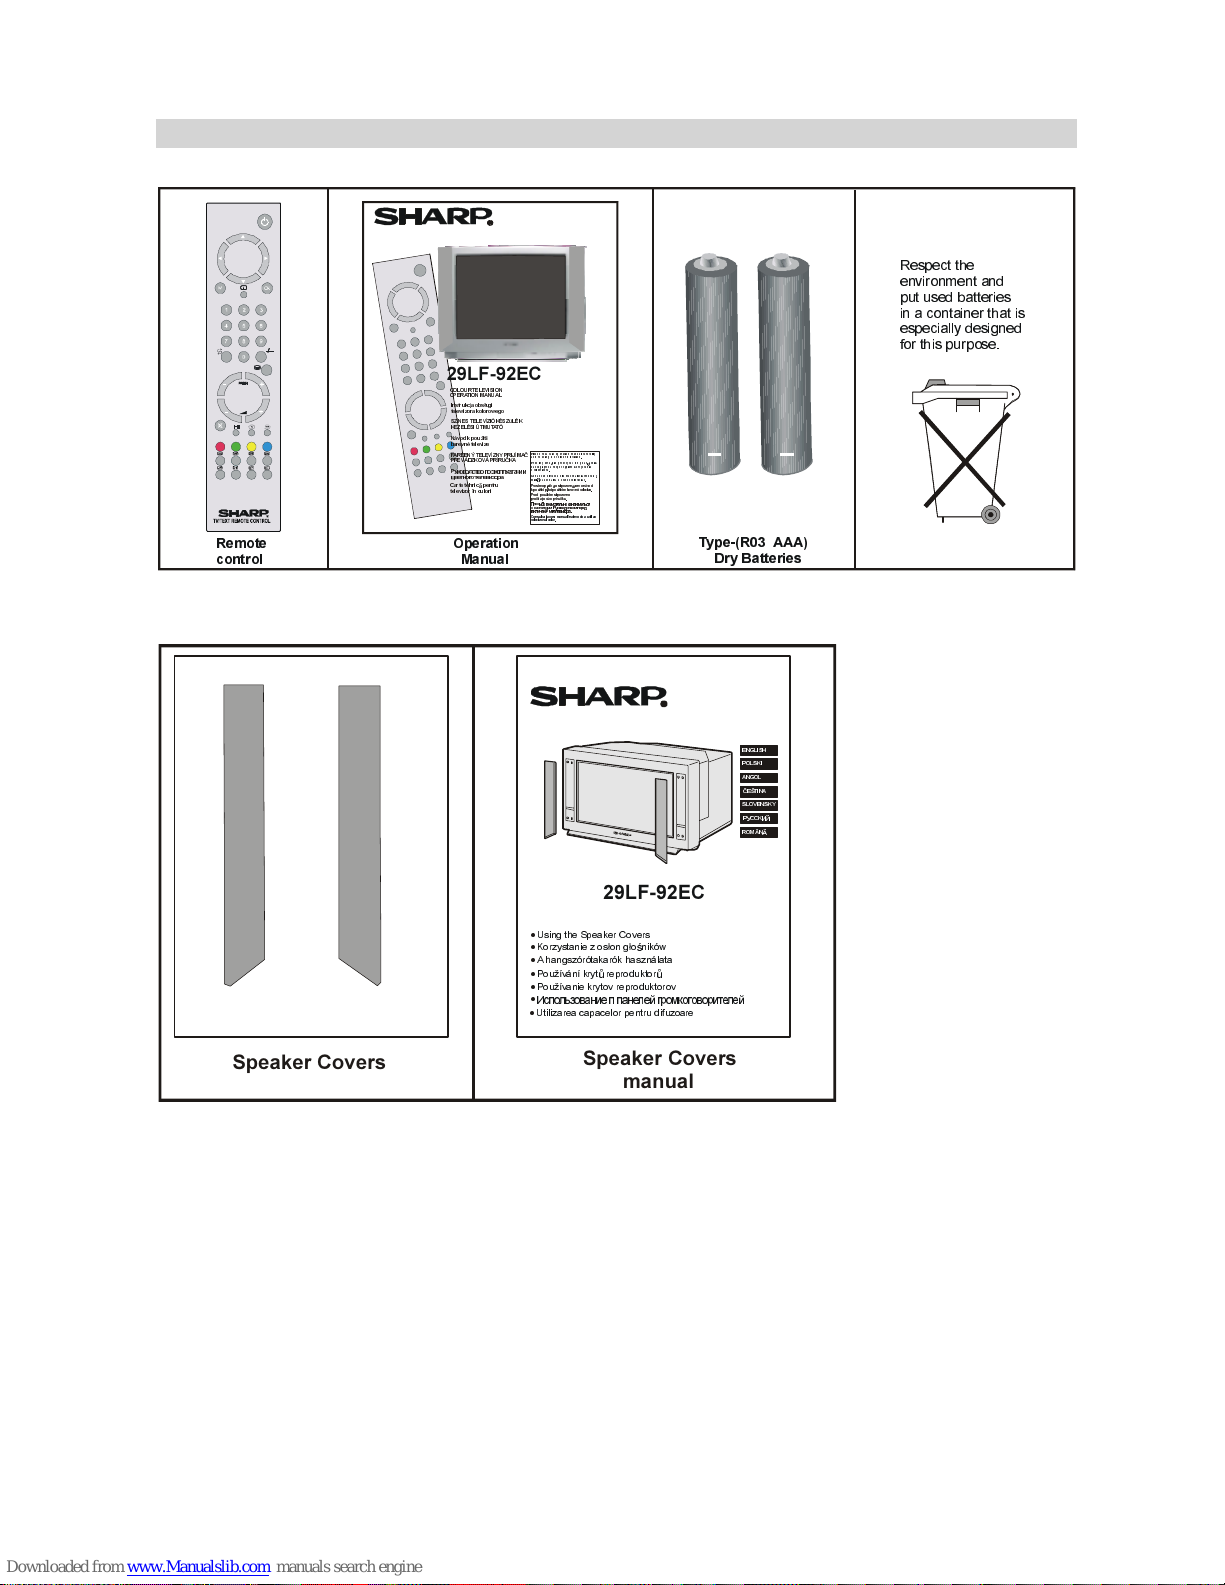
Supplied Accessories .............................................. 4
Remote Control Buttons ......................................... 5
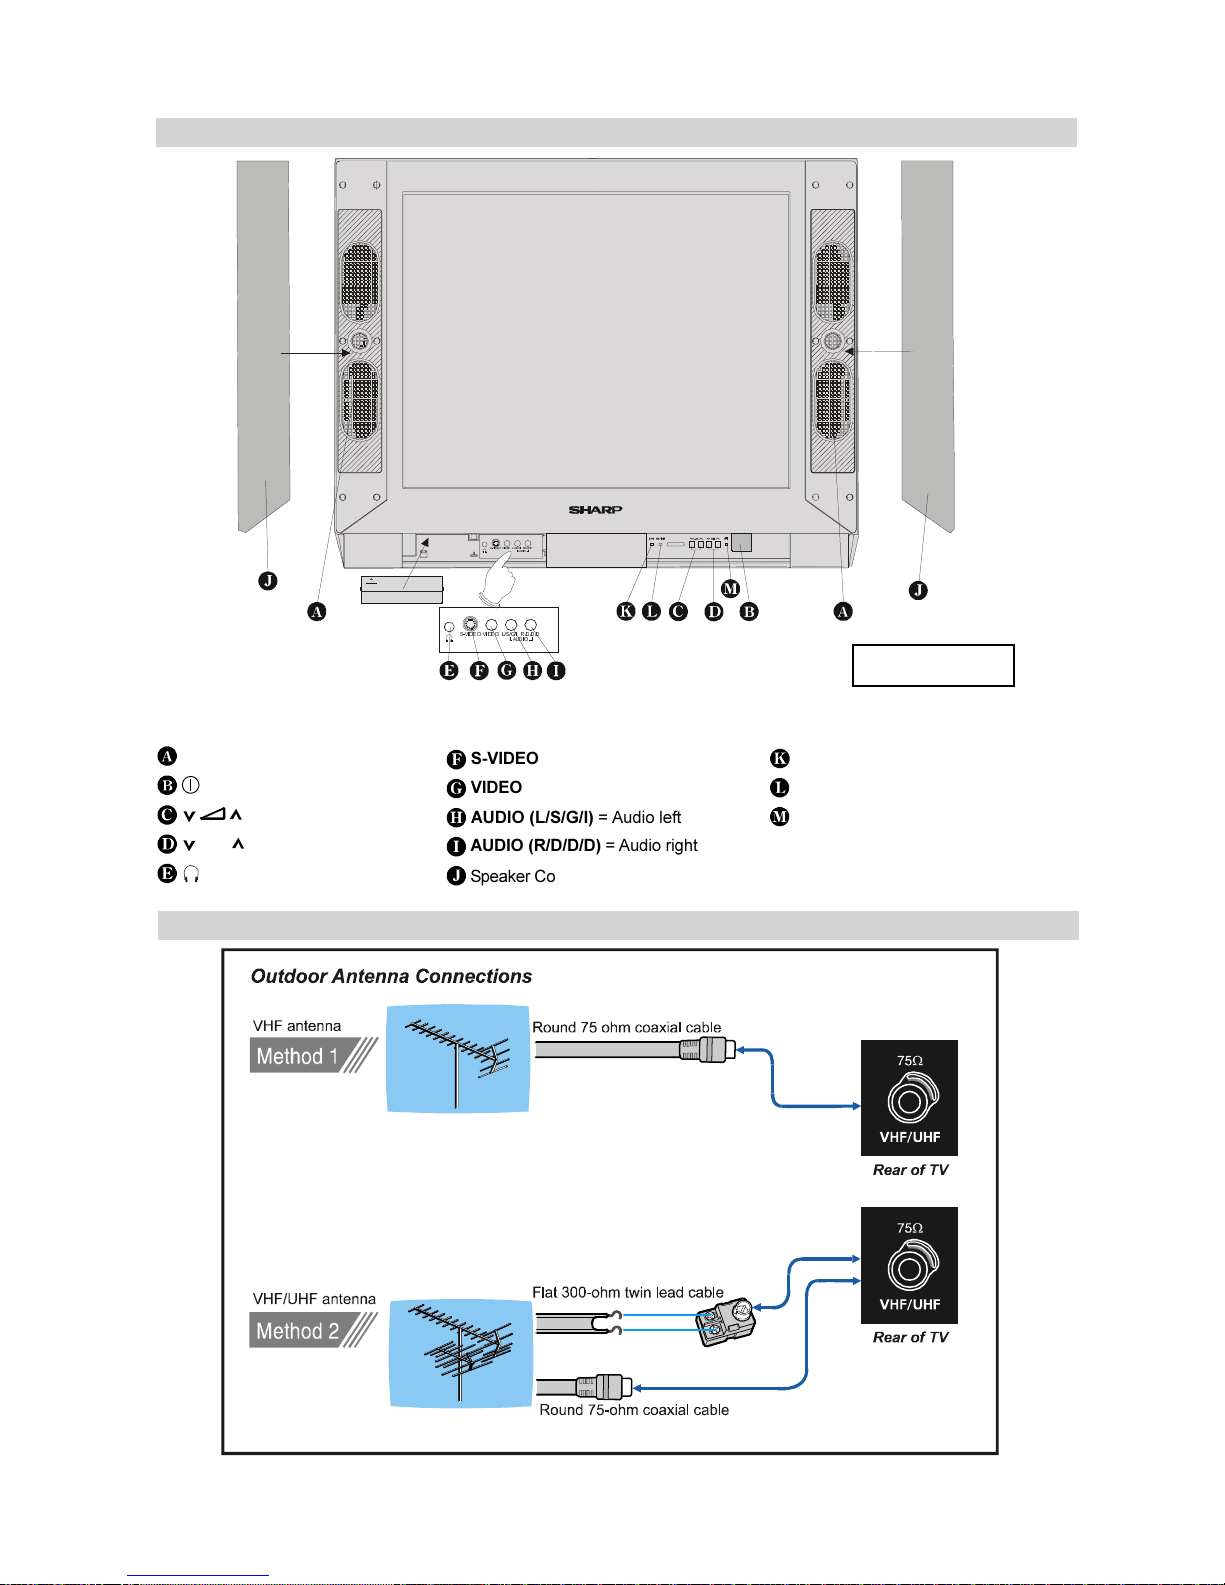
Control Panel Buttons............................................. 6
Antenna Connections .............................................. 6
Preparation ............................................................... 7
Features .......................................................................... 7
Before Switchin on your TV ................................. 7
Power connection............................................................. 7
Aerial Connections ........................................................... 7
How to connect external equipment ................................ 7
Remote Control Battery Installation .................................. 7
Switchin the TV ON/OFF ....................................... 7
To switc t e TV on.......................................................... 7
To switc t e TV off .......................................................... 7
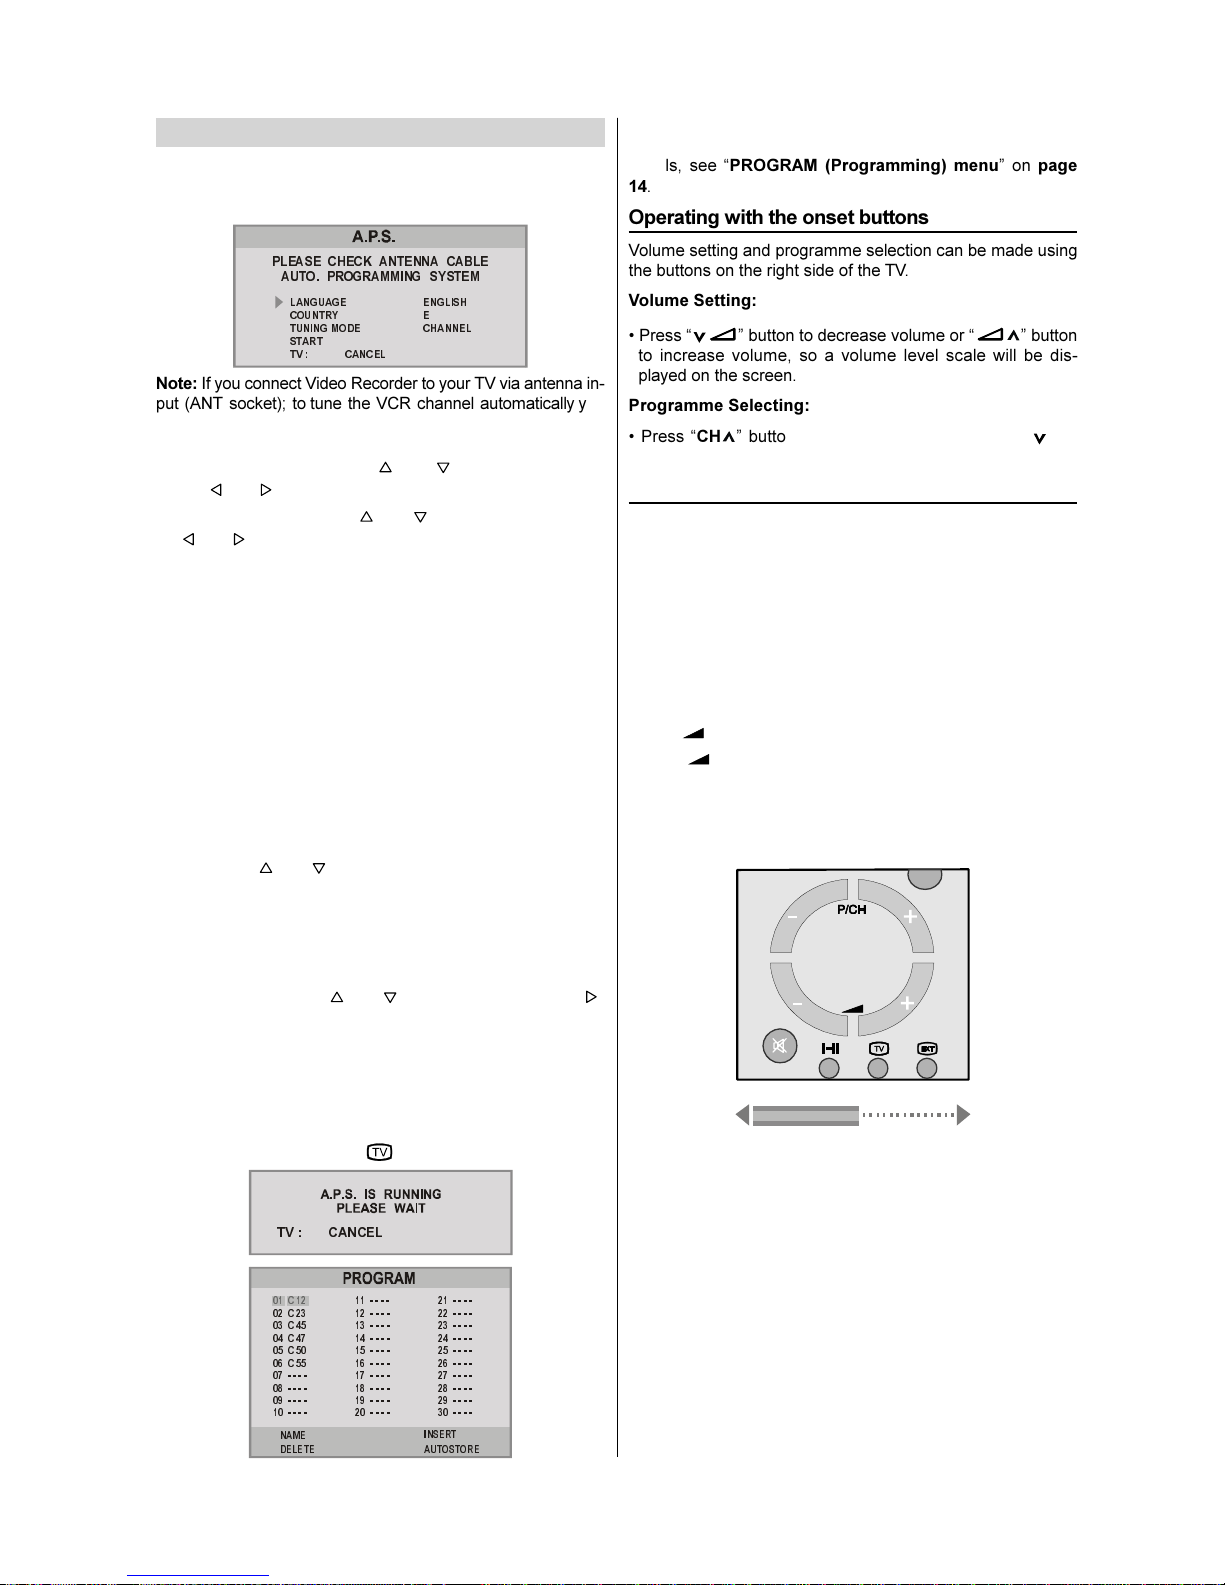
Initial Settin s .......................................................... 8
Operating wit t e onset buttons ...................................... 8
Operating wit Remote Control ......................................... 8
Menu System ............................................................ 9
Sound Menu..................................................................... 9
Picture Menu ................................................................. 10
Feature Menu ................................................................. 12
INSTALL. (Installation) Menu .......................................... 12
Program Menu ............................................................... 14
To start A.P.S (AUTOSTORE) ......................................... 14
Other Features ....................................................... 15
Sound Mute ................................................................... 15
Stereo / Bilingual ............................................................ 15
Information on Screen .................................................... 15
To Display t e Time........................................................ 15
Flas back ( ) ............................................................ 15
Teletext ................................................................... 15
To operate Teletext ......................................................... 15
To select a page of Teletext ............................................ 15
To Select Index Page ..................................................... 15
To Select Teletext wit a TV Programme ........................ 15
Searc ing for a page w ile watc ing TV ......................... 15
To Select Double Heig t Text ......................................... 15
To Reveal concealed Information .................................. 15
To Stop Automatic Page C ange .................................... 15
To Select a Subcode Page ............................................. 16
Fastext .......................................................................... 16
To exit Teletext ............................................................... 16
Connectin external equipment .......................... 16
Via t e Euro connector .................................................. 16
RGB mode ..................................................................... 16
Via t e RCA jacks .......................................................... 16
Via t e ANT (aerial) socket ............................................. 16
TV and Video Recoder (VCR) ......................................... 16
NTSC Playback ............................................................. 16
Copy Facility .................................................................. 16
To connect to S-VHS input ............................................. 16
Connecting Headp ones ................................................ 16
Connectin external equipment .......................... 17
Typical Connections .............................................. 18
Typical Connections (Continued) ........................ 19
Typical Connections (Continued) ........................ 20
Typical Connections (Continued) ........................ 21
Typical Connections (Continued) ........................ 22
21-pin Euro-SCART and 21-pin Audio/Video ....... 23
Troubleshootin .................................................... 24
Specifications......................................................... 25

- 2 -
Safety Precautions
T is equipment complies wit t e requirements of Directives
89/336/EEC, 92/31/EEC and 73/23/EEC as amended by 93/
68/EEC.
T is receiver s ould only be operated from a 220-240V AC,
50 Hz outlet.Ensure you select t e correct voltage setting for
your convenience.
0DLQV6RFNHW2XWOHW
$&a9+]
$17 (;7
(;7
To prevent fire or electrical s ock, do not use t e TV set in
an excessively damp place.
Position t e TV set out of direct sunlig t and away from eat,
as ig temperatures can damage t e cabinet, CRT, or ot er
electronic parts.
Do not cover ventilation slots wit objects suc as newspa-
pers, tableclot s, curtains, etc.
Do not cover t e ventilation oles at t e back of t e TV set,
t is can cause fire or ot er serious problems. Leave an ade-
quate open space be ind t e TV set for good ventilation.
In order to ensure t at t e television is properly ventilated,
leave a space of at least 10 cm around t e set.
Do not install t is equipment in a confined space suc as a
bookcase or a built-in cabinet.
Television equipment and cart combination s ould be moved
wit care. Quick stops, excessive force, and uneven surfaces
may cause t e equipment and cart combination to overturn.
To prevent electrical s ock, do not subject t e AC power cord
to damage by bending or twisting it, or by placing eavy
items on top of it and do not place t e AC power cord under
t e TV set. If t e AC power cord becomes damaged, unplug
it from t e wall outlet immediately and call your dealer for
service.
Do not place t is television equipment on an unstable cart,
stand, or table. T e television equipment may fall, causing
serious injury to a c ild or an adult, and serious damage to
t e equipment.
Use only wit a cart or stand recommended by t e manufac-
turer, or sold wit t e television equipment.
Never remove t e back of t e cabinet, as t ere is ig volt-
age in t e TV set.
Please call for service.
W en replacement parts are required, be sure t e service
tec nician as used replacement parts w ic are specified
by t e manufacturer or ave t e same specifications as t e
original one. Unaut orized substitutions may result in fire,
electrical s ock, or ot er azards.

- 3 -
CAUTION: For environmental and safety reasons, it is recommended t at t is television set is not left in stand-by
mode w ilst not in use. Switc it off using t e main switc . During periods of absence from ome it is also
wise to disconnect t e set by unplugging t e mains plug.
Unplug t e power cord from t e wall outlet immediately if t e
TV set begins to make unusual noises or give off smoke or
an odd smell, t en call your dealer for service.
Always disconnect your television from t e mains and t e
aerial cables during t understorms.
Even if your television is switc ed off, it can still be damaged
by lig tning striking t e mains and/or aerial cable.
Do not leave your TV set in Stand-by or operating mode w en
you leave t e ouse.
In order to prevent electrical s ocks and fires, ensure t at
t e television is not subjected to splas es or spills of water,
and avoid inserting objects or pouring any type of liquid into
t e set.
To prevent fire, never place any type of candle or naked
flames on t e top or near t e TV set.
If an object or liquid enters t e set, disconnect t e mains
supply and contact tec nical service.
Wall or s elf mounting s ould follow t e manufacturers in-
structions, and s ould use a mounting kit approved by t e
manufacturer.
Do place t e TV set onto an even stand, table or track w ic
size is bigger t an t e TV set.
If t e TV set is put onto a smaller size or uneven stand, table
or track may cause t e TV cabinet distort. Do not put or in-
sert anyt ing between TV set and t e stand, table or track.
T e tube of your TV as a special coating. Do not knock or
rub on t e tube face wit s arp or ard surfaces, ot erwise
you will damage t e coating.
To prevent damaging t e surface of t e television screen, re-
move finger prints only wit a soft clot dampened wit glass
cleaner. Do not use any abrasive cleaners.
Do not use t inner, benzene or ot er strong c emical clean-
ers.
Warning!
Any intervention contrary to regulations, in particular,
any modification of ig voltage or a replacement of t e
picture tube may lead to an increased concentration of
x-rays. Any television modified in t is way no longer
complies wit license and must not be operated.
Instructions for aste disposal:
Packaging and packaging aids are recyclable and
s ould principally be recycled. Packaging materials,
suc as foil bag, must be kept away from c ildren.
Batteries, including t ose w ic are eavy metal-free,
s ould not be disposed of wit ouse old waste.
Please dispose of used batteries in an environmentally
sound manner. Find out about t e legal regulations w ic
apply in your area.

- 4 -
Supplied Accessories
5HPRWH
FRQWURO 2SHUDWLRQ
0DQXDO 7\SH5$$$
'U\%DWWHULHV
5HVSHFWWKH
HQYLURQPHQWDQG
SXWXVHGEDWWHULHV
LQDFRQWDLQHUWKDWLV
HVSHFLDOO\GHVLJQHG
IRUWKLVSXUSRVH
3OHDVH UHDGWKLVRS HUDWLRQP DQXDOFDUHI XOO\
EHIRUHXV LQJWKHFR ORXUWHOHYLVLR Q
3URVtP HS HþW WH VLSR]R UQ WHQWRQiYRG
NSR XåLWt S HGSR XåLW tP EDUH YQpWH OHYL]H
3UHGSRXåLWtPVLSR]RUQH
SUHþtWDMWHW~WRSUtUXþNX
RF
H
/)(&
&2/2857(/(9,6,21
23( 5$7,21 0$18$/
,QVWUXNFMDREVáXJL
WHOHZL]RUDNRORURZHJR
6=Ë1(67(/(9Ë=,Ï.e6=h/e.
.(=(/e6,Ò7087$7Ï
1iYRGNSRX åLWt
EDUHYQ p WHO H YL ]H
)$5(%1é7(/(9Ë=1<35,-Ë0$ý
35(9È'=.29È35Ë58ý.$
3
&DUWHWHKQL F SHQWUX
WHOHYL]RUvQFXORUL
*RQGR VDQR OYDVVDH OD+DV ]QiODWL~WP XWDWyW
PLHO W WKDV]Qi OQiDV]tQH VWHOHYt] LyW
3URVLP\ XZD QLHSU]HF]\WDüWHQSRGU F]QLN
REVáXJL SU]HGUR]SRF ] FLHP NR U]\VWDQLD
]WHOHZL]RUD
&RQVXOWDWLDF HVWPDQXDOvQ DLQWHGHDXWLOL]D
WHOHYL]RUXOFRORU
6SHDNHU&RYHUV
PDQXDO
6SHDNHU&RYHUV
3&&.
3&&.
8VLQJWKH6SHDNHU&RYHUV
32/6.,
$1*2/
ý
(
â
7,1$
520
Æ
1
.RU]\VWDQLH]RVáRQJáR QLNyZ
$KDQJV]yUyWDNDUyNKDV]QiODWD
3RXåtYiQtNU\W UHSURGXNWRU
3RXåtYDQLHNU\WRYUHSURGXNWRURY
8WLOL]DUHDFDSDFHORUSHQWUXGLIX]RDUH
6/29(16.<
(1*/,6+
/)(&

- 5 -
Remote Control Buttons
CAUTION
RISK OF ELECTRIC SHOCK
T e lig tning flas wit arrow ead symbol, wit in an equilateral triangle, is intended to alert t e user to t e presence
of uninsulated "dangerous voltage" wit in t e product's enclosure t at may be of sufficient magnitude to constitute a
risk of electric s ock of persons.
T e exclamation point wit in an equilateral triangle is intended to alert t e user to t e presence of important operat-
ing and maintenance (servicing) instructions in t e literature accompanying t e appliance.
= Stand By
= Cursor Up
= Cursor Rig t
OK = OK
= Info (Program Menu)
0 - 9 = Direct Program
-/-- = Double Digit
= Wide mode button
P/CH+ = Program +
+ = Volume +
= TV / Quit Menu
(;7
= EXT button
(EXT-1, RGB, EXT-2, F-AV, S-VHS)
Yello = Feature Menu
Blue = Installation Menu
= Hold
= Update
= Index Page
= Reveal
= Expand
= Mix
= Teletext
= Time
Red = Sound Menu
Green = Picture Menu
= Mute
I-II = Mono/Stereo - Dual I-II
- = - Volume
- P/CH = -Program
= Flas back button
M = Menu
= Cursor Down
= Cursor Left

- 6 -
Control Panel Buttons
Antenna Connections
FRONT PANEL
Speakers (left + rig t)
= Power On / Off
= Volume -/+
CH = Program -/+
= Headp one 3,6 mm Ø
69,'(2 9,'(2 / 6 * , 5' ' '
$8', 2
69,'(2 9,'( 2
/6*,5'''
$8',2
S-VIDEO
VIDEO
AUDIO (L/S/G/I) = Audio left
AUDIO (R/D/D/D) = Audio rig t
Speaker Covers
Remote Control Indicator
Sound Indicator
Power Indicator

- 7 -
Preparation
Place TV on a solid surface.
For ventilation, leave a space of at least 10 cm free all around
t e set. To prevent any fault and unsafe situations, please do
not place any objects on top of t e set.
Use this apparatus in tropical and moderate climates.
Features
Remote Control Colour Television
100 UHF / VHF / Cable c annel presets
Cable C annel Compatible
Menu Driven functions
2 Euro connector Sockets
Front AV sockets
Front SVHS connector.
German+Nicam Stereo
Full function teletext (Fastext)
Headp one socket
Direct C annel access
APS (Automatic Programming system) Tuning
Program custom name feature
Automatic searc tuning
Sleep Timer
C ild lock
Blue mute on no video signals
Audio mute on no video signals
Auto switc off after 5 mins of no signal
WSS (wide screen signal decoding)
NTSC playback
Before Switching on your T
Power connection
Important: T e TV set is designed to operate on 220-240V
AC, 50 Hz.
After unpacking, allow t e TV set to reac t e ambient
room temperature before you connect t e set to t e mains.
Aerial Connections
Connect t e aerial plug to t e aerial input socket located at
t e back of t e TV.
How to connect external equipment
See Connecting external equipment on page 17.
See t e instruction manuals provided wit t e external de-
vices too.
Remote Control Battery Installation
Before using t e TV set for t e first time, install t e supplied
dry batteries in t e remote control.
1. Wit your t umb nail, pull up t e slit as indicated by t e
arrow to remove t e battery cover.
2. Insert two batteries 1.5 V (R03 AAA size). Be sure to
matc t e battery +/- terminals wit t e +/- marks inside
t e compartment.
9$$$5
3. Replace t e battery cover.
Notes:
Remove batteries if weak or if t e unit is not in use for long
periods.
Do not mix old and new batteries.
Incorrect installation of t e batteries may damage t e re-
mote control.
Switching the T ON/OFF
You can operate your TV either using the remote control
handset or directly using the TV onset buttons.
To switch the TV on
Your TV will switc on in two steps:
1- Press t e POWER button located on t e front of t e TV.
T en t e TV switc es itself to standby mode and t e RED
LED located below t e TV turns on.
2- To switc on t e TV from stand-by mode eit er:
Press a digit button on t e remote control so t at a program-
me number is selected,
or,
Press Stand-by, P/CH+ or -P/CH buttons on t e remote
control or CH or CH on t e TV.
To switch the TV off
Press t e stand-by button on t e remote control, so t e TV
will switc to stand-by mode.
or,
Press t e POWER button located on t e front of t e TV.
T e RED LED turns off.
- T e main LED (Power Indicator) s ine of colour RED w en
t e TV is in Stand-by and w en it is in operation mode.
- W en any button on t e remote control is pressed, t e re-
mote control indicator (located on t e front of t e TV) blink
of colour ORANGE.
- Sound Indicator LED s ine of colour GREEN.
If t e TV is switc ed off by POWER button on t e TV
w en TV is in stand-by mode, t e TV switc es on in stand-
by mode t e next time.
If t e TV is switc ed off by POWER button w en TV is in
operation mode, t e TV switc es on in operation mode t e
next time, t e last watc ed programme selected.

- 8 -
Initial Settings
T e message PLEASE CHECK ANTENNA CABLE AUTO.
PROGRAMMING SYSTEM will be displayed w en you turn
on your TV for t e first time.
3/($6( &+(&. $17(11$ &$%/(
$872 352*5$00,1* 6<67(0
/$1*8$*(
&28175<
781,1*02'(
67$57
79 &$1&(/
(1*/,6+
(
&+$11(/
Note: If you connect Video Recorder to your TV via antenna in-
put (ANT socket); totune t e VCR c annel automaticallyyou
must set t e VCR in play mode before you start APS.
1- Select LANGUAGE wit or button, t en press
t e or button to select a menu language.
2- Select COUNTRY wit or button, t en press t e
or button to select t e correct country.
? : OTHER NL : NETHERLANDS
D : GERMANY P : PORTUGAL
A : AUSTRIA E : SPAIN
CH : SWITZERLAND TR : TURKEY
I : ITALY EIR : IRELAND
F : FRANCE LUX : LUXEMBOURG
B : BELGIUM CZE : CZECH REPUBLIC
DK : DENMARK PL : POLAND
S : SWEDEN HUN : HUNGARY
N : NORWAY BG : BULGARIA
SF : FINLAND GR : GREECE
UK : UNITED KINGDOM CRO : CROATIA/HRVATSKA
3- Press t e or buttons to selectTuning Mode. T is
allows you to c oose ow you run t e APS. If you select
C annel Tuning Mode, t e APS will run t roug t e c an-
nel numbers for your area to locate TV stations. Alterna-
tively if you select Frequency Tuning Mode APS will run
t roug all t e frequencies to locate TV stations.
4- Select START wit or button, t en press t e
button to start A.P.S.
A.P.S., (Automatic Programming System) automatically pro-
grammes t e received c annels in your TVs programme
numbers. During A.P.S., A.P.S. IS RUNNING PLEASE
WAIT will be displayed. After A.P.S. is finalized, t e PRO-
GRAM menu appears.
To cancel A.P.S., press t e button.
79&$1&(/
$8726725(
,16(57
'(/(7(
1$0(
&
&
&
&
&
&
You can delete a c annel, insert a c annel into a programme
number, or re-start A.P.S. wit t e PROGRAM menu. For
details, see PROGRAM (Programming) menu on page
14.
Operatin with the onset buttons
Volume setting and programme selection can be made using
t e buttons on t e rig t side of t e TV.
Volume Setting:
Press button to decrease volume or button
to increase volume, so a volume level scale will be dis-
played on t e screen.
Programme Selecting:
Press CH button to select next programme or CH
button to select t e previous programme.
Operatin with Remote Control
T e remote control andset of your TV is designed to control
all t e functions of t e model you selected. T e functions will
be described in accordance wit t e menu system of your TV.
W en any button on t e TV remote control is pressed, t e
remote control indicator (located on t e front of t e TV)
blinks.
Functions w ic you can use out of menu system are de-
scribed below.
Volume Setting:
Press + button to increase volume.
Press - button to decrease volume.
Programme Selecting (Previous or next programme):
Press -P/CH button to select t e previous programme.
Press P/CH+ button to select t e next programme.
Programme Selecting (direct access):
Press digit buttons on t e remote control andset to select
programmes between 0 and 9. TV will switc to t e selected
program after a s ort delay.
For a two digit program number press -/-- button. Press
t e first digit and t en second digit of t e programme c an-
nel you want to watc .

- 9 -
Menu System
Your TV as been designed wit a menu system. Display
MENU (main menu) and enter one of five menus (SOUND,
PICTURE, FEATURE, INSTALL. and PROGRAM.).
1- Press M button to display MENU (main menu). T e
menu titles will be displayed in t e main menu.
2- Press or button to select a menu title, t en press
or button to enter t e menu.
To exit a menu, press button.
To go to t e previous menu, press M button.
6281'
3,&785(
)($785(
,167$//
352*5$0
Sound Menu
To chan e sound settin s:
To enter SOUND menu directly, press t e RED button, or
Press M button, now you are in main menu. In t e main
menu, SOUND will be t e first selected option. Enter t e
sound menu pressing or button.
Settin Volume:
As you enter t e sound menu, Volume will be t e first select-
ed option.
Press button to increase volume.
Press button to decrease volume.
92/80(
%$/$1&(
6281'02'(
:,'(6855281'
+($'3+21(
$9/
(48$/,=(5
0212
2))
21
Settin Balance:
Using or button select Balance.
Press button to c ange balance rig tward.
Press button to c ange balance leftward.
92/80(
%$/$1&(
6281'02'(
:,'(6855281'
+($'3+21(
$9/
(48$/,=(5
0212
2))
21
Selectin Sound Mode
Using or button select Mode.
Press or button to c ange Mode.
You can c oose MONO, STEREO or DUAL (I-II) mode, only
if t e selected c annel supports t at mode.
You can also c ange sound mode directly pressing I-II but-
ton on your remote control.
If t e selected or detected Sound mode is Stereo, Bilingual or
Mono NICAM, GREEN LED will turn on ot erwise will turn off.
92/80(
%$/$1&(
6281'02'(
:,'(6855281'
+($'3+21(
$9/
(48$/,=(5
0212
2))
21
In case of bilingual broadcast (Dual Sound), you can select
original or dubbed language using mode option.
Wide Surround:
T e wide surround effect depends on w et er t e feed is
MONO or STEREO.
If t e source feed is MONO, it produces a Pseudo Stereo
effect .
If t e source feed is STEREO, it produces a Wide Sur-
round effect, expanding t e stereop onic image.
92/80(
%$/$1&(
6281'02'(
:,'(6855281'
+($'3+21(
$9/
(48$/,=(5
0212
2))
21
To Chan e Headphone Sound Settin s:
W en you connect eadp ones you can c ange t e sound
settings by entering t e eadp one menu. To do t is, select
eadp one using or button t en enter eadp one
menu pressing or button.
92/80(
%$/$1&(
6281'02'(
:,'(6855281'
+($'3+21(
$9/
(48$/,=(5
0212
2))
21
Settin Headphone Volume:
As you enter t e Headp one sound menu, Volume will be
t e first selected option.
Press button to increase t e eadp one volume.
Press button to decrease t e eadp one volume.
+($'3+21(92/80(
6281'02'(
6725( 0212
Settin Headphone Sound Mode:
Using or button select Mode.
Pressing or button will c ange t e current sound
mode. (e.g.: If t e current sound mode is stereo, it will be
mono or vice versa).
In case of bilingual broadcast, you can select original or
dubbed language again using mode menu. So w en some-
body listens to t e original language from t e loudspeakers,
somebody else can listen to t e dubbed language from ead-
p one.
To Store the Headphone Settin s
Using or button select Store. Press or but-
ton to store current eadp one volume and sound mode.
T e stored values will be valid for all t e programmes.

- 10 -
Equalizer
To enter Equalizer sub-menu, select Equalizer using or
button, t en enter Equalizer menu pressing or
button.
92/80(
%$/$1&(
6281'02'(
:,'(6855281'
+($'3+21(
(48$/,=(5
$9/
0212
2))
21
+]
+]
.K]
.K]
02'(
6725(
.K]
)/$7
In Mode item t ere are four predefined and one user defined
options. T ese are Personal, Music, Speech, Jazz and
Flat. T e predefined options can not be c anged by t e user.
T e Personal option may be adjusted by t e user.
T e 5 items below t e Mode are available to adjust t e
sound settings in 5 frequency values: 120 Hz, 500 Hz, 1.5
kHz, 5 kHz and 10 kHz. To c ange t e values of 5 frequency
options, select one of t e options by or button, and
t en press to increase t e value, or to decrease t e
value.
To store t e Equalizer settings, press or button on
Store option.
Settin AVL
Automatic Volume Limiting (AVL) function normalizes sound
to obtain fixed output level between programs, aving different
sound levels. Pressing or button will turn ON and
OFF t is feature.
92/80(
%$/$1&(
6281'02'(
:,'(6855281'
+($'3+21(
$9/
(48$/,=(5
0212
2))
21
To Store the Settin s
Press or button on STORE option to store Sound
menu settings or press OK button.
%$/$1&(
6281'02'(
:,'(6855281'
+($'3+21(
(48$/,=(5
$9/
6725(
0212
2))
21
Auto Store:
Last volume level is stored automatically.
Picture Menu
To chan e picture settin s:
To enter PICTURE menu directly, press t e GREEN button,
or
Press M button, now you are in main menu. In t e main
menu, select PICTURE using or button, t en enter
t e picture menu pressing or button.
6281'
3,&785(
)($785(
,167$//
352*5$0
Note: W en Picture Mode is not MANUAL, BRIGHTNESS,
CONTRAST and COLOUR options can not be reac ed by
or buttons.
Factory Settin s:
In t e picture menu press t e flas back ( ) button to revert
to t e original factory settings.
Settin Bri htness:
You can c ange t e Brig tness setting only w en manual
picture mode is selected.
Using or button select Brig tness.
Press button to increase Brig tness.
Press button to decrease Brig tness.
%5,*+71(66
&2175$67
&2/285
6+$531(66
3,&785(02'(
&2/2857(03
:,'(02'(
0$18$/
1250$/
$872
Settin Contrast:
You can c ange t e Contrast setting only w en manual pic-
ture mode is selected.
Using or button select Contrast.
Press button to increase Contrast level.
Press button to decrease Contrast level.
%5,*+71(66
&2175$67
&2/285
6+$531(66
3,&785(02'(
&2/2857(03
:,'(02'(
0$18$/
1250$/
$872
Settin Colour:
You can c ange t e Colour setting only w en manual picture
mode is selected.
Using or button select Colour.
Press button to increase Colour level.
Press button to decrease Colour level.

- 11 -
%5,*+71(66
&2175$67
&2/285
6+$531(66
3,&785(02'(
&2/2857(03
:,'(02'(
0$18$/
1250$/
$872
Settin Sharpness:
Using or button select S arpness.
Press button to increase S arpness level.
Press button to decrease S arpness level.
%5,*+71(66
&2175$67
&2/285
6+$531(66
3,&785(02'(
&2/2857(03
:,'(02'(
0$18$/
1250$/
$872
Settin Hue (In AV mode only) :
Using or button select Hue.
Press button to increase Hue level.
Press button to decrease Hue level.
Hue adjust is functional only w en NTSC 3.58/4.43 is applied
in AV mode. It does not appear w en ot er colour systems
used.
%5,*+71(66
&2175$67
&2/285
6+$531(66
+8(
3,&785(02'(
&2/2857(03 0$18$/
1250$/
Picture Mode
T is item is used to c ange t e picture mode. By pressing
or button you may c oose one of t ese options:
BRIGHT, STANDARD, SOFT, MANUAL.
%5,*+71(66
&2175$67
&2/285
6+$531(66
3,&785(02'(
&2/2857(03
:,'(02'(
0$18$/
1250$/
$872
Colour Temp
Using or button select Colour Temp.
T is item is used to c ange t e Colour Temperature. By
pressing or button you may c oose one of t ese op-
tions: COOL, WARM, NORMAL.
%5,*+71(66
&2175$67
&2/285
6+$531(66
3,&785(02'(
&2/2857(03
:,'(02'(
0$18$/
1250$/
$872
Wide Mode :
Using or button select Wide Mode.
Wit t is item you can select t e widt of t e picture. By
pressing or button you may c oose one of t ese op-
tions : AUTO, 4:3 or 16:9.
Wide mode can be set by wide mode button also.
%5,*+71(66
&2175$67
&2/285
6+$531(66
3,&785(02'(
&2/2857(03
:,'(02'(
0$18$/
1250$/
$872
If wide mode button is pressed once, wide mode indi-
cator appears on t e screen. If it is pressed one more t e,
wide mode will be c anged.
Eac time you press t e wide mode button , t e widt
of t e picture c anges as indicated:
$872
* Auto mode (VPS code): T e VPS signal is sent by some
broadcasting stations wit information of t e original size.
W en t e TV is in AUTO mode and receives t e VPS sig-
nal, it c anges t e size automatically as indicated below:
W en t e TV is receiving VPS code 16:9 t e TV selects
16:9 automatically.
W en t e TV is receiving VPS code 4:3 t e TV selects 4:3
automatically.
External source: W en you are watc ing t e TV set
t roug t e Euro-SCART AV-1 terminal and it receives infor-
mation of 16:9 format (t roug t e audio-video control pin)
t e TV selects 16:9 automatically.
Wide Mode (Special detail information)
Special detail information about 16:9 and 4:3.
16:9
Wit 16:9 Mode you adapt t e picture 16:9 format w ile also
stretc ing t e centre of view. T is is an advantage, for exam-
ple, w en watc ing sports games w ere t ere is no real fixed
centre of t e picture.

- 12 -
4:3
You can watc 4:3 programs in 4:3 format by switc ing to
4:3 Mode function.
To Store the Settin s
Press or button on STORE option to store Picture
menu settings or press OK button.
&2175$67
&2/285
6+$531(66
3,&785(02'(
&2/2857(03
:,'(02'(
6725(
0$18$/
1250$/
$872
Auto Store:
Wide mode is stored automatically.
Feature Menu
To enter FEATURE menu directly, press t e YELLOW but-
ton, or
Press M button, now you are in main menu. In t e main
menu, select FEATURE, using or button. T en en-
ter t e feature menu pressing or button.
6281'
3,&785(
)($785(
,167$//
352*5$0
Sleep Timer
T e sleep timer is used to turn t e TV off after a defined peri-
od. Press or button to c oose a period of time after
selecting t is item. T e timer can be programmed between
Off and 120 minutes in steps of 10 minutes. (OFF, 010, 020,
030, 040, ......... ,120.)
If sleep timer is activated, at t e end of t e selected t e time,
t e TV goes automatically to stand-by mode.
6/((37,0(5
&+,/'/2&.
/$1*8$*(
(;7287387
%/8(%$&.*5281'
2))
2))
(1*/,6+
79
21
Child lock:
You can disable t e control panel buttons (except t e POW-
ER button) wit t is item.
Press or button to c ange t e setting to On or Off
after selecting t is item.
W en you set t is item to On, t e TV can be operated only
by using t e remote control andset.
6/((37,0(5
&+,/'/2&.
/$1*8$*(
(;7287387
%/8(%$&.*5281'
2))
2))
(1*/,6+
79
21
Lan ua e:
Menu Language can be selected by pressing or but-
ton on Language item.
6/((37,0(5
&+,/'/2&.
/$1*8$*(
(;7287387
%/8(%$&.*5281'
2))
2))
(1*/,6+
79
21
Settin External Source Output
You can use t is menu to select t e internal or external
source t at will be output at EXT-2 terminal.
In t e Feature menu select EXT-2 Output using or
button. T en select t e source you want to be output
at EXT.2 pressing or button (one of t e sources:
TV, EXT-1, F-AV or SCREEN).
6/((37,0(5
&+,/'/2&.
/$1*8$*(
(;7287387
%/8(%$&.*5281'
2))
2))
(1*/,6+
79
21
Blue Back round Durin No-Si nal
T e Blue Background feature can be set by or but-
ton to eit er On or Off.
6/((37,0(5
&+,/'/2&.
/$1*8$*(
(;7287387
%/8(%$&.*5281'
2))
2))
(1*/,6+
79
21
INSTALL. (Installation) Menu
You can store a c annel manually, or modify t e current set-
tings of a c annel (for example, fine-tuning a c annel).
You can also c ange t e colour system.
To enter INSTALLATION menu directly, press t e BLUE
button, or
Press M button to display t e main menu.
Press or button to select INSTALL. item. T en
or button to display t e INSTALL. menu.
6281'
3,&785(
)($785(
,167$//
352*5$0
Note:
If you want to modify t e current settings of a c annel, se-
lect t e c annel of w ic you want to modify t e setting.
T en display t e main menu on screen.
In AV mode, you can c ange only t e COLOUR SYSTEM
item.

- 13 -
1. PROGRAMME is t e first selected item as you enter t e
INSTALL. menu. Press t e or button to select t e
programme number w ere you want t e tuned c annel to
be stored. (You may also type t e programme number us-
ing t e digit buttons)
Note:
Do not use t e PROGRAMME item w en you want to
modify t e current programme number setting as t is may
cause ot er programmes to be c anged t at are in t e ex-
isting programme number.
2. Press or button to select Tuning Mode. By press-
ing or button , you can select t e mode in w ic
you want t e searc to be made, "Channel Search"
mode or "Frequency Search" mode.
W en you select "Channel Search" ("Channel" will be
displayed in t e menu.), t e display of t e
INSTALL.(Installation) Menu will be as below :
352*5$00(
781,1*02'(
%$1'
&+$11(/
67$1'$5'
&2/2856<67(0
),1(781,1*
3
&+$11(/
6
%*
3$/
3. Press or button to select BAND. Using or
button to select t e band in w ic you want to searc a
c annel.
4. Press or button to select SEARCH. Press or
button to start searc ing. (Press button to searc
forward. Press to searc backwards.)
If t e found c annel is not t e desired one, press or
button to start searc ing again.
To stop searc ing before a c annel is found, press t e
reverse direction button. For example, w en t e TV is
searc ing forward wit button, press button to
stop searc ing.
If you know t e c annel number w ic you want to find,
you can find t e c annel directly. Follow t e step 5 to
select t e correct standard, t en press or to
select CHANNEL again, and press or button to
select t e c annel number, or enter t e number wit t e
digit buttons.
5. If t e sound or picture is abnormal, c ange t e standard
(broadcasting system) of new c annel. Press or
button to select STANDARD, t en press or button
to c ange t e correct one.
T e indicated number will be c anged w en you c ange
t e standard.
B/G : C02-C12, C21-C73 / S01-S41 / S75-S79
D/K : C01-C12, C21-C69 / S01-S19, S22-S41
L : C05-C73 / S01-S41 / S75-S77
L : C01-C04
6. If t e picture is not clear or no colour appears, c ange t e
colour system to display t e picture normally. Press
or button to select COLOUR SYSTEM, t en press
or button to c oose t e correct one.
In TV mode: PAL / SECAM
In AV mode: AUTO / PAL / SECAM / NTSC 3.58 /
NTSC 4.43
7. If t e c annel reception is poor, fine-tune t e c annel.
Press or to select FINE TUNING, t en press
or button to fine-tune t e c annel.
8. After t e all settings are completed, store t e new
c annels setting to t e programme number w ic you se-
lected. Press or to select STORE, t en press
or button to store it.
%$1'
&+$11(/
67$1'$5'
&2/2856<67(0
),1(781,1*
6($5&+
6725(
6
%*
3$/
9. W en you select "Frequency Searc " , t e display of t e
Tuning menu will be as below :
352*5$00(
781,1*02'(
67$1'$5'
&2/2856<67(0
)5(48(1&<
6($5&+
6725(
3
)5(48(1&<
%*
3$/
As "Frequency Search" is selected, TV will searc ac-
cording to t e c annel frequencies.
Wit t e or button, select Search. Searc can be
made eit er forward, pressing button or backwards,
pressing button.
T e searc will be done wit steps of 0.25MHz. in eac
step.
If t e tuned station is not t e desired one, you can continue
searc ing pressing or button again.
W en t e desired station is tuned, select STORE using
or button and store it to t e programme number
you selected pressing or button or press OK but-
ton.
Now as you ad selected t e Frequency Searc , t e tuning
mode of t e program is stored as Frequency Searc Mode.
Direct Frequency Access
If you know t e c annel frequency of t e station you want
to tune, you do not need to make searc ; select Fre-
quency, using or button in t e Frequency Mode
Tuning Menu. You can type t e first 3 digits of t e fre-
quency using t e digit buttons, and t en you can select t e
decimal part of t e frequency by using or buttons
wit 250kHz steps. For example if you want to tune t e sta-
tion at frequency 224.25 MHz; first you can directly type
224. T e bar at bottom of t e menu will s ow 224.00 . T en
by increasing or decreasing wit 0.25 MHz steps using
or buttons, you can select t e 224.25MHz .W en you
type and select t e frequency, t e corresponding station
will be displayed.
To store t e station to t e programme number selected, se-
lect STORE option using or button and t en press
or button or press OK button.
Now as you ad selected t e Frequency Searc , t e tuning
mode of t e program is stored as Frequency Searc Mode.

- 14 -
Note : C annel Searc Tuning Mode uses a c annel table.
T e c annels and stations at t e table may vary from table to
table and from country to country. Eac c annel as an ex-
act frequency on t e table.
Frequency Searc Tuning Mode does not use a c annel
table and it is slower t an C annel Searc Tuning Mode.
C annel Searc Tuning Mode is recommended for t e
countries w ic uses standard c annel table.
Frequency Searc Tuning Mode recommended for t e
countries w ic uses non-standard c annel table.
Pro ram Menu
You can use t e Program menu to delete a c annel, to
c ange t e programme number of a c annel, to give a c an-
nel name to a c annel, and to start t e A.P.S (AUTOSTORE)
function.
To enter PROGRAM menu directly, press t e button,
or
Press M button to display t e main menu.
Press or button to select PROGRAM item, t en
or button to display t e PROGRAM menu.
$8726725(
,16(57
'(/(7(
1$0(
&
&
&
&
&
&
To choose a channel in the PROGRAM menu:
Press / / / button. T e programme number
t at you c oose is ig -lig ted in t e PROGRAM menu and
you can view t e picture of t at c annel.
Caution:
Using t e DELETE or INSERT function it is possible to re-
write t e current c annel list in t e PROGRAM menu. T is
can cause ot er c annels to be c anged if t ey were former-
ly in locations affected by t is function.
To ive a channel name (NAME):
1. C oose t e c annel you want to give a c annel name.
2. Press t e RED button to enter t e NAME mode.
3. Press or button to c oose t e position, and press
or button to c oose eac c aracter of c annel
name.
4. Press t e RED button to store t e c annel name.
To cancel t e NAME mode, press t e BLUE button.
To delete a channel (DELETE):
1. C oose t e c annel you want to delete.
2. Press t e YELLOW button to enter t e DELETE mode.
3. Press t e YELLOW button to delete it.
To cancel t is DELETE mode, press t e BLUE button.
To chan e the pro ramme number of a channel
(INSERT):
1. C oose t e c annel you want to c ange t e programme
number.
2. Press t e GREEN button to enter t e INSERT mode.
3. Press / / / button to c oose new
programme number.
4. Press t e GREEN button to insert t e c annel to t e c o-
sen programme number.
To cancel t is INSERT mode, press t e BLUE button.
To start A.P.S (AUTOSTORE)
A.P.S. automatically programmes t e received c annels in
your TVs programme numbers.
1. Press t e BLUE button to enter t e AUTOSTORE mode.
A warning message appears.
$// 35(6725(' 352*5$00(6
:,// %( (5$6('
&28175<
781,1*02'(
&217,18(
79&$1&(/
(
&+$11(/
To cancel t e AUTOSTORE mode, press t e but-
ton.
2. Press or button to c oose t e COUNTRY, t en
press or button t e c oose country you are now
located.
3. By pressing t e up and down buttons, come to t e Tuning
Mode item and select t e mode at w ic your TV will run
t e APS.
4. Press or button to c oose t e CONTINUE, t en
press button to start A.P.S. T e following message
appears.
$36 ,6 5811,1*
3/($6( :$,7
79 &$1&(/
To cancel t e A.P.S., press t e button.
5. After A.P.S. is finalized, t e PROGRAM menu appears
again.

- 15 -
Other Features
Sound Mute
To cut off the sound from the TV press button. To restore
the sound press the button again or use the + or -
buttons, in this case the volume will start from minimum
setting.
Stereo / Bilingual
f the TV channel you are watching broadcasts in two lan-
guages (e.g. Eurosport), you can select the dubbed or the
original language, pressing the I-II button.
When the stereo broadcast is received poorly, you can
change from stereo to mono sound so that you can hear
the broadcast more clearly and easily.
Information on Screen
First pressing the button displays the current status
Programme number,Station name and Sound
mode.
To Display the Time
While watching a TV programme with Teletext transmission
press button. The current time information, captured
from Teletext will be displayed at the upper right corner of
the screen.
f the programme being watched does not have Teletext
transmission, no time information will be displayed.
The time information will disappear after pressing but-
ton again.
Flash back ( )
This button is used to return to the previous viewed preset.
By pressing the " " button repeatedly it is possible to tog-
gle between two presets.
Teletext
Teletext is an information system that displays text on your
TV screen. Using the Teletext information system you can
view a page of information on a subject that is available in the
list of contents (index).
No on screen display will be available in text mode.
No contrast, brightness or colour control, but volume control
is available in text mode.
To operate Telete t
Select a TV station on which Teletext is being transmitted.
Press (TELETEXT) button. Usually the list of contents
(index) is displayed on the screen.
To select a page of Telete t
Press the appropriate digit buttons for the required Teletext
page number.
The selected page number is displayed at the top left corner
of the screen. The Teletext page counter searches until the
selected page number is located, so that the desired page is
displayed on the screen.
Press button to move the Teletext screen forward one
page at a time.
Press button to move the Teletext screen backward
one page at a time.
To Select Inde Page
To select the page number of the index (generally page
100), press button.
To Select Telete t with a TV Programme
Press button. The text is now superimposed over the
programme on the screen.
Press button again to return to the Teletext page.
Searching for a page while watching TV
To search for a specific page whilst viewing the TV picture,
whilst viewing teletext enter the desired Page number,
thenpress the button will restore the TV picture. Once
the desired page is found the Header of this page will ap-
pear on the screen. Press the button to view the full
page.
To Select Double Height Te t
Press button for the top half of the information page to
be displayed in double height text.
Press button again for the bottom half of the informa-
tion page to be displayed in double height text.
Press button once more for the full page of normal
height text.
To Reveal concealed Information
Pressing button once will reveal answers on a quiz or
games page.
Pressing button again will conceal the revealed an-
swers.
To Stop Automatic Page Change
The teletext page you have selected may contain more infor-
mation than can be displayed on one screen, in such cases
the page will update periodically.
Press button to stop the automatic page change.
Press button again to allow the next page to be dis-
played.

- 16 -
To Select a Subcode Page
Subcode pages are subsections of long Teletext pages that
can only be displayed on the screen one section at a time.
Select the required Teletext page.
Press button.
Select the required subcode page number by pressing four
digit buttons (e.g. 0001).
f the selected subcode page is not displayed in a short
time, press button. TV programme will be displayed on
the screen.
Teletext page number will be displayed on the upper left
corner of the screen when the selected page is found.
Press button to display the selected Teletext page.
Faste t
Teletext mode will be selected according to transmission au-
tomatically.
Your TV supports the 7 page Teletext system. When the
page number of any of the 7 pages in memory is entered, the
system will not search for the requested page; instead it will
display the page automatically.
Press button to move the Teletext screen forward one
page at a time.
Press button to move the Teletext screen backward
one page at a time.
For Fastext
The subject-heading for the information may have a particular
colour or can be in a form located in a coloured box.
Press an appropriate RED, GREEN, YELLOW or BLUE but-
ton in order to reach the relevant page quickly.
To e it Telete t
Press
79
button. The screen will switch to TV mode.
Connecting external equipment
Via the Euro connector
Your TV set has two euro connector sockets. f you wish to
connect external equipment (e.g. video recorder, decoder,
etc.) which have Euro connectors, to your TV, use the EX .1
(EX -1) or EX .2 (EX -2) terminals.
f an external device is connected via Euro connector sockets
the TV will be switched to AV mode automatically.
RGB mode
f a piece of equipment outputs RGB signals use the EX -1
Euro connector as this is RGB ready.
Via the RCA jacks
f you have an equipment (such as a Camcorder) which has
the RCA jacks, connect it to the Front AV (F-AV) terminal
with the video and audio cables.
f the equipment has the mono audio jack, connect it to the
AUDIO-L jack.
Via the ANT (aerial) socket
f your equipment does not have an Euroconnector or RCA
jacks, connect it to the TV with an aerial cable. For details,
see the manual provided with the equipment.
To store the test signal that comes from the equipment,
see INS ALL. Menu on page 12 and store it to the pro-
gramme number 0. You can watch images from that equip-
ment to select the programme number which you stored the
test signal.
TV and Video Recoder (VCR)
Connect the Video Recorder to the ANT (antenna input)
socket of the TV with the aerial cable.
Connect the Video Recorder to the EX .1 or EX .2 terminal
with the SCART cable, or connect it to the Front AV (F-AV)
terminal with the audio and video cables.
NTSC Playback
Connect a NTSC video recorder to a terminal. Then press
(;7
button to select the corresponding AV mode.
N SC 3.58/4.43 system is detected automatically in AV
mode.
Copy Facility
You can output the video and audio signals which inputs from
V or EX .1 (EX -1) terminal to the video recorder connected
to the EX .2 (EX -2) terminal.
To select the output source, see Setting External
Source Output on page 12.
To connect to S-VHS input
Connect your camera or camcorder at the front or back side
of your TV.
Connect your equipment to the TV via S-VHS input and au-
dio inputs of F-AV inputs by using S-VHS cables.
Connecting Headphones
Use the stereo headphone socket of your TV, to connect
headphones.

- 17 -
Connecting external equipment
Before connecting anything
Switch off all equipment.
Read the manuals provided with the equipments.
o select an AV mode
Pressing
(;7
button on the remote control selects one of AV modes (EX -1, RGB, EX -2, F-AV, SVHS)
To return to the V mode, repeatedly press
(;7
button.
EX .1 (EX -1) terminal: Euroconnector (21-pin, SCART)
Video input, Audio L/R inputs and RGB inputs are available.
TV broadcast outputs (Video and Audio L/R) are available.
EX .2 (EX -2) terminal: Euroconnector (21-pin, SCART)
Video input and Audio L/R inputs are available.
Video and Audio L/R outputs are available. (see Setting External Source Output on page 12.)
Front AV (F-AV) terminal: RCA connectors x 3 and S-V DEO (Y/C) connector
Video input and Audio L/R inputs are available.
S-V DEO input is available.
(;7
(;7
$QWHQQD (;7
(;7
$17,1
'HFRGHU
&DPFRUGHU
$XGLR
+HDGSKRQH
)RU6DWHOOLWH5HFHLYHU
9LGHR
9LGHR,QSXW
7HUPLQDO
$XGLR,QSXW
7HUPLQDO
)5217$9
)$9
+HDGSKRQH
69+6
69,'(2 9,'(2
/6*,5'''
$8',2

- 18 -
Typical Connections
Note: For further details, please refer to operation manual of your VCR.
$HULDOFRQQHFWLRQ79VHWRQO\
$HULDO,1
%$&.2)79
$HULDO
1RWVXSSOLHG
$HULDO/HDG
1RWVXSSOLHG
$17 (;7
(;7
$17 ( ;7
(;7
$HULDO&RQQHFWLRQV79DQG9&5
$HULDO
1RWVXSSOLHG
$HULDO/HDG
1RWVXSSOLHG
$17 (;7
(;7
$HULDO/HDG
1RWVXSSOLHG
6FDUW/HDG
1RWVXSSOLHG
%$&.2)79
$HULDO,1
%$&.2)9&5
$XGLR9LGHR
5)287
$97(50,1$/
$9
$HULDO,1

- 19 -
Typical Connections (Continued)
Note: For further details, please refer to operation manuals of your DVD Player, DECODER and VCR.
&RQQHFWLRQV79'9'3OD\HU'(&2'(5DQG9&59LGHRUHFRUGHU
$97 (50,1$/
$9
%$&.2)79
'9'3/$<(5
'(&2'(5
6FDUW/HDG
1RWVXSSOLHG
6FDUW/HDG
1RWVXSSOLHG
$97(50,1$/
$9
$HULDO,1
6FDUW/HDG
1RWVXSSOLHG
$HULDO/HDG
1RWVXSSOLHG
$HULDO
1RWVXSSOLHG
$HULDO/HDG
1RWVXSSOLHG
$HULDO,1
$XGLR9LGHR
%$&.2)9&5
5)287
$17 (;7
(;7
Other manuals for 29LF-92EC
1
Table of contents
Other Sharp TV manuals

Sharp
Sharp 54DS05SN User manual

Sharp
Sharp 21E-FG1F User manual

Sharp
Sharp 21L-FG1RU User manual

Sharp
Sharp AQUOS LC-40LE820UN User manual

Sharp
Sharp 32JF-74E User manual

Sharp
Sharp 29A-80ST User manual

Sharp
Sharp LC-32HI5232E User manual

Sharp
Sharp 66FW-54H User manual

Sharp
Sharp 81FW-57E User manual

Sharp
Sharp LC-13S1UB User manual

Sharp
Sharp LC-32SH130E Manual

Sharp
Sharp 28LS-92E User manual

Sharp
Sharp Aquos LC-65UB30U User manual

Sharp
Sharp 51GT-25S User manual

Sharp
Sharp LC-32GD8EE User manual

Sharp
Sharp BJ2E User manual

Sharp
Sharp Aquos LC-46D82U User manual

Sharp
Sharp CL20S10 User manual

Sharp
Sharp AQUOS LC-60EQ30U User manual

Sharp
Sharp 21AG1-SMK3 User manual