Shift Labs DRIPASSIST User manual

Owner’s Manual
Operating Conditions
1. Mount DripAssist
2. Position DripAssist
3. Activate DripAssist
DripAssist is a monitor and alarm
for gravity intravenous (IV) fluid
applications. Designed for
placement on the drip chamber of
a tubing set, DripAssist provides
precision feedback on IV drip
rate.
While you control the rate of flow
using the roller clamp on the tubing set, DripAssist provides visual feedback,
displaying values that accurately reflect the rate you set using the manual
clamp.
DripAssist is designed to be mounted directly on the drip
chamber of a tubing set by sliding it upward. See the image
at right.
Gently grip the drip chamber in one hand, and slide
DripAssist upward from the tubing onto the chamber, letting
the blue lever on the right side of the device swing
downwards.
The blue pads on the left and the blue lever on the right
snugly hold the drip chamber so the DripAssist hangs
securely.
Placing the DripAssist in the correct position on the chamber
is made easier by the labels on the device. The orange dotted
line indicates where you should see a free-falling drop in the
drip chamber.
Adjust the DripAssist up or down on the drip chamber until the
orange arrows are in line with where you see the drops fall. If
you can see the drops in free fall at the orange arrows, then
so can the DripAssist.
DripAssist operates most effectively within minimum and maximum flow rates for each tubing
set as shown in the following table:
Drip Factor
[gtt/mL]
Min
mL/hr Max mL/hr
Min
drops/min
Max
drops/min
10 12 999 2 400
15 8 999 2 400
20 6 999 2 400
60 2 402 2 400
If the maximum flow rate is exceeded, the device screen displays RATE HI.
Precautions:
When using the alarm feature, allow the flow rate to stabilize before activating the alarm
button.
DripAssist takes one AA battery. Do not use rechargeable batteries; doing so voids the
warranty. Ensure the battery is inserted correctly. Incorrect battery insertion can
damage the device.
In order to ensure ongoing accuracy, DripAssist does not work when the battery level
becomes too low. When the battery drops below a usable voltage, the screen displays
BATTERY, and the alarm sounds. When this happens, replace the battery.
Do not immerse DripAssist in water. If cleaning is necessary, use a cloth and rubbing
alcohol to wipe down the device.
•
•
•
•
Once DripAssist is correctly positioned (Steps 1 and 2), activate the device by pressing
the (Power) button.
Any time you need to power cycle the device—such as to change a tubing set—press this button
to turn the device off and then on again.
4. Set The Tubing Size
As you press the button, the screen toggles among the
four tubing sizes, highlighting each one in turn. When you
pause on the correct number, the DripAssist selects that
tubing size.
Press the button to select the tubing size you are using. Your clinic may use any of the
following tubing/giving sets: 10 gtt/mL, 15 gtt/mL, 20 gtt/mL, or 60 gtt/mL .
Note: Check the packaging to see what size tubing set you’re
using. Sometimes the tubing size is called the drop factor.
Important: Avoid drop formation
or splashing in the region of the
orange indicator line.
Important: The DripAssist does not control the rate of flow.
Important: This is a veterinary device only. It is not approved for use on humans.
DRIPASSIST
selected drop factor
5. Set The Flow Rate
6. Enable The Alarm
7. Choose Display Units
9. Understand the DripAssist Screen
Troubleshooting
Use the roller clamp inline with the tubing to set the flow rate as you would
normally.
The roller clamp will speed up or slow down the rate at which fluid flows into
the drip chamber. You’ll notice a lag between when you move the clamp and
how the bag responds. DripAssist will echo this response time. After adjusting
the flow rate with the clamp, allow the rate to stabilize and display on the
DripAssist screen.
Once you have manually set your target flow rate using the roller clamp, you may turn on the
alarm, if desired.
Press the (Alarm) button to turn on
the alarm.
In the picture to the right, the alarm has not been set. The alarm indicator
in the lower righthand corner of the screen displays “OFF”.
In the picture to the left, the alarm is set for 83 mL/hour. The alarm value
is displayed in the currently selected unit. Note that when total volume is
selected, the alarm icon remains, but the target value is not displayed.
DripAssist lets you see the flow rate in three different measurements: milliliters per hour (mL/hr),
drops per minute(dp/m), and total volume since the device was powered on (vol).
You can toggle among these three measurement selections while the device is running by pressing
the (Flow Rate Measurement) button.
8. Replace the DripAssist Battery
The DripAssist uses one disposable AA battery.
To open the battery door, push the inside edge of the battery
compartment door firmly to the right. The door lifts up and snaps back
into place by pushing to the left. When the battery runs low, the device
screen shows a low battery message on the screen—BATTERY—and
the alarm sounds. When the battery is too low to take accurate
readings, the device stops taking readings.
The alarm sounds when the flow rate changes outside of a
predetermined safe zone by either going too quickly or too slowly. The alarm also sounds when a
bag is empty, if the chamber backs up with fluid, or if the roller clamp slips, causing the bag to
enter a runaway-flow mode.
d/min
mL/h
vol
Important: Wait until you have manually stabilized
the flow rate before turning on the alarm.
The most common difficulty using DripAssist is correct placement on the drip chamber. If you find you are not
getting a reading, or the numbers change significantly, check the position of the device on the drip chamber.
Individual drops should freely fall past the orange indicator line.
When you see “--” on the screen, it means the device is not detecting any flow. This can happen for several
reasons:
The flow rate is so fast that there is a steady stream of liquid. DripAssist cannot provide a reading from a
solid stream. There must be individual drops for it to read correctly. If you can see drops, then so can the
device. If you cannot see separate drops, then neither can the device.
The flow rate has not yet started, the flow rate has stopped, or the bag is empty.
The device is positioned incorrectly. Check to ensure the individual drops are passing across the orange
indicator line on the front label.
Tip: Some tubing sets have a needle that protrudes from the top. Ensure the needle does not
cross the orange indicator line.
The device is too far forward on the drip chamber. Ensure the chamber fits snugly against the blue plastic
parts.
•
•
•
•
Thank you for using
DripAssist. We love hearing
from our customers. Tell us
what you think!
Shift Labs, Inc.
1752 NW Market St. #211
Seattle, WA 98107 USA
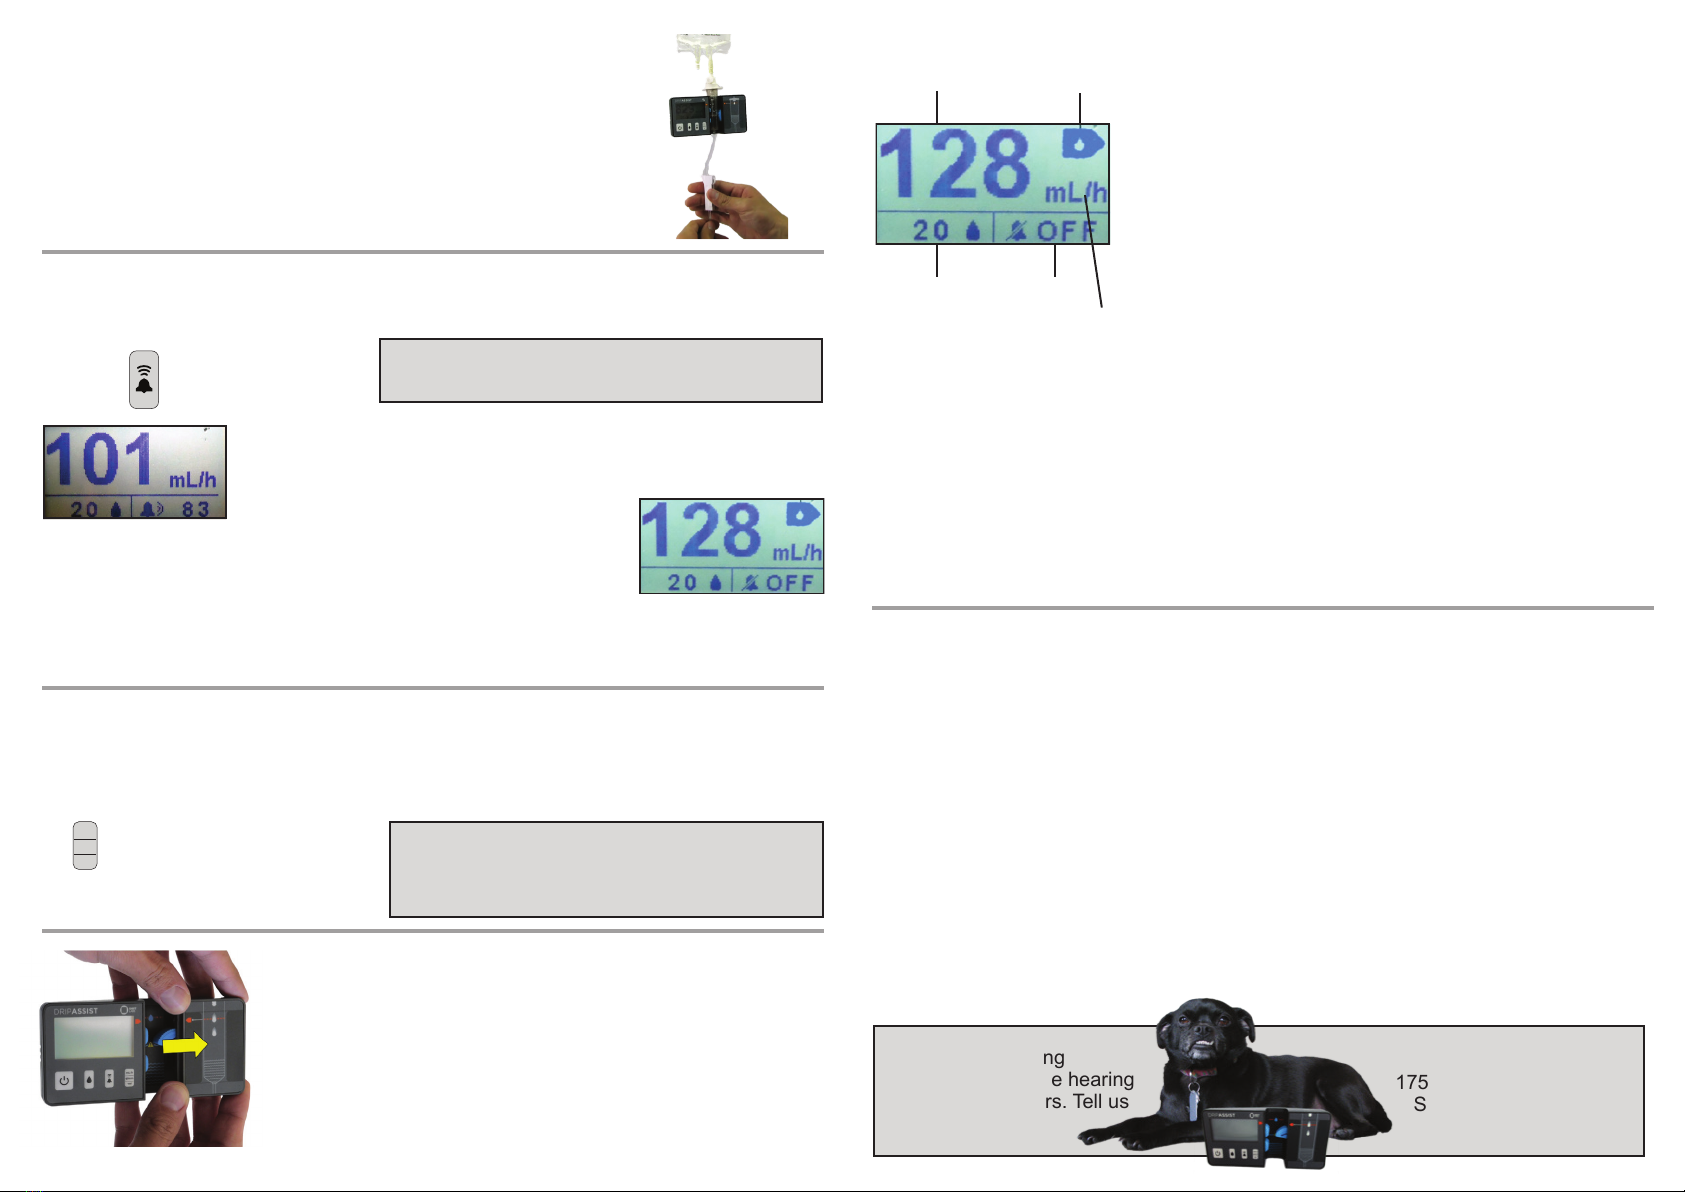
Flow Rate
Drop Factor Alarm
Units
Drip Indicator
variation in the flow that is undetectable by the human eye but readable by computer. DripAssist includes a Drip
Indicator that flashes every time the device senses a drop. As long as the Drip Indicator is flashing with each
drop, you can be confident the computer in the device is measuring the flow rate accurately, even if the numbers
on the screen change. If the Drip Indicator is not flashing but you can see drops, check to ensure the DripAssist
is correctly positioned. For more information, see the Troubleshooting section in this manual.
Alarm
The DripAssist calculates flow rates and monitors change in those rates. The alarm is optional.
Flow Rate
You must set the flow rate manually when you use the DripAssist. The DripAssist does not control the rate of
flow. If you can see drops in the chamber, so can the DripAssist. If you have a high flow rate so that it is a steady
stream of fluid, the DripAssist is not able to measure the rate. The Flow Rate screen displays a RATE HI
message when the flow rate exceeds operating conditions.
Drop Factor: Drop factor refers to how much fluid is in each drop.
The size of the needle in a tubing set determines the size of the drop.
There are four tubing set sizes: 10, 15, 20, and 60. Your country or
clinic may use only one or two of these, but the DripAssist is designed
to work globally, so it can accommodate all of these sizes.
Units: You can see the flow rate in either mL/h (milliliters per hour) or
dp/m (drops per minute) based on how prescriptions in your clinic are
written. The DripAssist also displays the total volume that has been
delivered from when the device was powered on until now.
Drip Indicator
Although drops from a bag appear to fall at a constant rate, there is
Important: Once you turn the DripAssist off, the
total volume measurement is reset. If this
information is important to you, be sure to note it
before resetting the device.
Other Shift Labs Medical Equipment manuals

Popular Medical Equipment manuals by other brands


natus
natus Quantum User and service manual

SmartLine Medical
SmartLine Medical SmartLift UNIVATOR user manual

Thuasne
Thuasne ImmoClassic manual

Bodypoint
Bodypoint Moduform Dynamic Arm Support AS001 manual

KYRA MEDICAL
KYRA MEDICAL k-tek KTEK2305 Instructions for use

GIBAUD
GIBAUD MALLEOGIB Instructions for use


