Shire Cubby Installation instructions

© Cubby Playhouse
Version 4 19/07/2017 Julian Shepherd
All informaon, contained in this booklet © Shire Garden Buildings .
Complies with EN71
These instrucons are for your safety. Please read through them thoroughly before use .
PLEASE KEEP THIS LEAFLET FOR FUTURE REFERENCE

Let’s
get started...
GB
02
Important information...
Safety 03
Base and positioning 04
Warranty 04
05 Before you start
Care maintenance & Recycling 06
In more detail...
Hardware chart 07
Detailed Technical Drawing 08-09
Parts List 10
11-24 Assembly instructions
customerservice@shiregb.co.uk
Brigstock Road Wisbech Cambridgeshire PE13 3JJ
F Pourobtenirunexemplairedesinstruconsouunecopiedansune
autrelangues'ilvousplaîtenvoyezune‐mailouécrireàl'adresseci‐
PL Nakopiiinstrukcjilubkopiiwinnymjęzykuprosimyowysłaniemailalub
pisaćnaadrespodanyponiżej.
RUS Дляполучениякопииинструкциииликопиянадругомязыке,
пожалуйста,отправьтепоэлектроннойпочтеилинаписатьпо
TR Başkabirdildetalimatlarıveyabirkopyasınıbirkopyasıiçinbire‐posta
gönderebilirveyaaşağıdakiadreseyazınız.
EN Foracopyoftheinstruconsoracopyinanotherlanguagepleasesend

Getting Started…..
GB
IE
03
EVERY PRECAUTION IS TAKEN TO ENSURE THAT YOUR BUILDING HAS NO ELEMENT
INCORRECTLY PLACED OR POSSIBLY HAZARDOUS, HOWEVER PRIOR TO USE
PLEASE CHECK ALL SURFACES FOR THE FOLLOWING:
(1) RAISED GRAIN, SPLINTERS: Sand down timber to smooth finish
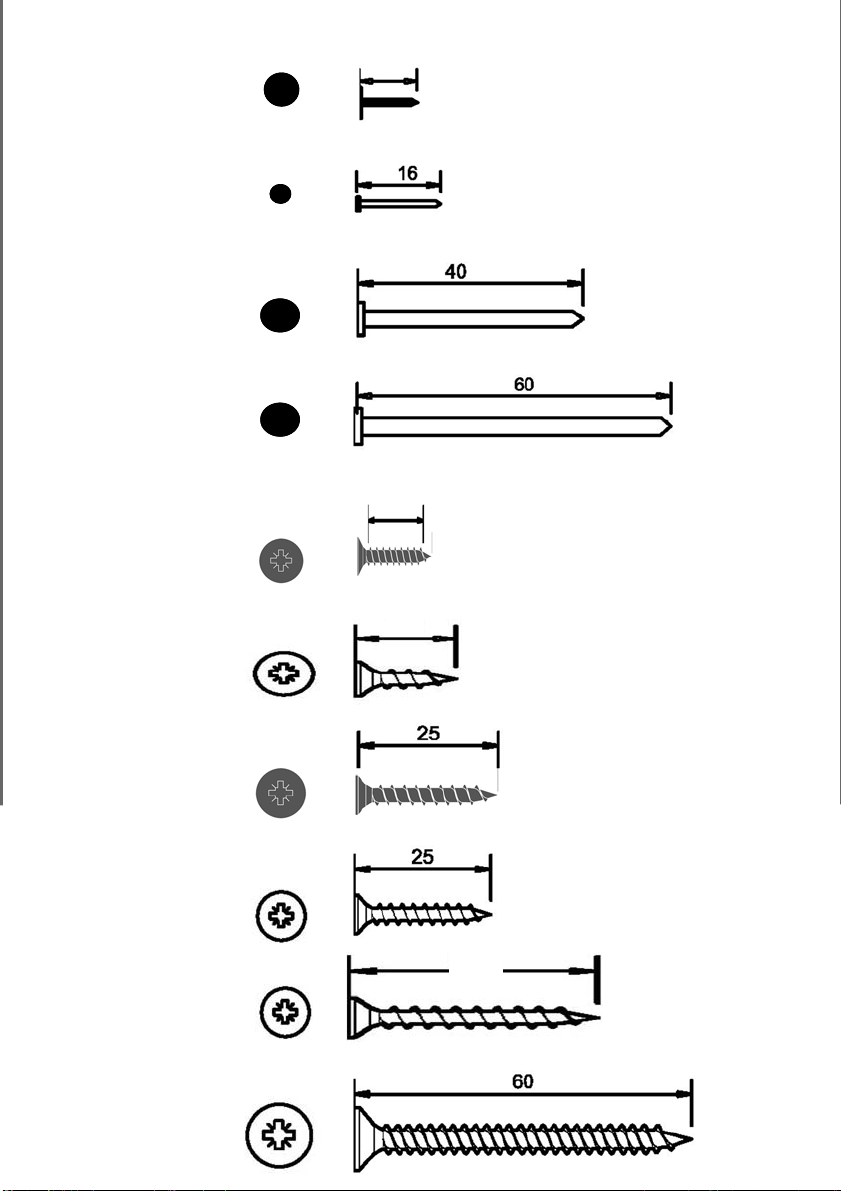
(2) NAIL/SCREW/PIN HEADS PROUD: Tap home to be flush with surface of timber
(3) DAMAGED SCREW HEADS RESULTING IN SHARP SPLINTERS OF METAL: Replace
(4) SHARP ENDS OF NAILS/ SCREWS/ PINS PROTRUDING THROUGH THE PANEL: Remove
and reposition.
(5) ENSURE ALL PARTS ARE SECURED AGAINST REASONABLE FORCE: Remove and refit
(6) ENSURE THERE ARE NO LOOSE PARTS: Remove and refit/discard
Important!
Check that you have noted all the following instructions
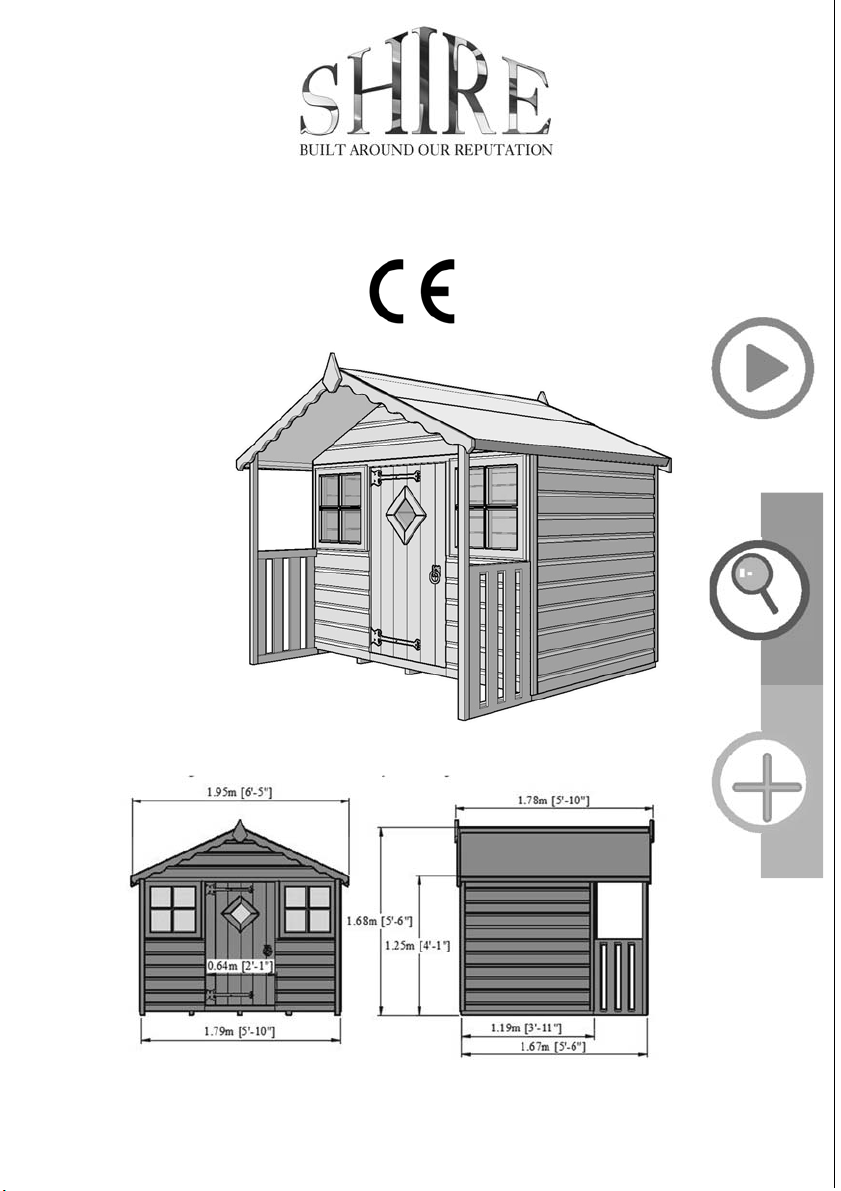
Cubby playhouse Safety
IMPORTANT ! For your safety please
read carefully the safety warnings
We advise the use of non slip protective gloves throughout
the assembly process.
We advise the use of steel capped protective footwear
throughout the assembly process
We advise the use of protective headwear and safety
goggles throughout the assembly process
Where a ladder is in use another person must hold the
ladder.
Do not attempt to work in windy conditions
We advise the use of a scaffold tower when fitting the roof ,
for felting or if you cannot reach from the ground.
Do not allow children near the tools and work area
Follow any safety precautions quoted by the manufacturer
for any equipment you use
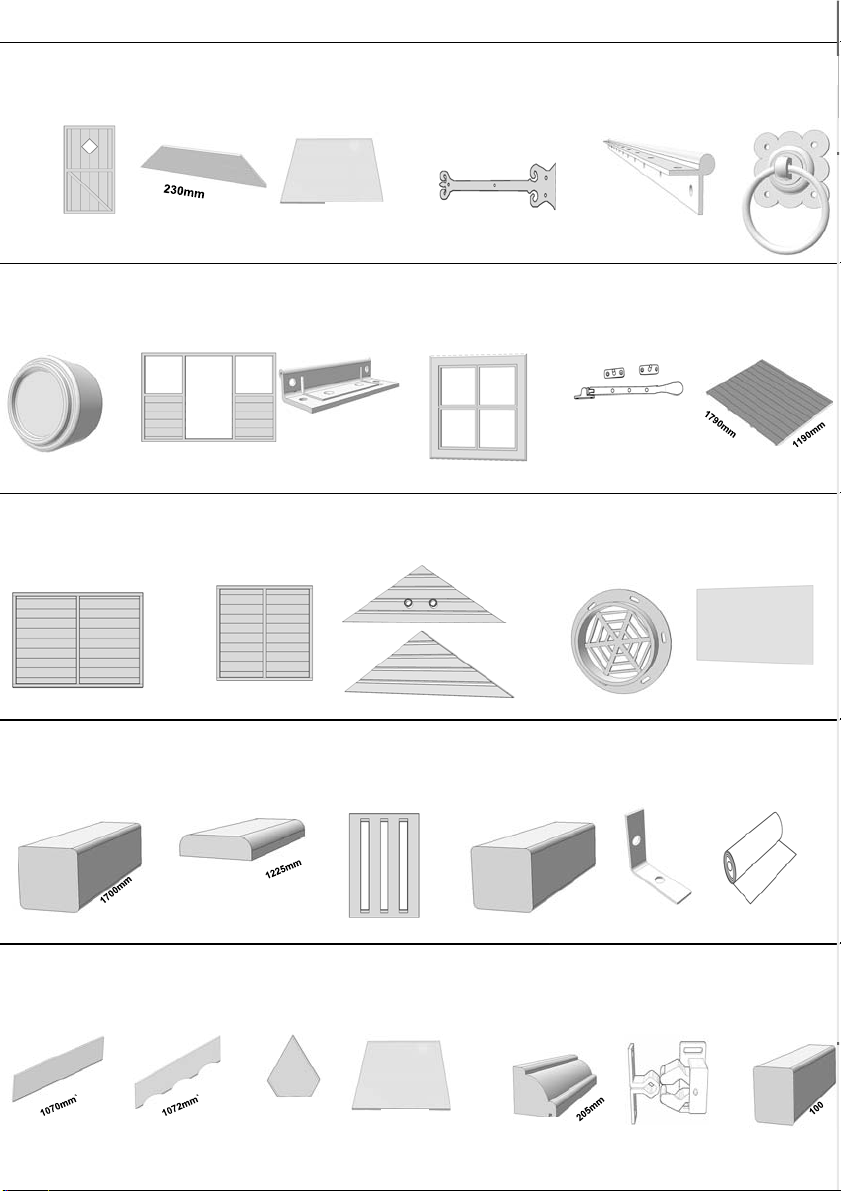
Check all parts before assembly
Only use child and animal safe wood preservative
Do not use creosote
Allow the wood preservative to fully dry before use
Regularly check the building for wear and tear
Children must be supervised at all times while playing with
this playhouse
Not suitable for children under 3 years old.

Getting Started…..
GB
IE
04
Cubby playhouse Base and Warranty
The following are also excluded
Damage resulting from poor assembly
Poor treatment application
Poor care and maintenance
Changes to the design
Misuse
General wear and tear
Warranty...
10 Year anti rot warranty subject to the following -
The building must be raised so it is not in contact with any water
retaining base surface (for example grass).
This can be achieved using a timber, concrete or slab base
When using a concrete or slab base use damp proofing strips
under the bearers
The building must have been completely treated and sealed
immediately prior to or after assembly
The building must have been re-treated and re-sealed annually
If your building has been pressure treated or has any pressure treated
parts additional treatment need not be applied (except for aesthetic
purposes )
Wood is a natural product and therefore the following are excluded
from the warranty
Colour changes
Warping
Preparation of base...
We recommend that the base onto which your building will stand should be at least
75mm larger in each direction than the total floor size of the building.
Actual floor area of the building: 1790 x 1190mm (excluding canopy)
Roof Overhang of canopy: 480mm
Total height clearance: 1750mm

In more detail…..
GB
IE
Before you start
Cubby playhouse
Things to check before you start
Check all parts as listed in the parts lists
Read the instructions fully before starting work
Follow all the health and safety guidelines
Ensure your base is ready– See page 3
05
Yo
Hammer
Spirit level
Ladder
1mm,3mm & 6mm drill
bits
Drill
Tape measure & Ruler
Sand paper
Mallet
Gloves
Saw
Pencil
Goggles
Chisel
A helper for some
tasks
Screwdriver
Sharp knife
When you see the drill icon
Onlyeverdrillthroughthefirst
pieceofframeworkwhichwillbea
pilotholeforthescrewtoaach
thesecondpieceofframework
6mm

0
6
The 5 golden rules of care
Cubby playhouse Care, Maintenance and Recycling
The 7 golden rules of maintenance
Recycling and disposal
1. Pallet and timber widely recycled
2. Cardboard widely recycled
3. Plastic strapping subject to local regulations
4. Plastic sheeting subject to local regulations
1. Timber widely recycled
2. Metal fixings widely recycled
3. Glass widely recycled
4. Roofing felt not currently recycled
packaging
Building
(1) Ensure your base is level and firm
(2) Ensure the building is not sitting directly on the ground using damp proof
membrane or the optional timber base.
(3) Ensure every piece of timber and surface, especially that is hidden upon
assembly is treated with a top quality wood preservative at least twice (see
note on pressure treated buildings in warranty section)
(4) Garden buildings are not waterproof, we recommend you seal between all
the panels with a silicone based sealant .
(5) Regularly check your roofing felt for weather damage and leaks
(1) Re apply the timber treatment annually. (see note on pressure treated
buildings in warranty section)
(2) Visually check for weather damage
(3) Check and replace if necessary any Silicone sealant if used on your
building.
(4) Check the roofing material for wear
(5) The doors and windows may require periodical adjustment
(6) Ensure your building is well ventilated especially during hot weather
(7) During extremely hot periods humidify your building to prevent the timber
from drying out and shrinking.
In more Detail…..
GB
IE

(13mm FN) x154
(16mm PP) x64
(40mm RH) x78
(20mm) x08
(25mm) x63
(25mm BLK ) x08
Felt Nail
Panel Pin
Posi-drive screw
Posi-drive screw
Posi-drive screw
Round head nail
Black
13
(60mm RH) x3
Round head nail
12
(12mm) x04
Posi-drive screw
black
20
(60mm) x30
Posi-drive screw
(45mm) x1
Posi-drive screw
45
Hardware Chart
Scale 1:1
07


(WI 4) x02
(PP10) x01
(CS-AL) x02
(DP4) x01
(VNT) x02 (RP15) x02
10
(PP11) x02
(SP18) x02
(GP4) x02
(FP1) x01
(B-RH) x01
(DR03) x1
628mm
(34s-1700) x04
(CH-1105-) x01
521mm
521mm
1120mm
1217mm
1790mm
412mm
1790mm
1183mm
1700mm
1050mm
(DI-FB) x02
(44C-1225) x04
44mm
(RC) x01
(70FCs –1070 x02 (PX-203-203) x08
203mm
203mm
(8.5B-205) x32
(WKB) x01
B
F
1183mm
1790mm
1105mm
680mm
445mm
(34s-1330) x02
(LB) x04
Parts List ....Not to scale
Door Panel
Black ring handle
Door Continuous Hinge
Wooden Knob Window insert
Plain panel (Back)
Casement set Floor panel
Safety vent Roof panel
Plain panel (Sides) Gable panels
Veranda fence34s framework Cover strips 34s framework L Bracket
For roof Veranda post (FLTs-2.0m) x03
Felt strips
Diamond Roller catch
Fascia Plastic Glazing Beading
(STH) x04
Window Hinge
(70FCw-1070)x02
Fascia
8.5mm
8.5mm
34mm`
34mm`
34mm`
34mm`
Door architrave Plastic Glazing
175mm
175mm
(SP7-230) x04 (PX-175-175) x1
(34s-100) x01
34s framework
For Door block
34mm`
34mm`
(FH-) x02
False Hinge
1330mm

GB-IE Fix the bottom pair of door architraves "SP7" on the other side flush with the cut out and position the
Perspex
Then fix the remaining 2 "SP7".door architraves.
Fit the false hinge “FH” as close to the top and bottom of the door as possible with black screws.
01
Door
(DR3)x01
Door architrave
(SP7-230)x04
GB-IE Mark for 8 holes as shown on the inside of the door and drill 4mm.
Plastic glazing
175mm
175mm
25mm
Screws
(20 mm)x08
20
11
4mm
HINGE
EDGE
OF
25mm25mm 12mm12mm
Black Screw
(12mmBLK)x04
Black Screw
(25mmBLK)x04
12
False hinge
(FHK)x02
These instructions are for your safety. Please read through them thoroughly before use.
Treat all the parts before assembly – see page 6!
Assembly instructions:

GB-IE Attach the smaller inner part of the 3 point hinges on the long edge of the door.
02
Door
(DR3)x01
Continuous hinge
(CH-1105)x01
Screw
(25mm)x14
Wooden Knob
(WKB)x01
Black ring handle
(B-RH)x01
Screw
(45mm)x01
Black screw
(25mmFH)x04
45
GB-IE Position the "black ring handle B-RH" on the outside over the door framework, mark the screw holes as
shown, drill the middle hole only for the "wooden knob WKB", attach the wooden knob on the inside of
the door first with the 45mm flat head screw and then attach the ring handle on the outside of the door
over the flat head screw.
6mm
6mm
12

GB-IE Rebate the top of the window insert 3mm deep. Use the hinge to mark the length. To comply with
EN71 safety regulations
Window insert
(WI4)x01
04
3mm
03
Door
(DR3) x01
GB-IE Lay the door panel "DP3" on the floor, lay the door evenly in position and attach..
Door panel
(DP4)x01
Screw
(25mm)x15
13

GB-IE Position the window insert in the aperture and screw the inner screw holes that are just visible first.
Open the window and insert the remaining screws.
14
06
05
Hinge
(STH)x02
Screw
(25mm)x04
Window insert
(WI4) x01
GB-IE Try the window in position in the panel to check that you have it the correct way around.
The hinges fit the top of the window.
Screw
(25mm)x10

GB-IE Drill both the "PP11 " panels as shown and screw to the ”PP10” panel with 2 60mm screws.
The cladding on the bottom of the panels overhangs the floor edge.
Floor
(FP1)x01
08
07
Screw
(25mm)x06
Casement set
(H-C-AL) x01
GB-IE Casement stay and pins must fit together loosely.
Fix the casement stay to the window insert first.
Then mark and fix the pins .
Back -Plain Panel
(PP10X01
Screw
(60mm)x02
PP11 PP10
Side– Plain panel
(PP11)X01
3mm
6mm
15

GB-IE Continue adding and fixing the walls as before
16
09
Screw
(60mm)x06
Side-Plain panel
(PP11) x01
Assembly from
Steps
01-06
6mm

GB-IE Place the Back Gable "GP3-b " panel level with the framework and fix to the panel below .
Repeat with the front gable.”GP3-F”
11
10
Screw
(60mm) x08
Back Gable
GB-IE Push the vents into the holes in the back gable panel.
Front Gable
(GP4-F) x01
Safety vent
(VNT) x01
6mm
17

18
13
12
Nail
(40mm)x28
GB-IE Position and nail the framework on both the long edges on both roof panels .
GB-IE Cut both pieces of the centre roof framework as shown for the peek of the roof.
Assembly step
12 x 02
Roof Panel
(RP15) x02
Roof framework
(34S-1700) x04
34mm`
34mm`

14
Assembly from
Steps 12 –13
GB-IE Place the roof panels on the building lining them up with the cladding at the back and with each other
19

17
GB-IE Fit cover strips at each corner with 3 nails each
Nail
(40mm) x12
Cover strip
(44C-1225) x04
44mm
16
15
Nail
(40mm)x22
Assembly from
Steps 12 –13
GB-IE Hold the roof panels together and nail together
GB-IE Position ( flush at the back ) and fix both roof panels nailing into the walls
Use 3 nails along each short edge and 5 nails along the long edge.
Nail
(60mm) x03
60
20
Table of contents
Popular Toy manuals by other brands

VTech Baby
VTech Baby Turn & Learn Ferris Wheel instruction manual

Eimmie
Eimmie 34143 Assembly & user instructions

Fisher-Price
Fisher-Price smart cycle Assembly Tip

Birds Eye View
Birds Eye View CONDOR 1500 Build instructions

KBmodel
KBmodel Gatehouse KkStB type 18/a 1896 instructions

Mattel
Mattel miracle baby instructions

REVELL
REVELL KIT 4990 Assembly manual

KidKraft
KidKraft 65833 Assembly instructions

Thames & Kosmos
Thames & Kosmos Tightrope-Walking Gyrobot Experiment manual

Horizon Hobby
Horizon Hobby P-51D Mustang 1.2m AS3X instruction manual

LEGO
LEGO 40127 Assembly instruction

LEGO
LEGO City Rock Band Bus Building instructions