ShopBot Desktop Series User manual
© Copyright 2021 ShopBot Tools, Inc.
page 1
Desktop Series Quick Start Guide

Desktop Series Quick Start Guide SBG00232
© Copyright Dec. 2021 ShopBot Tools, Inc.
page 2
Table of Contents
Desktop Tools Safety and Precautions......................................................................................................... 3
What’s in the Crate? ..................................................................................................................................... 6
ShopBot Desktop Overview.......................................................................................................................... 8
Uncrating...................................................................................................................................................... 9
Assemble Parts ............................................................................................................................................ 9
Tool Orientation and Direction of Axes....................................................................................................... 11
Video Demonstration.................................................................................................................................. 12
Software and Computer Configuration ....................................................................................................... 13
Plug in Pendant and Connect Power.......................................................................................................... 13
Launch Software......................................................................................................................................... 14
Setup Home Position and Square the Machine.......................................................................................... 16
Zero the X- and Y-axes .............................................................................................................................. 19
Tool Movement........................................................................................................................................... 20
The Position Window..................................................................................................................................20
The Keypad................................................................................................................................................21
Installing a Bit............................................................................................................................................. 21
Zero the Z-Axis........................................................................................................................................... 24
Move to Home Position .............................................................................................................................. 29
Spindle Warm-up Routine........................................................................................................................... 29
Desktop Spindle RPM Settings................................................................................................................... 30
Trim the Deck............................................................................................................................................. 31
Switch to ShopBot FULL ............................................................................................................................ 33
Surfacing the Deck..................................................................................................................................... 33
VCarve Pro................................................................................................................................................. 36
Maintenance............................................................................................................................................... 37
Transportation ............................................................................................................................................ 37
Resources .................................................................................................................................................. 38
ShopBot Tutorials & Videos........................................................................................................................38
ShopBot Training Classes..........................................................................................................................38
CAD/CAM Software Packages ...................................................................................................................38
Tooling, Materials, and more ......................................................................................................................38
ShopBot Forum...........................................................................................................................................38
Technical Support.......................................................................................................................................38
Desktop Series Quick Start Guide SBG00232
© Copyright Dec. 2021 ShopBot Tools, Inc.
page 3
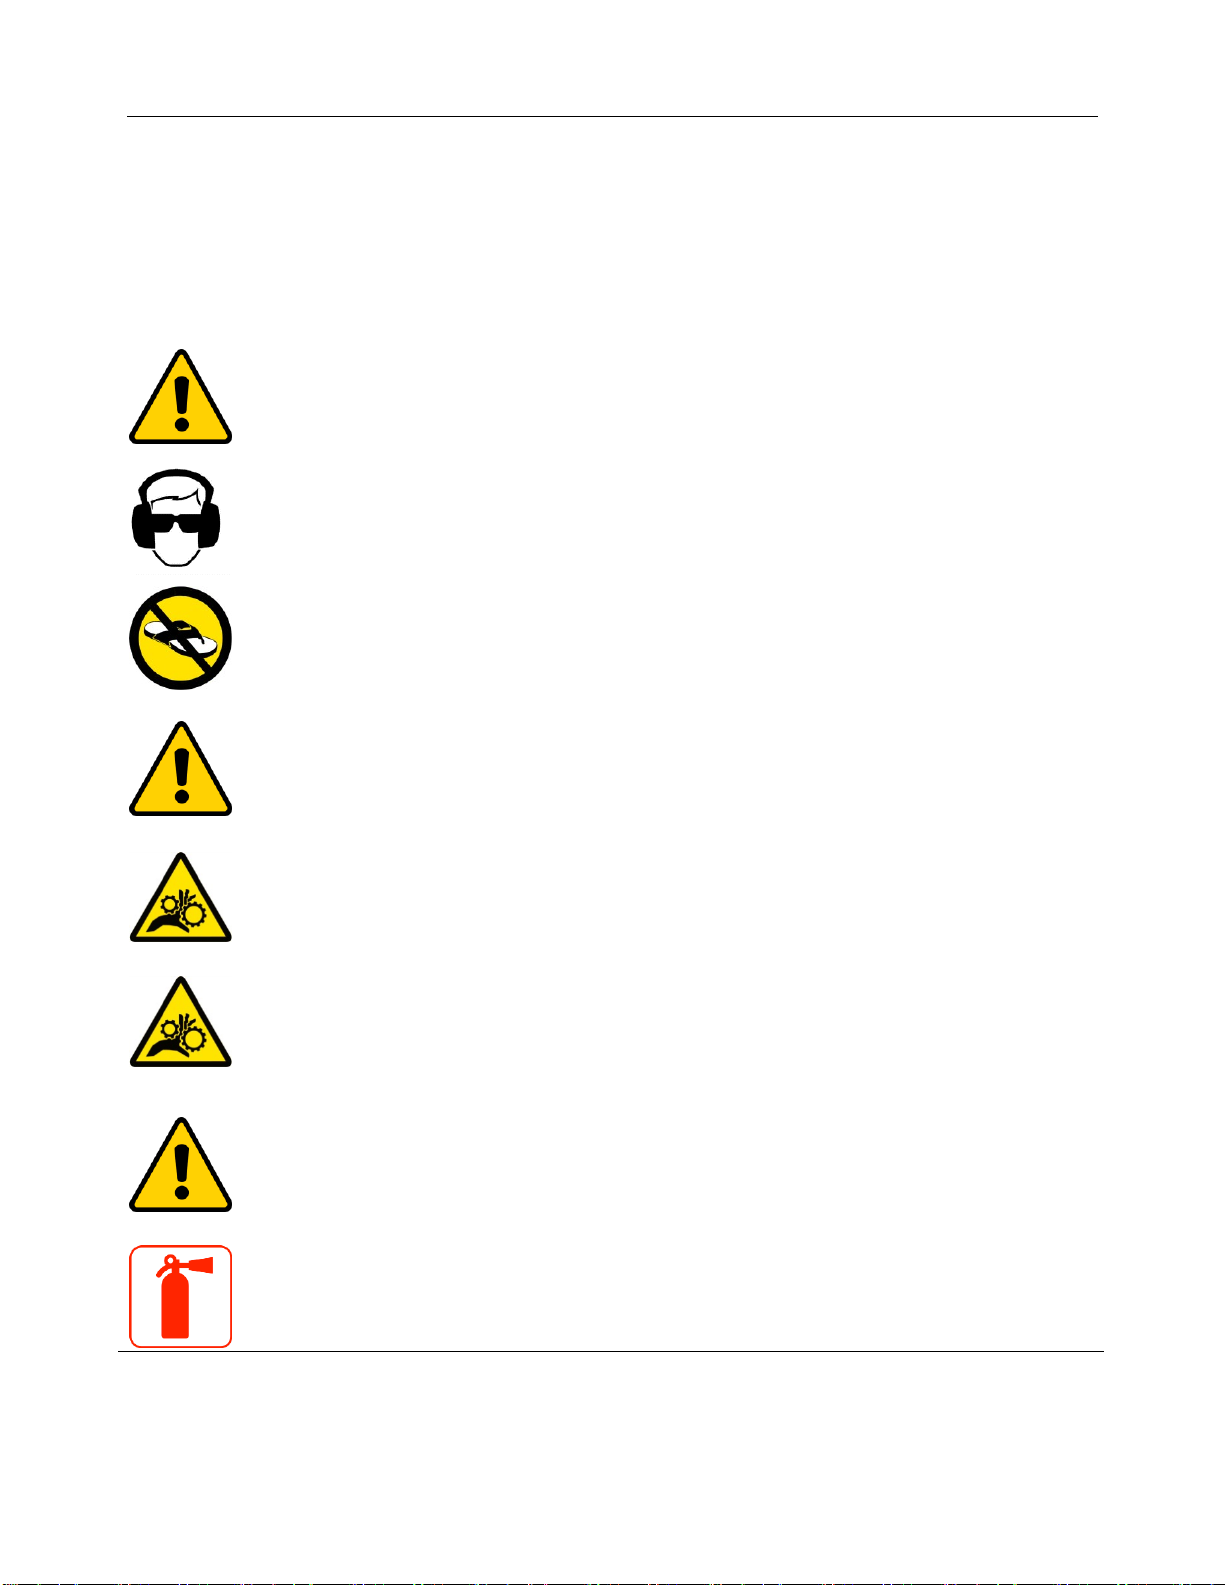
Desktop Tools Safety and Precautions
WARNING! Read all safety warning, instructions, illustrations and specifications provided with this power
tool. Failure to follow all instructions listed below may result in electric shock, fire, and/or serious injury.
Save all warnings and instructions for future reference. Refer to General Power Tool Safety Warnings
document sent with the User’s Guide.
Learn and understand safe use of the machine. Do not allow untrained individuals to operate
the machine without supervision. Be aware of the location of the Emergency Stop switches at
all times.
Eye and ear protection MUST be worn by the machine operator as well as any bystanders or
observers. Flying sawdust, material chips, and other debris can cause serious eye injury.
Wear closed-toe shoes at all times.
Make sure that your material is properly secured before cutting, and be aware of any small
parts that may come loose after being cut. If a small part catches the edge of a spinning bit, it
can be thrown forcefully in any direction, causing injury or damage.
Never place your hands on the rails of the ShopBot. Be aware that the machine may move
unexpectedly in any direction, which can cause serious injury if your hands are in the path of
movement.
Never wear gloves while operating the machine. As with any power tool, a glove can get caught
in moving or spinning parts and pull your hand into the machinery.
Never leave a machine running and unattended. Understand that a spinning tool generates
friction and heat, creating a risk of fire. This risk is minimized by using correct chip load, using
sharp bits, and by always double-checking your files before cutting. Be prepared to pause or
stop the cut if something seems incorrect or unsafe.
Keep a working fire extinguisher within reach of the machine, for the reasons listed above.

Desktop Series Quick Start Guide SBG00232
© Copyright Dec. 2021 ShopBot Tools, Inc.
page 4
Desktop Series Quick Start Guide SBG00232
© Copyright Dec. 2021 ShopBot Tools, Inc.
page 5
Desktop Safety and Precautions (cont’d)
Limitations on ambient conditions –This tool is intended for indoor use; Do not run the tool outside or
in wet weather.
The tool is intended to be used with wood, plastic, or non-ferrous materials. It is not intended for use with
ferrous materials.
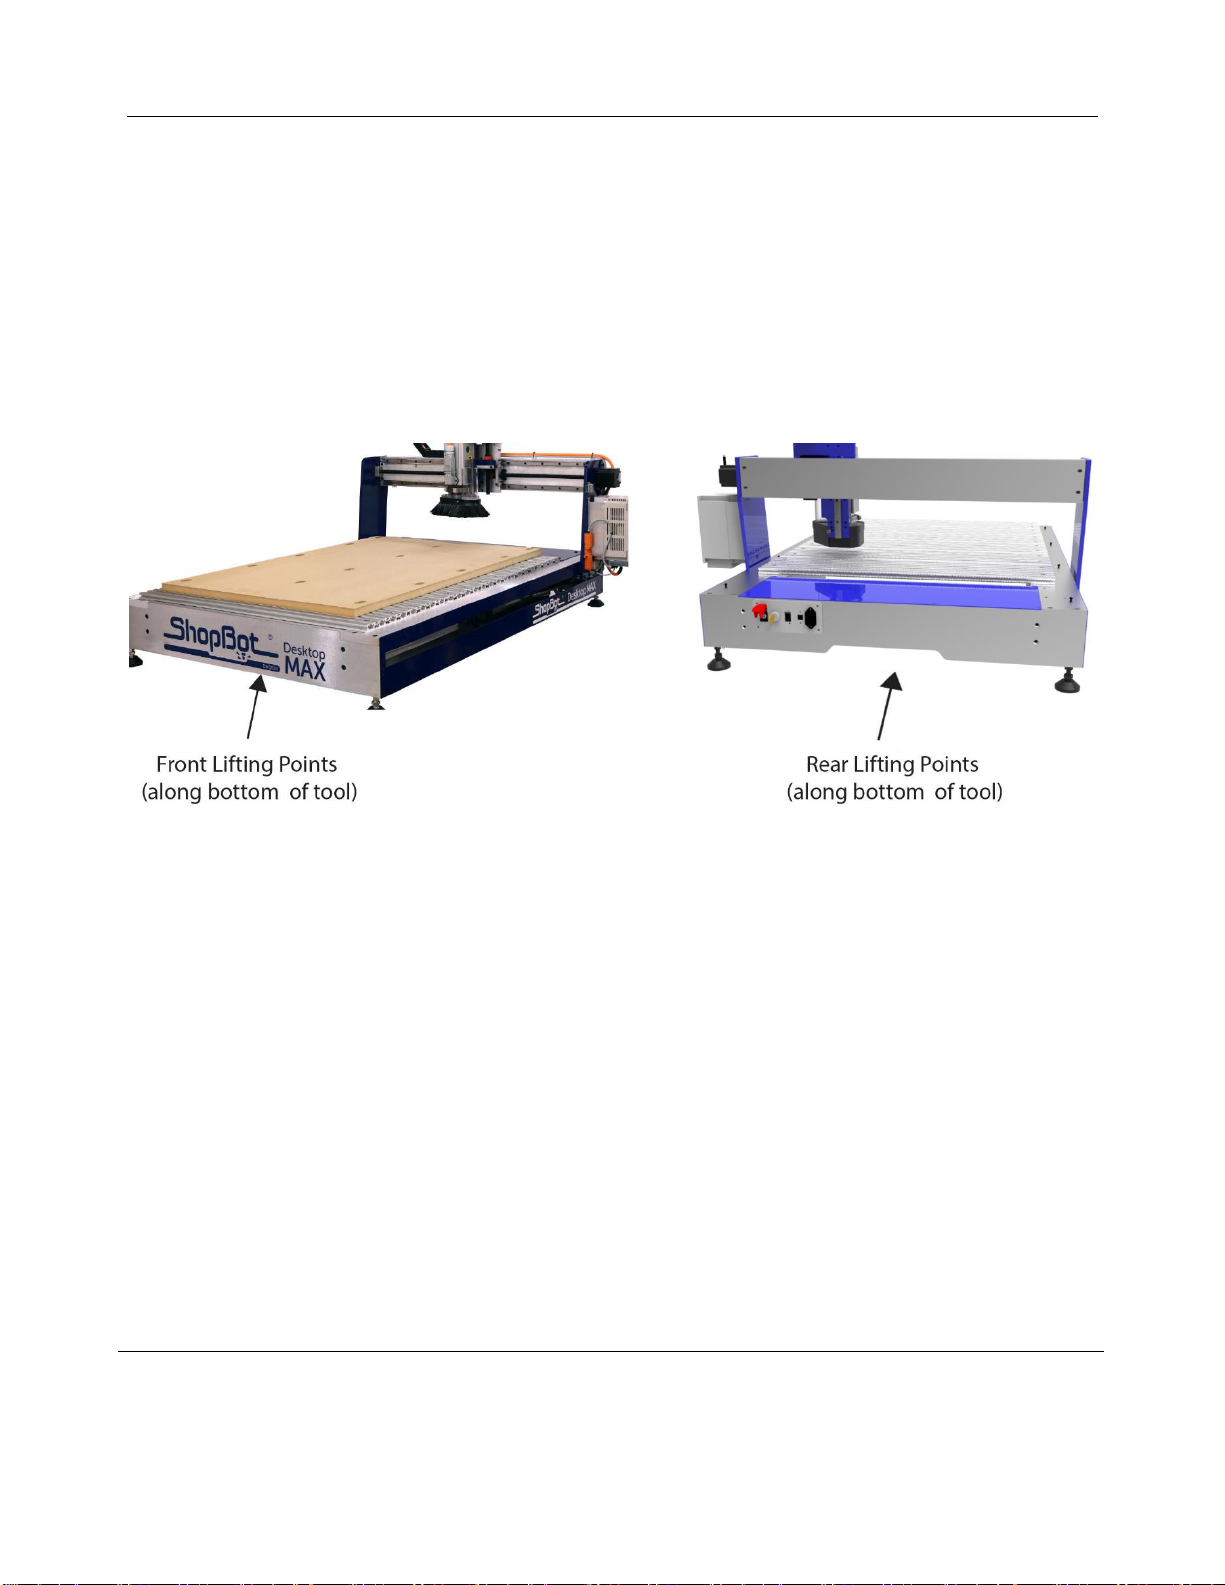
Transportation - This tool can be transported by two people by grabbing from the bottom front and rear
locations.
Desktop Series Quick Start Guide SBG00232
© Copyright Dec. 2021 ShopBot Tools, Inc.
page 6
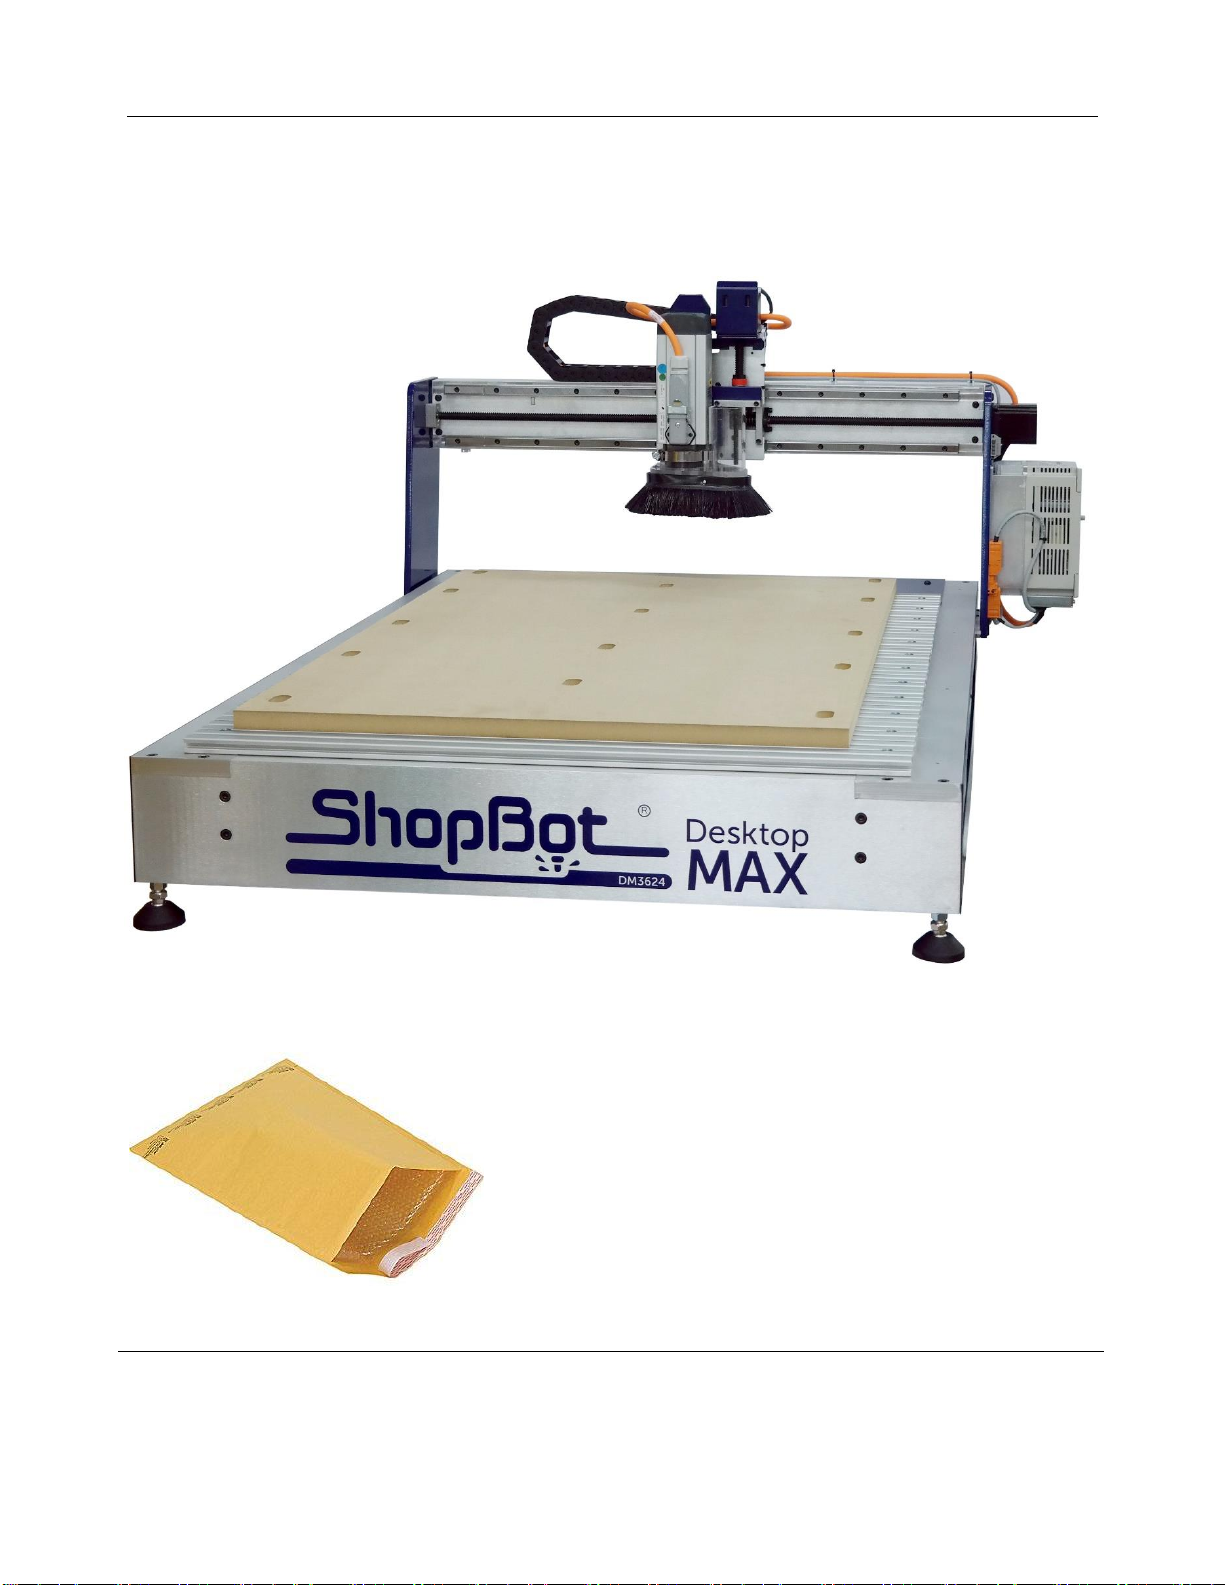
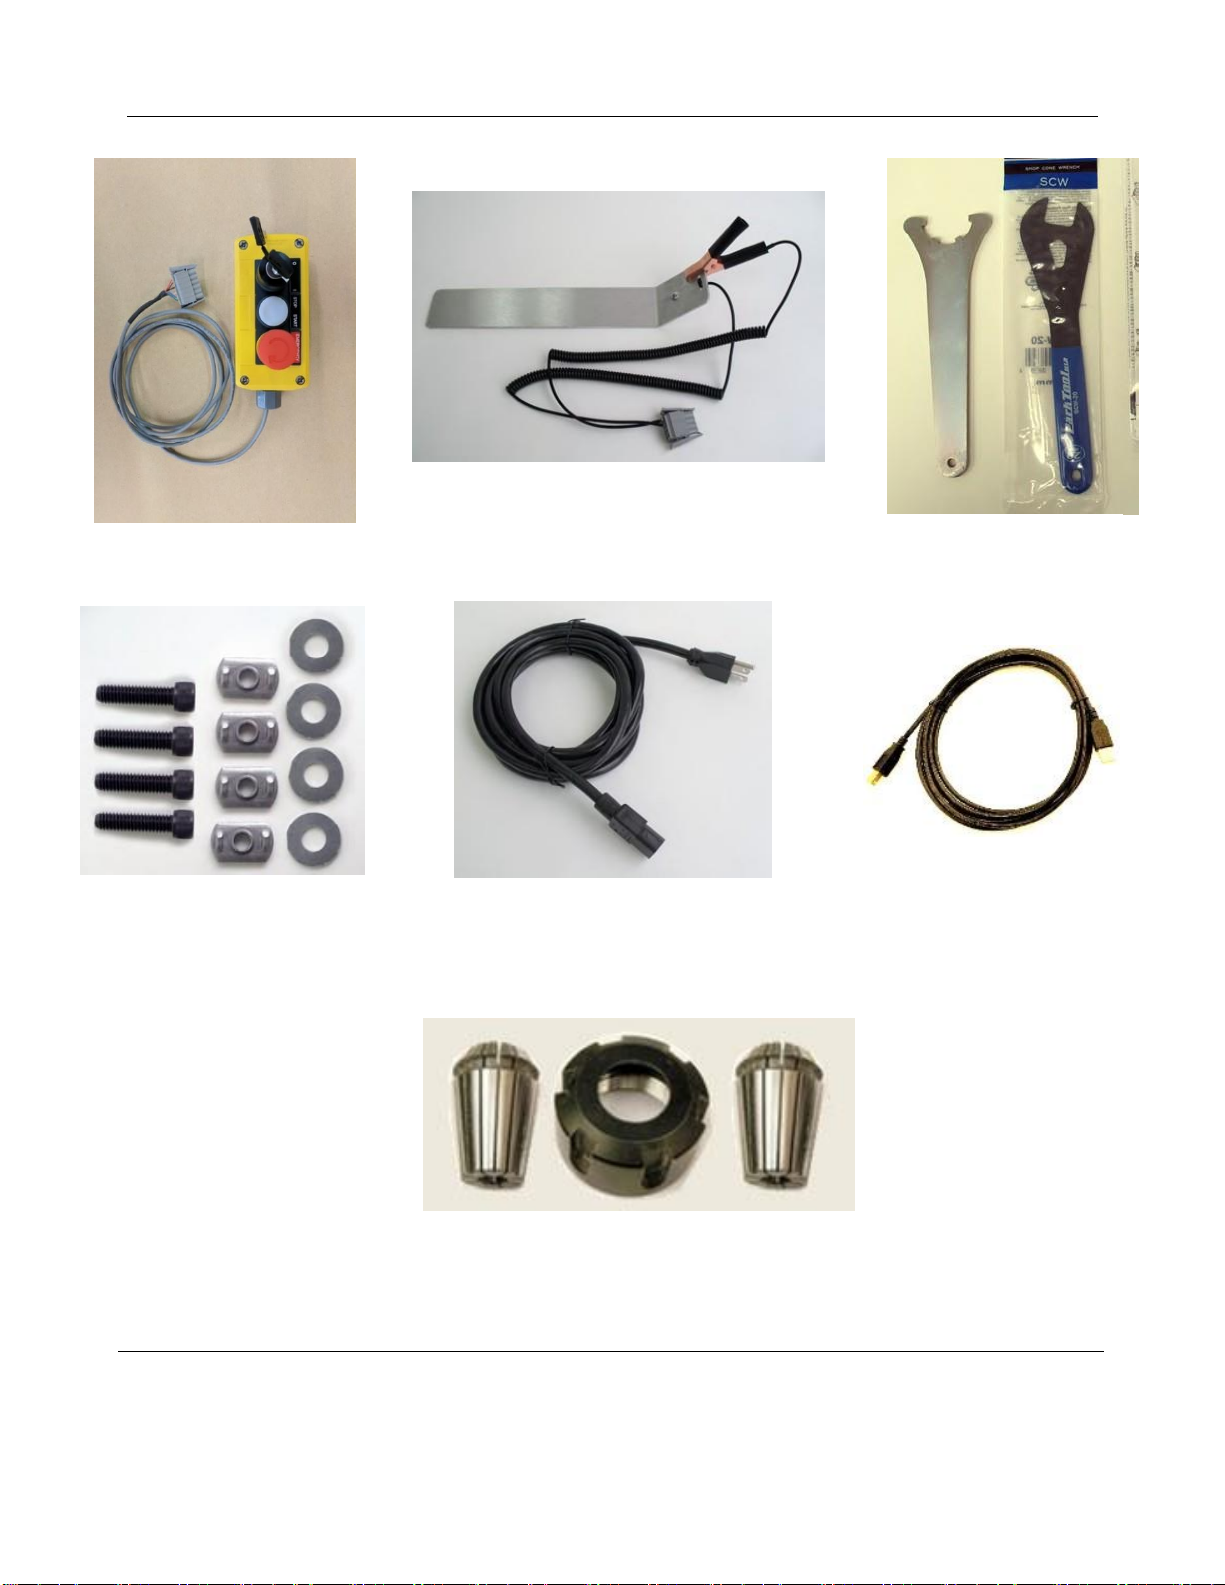
What’s in the Crate?
Desktop Tools
Desktop MAX model shown above with spindle and Variable
Frequency Drive (VFD) speed controller.
Manilla Envelope, which includes:
Desktop Quick Start Guide
Desktop Enclosure Document (if applicable)
Accessory Documents (if applicable)
Thumb Drive with Software
Desktop Series Quick Start Guide SBG00232
© Copyright Dec. 2021 ShopBot Tools, Inc.
page 7
Pendant
¼” & ½” Spindle Collet Sets
Collet Wrenches
Hold Down Hardware
Power Cord
USB Cable
Z-Zero Assembly
Desktop Series Quick Start Guide SBG00232
© Copyright Dec. 2021 ShopBot Tools, Inc.
page 8
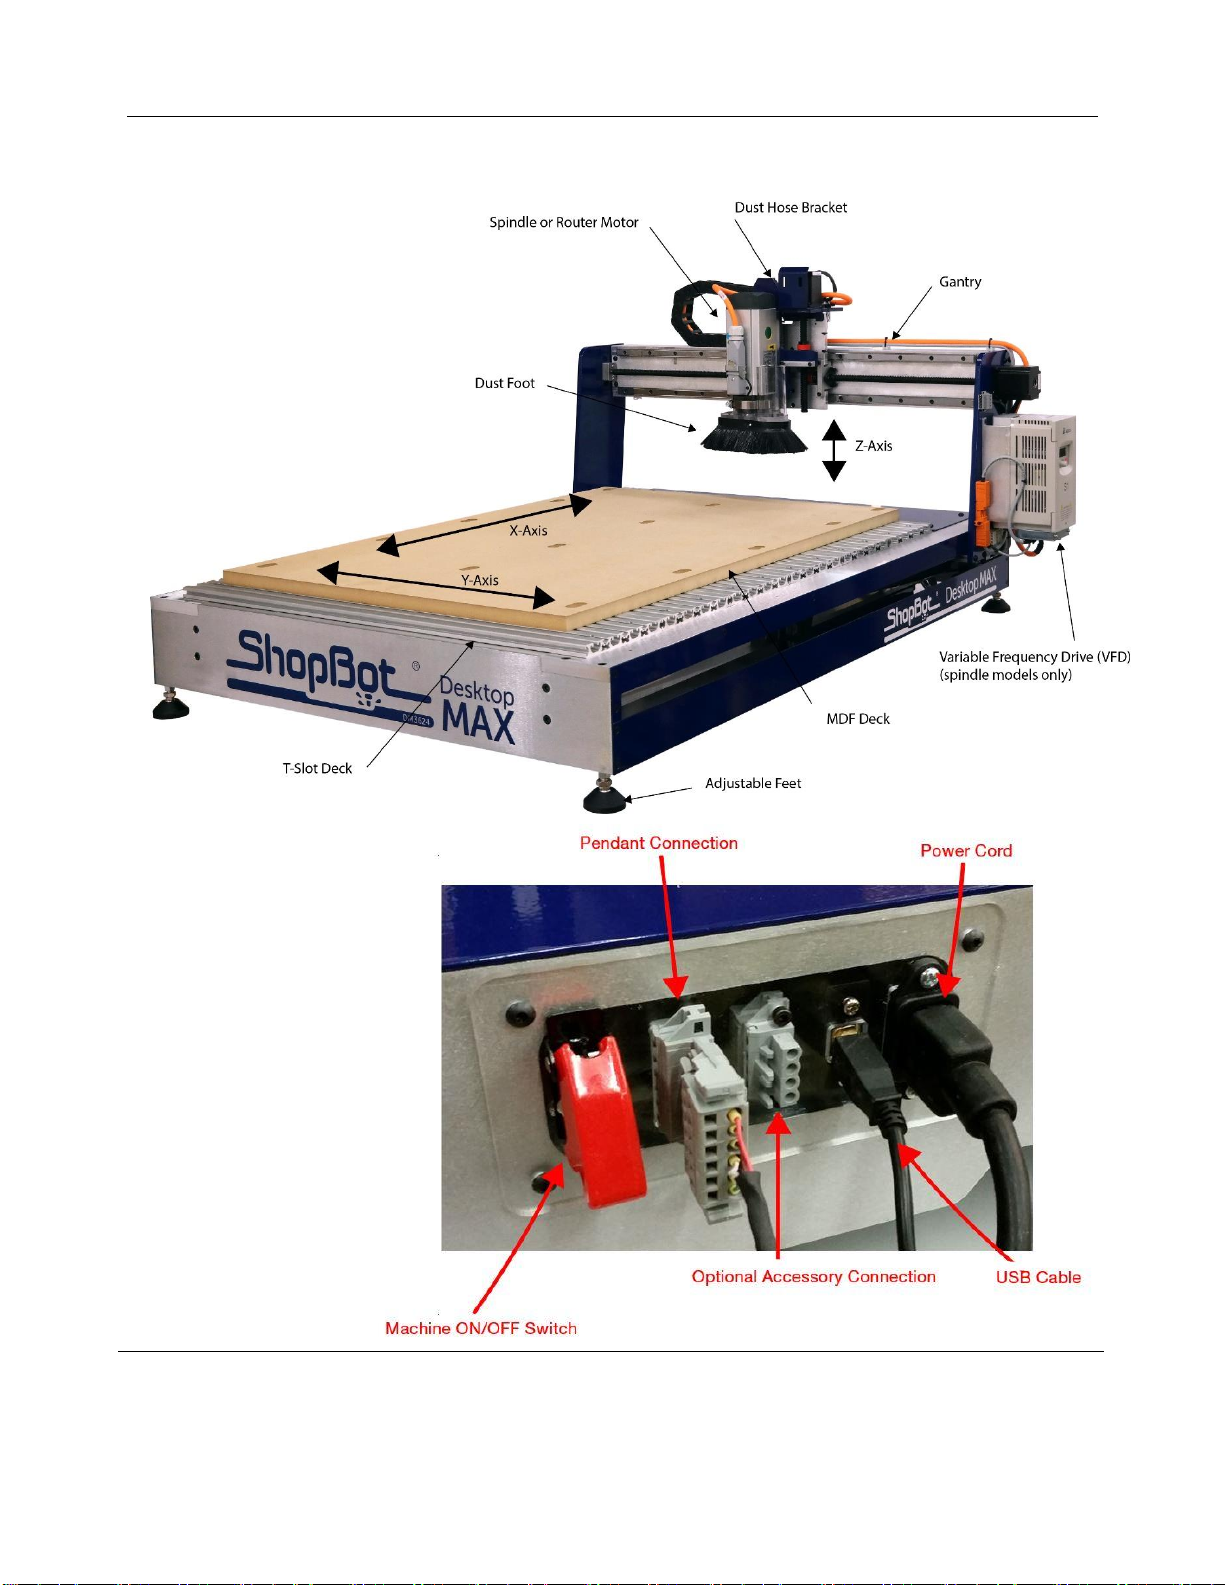
ShopBot
Desktop
Overview (Model
DT MAX 36” x
24” Shown)
Rear Cable Connections
and Power Switch
Desktop Series Quick Start Guide SBG00232
© Copyright Dec. 2021 ShopBot Tools, Inc.
page 9
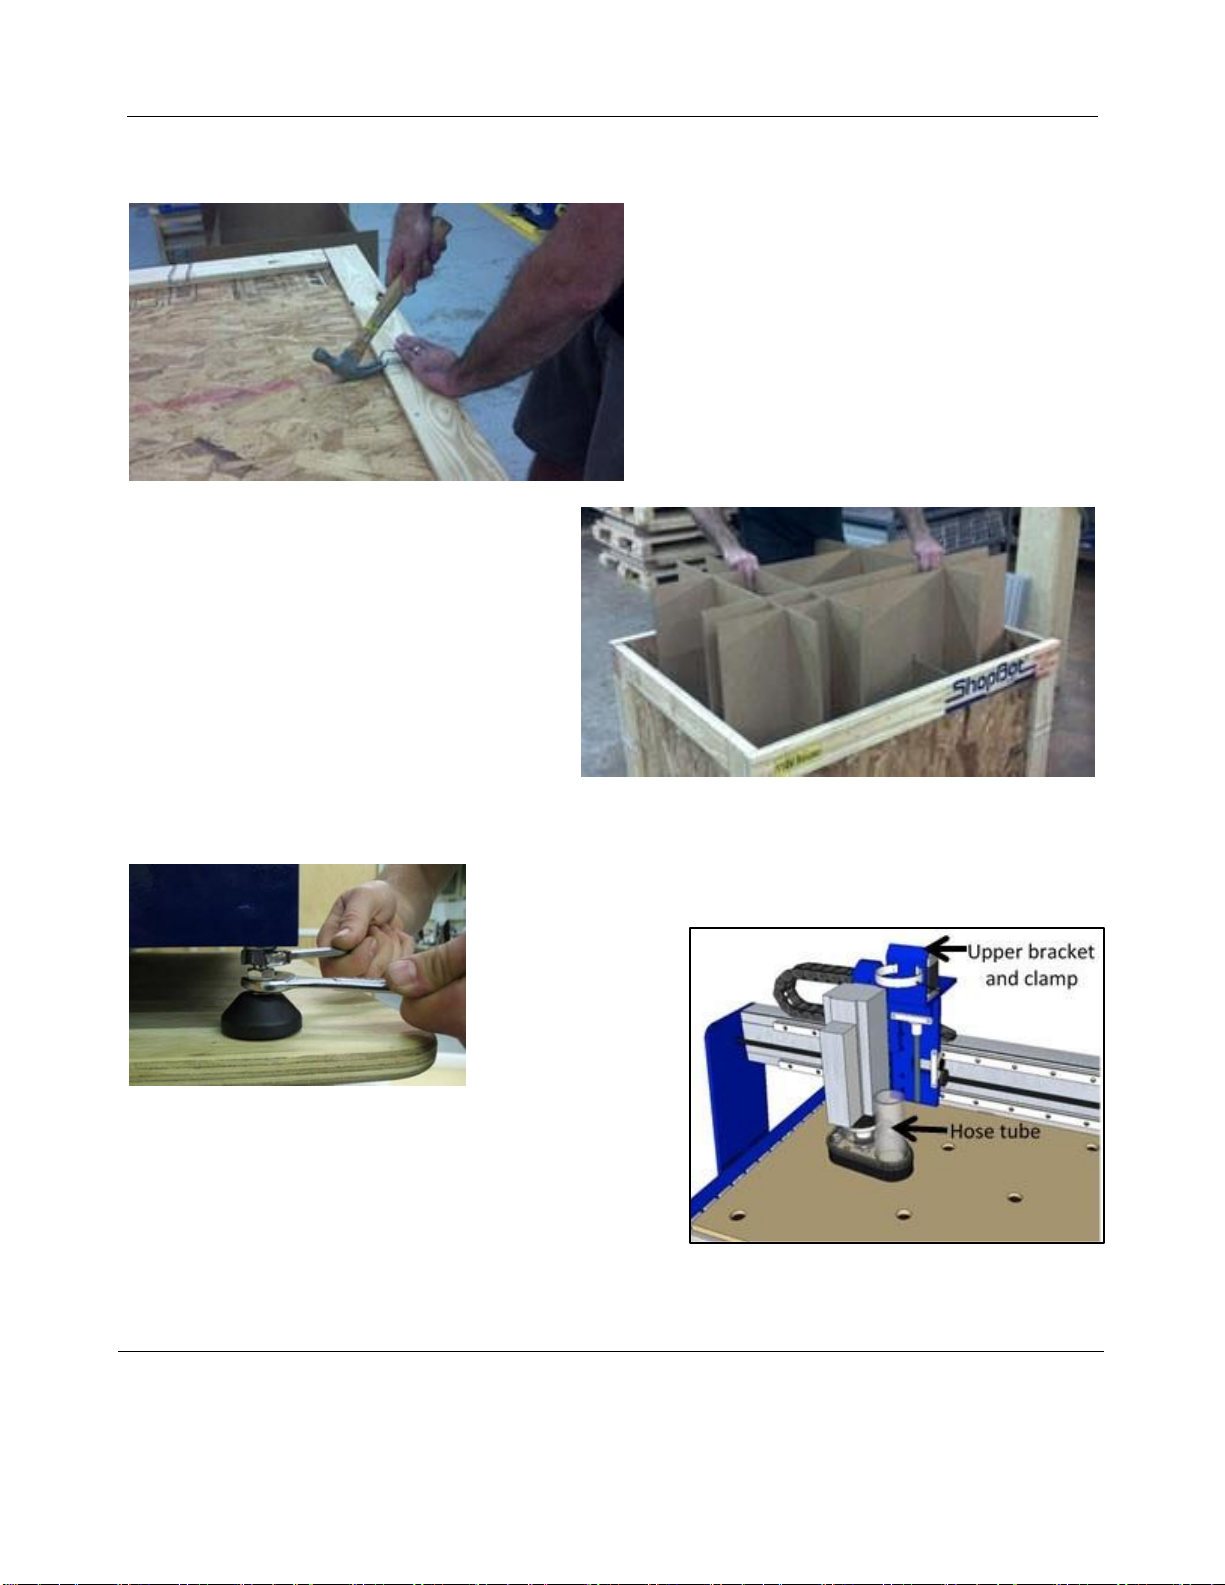
Uncrating
The ShopBot Desktop comes securely crated for
shipping.
Use a claw hammer to remove each of the four
metal clips.
Use caution, clips are under tension and may
spring during removal.
Remove all accessories packed with the Desktop.
Remove packing materials and sides of crate
using a #2 phillips screwdriver and cordless drill.
Lift Desktop onto a sturdy table or bench.
CAUTION!!
The ShopBot Desktop is a substantial tool and
depending on accessories, it can weigh from 150
to 190 lbs. Have AT LEAST one additional
person help lift the tool.
Assemble Parts
Adjustlevelingfeetwith5/8” wrenchsothetooldoesn’t rock - then
- use9/16” wrenchand nuts tolock the leveling feet into position.
If the Desktop is
equipped with a dust
collector, slide the
supplied hose over
the vertical hose
tube and attach hose to the upper bracket with hose clamp.
Note: The bottom of hose should not be clamped so it can
freely slide up and down on the tube during operation.
Refer to Desktop Dust Collection Setup Manual in the
Desktop section of ShopBot Docs at www.shopbottools.com
if you are planning on using dust collection.

Desktop Series Quick Start Guide SBG00232
© Copyright Dec. 2021 ShopBot Tools, Inc.
page 10
Refer to the Mini Enclosure document to install the enclosure if applicable.
Desktop Series Quick Start Guide SBG00232
© Copyright Dec. 2021 ShopBot Tools, Inc.
page 11
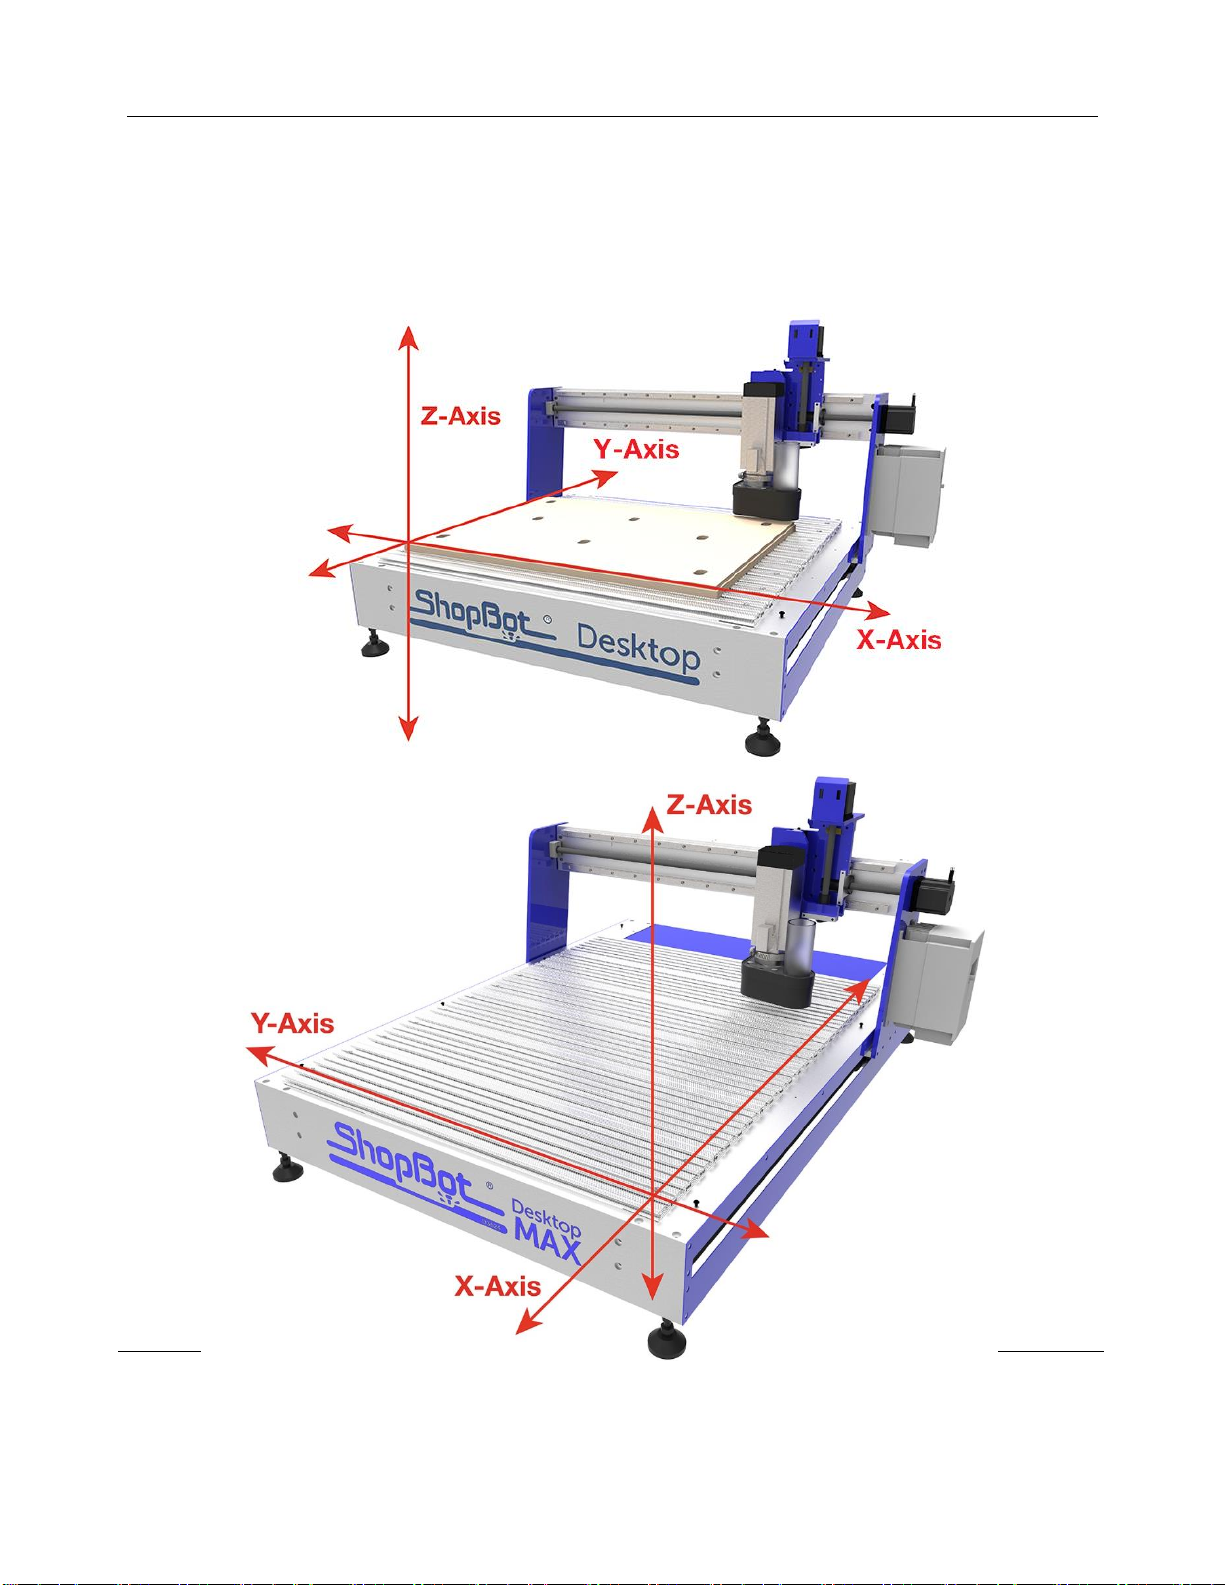
Tool Orientation and Direction of Axes
The pictures below show the axis orientation for the ShopBot Desktop 24” x 18” and the ShopBot Desktop
MAX 36” x 24.”
Normally, the 0, 0, 0 point is located at the intersection of the three axes as shown, and the “front” side is
noted.
FRONT
FRONT

Desktop Series Quick Start Guide SBG00232
© Copyright Dec. 2021 ShopBot Tools, Inc.
page 12
Video Demonstration
Accompanying documentation and videos can be found throughout ShopBot media. Below are links to the
Desktop Quick Start Series videos. These videos and links to the ShopBot YouTube channel can be found
on the Documentation page of the ShopBot Website, under the Desktop/Desktop MAX heading.
ShopBot Desktop Quick Start Videos and Tutorials:
Playlist for Desktop/MAX Setup Videos (tools shipped from Aug 2017 - current)
https://www.youtube.com/playlist?list=PLf632tVju0dFAcVIv0Z8DrLiqm9Q0V-zC
What’s in the Crate?
https://youtu.be/LG7ZIhAf1xg
Setting up Control Computer
https://www.youtube.com/watch?v=HgsEVSRpJqM&list=PLf632tVju0dEzZ5LnKpb98aaY2HkQMJtj
Installing the Control and Design Software
https://youtu.be/-Pb5YzfZcUY
Powering up and Connecting
https://youtu.be/f5TAtIZHJTE
Beginning Cuts and Operations
https://youtu.be/vscFI13_tOE
Playlist for Desktop Quick Start Videos (tools shipped July 2017 - earlier)
https://www.youtube.com/playlist?list=PLf632tVju0dHQph6LOtw0HHpaTiaNMpKn

Desktop Series Quick Start Guide SBG00232
© Copyright Dec. 2021 ShopBot Tools, Inc.
page 13
Software and Computer Configuration
Before Continuing! - Refer to the Control Computer Setup Videos - or - the Uninstalling and Reinstalling
ShopBot and VCarve Software document for software installation and software and computer configuration.
Plug in Pendant and Connect Power
Plug the pendant into the connector on the tool located in
the rear (on Desktop tools) or right side (Desktop MAX
tools).
The pendant has three functions:
1) A keyed interlock switch to cut power to the router or
spindle. The machine can still be moved with the interlock
turned off, but the cutting head will not be able to spin.
2) A start/stop button. For non-emergencies, simply hit the
space bar on the computer keyboard or the start/stop button
on the pendant. This will pause the tool while maintaining
XYZ coordinates, allowing the cut file to resume without
starting over.
3) An emergency stop switch. Pressing the emergency stop is the same as turning off the main power
switch. The tool will immediately stop moving and the cutter will turn off. Machine position WILL be lost
during an emergency stop. To release the emergency stop on the pendant, turn the red button clockwise
until it releases and pops up.
The presence of an emergency stop switch does
not alter the need for good safety procedures while
operating the ShopBot tool.
Also note that if the pendant is not plugged into the
machine, the machine will not power on. If the
pendant comes unplugged, the emergency stop
will automatically trigger and the machine will shut
down.
Install
power cord into back of the tool.
Desktop Series Quick Start Guide SBG00232
© Copyright Dec. 2021 ShopBot Tools, Inc.
page 14
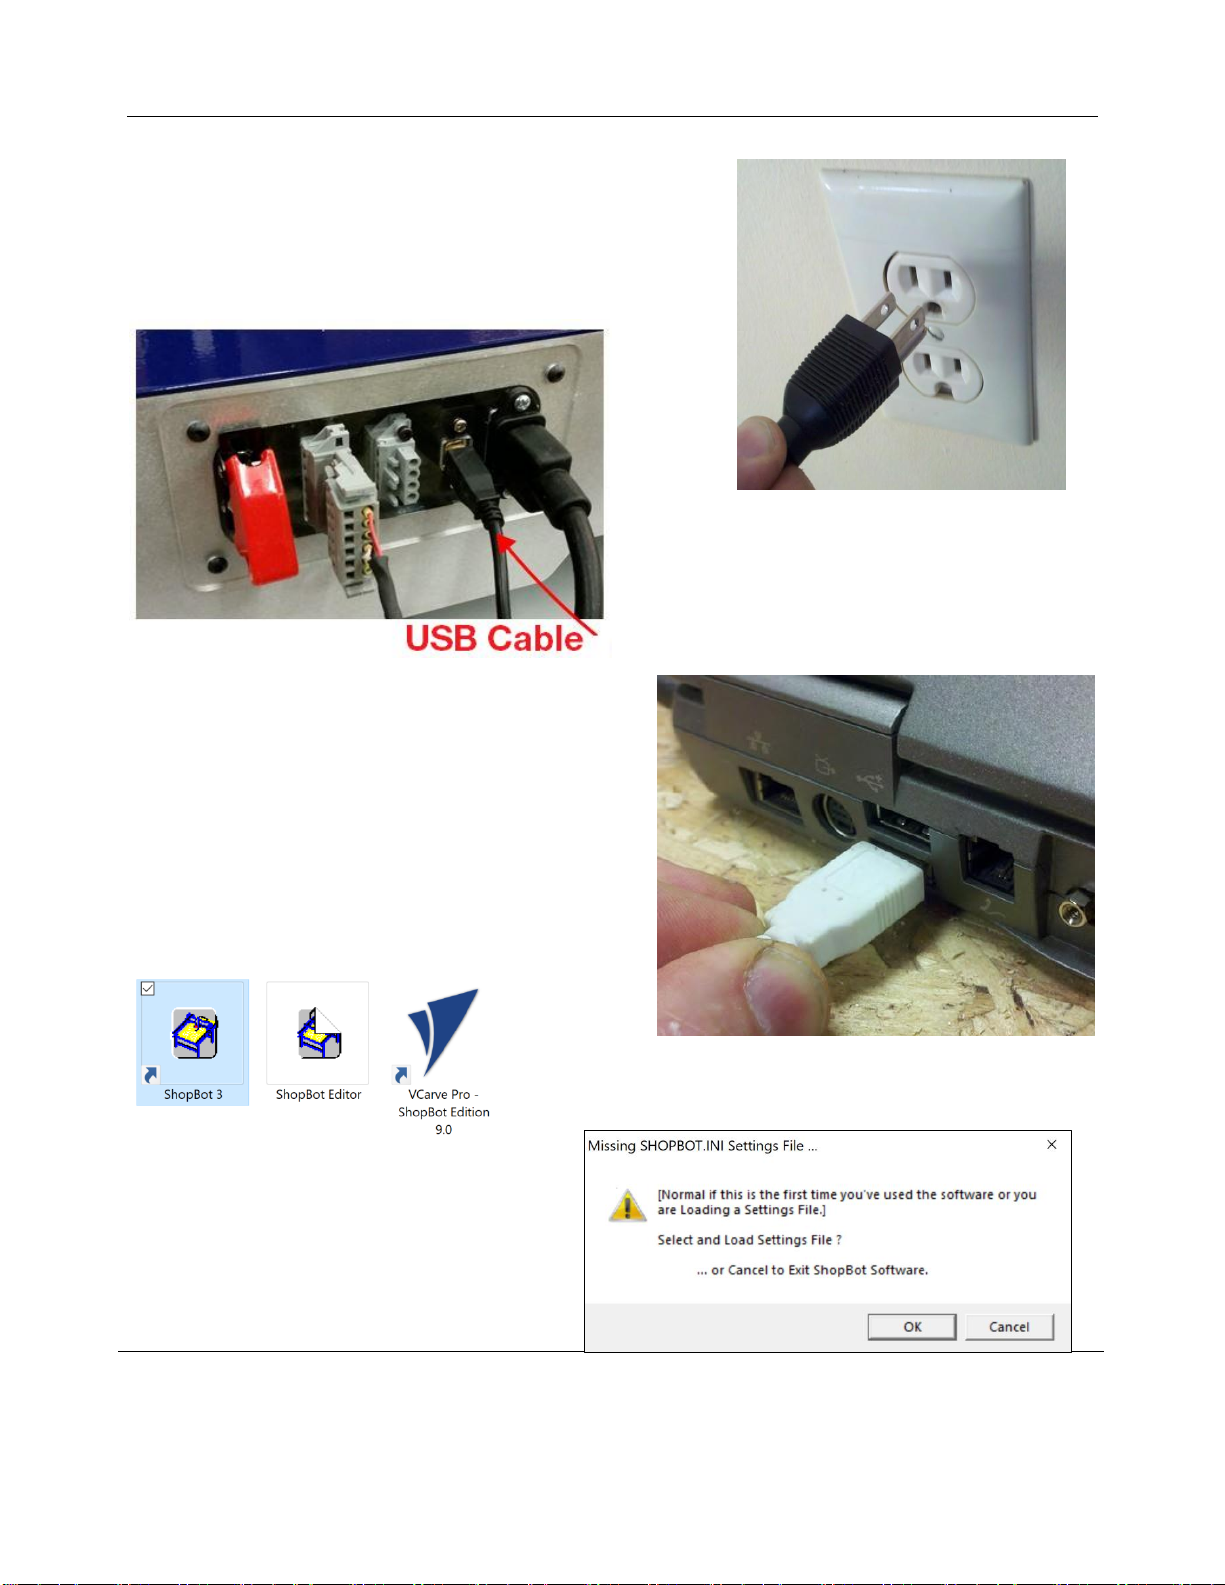
Plug the power cord into a standard 110 volt 15 amp receptacle.
(International tools 220v)
Note: Do not use a ground fault circuit interrupter. (GFCI)
Install USB Cable into the back side of the machine.
Connect USB cable to computer and Windows will
recognize a “New Device.”
Note: Ensure the port is a USB 2.0 port. It is best to use
the same USB port every time the ShopBot is attached to
the computer.
Launch Software
Right-click the ShopBot 3 icon and select Run as Administrator
to open the machine’s control program for the first time.
The first time the program is opened, there will
not be a settings file for the machine. Click “OK”
and a prompt will appear to load a settings file
for the machine.
Desktop Series Quick Start Guide SBG00232
© Copyright Dec. 2021 ShopBot Tools, Inc.
page 15
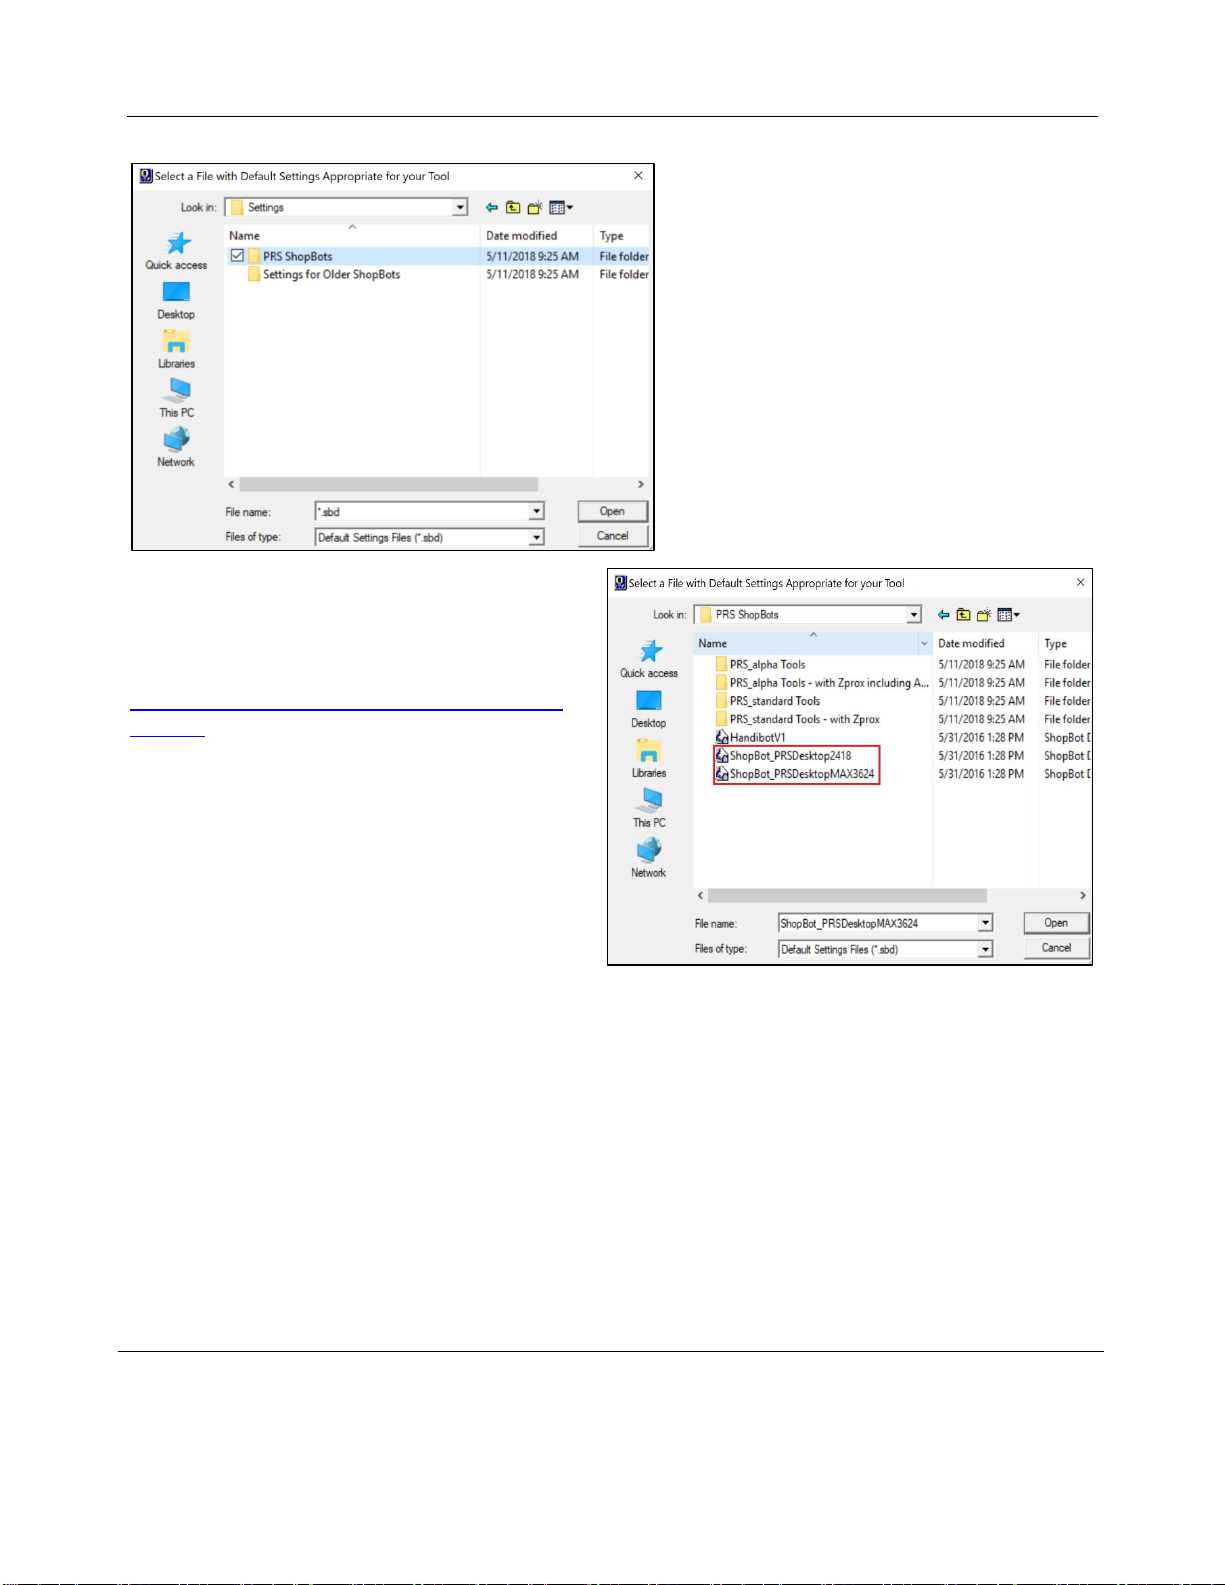
Access the PRS ShopBots folder and Open it.
Find the Desktop Settings file,
“ShopBot_PRSDesktop2418.sbd” or
“ShopBot_PRSDesktopMAX3624.sbd”
depending on your model.
Note: If this file is not available, it can be found on
the ShopBot website under the Control Software
heading, or at:
https://support.shopbottools.com/support/control-
software
Save the file to a thumb drive for future reference
Desktop Series Quick Start Guide SBG00232
© Copyright Dec. 2021 ShopBot Tools, Inc.
page 16
Setup Home Position and Square the Machine
The Desktop tools are somewhat unique among the ShopBot tool lineup in that they do not use the default
home position indicated by the SB3 software. Upon loading the Desktop tool profile the home location should
be correct. However, if it is not for any reason, the following procedure will change the home position to be at
the corner of the MDF spoil board that was installed at the factory.
The second procedure will square the gantry of the machine by crashing it against the hard stops. Because
the gantry is driven by one motor on each side, it is possible for the motors to come out of sync. This can
happen if the machine is moved with the power off (like during shipping), or if the machine were to hit
something unintended and lose position.
The squaring part of the procedure will produce a loud “grinding” sound, as the stepper motors are stalling
out. This does not, however, harm the motors in any way.
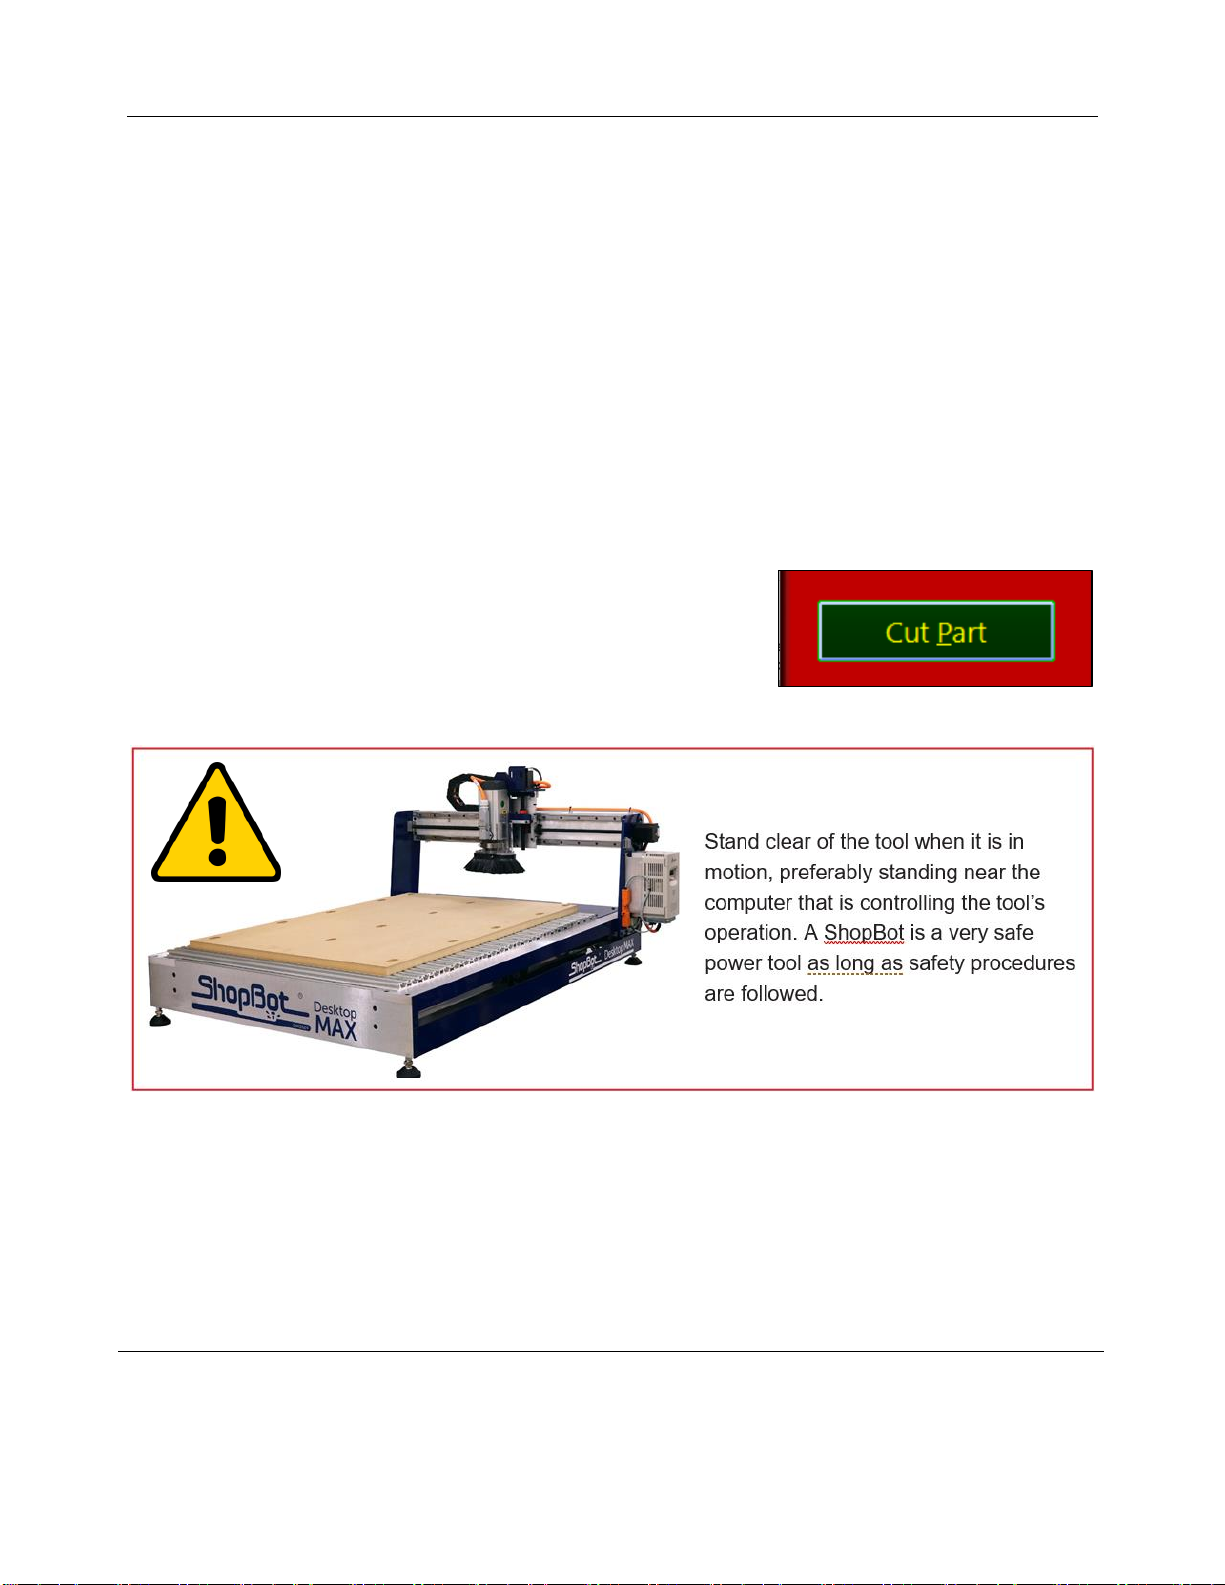
In the SB3 software, click the “Cut Part” button at the bottom of the
window.
Desktop Series Quick Start Guide SBG00232
© Copyright Dec. 2021 ShopBot Tools, Inc.
page 17
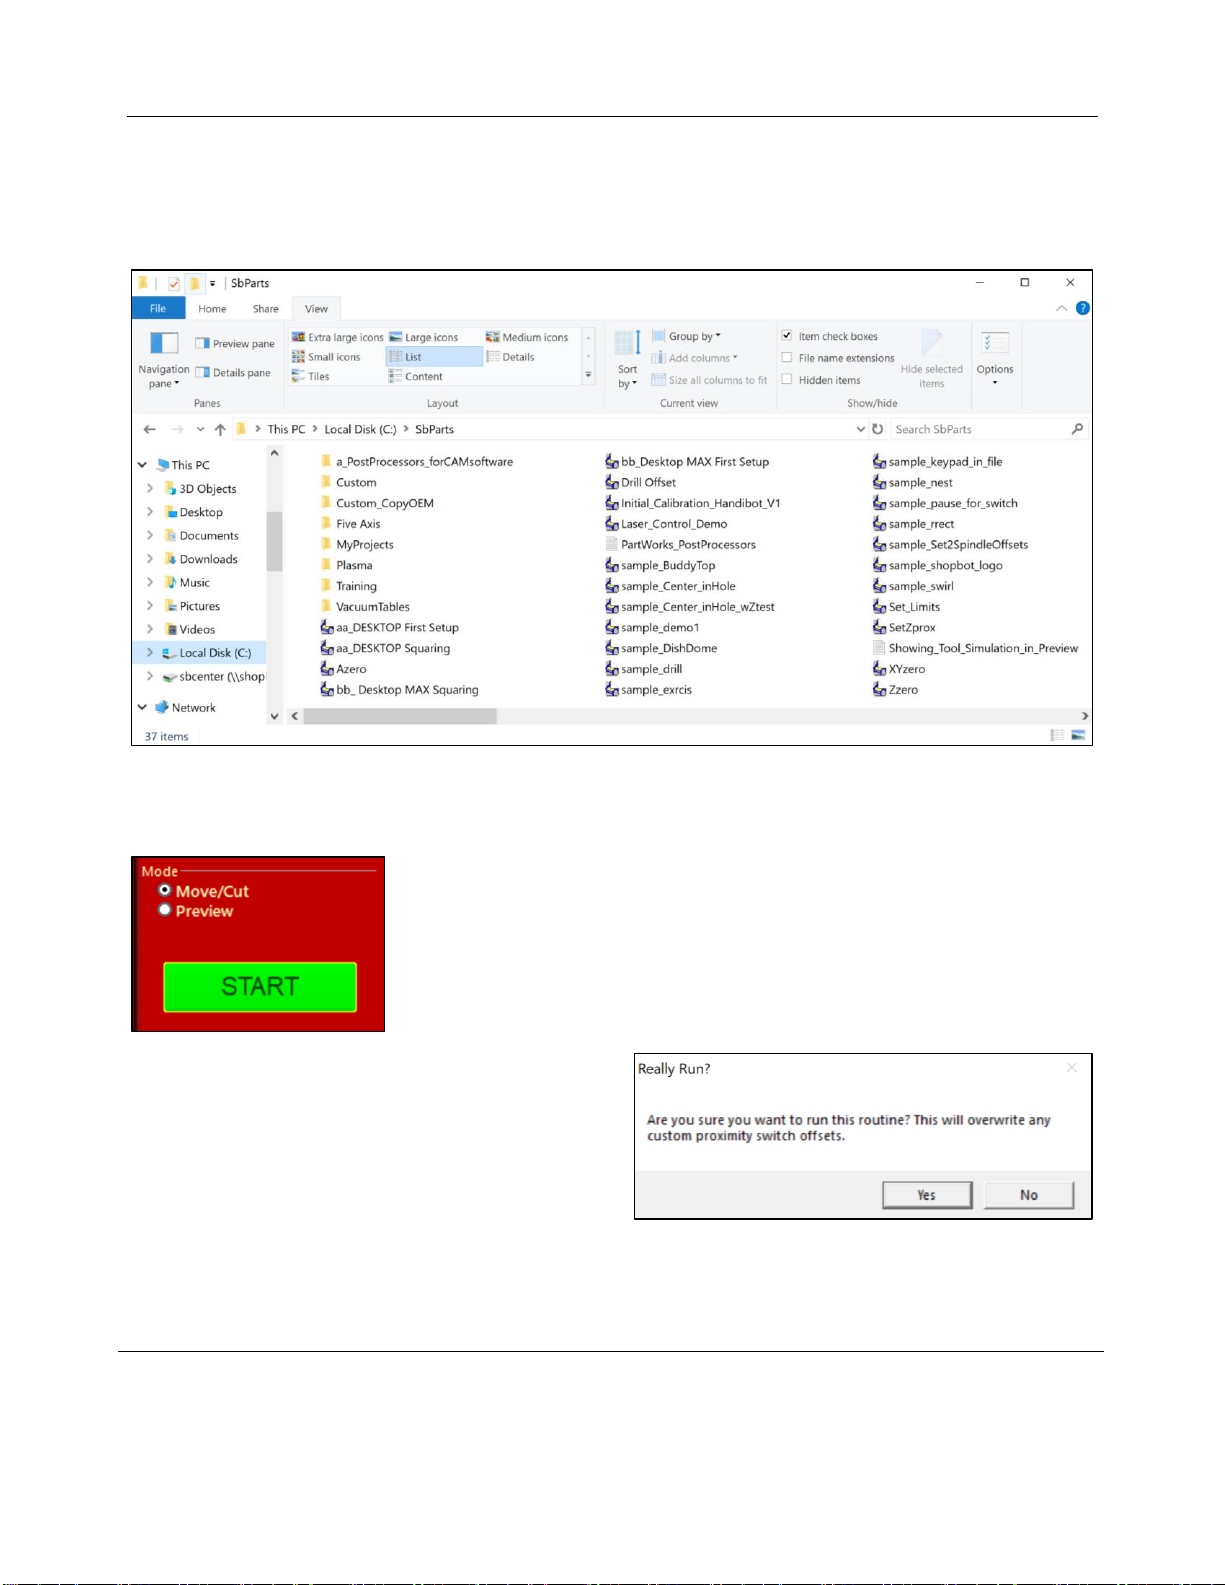
A file browser window will now pop up. Navigate to C:\SBParts\
This folder can found by going to the “Computer” file location, then open the “C:” drive or main disc found
under “Devices and Drives,” there the SBParts folder should be found. The folder should look like the figure
shown:
Select either the file named “aa_DESKTOP First Setup” if you have a
Desktop or “bb_Desktop MAX First Setup” if you have a MAX and then click
the Open button.
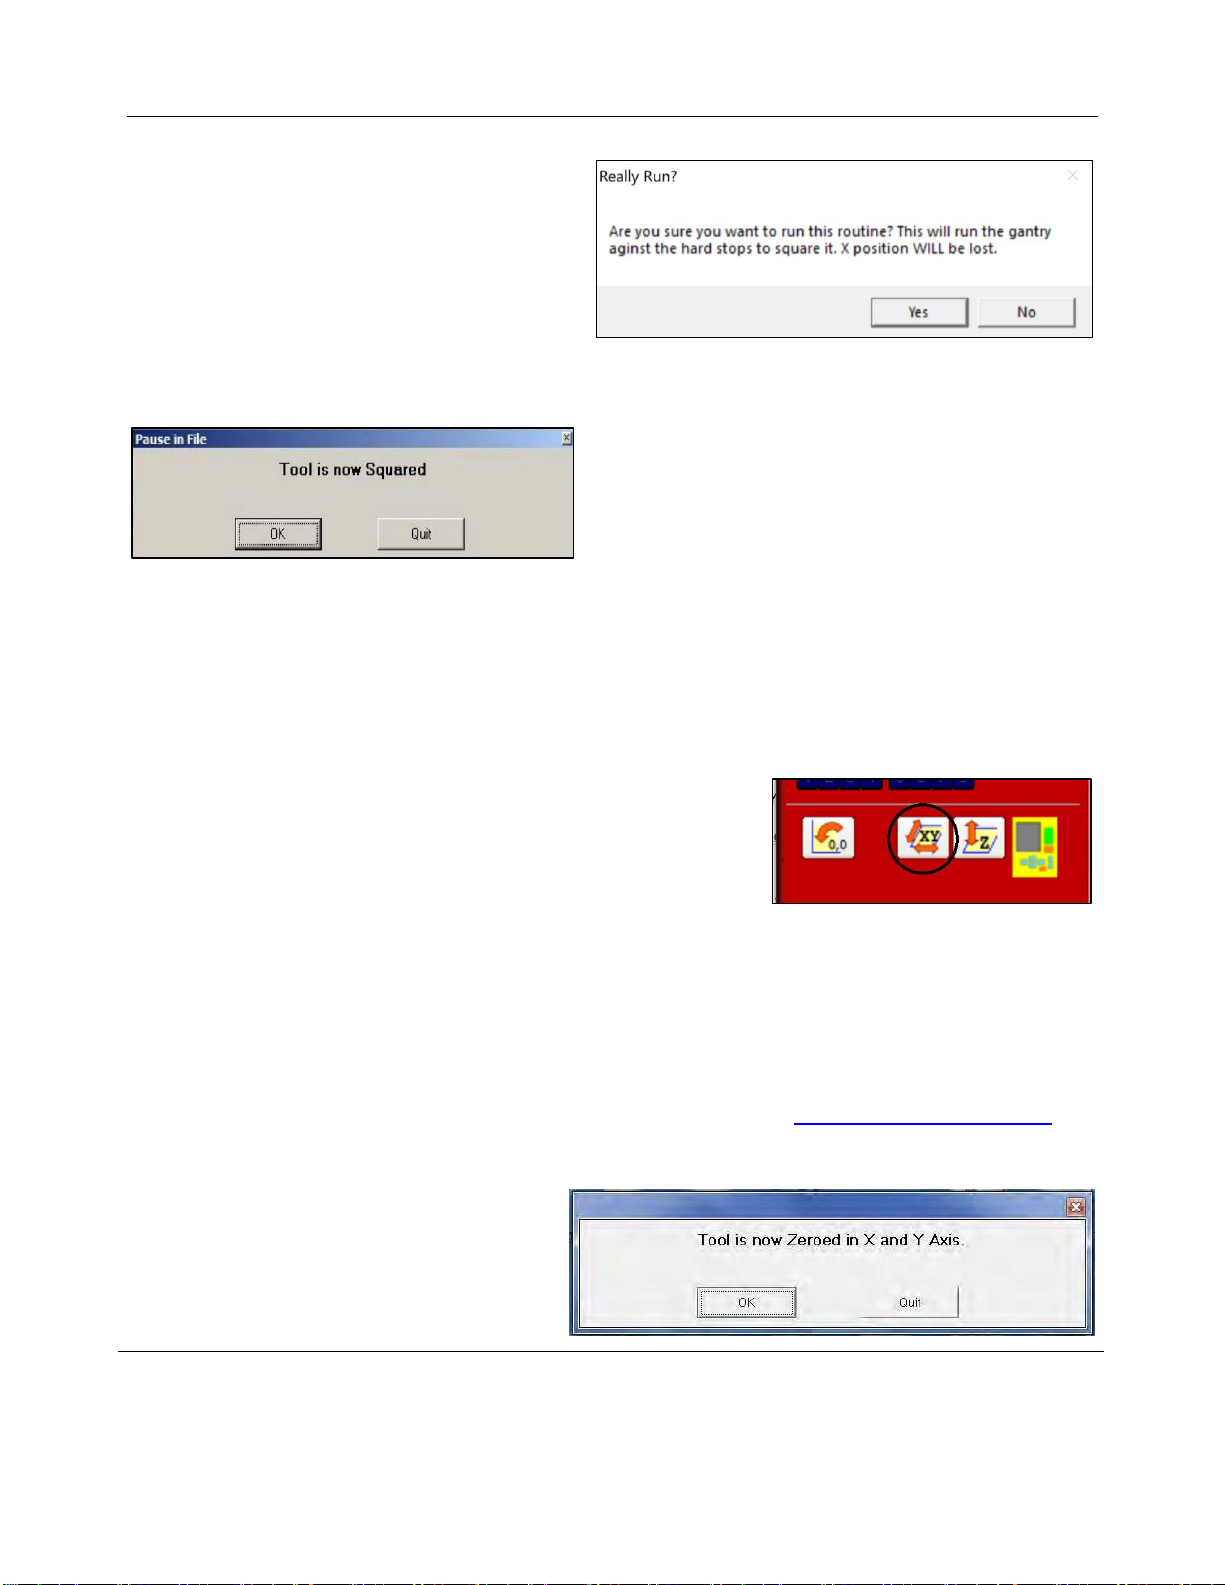
Now press the “START” button.
When prompted, click “Yes” to run routine. The
program does not visibly do anything, but it will change
your proximity switch offset variables for cutting the
rabbet into your spoil board in a later step.
Press “Cut Part” again.

Desktop Series Quick Start Guide SBG00232
© Copyright Dec. 2021 ShopBot Tools, Inc.
page 18
Locate and Open “aa_DESKTOP Squaring” or “bb_Desktop MAX Squaring” file in the SBParts folder.
Then click START to run the squaring routine.
Desktop Series Quick Start Guide SBG00232
© Copyright Dec. 2021 ShopBot Tools, Inc.
page 19
When prompted, click “Yes” to run the routine.
IMPORTANT! This procedure should be performed
any time the machine is crashed, after the gantry is
moved by hand with the power turned off, or after the
machine is moved to ensure that the gantry is square. If
this process is not performed, the cut program could be
noticeably off.
Zero the X- and Y-axes
Note: Ensure the setup and squaring process has been run prior to performing this step!
The cutting head now needs to be in the lower left (front) corner of the deck (X=0, Y=0 position).
As an 1/8” rabbet is being cut into the spoil board around the whole edge, the 0,0 location will be 1/8” from
the home corner.
Click the white button marked with the “XY.” Or select the [C]uts-
>C[3] Home XY Axes Using Prox Switches function from the
dropdown menu.
The machine will now move through an automatic routine that zeroes the X- and Y-axes to the lower left
(front) corner of the machine using the proximity switches.
Once the routine finishes, the X and Y locations in the position window should now read .000 units. The
physical location of the cutting head should be 1/8” in from the corner of the board, ready for the rabbet cut.
If the location is not correct, refer first to the video tutorial for steps on setting up the home location before
cutting the rabbet file: “Desktop Series – Beginning Cuts and Operations” - https://youtu.be/vscFI13_tOE.
Click OK on the “Tool is now Zeroed” message.
Desktop Series Quick Start Guide SBG00232
© Copyright Dec. 2021 ShopBot Tools, Inc.
page 20
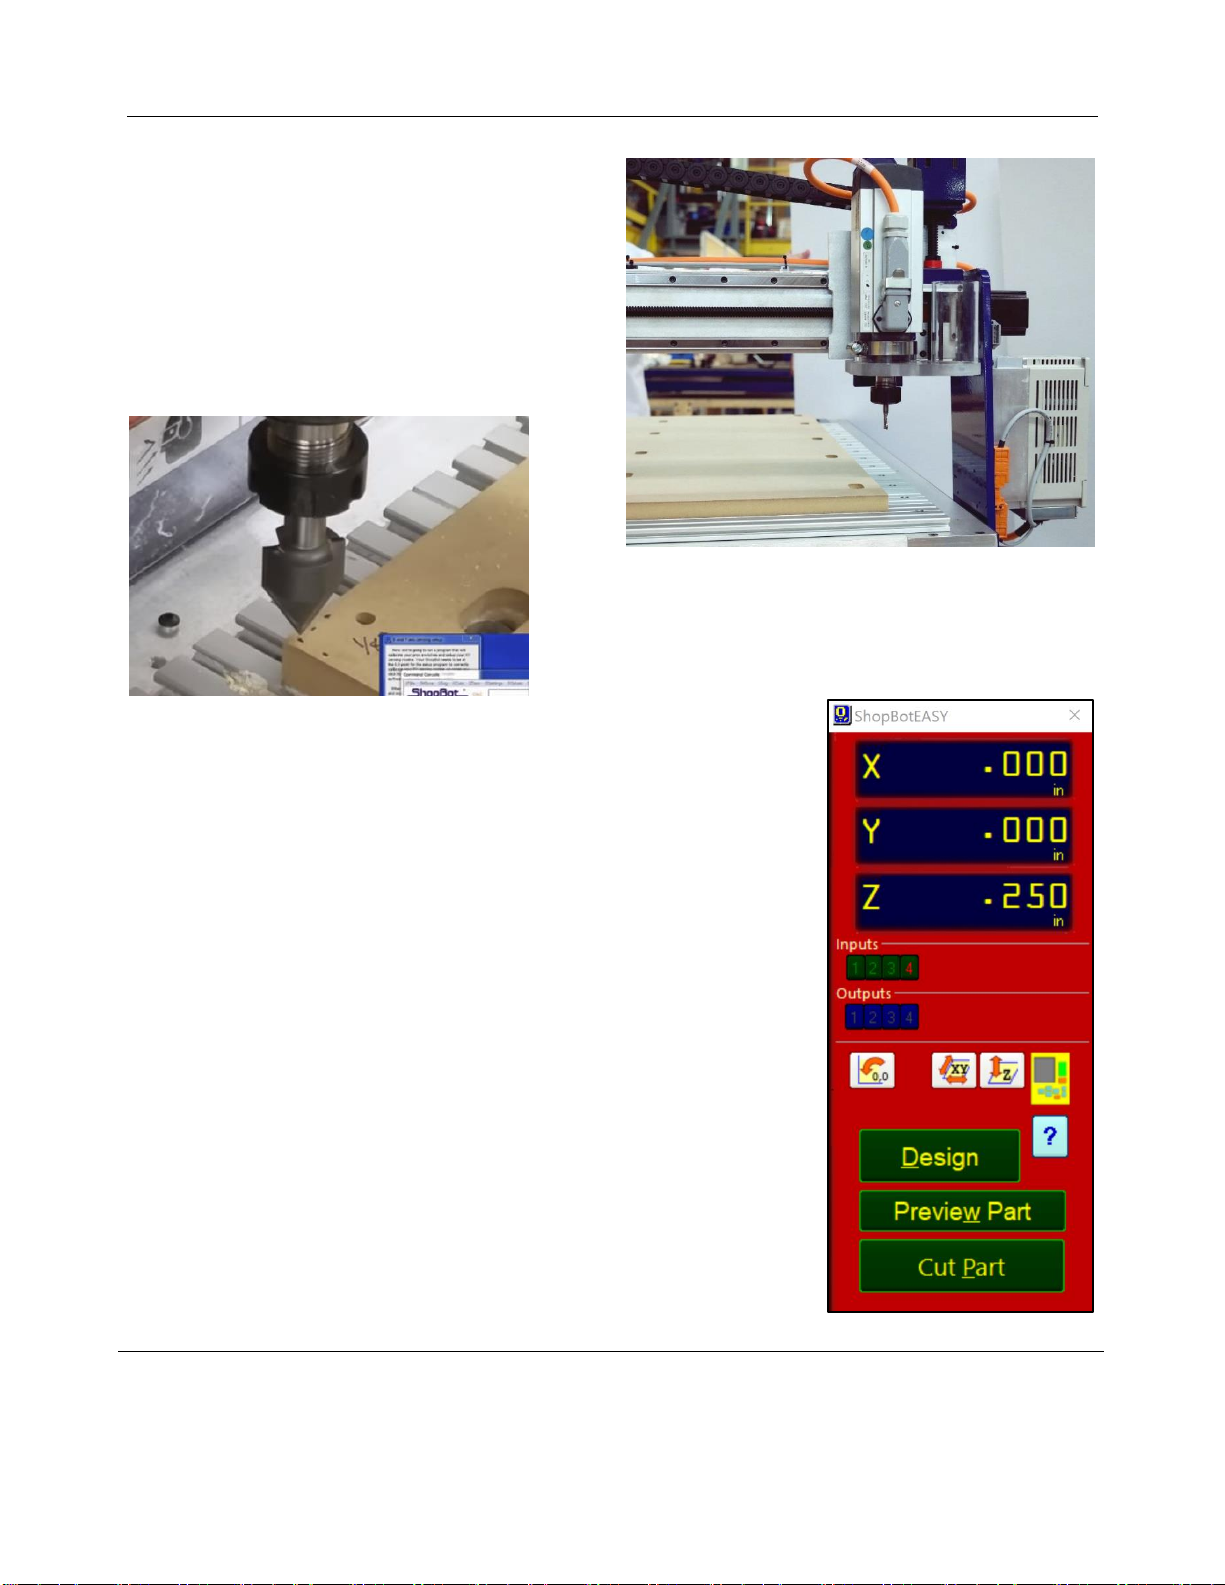
The cutting head should now be in the front corner of
the deck.
The picture to the right shows a Desktop MAX at the
home position while standing at the left end of the
tool.
Below is a close up picture of the cutting head at the
1/8” from the corner mark on a Desktop.
.
Tool Movement
The Position Window
This red panel provides essential machine information and controls. The
following steps will walk through the most frequently used controls and steps
to get up and running, this includes: installing a bit, zeroing the machines X-,
Y-, and Z- axes, and cutting.
Click on the yellow button to bring up the “KeyPad” panel.
This manual suits for next models
1
Table of contents
Other ShopBot Industrial Equipment manuals


Popular Industrial Equipment manuals by other brands

Reversomatic
Reversomatic RHRV-C100PECM Operation instructions

Polyprint
Polyprint PreTreater Pro Operation manual

Ingersoll-Rand
Ingersoll-Rand SHOCK BLOCKER Operator's manual

Jegs
Jegs 81568 Series installation instructions

Emerson
Emerson Penberthy Installation, operation and maintenance instructions

Ashland
Ashland FlexExtend Operator's manual


HP
HP 81200 installation guide

Siemens
Siemens 3VF9721-1 10 Series operating instructions

Eaton
Eaton Bussmann Series manual

Armstrong
Armstrong 3760 ProDoseVDG 2HP Installation and operating instructions

Dixon
Dixon Bayco DBC Series Maintenance and operating instructions

Cassese
Cassese CS1 UNI user & parts manual