Shott SHP 3500 User manual
SHP 3500
SHP 5000
SHP 6500
SHP 9000
Nome file:
1.0134 - ISTRUZIONI NEUTRE SHP 6 LINGUE.docx Rev. 7 del 12/06/2013
Pagina/Page 1- di/of 24
MANUALE UTENTE
ISTRUCTION MANUAL
GUĺA DEL USUARIO
GUIDE DE L’UTILISATEUR
BENUTZERHANDBUCH
ИНСТРУКЦИЯ ПО ЭКСПЛУАТАЦИИ

I T A L I A N O
Nome file:
1.0134 - ISTRUZIONI NEUTRE SHP 6 LINGUE.docx Rev. 7 del 12/06/2013
Pagina/Page 2- di/of 24
1.
DESCRIZIONE DEL PRODOTTO E CAMPO DI APPLICAZIONE.
La SHP è una pompa centrifuga a trascinamento magnetico, azionata da un motore sincrono a tenuta stagna ed è
quanto di più avanzato esiste nel mercato delle piccole pompe. Potente e affidabile trova impiego nei bacini d’acqua
domestici per il pompaggio dell’acqua pulita e torbida contenente particelle solide di dimensioni fino a 7 [mm].
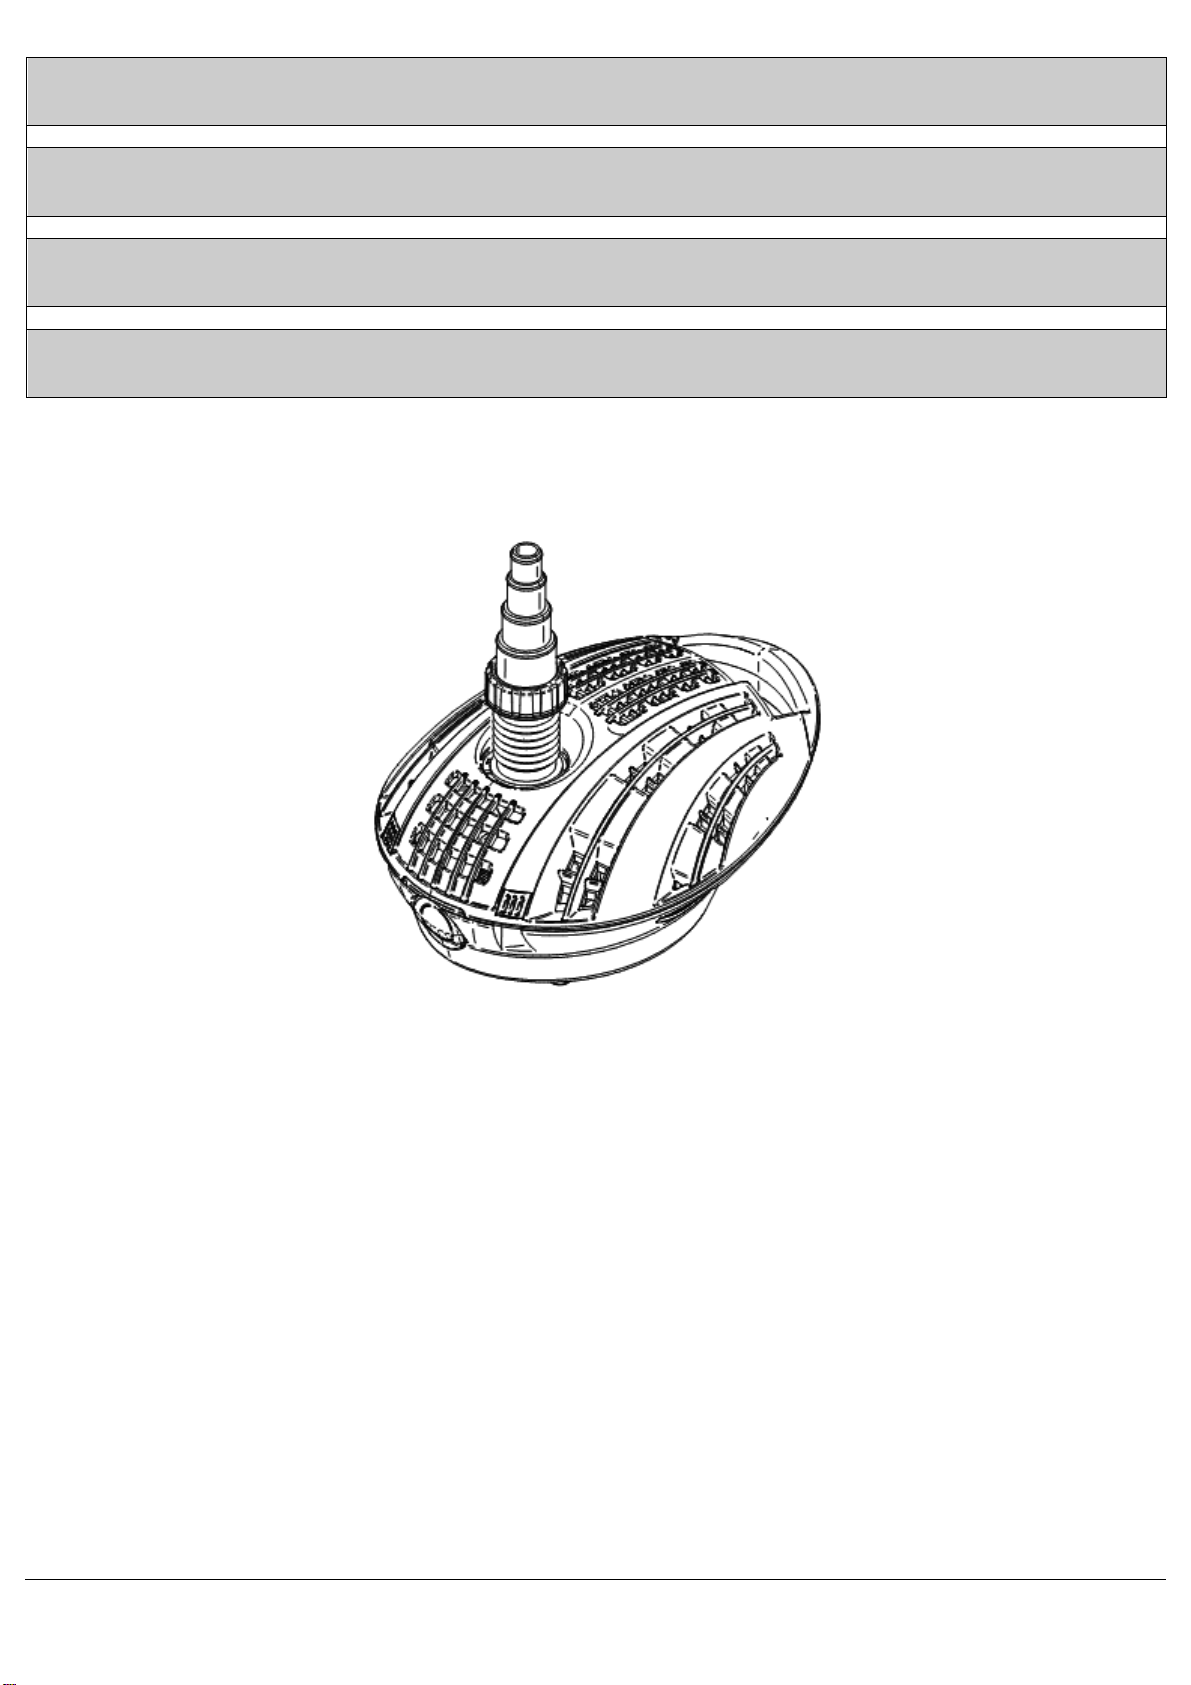
La SHP è dotata del rivoluzionario portagomma orientabile E.T.O. che permette di posizionare la pompa sul fondo
dello stagno nei più svariati modi senza mai compromettere la funzionalità del prodotto.
Nelle successive sezioni troverete tutte le indicazioni necessarie affinché possiate adattare al meglio la pompa
secondo le vostre esigenze e possiate eseguire autonomamente i piccoli interventi di pulizia e manutenzione che
questo tipo di prodotto richiede. Le lettere che troverete tra parentesi corrispondono ai componenti citati nell’esploso
finale.
Ricordatevi sempre e comunque che ogni intervento va eseguito a spina staccata e che la pompa non deve mai
funzionare senz’acqua.
2.
LIMITI DI APPLICAZIONE.
•
Massima temperatura dell’acqua: 35 [°C]
•
Minima temperatura dell’acqua: 4 [°C]
•
Massima profondità di immersione: 1 [m]
•
Minima profondità di immersione: 10 [cm]
3.
USO E REGOLAZIONE.
Prima di procedere all’attivazione della pompa, ricordatevi che questa va sempre fatta funzionare in acqua
indipendentemente dal tipo di utilizzo e che non deve mai essere utilizzata quando vi sono persone nel bacino
d’acqua.
Ad installazione eseguita la spina deve essere accessibile.
Alla pompa si possono collegare tubi flessibili da Ø 20 [mm] a Ø 38 [mm], utilizzando l’apposito portagomma (4, Fig.
22) in dotazione.
Attenzione: La pompa va messa in funzione solo dopo l’installazione.
UTILIZZO CON FILTRO (Fig. 1).
3.1.
Lo scopo principale della pompa SHP è quello di portare le acque torbide del laghetto in cui viene posizionata in un
sistema di filtrazione dell’acqua ad esempio un filtro a pressione o un filtro dotato di lampada germicida UV-C.
Per fare questo è sufficiente collegare il portagomma della mandata (4, Fig. 22) della pompa e l’entrata del filtro con
un tubo.
Ad installazione eseguita è sufficiente collegare la pompa ad una presa di corrente per avviarla.
UTILIZZO CON POND SKIMMER (Fig. 2).
3.2.
Una delle caratteristiche interessanti della pompa SHP é senz’altro quella di poterla collegare ad un sistema per la
pulizia della superficie del laghetto quale ad esempio un “Pond Skimmer” (Fig. 9)
In questo modo infatti il Pond Skimmer (Fig. 9) agisce da prefiltro e l’acqua sporca pescata finisce, per mezzo della
pompa SHP, dentro il gruppo di filtraggio.
Per fare questo è necessario adattare appositamente la SHP osservando la procedura descritta di seguito:
•
Svitare il portagomma 4 diametri (Fig. 4)
•
Rimuovere il guscio superiore agendo sugli appositi pulsanti (Fig. 5)
•
Rimuovere il coperchietto posto sul guscio inferiore (Fig. 6)
•
Applicare l’apposito adattatore per portagomma (Fig. 7)
•
Chiudere il guscio superiore (Fig. 8)
A questo punto la pompa é pronta per essere utilizzata con il Pond Skimmer (Fig. 9).
Per avviare il tutto è sufficiente collegare il Pond Skimmer (Fig. 9) alla pompa SHP e successivamente collegarla al
gruppo filtrante (Fig. 2).
Attenzione: non collegare mai il Pond Skimmer (Fig. 9) con il portagomma (4, Fig. 22) di mandata della pompa.
UTILIZZO PER CASCATELLE (Fig. 3).
3.3.
Quando l’acqua dello stagno è pulita potete utilizzare la vostra Pompa SHP per realizzare una cascatella sul vostro
laghetto.
Per fare questo è sufficiente che il tubo della mandata che, generalmente collega la pompa al sistema di filtraggio,
sia posto sopra una serie di rocce debitamente posizionate.
Attenzione: l’altezza della cascatella non deve superare la prevalenza della pompa.
Controllare quindi a quale altezza massima il vostro modello di SHP è in grado di spingere l’acqua prima di
realizzare una cascatella.
4.
MANUTENZIONE.
Prima di procedere a qualsiasi intervento ricordatevi di disinserire la spina e di non mettere mai le mani nell’acqua
se la pompa è in funzione. La manutenzione della pompa si limita alla pulizia della stessa.
Attenzione: Il prodotto non va mai lubrificato.

I T A L I A N O
Nome file:
1.0134 - ISTRUZIONI NEUTRE SHP 6 LINGUE.docx Rev. 7 del 12/06/2013
Pagina/Page 3- di/of 24
Smontaggio della pompa.
4.1.
Le parti della pompa che possono essere soggette a pulizia sono i gusci (5 e 7, Fig. 22) il rotore (2, Fig. 22) e la
camera girante (3, Fig. 22).
Per pulire i gusci è sufficiente sciacquare abbondantemente con acqua, mentre per pulire il rotore è necessario
rimuovere la pompa dalla propria sede.
Per fare questo è necessario rimuovere il guscio superiore prima agendo sui pulsanti anteriori come mostrato in Fig.
10 e poi ruotandolo come mostrato in Fig. 11.
Per rimuovere la pompa è sufficiente sganciarla dagli appositi supporti posti sul guscio inferiore Fig. 12 e Fig. 13
svitando di seguito il cavallotto bloccacavo (8, Fig. 22) agendo sulle viti (9, Fig. 22).
Pulizia pompa.
4.2.
Sganciare la camera girante Fig. 14.
Sfilare il rotore facendo attenzione a non perdere la guarnizione di tenuta Fig. 15.
Sciacquare il motore con acqua tiepida evitando l’uso di detergenti Fig. 16.
Riposizionare la guarnizione.
Riposizionare il rotore.
Attenzione: Il campo magnetico è molto forte per questo motivo è necessaria molta cautela nell’inserire il rotore
nella propria sede.
Agganciare la camera girante.
Nel caso in cui la pompa venga impiegata in acqua calcarea, è importante pulire il rotore ed il motore accuratamente
ad intervalli regolari. Il calcare può danneggiare in modo irrimediabile il prodotto.
Rimontaggio della pompa.
4.3.
Riposizionare la pompa facendola prima scivolare in avanti in modo che il dentino posto sulla camera girante vada
sotto la linguetta sul guscio inferiore Fig. 17 e successivamente spingendola verso il basso in modo che le alette
poste sul motore aggancino gli appositi supporti Fig. 18.
Avvitare il cavallotto passacavo.
Chiudere la pompa infilando il guscio superiore nel guscio inferiore come mostrato in Fig. 19 per le alette poste
dietro al superiore come mostrato in Fig. 20.
Agganciare il guscio superiore nel guscio inferiore esercitando una piccola pressione sul guscio superiore in modo
che avvenga l’aggancio con i pulsanti anteriori Fig. 21
5.
NORME DI SICUREZZA.
Prima di intervenire sulla pompa per qualunque motivo, staccate la spina dalla presa elettrica.
La pompa è dotata di una protezione termica che interviene quando c’è un malfunzionamento.
Se improvvisamente la pompa si dovesse fermare, molto probabilmente è perché è intervenuta la protezione
termica. In questo caso staccate la spina che porta l’alimentazione alla pompa e procedete alla pulizia della stessa
come indicato precedentemente. La pompa si deve raffreddare per poter ripartire. Riposizionatela nell’acqua quindi
e aspettate almeno due ore prima di alimentarla nuovamente. Se la pompa non dovesse ripartire, rivolgetevi al
vostro rivenditore.
Non mettete mai le mani nell’acqua se la pompa è in funzione.
Il cavo della pompa va collegato alla rete tramite un interruttore differenziale da non più di 30 [mA].
In caso di danneggiamento del cavo, questo non può essere riparato e le pompa deve essere rottamata.
L’utilizzo è limitato all’uso domestico.
Non utilizzare mai la pompa a secco.
Questo apparecchio non è adatto alle persone (anche bambini) affette da menomazioni fisiche, sensoriali o mentali
o alle persone che non dispongano di esperienza e conoscenze sufficienti, a meno che non vengano istruite sull’uso
dell’apparecchio e assistite nelle prime fasi dell’uso da una persona responsabile della loro sicurezza. Sorvegliare i
bambini, per assicurarsi che non giochino con l’apparecchio.
Verificate che l’impianto elettrico sia conforme alle normative internazionali/nazionali vigenti.
6.
GARANZIA.
Aspetti generali.
6.1.
i.
In accordo con queste disposizioni, il negoziante garantisce che il prodotto corrispondente a questa garanzia (“il
prodotto”) non presenta alcun difetto di conformità al momento della sua consegna.
ii.
Il Periodo di Garanzia per il prodotto è di due (2) anni, calcolato al momento della consegna dello stesso
all’acquirente.
iii.
Se si verificasse un difetto di conformità del prodotto e l’acquirente lo notificasse al negoziante durante il
periodo di Garanzia, il negoziante dovrà riparare o sostituire il prodotto a proprie spese e nel luogo che
considera più opportuno, a meno che ciò non risulti impossibile o sproporzionato.

I T A L I A N O
Nome file:
1.0134 - ISTRUZIONI NEUTRE SHP 6 LINGUE.docx Rev. 7 del 12/06/2013
Pagina/Page 4- di/of 24
iv.
Qualora non si potesse riparare o sostituire il prodotto, l’acquirente potrà sollecitare una proporzionale riduzione
del prezzo o, se il difetto di conformità risultasse sufficientemente importante, la risoluzione del contratto di
vendita.
v.
Le parti sostituite o riparate in virtù di questa garanzia non prolungheranno la durata della garanzia del prodotto
originale, ma godranno di una loro propria garanzia.
vi.
Per la validità della presente garanzia, l’acquirente dovrà accreditare la data di acquisto e consegna del
prodotto.
vii.
Quando siano trascorsi più di sei mesi dalla consegna del prodotto all’acquirente e questi adduca difetti di
conformità dello stesso, l’acquirente dovrà accreditare l’origine e l’esistenza del difetto riscontrato.
viii.
Il presente Certificato di Garanzia non limita o pregiudica i diritti che corrispondono ai consumatori in virtù di
norme nazionali di carattere imperativo.
Condizioni particolari.
6.2.
i.
La presente garanzia copre i prodotti cui fa riferimento questo manuale.
ii.
Il presente Certificato di Garanzia è applicabile unicamente nei paesi dell’Unione Europea.
iii.
Per la validità di questa garanzia, l’acquirente dovrà attenersi strettamente alle indicazioni del Fabbricante
incluse nella documentazione che accompagna il prodotto, quando questa risulti applicabile secondo gamma e
modello del prodotto.
iv.
Qualora venga specificato un calendario per la sostituzione, il mantenimento o la pulizia di alcune parti o
componenti del prodotto, la garanzia è da ritenersi valida solo nel caso che tale calendario sia stato
correttamente rispettato.
Limitazioni.
6.3.
i.
La presente garanzia è da applicarsi unicamente a vendite effettuate a consumatori, intendendo per
“consumatore” la persona che acquista il prodotto a fini non rientranti nell’ambito della sua attività
professionale.
ii.
Non si concede alcuna garanzia relativa al normale logorio dovuto all’uso del prodotto. In relazione a pezzi,
componenti e/o materiali fungibili o consumabili come rotori, cuscinetti, lampade, o-ring, guarnizioni, spugne,
cartucce, ecc.., si agirà rispettando quanto disposto nella documentazione che accompagna, a sua volta, il
prodotto.
iii.
La garanzia non copre i casi in cui il prodotto:
a. sia stato oggetto di un trattamento non corretto;
b. sia stato oggetto di riparazioni, mantenimento o manipolazione da una persona non autorizzata o
c. sia stato riparato e provvisto di parti non originali. Qualora il difetto di conformità del prodotto sia
conseguenza di una non corretta installazione o procedura di avviamento, la presente garanzia risponderà
solo quando detta installazione o procedura di avviamento sia inclusa nel contratto di compra-vendita del
prodotto e sia stata realizzata dal negoziante o dietro sua responsabilità.
7.
RACCOLTA RIFIUTI DI MATERIALE ELETTRICO/ELETTRONICO
Ai sensi dell’art. 13 del Decreto Legislativo 25 luglio 2005, n°151 “Attuazione delle Direttive 2002/95/CE,
2002/96/CE e 2003/108/CE, relative alla riduzione dell’uso di sostanze pericolose nelle apparecchiature elettriche
ed elettroniche, nonché allo smaltimento dei rifiuti.
Il simbolo del cassonetto barrato riportato sull’apparecchiatura o sulla confezione indica che il prodotto alla
fine della propria vita utile deve essere raccolto separatamente dagli altri rifiuti.
L’utente dovrà, pertanto, conferire l’apparecchiatura giunta a fine vita agli idonei centri di raccolta differenziata dei
rifiuti elettronici ed elettrotecnici, oppure riconsegnarla al rivenditore al momento dell’acquisto di una nuova
apparecchiatura di tipo equivalente, in ragione di uno a uno.
L’adeguata raccolta differenziata per l’avvio successivo dell’apparecchiatura dismessa al riciclaggio, al trattamento e
allo smaltimento ambientale compatibile contribuisce ad evitare possibili effetti negativi sull’ambiente e sulla salute e
favorisce il reimpiego e/o riciclo dei materiali di cui è composta l’apparecchiatura.
Lo smaltimento abusivo del prodotto da parte dell’utente comporta l’applicazione delle sanzioni amministrative
previste dalla normativa vigente.

E N G L I S H
Nome file:
1.0134 - ISTRUZIONI NEUTRE SHP 6 LINGUE.docx Rev. 7 del 12/06/2013
Pagina/Page 5- di/of 24
1.
DESCRIPTION OF THE PRODUCT AND APPLICATION FIELD.
The SHP is a centrifugal magnet driver pump, operate by a synchronous watertight motor and it is the most
advanced reality existing in the little pumps market. Powerful and reliable it is applied for domestic water-basins and
for the clean and dirty water-pumping who contains hard particles within 7 [mm] size.
The SHP is equipped with the revolutionary E.T.O hose tail who allows the right positioning of the pump on the pond
floor in many different ways never compromising the functionality of the product.
In the next sections you will find all the useful indications to best adapt the pump to your needs and allows you to do
by your own little cleaning and maintenance that this kind of product requires. The letters you will find between
brackets correspond to the components mentioned in the final exploded drawing.
Always and in any case operate with plug disconnected and never operate the pump without water.
2.
APPLICATION LIMITS.
•
Maximum water temperature: 35[°C]
•
Minimum water temperature: 4 [°C]
•
Maximum depth of immersion: 1 [m]
•
Minimum depth of immersion: 10 [cm]
3.
USE AND REGULATION.
Before the activation of the pump always remember that it must always operate in deep water independently from
how it is used and it must never be operated when there are people in the water-basin.
When the installation is done the plug must be easily accessible.
Flexible tubes from Ø 20 [mm] to Ø 30 [mm] can be connected to the pump, always using the proper hose tail (4,
Fig. 22) supplied.
Attention: The pump must operate only after its own installation.
USE WITH FILTER (Fig. 1).
3.1.
The first aim of the SHP pump is to bring the dirty waters of the pond where it is located to a filtration system of the
water, for example a pressure filter or a filter supplied with a germicidal UV-C lamp.
To do this just connect the hose tail of the pump delivery (4, Fig. 22) to the pump and the filter entrance with a tube.
Connect the pump to a wall socket to operate it after its own installation.
USE WITH THE POND SKIMMER (Fig. 2).
3.2.
One of the interesting capacities of the SHP pump is that it can be connected to the superficial cleaning system of
the pond like for example a “Pond Skimmer” (Fig. 9).
In fact in this way the Pond Skimmer (Fig. 9) works as a pre-filter and the dirty water infiltrated goes into the filter unit
thanks to the SHP pump.
To do so is needed to make a special adaptation on the SHP observing the following procedure:
•
Unscrew the 4 diameters hose tail (Fig. 4)
•
Remove the top shell pressing the buttons provided (Fig. 5)
•
Remove the little lid on the underneath shell (Fig. 6)
•
Apply the adaptor for the hose tail provided (Fig. 7)
•
Close the top shell (Fig. 8)
From this moment the pump is ready to be used with the Pond Skimmer (Fig. 9).
To start all the mechanism just connect the Pond Skimmer (Fig. 9) to the SHP pump and then connect the pump to
the filter unit.
Attention: never connect the Pond Skimmer (Fig.9) together with the hose tail (4, Fig. 22) of the pump delivery.
USE FOR LITTLE WATER FALLS (Fig. 3).
3.3.
When the pond water is clean you can use your SHP Pump to create a little water fall in your lake.
To do so just place the tube of the pump delivery, that usually connect the pump to the filter unit, on a series of
stones properly positioned.
Attention: the high of the little water fall must not exceed the pump’s prevalence.
Check therefore at which height your SHP model can push the water before realizing a little water fall.
4.
MAINTENANCE.
Always remember to disconnect the plug before operating any maintenance and never place your hands in water if
the pump is working. The pump’s maintenance is limited to its own cleaning.
Attention: Never lubricate the product.
Disassembling the pump.
4.1.
The parts of the pump that can be object of cleaning are the shells (5 and 7, Fig. 22) the rotor (2, Fig. 22) and the
impeller chamber (3, Fig. 22).
To clean the shells is enough to rinse them with plenty water while to clean the rotor the pump must be removed
from its seat housing.
To do so it is needed to remove the top shell, working first on the front buttons as shown in the Fig. 10 and then
rotate it as shown in the Fig. 11.

E N G L I S H
Nome file:
1.0134 - ISTRUZIONI NEUTRE SHP 6 LINGUE.docx Rev. 7 del 12/06/2013
Pagina/Page 6- di/of 24
To remove the pump just release it from the special supports provided on the lower shell Fig. 12 and Fig. 13
unscrewing consequently the saddle to grip the cable (8, Fig. 22) working on the screws (9, Fig. 22).
Pump Cleaning.
4.2.
Release the impeller chamber Fig. 14.
Unthread the rotor paying attention to don’t loose the gasket seal Fig. 15.
Rinse the motor with warm water avoiding any detergent Fig. 16.
Restore the gasket.
Restore the rotor.
Attention: The magnetic field is really strong. Be very careful when inserting the rotor in its own seat housing.
Hook up the impeller chamber.
If the pump is working in calcareous water is important to clean regularly and carefully the rotor and the motor. The
limestone can cause irreversibly damages to the product.
Reassembling the pump.
4.3.
Restore the pump making it first slide to the front so that the little tooth on the impeller chamber will take its position
under the tongue on the lower shell Fig. 17 and then pushing it to the base so that the flaps on the motor will hook
the supports provided Fig.18.
Screws the saddle cable-pusher.
Close the pump threading the top shell in the lower shell as shown in the Fig. 19 for the flaps positioned behind the
top shell as shown in the Fig. 20.
Hook up the top shell in the lower shell practicing a little pressure on the upper shell so that it will occur the
connection with the front buttons Fig. 21.
5.
SAFETY LAWS.
Disconnect the plug from the wall socket before operating in anyway and in any case the pump.
The pump is provided with a thermal protection that operate when there’s a malfunction.
If the pump suddenly stops, is probably because the thermal protection has operated.
In this case disconnect the plug that brings electricity to the pump and proceed with its cleaning as previously
indicated. The pump must cool down to restart. Restore it therefore in the water and wait at least two hours to supply
it again. If the pump does not restart speak to your retailer.
Never place your hands in water if the pump is working.
The pump cable must be connected to the net through a differential switch not bigger than 30 [mA].
If the cable is damaged it cannot be repaired and so the pump must be scrapped.
The application is limited to a domestic use.
Never operate the pump dry.
Do not let children play with the appliance, e.g. do not allow them to sit in the drawers or swing on the door. This
appliance is not intended for use by persons (including children) with reduced physical, sensory or mental
capabilities or lack of experience and knowledge unless they have been given initial supervision or instruction
concerning use of the appliance by a person responsible for their safety. Children should be supervised to ensure
that they do not play with the appliance.
Make sure the electrical plant complies with international/national prescriptions in force.
6.
GUARANTEE.
Generalities.
6.1.
i.
Pursuant to these provisions, the seller guarantees that the product mentioned in this guarantee (“the product”)
is free of non-conformities at the time of its delivery.
ii.
The Guarantee Period for the product is two (2) years, starting from the moment the product is delivered to the
purchaser.
iii.
In the event of product non conformities notified by the purchaser to the seller during the Guarantee period, the
seller shall repair or replace the product at its own cost and expense and in the place it considers most
appropriate, unless this turns out to be impossible or excessive.
iv.
If the product cannot be repaired or replaced, the purchaser shall have the right to ask for a proportional price
reduction or, if the non conformity is sufficiently serious, to terminate the sales agreement.
v.
Replaced or repaired parts under this guarantee shall not prolong the duration of the guarantee for the original
product, but shall have their own guarantee.
vi.
In order for this guarantee to be valid, the purchaser shall have to register the date of product purchase and
delivery.
vii.
If the purchaser claims product non conformities after more than six months from product delivery to the
purchaser, the purchaser shall have to prove the existence and origin of such claimed non conformities.

E N G L I S H
Nome file:
1.0134 - ISTRUZIONI NEUTRE SHP 6 LINGUE.docx Rev. 7 del 12/06/2013
Pagina/Page 7- di/of 24
viii.
This Guarantee Certificate shall in no way limit or prejudice the consumer’s rights pursuant to national
mandatory regulations.
Special conditions.
6.2.
i.
This guarantee refers to the products described in this manual.
ii.
This Guarantee Certificate is applicable exclusively in the countries of the European Union.
iii.
In order for this guarantee to be valid, the purchaser shall have to follow strictly the Manufacturer's instructions
included in the product documentation, insofar as they are applicable to the relevant product range and model.
iv.
If a schedule is given for the replacement, maintenance or cleaning of some product’s parts or components, the
guarantee shall be considered valid only if said schedule has been followed correctly.
Limitations.
6.3.
i.
This guarantee applies exclusively to sales to consumers, “consumers” being the people who buy the product
for purposes that do not concern his or her professional activity.
ii.
No guarantee is given concerning normal wear and tear due to the use of the product. With regard to spares,
components and/or replaceable materials or materials subject to wear and tear, such as rotors, bearings,
lamps, o-rings, gaskets, sponges, cartridges, etc., any guarantee shall be enforced pursuant to the provisions of
the product’s documentation.
iii.
The guarantee is not valid if the product:
a. has been handled incorrectly;
b. has been repaired, maintained or handled by unauthorised personnel, or
c. has been repaired using non original spares. If the product’s non conformity is the consequence of an
incorrect installation or commissioning, this guarantee shall cover the product only if such installation and
commissioning are included in the product’s transfer agreement and have been carried out by the seller or
under the seller’s responsibility.
7.
WASTE OF ELECTRICAL/ELECTRONIC EQUIPMENT
EU directive 2002/96/EC classifies this product as an electrical or electronic tool.
Do Not dispose of this tool as unsorted municipal waste.
Dispose of this tool at a collection or recycling centre according to local and national law.
The consumer has an important role in reducing the disposal of waste by returning waste electronic/electrical tool for
recycling.
Recycling avoids the dispersion of hazardous materials into the municipal waste stream.
The crossed-out bin symbol reminds the user not to dispose of this product as unsorted municipal waste.

ESPAG
Ñ
O L
Nome file:
1.0134 - ISTRUZIONI NEUTRE SHP 6 LINGUE.docx Rev. 7 del 12/06/2013
Pagina/Page 8- di/of 24
1.
DESCRIPCIÓN DEL PRODUCTO Y CAMPO DE APLICACIÓN.
La SHP es una bomba centrífuga de arrastre magnético, accionada por un motor síncrono hermético siendo lo más
avanzado que existe en el mercado de las bombas pequeñas. Potente y fiable, se la puede emplear en las cubas
de agua domésticas para el bombeo del agua limpia y turbia que contienen partículas sólidas de dimensiones hasta
7 [mm].
La SHP está provista del revolucionario portagoma orientable E.T.O. que permite posicionar la bomba en el fondo
del estanque de diferentes maneras sin comprometer la funcionalidad del producto.
A continuación se podrán encontrar todas las indicaciones necesarias con la finalidad de adaptar la bomba del
mejor modo según vuestras exigencias y realizar autónomamente las pequeñas operaciones de limpieza y
manutención que necesita este tipo de producto. Las letras que se encuentran entre paréntesis corresponden a los
componentes citados en el dibujo de despiece final.
Téngase siempre presente que todas las operaciones deben realizarse con la toma desenchufada y que la
bomba nunca debe funcionar sin agua.
2.
LÍMITES DE APLICACIÓN.
•
Temperatura máxima del agua: 35 [°C]
•
Temperatura mínima del agua: 4 [°C]
•
Profundidad máxima de inmersión: 1 [m]
•
Profundidad mínima de inmersión: 10 [cm]
3.
USO Y REGULACIÓN.
Antes de realizar la activación de la bomba, recuérdese que siempre debe funcionar dentro del agua cualquiera sea
el tipo de utilización y nunca debe ser utilizada cuando hay personas en la cubeta.
Una vez realizada la instalación el enchufe debe ser accesible.
Se pueden conectar a la bomba tubos flexibles de Ø 20 [mm] a Ø 38 [mm], utilizando el apropiado portagoma (4,
Fig. 22) suministrado.
Atención: La bomba será puesta en funcionamiento sólo después de la instalación.
UTILIZACIÓN CON FILTRO (Fig. 1).
3.1.
La finalidad principal de la bomba SHP es la de llevar el agua turbia del estanque donde es situada a un sistema de
filtración del agua por ejemplo un filtro a presión o un filtro provisto de lámpara germicida UV-C.
Para llevarlo a cabo es suficiente unir el portagoma del envio (4, Fig. 22) de la bomba y la entrada del filtro con el
tubo.
Una vez realizada la instalación es suficiente conectar la bomba a una toma de corriente para ponerla en marcha.
UTILIZACIÓN CON POND SKIMMER (Fig.2).
3.2.
Una de las características interesantes de la bomba SHP es sin lugar a dudas la de poderla conectar a un sistema
para la limpieza de la superficie del estanque como por ejemplo un “Pond Skimmer” (Fig. 9).
De esta manera el Pond Skimmer (Fig. 9) actua de pre-filtro y el agua sucia aspirada termina, a través de la bomba
SHP, dentro del grupo de filtración.
Para realizar ésto es necesario adaptar de manera apropiada la SHP observando el procedimiento descripto a
continuación:
•
Desenroscar el portagoma 4 diámetros (Fig. 4)
•
Extraer el casco superior a través de los respectivos botones (Fig. 5)
•
Extraer la tapa colocada en el casco inferior (Fig. 6)
•
Colocar el adaptador especial para portagoma (Fig. 7)
•
Cerrar el casco superior (Fig. 8)
Ahora la bomba está lista para ser utilizada con el Pond Skimmer (Fig. 9).
Para poner todo en marcha es suficiente unir el Pond Skimmer (Fig. 9) a la bomba SHP y luego unirla al grupo de
filtración.
Atención: nunca se debe unir el Pond Skimmer (Fig. 9) al portagoma (4, Fig. 22) de envio de la bomba.
UTILIZACIÓN PARA CASCADAS (Fig. 3).
3.3.
Cuando el agua del estanque está limpia es posible utilizar vuestra Bomba SHP para realizar una pequeña cascada
en el estanque.
Para hacerlo es suficiente colocar el tubo de envio que, generalmente une la bomba al sistema de filtración, sobre
una serie de rocas adecuadamente posicionadas.
Atención: la altura de la cascada nunca debe superar la altura de elevación de la bomba.
Controlar entonces cual es la altura máxima con el cual vuestro modelo de SHP logra empujar el agua antes de
realizar la cascada.
4.
MANUTENCIÓN.
Antes de realizar cualquier tipo de operación recuérdese desconectar el enchufe y nunca poner las manos en el
agua si la bomba está en funcionamiento. La manutención de la bomba se limita a la limpieza de la misma.
Atención: El producto nunca debe ser lubrificado.

ESPAG
Ñ
O L
Nome file:
1.0134 - ISTRUZIONI NEUTRE SHP 6 LINGUE.docx Rev. 7 del 12/06/2013
Pagina/Page 9- di/of 24
Desmontaje de la bomba
4.1.
Las partes de la bomba que pueden estar sujetas a limpieza son los cascos (5 y 7, Fig. 22) el rotor (2, Fig. 22) y la
cámara rotor (3, Fig. 22).
Para limpiar los cascos es suficiente enjuagar abundantemente con agua mientras que para limpiar el rotor es
necesario extraer la bomba del propio alojamiento.
Para realizarlo es necesario antes extraer el casco superior por medio de los botones anteriores como se muestra
en la Fig. 10 y luego hacerlo girar como se muestra en la Fig. 11.
Para extraer la bomba es suficiente desengancharla de los soportes especiales colocados en el casco inferior
Fig.12 y Fig. 13 desenroscando después el perno de U que bloquea el cable (8, Fig. 22) a través de los tornillos (9,
Fig. 22).
Limpieza de la bomba
4.2.
Desenganchar la cámara rotor Fig. 14.
Extraer el rotor prestando atención que no se pierda la guarnición de hermeticidad Fig. 15.
Enjuagar el motor con agua tibia evitando el empleo de detergentes Fig. 16.
Volver a posicionar la guarnición.
Volver a posicionar el rotor.
Atención: El campo magnético es muy fuerte por este motivo es necesario tener mucho cuidado cuando se
introduce el rotor en el propio alojamiento.
Enganchar la cámara rotor.
En el caso que la bomba sea empleada en agua calcárea, es importante limpiar el rotor y el motor cuidadosamente
con intervalos de tiempo regulares. La caliza puede dañar el producto de manera irremediable.
Remontaje de la bomba
4.3.
Volver a posicionar la bomba haciéndola deslizar hacia adelante de manera que el diente colocado en la cámara
rotor vaya debajo de la lengüeta del casco inferior Fig. 17 y luego empujarla hacia abajo de manera que las aletas
colocadas en el motor enganchen los respectivos soportes Fig. 18.
Enroscar el perno de U pasacable.
Cerrar la bomba introduciendo el casco superior en el casco inferior como se muestra en la Fig. 19 para las aletas
colocadas detrás del casco superior como se muestra en la Fig. 20.
Enganchar el casco superior en el inferior ejerciendo una pequeña presión sobre el casco superior de manera que
se produzca el enganche con los botones anteriores Fig. 21.
5.
NORMAS DE SEGURIDAD
Antes de intervenir en la bomba por cualquier motivo, desconectar el enchufe de la toma eléctrica.
La bomba está dotada de una protección térmica que interviene cuando se advierte un malfuncionamiento.
Si de improviso la bomba se detuviera, probablemente se debe a la intervención de la protección térmica.
En este caso desenchufar la bomba de la alimentación eléctrica y limpiarla como se ha indicado precedentemente.
La bomba debe ser enfriada para poder ponerla nuevamente en marcha. Colocarla de nuevo en el agua y esperar
por lo menos dos horas antes de conectarla a la electricidad. Si la bomba no se pusiera en marcha, dirigirse a
vuestro vendedor.
Nunca poner las manos en el agua si la bomba está funcionando.
El cable de la bomba debe conectarse a la red trámite un interruptor diferencial de no más de 30 [mA].
En caso que el cable se dañara, el mismo no puede ser arreglado y la bomba debe ser chatarreada.
La utilización se limita a uso doméstico. No utilizar nunca la bomba en seco.
Verifique que la instalación eléctrica esté conforme a las normativas internacionales/national vigentes.
Este aparato no está destinado a ser utilizado por personas (incluidos niños) con discapacidades físicas,
sensoriales o mentales, o por personas que no dispongan de suficiente experiencia y conocimientos, a no ser que
una persona responsable de su seguridad los haya instruido o supervisado inicialmente en la utilización del aparato.
Los niños deben estar siempre bajo supervisión para asegurar que no juegan con el aparato.
6.
GARANTÌA.
Aspectos generales.
6.1.
i. De acuerdo con estas disposiciones, el comerciante garantiza que el Producto correspondiente a esta
garantía (“el Producto”) no presenta ningún defecto de conformidad al momento de su entrega.
ii. El Periodo de Garantía para el Producto es de dos (2) años, calculado al momento de la entrega del mismo al
comprador.
iii. Si se verificara un defecto de conformidad del Producto y el comprador lo notificara al comerciante durante el
Periodo de Garantía, el comerciante deberá reparar o sustituir el Producto a su cargo y en el lugar que
considere más oportuno, a menos que ello resulte imposible o desproporcionado.

ESPAG
Ñ
O L
Nome file:
1.0134 - ISTRUZIONI NEUTRE SHP 6 LINGUE.docx Rev. 7 del 12/06/2013
Pagina/Page 10- di/of 24
iv. En caso de que no se pueda reparar o sostituir el Producto, el comprador podrá solicitar una proporcional
reducción del precio o, si el defecto de conformidad resultara suficientemente importante, la resolución del
contrato de venta.
v. Las partes sustituídas o reparadas en virtud de esta garantía no prolongarán la duración de la garantía del
Producto original, sino que gozarán de una garantía propia.
vi. Para la validez de la presente garantía, el comprador deberá acreditar la fecha de adquisición y entrega del
Producto.
vii. Cuando hayan transcurrido más de seis meses desde la entrega del Producto al comprador y éste aduzca
defectos de conformidad del mismo, el comprador deberá acreditar el origen y la existencia del defecto.
viii. El presente Certificado de Garantía no limita o perjudica los derechos que corresponden a los consumidores
en virtud de normas nacionales de carácter imperativo.
Condiciones particulares.
6.2.
i. La presente garantía cubre los productos a los que hace referencia este manual.
ii. El presente Certificado de Garantía es aplicable únicamente en los países de la Unión Europea.
iii. Para la validez de esta garantía, el comprador deberá atenerse estrictamente a las indicaciones del
Fabricante incluídas en la documentación que acompaña al Producto, cuando ésta resulte aplicable según la
gama y el modelo del Producto.
iv. En caso de que se especifique un calendario para la sustitución, el mantenimiento o la limpieza de algunas
partes o componentes del Producto, la garantía se debe considerar válida sólo en caso de que tal calendario
haya sido correctamente respetado.
Limitaciones.
6.3.
i. La presente garantía es aplicable únicamente a ventas efectuadas a consumidores, entendiendo por
“consumidor” la persona que adquiere el Producto a fines que no entren en el ámbito de su actividad
profesional.
ii. No se concede ninguna garantía relativa al normal desgaste debido al uso del Producto. En relación a precios,
componentes y/o materiales fungibles o consumibles como pilas, bombillas, etc., se obrará respetando cuanto
dispuesto en la documentación que acompaña, a su vez, al Producto.
iii. La garantía no cubre los casos en que el Producto:
a. haya sido objeto de tratamiento no correcto;
b. haya sido objeto de reparaciones, mantenimiento o manipulación por una persona no autorizada o
c. haya sido reparado y proveído de partes no originales. En caso de que el defecto de conformidad del
Producto sea consecuencia de una incorrecta instalación o procedimiento de puesta en marcha, la
presente garantía responderá solo cuando dicha instalación o procedimiento de puesta en marcha esté
incluida en el contrato de compra-venta del Producto y haya sido realizada por el comerciante o bajo su
responsabilidad.
7.
RECOGIDA DE RESIDUOS ELECTRICOS/ELECTRONICOS
La directiva 2002/96/EC clasifica este producto como un aparato eléctrico/electrónico.
No tire este aparato como si fuera un residuo municipal no clasificado.
Tire este aparato en un centro de recogida o de reciclaje según la ley local o nacional.
El consumador cumple un papel importante en la reducción de la eliminación de residuos, predisponiendo el
reciclaje de los aparatos eléctricos/electrónicos.
El reciclaje previene la dispersión de materiales peligrosos en la gran cantidad de residuos municipales.
El símbolo del bidón con una banda transversal recuerda al usuario que no debe tirar este producto como si fuera
un residuo municipal no clasificado.

F R A N C A I S
Nome file:
1.0134 - ISTRUZIONI NEUTRE SHP 6 LINGUE.docx Rev. 7 del 12/06/2013
Pagina/Page 11- di/of 24
1.
DESCRIPTION DU PRODUIT ET CHAMP D’APPLICATION.
La SHP est une pompe centrifuge à entraîneur magnétique, actionnée par un moteur synchrone étanche. Elle est la
plus avancée dans le marché des petites pompes. Puissante et fiable est appliquée pour les bassins de refoulement
à usage familiales de l’eau net et trouble en contenant particules solides grosses jusqu’à 7 [mm].
La SHP est dotée du révolutionnaire porte-gomme orientable E.T.O. qui permet de positionner la pompe dans le
fond de l’étang dans les plusieurs moyens possibles, jamais compromettant la fonctionnalité du produit.
Dans les suivantes sectionnes Vous trouverez toutes les indications nécessaires pour mieux adapter la pompe
selon vos exigences et Vous pourrez faire en autonomie toutes les petites opération de nettoyage et d’entretien que
ce type de produit demande. Les lettres que vous trouverez entre parenthèses corresponds aux components
mentionnées dans le dessin final.
Avant toute opération sur la pompe toujours débrancher la fiche du réseau électrique et toujours se souvenir que
la pompe ne doit jamais fonctionner sans eau.
2.
LIMITS D’APPLICATION.
•
Température maximal de l’eau: 35 [°C]
•
Température minimum de l’eau: 4 [°C]
•
Maximal profondeur d’immersion: 1 [m]
•
Minimum profondeur d’immersion: 10 [cm]
3.
UTILISATION ET REGOLATION
Avant l’activation de la pompe se souvenir que elle doit fonctionner toujours avec eau, indépendamment de le
moyen d’utilisation, et qu’elle ne doit jamais fonctionner quand il y sont des gens dans le bassin.
Quand l’installation a été effectuée la fiche doit être accessible.
On peut joindre tubes flexibles de Ø 20 [mm] jusqu’à Ø 38 [mm], en utilisant le spécial porte-gomme (4, Fig. 22) en
dotation.
Attention: Faire fonctionner la pompe seulement avant l’installation.
UTILISATION AVEC LE FILTRE (Fig. 1).
3.1.
Le but principale de la pompe SHP est d’amener les eau troubles dans l’étang où elle est positionnée, dans un
system de filtration de l’eau, par exemple un filtre à pression ou en filtre avec une lampe germicide UV-C.
Pour faire ça est suffisant joindre le porte-gomme du refoulement (4, Fig. 22) de la pompe et l’entrée du filtre avec
un tube.
Quand l’installation est effectuée est suffisant relier la pompe à la fiche du réseau pour la faire marcher.
UTILISATION AVEC LE POND SKIMMER (Fig. 2).
3.2.
Une des caractéristiques intéressantes de la pompe SHP est sans doute la possibilité de la joindre à un system pour
le nettoyage de la surface du lac comme par exemple un “Pond Skimmer” (Fig. 9).
En ce moyen le Pond Skimmer (Fig. 9) fonctionne comme un pré-filtre et l’eau trouble prie se jet, par moyen de la
pompe SHP, dans le groupe de filtration.
Pour faire ça on doit adapter spécialement la SHP en observant la procédure ci dessous:
•
Dévisser le porte-gomme 4 diamètres (Fig. 4)
•
Déplacer le coque supérieur fonctionnant sur les boutons destinées (Fig. 5)
•
Déplacer le petit couvercle placé sur le coque inférieur (Fig. 6)
•
Appliquer l’adaptateur destiné pour le porte-gomme (Fig. 7)
•
Fermer le coque supérieur (Fig. 8)
A ce point la pompe est prête pour être utilisée avec le Pond Skimmer (Fig. 9).
Pour faire marcher tout, joindre simplement le Pond Skimmer (Fig. 9) à la pompe SHP et après la relier au groupe
de filtration.
Attention: jamais relier le Pond Skimmer (Fig. 9) avec le porte-gomme (4, Fig. 22) du refoulement de la pompe.
UTILISATION POUR PETITES CHUTES (Fig. 3).
3.3.
Quand l’eau de Votre étang est net Vous pouvez utiliser Votre pompe SHP pour réaliser une petite chute dans Votre
lac.
Pour faire ça est suffisant que le tube du refoulement, qui généralement joindre la pompe au system de filtration, soit
placé dessus une série des roches dûment positionnées.
Attention: l’hauteur de la petite chute ne doit pas passer la prévalence de la pompe.
Contrôlez donc jusqu’à quelle hauteur maximum Votre modèle SHP peut pousser l’eau avant la réalisation de la
petite chute.
4.
ENTRETIEN.
Avant toute opération toujours débrancher la fiche du réseau et ne jamais mettre les mains dans l’eau si la pompe
est en fonctionne. L’entretien de la pompe est limitée à le nettoyage de sa même.
Attention: mais lubrifier le produit.
Démontage de la pompe.
4.1.
Le pièces de la pompe qui peuvent être objet de nettoyage sont les coques (5 et 7, Fig. 22) le rotor (2, Fig. 22) et la
chambre mobile(3, Fig. 22).

F R A N C A I S
Nome file:
1.0134 - ISTRUZIONI NEUTRE SHP 6 LINGUE.docx Rev. 7 del 12/06/2013
Pagina/Page 12- di/of 24
Pour nettoyer les coques est suffisant les rincer avec beaucoup d’eau, alors que pour le rotor on doit déplacer la
pompe de sa place.
Pour faire ça enlever le coque supérieur en appuyant sur les boutons antérieurs selon la Fig. 10 et puis on doit lui
tourner selon la Fig. 11.
Pour déplacer la pompe simplement la décrocher des support destinés qui sont placés sur le coque inférieur Fig. 12
et Fig. 13 et à la suite dévisser le tréteau serre-câble (8, Fig. 22) en fonctionnant sur les vis (9, Fig. 22).
Nettoyage de la pompe.
4.2.
Décrocher la chambre mobile Fig.14.
Défiler le rotor faisant attention à ne perdre pas le joint de tenure Fit. 15.
Rincer le moteur avec de l’eau tiède évitant l’utilisation des détergents Fig. 16.
Remettre la jointe.
Remettre le rotor.
Attention: Le champ magnétique est très fort. Pour ce motif agir avec prudence en introduisant le rotor dans sa
propre place.
Accrochez la chambre mobile.
Dans le cas où la pompe soit utilisez en eau calcaire, le nettoyage soigneux et par intervalles réguliers du rotor et du
moteur est importante. Le calcaire peut endommager le produit irréversiblement.
Remontage de la pompe.
4.3.
Replacer la pompe en la faisant glisser en avant si tant que le petit dent de la chambre mobile passe sous la
languette du coque inférieur Fig. 17 et à la suite pousser la pompe vers le bas si tant que les ailettes placées sur le
moteur accroche le supports destinés Fig. 18.
Visser le tréteau serre-câble.
Fermer la pompe connectant le coque supérieur dans le coque inférieur selon la Fig. 19 pour les ailettes à l’arrière
du coque supérieur selon la Fig. 20.
Accrocher le coque supérieur dans le coque inférieur faisant une léger pression sur le coque supérieur autant qu’
arrive l’accroche avec les boutons antérieurs Fig. 21.
5.
CONSIGNES DE SECURITE
Avant toutes opération sur la pompe toujours débrancher la fiche du réseau électriques.
La pompe est dotée d’une protection thermique qu’intervienne quand on se produit une défaillance.
Si tout à coupe la pompe se ferme, fort probablement la protection thermique s’est actionnée. Dans ce cas
débrancher la fiche qu’aliment la pompe et nettoyer la même comme précédemment indiqué. La pompe se doit
refroidir avant redémarrer. Donc, ramener la pompe dans l’eau et attendre au moins deux heures avant l’alimenter
encore. Si la pompe ne parte plus, adresser Vous à Votre revendeur.
Ne mettre jamais Votre mains dans l’eau si la pompe est en fonction.
Le câble de cette pompe doit être connecté au réseau avec un interrupteur différentiel avec courant nominale pas
supérieure à 30 [mA].
Le câble de la pompe ne peut pas être réparé ou remplacé. Si le câble est endommagé la pompe doit être éliminé.
Usage seulement domestique.
Ne actionner pas la pompe sans eau.
Cet appareil ne s’adresse pas aux personnes (et enfants) présentant des handicaps physiques, sensoriels ou
mentaux ni aux personnes ne disposant pas d’une expérience et de connaissances suffisantes, sauf si ces
dernières ont bénéficié d’une surveillance initiale ou ont reçu des instructions relatives à l’utilisation de l’appareil de
la part d’une personne responsable de leur sécurité. Les enfants ne doivent pas être laissés sans surveillance, afin
de s’assurer qu’ils ne jouent pas avec l’appareil.
Vérifier que l’installation électrique soit conforme aux normes internationals/national en vigueur.
6.
GARANTIE.
Aspects generaux.
6.1.
i. Conformément à cette disposition, le détaillant garantit que le produit correspondant à cette garantie (“le
Produit”) ne présente aucun défaut de conformité au moment de la livraison.
ii. La période de Garantie est de deux (2) ans, calculée au moment de la livraison du produit à l’acheteur.
iii. En cas de défaut de conformité du Produit et si l’acheteur le signale au détaillant pendant la période de
Garantie, le détaillant devra réparer ou remplacer le Produit à ses frais et sur le lieu qu’il considère le plus
approprié, à moins que ceci ne résulte impossible ou disproportionné.
iv. Si le Produit ne peut pas être réparé ou remplacé, l’acheteur pourra solliciter une réduction proportionnelle du
prix ou, si le défaut de conformité résulte suffisamment important, la résolution du contrat de vente.
v. Les pièces remplacées ou réparées en vertu de cette garantie ne prolongeront pas la durée de la garantie du
Produit original, mais auront leur propre garantie.
vi. Afin que cette garantie soit valable, la date d’achat et de livraison du Produit devront être accréditées par
l’acheteur.

F R A N C A I S
Nome file:
1.0134 - ISTRUZIONI NEUTRE SHP 6 LINGUE.docx Rev. 7 del 12/06/2013
Pagina/Page 13- di/of 24
vii. Si la livraison du Produit à l’acheteur a été effectuée plus de six mois auparavant, et celui-ci notifie un défaut
de conformité, il devra accréditer l’origine et l’existence du défaut vérifié.
viii. Le présent Certificat de Garantie ne limite pas et ne porte pas préjudice aux droits des consommateurs en
vertu de normes nationales de caractère impératif.
Conditions particulieres.
6.2.
i. La présente Garantie garantit les produits mentionnés dans ce manuel.
ii. Le présent Certificat de Garantie est valable uniquement dans les pays de l’Union Européenne.
iii. Afin que cette Garantie soit valable, l’acheteur devra s’en tenir strictement aux indications du Fabricant
contenues dans la documentation en dotation avec le Produit, en fonction des limites de son application selon
la gamme et le modèle du Produit.
iv. S’il existe un calendrier pour le remplacement, la maintenance ou le nettoyage de certaines parties ou
éléments du Produit, la Garantie sera valable uniquement si ce calendrier a été correctement respecté.
Limitations.
6.3.
i. La présente garantie est valable uniquement en cas de ventes effectuées à des consommateurs, c’est-à-dire
la personne qui achète le Produit dans un but qui n’est pas lié à son activité professionnelle.
ii. La garantie ne s’applique pas aux cas d’usure normale du Produit due à son l’utilisation. En ce qui concerne
les parties, les éléments et/ou les matériaux qui se consomment ou qui peuvent s’user comme les piles, les
lampes etc., on se conformera aux indications contenues dans ce manuel d’usage.
iii. La Garantie ne s’applique pas aux cas suivants:
a. le produit a été utilisé d’une façon incorrecte;
b. il a fait l’objet de réparations, maintenance ou manipulations par des personnes non autorisées, ou
c. il a été réparé et muni de pièces non originelles. Si le défaut de conformité du Produit est la conséquence
d’une installation ou d’une mise en service incorrecte, cette Garantie sera valable uniquement si la dite
installation ou procédure de mise en route est inclue dans le contrat d’achat vente du Produit et a été
réalisée par le détaillant ou sous sa responsabilité.
7.
COLLECTE DES DÉCHETS DE MATÉRIEL ELECTRIQUE/ELECTRONIQUE
La directive 2002/96/EC classifie ce produit comme appareil électrique/électronique.
Ne pas jeter cet appareil avec les déchets municipaux non classifiés.
Jeter cet appareil dans un centre de collecte ou de recyclage conformément à la loi locale et nationale.
Le consommateur joue un rôle important dans la réduction des déchets, en prévoyant le recyclage des appareils
électriques/électroniques.
Le recyclage permet d’éviter la dispersion de matériau dangereux dans la masse des déchets municipaux.
Le symbole du bidon barré rappelle à l’utilisateur de ne pas jeter ce produit avec les déchets municipaux non
classifiés.

D E U T S C H
Nome file:
1.0134 - ISTRUZIONI NEUTRE SHP 6 LINGUE.docx Rev. 7 del 12/06/2013
Pagina/Page 14- di/of 24
1.
PRODUKTBESCHREIBUNG UND EINSATZBEREICH.
Shott SHP ist eine Zentrifugalpumpe mit magnetischem Schub, die mit einem dichteten Synchronmotor betrieben
wird und stellt derzeitig auf dem Markt der Kleinpumpen das innovativste Produkt dar. Es handelt sich um eine sehr
leistungsfähige und zuverlässige Pumpe, die für Wasserbecken im Privatbereich, zum Pumpen von sauberem und
schmutzigem Wasser, Schmutzpartikeln bis zu 7 [mm] angewendet werden kann.
Die SHP ist mit einem revolutionären, orientierbaren Schlauchanschluss ausgestattet (E.T.O.), sie kann ganz
verschieden auf den Teichboden abgestellt werden, ohne die Funktionstüchtigkeit zu beeinschränken.
In den weiteren Abschnitten finden Sie alle notwendigen Informationen, um die Pumpe ihren Bedürfnissen anpassen
zu können und kleinere Wartungs- und Reinigungsoperationen selbstständig durchführen zu können. Die in
Klammer gesetzten Buchstaben beziehen sich auf die auf der Detailzeichnung angegebenen Komponenten.
Nicht vergessen: vor jedem Eingriff muss der Stecker gezogen werden. Die Pumpe darf nie ohne Wasser
funktionieren.
2.
ANWENDUNGSBESCHRÄNKUNGEN.
•
Max. Betriebstemperatur: 35 [°C]
•
Min. Betriebstemperatur: 4 [°C]
•
Max. Eintauchtiefe: 1 [m]
•
Min. Eintauchtiefe: 10 [cm]
3.
GEBRAUCH UND EINSTELLUNG.
Sich daran erinnern, dass die Pumpe nur im Wasser funktionieren darf, unabhängig vom jeweiligen Gebrauch der
Pumpe, außerdem darf die Pumpe nicht eingeschaltet werden, wenn sich Personen im Wasserbecken befinden.
Sich vergewissern, dass der Stecker nach der Installation zugänglich ist.
An der Pumpe können flexible Schläuche Ø 20 [mm] oder Ø 38 [mm] mit dem mitgelieferten Schlauchanschluss (4,
Fig. 22) angeschlossen werden.
Achtung: Die Pumpe darf nur nach der Installation in Betrieb genommen werden.
BENUTZUNG MIT FILTER (Fig. 1).
3.1.
Die Pumpe SHP wird hauptsächlich benutzt, um trübes Teichwasser zu einem Filtersystem (mit Druckfilter oder
keimtötendem UV-C Filter) zu befördern.
Dazu den Schlauchanschluss (4, Fig. 22) druckseitig an der Pumpe anschließen und den Filtereingang mit einem
Schlauch verbinden.
Nach erfolgtem Anschluss kann die Pumpe durch Anstecken eingeschaltet werden.
BENUTZUNG MIT POND SKIMMER (Fig. 2).
3.2.
Die Pumpe SHP besitzt eine sehr interessante Eigenschaft, sie kann nämlich mit einem Oberflächen-
Reinigungssystem (z.B.: Pond Skimmer, Fig.9) verbunden werden.
In dieser Version fungiert der Pond Skimmer (Fig.9) als Vorfilter, das aufgefangene schmutzige Wasser wird mit der
Pumpe SHP durch die Filtriergruppe gepumpt.
Für diese Funktion muss die Pumpe SHP eigens angepasst werden, hier nachstehend sind die einzelnen
Arbeitsschritte beschrieben:
•
Den Schlauchanschluss 4 losschrauben (Fig. 4);
•
Durch Betätigung der entsprechenden Druckknöpfe die obere Schale entfernen (Fig. 5);
•
Den kleineren Deckel an der unteren Schale entfernen (Fig. 6);
•
Den Adapter für Schlauchanschluss anbringen (Fig. 7);
•
Die obere Schale schließen (Fig. 8)
Nun ist die Pumpe zur Benutzung mit Pond Skimmer (Fig. 9) einsatzbereit.
In Betrieb setzen, indem man den Pond Skimmer (Fig. 9) mit der Pumpe SHP verbindet und diese letztere mit der
Filtriergruppe.
Achtung: niemals den Pond Skimmer (Fig. 9) mit dem Schlauchanschluss (4, Fig. 22) Pumpen-Druckseite
verbinden.
BENUTZUNG FÜR FONTÄNEN (Fig. 3).
3.3.
Wenn das Wasser in Ihrem Teich sauber ist, kann die Pumpe SHP zur Schaffung von Fontänen benutzt werden.
Dazu muss die Druckleitung, die normalerweise Pumpe und Filtrieranlage miteinander verbindet, auf einem
Steinhügel zweckmäßig positioniert werden.
Achtung: die Fontänenhöhe darf die Förderhöhe nicht überschreiten.
Überprüfen Sie also bis zu welcher Höhe Ihr SHP-Modell imstande ist Wasser zu pumpen, bevor sie ein
Springbecken realisieren.
4.
WARTUNG.
Nicht vergessen: vor jedem Eingriff Stecker ziehen und niemals die Hände ins Wasser tauchen, wenn die Pumpe
eingeschaltet ist. Die Wartung der Pumpe beschränkt sich auf die Reinigung derselben.
Achtung: Dieses Produkt wird nie geschmiert.
Demontage der Pumpe.
4.1.
Folgende Teile können gereinigt werden: die Schalen (5 und 7, Fig. 22) der Rotor (2, Fig. 22) Pumpenradkammer
(3, Fig. 22).

D E U T S C H
Nome file:
1.0134 - ISTRUZIONI NEUTRE SHP 6 LINGUE.docx Rev. 7 del 12/06/2013
Pagina/Page 15- di/of 24
Die Schalen werden mehrmals mit Wasser gespült. Zum Reinigen des Rotors muss die Pumpe aus ihrem Sitz
gebracht werden.
Dazu die obere Schale, durch Eingreifen auf die vorderen Druckknöpfe (Fig. 10) und anschließender Drehung wie in
Abb. 11 aufgezeigt, entfernen.
Die Pumpe dann aus den Halterungen an der unteren Schale nehmen (Fig. 12 und Fig. 13) und den Kabel-
Sperrbügel (8, Fig. 22) durch Lockerung der Schrauben (9, Fig. 22) loslösen.
Reinigung der Pumpe.
4.2.
Pumpenradkammer auslösen (Fig. 14).
Den Rotor herausnehmen, dabei die Dichtung (Fig. 15) nicht verlieren.
Mit warmem Wasser, ohne Zusätze, den Rotor spülen (Fig. 16)
Die Dichtung wieder anbringen.
Den Rotor wieder einsetzen.
Achtung: Magnetfeld sehr stark, Vorsicht beim Einsetzen des Rotors ist geboten.
Die Laufradkammer einhängen.
Wird die Pumpe in kalkhaltigem Wasser benutzt, müssen Rotor und Motor regelmäßig sorgfältig gereinigt werden.
Kalk kann das Gerät für immer beschädigen.
Wiedermontage der Pumpe.
4.3.
Die Pumpe wieder positionieren, indem man sie nach vorne rutschen lässt, der Zapfen vorne an der Laufradkammer
muss sich also unter der Zunge der unteren Schale positionieren (Fig. 17), die Zunge wird dann nach unten
gedrückt, um das Einklappen der Motorrippen zu ermöglichen (Fig. 18).
Den Kabel-Sperrbügel anschrauben.
Die Pumpe schließen, indem man die obere Schale auf die untere Schale setzt (Fig. 19); die an der oberen Schale
vorhandenen Rippen wie auf Fig. 20 aufgezeigt einsetzen.
Die obere Schale mit der unteren Schale durch leichtes Andrücken verbinden, um das Einklappen mit den vorderen
Druckknöpfen zu ermöglichen (Fig. 21).
5.
SICHERHEITSVORSCHRIFTEN.
Vor jedem Eingriff muss das Gerät ausgesteckt werden.
Die Pumpe ist mit Überwärmungs-Sicherung ausgerüstet, die bei Störungen einspringt.
Sollte die Pumpe ganz plötzlich ausschalten, wird höchst wahrscheinlich die Überwärmungssicherung ausgelöst
worden sein.
Gegebenenfalls den Stecker ziehen und die Pumpe vorschriftsmäßig reinigen. Bevor man die Pumpe wieder
einschaltet muss sie abgekühlt sein. Die Pumpe also wieder ins Wasser setzen und mindestens 2 Stunden warten,
bevor man sie wieder einschaltet. Wenn die Pumpe nicht funktioniert, wenden Sie sich an ihren Händler.
Niemals die Hände ins Wasser tauchen, wenn die Pumpe eingeschaltet ist.
Netzanschluss mit Differentialschalter nicht über 30 [mA].
Bei Beschädigung des Kabels muss die Pumpe verschrottet werden, das Kabel kann nämlich nicht repariert werden.
Nur für den häuslichen Gebrauch geeignet.
Die Pumpe darf nicht trocken laufen.
Dieses Gerät ist nicht bestimmt für Personen (auch Kinder) mit physischen, sensorischen oder mentalen
Beeinträchtigungen oder Personen, die nicht über ausreichende Erfahrung und Kenntnisse verfügen, es sei denn,
sie wurden durch eine Person, die für ihre Sicherheit verantwortlich ist, in der Benutzung des Gerätes unterwiesen
oder anfänglich beaufsichtigt. Kinder sollten nicht unbeaufsichtigt bleiben, um sicherzustellen, dass sie nicht mit dem
Gerät spielen.
Die Elektroanlage muss den geltenden internationalen/nationale Richtlinien entsprechen.
6.
GARANTIE.
Allgemeines.
6.1.
i. Unter den nachstehenden Bedingungen, garantiert der Händler, dass das von dieser Garantie gedeckte
Produkt bei Übergabe keinerlei Konformitätsfehler aufweist.
ii. Die Garantiedauer beträgt zwei (2) Jahre, ab Übergabe des Produktes an den Käufer.
iii. Sollten während der Garantiezeit vom Käufer Konformitätsfehler beanstandet werden, muss der Händler das
Produkt auf eigene Kosten in einem von ihm gewählten Ort entweder reparieren oder ersetzen lassen.
iv. Sollte das Produkt nicht repariert oder ersetzt werden können, ist der Käufer dazu berechtigt einen
angemessenen Preisnachlass zu verlangen und bei wichtigeren Konformitätsfehlern kann er den
Verkaufsvertrag auflösen.
v. Die entsprechend dieses Garantiescheins reparierten oder ersetzten Teile verlängern nicht die Garantiedauer
des Originalproduktes, sondern unterliegen einer eigener Garantie.
vi. Diese Garantie ist nur gültig, wenn Einkaufsdatum und Übergabetag nachgewiesen werden können.
vii. Beanstandet der Käufer nach über sechs Monaten Konformitätsfehler, muss er die Fehlerursache nachweisen
können.

D E U T S C H
Nome file:
1.0134 - ISTRUZIONI NEUTRE SHP 6 LINGUE.docx Rev. 7 del 12/06/2013
Pagina/Page 16- di/of 24
viii. Der vorliegende Garantieschein beeinträchtigt nicht, weder beschränkt er Rechte, die den Konsumenten durch
nationale Übereinkommen eingeräumt wurden.
Besonderere garantiebedingungen.
6.2.
i. Die hier angeführten Garantieleistungen erstrecken sich auf die in diesem Handbuch beschriebenen Produkte.
ii. Dieser Garantieschein ist nur in den EG-Staaten gültig.
iii. Die Garantie ist nur gültig, wenn der Käufer die Herstellerhinweise, die dem Produkt beigelegt werden strikt
befolgt, wenn die Garantie für das jeweilige modell und die jeweilige Serie applizierbar ist.
iv. Liegt ein Plan für Ersetzung, Aufrechterhaltung und Reinigung vor, muss dieser berücksichtigt werden, um die
Garantieleistungen in Anspruch nehmen zu können.
Einschränkungen.
6.3.
i. Die vorliegende Garantie ist nur für Konsumenten, womit Personen, die das Produkt für nicht gewerbliche
Zwecke kaufen gemeint sind, gültig.
ii. Für die normale Abnutzung durch Gebrauch des Produktes, wird keine Garantie gewährt. Betreffend der Teile,
Komponenten und/oder des Verbrauchsmaterials wie Batterien, Lampen usw., sich an den in den
Begleitpapieren des jeweiligen Artikels enthaltenen Anweisungen halten.
iii. Die Garantie ist nicht gültig, wenn:
a. das Produkt nicht richtig gehandhabt wurde;
b. das Produkt durch nicht bevollmächtigte Personen repariert oder gewartet wurde oder
c. mit nicht originalen Ersatzteilen repariert wurde. Sollte ein Konformitätsfehler durch nicht korrekte
Installation oder Inbetriebnahme verursacht worden sein, ist die Garantie nur gültig, wenn Installation und
Inbetriebnahme im Verkaufsvertrag inbegriffen waren und vom Händler oder dessen Bevollmächtigten
durchgeführt worden sind.
7.
ABFALLENTSORGUNG ELEKTRISCHES/ELEKTRONISCHES MATERIAL
Gemäß Richtlinie 2002/96/EC wird diese Produkt als elektrisches/elektronisches Gerät eingestuft.
Dieses Gerät nicht als nicht klassifizierten Stadtmüll beseitigen.
Diese Gerät an eine dafür vorgesehene Sammelstelle bringen, gemäß den vorortigen und auf nationalem Gebiet
geltenden Gesetzesbestimmungen.
Der Verbraucher kann beträchtlich dazu beitragen den Abfall zu verringern, indem er ein Recycling der
elektrischen/elektronischen Geräte vorsieht.
Ein Recycling verhindert, dass gefährliches Material im allgemeinen Stadtmüll beseitigt wird.
Das Symbol mit ausgestrichener Tonne soll bedeuten, dass das damit gekennzeichnete Produkt nicht als nicht
klassifizierter Stadtmüll zu beseitigen ist.

Р У С С К И Й
Nome file:
1.0134 - ISTRUZIONI NEUTRE SHP 6 LINGUE.docx Rev. 7 del 12/06/2013
Pagina/Page 17- di/of 24
1.
ОПИСАНИЕ ПРОДУКТА ИСФЕРА ПРИМЕНЕНИЯ
Насос для ручьев ифильтров серии SHP представляет собой центробежный насос смагнитным приводом,
управляемый синхронным водозащищенным электродвигателем иявляется наиболее продвинутым из
маленьких насосов, представленных на рынке. Являясь мощным инадежным, насос предназначен для
частных водоемов счистой изагрязненной водой, содержащей твердые частицы размером до 7 мм.
Насос SHP оборудован револ ционным гибким патрубком (изготовленным по технической инструкции по
испытаниям E.T.O.), который обеспечивает правильное позиционирование насоса на дне пруда внескольких
разных направлениях, при этом, не ухудшая функциональных свойств.
Вследу щем разделе вы найдете все необходимые указания для лучшей адаптации насоса квашим
потребностям, которые помогут вам самостоятельно осуществлять чистку иобслуживание этого типа
продукта. Буквы, которые указаны вскобках соответству т деталям насоса, обозначенным на схеме,
приведенной вконце инструкции.
Всегда вл бых ситуациях производить манипуляции спродуктом можно только при вынутой
электровилке иникогда нельзя работать снасосом без его погружения вводу.
2.
Ограничения по применению
•
Максимальная температура воды: 35[°C]
•
Минимальная температура воды: 4 [°C]
•
Максимальная глубина погружения: 1 [m]
•
Минимальная глубина погружения: 10 [cm]
3.
ИСПОЛ ЗОВАНИЕ ИРЕГУЛИРОВКА
Пожалуйста, помните отом, что перед тем как запустить насос, он должен быть помещен вглубоку воду и
работать только вводе, внезависимости от того, как он используется, атакже отом, что насос нельзя
вкл чать вводоеме, вто время когда там находятся л ди.
После установки насоса присоединяется электровилка.
Гибкие трубки от Ø 20 [мм] до Ø 30 [мм] могут присоединятся кнасосу, при этом всегда применяется
соответству щий патрубок ((4) Fig.22).
Внимание: насос может работать только после его полной установки.
Использование сфильтром ( Fig. 1).
3.1.
Основным назначением насоса SHP является подача грязной воды из пруда кфильтру щей системе,
например, кнапорному фильтру или фильтру сбактерицидной УФ-лампой.
Для этого необходимо всего лишь присоединить патрубок для подачи кнасосу ишланг квходу вфильтр ((4)
Fig.22).
Вкл чите насос всеть после его окончательной установки.
Использование спрудовым скиммером (Fig. 2).
3.2.
Одной из интересных возможностей насоса SHP является возможность его работы споверхностной
системой очистки воды, такой как, например прудовой скиммер. ( Fig. 9).
Фактически, вэтом случае, прудовой скиммер ( Fig. 9) выполняет работу префильтра ипредварительно
отфильтрованная грязная вода далее поступает вфильтру щий бак при помощи насоса SHP.
Для этих целей необходимо сделать некоторые специальные адаптационные операции сфильтром SHP,
следуя инструкциям:
•
Открутите патрубок (4) ( Fig. 4)
•
Снимите верхний корпус, путем нажатия соответству щих кнопок ( Fig. 5)
•
Удалите маленьку крышку, размещенну под корпусом ( Fig. 6)
•
Примените адаптер для патрубка ( Fig. 7)
•
Закройте верхний корпус ( Fig. 8)
После этого насос готов кработе со скиммером ( Fig. 9).
Для пуска механизма просто подсоедините прудовой скиммер ( Fig. 9) кнасосу SHP идалее подсоедините
насос кфильтровальной установке.
Внимание: Никогда не соединяйте прудовой скиммер ( Fig. 9) сотверстием подачи насоса ((4), Fig. 22).
ИСПОЛ ЗОвание для устройства мальких водопадов (ручьев) (Fig. 3).
3.3.
Когда вода впруду чистая, вы можете использовать насос SHP для создания небольшого водопада всвоем
водоеме.
Для этого, просто поместите трубку подачи насоса, которая обычно соединяет насос ифильтр поверх
нескольких камней, которые хорошо закреплены.
Внимание: высота водопада не должна превышать допустиму высоту подъема насоса. Для этого проверьте
на каку высоту ваша модель насоса SHP может поднимать воду.
4.
ОБСЛУЖИВАНИЕ
Перед тем, как обрабатывать насос, все его электрические части должны быть откл чены. Никогда не
погружайте руки вводу, вкоторой находится работа щий насос. Обслуживание насоса ограничено его
чисткой.
Внимание: никогда не смазывайте продукт.

Р У С С К И Й
Nome file:
1.0134 - ISTRUZIONI NEUTRE SHP 6 LINGUE.docx Rev. 7 del 12/06/2013
Pagina/Page 18- di/of 24
разборка насоса
4.1.
Части насоса, которые подлежат чистке это: корпуса ((5) и(7), Fig. 22), ротор ((2), Fig.(22)) икамеру
лопастного колеса ((3), Fig. 22).
Для очистки корпусов достаточно промыть их большим количеством воды, вто время как очистка ротора
требует извлечения насоса из корпуса.
Для этого необходимо снять верхний корпус, при помощи фронтальных кнопок, как показано на Fig. 10 и
затем вращать его, как показано на Fig. 11. Для извлечения насоса просто освободите его от специальных
креплений на нижней части корпуса Fig. 12 иFig. 13, открутив соответственно гнездо, зажав кабель ((8), Fig.
22) работа щий на винтах ((9), Fig. 22).
ЧИстка насоса
4.2.
Освободите лопастное колесо из отсека Fig. 14.
Аккуратно разберите ротор, таким образом, чтобы не потерять уплотнительное кольцо Fig. 15.
Промойте двигатель теплой водой без мо щих средств Fig. 16.
Установите обратно уплотнитель.
Установите обратно ротор.
Внимание: Магнитное поле очень сильное. Будьте очень аккуратны при установке ротора вего отсек.
Установите камеру лопастного колеса.
Если насос эксплуатируется вкальцийсодержащей воде, важно регулярно иаккуратно чистить ротор и
двигатель. Известняк может вызвать необратимые повреждения продукта.
Повторная сборка насоса
4.3.
Переустановите насос, продвинув его вперед, таким образом, маленький зубчик камеры лопастного колеса
займет сво позици под язычком нижней части корпуса Fig. 17 изатем придавите насос косновани , для
того, чтобы крылья двигателя закрепились на предусмотренных креплениях Fig.18.
Закрутите гнездо выталкивателя кабеля.
Закройте насос надевая верхн часть корпуса на нижн , как показано на Fig. 19 для обеспечения
фиксации крыльев за верхней часть корпуса, как показано на Fig. 20.
Закрепите верхн часть корпуса внижней части, немного надавив на верхн часть корпуса, чтобы
обеспечить соединение за счет фронтальных кнопок Fig. 21.
5.
ПРАВИЛА БЕЗОПАСНОСТИ
Выньте электровилку из розетки перед тем, как совершать л бые манипуляции снасосом.
Насос снабжен тепловой защитой, которая срабатывает при сбоях вработе.
Если насос внезапно прекратил работу, это, вероятнее всего, означает, что сработала тепловая защита.
Вэтом случае, извлеките электровилку, посредством которой подается электричество на насос и
осуществите чистку, согласно вышеуказанным инструкциям. До момента перезапуска насос должен
полность охладиться. Для этого установите его повторно вводу иподождите как минимум 2 часа перед тем
как запустить снова. Если насос не запускается, обратитесь кпродавцу.
Никогда не погружайте руки вводу, если вней установлен работа щий насос.
Кабель насоса должен быть подкл чен ксети через дифференциальный выкл чатель не более 30 [мА].
Если кабель поврежден таким образом, что его невозможно отремонтировать, насос подлежит утилизации.
Применение ограничено домашним использованием.
Никогда не вкл чайте ине допускайте работы насоса без воды.
Не позволяйте детям играть сприбором. Данный прибор не предназначен для использования л дьми
(вкл чая детей) сограниченными физическими, сенсорными или умственными способностями, атакже
л дьми, которые име т недостаточный опыт изнания, если только они не были обучены специалистом.
Дети должны быть предостережены от игры сприборами.
Убедитесь, что электроустановка (электровилка) продукта соответствует действу щим предписаниям по
силе тока.
6.
ГАРАНТИЯ.
Общие положения.
6.1.
i.
Всоответствии сданными мерами предосторожности, продавец устанавливает, что гарантия на продукт
(далее «продукт») не распространяется на время его доставки.
ii.
Гарантийный период на продукт составляет 2 (два) года смомента передачи товара покупател .
iii.
Вслучае уведомления покупателем онеисправности продукта втечение гарантийного периода, при
надлежащем обращении спродуктом втечение гарантийного периода, продавец чинит или заменяет
продукт за свой счет.
iv.
Вслучае невозможности починить или заменить продукт, продавец имеет право договориться с
покупателем об уценке, авслучае серьезных нарушений со стороны покупателя мер предосторожности
иправил эксплуатации, расторгнуть гарантийное соглашение.

Р У С С К И Й
Nome file:
1.0134 - ISTRUZIONI NEUTRE SHP 6 LINGUE.docx Rev. 7 del 12/06/2013
Pagina/Page 19- di/of 24
v.
Замененные или отремонтированные по гарантии части не продлева т общий срок гарантии на весь
продукт, но име т сво отдельну гаранти .
vi.
Для обеспечения действительности гарантии, покупатель должен отметить дату приобретения и
получения продукта.
vii.
Если покупатель заявляет онесоответствии продукта более, чем через шесть месяцев смомента
получения продукта, покупатель должен доказать наличие ипричину такого несоответствия.
viii.
Данный Гарантийный Сертификат ни коим образом не ограничивает или наносит вред правам
потребителя, соответству щим национальным обязательным нормам.
Особые условия.
6.2.
i.
Гарантия распространяется на продукты, описанные вданной инструкции по эксплуатации.
ii.
Гарантийный Сертификат распространяется на страны Европейского Со за иРосси .
iii.
Для обеспечения действительности гарантии, покупатель должен четко следовать всем инструкциям
завода-изготовителя, указанным вдокументации на продукт, сучетом ее применения кконкретной
модели продукта.
iv.
Если документацией установлен режим по замене, обслуживани или чистке отдельных частей или
компонентов продукта, гарантия будет действовать только при правильном собл дении установленного
режима.
Ограничения
6.3.
i.
Данная гарантия действует искл чительно по отношени кпотребителям, которые покупа т продукт с
целями отличными от использования продукта всвоей профессиональной деятельности.
ii.
Гарантия не распространяется на естественный износ, возника щий при использовании продукта.
Износ частей, компонентов и/или расходных материалов, таких как роторы, подшипники, лампы, кольца,
уплотнители, губки, картриджи ит.п. подлежит гарантии только при строгом собл дении мер
предосторожности иэксплуатации, указанных вдокументации кпродукту.
iii.
Гарантия не действительна, если:
d. спродуктом обращались ненадлежащим образом;
e. продукт был починен, обслуживался или установлен неавторизованным персоналом;
f. продукт ремонтировался сиспользованием неоригинальных запасных частей. Если неисправность
продукта обеспечена неправильной установкой или вводом вэксплуатаци , данная гарантия
покрывает только те случаи, когда такая установка или ввод вэксплуатаци были произведены
силами продавца или третьих лиц, за которые он несет ответственность, при наличии закл ченного
соглашения на такие работы.
7.
Примечания по утилизации
Директива ЕС - 2002/96/EC классифицирует данный продукт, как электрический или электронный
инструмент.
Не утилизируйте данный инструмент, как не рассортированный муниципальный мусор.
Утилизируйте данный инструмент вместном центре по сбору ипереработке отходов, предписанном
национальным законодательством.
Потребитель исполняет важну роль всокращении количества отходов, передавая использованный
электронный или электрический инструмент на переработку.
Переработка позволяет избежать рассеивания опасных веществ вмуниципальные стоки.
Символ перечеркнутого мусорного бака напоминает пользовател отом, что данный продукт нельзя
утилизировать как не рассортированный муниципальный мусор.
CARATTERISTICHE TECNICHE - TECHNICAL CHARACTERISTICS – CARACTÉRISTIQUES TECHNIQUES -
CARACTÉRISTIQUES TECHNIQUES - TECHNISCHE EIGENSCHAFTEN - ТЕХ ИЧЕСКИЕ ХАРАКТЕРИСТИКИ
Nome file:
1.0134 - ISTRUZIONI NEUTRE SHP 6 LINGUE.docx Rev. 7 del 12/06/2013
Pagina/Page 20- di/of 24
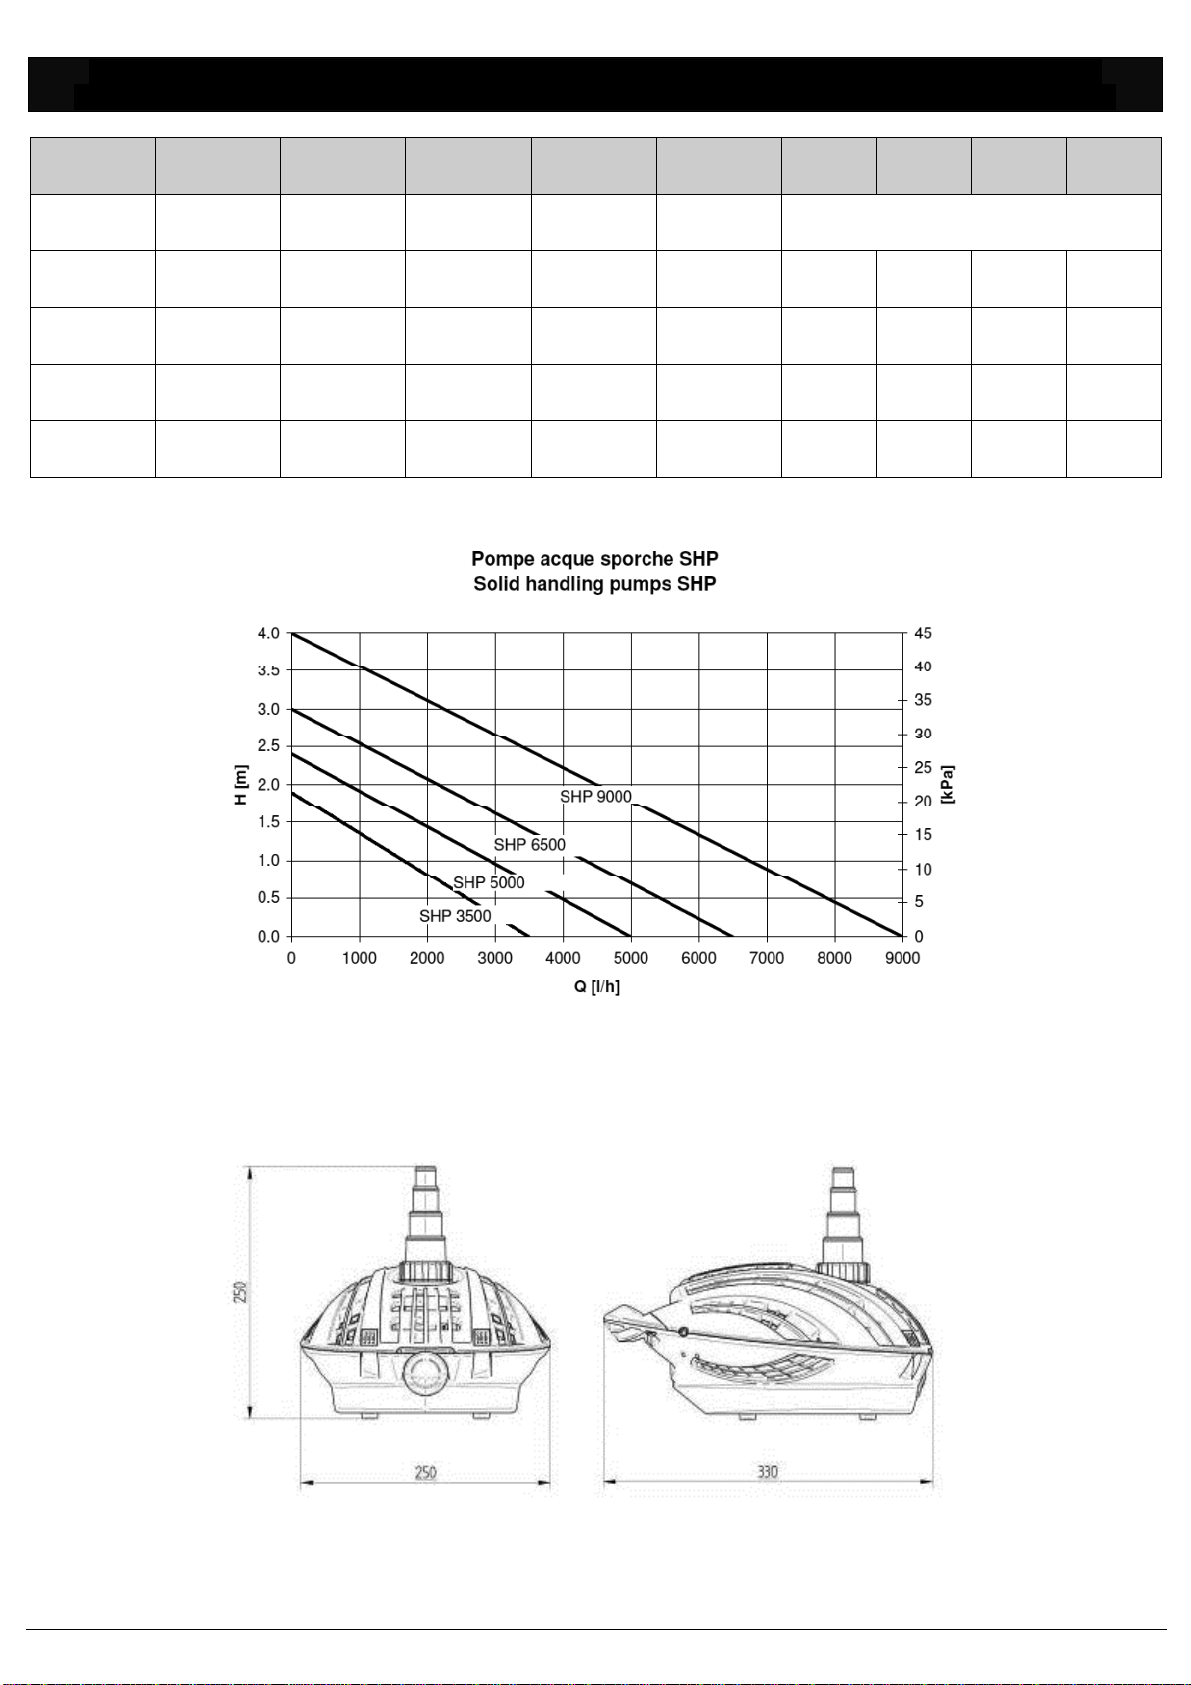
ITA ING SPA FRA DEU RUS SHP
3500 SHP
5000 SHP
6500 SHP
9000
Tensione Tension Tensiòn Tension Spannung Напряжение 230 [V] – 50 [Hz]
Potenza Power Energìa Puissance Leistung Электроэнергия 50 [W] 65 [W] 110 [W] 140 [W]
Portata Flow rate Caudal Débit Förderleistung Скорость потока 3500 [l/h] 5000 [l/h] 6500 [l/h] 9000 [l/h]
Prevalenza Maximum head Cabeza màxima Hauteur
maximum Förderhöhe Максимальная
высота подъема
воды 1.9 [m] 2.4 [m] 3 [m] 4 [m]
Peso Weight Peso Poids Gewicht Вес 1.8 [kg] 1.8 [kg] 2 [kg] 2 [kg]
This manual suits for next models
3
Table of contents
Languages:


