ShowTex KABUKI 30 User manual
INSTALLATION MANUAL
KABUKI 30
06/2021
DISCLAIMER & COPYRIGHT
No part of this publication may be duplicated or edited in any form or
by any means, including any type of electronic or mechanical method
without prior written permission from ShowTex.
ShowTex NV and its employees are fully aware of their task to provide a reliable edition
of this document. Nevertheless they can accept no liability for (the direct or indirect
consequences of) imperfections that might remain in this edition. The material in this
manual is subject to change without notice.
All products from the ShowTex Rental range are supposed to be returned in the same state
as they were rented. Please treat our products with care, allowing the next user to enjoy
the products as much as you did. The rented products are internally checked according to
the general rental conditions. Be sure to check our rental guidelines on our website before
installing and using this product:
http://www.showtexrental.com/showtex-rental-guidelines.
Read and understand this user manual before installing and
or operating the automatic reveal system. Failure to follow the
instructions in this document could result in serious injury!
As a result of the above warning, any ShowTex product must be installed
and operated by a qualified technician who has knowledge of its
capabilities as well as its limitations.
Following the guidelines of this manual will reduce the risk of damaging the
equipment or injuring yourself and the people around you. Damage to the system
caused by any other method of installation than the one shown in this manual can
only be repaired or fixed at the customer’s expense.
CONTENT
Disclaimer & copyright................................................................................................................................................................. 2
Intro..................................................................................................................................................................................................... 3
Warranty ............................................................................................................................................................................................ 3
Product description....................................................................................................................................................................... 3
Safety instructions ......................................................................................................................................................................... 3
Max load & distance.............................................................................................................................................................. 4
Technical specifications ............................................................................................................................................................... 5
Components............................................................................................................................................................................ 5
Assembled Kabuki 30........................................................................................................................................................... 6
Front, top and bottom plan view ............................................................................................................................ 6
Side and exploded view ............................................................................................................................................. 7
Installation ........................................................................................................................................................................................ 8
Necessary steps ...................................................................................................................................................................... 8
Necessary tools....................................................................................................................................................................... 8
How to........................................................................................................................................................................................ 9
Fasten the 100 Kg Hook Clamp................................................................................................................................ 9
Connect the Kabuki and the remote control ....................................................................................................10
Arm the Kabuki ...........................................................................................................................................................11
Grip the fabric or the ribcord ..................................................................................................................................12
Release the Kabuki manually..................................................................................................................................13
Care & maintenance ...................................................................................................................................................................14
Trouble shooting ..........................................................................................................................................................................14
Contact & support........................................................................................................................................................................14
SHOWTEX INSTALLATION MANUAL KABUKI 30 2

INTRO
Thank you for purchasing a ShowTex product.
Please take a moment to read this manual before installing or starting to use your
new curtain track system. It contains important information regarding health and
safety regulations and will guide you through the installation process safely and will
show you how to use the system without injuring yourself or the people around you.
WARRANTY
ShowTex warrants that its mechanical/technical products, when delivered in new
condition, in original packaging, sold directly and used in normal conditions, are
free from any defects in manufacturing, materials and workmanship. The warranty
shall only apply if the mandatory preventive maintenance actions as described in the
technical documentation have been executed by skilled people. Warranty starts on
invoice date for a period of 24 months.
Please read the entire warranty declaration on our website www.showtex.com before
installing & using this product.
PRODUCT DESCRIPTION
The individual module of the famous Kabuki curtain drop system now
comes with even more reveal options. Just attach your fabric or sashline
thanks to the friction technology and trigger the release with a single push
of a button. Its compact size allows you to mount the system wherever you want: in
corners, upside down, on the floor or anywhere on stage. Especially when coupled
with the HiSpeed Reveal or traditional Kabuki system, the options of the solo Kabuki
module are endless.
SAFETY INSTRUCTIONS
Only use ShowTex components for this product (control units, cables,…)
Kabuki 30 must be installed with appropriate hook clamp and safety
hinge cable. If not, the safety of environment and people is compromised
Note that this is a friction holding system, for fabric only. Do not hang lighting or
any other objects. The maximum traction weight mustn’t exceed 20kg. Overloading
can cause damage to the system and endanger the safety of its users and direct
environment.
The operator should always keep an eye on the system during operation and make
sure no one walks or places any object under the load. Do not allow any item to be
operated or used when in doubt about the safety or good working order to avoid
accidents and injuries. Most accidents are the result of lack of training, carelessness
and overconfidence, do not assume anything.
The person in charge of overseeing and ensuring the safety of the operating process
always have a good viewing angle to ensure an incident-free operation. If something
goes wrong, pressing the emergency stop will instantaneously freeze the system in
a reveal case when using Hispeed Reveal. In case of power brake-down, the magnet
will stay activated. The system can be released manually.
The fabrics should be in good condition checked and tested before use. All cables
and ropes must be checked, secured and attached in a way that they can’t interfere
with the system’s movement. Do not use any damaged fabric or cables. Do not use
fabric with weights or eyelets and do not attach it with Griptex when coupled
with Hispeed Reveal.
Disassembly must be carried out under the same conditions and following the same
steps as assembly. Remove all curtains or other suspended items before removing the
module from its permanent location.
The system must be installed in a dry frost-free environment that doesn’t exceed 50°C.
To prevent electrocution and contact with moving parts, disable the
power supply before carrying out any work on the units.
SHOWTEX INSTALLATION MANUAL KABUKI 30 3

TECHNICAL SPECIFICATIONS
COMPONENTS
The following components are parts of the Kabuki 30 system.
For more technical information, please refer to the technical datasheet.
LEGEND
/m Weight per metre.
/p Weight per piece.
/s Weight per set
93
207
132
Kabuki 30 Brake
Article code Colour
8145 0000 0007 Black
Info Weight
Max. working load 20 kg 2.15 kg/pc
Safety cable
Article code Colour
8700 0306 0607
8700 0306 1207
Black
Black
Info Weight
Length: 60 cm
Length: 120 cm
0.08 kg/pc
0.11 kg/pc
145
95
227
Control unit
Article code Colour
8150 0950 0010 Black
Info Weight
0.82 kg/pc
Connection cable - 2m
Article code Colour
8145 0915 0007 Black
Info Weight
Length: 200 cm 0.45 kg/pc
170
110
30
Hook Clamp 100kg
Article code Colour
8700 0677 1007 Black
Info Weight
100 kg capacity
ø: 38/51 mm 0.50 kg/pc
Power Cord - True1 / Open - 2m
Article code Colour
8145 0912 0027 Black
Info Weight
Length: 200 cm 0.35 kg/pc
Power Cord - True1 / Schuko - 2m
Article code Colour
8145 0912 0017 Black
Info Weight
Length: 200 cm 0.44 kg/pc
SHOWTEX INSTALLATION MANUAL KABUKI 30 4

SHOWTEX INSTALLATION MANUAL 5KABUKI 30
ASSEMBLED KABUKI 30
FRONT, BACK, TOP AND BOTTOM PLAN VIEW
Front view Back view
Top view
Bottom plan view
SHOWTEX INSTALLATION MANUAL 6KABUKI 30
SIDE AND EXPLODED VIEW

INSTALLATION
This chapter provides all required information and steps necessary for installing a Kabuki 30 system.
Note that a certain technical knowledge and experience are required to understand this guide and install this produc
BE SURE TO CHECK THE “HOW TO …” CHAPTER FOR CORRECT INSTALLATION OF THE SYSTEM.
NECESSARY STEPS
1. Check that correct channel nut is mounted (M10 or 3/8” ).
2. Fasten 100kg Hook Clamp as provided and fix to truss.
3. Install all units at appropriate locations.
4. Connect all cables.
5. Perform safety instruction check-up.
6. Arm Kabuki 30.
7. Insert fabric or 6mm sashline in the gripping zone.
8. Repeat operation on other units.
9. Trigering the cotrol unit will release the gripping system.
10. Check that power trigger does not exceed 30 seconds.
11. Go back to step 6 to reload the system.
12. Arm every unit before dismantling.
NECESSARY TOOLS
The following tools are needed to install the Kabuki 30
SHOWTEX INSTALLATION MANUAL 7KABUKI 30
Allen Key n°4
Allen Key n°8

Always check that screw for fixing hook clamp or any other fixture is correctly tightened. Attach the unit to to a fix point (truss,…) with the safety hinge cable.
In case of fixing on a solid surface, make sure that fixing bolt is 10mm length (see below).
SOLID SURFACE
Safety Hinge Cable
10mm
SHOWTEX INSTALLATION MANUAL 8KABUKI 30
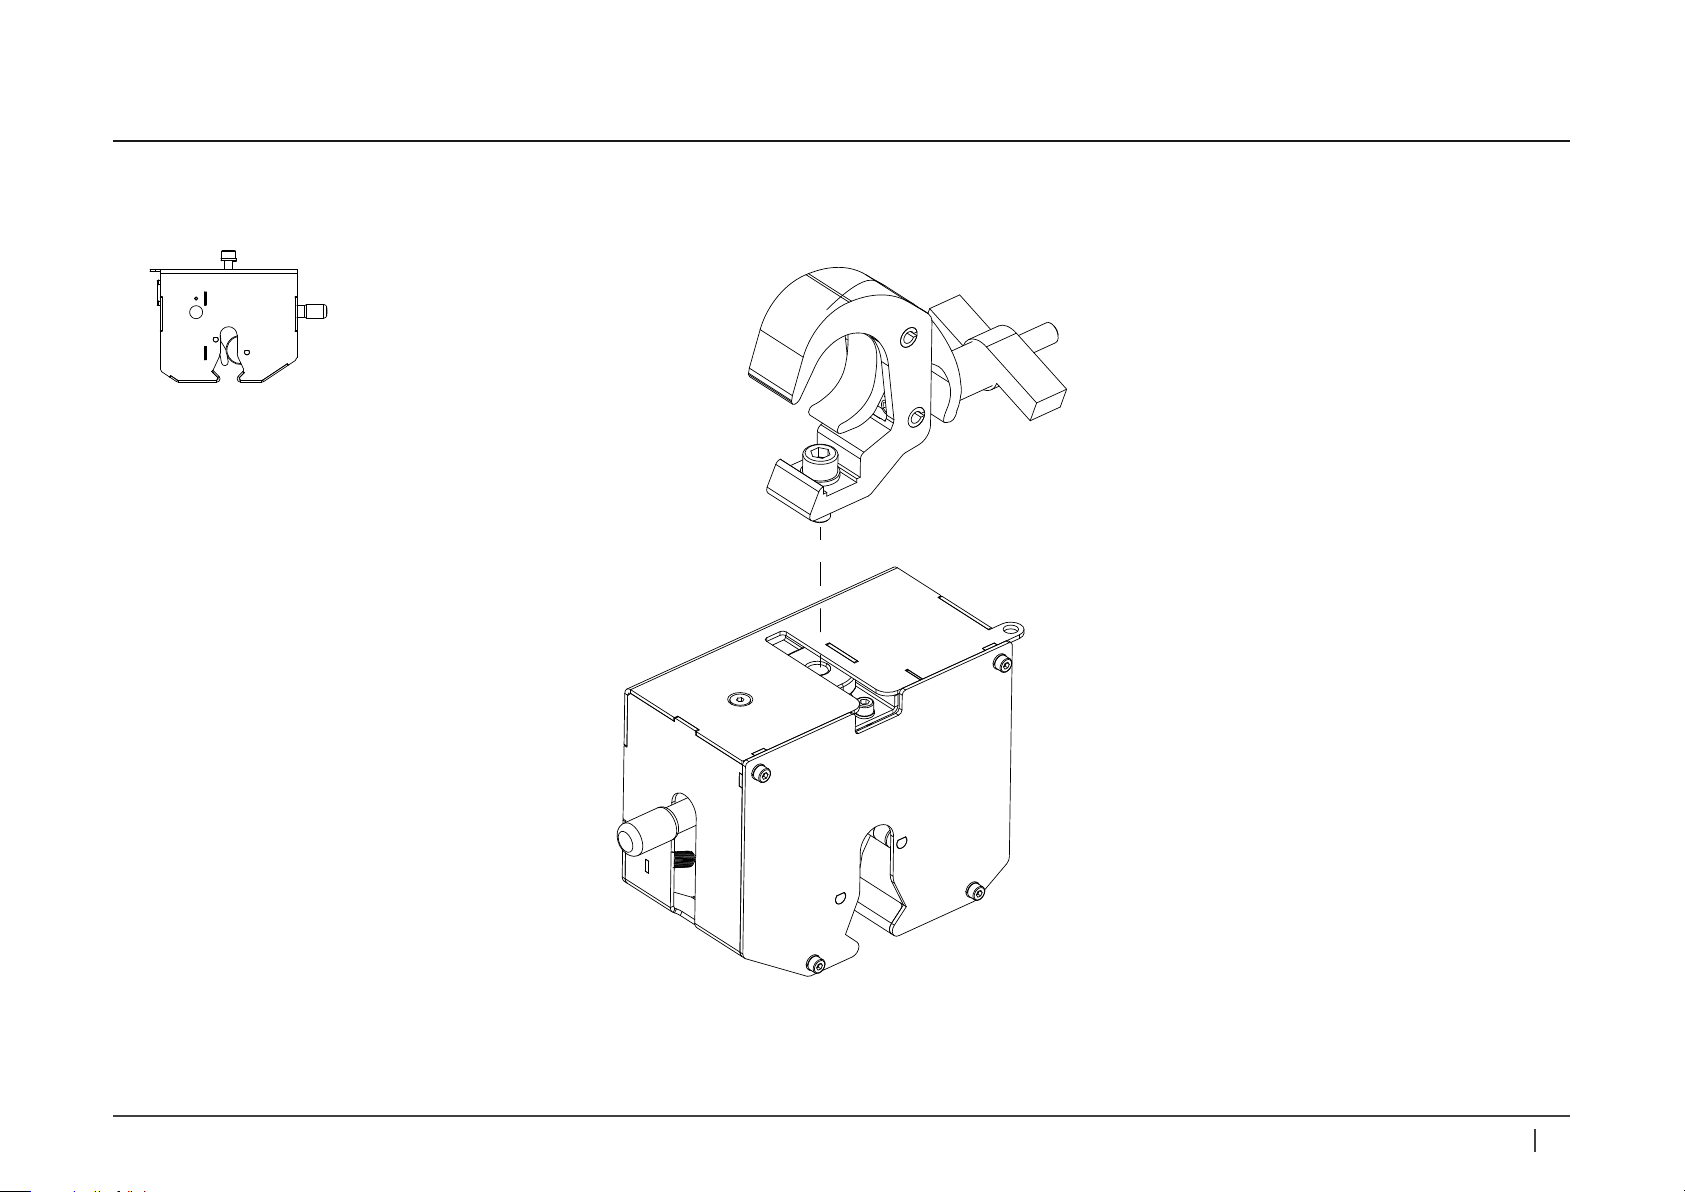
2: Fasten hook clamp to channel nut in Kabuki using screw and spring washer (M10x25). Note that US 3/8” bolt can also be used.
1: Insert screw M10 + spring washer in the hook clamp
HOW TO...
FASTEN THE 100 KG HOOK CLAMP
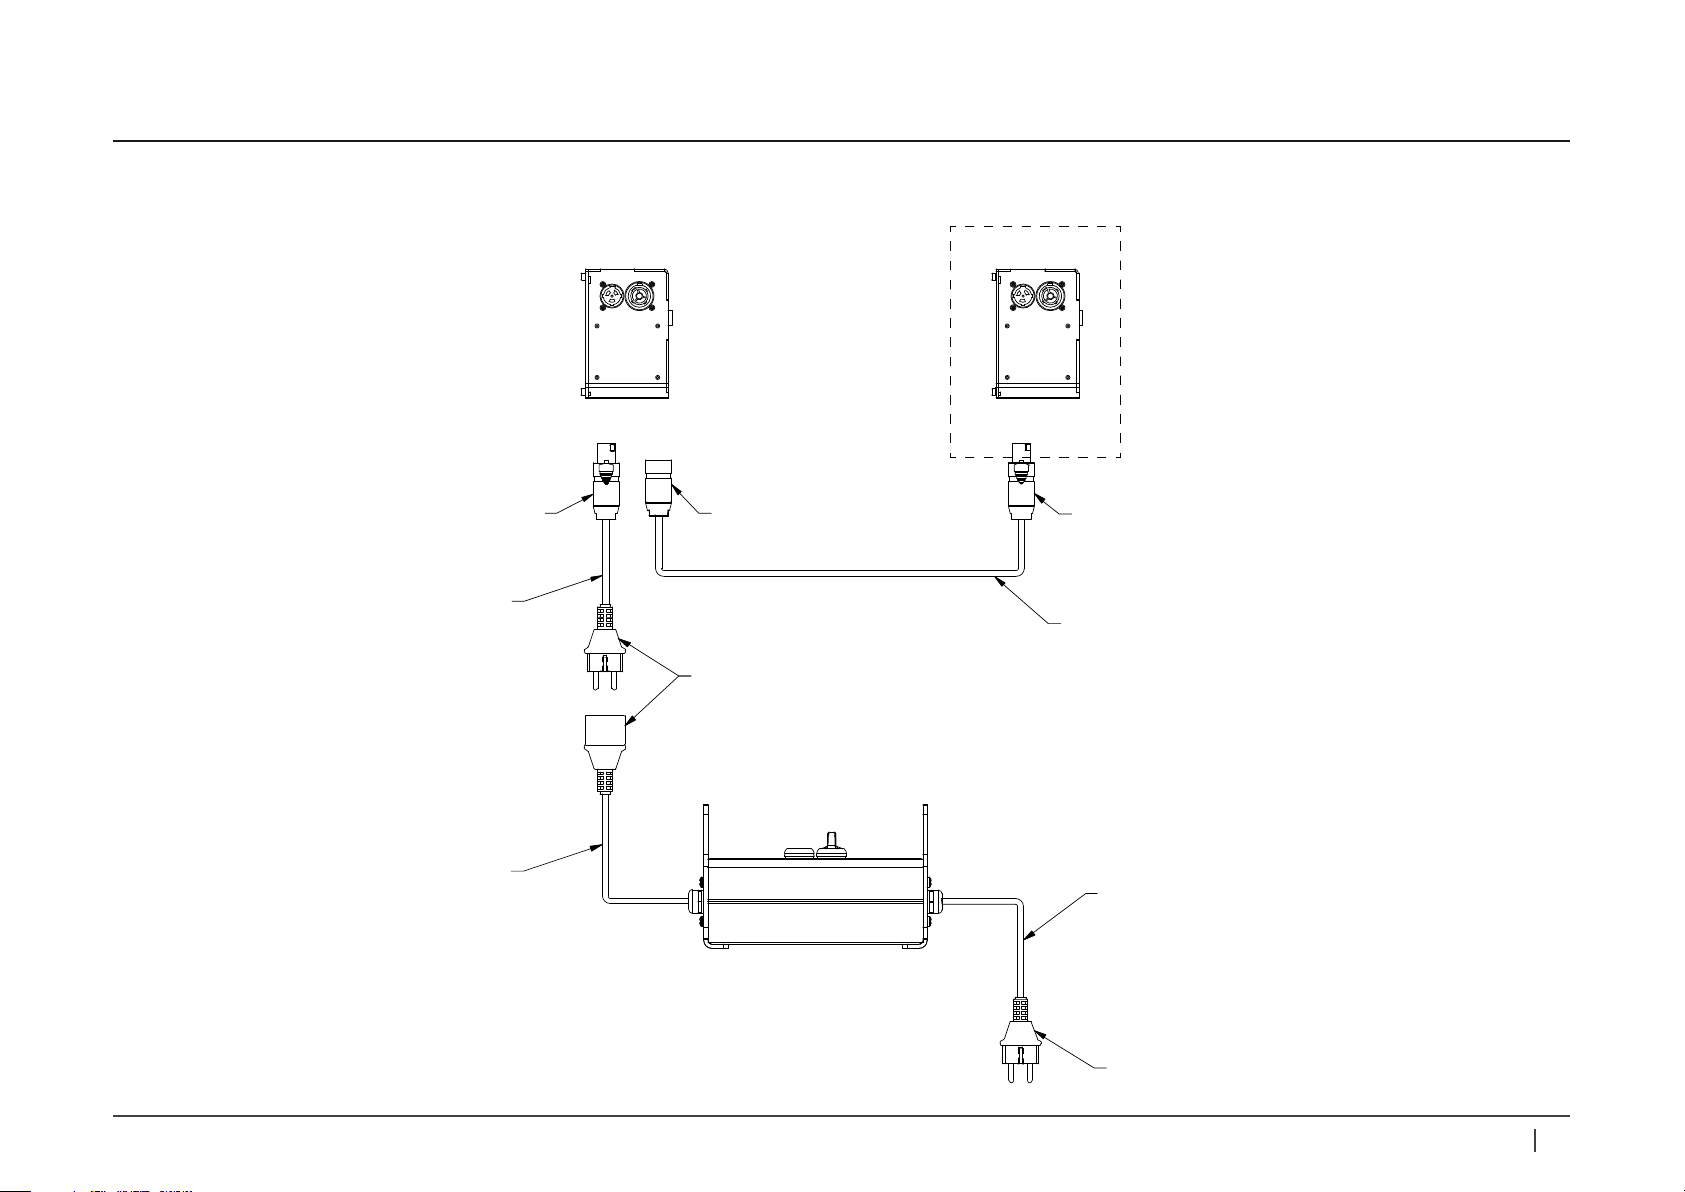
IN OUT IN OUT
Schuco main connector
230VAC - 0.5A
115VAC - 0.75A
Schuco main connector
230VAC - 0.5A
115VAC - 0.75A
PowerCON TRUE1
NAC3MX-W
PowerCON TRUE1
NAC3FX-W
PowerCON TRUE1
NAC3FX-W
3G1.5
3G1.5
3G1.5
3G1.5
Kabuki 30
Remote Unit
Next Kabuki 30
SHOWTEX INSTALLATION MANUAL 9KABUKI 30
CONNECT THE KABUKI AND THE REMOTE CONTROL

SHOWTEX INSTALLATION MANUAL 10KABUKI 30
ARM THE KABUKI
To prevent any damage and ensure a smooth installation, the following steps must be applied to arm the Kabuki.
After Step 3, the excentric cylinder must be able to move up freely, it is now ready to grip fabric or 6mm sashline.
STEP 1:
Push up the excentric cylinder
STEP 2:
By doing Step 1, reload the lever
STEP 3:
Release the excentric cylinder

SHOWTEX INSTALLATION MANUAL 11KABUKI 30
GRIP THE FABRIC OR THE SASHLINE
1: Slide the fabric in the gripping system, make sure that no extra fabric or end of ribcord goes to far in the unit.
2: If the gripping system seems blocked (you can’t slide material), just manually release the system and re-arm.
SASHLINE 6MM: RIBCORD 1&2MM:
(Maximum angles of use)

SHOWTEX INSTALLATION MANUAL 12KABUKI 30
RELEASE THE KABUKI MANUALLY
1: The magnet is permanent holding, the system won’t release if no power trigger is applied, manual release is then possibe. Pull down the lever shortly but strongly.
2: Make sure that re-arming is done correctly (excentric cylinder must be free to move).
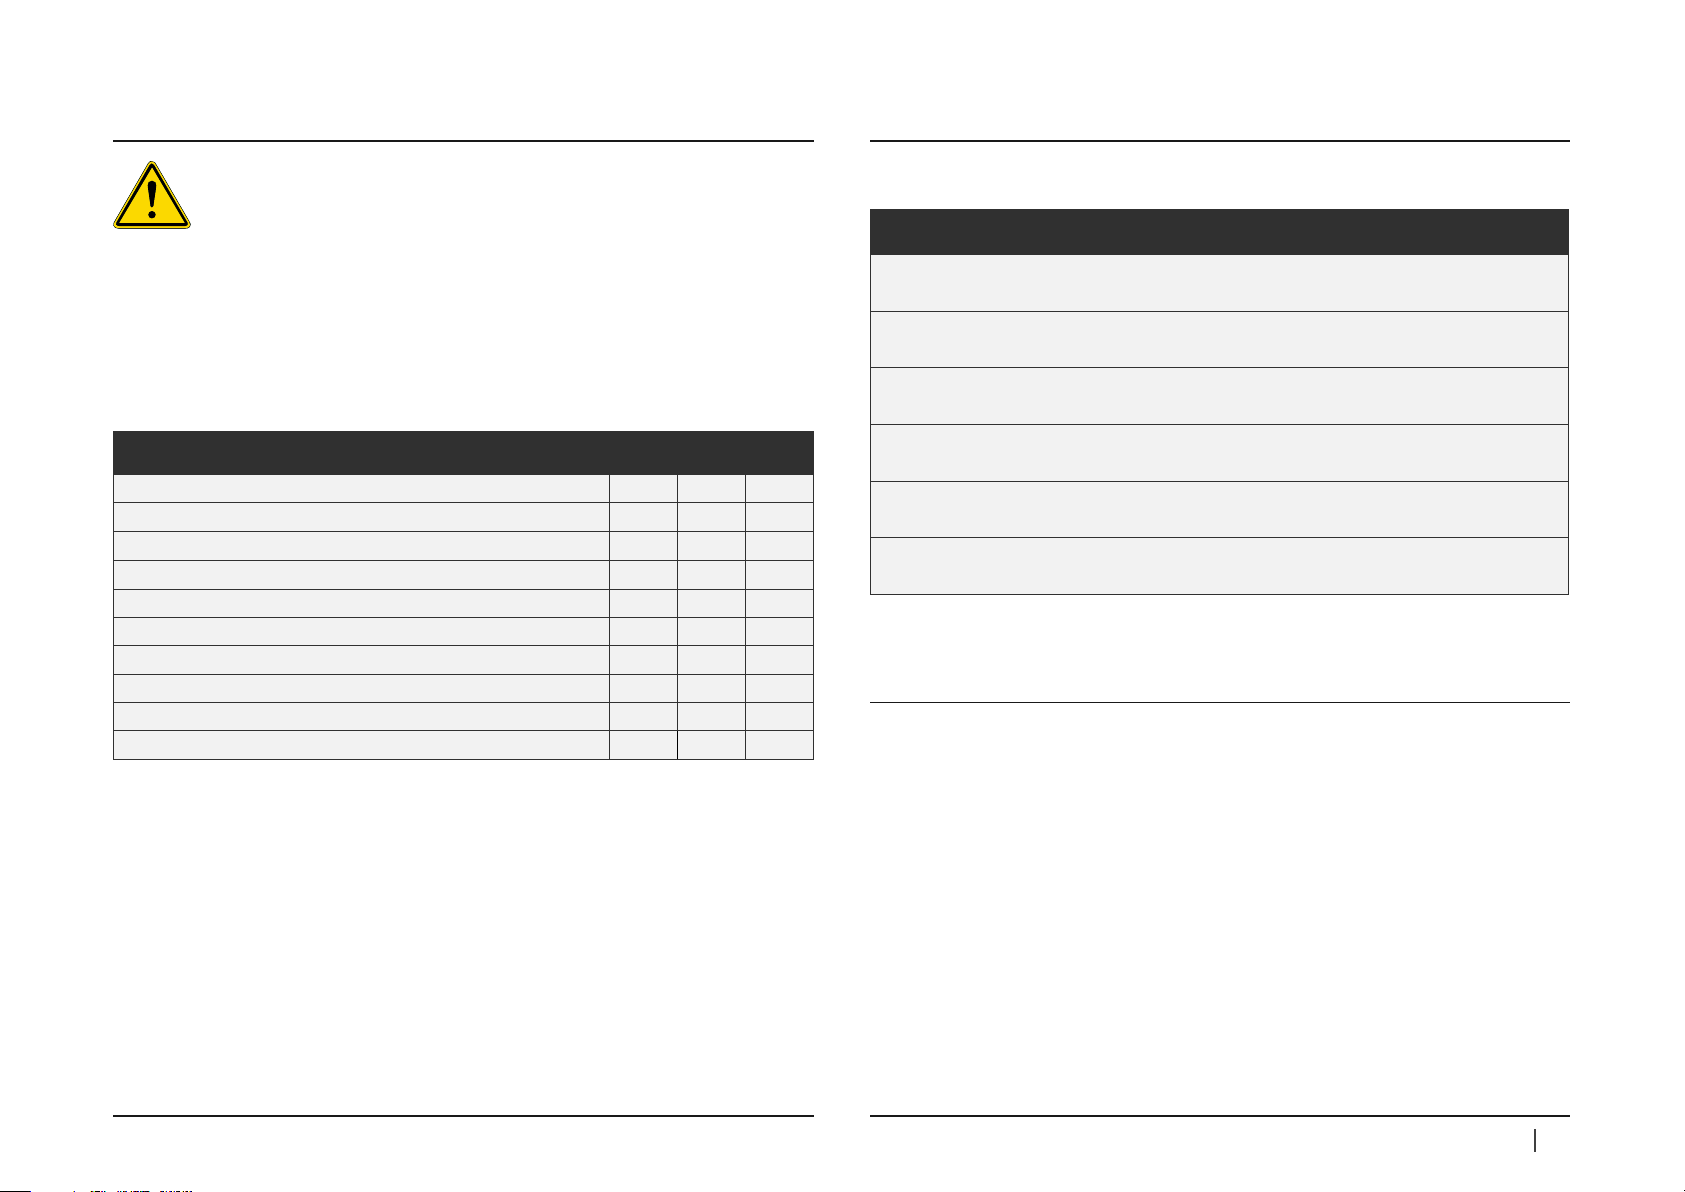
CARE & MAINTENANCE
Periodic, regularly scheduled maintenance inspections are necessary for
any mechanical system. A theatrical curtain track system is no different. It
has components that must be inspected, adjusted, maintained and
replaced. In order to keep your system safe and in good working order, a regular
inspection and maintenance program must be implemented.
Follow the schedule outlined below as a minimum maintenance programme. Once
the operating personnel has had an opportunity to work with the system during the
requirements.
TROUBLE SHOOTING
Please perform the following steps if:
CONTACT & SUPPORT
For more technical assistance, please contact your local ShowTex branch, the address
and contact information can be found on our website:
www.showtex.com
THE FABRIC DOESNOTRELEASE WHEN TRIGGERED
1. Check that trigger time is sufficient (2 seconds). Pressing to briefly on trigger button is
sometimes not enough.
2. Check that no extra fabric or end of ribcord is blocked somewhere in casing.
3. Check that system releases properly without any fabric.
4. Check that sashline is 6mm diameter (not less, not more).
5. Check that maximum angles of use are not exceeded.
6. Check that fixing bolt (for hook clamp or solid surface) does not exceed recommended length.
ITEM W M Y
Operate trigger x
Listen for unusua noise x
Check that a piece of fabric can be released thanks to gravity only x
Check state of ruber gripping surface on excentric cylinder x
Inspect state of locking nuts and bolts, use same model if necessary x
Inspect rigging clamps and safety hinge cable x
Check if the magnet is free of metal particles x
Check that chaining units operates correctly x
Inspect state of electrical cables, change if necessary x
Change ruber gripping sticker 2x
* W = every week
* M = every month
* Y = every year (“2x”= every 2 years)
Within 24hours of using a recently installed system, confirm all these last steps.
The best way to maintain your system is by using it regularly. This will allow the
inspector to regularly check for unusual noise or drag in the system. Above-average
use or operating the system at locations subject to high humidity, dust, extreme
temperature changes, etc. may require shorter intervals than indicated in the
scheduled programme outlined above.
SHOWTEX INSTALLATION MANUAL KABUKI 30 13
Table of contents
Other ShowTex Industrial Equipment manuals


