Shukla Medical Xtract-All Hip Series User manual

Surgical Technique Guide
...Because Every Minute Counts®
©Shukla Medical 2018 •FCD-0358 REV04

3
®
FCD-0358 REV04
Xtract-All® Hip (104-00) Universal Hip Stem Extraction System
2
®
FCD-0358 REV04
Xtract-All® Hip (104-00) Universal Hip Stem Extraction System
Introduction Warning and Precautions
Intended Use
The Xtract-All® Universal Hip Stem Extraction
System is designed for the removal of hip implants
during revision procedures.
Indications for Use
For use by, or as directed by, a surgeon during
hip revision surgeries. Appropriate for removal of
most hip implant types, including but not limited
to tapered neck, monoblock, threaded, & modular
stems.
Contraindications
The Xtract-All® Hip System includes multiple
attachment methods specic to a variety of hip
stem implant styles. All attachment congurations
ultimately connect to the Extraction C-frame and
require repeated strikes with a mallet to extract the
implant. Therefore, when there is insufcient quality
or quantity of bone, or any other condition that may
result in fracture of the femur during extraction, the
provided instrumentation should not be used.
Listed below are possible (not inclusive) scenarios
in which the Xtract-All® Hip System should not be
used:
• Fully porous-coated straight and bowed stems:
Due to the excessive bone ingrowth on fully
porous-coated straight and bowed stems, it is not
recommended to use this system for removal of
such implants.
• Foreign body sensitivity: Where material
sensitivity is suspected, appropriate tests should be
performed to rule out sensitivity prior to use.
Preoperative
• The surgeon should be familiar with general
principles of revision surgery and techniques for
removal of implants.
• The instruments should be inspected for visible
damage prior to use. Do not use the product if
damage is suspected.
• Only validated cleaning and sterilization procedures
should be used
Operative
• Proper handling and storage of the instrumentation
is mandatory. Damage to the instrumentation may
produce stresses and cause defects, which could
become a focal point for failure.
• The surgeon should be cautious with limb position
change and/or excessive force when extracting
implants with instrumentation provided in the tray.
Hip stem extractor
Introduction ........................................................................................................................................................ Page 3
List of Components ......................................................................................................................................... Page 4
Surgical Technique .......................................................................................................................................... Page 6
Surgical Technique - Modular Hip Stems .............................................................................................. Page 9
Cleaning & Sterilization ................................................................................................................................. Page 10
Contents
5
FCD-0358 REV04
Xtract-All® Hip (104-00) Universal Hip Stem Extraction System
4
®
FCD-0358 REV04
Xtract-All® Hip (104-00) Universal Hip Stem Extraction System
Single-Use Only Extractor Tips
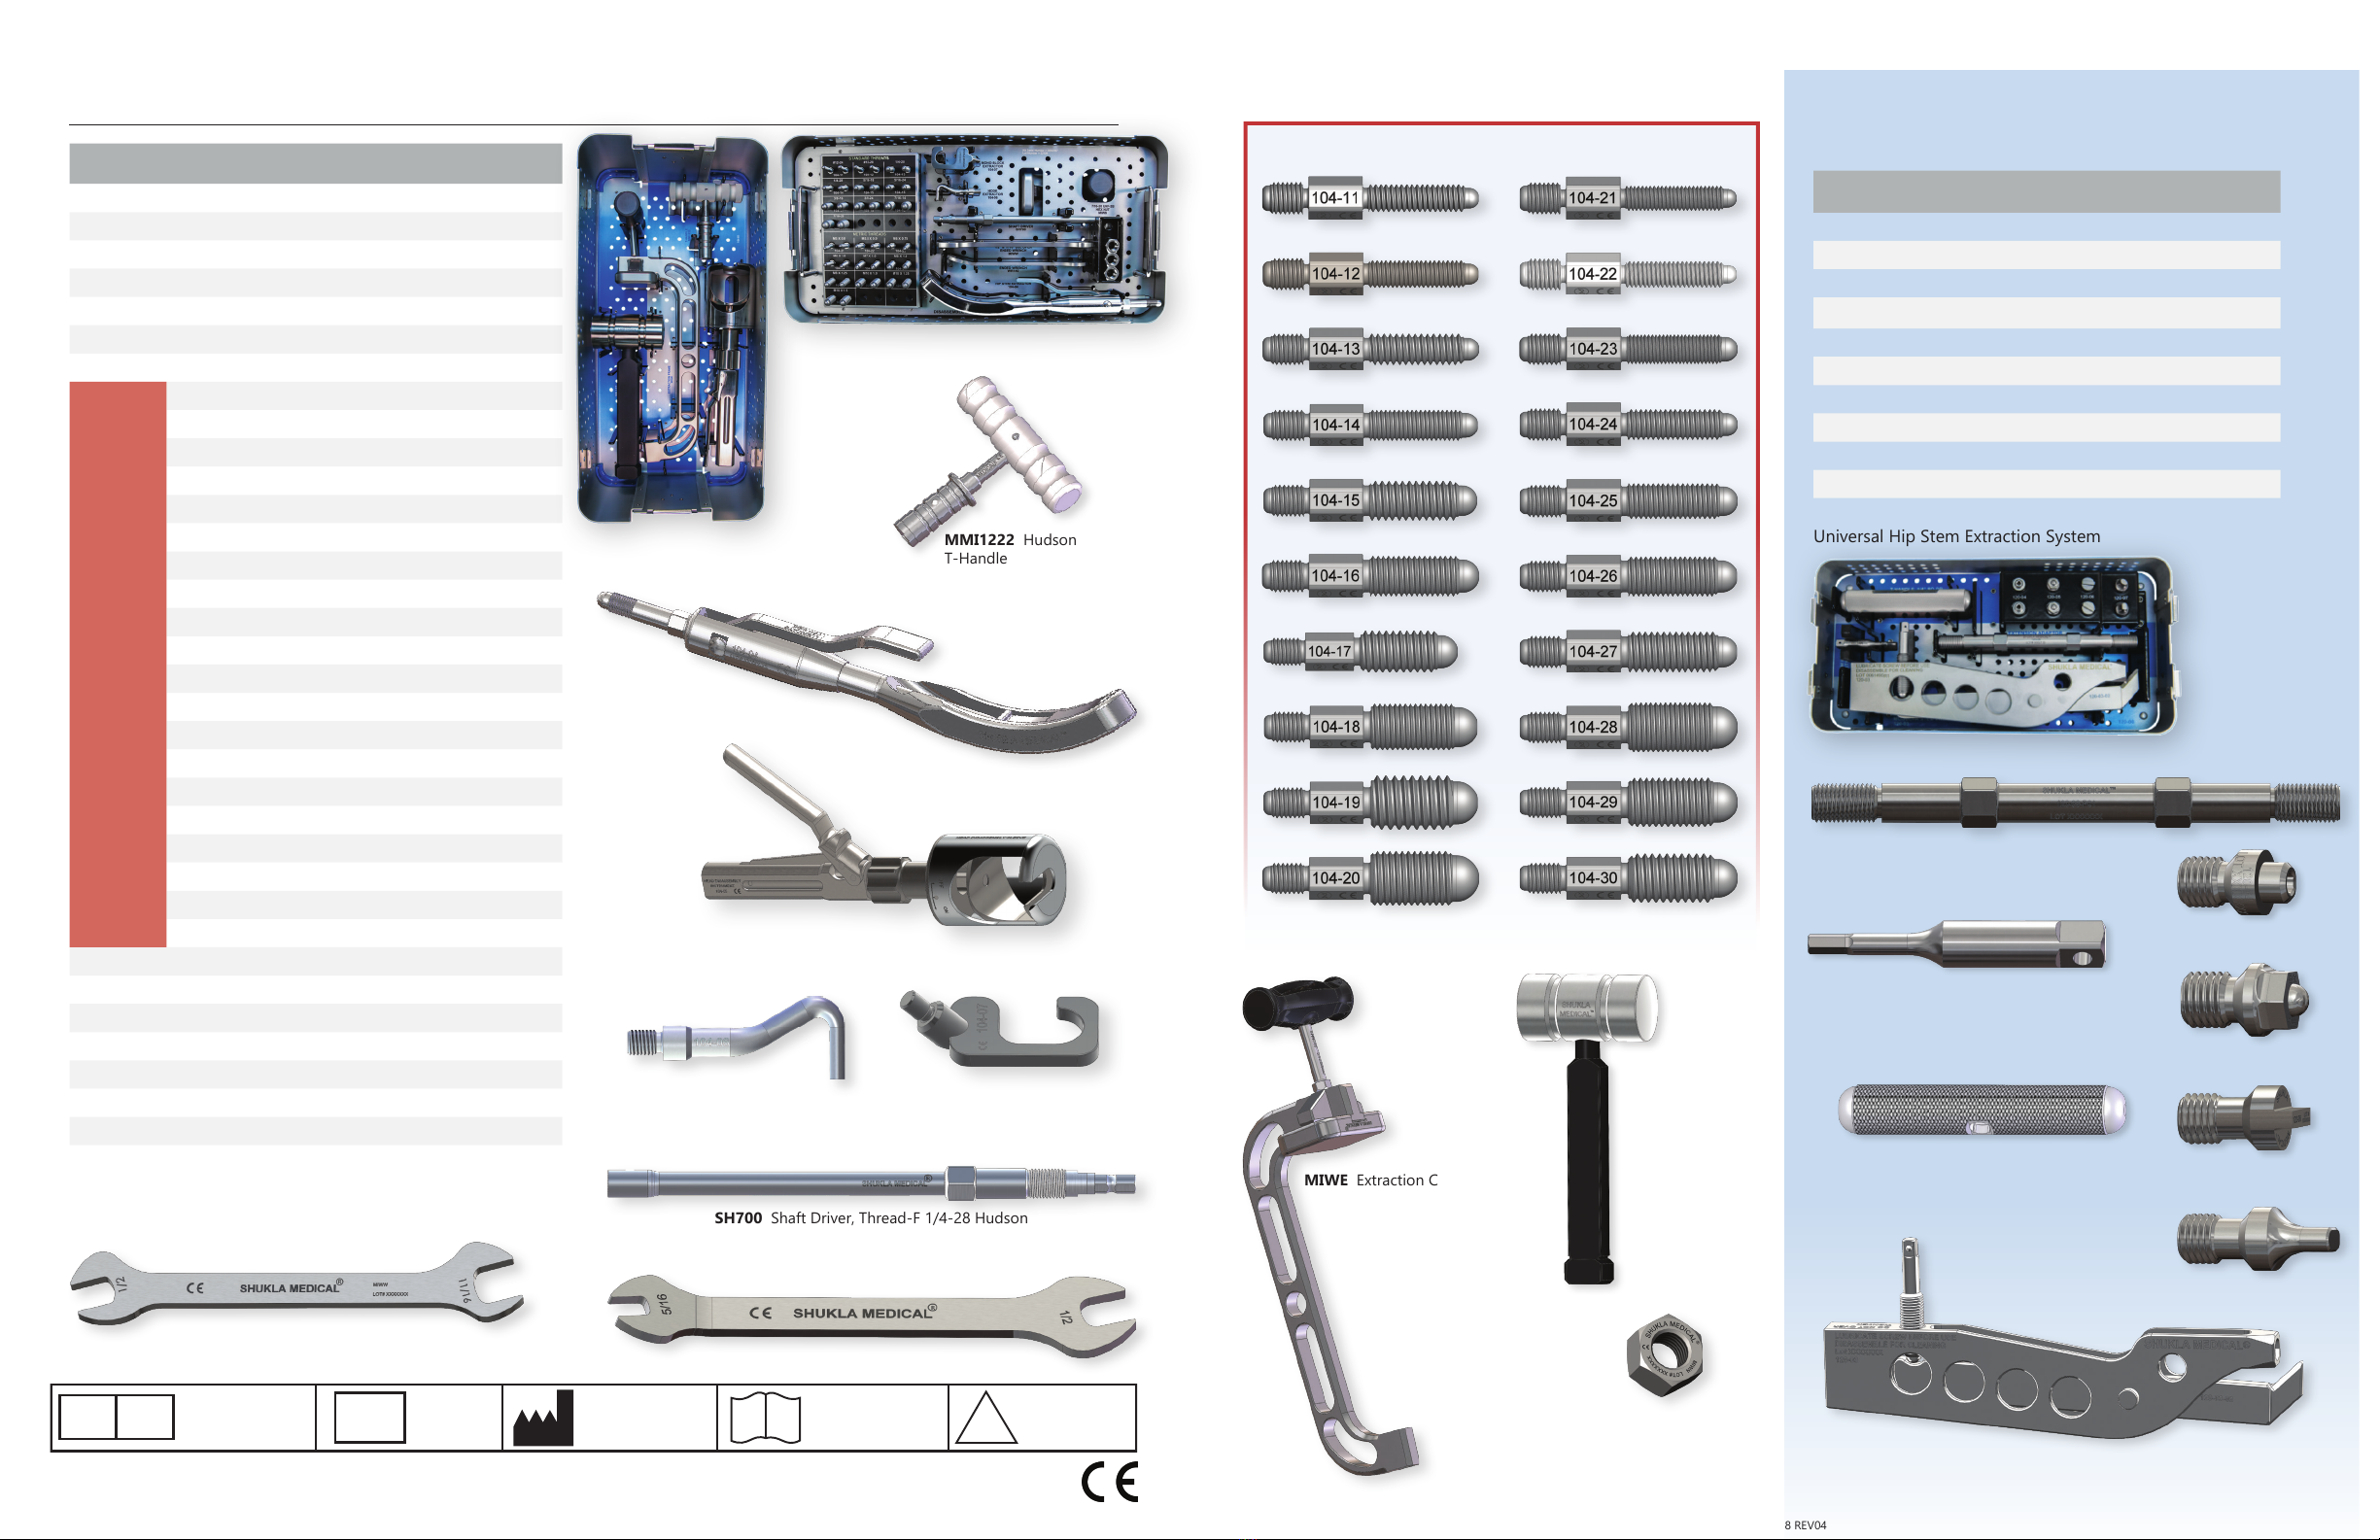
Xtract-All®Hip (104-00) Universal Hip Stem Extraction System
Part # Description Qty
104-01 Case 1
SCS011 Lid 1
104-04 Hip Stem Extractor 1
104-05 Femoral Head Disassembly Instrument 1
104-06 Hook Extractor 1
104-07 Monoblock Stem Extractor 1
104-08 Tray 1
104-11 #12-24 Male Extractor Tip 2
104-12 #12-28 Male Extractor Tip 2
104-13 1/4-20 Male Extractor Tip 2
104-14 1/4-28 Male Extractor Tip 2
104-15 5/16-18 Male Extractor Tip 2
104-16 5/16-24 Male Extractor Tip 2
104-17 3/8-16 Male Extractor Tip 2
104-18 3/8-24 Male Extractor Tip 2
104-19 7/16-14 Male Extractor Tip 2
104-20 7/16-20 Male Extractor Tip 2
104-21 M5 X 0.8 - 6G Male Extractor Tip 2
104-22 M5.5 X 0.9 - 6G Male Extractor Tip 2
104-23 M6 X 0.75 - 6G Male Extractor Tip 2
104-24 M6 X 1.0 - 6G Male Extractor Tip 2
104-25 M7 X 1.0 - 6G Male Extractor Tip 2
104-26 M8 X 1.0 - 6G Male Extractor Tip 2
104-27 M8 X 1.25 - 6G Male Extractor Tip 2
104-28 M10 X 1.0 - 6G Male Extractor Tip 2
104-29 M10 X 1.25 - 6G Male Extractor Tip 2
104-30 M10 X 1.5 - 6G Male Extractor Tip 2
MMI1222 Hudson T-Handle 1
SH700 Shaft Driver, Thread-F 1/4-28 Hudson 2
MIWW 1/2” & 11/16” Double Open End Wrench 1
WR140 5/16” & 1/2” Double Open End Wrench 1
MMM5 Mallet 1
MIWN 7/16-20 UNF 2B Nut, Hex 3
MIWE Extraction C-Frame 1
*Extractor tips 104-11 through 104-30 are single-use only and
must be discarded after use
Emergo Europe
Prinsessegracht 20
2514 AP The Hague
The Netherlands
EC REP 104-00
120-00
REF NON-STERILE
PRODUCT
NON
STERILE
Shukla Medical
8300 Sheen Drive
St. Petersburg, FL 33709
USA
CONSULT
INSTRUCTIONS
FOR USE
i
Part # Description Qty
120-01 Case 1
120-02 Lid 1
120-03 Modular Hip Stem Extractor 1
120-04 Stryker Rejuvenate Clamping Pin 2
120-05 Smith & Nephew Clamping Pin 2
120-06 Wright Medical Clamping Pin 2
120-07 Zimmer Clamping Pin 2
120-08 Extension Adapter 1
HD218-M01 T-Handle 1/4” Square Drive 1
MBT130 Driver Bit 3.0mm 1
Xtract-All®Modular Hip Stem
Extraction System (120-00)†
† For use in conjunction with the Shukla Medical Xtract-All®
Universal Hip Stem Extraction System
MMM5 Mallet
MIWN 7/16-20 UNF 2B
Nut, Hex
MIWE Extraction C-Frame
104-11 #12-24 UNC 2A Male Extractor Tip
104-12 #12-28 UNC 2A Male Extractor Tip
104-13 1/4-20 UNC 2A Male Extractor Tip
104-14 1/4-28 UNF 2A Male Extractor Tip
104-15 5/16-18 UNC 2A Male Extractor Tip
104-16 5/16-24 UNF 2A Male Extractor Tip
104-17 3/8-16 UNC 2A Male Extractor Tip
104-18 3/8-24 UNF 2A Male Extractor Tip
104-18 7/16-14 UNC 2A Male Extractor Tip
104-20 7/16-20 UNF 2A Male Extractor Tip
104-21 M5 X 0.8 - 6G Male Extractor Tip
104-22 M5.5 X 0.9 - 6g Male Extractor Tip
104-23 M6 X 0.75 - 6G Male Extractor Tip
104-24 M6 X 1.0 - 6G Male Extractor Tip
104-25 M7 X 1.0 - 6G Male Extractor Tip
104-26 M8 X 1.0 - 6G Male Extractor Tip
104-27 M8 X 1.25 - 6G Male Extractor Tip
104-28 M10 x 1.0 - 6G Male Extractor Tip
104-29 M10 x 1.25 - 6G Male Extractor Tip
104-30 M10 x 1.5 - 6G Male Extractor Tip
Parts not shown to scale
MMI1222 Hudson
T-Handle
104-04 Hip Stem Extractor
104-05 Femoral Head
Disassembly Instrument
104-06 Hook Extractor 104-07 Monoblock Stem Extractor
SH700 Shaft Driver, Thread-F 1/4-28 Hudson
MIWW 1/2” & 11/16” Double Open End Wrench
WR140 5/16” & 1/2” Double Open End Wrench
HD218-M01 T-Handle 1/4” Square Drive
MBT130 Driver Bit 3.0mm
120-03 Modular Hip Stem Extractor
120-08 Extension Adapter
120-04
Stryker Rejuvenate Clamping Pin
120-05
Smith & Nephew Clamping Pin
120-06
Wright Medical Clamping Pin
120-07
Zimmer Clamping Pin
120-00 Modular Hip System
Parts not shown to scale
104-00 Hip System: Level 1
104-00 Hip System: Level 2

6
®
FCD-0358 REV04
7
®
FCD-0358 REV04
Xtract-All® Hip (104-00) Universal Hip Stem Extraction SystemXtract-All® Hip (104-00) Universal Hip Stem Extraction System
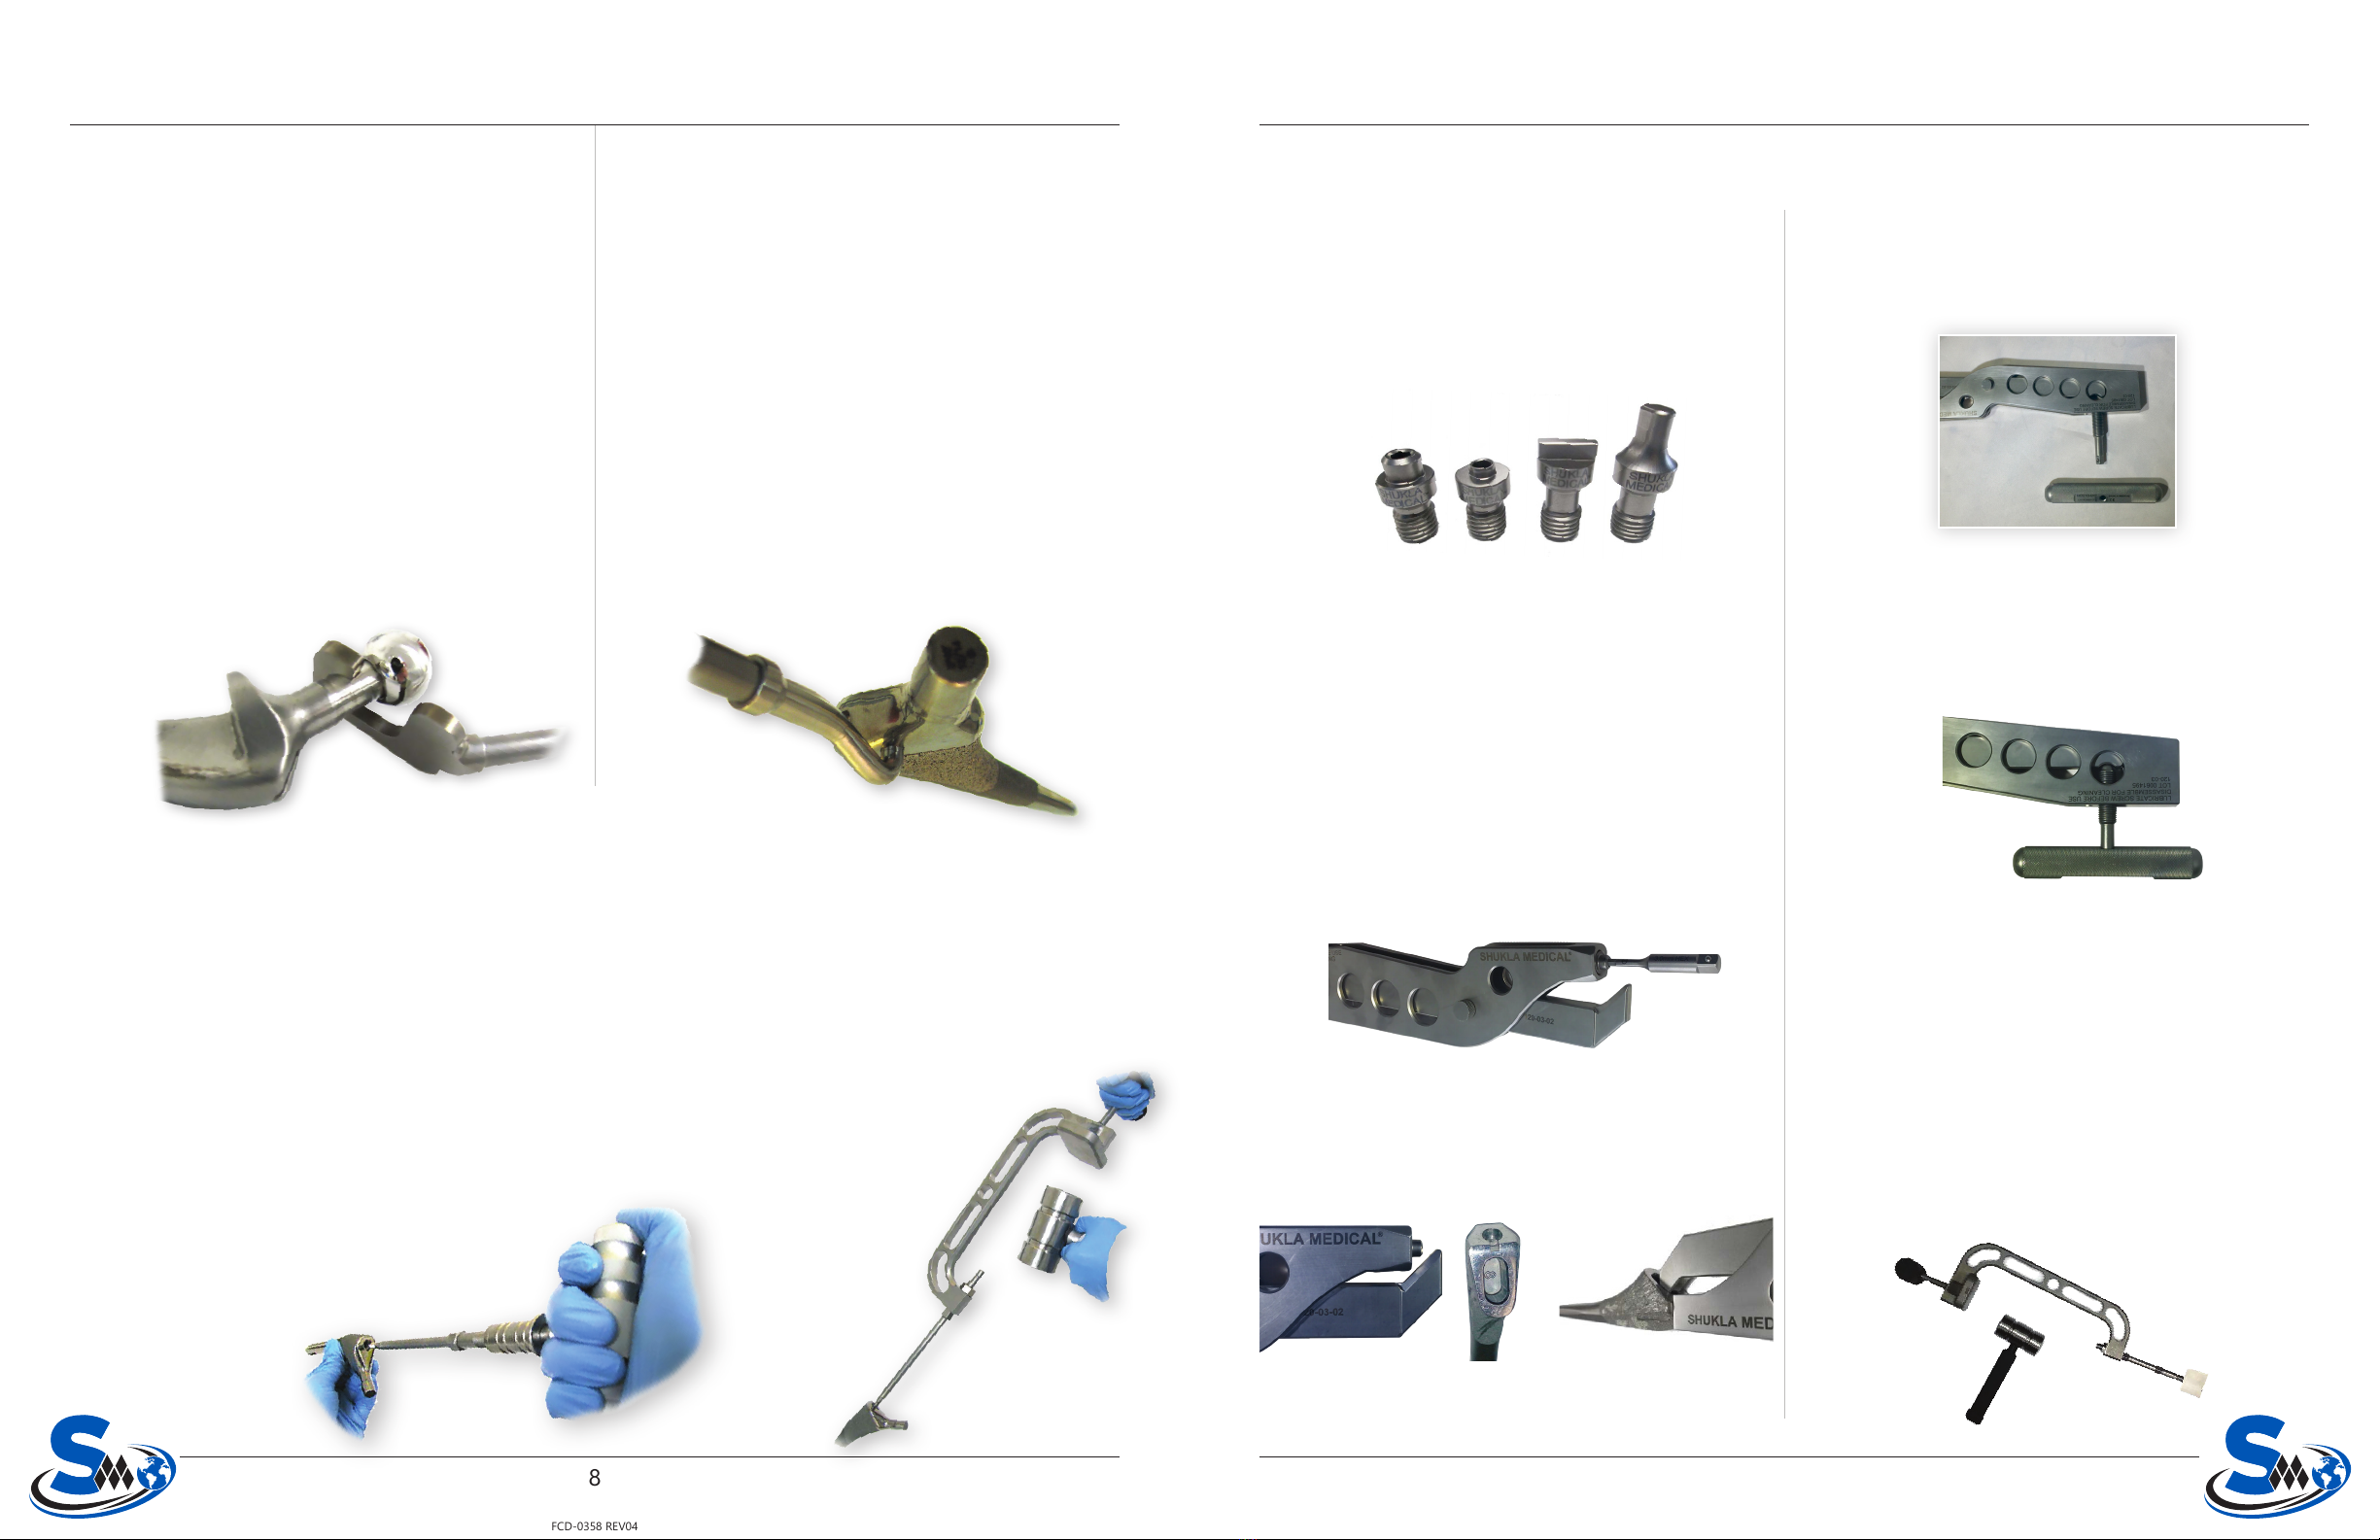
1. With handle in open position, slide Hip Stem Extractor (104-04) over implant neck as far down as possible.
Rotate the extractor handle counter-clockwise to loosen the jaw if necessary (Fig 3a).
2. Tighten jaw grip by rotating handle clockwise. Tighten as far as possible, then reverse 180° to close the handle.
Stop when you rst experience resistance - the jaw has begun to clamp onto the neck. Check to ensure the
extractor axis is in line with the hip stem before closing fully. Make manual adjustment if not aligned
properly (Fig. 3b).
3. Press handle toward extractor body until it locks completely closed. Handle must close
fully to ensure a secure grip on the implant neck. Conrm secure attachment by pulling
slightly.
4. With extractor aligned and securely locked onto hip stem, slide the Extraction
C-Frame (MIWE) and a Hex Nut (MIWN) onto the proximal end. Tighten nut fully
with the 11/16” Wrench (MIWW) while applying counter-torque with the 1/2”
Wrench (WR140).
5. Extract implant with repeated strikes of the Mallet (MMM5) on extraction
C-frame strike plate (Fig. 3c). If implant resists removal after several
strikes, loosen bone around implant prior to continuing.
6. After implant is pulled free from the femur, open extractor &
remove implant from extraction assembly.
Figure 3c
Tapered Neck Stem Removal
3
Figure 3b: Alignment of extractor to hip stem
Surgical Technique
For the best possible surgical outcome of the Xtract-All® Universal Hip Stem Extraction System (104-00), it is
necessary to preoperatively determine if the hip stem is a standard stem or a modular stem.
Removal of a modular stem requires the Xtract-All® Modular Hip Stem Extraction System (120-00) in addition to
the standard system (104-00). See page 9.
Tapered Neck Stem Monoblock Stem Proximally Threaded Stem Modular Stems
Determine Stem Type
1
1. Rotate knob in center of Femoral Head Disassembly Instrument (104-05) until the inner sleeve is fully
descended, such that the inner and outer sleeves are nested together at the distal end.
2. Slide the instrument onto the hip implant neck, with the femoral head inside the nested sleeves.
3. Rotate knob to adjust sleeve spacing, raising the inner sleeve until it rests against the femoral head and the
outer sleeve rests against the femoral neck (Fig. 2a).
4. Press handle toward instrument body (Fig. 2b) to detach femoral head from neck.
5. The femoral head is retained inside the inner sleeve for easy disposal.
Femoral Head Removal
2
Figure 2b
Figure 2a
Figure 3a
OPEN: handle lifted away from extractor body
CLOSE: push handle toward body of extractor
COUNTER-CLOCKWISE
TO LOOSEN
CLOCKWISE
TO TIGHTEN
8
®
FCD-0358 REV04
9
®
FCD-0358 REV04
Xtract-All® Hip (104-00) Universal Hip Stem Extraction System Xtract-All® Hip (104-00) Universal Hip Stem Extraction System
Fig. A Fig. B Fig. C Fig. D
Surgical Technique for Modular Stems
Choose Clamping Pin (120-04 through 120-07) that
corresponds to implant.
120-04 Stryker Rejuvenate (Fig. A)
120-05 Smith & Nephew (Fig. B)
120-06 Wright Medical (Fig. C)
120-07 Zimmer (Fig. D)
1
The Xtract-All® Modular Hip Stem Extraction System (120-00) should be used in conjunction with the
Xtract-All® Hip System (104-00) when removing any modular hip stem.
Screw Clamping Pin into Modular Hip Stem Extractor
(120-03). Loosen extractor jaw to improve access if
necessary.
120-04 may be tightened manually or with the
3.0mm Driver Bit (MBT130) (Fig. E).
120-05 should be tightened manually
120-06 & 120-07 should be screwed in manually
and will spin freely when fully engaged.
2
Figure E
Align Clamping Pin with implant and t extractor lever
hook into vacated trunnion tting (Fig. F, Fig. G).
3
Figure F Figure G
Attach T-Handle (HD218-M01) to Clamping Screw
(Fig. H) by pushing until you hear a click.
4
Figure H
Tighten Clamping Screw with T-Handle until you begin
to experience resistance. At this point, tighten the
screw ½ to 1 full turn maximum past this point. Do
not over-tighten. The extractor is now fully engaged
(Fig. I).
5
Figure I
Remove T-Handle from Clamping Screw. Screw
Extension Adapter (120-08) into Extractor. Slide the
Extraction C-Frame (MIWE) and a Hex Nut (MIWN)
onto the proximal end. Tighten nut fully with the
11/16” Wrench (MIWW) while applying counter-torque
with the 1/2” Wrench (WR140).
6
Extract implant with repeated strikes of the Mallet
(MMM5) on extraction C-frame strike plate (Fig. J). If
implant resists removal after several strikes, loosen
bone around implant prior to continuing.
7
Figure J
Surgical Technique
(Continued)
1. Thread Monoblock Stem Extractor (104-07)
onto Shaft Driver (SH700).
2. Slide the Extraction C-Frame (MIWE) and a Hex
Nut (MIWN) onto the proximal end. Tighten
nut fully with the 11/16” Wrench (MIWW) while
applying counter-torque with the 1/2” Wrench
(WR140).
3. Hook Monoblock Stem Extractor around
implant neck (Fig. 4).
4. Keeping impaction force in line with the axis
of the implant, use repeated strikes of the
Mallet (MMM5) on the extraction C-frame strike
plate to extract stem. If implant resists removal
after several strikes, loosen bone around
implant prior to continuing.
Monoblock Stem Removal
4
1. Thread Hook Extractor (104-06) onto Shaft
Driver (SH700).
2. Slide the Extraction C-Frame (MIWE) and a Hex
Nut (MIWN) onto the proximal end. Tighten
nut fully with the 11/16” Wrench (MIWW) while
applying counter-torque with the 1/2” Wrench
(WR140).
3. Hook the extractor through the cross hole shaft
(Fig. 5).
4. Keeping impaction force in line with the axis
of the implant, use repeated strikes of the
Mallet (MMM5) on the extraction C-frame strike
plate to extract stem. If implant resists removal
after several strikes, loosen bone around
implant prior to continuing.
Slotted or Cross Hole Stem Removal
5
Figure 4
Figure 5
1. Determine size of threaded implant neck and select corresponding single-use Extractor Tip (104-11 through
104-30).
2. Screw selected Extractor Tip into Shaft Driver. Then attach Shaft Driver (SH700) to Hudson T-Handle
(MMI1222) by pulling handle shaft up, inserting & aligning the driver, & releasing handle to lock in place.
3. Use the T-handle to screw the Shaft Driver assembly tightly into implant neck (Fig. 6a).
4. Remove T-handle from Shaft Driver. Slide the Extraction C-Frame (MIWE) and a Hex Nut (MIWN) onto
the proximal end. Tighten nut fully with the 11/16” Wrench (MIWW) while applying counter-torque
with the 1/2” Wrench (WR140).
5. Extract implant with repeated strikes of the Mallet (MMM5) on extraction C-frame strike plate
(Fig. 6b). If implant resists removal after several strikes, loosen bone around implant prior to
continuing.
6. After extraction, use wrenches to remove
Extractor Tip from assembly and discard.
Threaded Stem Removal
6
Figure 6a
Figure 6b
10
®
FCD-0358 REV04
11
®
FCD-0358 REV04
Xtract-All® Hip (104-00) Universal Hip Stem Extraction SystemXtract-All® Hip (104-00) Universal Hip Stem Extraction System
For detailed sterilization instructions, please refer to industry standards ANSI/AAMI ST79:2012 & A1:2012 and ANSI/
AAMI ST8:2001.
NOTE: All Shukla Medical surgical instruments require manual cleaning with a neutral pH cleanser. Open and
disassemble all instruments, making sure to remove all contamination during cleaning. Instruments must be
reassembled prior to sterilization. Machine washing is not recommended. Maintenance and care using an autoclaveable
lubricant on movable parts is required to preserve the life of the instrument. For more cleaning, inspection,
maintenance, and care tips, contact Shukla Medical directly.
The instrument case must be sterilized following the parameters listed below:
Cleaning and Sterilization
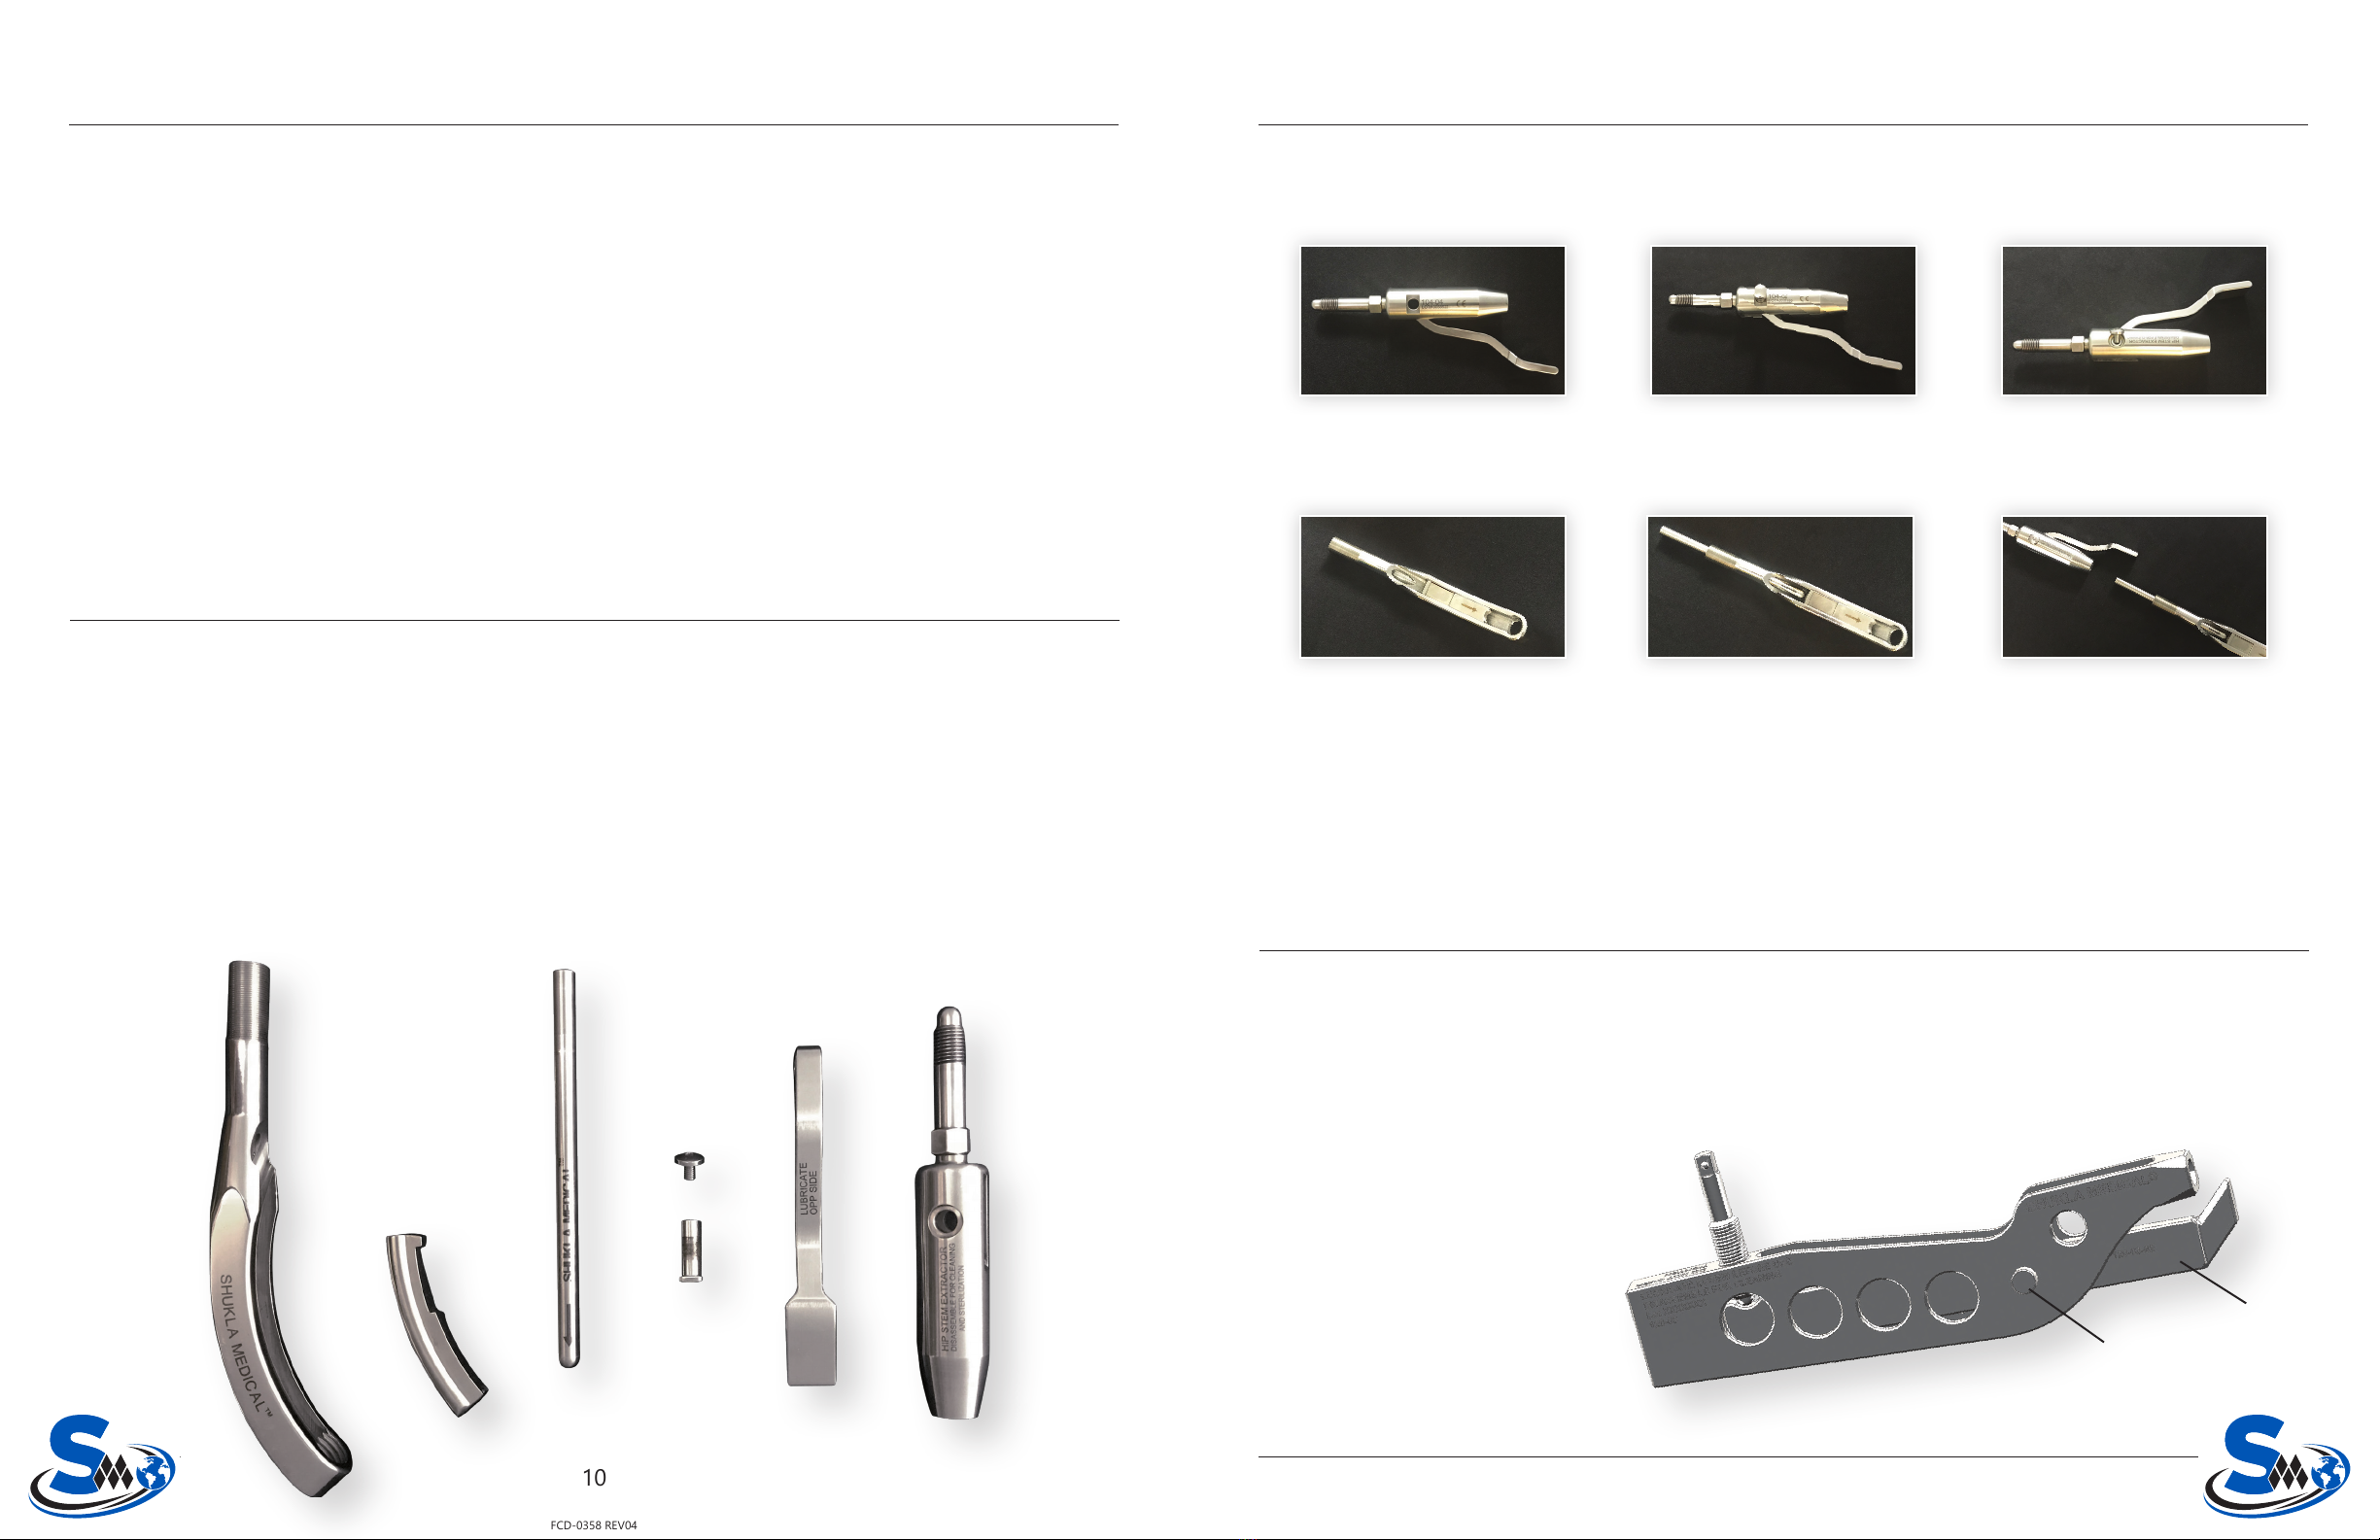
1. Unscrew the cam cap by lifting the cam handle &
turning counterclockwise
2. Remove the push rod from inside the assembly
3. Grasp the curved jaw and slide out from the curved
body
4. Unthread the cam cap screw from the pin using 3mm
hex key (not included)
5. Pull the cam handle free from the instrument
Disassembled extractor should result in a total of
seven (7) pieces:
A. Curved body (104-04-01)
B. Curved jaw (104-04-02)
C. Push rod (104-04-15)
D. Cam handle (104-04-17)
E. Screw (104-04-12)
F. Thread pin (104-04-10)
G. Cam Cap (104-04-07)
Xtract-All® Universal Hip Stem Extractor Assembly (104-04) must be disassembled completely for cleaning. All
contamination must be removed at this stage. The extractor must be reassembled prior to sterilization.
Disassembly Instructions: 104-04 Hip Stem Extractor
Reassembly Instructions: 104-04 Hip Stem Extractor
Once all contamination has been removed from the disassembled extractor, the instrument must be reassembled for
sterilization.
1. Insert cam handle into cam
cap, lining up holes.
2. Insert threaded pin into
holes.
3. Insert screw into threaded
pin; tighten using 3mm hex
key (not included).
4. Insert curved jaw into
curved body. There is an
arrow on the jaw to indicate
direction.
5. Insert push rod into the
curved body, resting on top of
the curved jaw. Use the arrow
on the jaw as a directional
guide.
6. Connect the cam cap/
handle assembly to the curved
body/jaw assembly via the
push rod.
Dry Time: 60 minutes
Open Door Time: 15 minutes
Cool-down Time: 30 Minutes outside of
chamber on a wire rack
Sterilizer Type: Prevacuum
Preconditioning Pulses: 4
Temperature: 132° C
Full Cycle Time: 4 minutes
Disassembly Instructions: 120-03 Modular Hip Stem Extractor
The Modular Hip Stem Extractor must be disassembled for cleaning.
1. Use T-handle to loosen extractor jaw and remove Clamping Screw.
2. Unscrew the knurled pivoting screw (Fig. A-1) and remove pivoting body and lever (Fig. A-2).
3. Unscrew Clamping Pin from Extractor tip.
4. Clean extractor as normal.
5. Reassemble prior to sterilization.
A-1
A-2
Figure A
A. Curved body
B. Curved jaw
C. Push Rod
D. Cam Handle
G. Cam Cap
E. Screw
F. Thread pin

U
n
i
v
e
r
s
a
l
O
r
t
h
o
p
e
d
i
c
E
x
t
r
a
c
t
i
o
n
T
e
c
h
n
o
l
o
g
i
e
s
For more information on the
Xtract-All®Hip (104-00) Universal Hip Stem Extraction System
Call us at 888-4-SHUKLA (888-474-8552) or visit
www.ShuklaMedical.com
...Because Every Minute Counts®
T: 888-4-SHUKLA
T: 888-474-8552
F: 727-626-2770
Shukla Medical
8300 Sheen Drive
St. Petersburg, FL 33709
www.ShuklaMedical.com
©Shukla Medical 2018 •FCD-0358 REV04
This manual suits for next models
2
Table of contents
Other Shukla Medical Medical Equipment manuals


