Shure MV51 User manual

General Description
The Shure MV51 is a professional-quality USB condenser microphone, ideal
for home recording, podcasting, and video conferencing. The attractive and
durable all-metal design features an adjustable kickstand for desktop use,
and can also mount onto a microphone stand. A touch panel user interface
provides control of microphone gain, headphone level, application modes,
and muting.
Features
• Easily adjust settings with the intuitive touch panel interface
• Compatible with most iDevices (iPhone, iPad, and iPod) through Light-
ning®interface
•Compatible with most computers, tablets and smart phones through USB
interface
• Large-diaphragm electret condenser microphone captures speech and
music with excellent clarity
• Sleek design includes all-metal housing for professional-grade durability
•Headphone output allows real-time monitoring of the live signal and audio
from the computer or device
• Preset DSP modes include equalization and compression settings for
specific applications
• Desktop kickstand includes a removable tip for mounting onto a micro-
phone stand
Mounting and Placement
Desktop
Aim the microphone towards the sound source by adjusting the kickstand.
Microphone Stand
Unscrew the end cap to thread the kickstand onto a standard 5/8" microphone
stand.
Kickstand End Cap
Quick Setup
The MV51 is compatible with most devices that have a USB or Lightning
connector.
1. Connect the microphone to a computer or mobile device. Use the
appropriate cable (USB or Lightning).
Drivers will be installed automatically. The touch panel illuminates to in-
dicate a successful connection.
2. Open the sound control panel. Select the Shure MV51 driver.
Raise the level on both the MV51 product and the host computer for
proper monitoring.
3. Confirm that the MV51 is the selected audio device.
Plug headphones into the MV51 device audio output and play an audio
track. If you can hear sound, the microphone is functioning properly.
If your computer settings default to another device, open the sound
control panel and select the MV51 device.
4. Adjust the headphone volume on the Shure MV51 device driver.
Open the MV51 driver from the sound control panel and raise the head-
phone volume from the playback or output tab.
5. Use the MODE button to select the preset mode that fits your appli-
cation.
If the audio is too quiet or causes distortion, adjust the gain manually.
Refer to the "Adjusting Microphone Level" topic in this guide for more
details.
6. In your recording application, select the MV51 as the input source.
See your software user guide for information on assigning input sources.
You are ready to record.
Touch Panel Interface Controls
1/6©2017 Shure Incorporated
MV51
Digital Large-Diaphragm Condenser Microphone

5
Touch Panel
① Volume Control Slider
Adjust microphone or headphone level by sliding your finger across the
control surface.
• Press the mode button to activate microphone level.
• Press the headphone button to activate headphone volume.
② LED bar
Displays microphone and headphone level. The LED color indicates the
level being displayed or adjusted.
•Green: Microphone level
•Orange: Headphone level
③ Mute Button
Press to mute and unmute the microphone.
④ Mode Selector
Press to select preset mode.
⑤ Headphone Volume Selector
Press to select headphone level controls (orange LED bar). Then use the
volume control slider to adjust headphone level. Press again to return to mi-
crophone level display (green LED bar).
Preset Modes
Five selectable modes optimize settings for equalization and compression
to match your recording needs. Set your volume level and scroll through the
modes to find which setting sounds best. The preset settings will not affect
the microphone level.
ApplicationIconMode
Use for speech in podcastingSpeech
Use to capture solo or group vocal performancesSinging
Suited for acoustic instruments and quiet music
applications
Quiet
and
Acoustic
Music
Use when recording a band or other loud sources
Loud
Music
or
Band
A completely unprocessed signal (no equalization
or compression settings used). Use when
processing the audio after recording.
Flat
Applications
This section suggests microphone placement for typical use cases. Keep in
mind that there are many effective ways to record a given source. Experiment
with the following microphone placement and settings to find what works
best.
Podcast and Voice Recording
Set the microphone to the Speech mode. Speak directly into the front of the
microphone at a distance of 2-12 inches (5-30 cm) away. Speaking closer
to the microphone results in more bass response, similar to voices on a radio
broadcast. Make additional gain adjustments if necessary.
2-12 in
(5-30 cm)
Typical position for speech
Acoustic Instruments and Music
To capture acoustic sources, such as singing, acoustic guitar, soft percussion,
or other musical instruments, use a close microphone placement.
Aim the microphone directly at the sound source. For a single source, such
as a string instrument or a vocalist, place the microphone 6 to 12 inches (15
to 30 cm) away. For a small group or a performer who is singing and playing
an instrument simultaneously, use a distance of 2 to 10 feet (0.6m to 3 m).
Placing the microphone farther away results in more ambient room sound.
Set the microphone to the Acoustic or Singing mode and make additional
gain adjustments if necessary.
Bands and Loud Sources
To record a band with drums or amplified instruments, aim the microphone
towards the group at a distance of 6 to 15 feet (1.8 to 4.6 m). Placement of
the microphone depends on the size of the room, number of people, and in-
strument volume. If possible, walk around the room and listen to find where
it sounds best.
6-15 ft
(2-4 m)
For other loud sources, such as an electric guitar amplifier, aim the micro-
phone at the sound source from 0-18 inches (0-45 cm) away.
Shure IncorporatedMV51 Digital Large-Diaphragm Condenser Microphone
2017/11/012/6

Set the microphone to the Band mode and make additional gain adjustments
if necessary.
0-18 in
(0-45 cm)
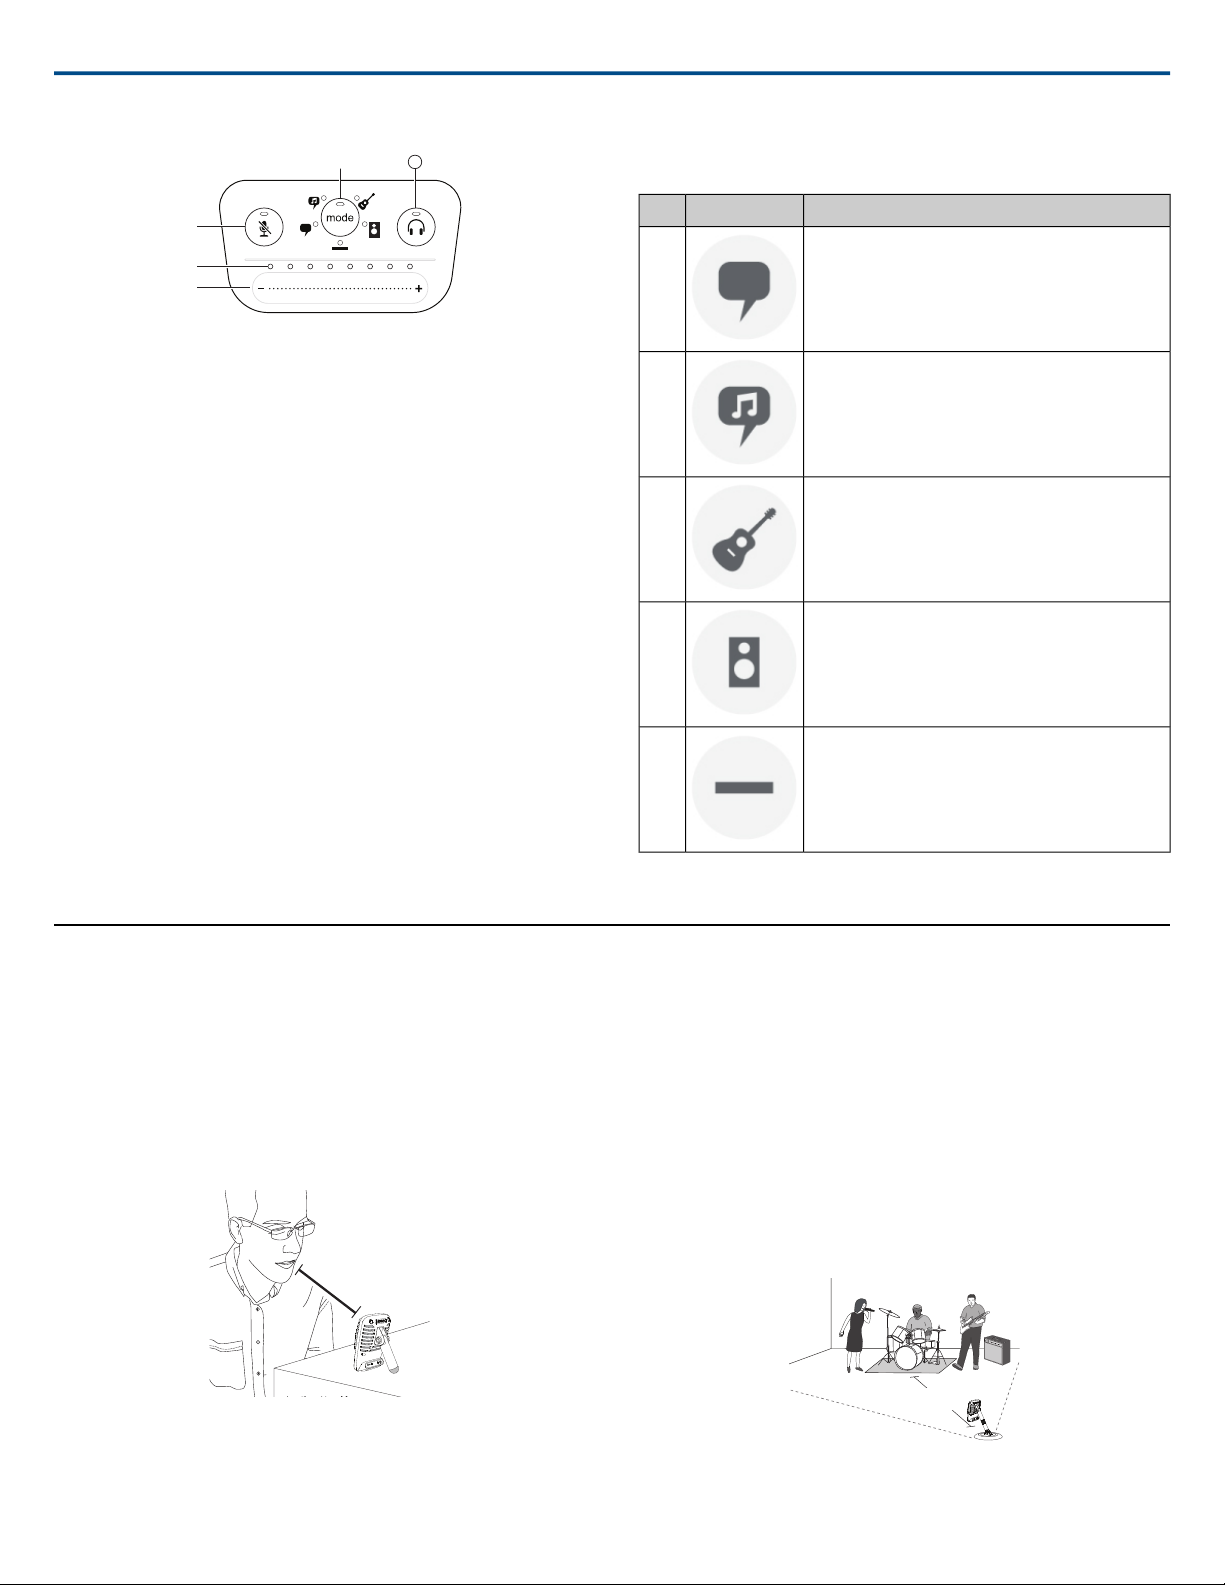
Bypass EQ and Compression (Flat)
To record a signal without any processing, set the microphone to the Flat
mode. This mode is appropriate for any application when you want to bypass
equalization and compression presets, and is ideal when applying signal
processing to the recording at a later time.
Additional Tips
Shure offers additional educational publications on recording techniques for
specific instruments and applications. Visit shure.com for more information.
Adjusting Microphone Level
Select the correct preset mode for your recording application. If you hear
distortion or the audio is too low, adjust the microphone level in the audio or
sound control panel of your computer or recording device.
Tips:
• Set the microphone level before adjusting headphone volume.
• The headphone volume does not affect the signal level sent to the com-
puter.
• Use the volume slider on the front panel to adjust the microphone gain
level.
Note: The microphone gain control is independent of the preset modes.
Set your microphone level and experiment with dynamic processing op-
tions via the preset modes.
Adjusting Headphone Level
The headphone monitoring level is affected by the MV51 device level and
the computer settings level. Raise your computer volume up and easily adjust
headphones through the MV51 device headphone settings.
Headphone Volume
Microphone Level
Computer Volume Level
Accessing the Control Panel
PC
1. Open the sound control panel and select the Recording tab.
2. Open the Shure MV51 device.
3. Under the Levels tab, adjust the gain level using the slider.
Mac®
1. Open the Audio Midi Settings panel.
2. Select the Shure MV51 device.
3. Click on Input to adjust the gain using the slider.
Mac audio settings panel
Input Meter Level
If your digital audio workstation or recording software has input meters, adjust
the microphone level so it peaks between -12 and -6 dB. Otherwise, simply
listen to the audio to make sure it is loud enough and not distorting.
db
L
R
-30 -20 -15 -10 -7 -5 -3 -2 -1 0
Peak Levels
The target range for peak levels on a typical meter is between -12 and -6
dB.
Monitoring with the MOTIV Device
The headphone output provides an equal blend of the direct microphone
signal and audio playback from the computer. This allows you to conveniently
adjust the overall headphone volume with one control on the device touch
panel. To change the playback audio level relative to the direct microphone
signal level, adjust the computer or DAW mixer settings.
Tip: When first connecting the microphone to your computer, make sure to
raise the volume level in the sound control panel of the computer for a strong
audio signal. Then adjust headphone level on the device for comfortable
monitoring.
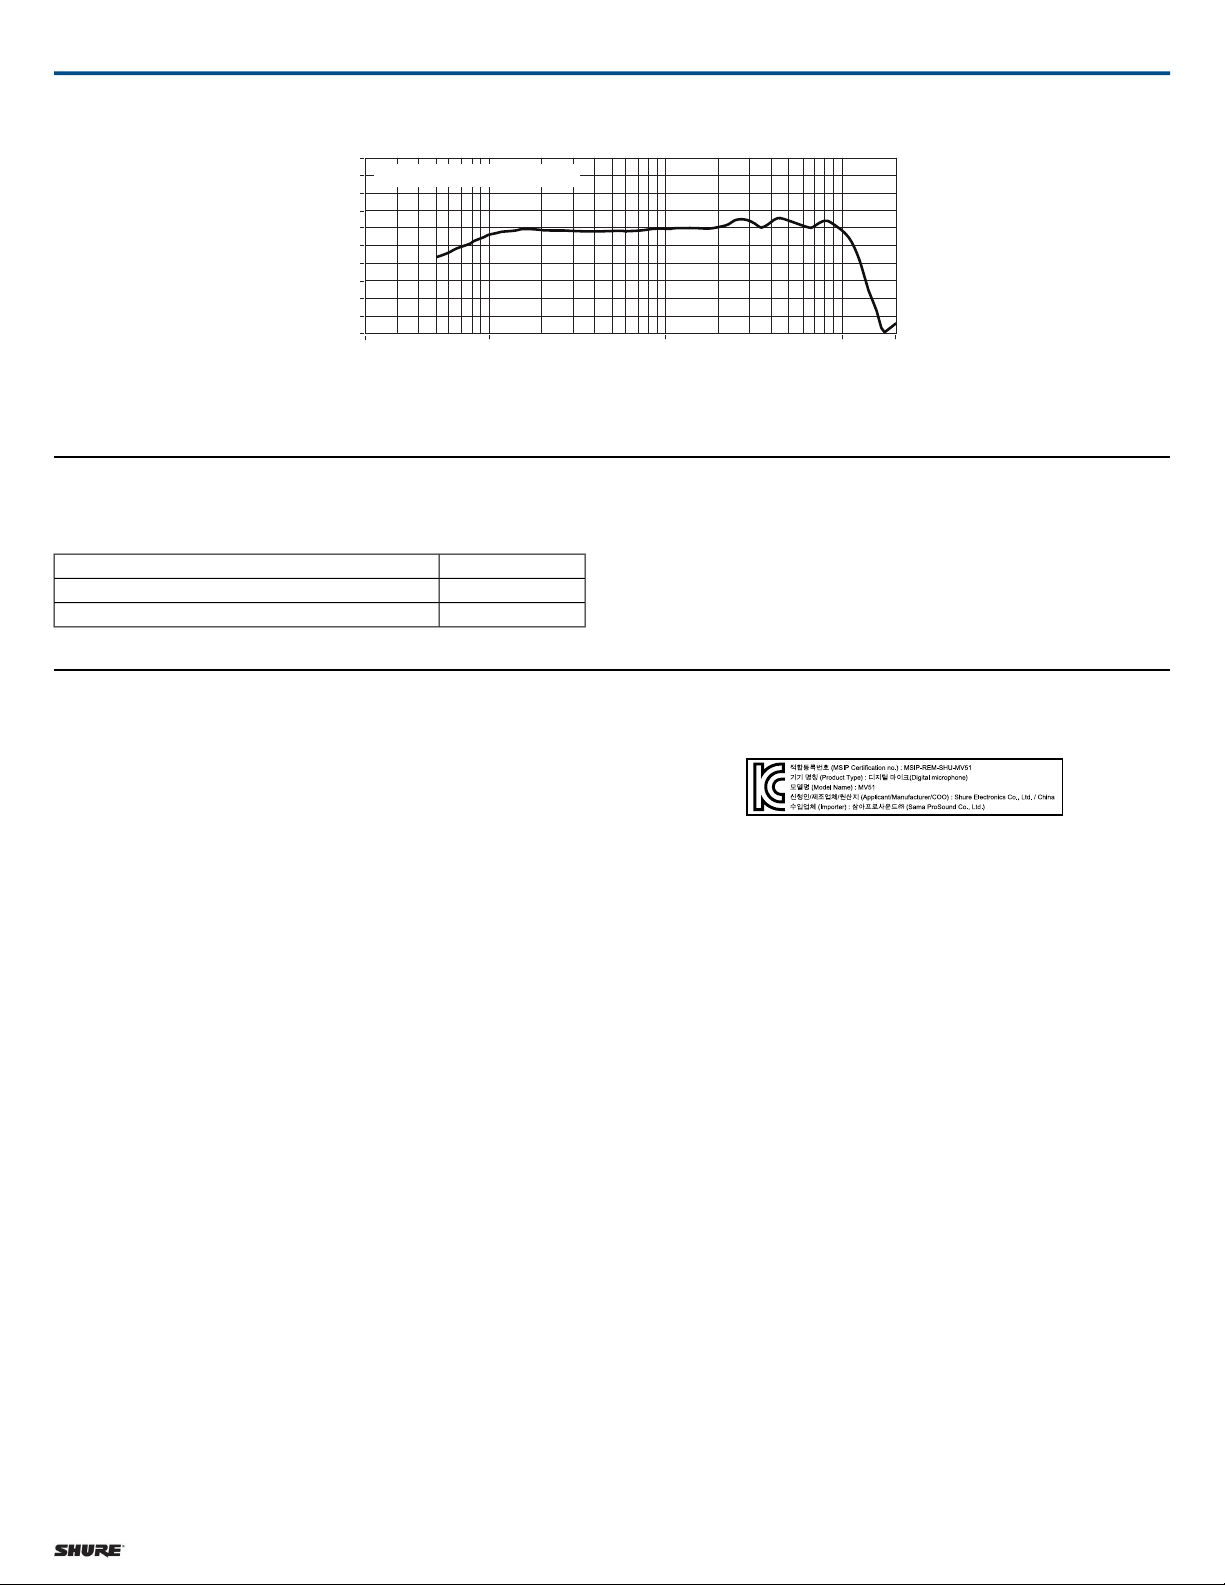
Sampling Rate and Bit Depth
Sample Rate and Bit Depth settings are found in a drop down menu in the
audio or sound control panel of your computer. You can adjust these variables
to fit your needs. Select a lower sample rate for podcast recording, when it
is important to have a smaller file for easy download. Select a higher sample
rate for music and more dynamic recordings.
Shure IncorporatedMV51 Digital Large-Diaphragm Condenser Microphone
3/62017/11/01

Tip: Record at a higher sample rate and bounce down to an M4A for a file
with the highest sound quality at a manageable size.
Tip for PC users: Make sure that the sample rate and bit depth microphone
settings, found in the sound control panel of the computer, match with the
sample rate and bit depth selected in your software.
Troubleshooting
SolutionIssue
Make sure that the MV51 is fully plugged in.
The display does not
illuminate
Check the computer sound control panel
settings. When first connecting the MV51 to your
computer, make sure to raise the computer
volume level.
Audio is too low
Check the sound control panel of the computer
to ensure that the MV51 is fully plugged in and
recognized.
Audio sounds bad
Use the audio meter to ensure that volume
peaks are within the target range. If level is
reaching the red peak indicator of the input
meter, turn the gain down.
Audio is distorted
SolutionIssue
Make sure that the sample rate and bit depth
microphone settings, found in the sound control
panel of the computer, are consistent with the
sample rate and bit depth selected in your
software.
Audio sounds unnatural
or jittery
Edit the privacy setting for the iOS device under
SETTINGS>PRIVACY>MICROPHONE to give
the recording application permission to use the
microphone.
MV51 is plugged in, but
the volume meter does
not register a signal.
The MV51 requires 250 mA per port. Check USB
hub documentation for current/port specification.
Device not working with
USB hub.
System Requirements and Compatibility
•Windows 7 and higher
•Minimum RAM = 64 MB
•USB 2.0
Windows
•OS X Lion 10.7 and higher
•Minimum RAM = 64 MB
•USB 2.0
Macintosh
•iOS 10.0 and higher
iOS
•iPhone 5 and higher
iPhone
•5th gen
iPod Touch
•iPad 4th gen and higher
iPad
•iPad Mini 1st gen and higher
iPad Mini
Specifications
MFi Certified
Yes
DSP Modes (Presets)
Speech/Singing/Acoustic/Loud/Flat
Transducer Type
Electret Condenser (25 mm)
Polar Pattern
Unidirectional (Cardioid)
Bit Depth
16-bit/24-bit
Sampling Rate
44.1/48 kHz
Frequency Response
20 Hz to 20,000 Hz
Shure IncorporatedMV51 Digital Large-Diaphragm Condenser Microphone
2017/11/014/6

Adjustable Gain Range
0 to +36 dB
Sensitivity
-39 dBFS/Pa at 1 kHz [1] [2}
Maximum SPL
130 dB SPL [2]
Headphone Output
3.5 mm (1/8")
Power Requirements
Powered through USB or Lightning connector
Mute Switch Attenuation
Yes
Mounting Stand
Built-in
Stand Adapter
5/8-27 thread mount (standard mic stand mount)
Housing
all metal construction
Net Weight
574.7 g (20.27oz.)
Dimensions
128 x 86 x 70 mm H x W x D
Cable
1 m USB cable, 1 m Lightning cable
0 1
500 Hz
250 Hz
1,000 Hz
6,400 Hz
9,000 Hz
2,500 Hz
15 dB
10 dB
5 dB
0 dB
0
15 dB
10 dB
5 dB
0 dB
0
Polar Pattern
0[1] 1 Pa=94 dB SPL
1[2]At Minimum Gain, Flat Mode
Shure IncorporatedMV51 Digital Large-Diaphragm Condenser Microphone
5/62017/11/01

20
15
10
5
0
-30
-25
-20
-15
-10
-5
dB
Hz
20 100 1k 10k 20k
0,6 m (2 ft.) from sound source
Frequency Response
Accessories
Furnished Accessories
AMV-USB1 m USB cable
AMV-LTG1 m Lightning cable
95A20505/8" to 3/8" (Euro) Threaded Adapter
Certifications
Information to the user
This equipment has been tested and found to comply with the limits for a
Class B digital device, pursuant to Part 15 of the FCC Rules. These limits
are designed to provide reasonable protection against harmful interference
in a residential installation. This equipment generates uses and can radiate
radio frequency energy and, if not installed and used in accordance with the
instructions, may cause harmful interference to radio communications.
However, there is no guarantee that interference will not occur in a particular
installation. If this equipment does cause harmful interference to radio or
television reception, which can be determined by turning the equipment off
and on, the user is encouraged to try to correct the interference by one or
more of the following measures:
• Reorient or relocate the receiving antenna.
• Increase the separation between the equipment and the receiver.
• Connect the equipment to an outlet on a circuit different from that to
which the receiver is connected.
• Consult the dealer or an experienced radio/TV technician for help.
Industry Canada ICES-003 Compliance Label: CAN ICES-3 (B)/NMB-3(B)
Note:Testing is based on the use of supplied and recommended cable types.
The use of other than shielded (screened) cable types may degrade EMC
performance.
This product meets the Essential Requirements of all relevant European di-
rectives and is eligible for CE marking.
The CE Declaration of Conformity can be obtained from:
www.shure.com/europe/compliance
Authorized European representative:
Shure Europe GmbH
Headquarters Europe, Middle East & Africa
Department: EMEA Approval
Jakob-Dieffenbacher-Str. 12
75031 Eppingen, Germany
Phone: +49-7262-92 49 0
Fax: +49-7262-92 49 11 4
Email: [email protected]
"Made for iPod," "Made for iPhone," and "Made for iPad" mean that an elec-
tronic accessory has been designed to connect specifically to iPod, iPhone,
or iPad, respectively, and has been certified by the developer to meet Apple
performance standards. Apple is not responsible for the operation of this
device or its compliance with safety and regulatory standards. Please note
that the use of this accessory with iPod, iPhone, or iPad may affect wireless
performance.
iPad, iPhone, iPod, iPod classic, iPod nano, iPod touch, and Retina are
trademarks of Apple Inc., registered in the U.S. and other countries. iPad Air
and iPad mini are trademarks of Apple Inc. The trademark "iPhone" is used
with a license from Aiphone K.K.
Mac®and Lightning®are registered trademarks of Apple Inc.
Shure IncorporatedMV51 Digital Large-Diaphragm Condenser Microphone
6/6
Shure Incorporated 5800 West Touhy Avenue Niles, IL 60714-4608 USA Phone: +1-847-600-2000 Email: inf[email protected]
Other manuals for MV51
5
Table of contents
Other Shure Microphone manuals

Shure
Shure ROSWELLITE KSM353 User manual

Shure
Shure VP82 User manual

Shure
Shure SM58 User manual

Shure
Shure 588SDX User manual

Shure
Shure PGA 56 User manual

Shure
Shure VP88 User manual

Shure
Shure SM27-LC User manual

Shure
Shure EZB/C User manual

Shure
Shure UNISPHERE PE585V User manual

Shure
Shure 819 User manual