manuals.online logo
Brands
  1. Home
  2. •
  3. Brands
  4. •
  5. Shuttle
  6. •
  7. Industrial PC
  8. •
  9. Shuttle P15 Series User manual

Shuttle P15 Series User manual

Copyright © 2023, Shuttle Corporation. All Rights Reserved
󶗶󶻃󱎗󶛱󳒙󰉏󰉁󰈯󰉺󰈶󱎵󶛱
P15xxxx (x 1)
󴶺󱬃󱢘
1x Externes Netzteil
1x bloc d’alimentation externe
1x fuente de alimentación externa
󰦞󰦠󰈠󰈾󰉕󰈽

󵞻󶚲󶛙󶻃
󱘆󰈎󱄈󰇕󰇲󵞻󶚲
Before using the rear I/O connectors, you need to remove the connector cover first.
󱥘󱆯󳝘󴋼󵦒󵉓󲗕󱨐󱁻󱑽󴳻󱍸󱘆󱀻󵉓󲗕󱨐󱭆󴛻󰆎
Vor Nutzung der hinteren Anschlüsse bitte deren Abdeckung entfernen.
Avant d’utiliser les connecteurs à l’arrière, veuillez retirer leur couvercle.
Antes de usar los conectores traseros, por favor quíteles la tapa.
󴋼󵦒󰇲󰈱󰉋󰈭󰈽󰈖󱆯󳝘󰇝󰈏󱑽󰇯󰆍󰈱󰉋󰈭󰈽󰈩󰉎󰉺󰈖󱘆󰈎󱭆󰇛󰇪󰇓󰇤󰇙󰇈󰆎

󵤫󳃀󴀊

1x cordon d’alimentation
1x cable de alimentación de CA
󵤫󳃀󰈱󰉺󰉇


󲔹󳎗󲶕󵲏󳰫󵢔󵉓󲗕󱨐󱭆󴛻󰆎



󰈱󰉋󰈭󰈽󰈩󰉎󰉺󰈖󰇲󵨶󰇯󱘆󰈎󱭆󰇛󰈂󰇝󰆎


󲔹󳎗󲶕󵲏󱶹󴬍󵉓󲗕󱨐󱭆󴛻󰆎



󰈱󰉋󰈭󰈽󰈩󰉎󰉺󰈖󰇲󵨶󰇯󱘆󰈎󱄈󰇕󰈂󰇝󰆎

3. Slide the bracket back into the chassis and tighten the thumbscrew and two screws.
󱸷󳪜󳫏󵉓󱘼󲝟󲧦󴬍󱎕󲲏󲷬󱎗󱁖󲜠󳿺󲑻󵅹󴧪󳾢󱗺󱎙󵩶󴧪󳾢󰆎
Schieben Sie die Halterung zurück ins Gehäuse und drehen Sie die Rändelschraube und zwei Schrauben fest.
Replacez le support dans le boîtier et serrez la vis moletée et les deux vis.
Deslice el soporte de nuevo en la carcasa y apriete el tornillo de pulgar y dos tornillos.
󰉔󰉧󰈯󰉁󰉆󰈖󰈵󰉡󰉺󰈵󰇲󱁝󰇯󰈷󰉧󰈢󰉇󰇙󰇟󰇪󲀞󰇛󱎕󰈐󰆍󲑻󱤎󰇛󰉋󰈶󰇬󰇨󰇲󰉋󰈶󰇫󴀐󰈅󰇪󱤪󱷊󰇛󰈂󰇝󰆎

1. If you want to replace the M.2 SSD, unscrew the thumbscrew and two screws of the bracket and remove it.
󱮲󲧌󴮱󲤤󲘋󱤪󲍻󳪜󳫏󴳻󵴶󵞻󲝟󲧦󱀺󳢴󲑻󵅹󴧪󳾢󱗺󱎙󵩶󴧪󳾢󱸷󱎦󱘆󱐪󰆎

Pour remplacer le SSD M.2, veuillez desserrer les vis moletées et les deux vis du support.

󰈢󰉱󰈿󰈖󱃔󲘋󰇝󰈏󱩤󱘸󰆍󲑻󱤎󰇛󰉋󰈶󰇬󰉔󰉧󰈯󰉁󰉆󰇯󱄈󰇈󰇪󰇈󰈏󰇨󰇲󰉋󰈶󰈖󴀙󰈅󰇪󱘆󰈎󱭆󰇛󰈂󰇝󰆎

M.2

󴐺󱤪󲍻󳪜󳫏
󱘔󰇈
1 pcs screw (M3 x 4L) to mount the M.2 device (optional)
󵩶󴧪󳾢󵗆󵡴󱥘󴬍󴆞󵊨󵍽

1x vis (M3 x 4L) pour le montage d’un carte M.2 (optionnel)

󱸮󲈌󰉅󰉎󰈢󰈷󱘆󱄈󳝘󰉋󰈶󰈨󰉕󰈵󰉥󰉱

VESA screws 4 pcs (M4 x 6L) (optional)
󵩶󴧪󳾢󵊨󵍽

4x vis VESA (M4 x 6L, optionnel)
4 tornillos VESA (M4 x 6L, opcional)
󱤪󱷊󳝘󰉋󰈶󰈨󰉕󰈵󰉥󰉱

Quick Start Guide (optional)
󲈛󵉏󱶹󴬍󲔷󱖇󵊨󵍽

Guide rapide (optionnel)
Guía de inicio rápido (opcional)
󰈭󰉨󰉁󰈭󰈷󰈽󰉺󰉆󰈪󰈢󰉇󰈨󰉕󰈵󰉥󰉱

󳝒󱛱󶚗󶻵󶻍󱛱󶤮󴮱
2. 15” FHD LCD display
󱎘󵴈󳀵󲿢󲢦󱹿󵪟󳭪

Écran LCD 15”” full HD

󰈢󰉱󰈿󰉠󰉉󰈽

1
󳿢󵀟󲝍󲆡󲲏
󰈤󰈥󰉔󰈩󰉟󰉧
14. Connector for external antenna (optional)
󱭆󵌘󱭙󴀊󵉓󲗕󱢘󵊨󵍽
Anschluss für die externe Antenne (optional)
Connexion pour l’antenne externe (optionnel)
Conector para la antena externa (opcional)
󱭆󵌘󰈠󰉱󰉄󰉈󳝘󰈱󰉋󰈭󰈽󰈨󰉕󰈵󰉥󰉱

3. Potential equalization pin (POAG, optional)
󵤫󱅽󱥷󴪑󲅅󴎣󵊨󵍽
Potentialausgleichsstift (POAG, optional)
Broche de liaison équipotentielle (POAG, optionnel)

󳵹󵤫󱅽󲗕󱥠󳴟󱶀󰈨󰉕󰈵󰉥󰉱


󴉣󲲏󱶄󵨣󳃀󵅨󱐪󱨐

Prise casque / Sortie audio
Conexión para auriculares / salida de audio
󰈢󰉢󰉙󰉱󰈨󰉺󰉅󰈡󰈨󱐪󱓋󳴟󱶀


󶃕󱍻󵫘󲘂󱶄

Entrée Micro
Entrada del micrófono
󰉜󰈢󰈭󱎕󱓋󳴟󱶀

(7) 1st LAN on MB, (8) 2nd LAN via optional daughter board (support wake on LAN)
󳵜󱀰󱈻󳿢󵀟󱨐󱥘󱁫󲦯󳵜󱂼󱈻󳿢󵀟󱨐󵈿󵉾󵊨󵍽󳢴󱸿󲦯󱎙󴈵󵌭󲝟󲘤󳿢󵀟󱟊󵏂
(7) ein Port ist fest installiert, (8) ein zweiter ist per Tochterplatine nachrüstbar (unterstützt WOL)
(7) un port est installé, (8) un second peut être installé ultérieurement via la carte fille (compatible WoL)

󳵜󰇳󱀺󰆍󳵜󰇳󰈨󰉕󰈵󰉥󰉱󰇲󰉇󰉺󰈽󰉺󰉚󰉺󰉇󰇐󲇵󴮱󰇫󰇝󰆎󱸮󲈌


󵉓󲗕󱨐


Puertos USB 3.2 Gen1 tipo A
󰉛󰉺󰉆

󵉓󲗕󱨐

Prise HDMI \ Puerto HDMI
󰉛󰉺󰉆
12. COM 1 port (RS232 only)
󵉓󲗕󱨐󱋵󵊙󳝘󲟬

Prise COM 1 (uniquement en RS232)
Puerto COM 1 (solo RS232)
󰉛󰉺󰉆󰇲󰈃


󵤫󳃀󵅨󱎕󱶄



󲗕󳿊󵌘

11. Power button
󵤫󳃀󵞻󵠌󲔹󵑅

Bouton d’alimentation
botón de encendido
󵤫󳃀󰉚󰈽󰉱

The product’s colour and specifications may vary from the actually shipping product.
󱐪󴻘󲲏󳱞󵩿󴒢󱗺󴮿󲩬󵍽󱋉󱄕󱸖󵣋󱐪󴻘󲲏󳱞󳋪󳃆󰆎
Die tatsächliche Farbe des gelieferten Produktes kann von diesen Abbildungen abweichen.
Le coloris du produit livré peut varier de ces illustrations.
Color y la especificación del producto dependerá del transporte de mercancía corriente.
󴬭󱛱󰇲󴒢󱗺󰇷󰈷󰉘󰉁󰈭󰇳󰆍󱷏󵣋󰇬󳞠󰇮󰈏󱩤󱘸󰇐󰇘󰇚󰇈󰈂󰇝󰆎

For safety reasons, please ensure that the power cord is disconnected before opening the case.
󱨪󲟬󱶹󱎘󴈳󵏿󳰫󵞻󲲏󲷬󲡲󴳻󱍸󲔄󵢔󵤫󳃀󴀊󰆎
Achten Sie aus Sicherheitsgründen darauf, dass das Gerät vor dem Öffnen vom Stromnetz getrennt wird.
Pour des raisons de sécurité, veuillez vous assurer que le cordon d’alimentation est débranché avant d’ouvrir le boîtier.
Por razones de seguridad, no olvide desconectar el cable de alimentación antes de abrir la carcasa.
󱶹󱎘󰇲󰇣󰈅󰇯󰆍󰈯󰉺󰈷󰈖󵞻󰇕󰈏󱑽󰇯󵤫󳃀󰈱󰉺󰉇󰈖󱭆󰇛󰇪󰇈󰈏󰇗󰇬󰈖󳫪󴲽󰇛󰇪󰇓󰇤󰇙󰇈󰆎

!
The thumbscrews should be tightened with a tool after both initial installation and subsequent access to the panel PC.
󱥘󵯆󲵑󱶹󴬍󱚼󲆼󴂼󲲏󱘠󲓶󴬍󵌭󲏹󱆯󳝘󲀕󱎧󱸷󲑻󵅹󴧪󳾢󲜠󳿺󰆎

Les vis moletées doivent être serrées avec un outil après l'installation initiale et l'accès ultérieur au Panel PC.
Los tornillos moleteados deben ser apretados con una herramienta después de cada intervención en el Panel PC.
󲑻󱤎󰇛󰉋󰈶󰇳󰆍󱘆󱄈󰇐󳽲󰈓󰇧󰇣󲆼󰇯󲀕󱎧󰇫󲥜󴀐󰈅󰇛󰆍󲵑󰇯󰉏󰉋󰉩󰇲󲗕󳿊󰇼󵉢󰈃󰈂󰇝󰆎

!
Quick Start Guide
󲈛󵉏󱶹󴬍󲔷󱖇

Guide rapide
Guía de inicio rápido
󰈭󰈢󰉁󰈭󰈷󰈽󰉺󰉆󰈪󰈢󰉇

󱮲󱆅󲤤󲖒󱤪󶟦󳪜󳫏
󰈢󰉱󰈿󰇲󶕝󶡊
131210
76

aa
bb
cc
cc
bb
aa
󲟠󱤪󲍻󳪜󳫏
󲟠󰇛󰇈
2. Install the M.2 device into the M.2 slot and secure with the screw.
󱸷󴬍󴆞󲘂󱎕󲘂󲰭󱁖󵗆󱀺󱤪󱷊󴧪󳾢󰆎



󰈷󰉫󰉁󰉆󰇯󱸮󲈌󰉅󰉎󰈢󰈷󰈖󲕯󱎕󰇛󰆍󰉋󰈶󰇫󰇛󰇧󰇏󰈎󰇬󴀐󰈅󰇪󱀻󰇙󰇈󰆎

cc
14
Four screws
󵩶󴧪󳾢
Vier Schrauben
Quatre vis
Cuatro tornillos
󰇨󰇲󰉋󰈶

1
2
Connector cover (optional)
󵉓󲗕󱨐󱭆󴛻󵊨󵍽

Couvercle du connecteur (optionnel)
Tapa del conector (opcional)
󰈱󰉋󰈭󰈽󰈩󰉎󰉺󰈨󰉕󰈵󰉥󰉱

Slope angle
󱋮󲟌󴰂󲃖
Angle d’inclinaison
Ángulo de inclinación
󱋮󲟌󴰂
aa
bb
511
3 98
!
2
Optional I/O ports are
available depending on
the specs of the actually
shipping product.
󱘟󷁄󳢴󷀛󶡀󱨐󱗺󴮿󲩬󵍽󱋉
󱄕󱸖󵣋󱐪󴻘󲲏󳱞󳋪󳃆󰆎
Optionale Anschlüsse sind
entsprechend der Spezifikation
des vorliegenden Produktes
vorhanden.
Des connexions optionnelles
sont disponibles selon les
spécifications de ce produit.
Hay puertos de E/S opcionales
disponibles dependiendo
de las especificaciones del
producto que se esté enviando.
󰈨󰉕󰈵󰉥󰉱󰇲󰉛󰉺󰉆󰇳󰆍
󰇡󰈐󰇢󰈐󱐪󴖧󳒙󰇯󰈌󰇧󰇪󱎵󱷩
󰇯󵊅󰇈󰇐󰇘󰇚󰇈󰈂󰇝󰆎




!
Optional I/O Port
󱘟󵊨󳢴󳴟󱘓
Optionaler Anschluss
Connexion optionnelle
Puerto de E/S opcional
󰈨󰉕󰈵󰉥󰉱󰉛󰉺󰉆

Occupied Sections
󱆄󳝘󷁛󱐶
Belegte Bereiche
Sections occupées
Secciones ocupadas
󱸲󲤹󵌘󱐶

Specifications / Limitations
󴮿󲩬󷃰󱑦
Spezifikation / Einschränkungen
Spécifications / Limitations
Especificaciones / Limitaciones
󴮿󲩬󶘓󰇷󱑦󷃰

M.2 SSD
󱤪󲍻󳪜󳫏

SSD M.2
SSD de M.2
M.2 SSD
M.2 SSD
1
M.2 2280 M key slot
󲘂󲰭
M.2 2280 M Steckplatz
Emplacement M.2 2280 M
Ranura M.2 2280 M
󰈫󰉺󰈷󰉫󰉁󰉆

󵉓󲗕󱨐


󰉛󰉺󰉆
1󲤰󵴈󴰓󲧀󲃖

󲤰󱭗󴰓󱋿󲃖



󵉓󲗕󱨐

󰉛󰉺󰉆
1
USB 2.0 Ports
󵉓󲗕󱨐

Prises USB 2.0
Puertos USB 2.0
󰉛󰉺󰉆

1USB2.0 x 4pcs
󵉓󲗕󱨐

󰉛󰉺󰉆

1
󱋵󵊙󳝘󲟬
Nur für RS232 \ uniquement en RS232
󰇲󰈃
4
󳿢󵀟󱨐
󰉛󰉺󰉆
P15xxxx Series
Should any accessories be required, please contact Shuttle or your relevant supplier.
󴔕󲤹󱄫󱆅󵍽󱄦󵤰󲹲󴳻󴊟󴂛󲑆󳞦󱥠󳢴󱇋󲏹󱝶󰆎

Si vous avez besoin d’accessoires, veuillez contacter Shuttle ou votre fournisseur.
Si necesita accesorios, póngase en contacto con Shuttle o con su respectivo proveedor.
󲇵󴮱󰇮󰈠󰈭󰈹󰈳󰉨󰉺󰇐󰇆󰈏󱩤󱘸󰆍󳭮󰈆󰇛󰇓󰇳󴻙󱬢󲃇󲰈󰈂󰇫󰇎󱝿󱘸󰇟󱀻󰇙󰇈󰆎

i
2. Screw the antennas on to the appropriate connectors on
the back panel. Make sure the antennas are aligned vertically
or horizontally to achieve the best possible signal reception.
󱸷󵡴󲁦󳢴󱭙󴀊󵗆󴐣󴋼󵦒󲦯󳢴󳤨󲏹󵉓󲗕󱢘󱀺󰆎
󳫪󴲽󱎦󱦲󳤤󲑆󲹤󲂣󱸽󶅺󱄕󳖢󲇇󲤰󱆣󳢴󱈑󴢏󲗕󲝦󰆎
Schrauben Sie die Antennen auf die entsprechenden
Anschlüsse auf der Rückseite. Zur Optimierung des Empfangs
richten Sie bitte die Antennen vertikal oder horizontal aus.
Vissez les antennes sur les connecteurs correspondants
situés à l’arrière. Pour optimiser la réception, alignez les
antennes verticalement ou horizontalement.
Atornille las antenas a los conectores correspondientes
en el panel trasero. Para optimizar la recepción, por favor,
alinee las antenas vertical u horizontalmente.
󴋼󵦒󰇯󰈠󰉱󰉄󰉈󰇲󰈱󰉋󰈭󰈽󰈖󴀐󰈅󰇪󱘆󰈎󱄈󰇕󰈂󰇝󰆎
󰈠󰉱󰉄󰉈󰇲󱙁󰇑󰈖󴁖󲱚󰇯󱬹󰇌󰇪󴲖󰇛󰆍󱘇󱈑󲍏󲃖󰇐󲤰󵊙
󰇬󰇮󰈏󱅽󴆞󰈖󳫪󴲽󰇛󰇪󰇓󰇤󰇙󰇈󰆎




2. Properly tighten the vertical stand with four screws (M4 x 10L) at the rear of the Panel PC.
󱸷󳤤󳳻󲝟󲧦󴐷󴋼󵦒󲦯󳢴󱤋󱈻󴧪󳾢󱶄󱸽󶅺󱁖󵗆󳿺󴧪󳾢󱤪󱷊󰆎

Fixez le pied vertical à l’arrière du Panel PC à l’aide de quatre vis (M4 x 10L).

󰉏󰉋󰉩󰦭󰦠󰇲󴋼󵦒󰇬󴁖󴆞󰇑󰈷󰈽󰉱󰉇󰈖󰇨󰇲󰉋󰈶󰈖󱆯󰇧󰇪󱤪󱷊󰇛󰈂󰇝󰆎

󱆯󳝘󶬝󶮭󲝟󲧦󷁄󷁦
󰈷󰈽󰉱󰉇󰈖󱆯󰇊󰈨󰉕󰈵󰉥󰉱

Touch panel brings digital life for an easy touch experience. Experience the
ease of managing your digital life with a few touches. Your touch functions
like a mouse device and all you need to interact with the touch panel.
󰉹
󰉹
󴰨󲗗󴧒󲂅󲁦󳾖󲋘󳹑󱟞󳢴󴰨󲗗󵴄󵲇󴷃󱆐󵅅󵴶󳢴󱃛󱘇󲞨󱅽󳝏󲽫󰆎󱆯󳝘󲔷󱹆󵅅󴰨
󲂮󱀻󱹡󱘟󱄕󴷃󲋘󵅅󵴶󱥠󳷑󳘶󲞨󱅽󳝏󲽫󰆎󴰨󲗗󳢴󲟩󲄿󱹡󱋿󳄁󶅐󳁨󲱉󱀰󴑜󳢴󱋣
󵊄󲑰󵤰󳢴󲔷󱄔󱄕󵉢󴩼󲑰󲤹󱃂󱔅󰆎
󰉹󵅅󴰨󱹡󱮲󳄁󶅐󲀖󵖥
󰉹󴰨󳫠󱊌󳞉󱀽󲝮󱹡󱮲󳄁󶅐󱘣󵖥
Mit einem Touchscreen kann auf Informationen noch einfacher und
schneller als mit einer Maus zugegriffen werden, da der Anwender für
seine Auswahl lediglich intuitiv den Bildschirm berühren muss.
󰉹
󰉹
Avec un écran tactile, l’accès aux informations est encore plus facile
qu’avec une souris, car il suffit de toucher intuitivement l’écran pour les
sélectionner.
󰉹
󰉹

más fácil y rápida que con un ratón, ya que el usuario sólo tiene que tocar
intuitivamente la pantalla para hacer una selección.
󰉹
󰉹

󱇍󲇚󱄕󱀻󴮿󱑷󱆶󳀵󳆄󴧒󲂅



󰉩󰉺󰉩󰇯󲻯󰇧󰇪󰉏󰉋󰉩󰇲󳀵󲖳󰈈󰈷󰈭󰉨󰉺󰉱󰈖󱘆󰈎󲒡󰇧󰇪󰇓󰇤󰇙󰇈󰆎

1. Moisten a soft cloth with a little water or alcohol (max. 75%) to clean the screen.
Please never spray alcoholic cleaning agents directly onto the touchscreen.
󳝘󲨄󵄏󳢴󲀳󲻮󱹁󴱡󲹤󲑆󵎂󳻮󳇳󲃖󱀽󱘟󱆶󳀵󳆄󴧒󲂅󰆎󳾅󱀽󱘟󳤤󲗕󱢤󳊁󵎂󳻮󳀵󲽇󱓁󱥘󴰨󲗗󴧒󲂅󰆎
Befeuchten Sie ein weiches Tuch mit wenig Wasser oder Alkohol (max. 75%) um damit den Bildschirm zu reinigen.
Bitte sprühen Sie alkoholische Reinigungsmittel niemals direkt auf den Touchscreen.
Humidifiez un chiffon doux avec un peu d’eau ou d’alcool (max. 75 %) pour nettoyer l’écran.

Humedezca un paño suave con un poco de agua o alcohol (máx. 75%) para limpiar la pantalla.
Por favor, no rocíe nunca limpiadores con alcohol directamente sobre la pantalla táctil.
󲀳󱥠󰇯󱹁󵏿󰇲󲹤󰈆󰇛󰇓󰇳󰈠󰉩󰈱󰉺󰉩󲤰󱭗󰦂󰇫󰈷󰈭󰉨󰉺󰉱󰈖󲔝󰇑󰈂󰇝󰆎󰈠󰉩󰈱󰉺󰉩󰈷󰉕󰉪󰉺󳵹󰈖󳤤󲗕󰈽󰉁󰈿󰈷󰈭󰉨󰉺󰉱󰇯󱆯󰈓󰇮󰇈󰇫󰇓󰇤󰇙󰇈󰆎


2. Note that only the front side is IP65 protected. Be sure to avoid moisture on the other components.
󲼘󲌿󱘚󲤹󲶓󵦒󲤹󳢴󱈍󴶧󰆎󳫪󴲽󱎦󱄆󱍳󱄦󲏹󵊯󱍽󲄴󳈅󰆎

Notez que seul le panneau avant est protégé par la norme IP65. Évitez l’humidité sur les autres composants.
Tenga en cuenta que sólo el panel frontal tiene protección IP65. Evite la humedad en los demás componentes.
󰇳󲥜󱆃󱑽󵦒󰇲󰈃󲤹󱓩󰇫󰇝󰆎󱄆󵌘󱐶󰇯󱸮󰇛󰇪󰇳󳂯󲹇󰇏󰈍󵊯󰇕󰇪󰇓󰇤󰇙󰇈󰆎

󳀵󶨈󴧒󶝟
󰈷󰈭󰉨󰉺󰉱󰇲󰈭󰉨󰉺󰉉󰉱󰈮󶢡󶦠
󷀛󶡀󵤫󳃀󶴴󵞻󶥍
󵤫󳃀󰇲󱎕󰈐󶢡
Screws M4 x 10L * 4pcs
󴧪󳾢󵩶
Vier Schrauben M4 x 10L
Quatre vis M4 x 10L
Cuatro tornillos M4 x 10L
󰉋󰈶󰧕󱈻

Screws M4 x 12L * 4pcs
󴧪󳾢󵩶
Vier Schrauben M4 x 12L
Quatre vis M4 x 12L
Cuatro tornillos M4 x 12L
󰉋󰈶󰧕󱈻

󷁄󷁦󶛙󶻃󶩃󶱉󶈶󶱉󵤰󴮱󷀼󱘸󳢴󶚗󶥺󳑸󲥜

Installation optionnelle d'antennes Wifi (châssis approprié requis)
Instalación opcional de antenas WLAN (se requiere una versión de carcasa especial)
󰈨󰉕󰈵󰉥󰉱󶩃󶱉󰈠󰉱󰉄󰉈󰇲󱘆󰈎󱄈󰇕󱸮󲈌󰇝󰈏󰈵󰉡󰉺󰈵󰇯󷃰󰈏

1. Take the two antennas out of the accessory box.
󲇎󵤦󱄦󳤂󱁝󱘆󱐪󱎙󱈻󱭙󴀊󰆎

Retirez les deux antennes de la boîte d’accessoires.

󰈠󰈭󰈹󰈳󰉨󰉚󰉁󰈭󰈷󰈌󰈎󰈠󰉱󰉄󰉈󰈖󲥜󱘆󰈎󰈂󰇝󰆎


The standard VESA openings show where an arm / wall mount kit
which is available separately can be attached.
󳵖󱘸󲱉󳃆󴮿󲩬󱘟󱄕󱸷󲋘󲑰󴼬󴻧󳢴󱫱󴏲󲝟󲧦󵅅󵴶
󱶹󴬍󱑠󲱉󳃆󴧪󱶄󱁝󰆎


Les ouvertures VESA standard indiquent où il est possible de
fixer un kit de montage mur / bras, disponible séparément.
Un brazo / soporte VESA comprado puede ser fácilmente

󴮿󲩬󰇯󳃆󰇜󰇣󰈤󰈧󰉺󰉩󰉜󰈤󰉱󰉆󰈈󰈠󰉺󰉞󰈖󱘆󱄈󰈏󱂻󰇐󰇫󰇑󰈂󰇝󰆎



ba
3
2

󲔹󳎗󱀻󱥆󲶕󵲏󱸷󵤫󳃀󴶺󱬃󱢘󵉓󲗕󴐣󵤫󳃀󵅨󱎕󱶄󰆎



󱄕󱀻󰇲󱤣󰇯󰇆󰈏󵤫󳃀󲗕󳿊󰇲󰈷󰉄󰉁󰉕󰇯󲇃󰇈󰈠󰈾󰉕󰈽󰉺󰇬󰈖󰈶󰉡󰉁󰈭󰇯󲗕󳿊󰇛󰇪󰇓󰇤󰇙󰇈󰆎

󰈽󰉁󰈿󰉏󰉋󰉩󰇳󰆍󰉅󰈶󰈽󰉩󰉧󰈢󰉓󰈖󳹑󱖈󰇯󰈆󰇣󰈍󰇛󰇪󰇓󰈐󰈂󰇝󰆎󲞠󱤎󰇲󳹑󱖈󰇮
󰈽󰉁󰈿󰇫󰉜󰈤󰈷󰇲󰈌󰇊󰇯󲲏󴌭󰇙󰇟󰇆󰇮󰇣󰇐󱔅󰇏󰇛󰇣󰇈󰈌󰇊󰇯󲛽󱆌󰇝󰈏󰇗󰇬󰇐󰇫
󰇑󰈂󰇝󰆎
󰉹󰈽󰉁󰈿󰉜󰈤󰈷󰇲󲀖󰈭󰉨󰉁󰈭
󰉹󰈽󰉁󰈿󰇛󰇪󲶒󰈂󰈏󰉜󰈤󰈷󰇲󱘣󰈭󰉨󰉁󰈭




󰉹
󰉹
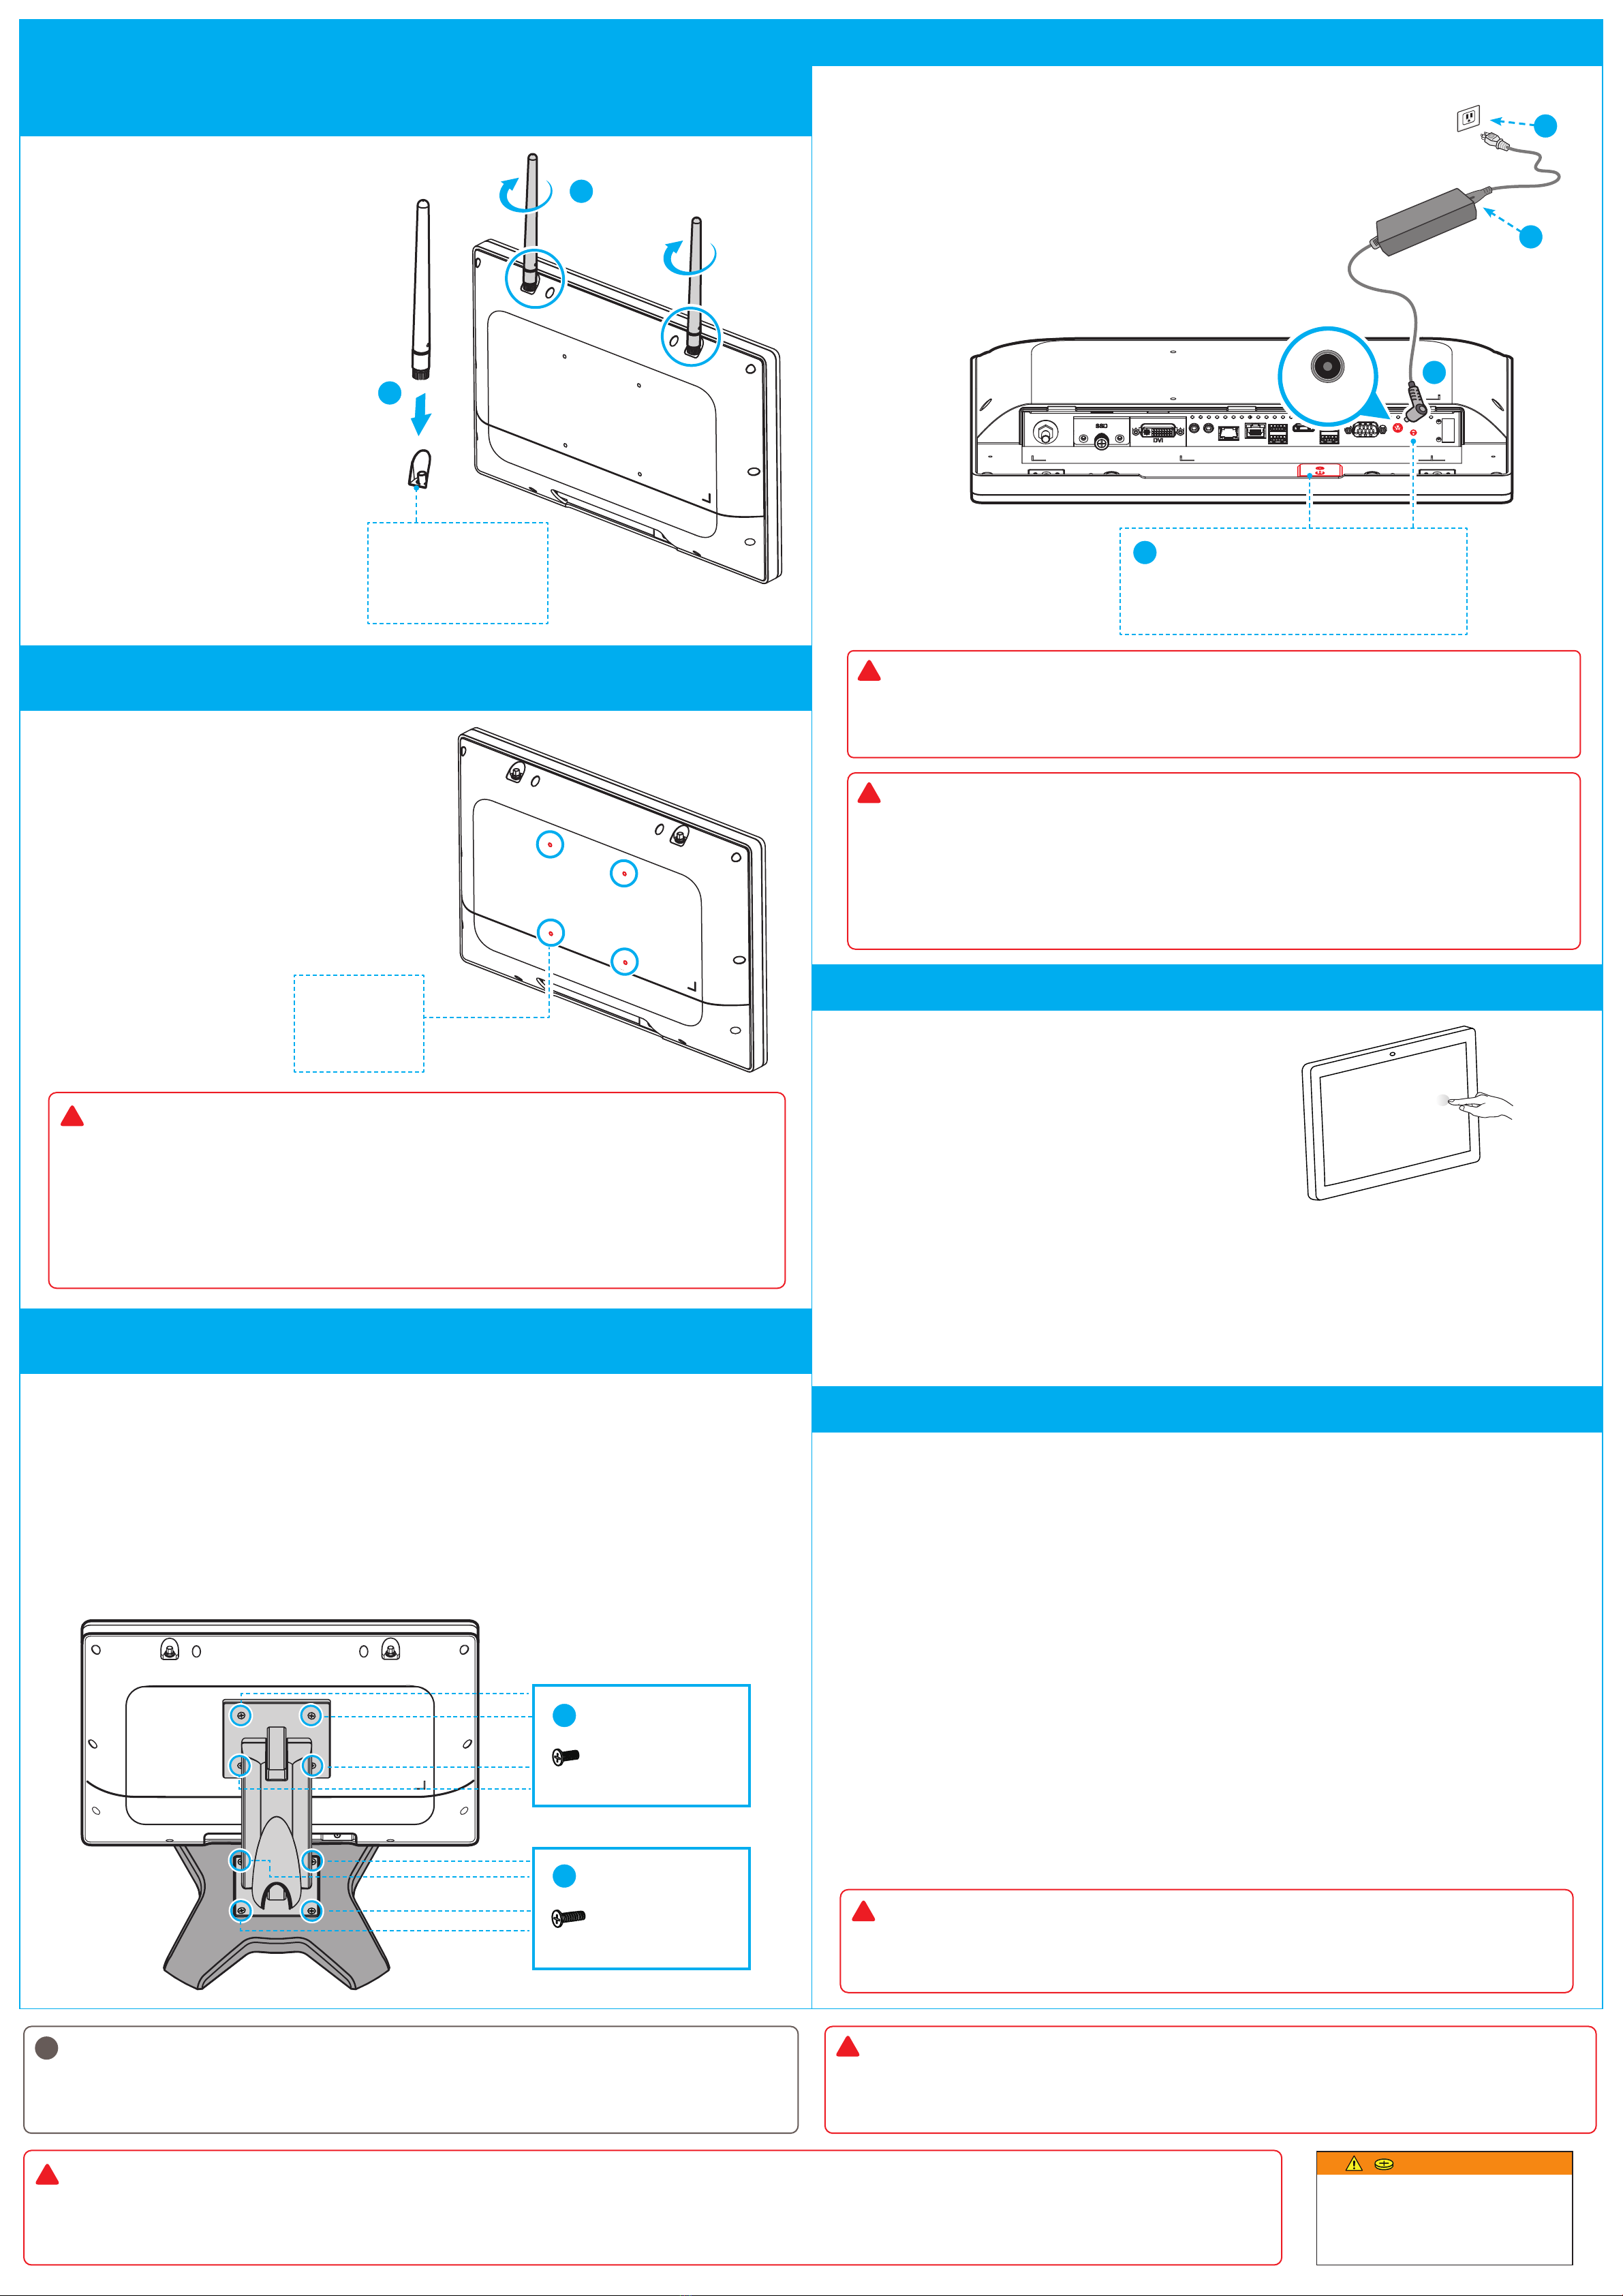
Press the power switch/button (4) to turn on the system.
󲔹󱀻󵤫󳃀󵞻󵠌󲔹󵑅󵞻󱞏󳼫󳾡󰆎

Pour allumer, appuyez sur le bouton d’alimentation (4).
Presione el botón de encendido (4) para encender la energía.
󵤫󳃀󰉚󰈽󰉱󰈖󲓬󰇛󰇪󰈵󰈷󰉄󰉞󰈖󴾧󱔅󰇙󰇟󰈂󰇝󰆎

Press the power button (a or b) to turn on the system.
󲔹󱀻󵤫󳃀󲔹󵑅󲑆󵞻󱞏󳼫󳾡󰆎

appuyez sur le bouton d’alimentation a ou b.
Presione el botón de encendido a o b.
󵤫󳃀󰉚󰈽󰉱a / b󰈖󲓬󰇛󰇪󰈵󰈷󰉄󰉞󰈖󴾧󱔅󰇙󰇟󰈂󰇝󰆎

4
Do not use inferior extension cords as this may result in damage to your panel PC. The panel PC comes with its own AC adapter.
Do not use a different adapter to power the panel PC and other electrical devices.
󱐷󱔯󱆯󳝘󱓓󴼚󲄦󵞧󴀊󱙖󱑷󱘟󴌭󱸾󴐤󲘽󱬎󰆎󲶔󵣘󵡴󱸸󳝘󳢴󱃔󲽱󵊙󵍽󱢘󰆎󴳻󱔯󱆯󳝘󱎦󱄆󵊙󵍽󱢘󳋪󲶔󱗺󱎦󱄆󵤫󱶀󴱝󱋉󱇋󵤫󰆎


N'utilisez pas de rallonges de qualité inférieure, car cela pourrait endommager le Panel PC. Ce dernier est fourni avec son propre bloc d'alimentation.
N'utilisez aucun autre bloc d'alimentation pour l'alimentation du Panel PC et d'autres appareils électriques.
No utilice cables de extensión inferiores ya que esto puede causar daños al Panel PC. El Panel PC tiene su propia fuente de alimentación.
No utilice ninguna otra fuente de alimentación para alimentar el Panel PC y otros dispositivos eléctricos.
󵤫󳃀󰇲󲄦󵞧󰈯󰉺󰉔󰉩󳵹󰇳󰆍󰉏󰉋󰉩󰇯󵣌󱷣󰈖󲅅󰇑󴾧󰇗󰇝󱘟󴌭󲉗󰇐󰇆󰈎󰈂󰇝󰆎󱄈󱺎󰇛󰇪󰇈󰈏󱸲󳝘󰈠󰈾󰉕󰈽󰉺󱄕󱭆󰈖󱆯󰈓󰇮󰇈󰇫󰇓󰇤󰇙󰇈󰆎
󱄈󱺎󰇲󰈠󰈾󰉕󰈽󰉺󰇳󰉏󰉋󰉩󰇯󱄕󱭆󰇯󱆯󳝘󰇛󰇮󰇈󰇫󰇓󰇤󰇙󰇈󰆎󵏽󱭗󰇮󵣌󱷣󰈖󰈆󰇣󰈍󰇝󱖡󵢪󰇐󰇆󰈎󰈂󰇝󰆎


!

󴶖󱙺󲼘󲌿󱀽󱘟󱆯󳝘󲑆󱢤󳊁󲅧󳋸󳃦󱓁󱮲󲘞󳢬󲻩󳰰󵏻󱓁󲑆󱎦󱄆󳃦󱓁󰆎



󴶖󱙺󰦗󰉗󰉱󰈶󰉱󰈈󰈵󰉱󰉈󰉺󰇬󰇈󰇧󰇣󲅧󰇈󳃦󱒔󰈖󱆯󳝘󰇛󰇣󰈎󱢤󵥗󰇛󰇮󰇈󰇫󰇓󰇤󰇙󰇈󰆎

The unit can be operated at an ambient temperature of max. 40°C (104°F). Do not expose it to temperatures below 0°C (32°F) or above 40°C (104°F).
󲥜󳝒󱛱󲤰󵴈󲛽󱆌󳃛󲃖󳋪󰆎󴳻󱔯󱥘󱅾󲟬󲑆󵴈󲟬󳢴󳛠󱪳󱁝󱆯󳝘󲥜󳝒󱛱󰆎
Das Gerät darf bis zu einer maximalen Umgebungstemperatur von 40°C (104°F) betrieben werden. Setzen Sie das Gerät nicht Temperaturen von unterhalb 0°C (32°F) bzw. oberhalb 40°C (104°F) aus.
L’appareil peut être utilisé à une température ambiante maximum de 40°C (104°F). Ne pas exposer l’appareil à une température inférieure à 0°C (32°F) ou supérieure à 40°C (104°F).
No utilice la unidad cuando la temperatura ambiente sea superior a 40°C (104°F). No someta el equipo a temperaturas inferiores a 0°C (32°F) ni superiores a 40°C (104°F).
󲥜󲲏󱢘󰇳󱚘󵇪󳁙󲃖󰈂󰇫󰇲󳛠󱪳󰇫󲖌󲨫󰇝󰈏󰇗󰇬󰇐󰇫󰇑󰈂󰇝󰆎󲥚󳂰󰇆󰈏󰇈󰇳󰈖󴾵󰇌󰈏󳛠󱪳󰇫󱆯󳝘󰇛󰇮󰇈󰇫󰇓󰇤󰇙󰇈󰆎

!
Incorrectly replacing the battery may damage this computer. Replace only with the same or equivalent as recommended by Shuttle. Dispose of used batteries according to the manufacturer’s instructions.
󲤤󲘋󵤫󲺐󲟩󲄿󵕟󴳔󱘟󴌭󲤳󲘽󱬎󲥜󵤫󴎖󰆎󱋵󴌭󱇍󳢴󲄪󴶠󱄕󳤨󱘼󲑆󱘼󳵹󳢴󵤫󲺐󲤤󲘋󰆎󴳻󱇍󳎗󴬭󵉐󱝶󳢴󱆯󳝘󴳚󲠾󴢅󳘶󲄒󵤫󲺐󰆎
Das unkorrekte Austauschen der Batterie kann diesen Computer beschädigen. Ersetzen Sie die Batterie nur durch den von Shuttle empfohlenen Typ oder ein gleichwertiges Modell. Entsorgen Sie gebrauchte Batterien gemäß den Herstellerangaben.


󰉎󰉁󰉄󰉨󰈖󵟃󵊅󰇧󰇪󰈹󰉁󰉆󰇝󰈏󰇬󰆍󰇗󰇲󰈱󰉱󰉒󰉣󰉺󰈽󰇐󲘽󱋧󰇝󰈏󱗏󱤐󰇬󰇮󰈎󰈂󰇝󰆎󱃔󲘋󰇝󰈏󵣋󰇳󰆍󰇐󲗘󱮘󰇝󰈏󰉎󰉁󰉄󰉨󰇬󱘼󰇜󰈆󰇲󰈂󰇣󰇳󱘼󳵹󰇲󰈆󰇲󰇤󰇕󰈖󱆯󳝘󰇝󰈏󰈌󰇊󰇯󰇛󰇪󰇓󰇤󰇙󰇈󰆎󱆯󳝘󳀸󰈃󰉎󰉁󰉄󰉨󰇳󰆍󰉟󰉺󰈩󰉺󰇲󲔷󳭪󰇯󲇃󰇧󰇪󱐖󱐶󰇛󰇪󰇓󰇤󰇙󰇈󰆎



󱘟󱆯󳝘󴐷󱎬󱷩󳢴󱫱󴏲󲝟󲧦󵉢󴩼󱫱󲗋󲄿󱶹󴬍󰆎󲤰󱭗󴻐󵄹󴌭󱓋󳋪󱋵󵊙󱘸󱥘󳢴󵴈󲃖󱶹󴬍󰆎
󲝟󲧦󲦯󱗊󲃖󲇵󵨸󱃻󲟬󱚼󱎜󵐀󱁻󵟃󰆎



doit pas être situé à plus de 2 m de hauteur. L'épaisseur du support de montage VESA doit être comprise entre 1,6 et 2,0 mm.
El Panel PC puede ser montado en la pared o en un brazo usando un soporte VESA de 100x100 mm. La montura debe estar diseñada para una carga de al
menos 10 kg y no debe estar ubicada a más de 2 m de altura. El grosor del metal del soporte VESA debe estar entre 1,6 y 2,0 mm.
󰉏󰉋󰉩󰇳󰆍󴮿󲩬󰈖󱆯󰇧󰇪󰈠󰉺󰉞󰈈󱫱󵦒󰇯󱘆󰈎󱄈󰇕󰈏󱂻󰇐󰇫󰇑󰈂󰇝󰆎󴉀󴖧󵏽󰧈󰧄󱗺󰇷󵴈󰇙󱄕󱀻󰇬󰇮󰈎󰈂󰇝󰆎
󰉜󰈤󰉱󰉆󲦯󰇲󱗊󰈃󱸮󲈌󲁵󰦗󰆎


!
󱮲󱆅󱆯󳝘󴰨󶡁󴧒󶝟
󰈽󰉁󰈿󰉏󰉋󰉩󰇲󱆯󰇈󶢡
󱘺󲗋󶢢󶎉󱀺󷁄󷁦

󰈖󰈤󰈧󰉺󰉩󰇯󱘆󰈎󱄈󰇕󰈏󱩤󱘸󰈨󰉕󰈵󰉥󰉱
Press and hold the power button (a or b) for 5 seconds to force shutdown.
󲔹󱅿󵤫󳃀󲔹󵑅󲑆󳰂󲅧󱑦󵠌󲲏󰆎

Pour forcer l'arrêt du système, appuyez sur le bouton d'alimentation a ou b pendant 5 secondes.
Para forzar el apagado, por favor presione el botón de encendido a o b durante 5 segundos.
󵤫󳃀󰉚󰈽󰉱󰈖󳰂󱄕󱀺󵞧󲓬󰇛󰇝󰈏󰇬󰆍󰈵󰈷󰉄󰉞󰈖󲅧󱑦󳽲󱂶󰇙󰇟󰈂󰇝󰆎

!
!
!
THIS PRODUCT CONTAINS A BUTTON BATTERY
WARNING
If swallowed,a lithium button battery can cause severe or fatal
injuries within 2 hours.
Keep batteries out of reach of children.
If you think batteries may have been swallowed or placed
inside any part of the body, seek immediate medical attention.
1
Connector for WLAN antennas
󱭙󴀊󵉓󲗕󱨐

Connexions pour les antennes Wif
Conexiones para las antenas WLAN
󳍑󴀊󰈠󰉱󰉄󰉈󳝘󰈱󰉋󰈭󰈽

2
1. Tighten the vertical stand securely with four screws (M4 x 12L)
󱆯󳝘󱤋󵩶󴧪󵐈󱸷󳤤󳳻󲄿󲝟󲧦󲜠󳿺󱤪󱷊󰆎
Schrauben Sie den Standfuß mit vier Schrauben (M4 x 12L) fest.
Fixez le pied vertical avec quatre vis (M4 x 12L).
Atornille el soporte con cuatro tornillos (M4 x 12L).
󴁖󴆞󰇑󰈷󰈽󰉱󰉇󰈖󰇨󰇲󰉋󰈶󰈖󴀐󰈅󰇪󱤪󱷊󰇛󰈂󰇝󰆎

(M4 x 12L).
Screws M4 x 6L * 4pcs
󴧪󳾢󵩶
Vier Schrauben M4 x 6L
Quatre vis M4 x 6L
Cuatro tornillos M4 x 6L
󰉋󰈶󰧕󱈻

1
2
1


This manual suits for next models

2

Other Shuttle Industrial PC manuals

Shuttle DH670 User manual

Shuttle

Shuttle DH670 User manual

Shuttle P21WL01 User manual

Shuttle

Shuttle P21WL01 User manual

Popular Industrial PC manuals by other brands

Pro-face PS5000 Series user manual

Pro-face

Pro-face PS5000 Series user manual

Texas Microsystems, Inc. 2003 user manual

Texas Microsystems, Inc.

Texas Microsystems, Inc. 2003 user manual

Unitedlink UniBox-3240 user manual

Unitedlink

Unitedlink UniBox-3240 user manual

MPL PIP20 Technical reference manual

MPL

MPL PIP20 Technical reference manual

Chipsee PPC-A9-150-C manual

Chipsee

Chipsee PPC-A9-150-C manual

Kontron KBox A-150-HSW user guide

Kontron

Kontron KBox A-150-HSW user guide

Advantech CompactPCI MIC-3665A user manual

Advantech

Advantech CompactPCI MIC-3665A user manual

Advantech UNO-2483 quick start guide

Advantech

Advantech UNO-2483 quick start guide

AXIOMTEK IFB112 Hardware user manual

AXIOMTEK

AXIOMTEK IFB112 Hardware user manual

ADLINK Technology DLAP-411-Orin user manual

ADLINK Technology

ADLINK Technology DLAP-411-Orin user manual

DFI EC500-SD user manual

DFI

DFI EC500-SD user manual

JETWAY JBC38AZ02-2LU Quick installation guide

JETWAY

JETWAY JBC38AZ02-2LU Quick installation guide

Allen-Bradley 6181 installation instructions

Allen-Bradley

Allen-Bradley 6181 installation instructions

GIGAIPC QBiX-Pro Series quick start guide

GIGAIPC

GIGAIPC QBiX-Pro Series quick start guide

Advantech UNO-1372GH user manual

Advantech

Advantech UNO-1372GH user manual

Kontron KISS 4U V3 user guide

Kontron

Kontron KISS 4U V3 user guide

Seco i-PAN T10 Baseboard manual

Seco

Seco i-PAN T10 Baseboard manual

GIGAIPC QBiX-Pro-WHLA8265H-A1 quick start guide

GIGAIPC

GIGAIPC QBiX-Pro-WHLA8265H-A1 quick start guide

manuals.online logo
manuals.online logoBrands
  • About & Mission
  • Contact us
  • Privacy Policy
  • Terms and Conditions

Copyright 2025 Manuals.Online. All Rights Reserved.