Siafa SKY2000-M4 User manual
www.szyuante.com
Shenzhen YuanTe Technology Co., Ltd.
Tel: 86-755-26722925 Fax: 86-755-85258143 Web
:
www.szyuante.com
User Manual-SKY2000-M4
Thanks for purchasing our product. Please read the user manual carefully before using.
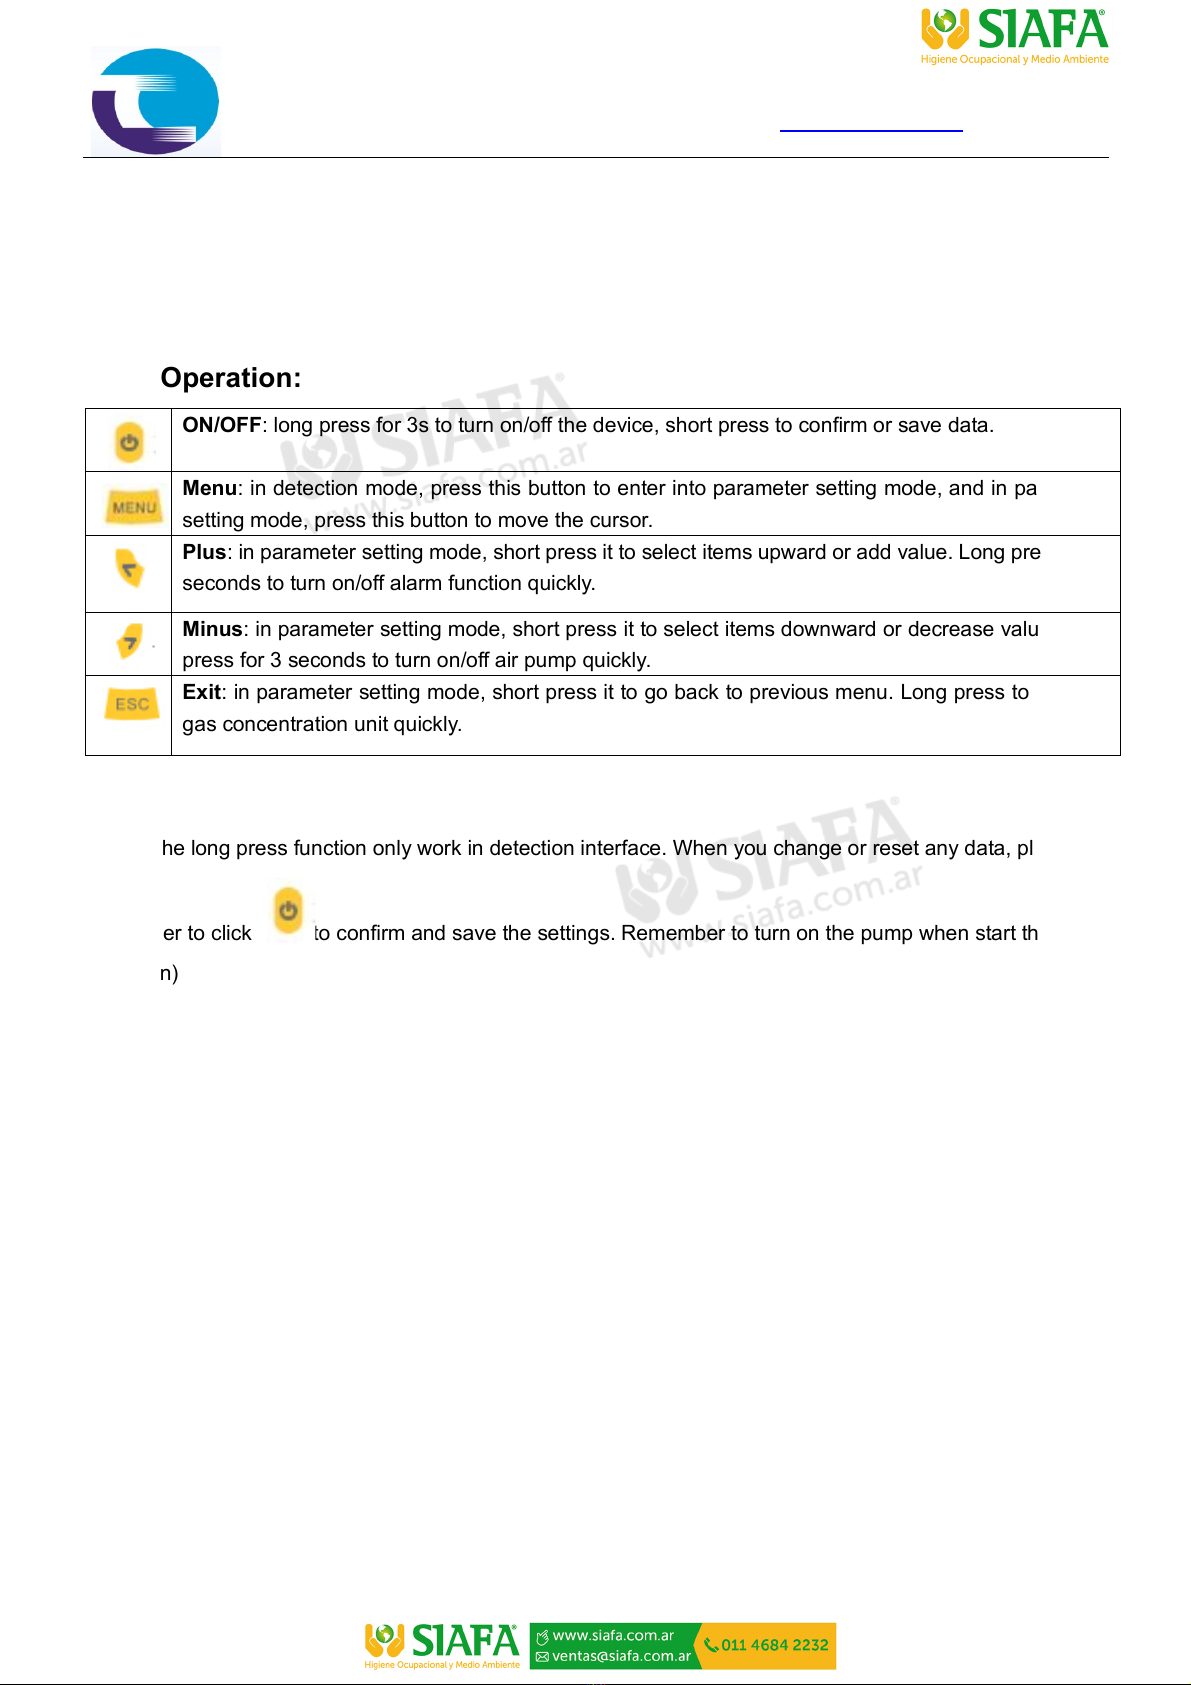
Keys Operation:
ON/OFF: long press for 3s to turn on/off the device, short press to confirm or save data.
Menu: in detection mode, press this button to enter into parameter setting mode, and in parameter
setting mode, press this button to move the cursor.
Plus: in parameter setting mode, short press it to select items upward or add value. Long press for 3
seconds to turn on/off alarm function quickly.
Minus: in parameter setting mode, short press it to select items downward or decrease value. Long
press for 3 seconds to turn on/off air pump quickly.
Exit: in parameter setting mode, short press it to go back to previous menu. Long press to shift the
gas concentration unit quickly.
(Note: The long press function only work in detection interface. When you change or reset any data, please
remember to click to confirm and save the settings. Remember to turn on the pump when start the
detection)
Power On
Press the “ON/OFF” for three seconds, the detector will be turned on and the pump will start to work. The
screen displays the following interface successively: Brand and Logo, main parameter interface, initialing
countdown. The countdown would be 60 seconds, which is to make sure that the sensors are fully activated.
After 60 seconds, the device enter normal detection interface.
Zero Calibration
Zero calibration must be done in clean air. Zero calibration is needed when there is zero shift happens.
Put the detector in clean air for 3-5 minutes, under the detection interface, press the “PLUS” and “MINUS”
buttons at the same time for three seconds, the data of all channels will reset to zero automatically.
Note: Zero calibration of oxygen detector, nitrogen detector and carbon dioxide detector (target gases are
component of the air), the data will be defaults to 20.9%VOL (O2), 79.1%VOL (N2), 400ppm (CO2). Do not do
the zero calibration in not clean air or when there is no zero shift happens.
www.szyuante.com
Shenzhen YuanTe Technology Co., Ltd.
Tel: 86-755-26722925 Fax: 86-755-85258143 Web
:
www.szyuante.com
Process of Over-range incorrect operation
Users should avoid using gases which exceed the measure range to impact the sensor, because it will affect
the lifespan and sensitivity of the sensor, even, "poison" the sensor. If there is any over-range incorrect
operation makes the detector displaying an concentration at a large reading, the remedy is to take the device
out of the environment immediately and put it in clean air for over half an hour, and then observe the reading, if
it keeps going down, then wait until the reading back to zero before powering it off, and do the zero point
calibration next time before using it. If the reading maintained at full scale, user should send the device back to
manufacturer or agent for repairing or replacing the sensor.
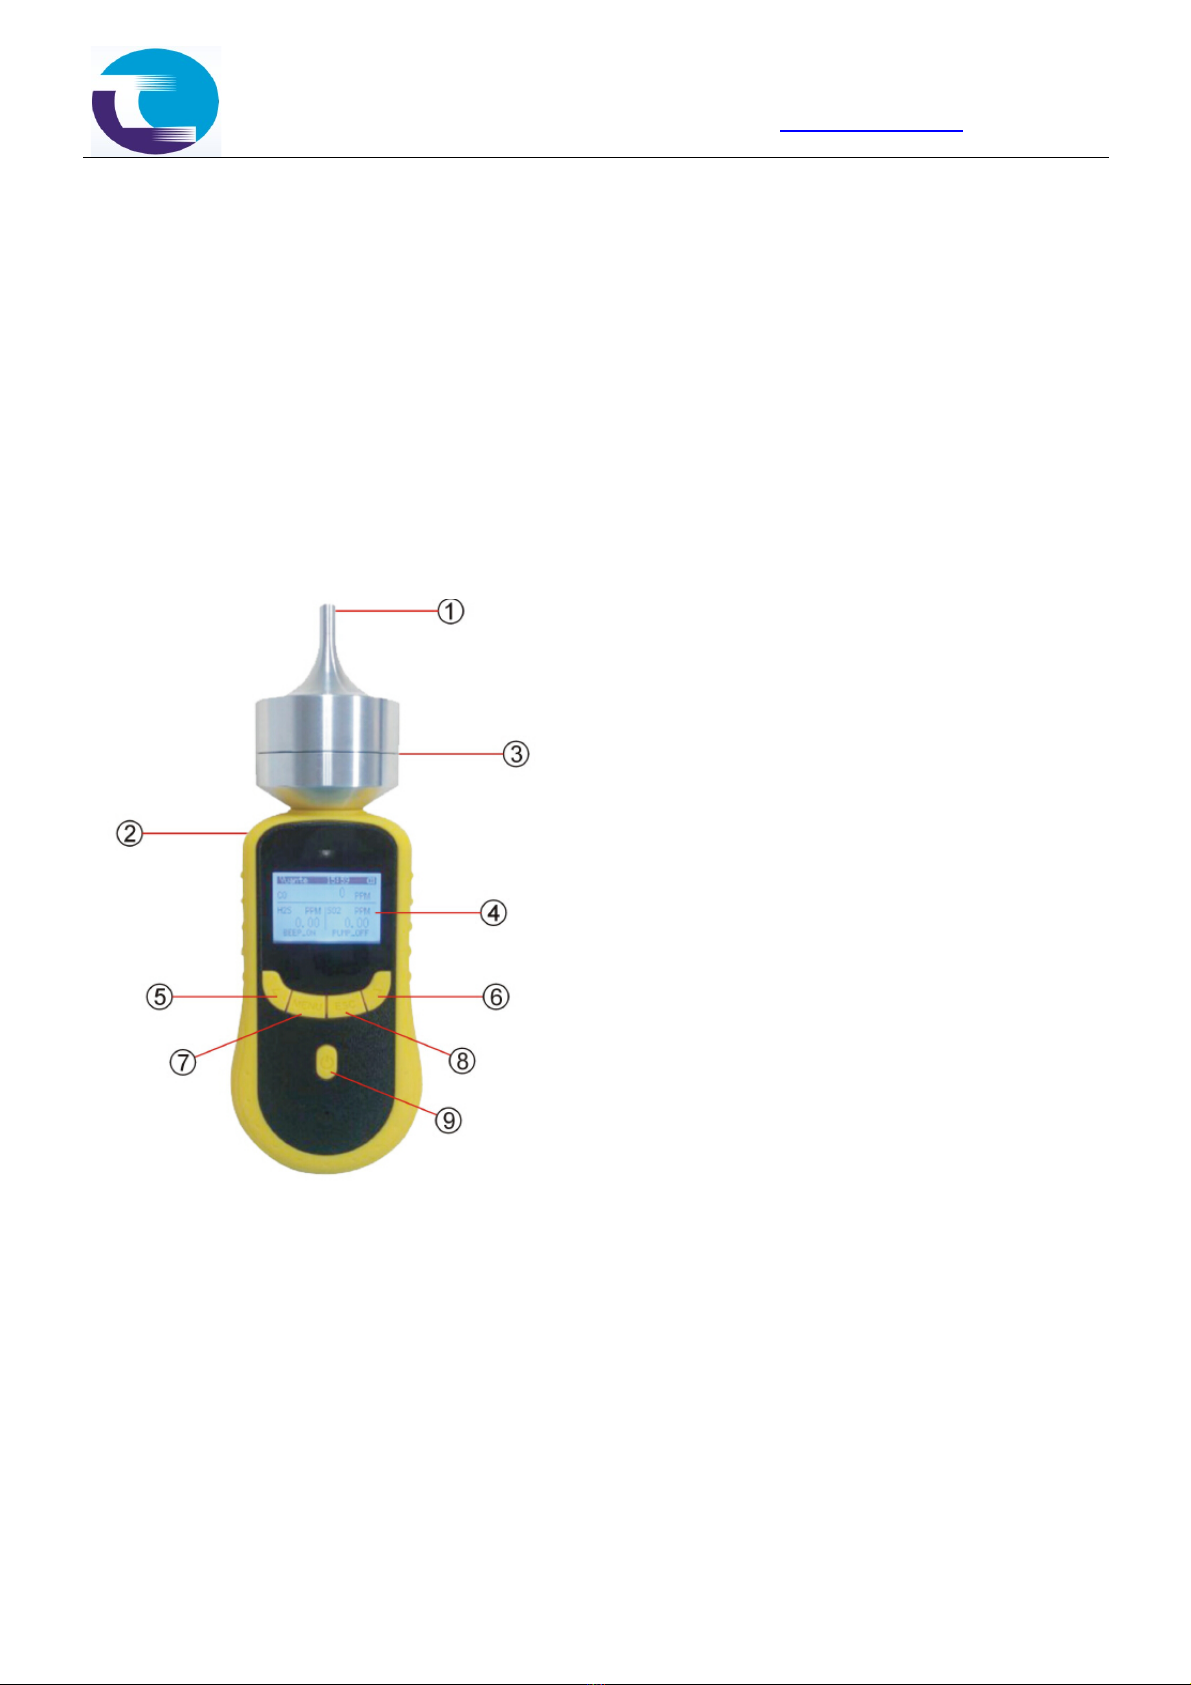
①— Air Inlet
②— Air Outlet
③— air chamber of sensor
s
④— LCD
⑤— PLUS
⑥— MINUS
⑦— MENU
⑧— ESC (exit)
⑨— ON/OFF
-----------------------------------------------------------------------------------------------------------------------------
Note
*If detector is used for the gas cylinder detection, considering the high pressure in the cylinder, please use a
pressure regulator, and keep it as the below data:
Flow rate: 800mL~1L/minute
Pressure: 0.1MPa or 1Bar
*Working temperature: -20~50 degree C
* Working humidity: 0-95%RH, no condensing
* Please put the detector in clean air for about 5 minutes and waiting for the data falling down to normal before
turning it off after measurement.

www.szyuante.com
Shenzhen YuanTe Technology Co., Ltd.
Tel: 86-755-26722925 Fax: 86-755-85258143 Web
:
www.szyuante.com
Operation Interface
When the detector is turned on completely, the device will enter the detecting interface. Four or three or two
detected gases will be showed on the screen (for example: O2, CO, H2S, EX). Time and battery power will be
showed at the top right. When the alarm is on, there will be a “B” at the left bottom which means “BEEP-ON”, if
the alarm is off then there will be no “B”. When the pump is on, there will be a “P” at the right bottom, while if
the pump is off, the “P” will not be showed.
Alarm Status
When the detected gas concentration is lower than the low alarm value, the relative gas value will be
highlighted, and the alarm sound will be on, blue light will be flickered.
When the detected gas concentration is high than the high alarm value, the relative gas value will be
highlighted, and the alarm sound will be on, red light will be flickered.
When there is low alarm and high alarm at the same time, both relative gas values will be highlighted, and high
alarm will take the priority.
Low Battery Alarm
When the battery is low, there will be sound, light low battery alarm. There will be sound and light every 5
seconds to remind the user to charge the device in time. When the battery is used up, the device will be turned
off automatically.
Alarm Setting
Press “Menu”, choose the “Alarm”, and start to set the alarm value.
There are 3 options under the alarm setting mode. The first option is the “channel”, there will be 4 channels for
4 in 1 multi gas detector.
Channel choose: press “ON/OFF” button, the cursor will be at the channel number, then press the “PLUS”
button to choose the channel, press the “ON/OFF” button to confirm.
Alarm setting: The second option is the low alarm value, and the third option is the high alarm value. Choose
the option that you want to change, then press “ON/OFF” to confirm, then press the “PLUS” and “MINUS” to
increase or decrease the value, press the “MENU” to move cursor. After the setting is done, press “ON/OFF”
button to save the settings.
Storage set
Press the MENU, choose HIST, then you can get in the storage interface. There are three options in the
storage set.
1. CYC: it is the storage time interval, when you set the time, the detector will start to record the data. The
time interval can be 5 seconds, 10 seconds, 15 seconds, etc. The highest interval is 1 hour. If you don’t
want to record the data, please set the interval 0000.
2. VIEW: at the top is the total record number, if you press MINUS, then the record data will be from the first

www.szyuante.com
Shenzhen YuanTe Technology Co., Ltd.
Tel: 86-755-26722925 Fax: 86-755-85258143 Web
:
www.szyuante.com
record to the second in turn. If the record number is above 10, and you want to check the specific number,
you press the MENU again, then you can input the exact number and check that record(press the MENU to
move the cursor, and press the MINUS and PLUS to change the number), press ON/OFF to confirm and
then you will see the detailed record.
In the middle are the date and time, and the detailed concentration is at the bottom.
3. DEL: Delete record data. To make sure the detector work perfectly and you can check the history data
quickly, we suggest you to erase the history data regularly. Change the “NO” to “YES”, then press the
ON/OFF to confirm, then all the record will be deleted.
Calibration
Note: Calibration needs to be done by professionals and with necessary accessories and standard gas.
Press MENU, choose the CALIBRATION. There are three options in the calibration interface:
1. Channel option: you need to choose the right channel/gas type before calibration, there will be 4 channels
for the 4 gases multi gas detector.
2. Zero calibration option: put the detector in clean air for 3-5 min, then press ”ON/OFF” button, wait for the
value become stable, press”ON/OFF” again, the zero calibration is finished. You can also do the zero
calibration in the detection interface, press the “PLUS” and “MINUS” buttons at the same time for three
seconds, the data of all channels will reset to zero automatically.
3. Target point calibration:
Prepare the standard gas before starting the target point calibration. Choose the target point calibration, press
ON/OFF button to enter. Then you will need to enter password. (If you need password, please contact the
manufacturer to get it)
After entering the password successfully, press ON/OFF to enter the target point calibration interface. The
value at the left side is current concentration of the gas, the value at the right side is the AD value. Change the
target concentration to the standard gas concentration, after the value on the left side and right side is stable,
press the “ON/OFF”, to finish the calibration.
The detailed process is as below:
1. Connect the detector with standard gas cylinder by hose.
2. Enter the target point calibration interface, enter password correctly,
3. Change the target point value to the standard gas value.
4. Release the standard gas to the detector in a flow rate of 700mL/min.
The value of “current concentration” will become larger gradually, and
become stable after 30seconds.
5. When the value of “concentration” is stable, press the “ON/OFF”
button, the value of “current concentration” will be same with or almost
same with the “target point value”. The calibration is finished.
6. Cut off the standard gas supply. Press “ESC” to go back to detection
interface.
Table of contents


