SIGURO SGR-GR-K630B User manual

SGR-GR-K630B
Electric Coffee Grinder
Electric Coffee Grinder
Elektrische Kaffeemühle
Elektrický mlýnek na kávu
Elektrický mlynček na kávu
Elektromos kávédaráló
EN Translation of the operating instructions from the original language.
DE Übersetzung der Bedienungsanleitung aus der Originalsprache.
CZ Návodkpoužitívoriginálnímjazyce.
SK Prekladnávodunapoužitiezoriginálnehojazyka.
HU Ahasználatiutasításfordításaeredetinyelvről.

ENGLISH 5
Safety information 5
Technical specications 8
Before rst use 8
Before use 9
Use 10
Cleaning and maintenance 12
Error messages 14
DEUTSCH 15
Sicherheitshinweise 15
Technische parameter 19
Vor der erstverwendung 19
Vorbereitung vor der verwendung 20
Verwendung 21
Reinigung und wartung 24
Fehlermeldungen 25
ČESKY 26
Bezpečnostní informace 26
Technické parametry 29
Před prvním použitím 29
Příprava před použitím 30
Použití 31
Čištění a údržba 33
Chybová hlášení 34
SLOVENSKY 36
Bezpečnostné informácie 36
Technické parametre 39
Pred prvým použitím 39
Príprava pred použitím 40
Použitie 41
Čistenie a údržba 43
Chybové hlásenia 44
MAGYAR 46
Biztonsági információk 46
Műszaki paraméterek 49
Az első használatba vétel előtt 49
Előkészület a használathoz 50
Használat 51
Tisztítás és karbantartás 53
Hibaüzenetek 55

1
3
4
5
2
6
7
8
9
10
11
12
13
14
15
16
17 18
A1
A2

EN
EN - 5 EN - 5
Thank you for purchasing a SIGURO appliance. We are grateful
for your trust and are pleased to introduce on the following pages
the device, its functions and uses.
We believe in a fair and responsible company, and therefore we only work
with suppliers who meet our strict criteria to protect the interests of employ-
ees, prevent their abuse and fair working conditions.
If you need help with extensive maintenance or repair of the product that re-
quires intervention in its internal parts, our authorized service center is avail-
able at siguro@alza.cz. You may also contact the vendor’s helpline. For your
convenience in solving potential issues with the product, the unied contact
points above can also be used for any complaints or post-warranty service.
SAFETY INFORMATION
Please read this manual carefully before
use and keep it for future reference.
1. This appliance is not intended for use by children.
Keep the appliance and its power cord out of the
reach of children.
2. The appliance may be used by persons with reduced
physical, sensory or mental capabilities, or lack of
experience and knowledge, provided they have been
given supervision or instruction concerning use of
the appliance in a safe manner and understand the
potential hazards.
3. Children must not play with the device.
4. Cleaning and user maintenance must not be done
by children.
5. If the power cord is damaged, it must be replaced
by the manufacturer, its service agent or similarly
qualied persons in order to avoid a dangerous
situation.
6. WARNING: Risk of injury from improper use.
7. Pay attention when handling the grinding stones,
especially during cleaning. The grinding stones are
ENGLISH

EN
EN - 6
sharp and there is a risk of serious injury.
8. Wash the ground coffee container, the lid of the
container, the lid of the tray in warm water with a
little kitchen detergent. Rinse and wipe dry. Wipe
the bean tray with a soft sponge slightly dampened
with warm water. Then wipe with a dry cloth.
9. Always unplug the appliance if it is left unattended
and before assembly, disassembly or cleaning.
10.Always wait until the accessible parts that move
during use have come to a complete stop, then
switch off the appliance and disconnect it from the
power supply.
11. Use only the accessories supplied with the appliance or those specically
recommended by the manufacturer. The use of accessories other than
those supplied or recommended is prohibited.
12. This appliance is intended for household use only and for grinding
common household coffee beans. Do not use the appliance for any
purpose other than that for which it is intended. Do not use the
appliance to grind nuts, seeds, spices, etc. The appliance is not intended
for commercial or laboratory use.
13. Do not use the appliance outdoors.
14. Before connecting the fork of the power cord to a power outlet, make
sure that the voltage listed on the power cord's rating plate matches the
voltage in your power outlet. Plug the power cord plug into a properly
grounded outlet. Do not use extension cords or plug adapters.
15. Unwind the power supply completely before plugging it in.
16. Do not let the power cord hang over the edge of a table or countertop,
touch hot surfaces, or become tangled. Do not place heavy objects on
the power cord.
17. To prevent electric shock, do not immerse the appliance, power cord or
plug in water or other liquid.
18. Do not touch the appliance, the power cord or the plug with wet or
damp hands.
19. We recommend connecting the appliance to a separate electrical circuit.
20. Always place the appliance on a stable, level and dry worktop at a
sufcient distance from the mains socket. Vibrations during operation
may cause unwanted movement of the appliance.
21. Do not place the appliance on or near heat sources such as an oven or
stove.
22. This appliance is not intended to be controlled by an external timer,
programmer, etc.
23. Make sure the appliance is assembled correctly and the lid of the bean
tray is properly tted. The appliance is equipped with a safety lock that

EN
EN - 6 EN - 7
prevents it from starting if it is not assembled correctly.
24. Do not run the appliance empty. There's a risk of damage!
25. Do not leave the appliance unattended when switched on!
26. Do not touch rotating parts of the appliance. Make sure that foreign
objects, loose pieces of clothing, hair, etc. do not get near them. There is
a risk of serious injury!
27. The appliance is equipped with safety mechanisms to ensure its safe
operation. Do not put such mechanisms out of service.
28. Before using the appliance, check that there are no foreign objects in the
bean tray.
29. Switch off the appliance and unplug it from the mains socket if you are
not going to use it or leave it unattended.
30. Disconnect the power cord from the socket by pulling the plug. Do not
disconnect by pulling on the power lead. There is a risk of damaging the
power cord or the power socket.
31. Clean the appliance and its accessories according to the instructions in
the "Cleaning and maintenance" section.
32. Check the appliance and accessories regularly for damage. Do not use
the appliance if it is damaged or the accessories are damaged. You're in
danger of serious injury!
33. Replace damaged accessories with new ones. Have a damaged
appliance or one that is not working properly checked and repaired.
Contact an authorized service center.
34. All appliances are subject to strict quality control. Practical tests are
carried out on randomly selected appliances, and this may explain any
slight traces or residues of coffee that you may notice before use. This is a
common practice.
Do not immerse in water or any other liq-
uid!
Electrical safety class: II
Protection against electric shock is provided by double or reinforced insu-
lation.
EN
EN - 8
Overview
1 Coffee bean tray lid
2 Removable coffee bean tray
3 Upper grinding stone
4 Bottom grinding stone
5 Grind setting rotary dial
6 Control panel and display
7 Ground coffee dispensing
8 Switch
9 Grinder base
10 Ground coffee container lid
11 Ground coffee container
12 Ground coffee container base
13 Portalter attachment ø 58 mm
14 Portalter attachment ø 53 mm
15 Cleaning brush
16 Airpress
17 Silicone attachment ø 58 mm
18 Silicone attachment ø 53 mm
Control panel
Button to select grinding by
time or by number of cups
Button to extend the grinding
time / increase the number of
cups
Button to reduce grinding time /
reduce number of cups Button to start/stop grinding
TECHNICAL SPECIFICATIONS
Power 220–240 V~, 50–60 Hz
Input power 165 W
Coffee bean tray capacity 350 g (10.74 lb)
Ground coffee container capacity 150 g (10.74 lb)
Power cable length 80 cm
BEFORE FIRST USE
Remove the appliance and its accessories from the packaging. Before disposing of the
packaging, be sure to remove all components. Check the appliance and accessories for
3

EN
EN - 8 EN - 9
damage.
Wash the ground coffee container, container lid, bean tray lid, lever attachments and
silicone attachments in warm water with a little kitchen detergent. Rinse with clean
water and wipe dry.
Wipe the exterior surface of the appliance and bean tray with a soft sponge slightly
moistened in warm water. Then wipe with a dry cloth.
BEFORE USE
Upper grinding stone
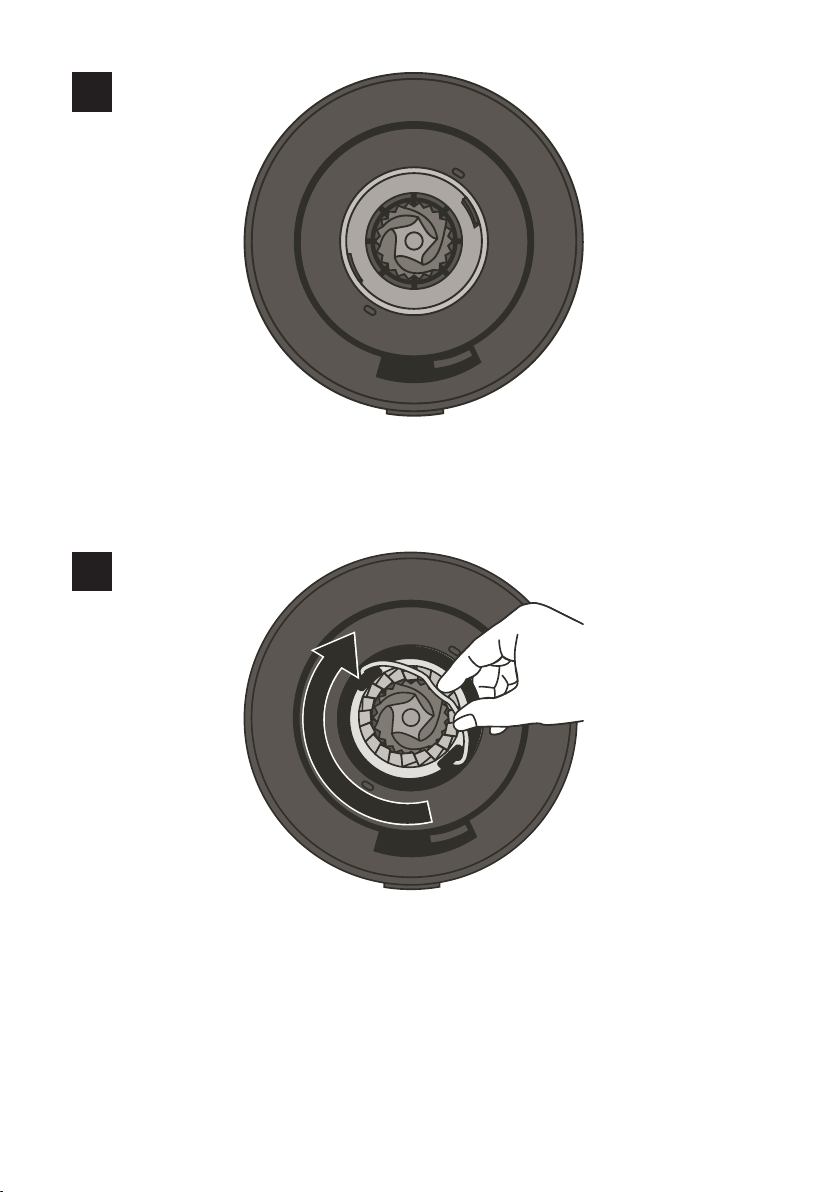
Before inserting the upper grinding stone, make sure there is no ground coffee resi-
due in the grinding chamber (see Figure A1).
Insert the upper grinding stone into the grinding chamber and turn the handle clock-
wise until you hear a click (see Figure A2).
Inserting and removing the bean tray
Always make sure the power supply is disconnected from the mains socket before
inserting or removing the bean tray.
Removing the tray
1. Press the lever to release the tray at the back of the grinder so that it will point to
the symbol.
2. Then turn the tray counter-clockwise until the symbol on the tray is aligned with
the symbol on the lever at the back of the grinder.
3. Pull the tray upwards out of the grinder body.
Inserting the tray
1. Remove ground coffee residue from the top grinding stone with the cleaning
brush provided. It is important that the upper grinding stone is clean so that the
tray can be easily inserted.
2. Insert the tray from the top into the body of the grinder so that the symbol on
the tray is aligned with the symbol on the lever at the rear of the grinder.
3. Turn the tray clockwise until the symbol on the tray is aligned with the symbol
on the lever at the back of the grinder.
Note:
If the grinder is not assembled correctly, it will not be possible to switch it
on and grind the coffee.
Filling the tray with coffee beans
1. Check that the tray is correctly tted.
2. Remove the tray lid and pour the roasted coffee beans into the tray.
3. Put the lid on and make sure it seals well. Do not use the grinder without a
properly tted lid.
Warning:
Always observe the MAX line marked on the tray when lling. Do not over-
ll the tray. Do not use the grinder to grind crushed coffee beans, nuts or
other foods.

EN
EN - 10
Note:
Do not use the tray for long-term storage of coffee beans. If you don't use
the beans, transfer them to an airtight container and store them in a cool,
dry place.
Grind setting
The rotary knob is used to set the grinding coarseness. The grinder has 51 different
grind settings.
While the grinder is switched off, turn the control knob to the left or right to adjust the
desired grind level according to the intended use of the ground coffee. Grinding grade
"1" corresponds to the nest ground coffee, while grinding grade "51" corresponds to
the coarsest ground coffee.
The table below serves as a reference when grinding and using ground coffee.
Coffee
brewing
machine
Espresso
machine
Moka pot Vacuum
pot
Drip Coffee
Maker
Manual
dripping
machine
(Pour Over)
French
press
Grind set-
ting
Fine Medium
ne
Medium Medium Medium
coarse
Coarse
Setting the
grinder
1–7 8–15 16–26 27–34 35–43 44–51
USE
The amount of ground coffee is determined by the grinding time. The grinder auto-
matically stops after the set total grinding time has elapsed. You can adjust the grind-
ing time as required. Three modes of operation are available.
Basic controls
1. Place the grinder on a at, dry worktop well away from the mains socket.
2. Make sure the grinder is assembled correctly and the beans are in the tray.
3. Set the desired grinding coarseness.
4. Place a container under the ground coffee dispenser or insert the lever
attachment.
5. Plug the power plug into the mains socket, an audible warning sounds and the
display with the control buttons lights up. The default mode for grinding coffee is
grinding by the number of cups. The display will show "01" and the symbol .
6. Change the grinding mode and set the desired amount of ground coffee - see the
instructions below.
7. Press the button and the grinder will start.
8. The grinder automatically switches off after the grinding time has elapsed.
9. If you need to stop the grinding process earlier, press the button and the
grinder will stop.
10. Remove the container or lever with ground coffee and prepare your favourite
coffee.
11. If you are not going to use the grinder, unplug the plug from the mains socket
and clean the grinder according to the instructions in the chapter "Cleaning and
maintenance".

EN
EN - 10 EN - 11
Power save mode
The grinder automatically switches to power saving mode after 3 minutes of inactivity.
In power saving mode, the display and control buttons are switched off and power
consumption is reduced to a minimum. This is normal behaviour.
Press any button to switch the grinder on and cancel the power saving mode.
To switch off the grinder completely, disconnect the plug from the mains socket.
Function of the button
1. In coffee grinding mode, depending on the number of cups or the time, a button is
used to start the grinding. Press again to stop the grinding process.
2. In the time-based grinding mode, press and hold the button to start the manual
grinding. The display starts reading the grinding time from 10 seconds to a
maximum of 60 seconds. When the button is released, the grinder stops grinding.
3. In the portalter grinding mode, press and hold the button to start the manual
grinding. The display starts reading the grinding time from 8 seconds to a
maximum of 20 seconds. When the button is released, the grinder stops grinding.
Coffee grinding by number of cups
This is the grinder's default mode when grinding coffee. The symbol lights up on
the display.
In this mode, the total grinding time is determined by multiplying the number of cups
by the grinding time per 1 cup. (e.g. the grinding time for 1 cup is 4 seconds, with a
setting of 2 cups the total grinding time is 8 seconds).
1. Place the ground coffee container under the ground coffee dispenser.
2. Use the / buttons to set the desired number of cups from 1 to 12 cups. One
cup represents grinding for 4 seconds. The display will show the number of cups
(on the left) and the total grinding time (on the right).
3. If you need to adjust the grind time for one cup, press and hold the button until
the grind time ashes.
4. Then use the / buttons to adjust the grinding time. Each short press
shortens/extends the grinding time by 1 second. Holding down the button will
speed up the grinding time setting.
5. Wait for the grinding time to stop ashing on the display and then press the
button. The grinder will start.
Note:
The last setting will remain stored in the grinder's memory, even after the
grinder is disconnected from the power supply.
Coffee grinding by time
1. Place the ground coffee container under the ground coffee dispenser.
2. Press the button twice briey and the display will light up with the default
grinding time "10.0".
3. Use the / buttons to set the desired grinding time. You can set the grinding
time from 1 to 60 seconds. Each short press shortens/extends the grinding time by
1 second. Holding down the button will speed up the grinding time setting. Set the
grinding time from 1 to 15 seconds in 0.1 second increments (9.9 - 9.8 - 9.7 etc.), set
the grinding time from 16 to 60 seconds in 1 second increments.
4. Press . The grinder will start.

EN
EN - 12
Note:
• To return to the coffee grinding mode according to the number of
cups, press the button twice briey.
• The last setting will remain stored in the grinder's memory, even after
the grinder is disconnected from the power supply.
Grinding into the portalter
1. Place the portalter attachment on the ground coffee outlet. Push it all the way
back. The grinder is equipped with a sensor that senses whether the portalter
attachment is installed. The symbol lights up on the display and the default
grinding time of 8 seconds is shown.
2. Insert the strainer into the portalter and attach the silicone attachment. This
makes it easy to dispense ground coffee directly into the portalter.
3. Insert the portalter into the attachment.
4. Use the / buttons to set the desired grinding time. You can set the grinding
time from 5 to 20 seconds. Each short press shortens/extends the grinding time by
1 second. Holding down the button will speed up the grinding time setting.
5. Push the portalter slightly towards the grinder body. The switch is activated and
the grinder starts.
6. The grinding process is automatically stopped after the grinding time has elapsed.
7. If you need to stop the grinding process earlier, push the portalter slightly towards
the grinder body. The switch is activated and the grinding process stops.
Switching off the audible alarm
Press and hold the / buttons simultaneously until "OFF" appears on the display.
An acoustic warning will sound and the buttons will be switched off.
Press and hold the / buttons at the same time when the beep sounds.
The beep setting will remain stored in memory even after the grinder is disconnected
from the power supply.
Thermal fuse
The grinder is equipped with a thermal fuse to protect it from damage due to over-
heating. If the temperature sensor detects a high internal temperature, it activates
a thermal fuse that switches the grinder off. In this case, disconnect the power plug
from the mains socket and allow the grinder to cool down for about 30 minutes. You
will then be able to use it again.
If the grinder does not turn on, contact an authorised service centre.
CLEANING AND MAINTENANCE
Regular cleaning and maintenance will ensure the long life of your grinder.
Before any cleaning or maintenance, always power down the appliance, unplug it from
the mains, and allow it to cool down completely.
Warning:
Never immerse the appliance, the power cord or the plug of the power
cord in water or any other liquid.
Do not use plastic or metal scrapers, harsh cleaners, chemicals, petrol, solvents or
other similar substances to clean any parts of the appliance. The surface nish could

EN
EN - 12 EN - 13
be seriously damaged.
Cleaning accessories
Wash the ground coffee container, container lid, bean tray lid, lever attachments and
silicone attachments in warm water with a little kitchen detergent. Rinse with clean
water and wipe dry.
Cleaning the grinder body and bean tray
Transfer the unused beans from the tray into an airtight container and store in a cool,
dry place.
Wipe the exterior surface of the appliance and bean tray with a soft sponge slightly
moistened in warm water. Wipe with dry dish towel.
Cleaning the grinding stones
Clean the grinding stones regularly to ensure their long-term durability. During nor-
mal operation of the grinder, the grinding stones should be cleaned once or twice a
month.
1. Remove the bean tray and empty it.
2. Install the empty tray back into the grinder.
3. Run the grinder at idle for a few seconds to remove the coffee bean residue from
the grinding stones.
4. Remove and clean the bean tray as instructed above.
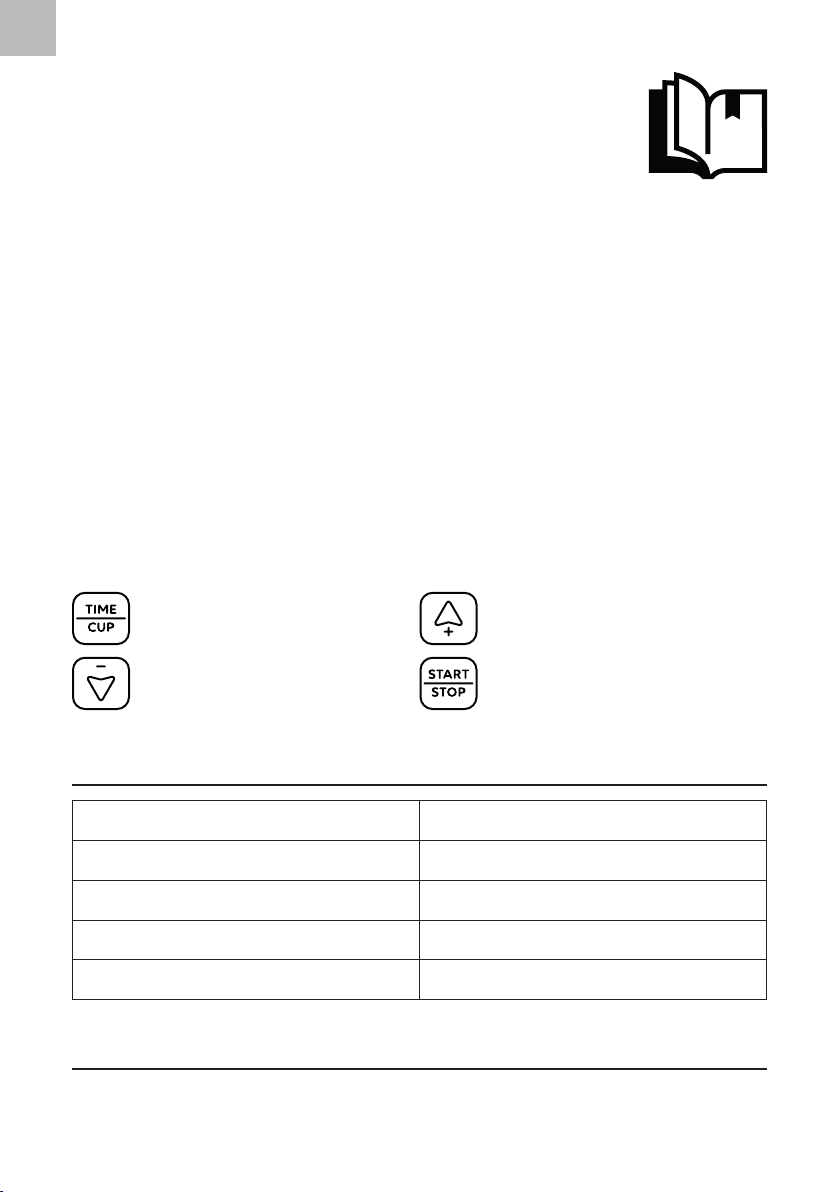
5. Lift the handle of the upper grinding stone and turn it counter-clockwise until it
reads "UNLOCK". Then pull it upwards out of the grinder.
6. Clean the upper grinding stone, the lower grinding stone and the grinding
chamber area with the supplied cleaning brush.
7. Clean the ground coffee outlet with the cleaning brush provided.
8. Insert the upper grinding stone into the grinding chamber so that the ends of the
handle of the upper grinding stone are aligned with the "UNLOCK" lettering on
the grinding chamber. Press gently to ensure that the grinding stone is properly
seated in the grinding chamber.
9. Turn the upper grinding stone clockwise until you hear a click and the ends of the
handle of the upper grinding stone are aligned with the "LOCK" lettering on the
grinding chamber.
10. Install the bean tray.
Note:
Before inserting the upper grinding stone, make sure there is no ground
coffee residue in the grinding chamber (see Figure A1). Insert the upper
grinding stone into the grinding chamber and turn the handle clockwise
until you hear a click (see Figure A2).
Storage
Before storing, make sure that the appliance and its accessories are cool and clean.
Store the appliance and its accessories in a dry and well-ventilated place out of the
reach of children or pets. Do not place any objects on the appliance.
EN
EN - 14
ERROR MESSAGES
Error code Meaning Solution
E1 + The bean tray is incorrectly
inserted or not installed
at all.
Insert the tray correctly to
activate the switch.
The grinder's overheated. Unplug the power plug
from the mains socket and
allow the grinder to cool
down for about 10 minutes.
E2 + Four consecutive grinding
cycles have started, which
is the maximum number
allowed.
This is overheating protec-
tion.
Unplug the power plug
from the mains socket and
allow the grinder to cool
down for about 10 minutes.
If the message persists, switch off the appliance, disconnect the power plug from the
mains socket and contact an authorised service centre.

DE
DE - 15 DE - 15
Vielen Dank, dass Sie sich für ein Gerät der Marke SIGURO ent-
schieden haben. Wir sind dankbar für Ihr Vertrauen und freuen
uns, Ihnen das Gerät auf den folgenden Seiten vorzustellen und
Sie mit all seinen Funktionen und Verwendungszwecken vertraut
zu machen.
Wir glauben an ein faires und verantwortungsvolles Unternehmen und
arbeiten daher nur mit Lieferanten zusammen, die unsere strengen Kriterien
zum Schutz der Interessen der Mitarbeiter, zur Verhinderung von Missbrauch
und fairen Arbeitsbedingungen erfüllen.
Wenn Sie Hilfe bei der umfassenden Wartung oder Reparatur des Produkts
benötigen, die einen Eingriff in die Innenteile erfordert, stehen Ihnen unser
Hotline des Verkäufers zur Verfügung. Bei der Lösung von Problemen mit
dem Produkt haben wir diese Kontaktstellen vereinheitlicht. Die oben ge-
nannten Kontakte können auch bei Beschwerden oder Nachgarantieservice
genutzt werden.
SICHERHEITSHINWEISE
Lesen Sie vor der Anwendung sorgfältig
dieses Benutzerhandbuch durch und be-
wahren Sie es für den künftigen Gebrauch
auf.
1. Dieses Gerät darf nicht von Kindern bedient
werden. Bewahren Sie das Gerät und das Netzkabel
außerhalb der Reichweite von Kindern auf.
2. Das Gerät kann von Personen mit verminderten
physischen und mentalen Fähigkeiten oder
mangelnden Erfahrungen und Kenntnissen
verwendet werden, sofern diese beaufsichtigt
sind oder über die sichere Anwendung des Geräts
belehrt wurden und mögliche Gefahren verstehen.
3. Kinder dürfen nicht mit dem Gerät spielen.
4. Die Reinigung und Wartung durch den Benutzer
darf nicht von Kindern durchgeführt werden.
5. Wenn das Netzkabel beschädigt ist, muss es vom
Hersteller, seinem Servicetechniker oder einer
DEUTSCH

DE
DE - 16
ähnlich qualizierten Person ersetzt werden, um
eine gefährliche Situation zu vermeiden.
6. WARNUNG: Bei unsachgemäßer Verwendung
besteht die Gefahr von Verletzungen.
7. Seien Sie vorsichtig beim Umgang mit den
Schleifmessern, insbesondere bei der Reinigung.
Die Mahlsteine sind scharf und es besteht die Gefahr
von schweren Verletzungen.
8. Waschen Sie den Behälter für gemahlenen Kaffee,
den Deckel des Behälters und den Deckel des
Einfülltrichters in warmem Wasser mit etwas
Küchenreiniger. Spülen Sie sie ab und wischen
Sie sie trocken. Wischen Sie den Behälter für
Kaffeebohnen mit einem weichen, mit warmem
Wasser angefeuchteten Schwamm ab. Wischen Sie
ihn dann mit einem trockenen Tuch ab.
9. Trennen Sie das Gerät immer vom Netz, wenn es
unbeaufsichtigt ist und bevor Sie es montieren,
demontieren oder reinigen.
10.Warten Sie immer, bis die zugänglichen Teile, die
sich während des Gebrauchs bewegen, vollständig
zum Stillstand gekommen sind, schalten Sie dann
das Gerät aus und trennen Sie es vom Stromnetz.
11. Verwenden Sie nur das mit dem Gerät gelieferte oder das vom Hersteller
ausdrücklich empfohlene Zubehör. Die Verwendung von anderem als
dem mitgelieferten oder empfohlenen Zubehör ist verboten.
12. Dieses Gerät ist nur für den Hausgebrauch und für die Verarbeitung von
üblichen Mengen von Kaffeebohnen vorgesehen. Verwenden Sie das
Gerät nicht für andere Zwecke als die, für die es bestimmt ist. Verwenden
Sie das Gerät nicht zum Mahlen von Nüssen, Samen, Gewürzen usw. Das
Gerät ist nicht für kommerzielle Zwecke oder Laborzwecke vorgesehen.
13. Verwenden Sie das Gerät nicht im Freien.
14. Vergewissern Sie sich vor dem Einstecken des Steckers in die Steckdose,
dass die auf dem Typenschild des Netzkabels angegebene Spannung
mit der Spannung Ihrer Steckdose übereinstimmt. Stecken Sie den
Stecker des Netzkabels in eine ordnungsgemäß geerdete Steckdose.
Verwenden Sie keine Verlängerungskabel oder Steckeradapter.
15. Wickeln Sie das Netzkabel vollständig ab, bevor Sie es einstecken.
16. Lassen Sie das Netzkabel nicht über die Kante eines Tisches oder einer

DE
DE - 16 DE - 17
Arbeitsplatte hängen, berühren Sie keine heißen Oberächen und
verheddern Sie es nicht. Stellen Sie keine schweren Gegenstände auf das
Netzkabel.
17. Um das Risiko eines Stromschlags zu vermeiden, tauchen Sie das
Gerät, das Netzkabel oder den Stecker nicht in Wasser und andere
Flüssigkeiten.
18. Berühren Sie das Gerät, das Netzteil oder den Stecker nicht mit nassen
oder feuchten Händen.
19. Wir empfehlen, das Gerät an einen separaten Stromkreis anzuschließen.
20. Stellen Sie das Gerät immer auf eine stabile, ebene und trockene
Arbeitsäche in ausreichendem Abstand zur Steckdose. Vibrationen
während des Betriebs können zu unerwünschten Bewegungen des
Geräts führen.
21. Stellen Sie das Gerät nicht auf oder in der Nähe von Wärmequellen wie z.
B. einem Ofen oder Herd auf.
22. Dieses Gerät ist nicht für die Bedienung durch eine externe Zeitschaltuhr,
ein Programmiergerät usw. vorgesehen.
23. Vergewissern Sie sich, dass das Gerät richtig zusammengebaut ist und
der Deckel des Bohnenbehälters richtig aufgesetzt ist. Das Gerät ist mit
einer Sicherung ausgestattet, die ein Einschalten verhindert, wenn es
nicht korrekt zusammengebaut ist.
24. Lassen Sie das Gerät nicht leerlaufen. Es besteht die Gefahr von Schäden!
25. Lassen Sie das Gerät im eingeschalteten Zustand nicht unbeaufsichtigt!
26. Berühren Sie keine rotierenden Teile des Geräts. Achten Sie darauf, dass
keine fremden Gegenstände, lose Kleidungsstücke, Haare usw. in ihre
Nähe gelangen. Es besteht die Gefahr von schweren Verletzungen!
27. Das Gerät ist mit Sicherheitsmechanismen ausgestattet, die seinen
sicheren Betrieb gewährleisten. Setzen Sie solche Mechanismen nicht
außer Betrieb.
28. Vergewissern Sie sich vor der Verwendung des Geräts, dass sich keine
Fremdkörper im Bohnenbehälter benden.
29. Schalten Sie das Gerät aus und ziehen Sie den Stecker aus der Steckdose,
wenn Sie es nicht benutzen oder unbeaufsichtigt lassen.
30. Ziehen Sie das Netzkabel aus der Steckdose, indem Sie am Stecker
ziehen. Ziehen Sie nicht am Netzkabel. Es besteht die Gefahr, dass das
Netzkabel oder die Steckdose beschädigt wird.
31. Reinigen Sie das Gerät und sein Zubehör gemäß den Anweisungen im
Abschnitt „Reinigung und Wartung“.
32. Überprüfen Sie das Gerät und das Zubehör regelmäßig auf Schäden.
Verwenden Sie das Gerät nicht, wenn es beschädigt ist oder das Zubehör
beschädigt ist. Es besteht die Gefahr von schweren Verletzungen!
33. Ersetzen Sie beschädigtes Zubehör durch neues. Lassen Sie ein
beschädigtes oder nicht richtig funktionierendes Gerät überprüfen und
reparieren. Wenden Sie sich an eine autorisierte Kundendienststelle.
34. Alle Geräte werden einer strengen Qualitätskontrolle unterzogen.
Praktische Tests werden an stichprobenartig ausgewählten Geräten
durchgeführt. Dies kann leichte Spuren oder Rückstände von Kaffee
erklären, die Sie vor der Verwendung feststellen können. Dies ist eine
gängige Praxis.

DE
DE - 18
Tauchen Sie sie nicht in Wasser und andere
Flüssigkeiten!
Schutzklasse vor Stromschlag: II
Der Schutz gegen Stromschlag wird durch eine doppelte oder verstärkte
Isolierung gewährleistet.

DE
DE - 18 DE - 19
Übersicht
1 Deckel des Bohnenbehälters
2 Abnehmbarer Bohnenbehälter
3 Oberer Schleifstein
4 Unterer Schleifstein
5 Drehknopf zur Einstellung der Mahlgrades
6 Bedienfeld mit Display
7 Ausgabe von gemahlenem Kaffee
8 Schalter
9 Basis der Mühle
10 Behälterdeckel für gemahlenen Kaffee
11 Behälter für gemahlenen Kaffee
12 Boden des Behälters für gemahlenen Kaffee
13 Hebelaufsatz ø 58 mm
14 Hebelaufsatz ø 53 mm
15 Reinigungsbürste
16 Airpress
17 Silikonaufsatz ø 58 mm
18 Silikonaufsatz ø 53 mm
Bedienfeld
Taste zur Auswahl des Mahlens
nach Zeit oder nach Anzahl der
Tassen
Taste zur Verlängerung der
Mahldauer / Erhöhung der
Tassenzahl
Taste zur Verkürzung der
Mahldauer / Reduzierung der
Tassenzahl
Taste zum Starten/Beenden des
Mahlens
TECHNISCHE PARAMETER
Stromversorgung 220–240 V~, 50–60 Hz
Stromverbrauch 165 W
Fassungsvermögen des Bohnenbehälters 350 g
Fassungsvermögen des Behälters für
gemahlenen Kaffee
150 g
Länge des Netzkabels 80 cm
VOR DER ERSTVERWENDUNG
Nehmen Sie das Gerät und sein Zubehör aus der Verpackung. Vergewissern Sie sich,
3

DE
DE - 20
dass alle Komponenten entfernt wurden, bevor Sie die Verpackung entsorgen. Verge-
wissern Sie sich, dass weder Gerät noch Zubehör beschädigt sind.
Waschen Sie den Behälter für gemahlenen Kaffee, den Deckel des Behälters, den
Deckel des Bohnenbehälters, die Hebelaufsätze und die Silikonaufsätze in warmem
Wasser mit ein wenig Küchenreiniger. Spülen Sie sie mit klarem Wasser ab und wi-
schen Sie sie trocken.
Wischen Sie die Außenäche des Geräts und des Behälters mit einem weichen mit et-
was warmem Wasser angefeuchteten Schwamm ab. Wischen Sie ihn dann mit einem
trockenen Tuch ab.
VORBEREITUNG VOR DER VERWENDUNG
Oberer Schleifstein
Vergewissern Sie sich vor dem Einsetzen des oberen Mahlsteins, dass sich keine Kaffe-
emehlreste in der Mahlkammer benden (siehe Abbildung A1).
Setzen Sie den oberen Mahlstein in die Mahlkammer ein und drehen Sie den Griff im
Uhrzeigersinn, bis Sie ein Klicken hören (siehe Abbildung A2).
Einsetzen und Entfernen des Bohnenbehälters
Vergewissern Sie sich immer, dass das Gerät vom Stromnetz getrennt ist, bevor Sie
den Bohnenbehälter einsetzen oder herausnehmen.
Herausnehmen des Behälters
1. Drücken Sie den Hebel zur Freigabe des Trichters an der Rückseite der
Kaffeemühle so, dass er auf das Symbol zeigt.
2. Drehen Sie dann den Behälter gegen den Uhrzeigersinn, bis das Symbol auf dem
Behälter mit dem Symbol auf dem Hebel an der Rückseite der Kaffeemühle
übereinstimmt.
3. Ziehen Sie den Behälter nach oben aus dem Körper der Kaffeemühle.
Einsetzen des Behälters
1. Entfernen Sie die Rückstände von gemahlenem Kaffee vom oberen Mahlstein
mit der mitgelieferten Reinigungsbürste. Es ist wichtig, dass der obere Mahlstein
sauber ist, damit der Behälter leicht eingesetzt werden kann.
2. Setzen Sie den Behälter von oben in den Körper der Kaffeemühle ein, so dass das
Symbol auf dem Behälter mit dem Symbol auf dem Hebel an der Rückseite
der Kaffeemühle übereinstimmt.
3. Drehen Sie den Behälter im Uhrzeigersinn, bis das Symbol auf dem Behälter mit
dem Symbol auf dem Hebel an der Rückseite der Kaffeemühle übereinstimmt.
Bemerkung:
Wenn die Kaffeemühle nicht richtig zusammengesetzt ist, kann sie nicht
eingeschaltet und der Kaffee nicht gemahlen werden.
Befüllen des Behälters mit Kaffeebohnen
1. Prüfen Sie, ob der Behälter richtig eingesetzt ist.
2. Nehmen Sie den Behälterdeckel ab und geben Sie die gerösteten Kaffeebohnen in
den Behälter.
3. Setzen Sie den Deckel auf und achten Sie darauf, dass er gut abdichtet. Verwenden
Table of contents
Languages:
Popular Coffee Grinder manuals by other brands


La Marzocco
La Marzocco vulcano swift instruction manual

zassenhaus
zassenhaus LA PAZ instruction manual

Lelit
Lelit PL043MMI User instructions

Krups
Krups II Barista 220 Instructions for use

Santos
Santos 2 & 4-LITER MIXER User and maintenance manual

Hamilton Beach
Hamilton Beach Custom Grind Custom Grind Deluxe Use & care guide


