Silent Witness SW010 User manual

1
FOR YOUR
SW010

2
Recording
indicator
Speed
GPS Ba ery
indicator
Microphone
Time & Date
Loop
Indicator
DigitalCamera
Automa!c balance
Mo"on
Detec#on
This picture shows the camera is Recording This picture shows the camera with the recording Paused

3
1
2
3
4
5
Picture 3
The le$side of the camera, you can %nd a power bu&on,
this is used to manually turn the camera ON and OFF
Picture 1
This is the GPS windscreen module, the power must be
inserted into this usb port to enable the gps op'on.
Picture 2
This is the top of the camera (from le(to right)
computer usb port -AV output - Microphone
AV Output - This is used to connect the camera to a television
that does not have the HDMI port, This lead is included in the
kit.
Picture 4
This is the external SD card slot, if you wish to upgrade your
memory this expansion slot can be used.
Takes up to a 32gb micro sd class 6
Picture 5
This port is used to connect your camera to the television
using the HDMI lead included in the kit.

4
RECORDING
This screen shows your device switched on and recording
The red ball in the top le)will pulse to show it is recording.
When the camera has been PAUSED this will now allow you
to enter the menu.
PRESS and HOLD the UP arrow key, the menu will appear
When in the menu, use the UP and DOWN arrow keys to
highlight the op ons and PRESS OK to enter thatop!on.
PAUSED RECORDING
This screen shows your device switched on and the recording
has been PAUSED.
You can PAUSE this device by pressing the OK
Video Resolu"on
Press OK to enter video resolu*on , and using the UP and
DOWN arrow keys make your selec+on and press OK to
to con%rm.
1920x1080 is the highest HD recording quality
VGA is the lowest recording quality
We recommend -1920 x 1080
Photo Size
This op,on allows you to alter the digital camera picture size
From 0.9 Megapixel to 4 Megapixel
We recommend -4 megapixel

5
Sharpness
This op-on Lets you alter the sharpness of the video and
digital Pictures,
We recommend this is set to AUTO
Contrast
This op.on lets you change the contrast of the video and
digital pictures.
We recommend this is set to AUTO
Flicker Rate
This op/on lets you change the 0icker rate of the device.
European countries use 60Hz .
If you are unsure please set this op1on to AUTO

6
Tv Type
If you want to connect your camera to a analogue television,
you may need to change this se2ng.
PAL is the most common type used in the UK
Please see page 3 picture 2 ofthe “quick guide”
Time Set Up
This op3on lets you set the date and 4me of the device.
Please note, that when the GPS is connected, the device will
obtain the 5me automa6cally from satellites.
Time Set Up Cont..
The 1st set of digits in yellow is the 7me zone, this has to be
correct for the GPS to obtain the 8me se9ngs.
Bri:sh standard ;me +00
Bri<sh summer =me +01
Use the UP and DOWN arrows to navigate and OK to con%rm
Time Set Up Cont…
When you press OK the yellow box will move across the
screen to the next se>ng.
Time Zone—Year—Month–Day—Hour—Minutes
Auto Power O#
This op?on lets you set a @mer to power down the camera
when the camera is removed from the power source.
When in the OFF posiAon the camera will remain on unBl the
baCery is depleted.

7
Date Time Display
This opDons stamps the data into the video %le.
So when playing the video %le back the date and Eme will be
displayed
Loop Se$ng
The Loop seFng feature allows the device to recycle the
memory card.
We recommend a 5 minute loop seGng, every 5 minutes the
camera will make a new video %le, when the card is full the
camera will automaHcally delete the oldest video and recycle
the recordings.
Please note in the OFF posiIon when the card is full the
camera %les will have to be deleted manually
Sensor Flip
This allows the camera to be installed 180 degrees so the
screen and camera are showing the correct way.
This funcJon is only used in certain installs
Mo%on Detect
This funcKon is used in a CCTV install, where the camera is in
sleep mode unLl the lens detects movement, when this
happens the camera wakes and starts recording.
This func&on is NOT used if the camera is being used as a
drive accident camera
Stamp
This funcMon allows more data to be inpuNed into the video
%le.
We recommend GPS DATA sothe speed and gps data is
stamped into the video %le along with the Ome and date

8
Video Record Mode
This funcPon lets you choose if the camera records
Video and audio or just video
Power O#Screen
When the device is switch on the screen can be set to auto-
maQcally switch oRand go into screensaver mode.
We recommend 1 minute , aSer 1 min the device will switch
oRthe screen so it does not distract you whilst driving.
If switched to the OFF seTng,the screen will remain on.
Driver Number
This funcUon allows a name-vehicle reg to idenVfy the
Use the UP and DOWN arrows to choose a LeWer or Number
and press OK to con%rm, this will then move to the next icon
on the screen.
G Sensor Precision
G Sensor is a shock sensor, which acXvates at front/side or
rear accident, it then locks the video %le for safe keeping.
This can be set from 2g up to 5g
We recommend this being setat 2g , this can be altered later
if required.
G Sensor Calibra'on
This funcYon needs to be run once installed in your vehicle,
This will calibrate the device, choose YES and keep the camera
and vehicle sZll, while the camera calibrates.

9
G Sensor Calibra(on Cont..
Please wait for this screen to calibrate
This will take only a few seconds
Choose Card
This camera comes with a 8GB onboard memory , but if you
would like to upgrade the card you can purchase a 32GB card
class 6 and install into the SD card slot as shown in picture 4
on page 2.
Then choose the OUTTER CARD in the menu.
Please see page 3 picture 4 in“quick guide”
GPS
To enable the GPS func[on on the camera the camera GPS
needs to be set to OPEN, if in the CLOSE posi\on the GPS will
not work.
Please see page 3 picture 1 inthe “quick guide”
Format
This func]on formats (deletes) all videos and photos on the
internal and external memory
Please remember to back up your data before using this
func^on
Firmware
This func_on gives informa`on about the %rmware version on
the camera

10
REVIEWING VIDEO AND PHOTOS
To view videos and photos stored on the device
In PAUSE mode PRESS and HOLD the DOWN arrow buaon
Use the UP and DOWN arrow keys to choose the video
File you wish to play.
PRESS the OK bubon to con%rm
To view the photos stored on the device
PRESS and HOLD the DOWN arrow key
To go back to the main screen,
PRESS and HOLD the DOWN arrow key
Then PRESS OK to resume recording

11
HOW TO CONNECT YOUR CAMERA
TO YOUR COMPUTER
AND SOFTWARE

12
Installing the socware
1. Plug theusb lead intothe camera usingthe porton page 3 picture2
2. Plug theusb lead intoyour computer andwaitforthe computer to con %gure
3. “Auto Play”shouldappear (if not please goto “my computer”tolocate the device)
4. Click Open folder to view
5. DoubleClick on the folder called “Player”
6. Now you will seethe sodware called “SILENT_WITNESS.exe”
7. Doubleclick on the “SILENT_WITNESS.exe” soeware
All sofwareand manuals are available at www.silentwitness.co.uk
Please Note thedrive Le)er

13
This will now load the sogware
Browse folder will appear on the screen
· Using the %le menu locate thedrive Leher and double click
· Double Click “Removable DiskE”
· Double Click DCIM folder
· Double click 100MEDIA Folder
This will now display all the video %les within the folder
1

14
Highlight all the video %les and then click OPEN
This will open them into the soiware

15
Your video %les Your Speed G Sensor
Highlight and play
Or double click
Your Video plays here Google Maps Shows here
Snapshot File Menu Skip Back Skip Forward Delete Volume
Rewind Play Fast forward
Please Note internet connec*on is needed
For Google mapping

User’s Manual
SW010
Please ReadThisManual CarefullyBefore Using
Pleasekeep forfuture reference

2
Preface
About the Manual
Thankyou for choosing ourproduct!
In order toeasily useyour product, we attach adetailed user’smanual withtheproduct .Please readitcarefullybefore
operation to get the best fromyour digitalvideo recorder.
Ifthere is a difference between the manualandrecorder,pleasetakethe recorder as standard.Wereservetherightto
changecontent or technicalrules without prior notice. In addition, the manufacturer reserves theright tochange
technical specifications without prior notice.
Weare not responsiblefor anydata loss and personaldamage caused bymisuse ofsoftware or hardware,
maintenance,batteryreplacement or other unforeseen circumstances, we arealso not responsiblefor anyindirect loss
caused bythis .Besides, wecan’t controlthemisunderstanding ofusers for this manual, so ,we won’tbe responsiblefor
the accidental loss intheuse ofmanual and the third-partyclaimsarising fromthe use ofthe product .
Ifthe actual accessories in packaging doesn’t match the attachment items , pleasetake the actual accessories as
standard. NOTICE: - Please note that this device is 12-24vwitha 5voutput, please do not removeanyadaptors and
install direct toa 12-24 battery.
Aboutyour DVR
This device is designed to capture video whilst you are drivingand in the event ofan accident to
help protectyou and your passengers. Withthe video footage collected you can prove what really
happened andyou do not have to relyon witness statements.
G-Sensor
Your device has a G-Sensor, this is designed to tell the device that aevent has just happened,
when the G-Sensor hasbeenactivated it will automaticallyduplicatethe current video file and place
it into a un-delectable folder for protection.
In the unfortunate event of anaccident,ifyou believe accidenthas not activated the G-Sensor
(depends on G-Sensor setting) you can manuallylock the file bypressingthe down arrowkey, just
for your peace of mind.
The G-sensor can be set from2gup to 5gthissettingdepends on the vehicle and roads
you drive on.
As default thedevice is set to 2gbut for larger vehicle such as HGV’s andoff–road vehicles this
settingmayneedto beincreased.

3
Product Features
u130 degreeultra wide angle lens .
u1920x1080P FULLHD high qualityresolution.
u4 mega pixels.
u4Xdigitalzoom,still image 8X zoom.
u1.5 inch high resolution LCD, can watch while recording.
uAdvancedH.264video compression technology.
uGPS, record the latitude and longitude dataautomatically.
uGoogle map, to reviewyour car tracking, speed and G-sensor info.
uG-sensor, once device detects collision, thecurrent filewouldbe protected.
uSeamless continuous recording will not miss anydata.
uAutomaticallyrecording(stop recording) aftercarpower on (off).
uSupport AVout/HDMI
uUpgraded software to improve recordingunder dark environments.
u30/60 frames per second for smooth videoflow.
uAutomatic circulating video recording, being able to setthe record time for each file.
u1.5 inch screen to help you to watch video while make videorecording in driving.
uImprove time & date display, no need to reset when re-starting.
uScreenshots function, can capture the videoscreen while video recording and reviewing.
uEasyoperation.
uBuilt in 8 GB card, upgradable up to 32GB class 6
1. GPS unit : With 3M adhesive a semi-permanent fixture to the vehicles front window.
2. USBport 1:Connect to the charger and computer byUSB
3. AVport
4. Menu Button:Press andhold for Menu; short press for UP/Last fi
le; while recording, press for mute.
5. OK Key:Short press for start recording, longtime press to take a picture; in menu, press toconfirm.
6. PlaybackButton: Long press for Playback; short press for down /next file. While recording short press
manual locks the video file.
7. Lightindicator:
8. Lens
9. USBPort 2 (Support power bycharger)
10. Power Button:Short press for power on; long press 2 seconds for power off; press for 8 seconds for
reset.
11. HDMI port
12. SD card expansion slot

4
Display
ICON About the indication ofeach icon and symbol, see the table below.
Video Mode
Start recording
Camera Mode
Take a picture
Supplylight(off) Battery
SD Card
Motion Detection
V:-------MPH
Car speed monitor after
GPS is linked to a satellite.
White Balance (Auto)
USB connecting
Protected file
FULLHD /1080P/720P Resolution 2008/01/01
01 07AM
Date and Time Display
loop recording time (1 min)
GPS connected
Light indicator
Red ----charging
Blue -----stand by
Red/Blue--- Recording while charging
Blue flashing-----recording

5
MENU
This DVR is alreadypre-set, althoughyou can choose your ownpersonal settings
Howto configure your device
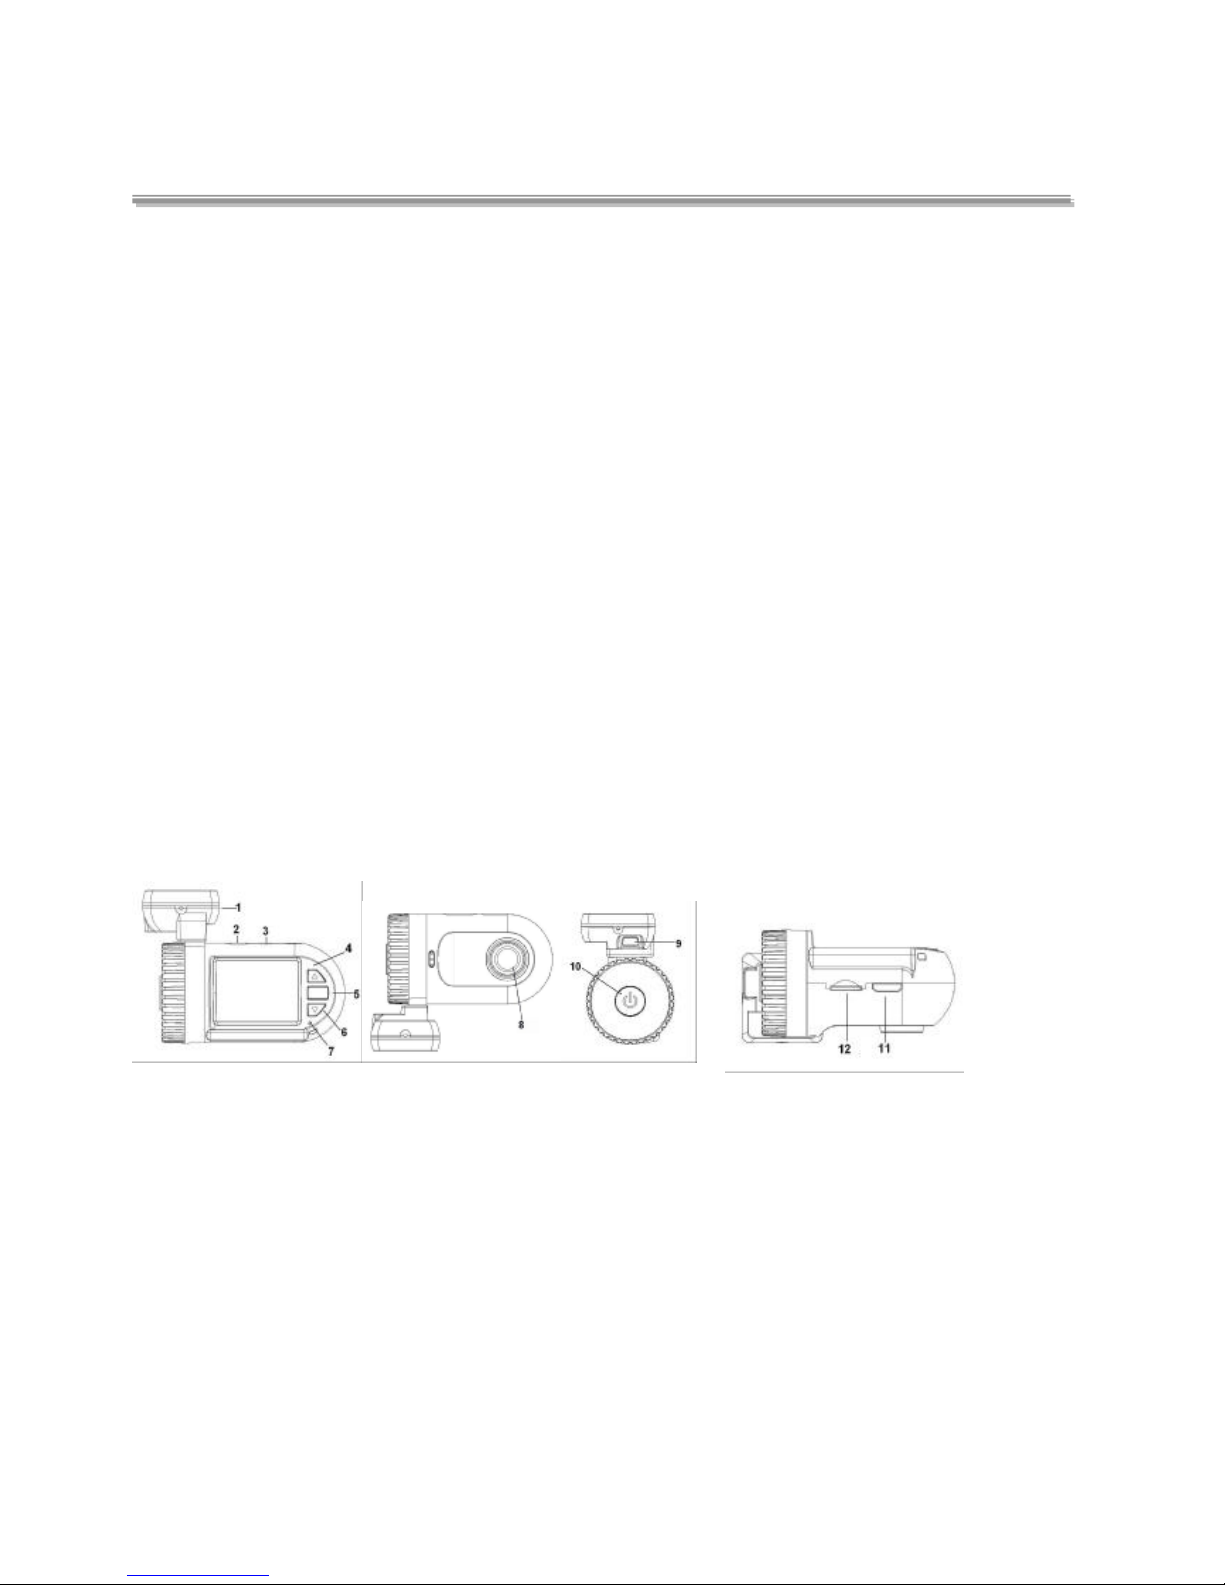
• Power on the device. ifthe is flashing press the OK button to pause recording,
the ball will nowchange colour, to grey.
• Press and Hold the UParrow, this will enter the menu list.
•To navigate through the menu use the UPand DOWN arrow keys, and to enter the categorypress OK.
•To alter setting inside thecategory’s use the UPand Down arrow keys and OK to confirm.
______________________________________________________________________________
• Video resolution: Video Mode, Choose the video qualitysetting to record ((recommend FULLHD)
1920x1080p – 1440 x 1080p – 720p60 – 1280 x 720p – wvgap60 – wvgap30 - vga
• Photo size: Photo mode, Choose thequalityofstill photos( M = Megapixel)
0.9M, 2M, 3M, 4M
• Sharpness: Altersthe sharpnessofthe camera
• Contrast:altersthecontrastof the cameras
• Flicker: alters the flicker rate PAL=50hzNTSC=60hz
• White Balance: Photo mode
AUTO/Sunny/Incandescent/fluorescent/cloudy
• TV type:
NTSC/PAL
•AUTO power off: The amount oftime the camera will stayon after the power has been disconnected (charge depending)
1 min / 3 min / 5 min /OFF
• Time Setup: SettheTime,TimeZone andDate
UK time zone +01 British summer timeStandard +00
• Date time display: Imprints the data into thevideo file (recommendDate andTime)
Date time/off/date&time
• Loop setting: The length ofeach video clip (recommend 5 min)
1 min / 3 min / 5 min / OFFPlease note ifyou choose theOFFsetting, once the recorder hasfilled the card,the card will need to be
cleared before itcontinues to record. Please see page 7loop recording
• Sensor Flip: Lets you turnthe camera 180° for different installations
•Motion detect: The camera will onlyrecord when it detects movement infrontofthelens (Thisfunction is normallyuse when the
camera is powered froma24hr power source.)
off/on
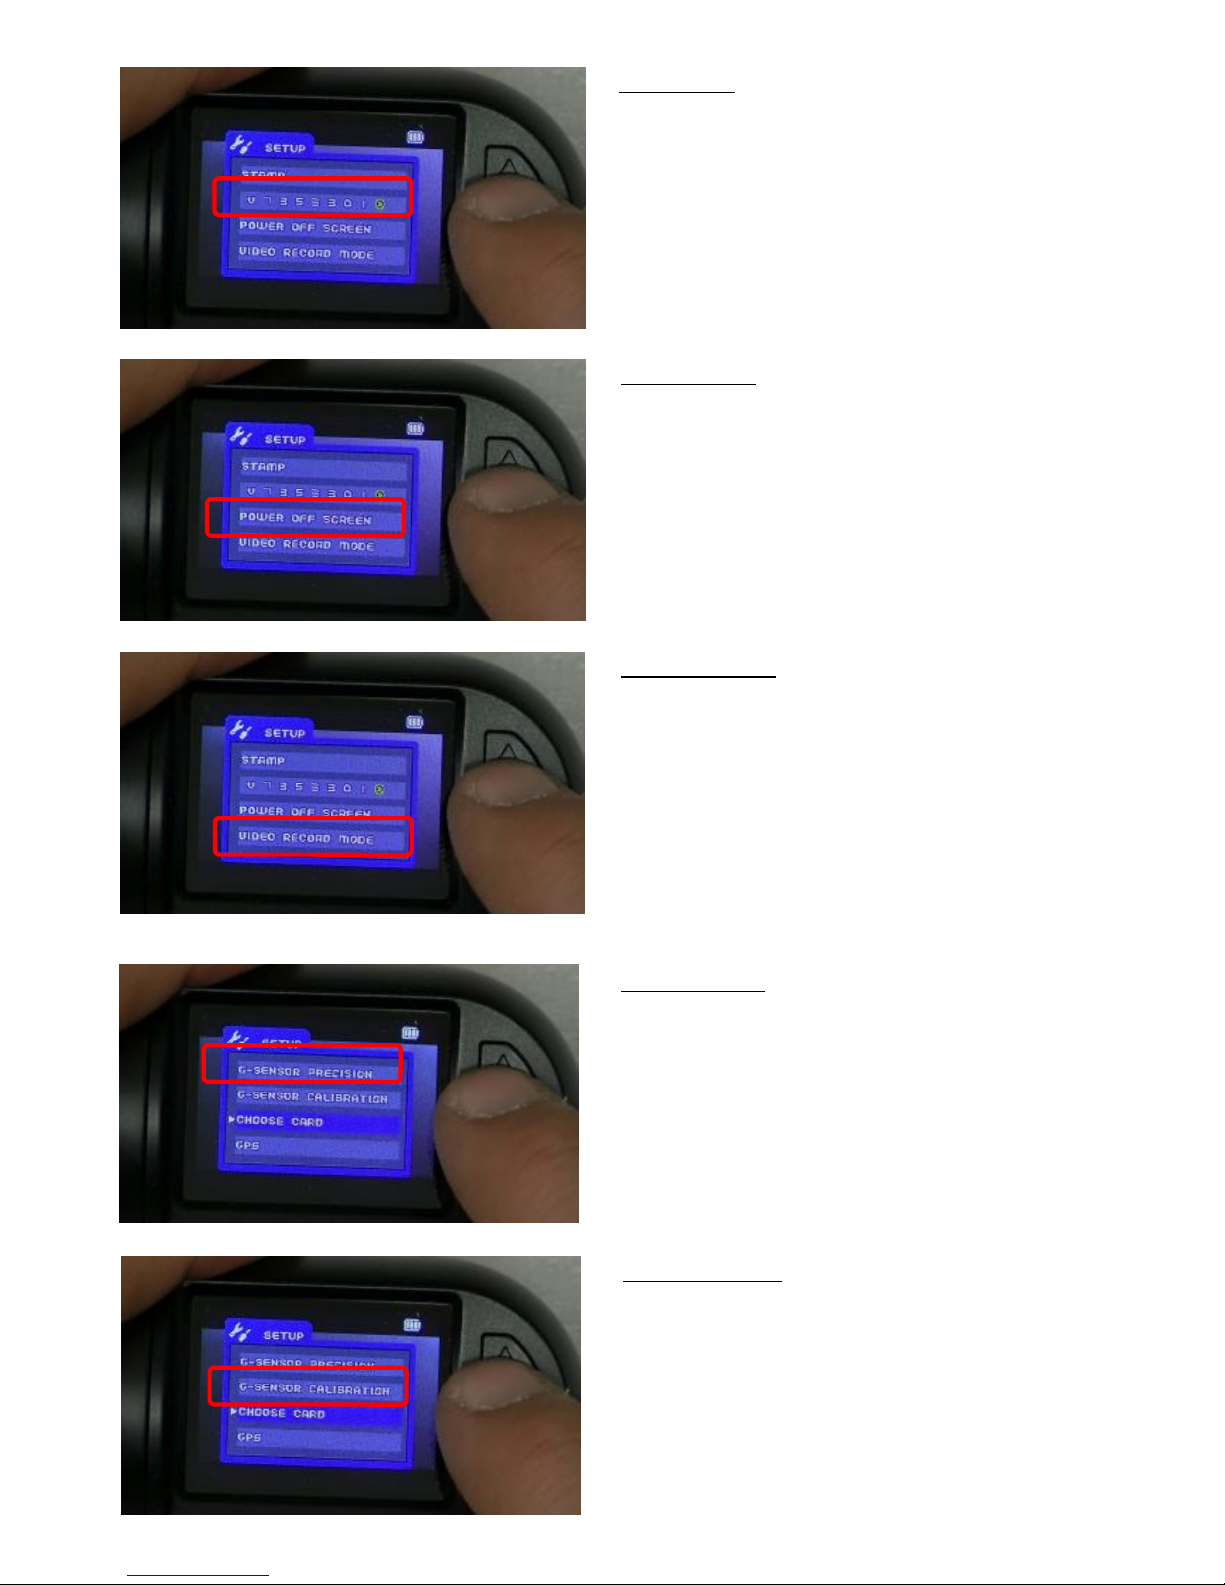
• Time Stamp: Will imprintthis dateintothevideo file (recommend GPSDatafor standard use)
Driver Number/OFF/Date/Time/Date time/GpsData
• Driver number: Add a9 digit number ornameto the camera
• Power off screen : Screen saver (recommend 1 min)
Off/1 Min /3 Min /5 Min (in the OFFpositionthe screen will remain on)
Table of contents
Other Silent Witness Security Camera manuals

Silent Witness
Silent Witness SW2200 User manual

Silent Witness
Silent Witness MagnaView V28R User manual

Silent Witness
Silent Witness SW021 User manual

Silent Witness
Silent Witness V60 Night Hawk User manual

Silent Witness
Silent Witness Night Hawk SWX45 User manual

Silent Witness
Silent Witness V25 ArmorDome User manual

Silent Witness
Silent Witness SW001 User manual

Silent Witness
Silent Witness SWX80 User manual

Silent Witness
Silent Witness SWC40 Series User manual